SCENARIO 8
Portraits of Couples
How to get two people to look amazing together.
GEAR NEEDED:
- Camera + Trigger
- Medium to long focal length lens (50mm or higher recommended)
- 2 Off-camera flashes
- 2 Full CTO (color temperature orange) gels
- 2 Light stands
- Umbrella
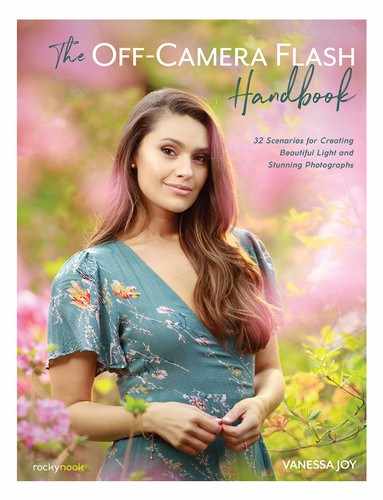
GOAL IMAGE
Let’s start this chapter off with me admitting that I do not do this during all of my couple’s shoots. Do I want to? Heck yes. However, if natural light is looking good and I can get a quality image with just a reflector, that’s what I’m going to do. Why? Because it’s easier and, more importantly, it makes it easier for me to connect with my clients. They can move around more freely and respond to my prompts without anyone worrying about light direction (Figure 8.1).
However, if I don’t have great natural light, or I want to control it a bit more, this is my go to setup. It’s the same as my favorite individual portrait light setup, with a few changes that help with photographing couples. As for the previous scenario, my goal in an image like this is to light not only the subject, but also the environment around them so that everything looks evenly lit.
If you’re photographing this during a cloudy day you’ll have no problem using speedlights for this setup. If the sun is bright, you may want the power of a 250-watt (or higher) second strobe. It’ll just make things easier for you so you don’t have to worry as much about battery power and whether or not your light will be powerful enough for the scene.
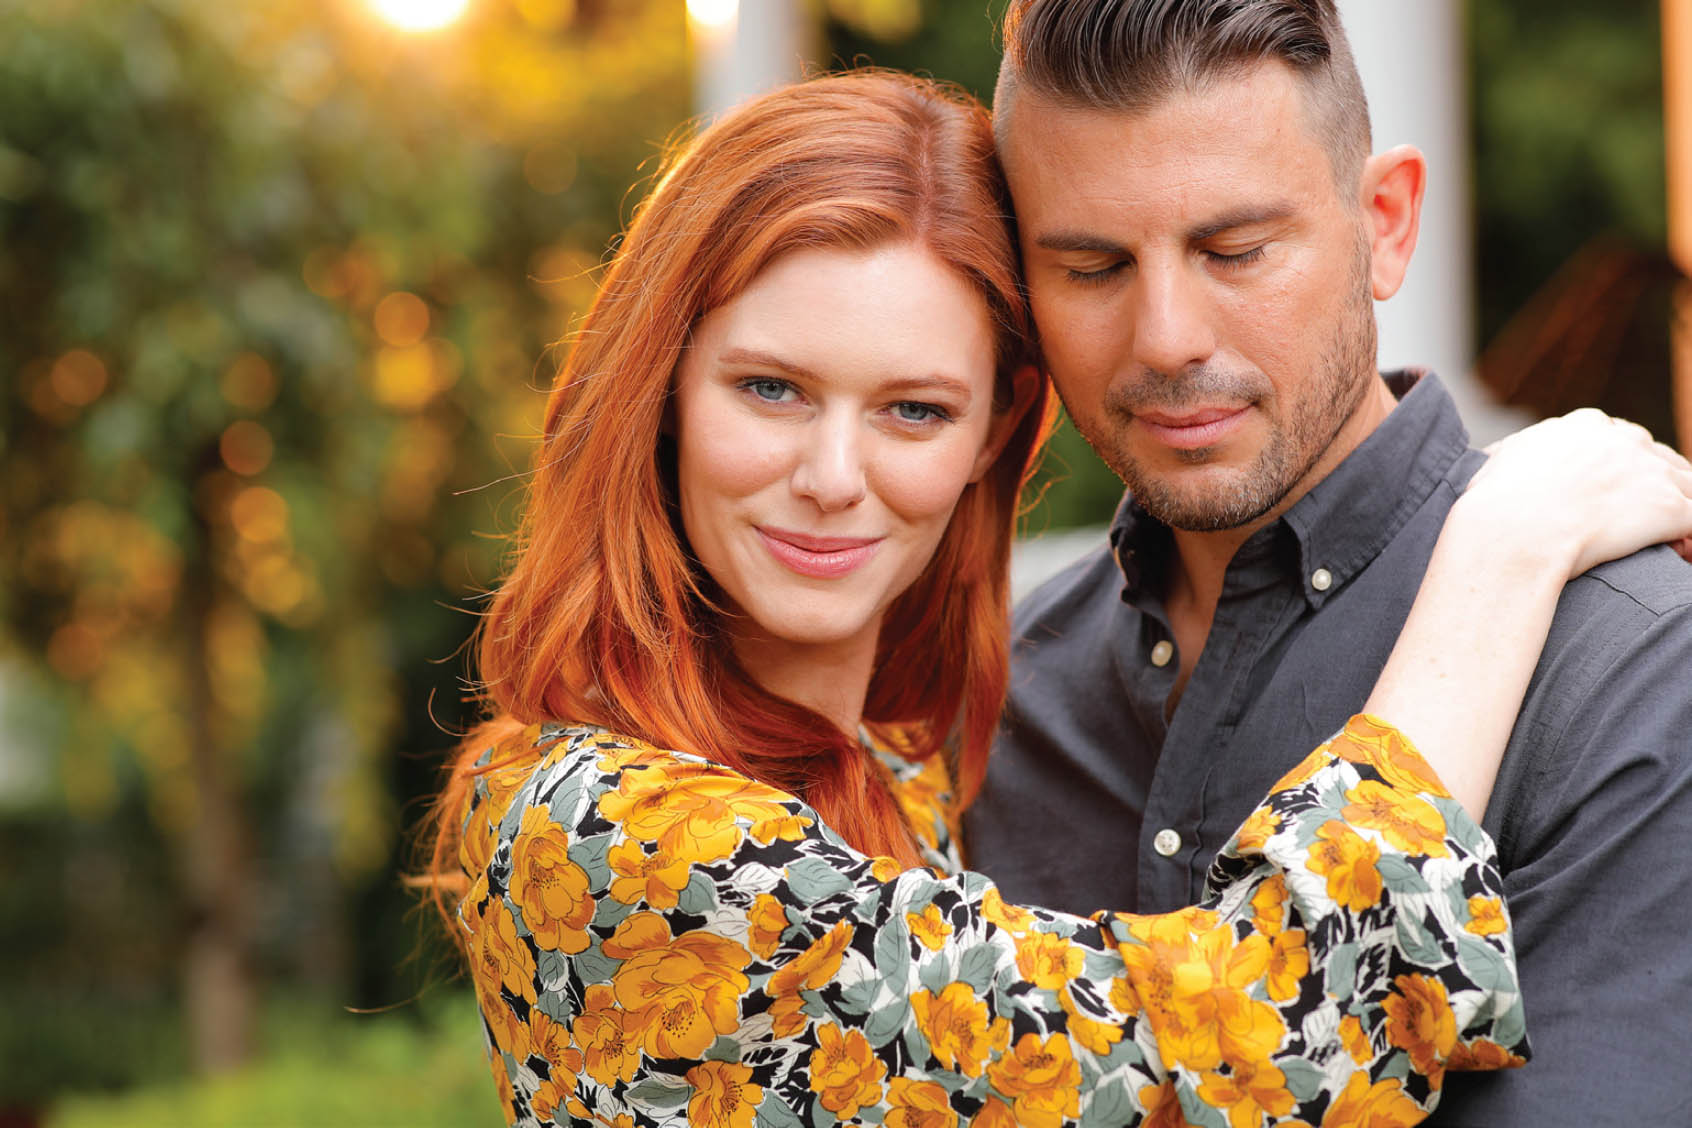
FIGURE 8.1
GOAL IMAGE.
CANON 1DXII, CANON 85MM 1.4, ISO 125, APERTURE 3.2, SHUTTER 1/250, WB 5700K
I highly recommend that you use a medium or large umbrella with a diffuser on it for this scenario. You could use a shoot-through umbrella, but because this is being shot in an open space, some light would be wasted. A five-foot octa would also do the trick. Any light that is large and diffused will work. All images in this chapter are straight out of the camera.
Step by Step
- Position the back light: This is the light that will have the two CTO gels on it. Try to be at least 20 feet away from your subjects, slightly to the right or left of them, and behind trees or bushes that’ll break up the light and make it look more natural. Don’t point the light directly at their heads! Aim it behind and past their heads so that the light spreads softly across them and their surroundings.
- Position the front light: This light will have the umbrella or large modifier on it. You’ll want it as close to your subject as possible without being in frame. I suggest placing it just to your right or left at less than a 45-degree angle to your subjects and about 8 feet high. Feather the light a bit in front of and across your subjects so it lights them and their surroundings. The closer your light gets to your camera, the less chance you’ll have at throwing unwanted shadows around and the easier it will be to pose the couple freely.
- Set the camera exposure: Get an exposure for the natural light on your subjects as if you weren’t using off-camera flash. Take a test shot and check your histogram. Your subjects will likely be a little dark, especially in the eyes depending on the natural light in the scene. I prefer a shallow depth of field with this setup, so I usually aim for around f/2.2–3.2.
- Set the white balance: The flash that will hit the front of your subjects won’t have a gel on it so set your WB to the color temperature of the front flash (usually ~5600K). If you’re not into dialing in your white balance Kelvin manually, try using the sunny day preset. Take a test shot and check the coloring of your photo. Feel free to warm or cool it slightly depending on your taste.
- Set the back flash: Turn on just your back flash and use TTL to get a power setting. Flip it to manual keeping the same power setting and adjust the light until you like how powerful the “sun” looks. Turn this flash head off.
- Set your front flash: Turn on your front flash and use TTL to get a power setting. Flip it to manual, keeping the same power setting, and adjust the light brighter or darker to get a proper exposure on your subjects’ faces. Alternatively for both lights you could set your camera to manual and set the flash power to a mid-range. Adjust up or down to your liking, or use a light meter to measure and set both lights to have the same exposure on the front and back of your subjects.
- Check both flashes: Turn your back flash back on, still set with the power setting you got in step 5, and take a test shot with both flashes firing together. Adjust your flashes up or down until you get the look you’re going for.
- Change your camera angle: While the goal of this setup isn’t to get “sun flare,” you definitely can grab that if you’d like. Try backing up, moving closer, and changing lenses. You’re set to manual so you won’t see much of a difference in the light between lenses so you can keep shooting without worrying about the exposure.
- Make adjustments: Once you have a solid image, feel free to change your exposure, white balance, or flash settings. Be sure to only change one thing at a time so you don’t get too far away from what was working originally and you can’t get back.
OPTIONAL: Only use one of the lights instead of both. You might like the outcome better!
Shot by Shot
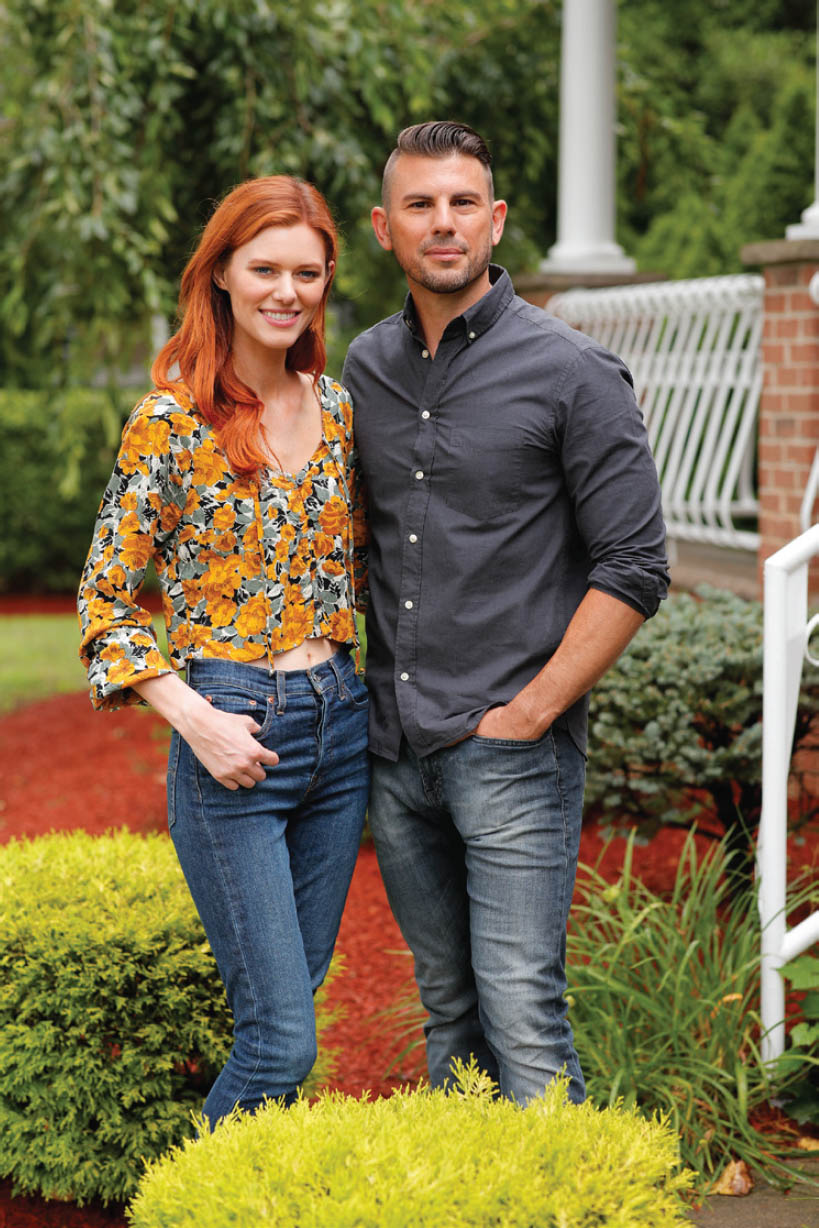
FIGURE 8.2
NATURAL LIGHT.
CANON 1DXII, CANON 85MM 1.4, ISO 125, APERTURE 3.2, SHUTTER 1/250, WB 5700K

FIGURE 8.3
TURN ON THE BACK PROFOTO B1 (WITH TWO FULL CTO GELS) ON TTL.
CANON 1DXII, CANON 85MM 1.4, ISO 125, APERTURE 3.2, SHUTTER 1/250, WB 5700K

FIGURE 8.4
I TURNED ON THE FRONT FLASH, BUT IT WAS TOO BRIGHT. I SWITCHED TO MANUAL AND LOWERED THE POWER IN THE SECOND PICTURE. SETTINGS FOR BOTH: PROFOTO B1 WITH MEDIUM UMBRELLA AND DIFFUSER.
CANON 1DXII, CANON 85MM 1.4, ISO 125, APERTURE 3.2, SHUTTER 1/250, WB 5700K

FIGURE 8.5
I TURNED ON THE FLASHES, BOTH OF WHICH WERE STILL SET TO WHERE I LEFT THEM.
CANON 1DXII, CANON 85MM 1.4, ISO 125, APERTURE 3.2, SHUTTER 1/250, WB 5700K

FIGURE 8.6
WE SWITCHED UP THE POSE AND DID A FEW CROPPED VARIATIONS AND EXPRESSIONS.
SETTINGS ARE THE SAME FOR ALL: CANON 1DXII, CANON 85MM 1.4, ISO 125, APERTURE 3.2, SHUTTER 1/250, WB 5700K
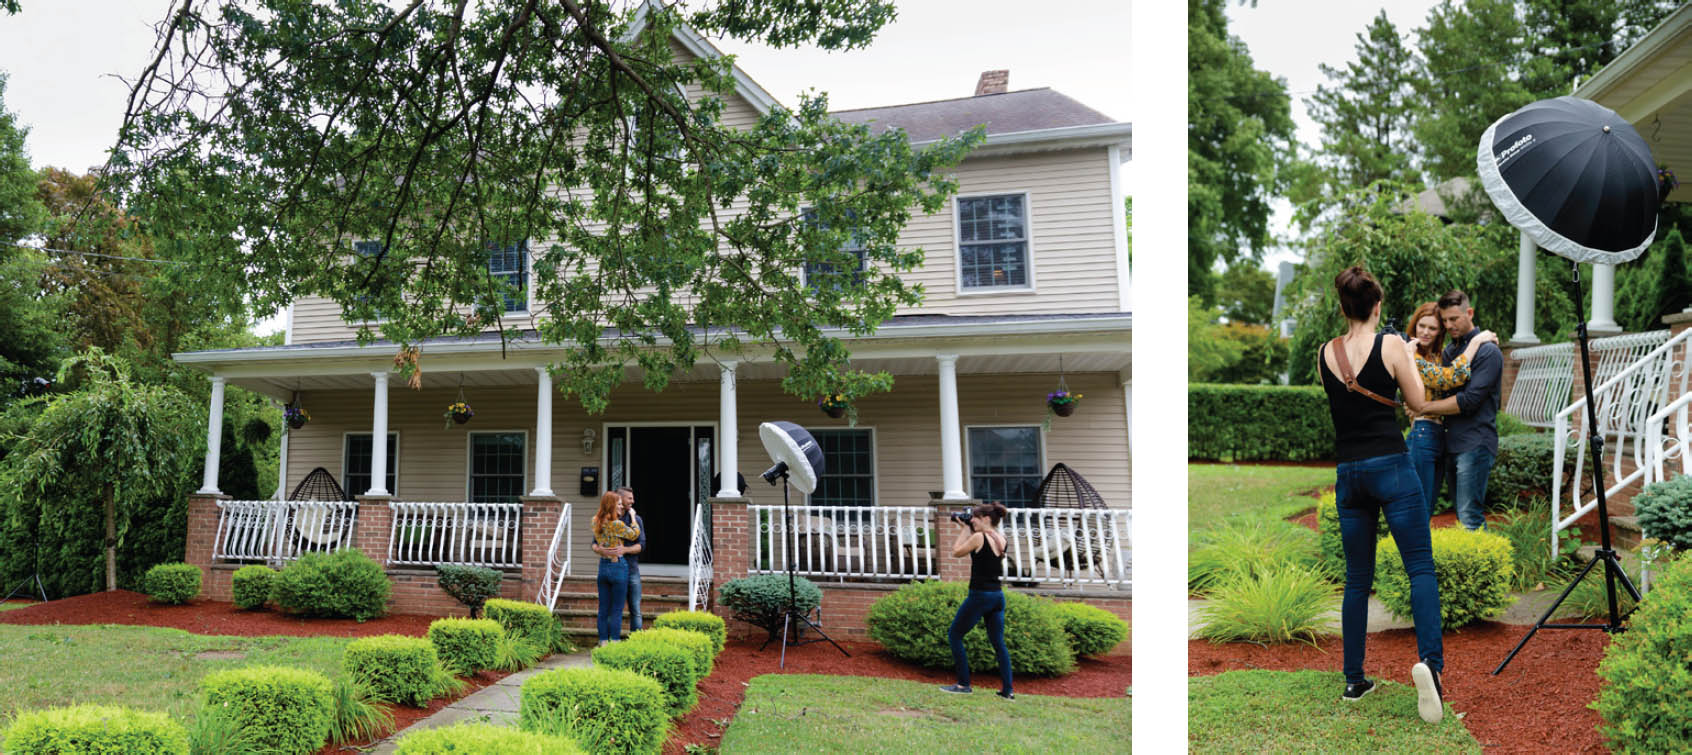
FIGURE 8.7
BEHIND THE SCENES.
Potential Problems
The biggest hurdle to overcome in this scenario is favoring the light to one side or the other. Ideally, I like to have directional light on my subjects’ faces, but that becomes an obstacle with a couple. I need to have them both facing the same direction or one subject’s face will be lit, while the other’s is in shadow and the back of their head is lit.
In this case, I use the main light more directionally, and intentionally pose the couple so both of their faces are turned towards the light. Then I position the main light to be a bit more flat so they can turn and move any way they’d like without the casting shadows on each other or one of them turning away from the light.
Also, I have to give a huge thank you to my hubby for posing as the male model in this chapter with our model, Claire. He wasn’t particular thrilled about it as he’s not a huge fan of having his picture taken, but did it anyway.