SCENARIO 10
Enhancing Natural Light
What to do when you’ve got a day with gorgeous natural light that you want to step up even further.
GEAR NEEDED:
- Camera + Trigger
- Medium to long focal length lens (50mm or higher recommended)
- Off-camera flash
- Light stand
- Umbrella/softbox/octa
GOAL IMAGE
Let’s get one thing straight: I know I’m writing a book about off-camera flash, but if the natural light is gorgeous, use the natural light! Flash is not mandatory by any means. If the pictures look great with natural light, use it! I certainly do. Flash is a tool just like any other piece of equipment we have, and we can choose if, when, and how to use it.
All images in the step-by-step walkthrough are straight-out-of-camera.
The first way I really learned to use off-camera flash was with this technique. My photo friend Rich Schaub helped my friend Ahmet Ze and I learn off-camera flash this way because this method is great for a sunny day, a cloudy day, or even if the sun keeps moving in and out from behind the clouds. The sun will mostly affect the background exposure, and not the flash power on the your subject’s skin, which is the most important part of the photo.

FIGURE 10.1
GOAL IMAGE. TAKEN WITH A PROFOTO B10 WITH A SMALL WHITE UMBRELLA AND DIFFUSER, AND EDITED WITH CAPTURE ONE.
CANON 1DXII, CANON 85MM 1.4, ISO 200, APERTURE 4.5, SHUTTER 1/250, WB 5900

FIGURE 10.2
PHOTO BY RICH SCHAUB
Just like that horrible old photo I can’t believe I let you see, we’ll be using the sun as a backlight in this scenario and a flash to light the front of the subject. You might think, “why not just use a reflector?” You certainly could, but here are some reasons why that might not be the best solution:
- Reflectors usually require an assistant to hold them.
- Reflectors move a lot.
- OCF will allow you to change the color of the photo.
- OCF gives you more control over how bright or dark your background will be.
- Reflectors require the sun to be out and not dipping behind clouds, or else your exposure changes. Using a flash works well even if the sun keeps moving in and out of the clouds.
Step by Step
- Position the subject: Place your subject so that the sunlight is hitting the back of their head. The sun may be going in and out of clouds, but that won’t change your flash exposure.
- Position the light: This light will have an umbrella/softbox/octa modifier on it. You’ll want it to be as close to your subject as possible without being in frame, so it’s nice and soft. I suggest placing it just to your right or left at about a 45-degree angle to your subject, about 8 feet high. You’re welcome to experiment with placement, especially if your subject’s head will be turning to the side.
- Set the camera exposure: Get an exposure for the natural light on your subject as if you weren’t using off-camera flash. Take a test shot and check your histogram. You want the subject to be a little dark so that your flash is what is primarily lighting the face.
- Set the white balance: The flash that will hit the front of your subject won’t have a gel on it so set your WB to the color temperature of the flash (usually ~5600K). You could also use the sunny day preset. Take a test shot and check the coloring of your photo. Feel free to warm or cool it slightly depending on your taste.
- Set the flash power: Turn on just your front flash and use TTL to get a power setting. Alternatively, you could set your camera to manual and set the flash power to a mid-range value and adjust up or down to your liking, or use a light meter. Flip it to manual, keeping the same power setting, and adjust brighter or darker for a proper exposure on your subject’s face.
If you don’t like how your background looks, change the shutter speed after you’ve figured out the correct flash power for the subject’s face.
- Make adjustments: Once you have a solid image, feel free to change your exposure, white balance, or flash settings. Be sure to only change one thing at a time so you don’t get too far away from what was working originally and you can’t get back.
Shot by Shot

FIGURE 10.3
NATURAL LIGHT.
CANON 1DXII, CANON 85MM 1.4, ISO 200, APERTURE 5, SHUTTER 1/250, WB 5900

FIGURE 10.4
THIS IMAGE HAS THE ADDITION OF A PROFOTO B10 WITH A SMALL WHITE UMBRELLA AND DIFFUSER TO CAMERA RIGHT.
CANON 1DXII, CANON 85MM 1.4, ISO 200, APERTURE 5, SHUTTER 1/250, WB 5900

FIGURE 10.5
I LOWERED THE APERTURE TO BRIGHTEN THE FLASH SINCE THE SUBJECT MOVED FARTHER AWAY FROM IT. THERE IS A PROFOTO B10 WITH A SMALL WHITE UMBRELLA AND DIFFUSER TO CAMERA RIGHT.
CANON 1DXII, CANON 85MM 1.4, ISO 200, APERTURE 4.5, SHUTTER 1/250, WB 5900
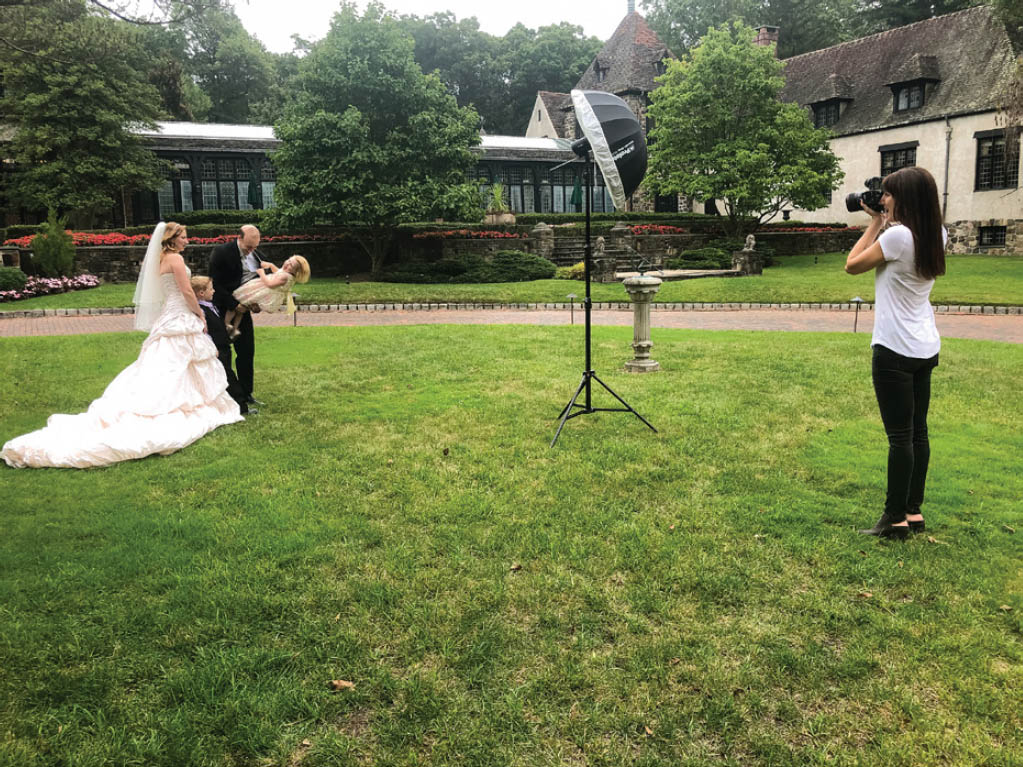
FIGURE 10.6
BEHIND-THE-SCENES SHOT.
PHOTO BY JUAN ACEA
Potential Problems
If you have a partly cloudy day on your hands, you may get frustrated with the sun going in and out of the clouds, changing the way your background looks from shot to shot. It’s helpful to put your subject in a spot where their back is lit by the sun but their face is in the shade (and lit by your flash). The more your frame (both the subject and the background) is in the shade, the less your shot will be affected by the sun.
Either way, try to set your shutter speed around 1⁄125 of a second. This will give you the freedom to move your shutter speed up or down a couple of stops to compensate for your background going brighter or darker. This won’t affect the flash exposure on your subject, and you won’t need to go into HSS. If the changes are super extreme, you may need to go into HSS to give yourself more leeway.
Special thanks to photographer Vail Fucci, who not only trusted me to photograph her and her family, but also allowed me to use their images in my book! Thanks girl!