SCENARIO 19
Table Details
My go-to, easy-peasy wedding reception lighting setup that shows off every little detail.
GEAR NEEDED:
- Camera + Trigger
- 50mm or 85mm focal length lens
- 2 Off-camera flashes
- 2 Light stands
- 2 Grids
- Third off-camera flash (optional)
- Gel set (optional)
GOAL IMAGE
I absolutely love my time at wedding receptions photographing all of the décor. My goal is to capture it as it looks, so sometimes that means using only natural light.
If you’re photographing a daytime wedding, this lighting setup isn’t appropriate or necessary. But if you’re photographing a night wedding, this will show you how to capture every little detail and keep the ambiance of the room (Figure 19.1).
My goal at a wedding is to create imagery that represents what guests and clients see when they walk into a room. I used to color balance for an orange-glowing room, but then I realized I was taking all of the natural color out of the images. My clients would wonder why the images didn’t show the warm candlelight feel they were going for, so I stopped color balancing my lights to match the ambient light.
I used to just bounce flash the detail pictures. The problem with that is that you’re not controlling the light, so it’s bouncing and lighting both the table and backdrop, killing the ambient light. Bouncing the light doesn’t show off the details quite as well as pointing it more directly at your subjects does.
My favorite method uses two lights on either side of the table. This allows for light and shadow to show off the texture and color of what I’m photographing. Occasionally, I’ll let one of the lights flare into my shot, giving the image a glamorous feel.

FIGURE 19.1
GOAL IMAGE. SHOT WITH ONE PROFOTO B2 ON CAMERA RIGHT.
CANON 1DX, CANON 24MM 1.4, ISO 1600, APERTURE 3.2, SHUTTER 1/125
Step by Step
- Grid the lights: It would be best to use two grids of the same size. However, I own 20-, 10-, and 5-degree grids. I have only one of each size, so I use the 20- and 10-degree grid one on each light. I then position the 10-degree gridded light a few feet farther away from my subject than the 20-degree gridded light. This prevents the spread of light so that both sides of my subject (the table) are lit evenly. This does potentially mean that the light that’s farther away may need to have a brighter power setting.
- Position the lights: Choose what you’re photographing and place one light directly to the left of it and one light directly to the right of it. Raise the lights to just at or above the height of the centerpiece of the table.
- Set the camera exposure: Create an exposure that shows off the level of ambient light (e.g., candlelight, uplighting) that you want to see in the image. I like using a shallow depth of field, somewhere around f/2.2–3.2, to get the look I’m going for.
- Set the white balance: Because the flash is your main light source, set your white balance to the flash preset or 5600 Kelvin depending on the temperature of your light. If you want the entire image to have a slightly warmer look, you can raise your white balance to achieve this.
- Set the flash power: Turn both lights on and take a shot using TTL. Flip to manual mode and adjust. You do not have to have both sides of the subject evenly lit. You could decide to have the right side a bit brighter than the left. That is completely up to you. If you don’t have TLL available, start on the lowest manual setting your flash has and slowly move up until you have the desired brightness, or use a light meter. Do this one light at a time.
- Move lights to shoot table details: When you’ve shot the whole table and centerpieces and want to move on to the details on the table like the plates, glasses, and silverware, you may need to lower the lights. This way they will light the table and décor more prominently.
OPTIONAL: Place one of the lights a little more behind the subject and pointed towards you to get a bit of flare in your image.
OPTIONAL: If you have a boring room without much light in the background, throw a third light with any color gel in the back. Point it towards a background wall to add some life to the shot.
Shot by Shot

FIGURE 19.2
THIS FIRST LIGHTING SETUP IS ON THE RIGHT SIDE. I USED A PROFOTO B1 WITH A GRID.
CANON 1DXII, CANON 85MM 1.4, ISO 1250, APERTURE 2, SHUTTER 1/200
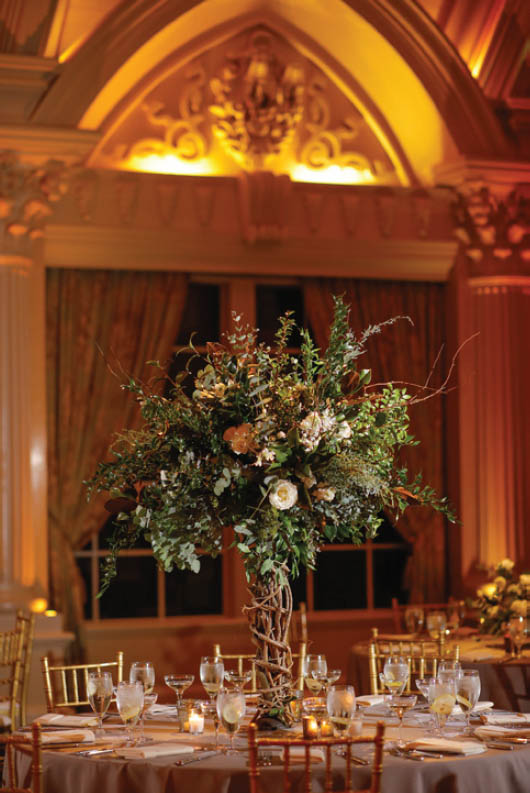
FIGURE 19.3
I ADDED A SECOND LIGHT ON THE LEFT. THE BACKGROUND UP-LIGHTING CHANGED BUT DIDN’T AFFECT IMAGE TOO MUCH. I USED TWO PROFOTO B1S WITH GRIDS.
CANON 1DXII, CANON 85MM 1.4, ISO 1250, APERTURE 2, SHUTTER 1/200

FIGURE 19.4
IT’S EASY TO MOVE AROUND FROM THERE TO CAPTURE SMALLER DETAILS. I USED TWO PROFOTO B1S WITH GRIDS.
CANON 1DXII, CANON 85MM 1.4, ISO 1250, APERTURE 2, SHUTTER 1/200
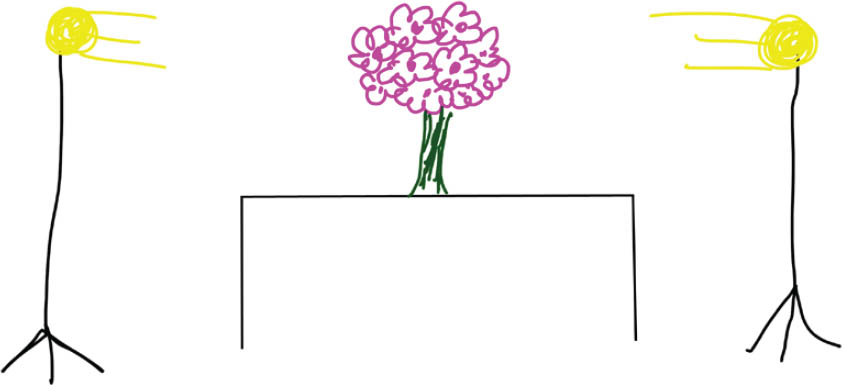
FIGURE 19.5
LIGHTING SETUP.
Potential Problems
The reason I place the lights above the table centerpiece is because the tablecloths at weddings are typically white or a light color, while the flowers are a mix of colors. Because of this, it can be very easy to overexpose the table itself, even when the centerpiece is exposed correctly.
Avoid this by raising the lights to specifically light the centerpiece when you’re photographing the table as a whole. Then when you’re ready to move onto the smaller details on the table you can lower the lights as you see fit.

FIGURE 19.6
THE WHITES ON THIS TABLE ARE BLOWN OUT BECAUSE I DIDN’T USE A GRID FOR THE TWO PROFOTO B1S. THIS IS BAD.
CANON 1DX, CANON 50MM 1.2, ISO 1600, APERTURE 2.5, SHUTTER 1/125
I have certainly had my share of marathon wedding-reception-room shoots. If you’re short on time just use one light. Set the light on manual and walk around (faster with an assistant, but you can keep moving around a light stand) from detail to detail, holding the light at the same distance from and angle to your subject each time.
We had about six and a half minutes to photograph the most glorious wedding reception of my career. It was a bummer to have to rush, but gosh darn it, we did it, and it was epic none-the-less.

FIGURE 19.7
SHOT WITH ONE PROFOTO B2 ON CAMERA RIGHT.
CANON 1DX, CANON 24MM 1.4, ISO 1600, APERTURE 3.2, SHUTTER 1/125

FIGURE 19.8
HERE THERE IS AN UNDESIRABLE SHADOW ON THE DRINK COASTER. I REMOVED THE ITEM THROWING THE SHADOW AND USED ONE PROFOTO B1 WITH A GRID.
CANON 1DXII, CANON 85MM 1.4, ISO 1250, APERTURE 2, SHUTTER 1/200
Since you’re likely inside trying to keep your ISO as low as possible to get a clean image, I imagine your shutter speed will be a bit on the lower side. Sometimes this can let in a little too much light. Try raising your shutter speed to darken the ambient light in the space. Alternatively, if you’re taking a picture and you feel like it looks like you’re shooting in a black cave, lower your shutter speed to make the background brighter.
Sometimes you’ll need to move table details that are not in the shot so they don’t throw a shadow on what you’re photographing. You could also move the light, but I often find it’s easier just to move whatever is throwing the shadow.
Practical Uses
With this method you can have a bit more creative fun shooting wedding reception details. You can use a nice long lens like an 85mm and shoot under, over, or through wedding décor in the foreground. It makes for a very pretty, intimate-looking photo that wouldn’t be possible with a bounce flash. The bounced light off of the foreground makes it distracting instead of being an entry point into the photograph that draws the viewer’s eye through to the detail you’re photographing.
You can use this same method to photograph a wide shot of the entire room as well. Choose what tables you’d like to light (ahhhh, wouldn’t it be nice if we had 26 lights to spot light every single one?). Alternatively, you can position one light at the right side of the room pointed at the left side of your frame, and the second light on the left side of the room pointed at the right side of your frame. With grids on the lights they won’t entirely bathe the room in light, letting you keep the ambience of the room while you strategically light your subject. See more on this in Scenario 26, “Lighting a Dark Room.”
Finally, if you are shooting a day wedding but your client wishes they had an intimate, dark reception; or you happen to only have time to shoot the details during the day when it is a night reception; you can use this method to make it look like the image was shot at night. Follow the same instructions, except set your initial exposure to be very dark (as though it was night) instead of setting it for the correct daylight exposure. Continue through the steps and consider the option of adding a third light with a gel on it.