SCENARIO 14
Keeping a Blue Sky
How to show off a beautiful blue sky when you have it.
GEAR NEEDED:
- Camera + Trigger
- Lens of any focal length that’ll let you see the sky in your shot
- Off-camera flash
- Light modifier (such as a 2x3 softbox)
- Light stand
- ND filter (optional)
- Half CTO gel (optional)
GOAL IMAGE
While natural light produces some beautiful imagery, it can often result in a blown-out white sky on a beautifully blue-sky kind of day. Depending on your style, you might like one over the other. Personally, I’m a big fan of complimentary colors, so when I saw this beautiful yellow dress in the example image, I just had to put it up against the bright blue sky we were under (Figure 14.1).
To avoid making an image like this look “flashy,” you need to position your light to be facing the same direction as the sun. Think of molding the existing light with your off-camera flash rather than trying to fight it. Think about how you’d create this look with natural light, and copy the light position. With natural light, the easiest option for taking this photo is with the sun at your back. The light would ideally be low in the sky and perhaps lighting your subject slightly from the side.
Step by Step
- Position your subject: Find the bluest part of the sky to position your subject against. The sun won’t be in the picture, because you’re pretending your flash is the sun. I like finding a spot for my subject to be higher up so I can shoot up toward the person to show more of the sky.
- Position the light: You’ll have to get your light pretty close to your subject here. You’re essentially fighting the power of the sun, so the closer your light is to your subject the better. Place the light to be shining in the same direction as the sun, opposite of wherever you see the shadows falling on the ground.
- Set the camera exposure: Set your camera as though you were just taking a photo of the background and that beautiful blue sky. If you like a lot of depth of field in your image and don’t mind using a higher f-stop, keep your shutter speed below your camera’s sync speed (1⁄250 or so) so you don’t have to put your flash into High Speed Sync. HSS will use up a lot of extra battery power and won’t be as bright. Personally I like a more shallow depth of field in my images, so I tend to go into HSS and keep my battery usage in mind.
Alternatively, you can use a neutral density (ND) filter to darken the image, making it possible to use a lower f-stop for a shallower depth-of-field look. These filters darken the entire image so you don’t have to darken the image using your exposure.
- Set the white balance: The flash is the main source of light hitting your subject, so set your WB to flash or 5600 Kelvin depending on the color temperature of your light.
- Set the flash: I typically find TTL works really well in this scenario because it’s fairly straightforward. If you’re using a manual flash, start at the highest power setting or use a light meter and adjust down to your liking. Either way, take a test shot and adjust your light to be more or less powerful to correctly expose your subject.
- Make adjustments: Once you have a solid image, feel free to change your exposure, white balance, or flash settings. If you want the entire image to be dark, adjust your ISO or aperture. If you just want to darken or lighten the background/sky, adjust your shutter speed. Be sure to only change one thing at a time so you don’t get too far from what was working originally and can’t get back.

FIGURE 14.1
GOAL IMAGE. SHOT WITH A PROFOTO CANON AIR REMOTE, PROFOTO B10, AND A PROFOTO 2X3 OCF SOFTBOX. SEE FIGURE 14.5 FOR THE STRAIGHT-OUT-OF-CAMERA IMAGE.
CANON 1DX MARKII, CANON 135MM 2.0, ISO: 125, APERTURE: 2, SHUTTER: 1/4000, WB: 5600K
OPTIONAL: Put a half CTO gel on your light and change your white balance to roughly 4000K. This will let you blue the sky and background even more to show it off while keeping a normal color on your subject. Be careful not to make it look unnatural if that’s not what you’re going for.
Shot by Shot

FIGURE 14.2
NATURAL LIGHT SHOT TO EXPOSE FOR THE SUBJECT.
CANON 1DX MARK II, CANON 50MM 1.2, ISO 50, APERTURE 1.8, SHUTTER 1/1000
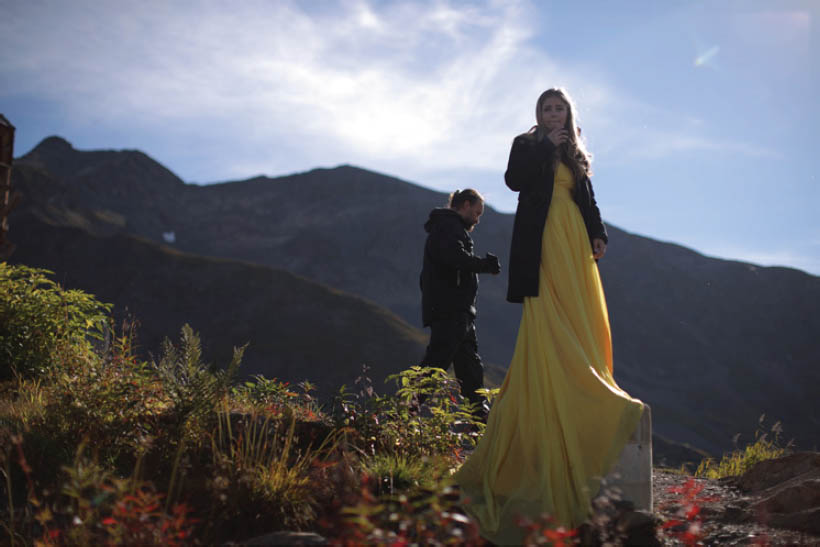
FIGURE 14.3
NATURAL LIGHT SHOT EXPOSING FOR THE SKY.
CANON 1DX MARK II, CANON 50MM 1.2, ISO 50, APERTURE 1.8, SHUTTER 1/4000

FIGURE 14.4
I CHANGED LENSES AND RAISED THE ISO TO ADJUST FOR THE APERTURE DIFFERENCE BETWEEN THE LENSES. SHOT WITH A PROFOTO CANON AIR REMOTE, PROFOTO B10, AND A PROFOTO 2X3 OCF SOFTBOX
CANON 1DX MARK II, CANON 135MM 2.0, ISO 125, APERTURE 2, SHUTTER 1/4000, WB 5600K

FIGURE 14.5
LIGHTING SETUP: BEHIND THE SCENES WITH OCF. USING A PROFOTO CANON AIR REMOTE, PROFOTO B10, AND A PROFOTO 2X3 OCF SOFTBOX.
CANON 1DX MARK II, CANON 50MM 1.2, ISO 50, APERTURE 1.8, SHUTTER 1/4000

FIGURE 14.6
LIGHTING DIAGRAM.
Potential Problems
A shot like this is going to use all the power in your flash. I recommend using a more powerful strobe with 250 watt seconds or higher, or you’ll have a hard time getting the light to affect your exposure. If you only have speedlights at your disposal, use two, three, or even four of them all coming from the same direction to essentially create one more powerful light.
Practical Uses
This is a great technique to use on a shoot when you’d like to give your client multiple looks, or if you have an epic sky you’re trying to show off. I’ve used this method on more than one occasion when a storm was coming or had just passed and there was a crazy, cloudy sky. Without off-camera flash there would be no way to properly expose both my subject and the sky in these scenarios.
FIGURE 14.7
NATURAL LIGHT.
CANON 1DX MARK, CANON 50MM 1.2, ISO 320, APERTURE 2.5, SHUTTER 1/400

FIGURE 14.8
WITH FLASH SECONDS LATER.
CANON 1DX, CANON 50MM 1.2, ISO 320, APERTURE 2.8, SHUTTER 1/6400
FIGURE 14.9
NATURAL LIGHT.
CANON 1D MARK IV, CANON 50MM 1.2, ISO 200, APERTURE 2.5, SHUTTER 1/200
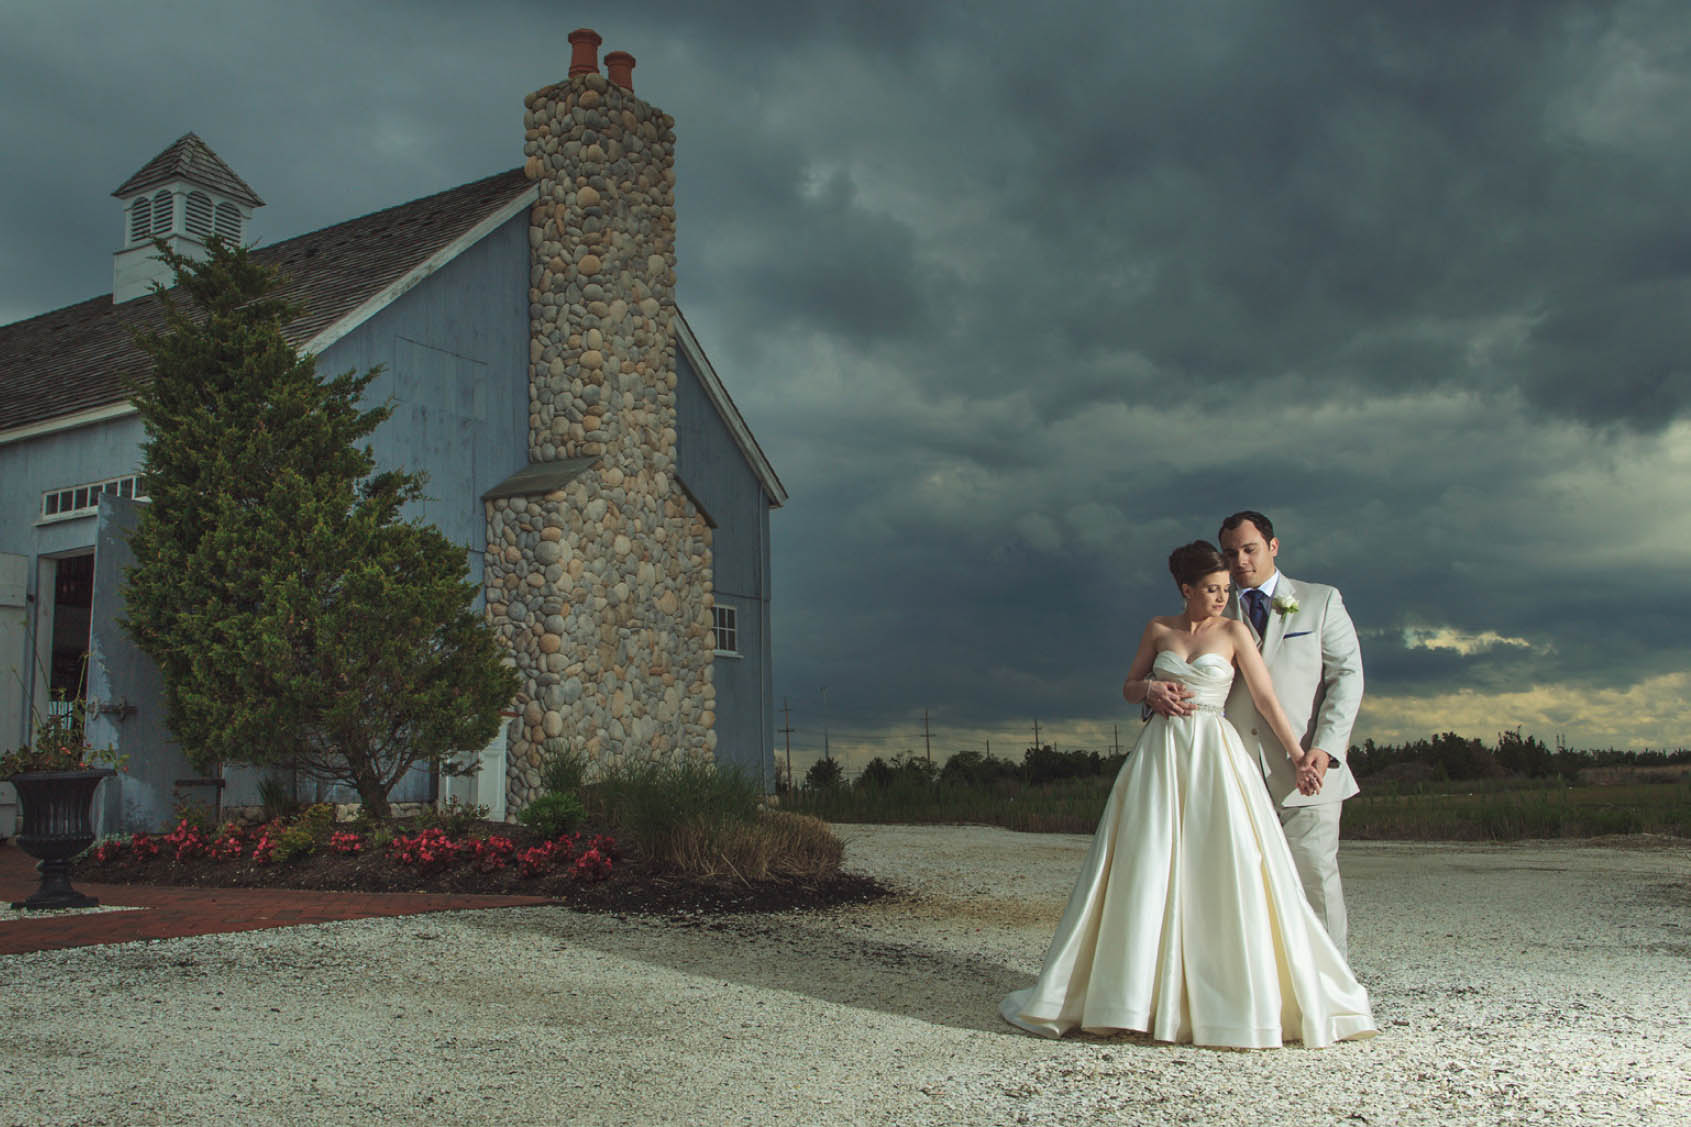
FIGURE 14.10
WITH FLASH SECONDS LATER.
CANON 1D MARK IV, CANON 24MM 1.4, ISO 200, APERTURE 10, SHUTTER 1/250