
Organizing and Viewing Information in Project Web App
Web-based Projects
Team Builder
Resource Engagements
Risks, Issues, Deliverables, and Documents
Project Details
Publishing a Task List in SharePoint
Reporting
The Business Intelligence Center
Project Web App Review Exercise
 Learning Objectives for This Chapter
Understand basic Project Server security
Create an enterprise project from Project Web App, including the use of SharePoint tasks lists
Organize and view information in Project Web App
Use Team Builder from Project Web App
Request resource engagements from the project manager’s end
Manage resource engagement requests from the resource manager’s end
Manage non-project time
Use the Resource Center to display availability vs. capacity and manage resource allocations across projects
Use the project sites (workspace) to access, edit, manage, and report on risks, issues, and documents
View and update Project Details
The tracking features of Project Web App 2019 are extremely valuable, since they help overcome one of the great frustrations in using older project management software. As a specific configuration of SharePoint for project management functions, Project Web App includes many standard SharePoint features that have been designed and set up for project management use.
One of the most versatile aspects of SharePoint is its list management capability. This chapter describes some of the more common uses of this functionality.
13.1 Organizing and Viewing Information in Project Web App
In the previous chapter and this one, we are discussing the exchange of assignment and progress information between the project manager and team members using Microsoft Project Web App. Projects are managed in organizations and use organizational resources, which means executives and resource managers need information about project activities and resource utilization.
The primary sources of such information are the Project Center and Resource Center pages in Project Web App. The information you see in the Project Center and Resource Center is based on the security setting established by the Project Server administrator(s).
Overview of Project Server Security
Microsoft Project Web App ships with eight predefined groups: Team Members, Team Leads, Resource Managers, Proposal Reviewers, Project Managers, Portfolio Managers, Executives, and Administrators; additional groups can be created by an administrator. Individuals are assigned to one or more groups. Each group has predefined permissions which govern what they can and can’t do in the application.
Note to users accessing Project Online through Office 365: Your instance of Project Server is usually hosted in an arrangement known as a tenant. A tenant is a separate instance of Project Server that is co-hosted with other tenants (typically users from other organizations that are separated from your instance). Office 365 is designed with additional layers of security that protect access to your organization’s information from users in other organizations. As a result, your default groups may be set up differently. Refer any questions about this to your organization’s Project Online administrator.
Groups are given access to categories, which contain objects such as projects and views. The combination of groups and categories defines the security for information in Project Server. For example, resources in the Team Member group given access to the My Tasks category (the default for team members) will see only the Project Center views given to the My Tasks category by the Project Server administrator; they will not see the Resources link at all on their individual Home pages.
Resources in the Project Manager group will see their own projects (those they have published or are assigned to) in the Project Center page and can view assignment information in the Resource Center.
Project Web App Views
The content and format of views in Project Web App is defined by a Project Server administrator and cannot be changed by users, just as enterprise views in Microsoft Project cannot be changed by project managers. The significant difference is only data appearing in a Project Web App view can be used for filtering and grouping, whereas all data in Microsoft Project is available, whether visible or not. For example, you can filter the data in the Entry Table in the Gantt Chart by cost, even though cost data is not visible.
This means that, especially in the early stages of a Microsoft Project 2019 implementation, solid communication between administrators and users is critical. Administrators of course work to provide the information and organizational tools needed, but often this effort requires estimation on their part. If required information isn’t available, contact your administrator.
13.2 Web-Based Projects
As we learned in the previous chapter, clicking the Projects link in the Quick Launch sidebar or the Projects tile in the carousel takes you to a list of the enterprise projects you are authorized to view. The Project Center page provides links to a multitude of functions and activities. In this chapter we will attempt to group these functions logically and to provide a complete description for each.
In addition to web-based projects, this chapter will describe reporting, status reports, risks, issues, deliverables, and document management in Project Web App.
Your sidebar options and the overall look and feel of your Project Web App views may differ slightly from those in this section. This is dependent on the permissions your Project Server administrator has granted to you.
Project Center
![]() For this exercise, you will need to launch Internet Explorer and connect to Project Web App.
For this exercise, you will need to launch Internet Explorer and connect to Project Web App.
- 1.From your Project Web App home page, click the Projects tile in the carousel or select the Projects link in the sidebar. Your screen will resemble the following.
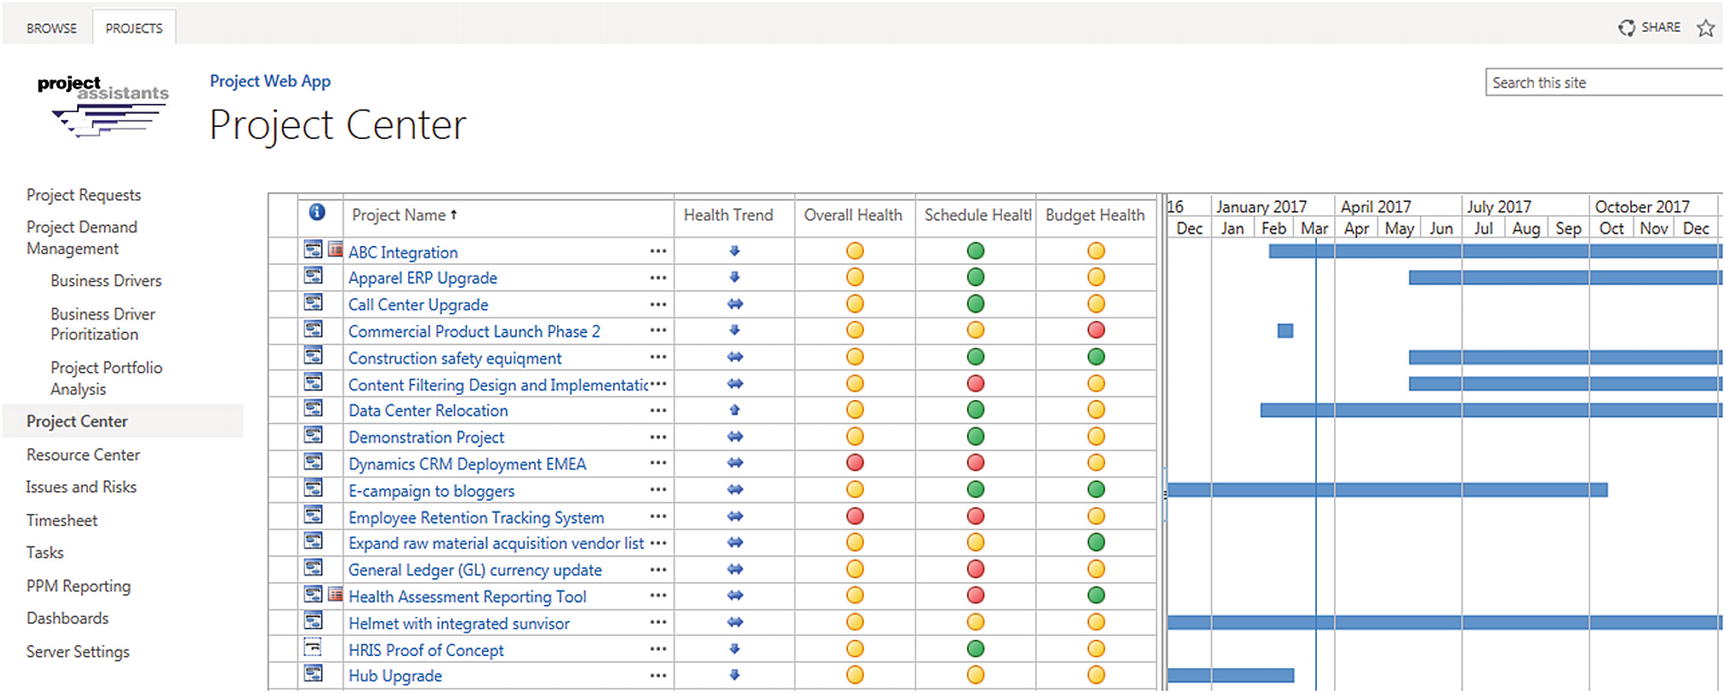 Figure 13-1
Project Center
- 2.Click the Projects tab to see all Projects ribbon options, including the following groups: Project, Navigate, Zoom, Data, Timeline, Share, and Project Type.
 Figure 13-2
Project Center ribbon options
The following is a summary of the available editing options in the Projects:Project group.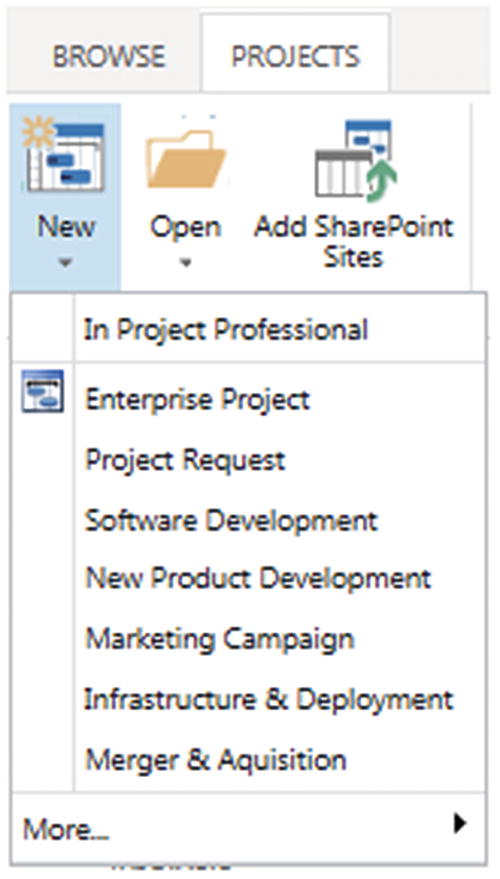 Figure 13-3
Projects:Project group options, with New options expanded
Clicking the New icon found in Projects:Project provides you some options:In Project Professional – Launches Microsoft Project 2019 so you can build a new project plan.
- Enterprise Project – Takes you to the Basic Info dialog box where you enter summary project information; once you click Save, this information is saved as a new Enterprise Project.
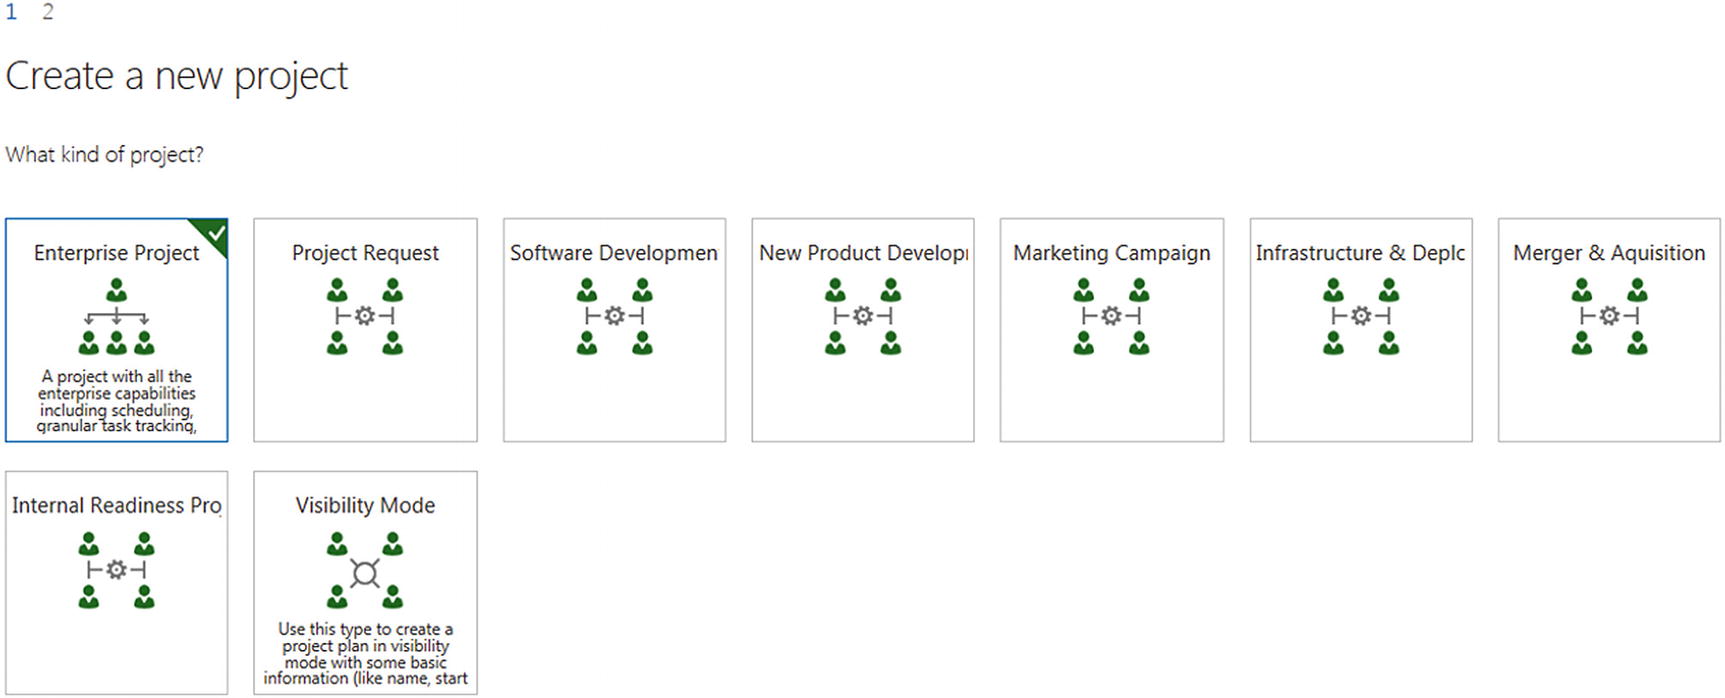 Figure 13-4
Creating a new enterprise project (web page 1: what kind of project?)
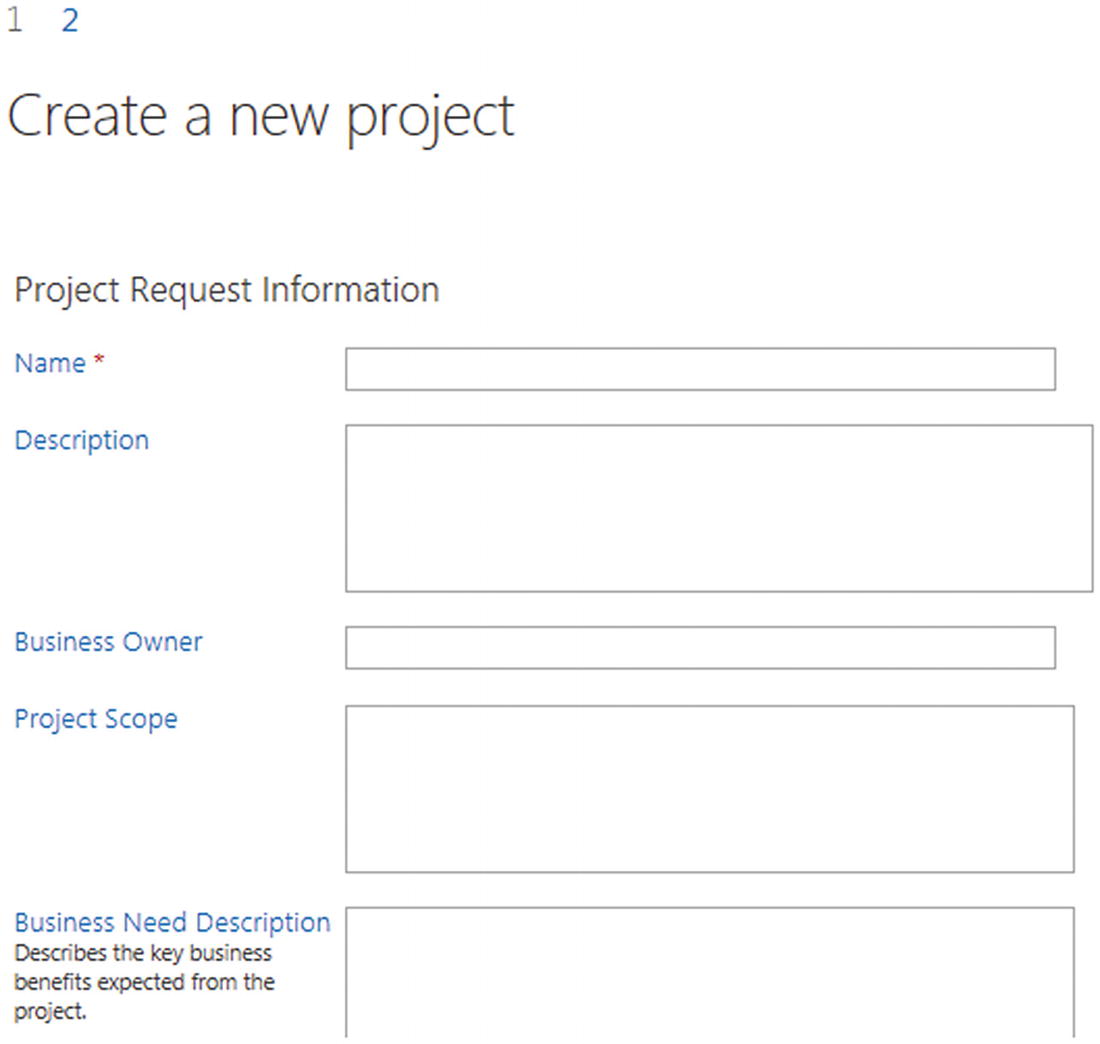 Figure 13-5
Creating a new enterprise project (web page 2)
Clicking the Open icon found in Projects:Project provides you, by default, four options for opening an existing project.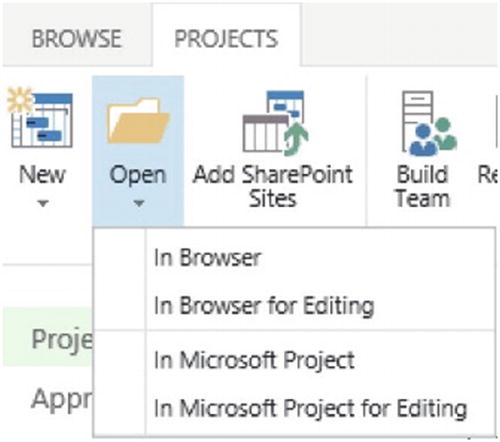 Figure 13-6
Projects:Project group options, with Open options expanded
In Browser – Opens the project in Project Web App for viewing or for editing if the project is already checked out to you; this is the same as if you just clicked the project name in the Project Center view.
In Browser for Editing – Opens the project in Project Web App for editing.
In Microsoft Project – If you have the Microsoft Project Professional client on your personal computer, opens the project for viewing (read only).
In Microsoft Project for Editing – If you have the Microsoft Project Professional client on your personal computer, opens the project for editing.
The edit functions noted here include the ability to access the project as read only or to update in either Project Web App or Microsoft Project Professional.
Note: Update functions are dependent on having permission to update this project. You will also be unable to edit a project if it is checked out to someone else.
Add SharePoint Site is the final option in the Projects:Project group. This option allows you to create a new project in Project Web App from an existing tasks list. Your project will show up in features such as reporting and resource availability.
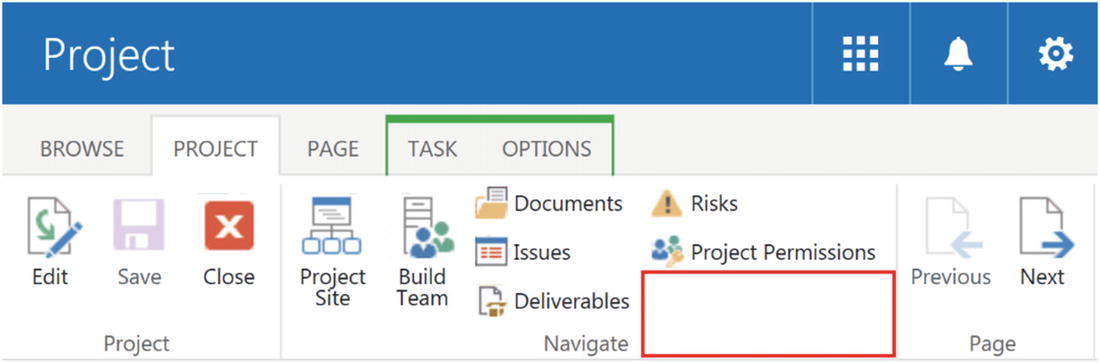
In the Projects:Navigate group, you will find the following.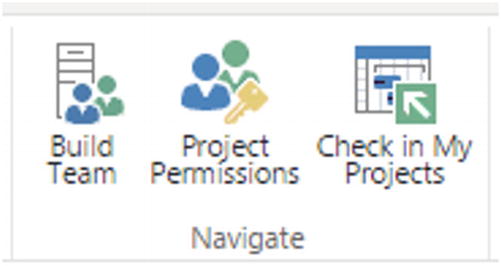 Figure 13-7
Projects:Navigate group options
Build Team – Allows resource managers or other users with appropriate permissions to create a team for a project; they cannot assign resources to project tasks but can add them to the team.
Project Permissions – Takes you to the Project Permissions page, where you can set permissions for a selected project; you can give users permission to view or edit the project.
Check in My Projects – Takes you to a page where you can check in stranded enterprise projects; note that this is not project specific: all your checked out projects will be listed.
The Projects:Zoom group options help you define the timescale displayed on your screen.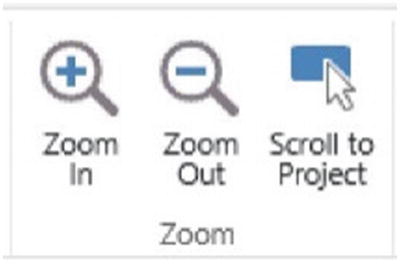 Figure 13-8
Projects:Zoom group options
Zoom In and Zoom Out – Allow you to show a smaller/larger time increment on the timescale
Scroll to Project – Moves the timescale to the area on the Gantt Chart containing the bar for the selected project
The options shown in the Projects:Data group dropdown menus provide tools to help you isolate the data you need.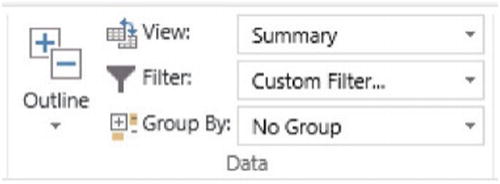 Figure 13-9
Projects:Data group options
Outline – Provides options for adjusting the level of detail you wish to display in the projects listed in the Project Center.
View – Allows you to customize the appearance of the Project Center list.
Filter – Allows you to select built-in filters, create a custom filter, or turn on Auto-filter.
Group By – Groups projects by any field in the selected view to three grouping levels; Clear All returns you to the default no group.
Other Project Center features of note include the following.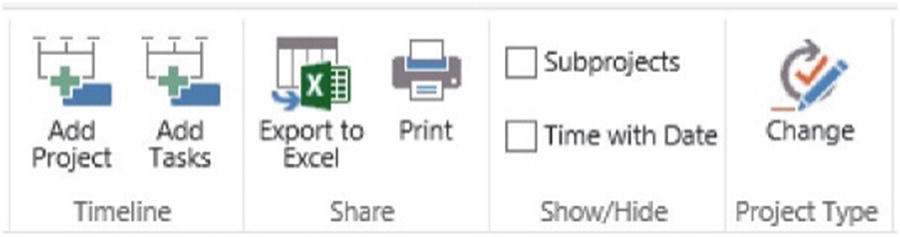 Figure 13-10
Additional Projects ribbon options
Add Project and Add Tasks – Add projects and tasks to the timeline, just as in Microsoft Project Professional.
Export to Excel – Exports the data displayed in the grid to Microsoft Excel.
Print – Prints the data as it is displayed in the grid.
Show/Hide Subprojects – Displays subprojects in the Project Center; if you have a master project, this will display its associated subprojects.
- Show/Hide Time with Date – Changes the display for all dates to also include time, as in the following figure.
 Figure 13-11
Show Time with Date
Change:Project Type – Allows you to update the enterprise project type associated with the project, including the workflow, pages, and custom fields.
- Clicking a column name sorts the projects by the entries in that field in ascending or descending order.
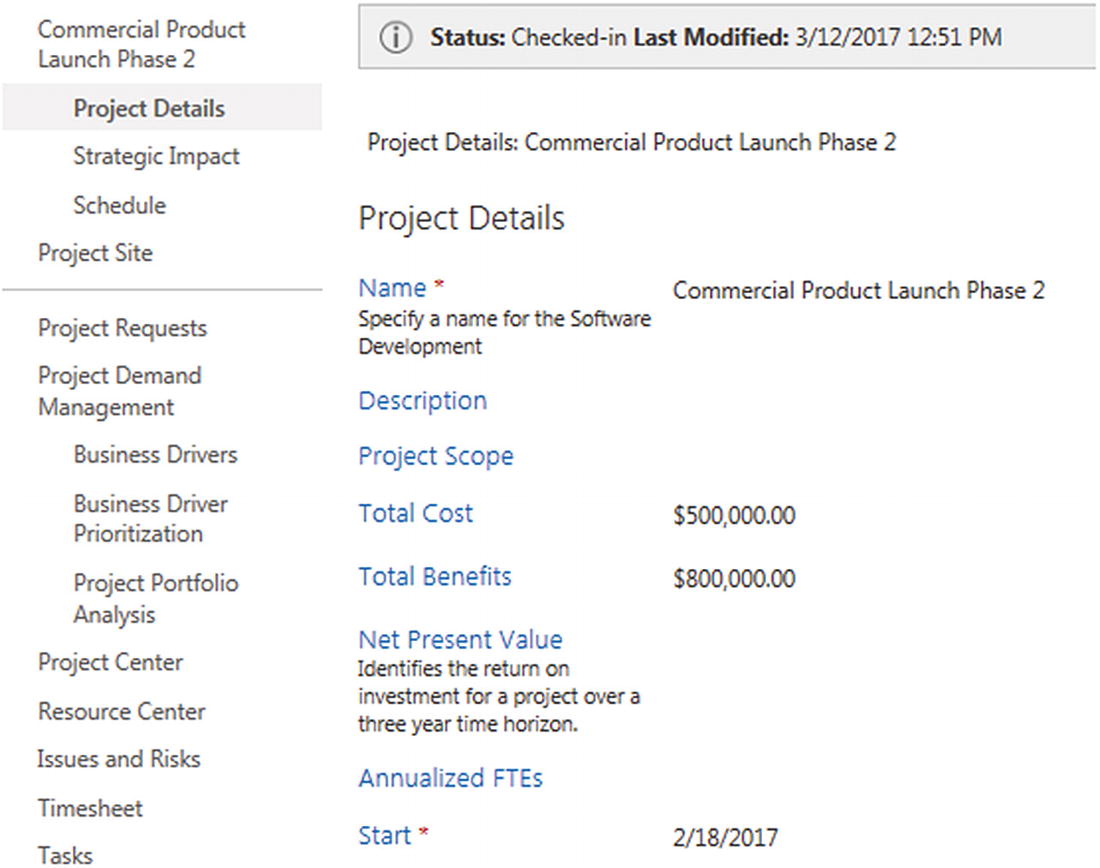 Figure 13-12
Commercial Product Launch Phase 2 Project Details page
Clicking a project name opens a Project Details page where the user can see a series of predefined views of data for that single project. The commands in the toolbar are similar to those in the Project Center.
To exit the Project Details, click Project Center in the left navigation links.
- Clicking the empty box to the far left of the Project Name column allows you to select that row’s project. This is necessary when you’re performing functions on a specific project.
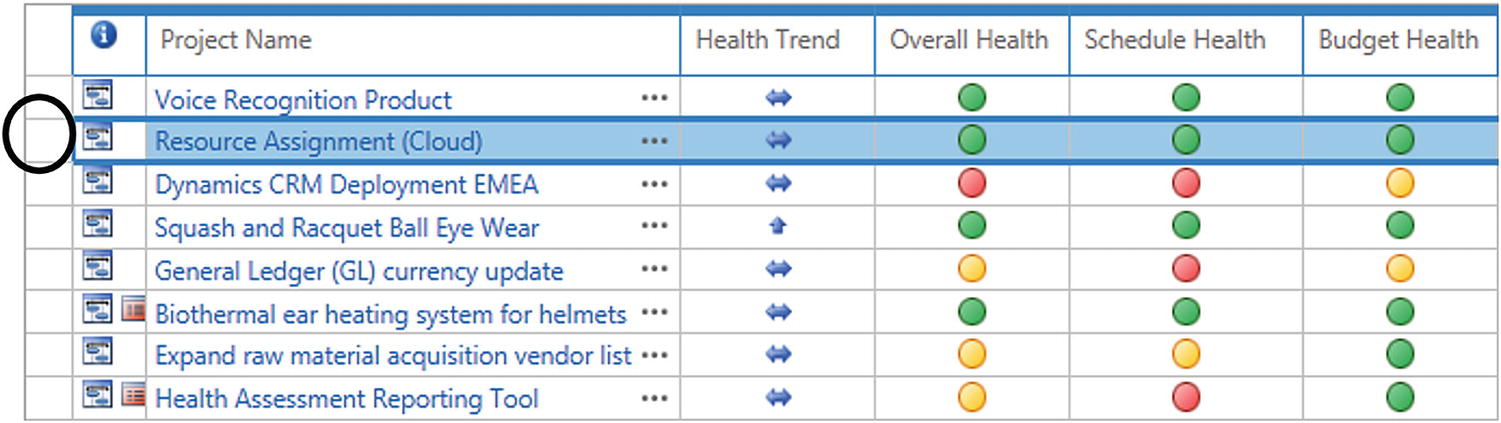 Figure 13-13
Selecting a project
- Clicking the Browse tab displays a Search this site field, as displayed in the following figure. This functionality allows you to search for content across the site.
 Figure 13-14
Project Center Search tool
13.3 Team Builder
In many organizations, the process for determining the team that should work on a project is separate from the process that defines the tasks in the work breakdown structure. There are team building functions in both Microsoft Project Professional and Project Web App.
- 1.
Click the Projects link in the sidebar to navigate to the Project Center page.
- 2.
From the Project Center page, click a Project Name to open the Project Details page for that project.
- 3.Click the Project tab to display the Project tab options.
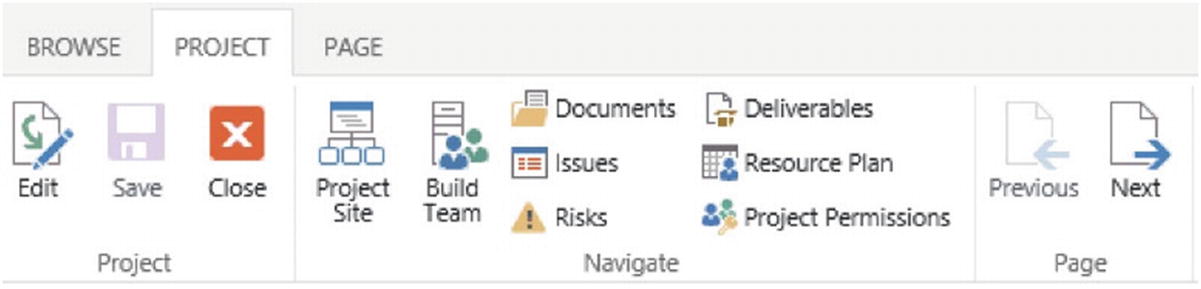 Figure 13-15
Project tab options
- 4.From Project:Navigate, click the Build Team icon [
 ]. The resulting view (similar to the following) will display the current project team (if any) for the selected project and the resource pool.
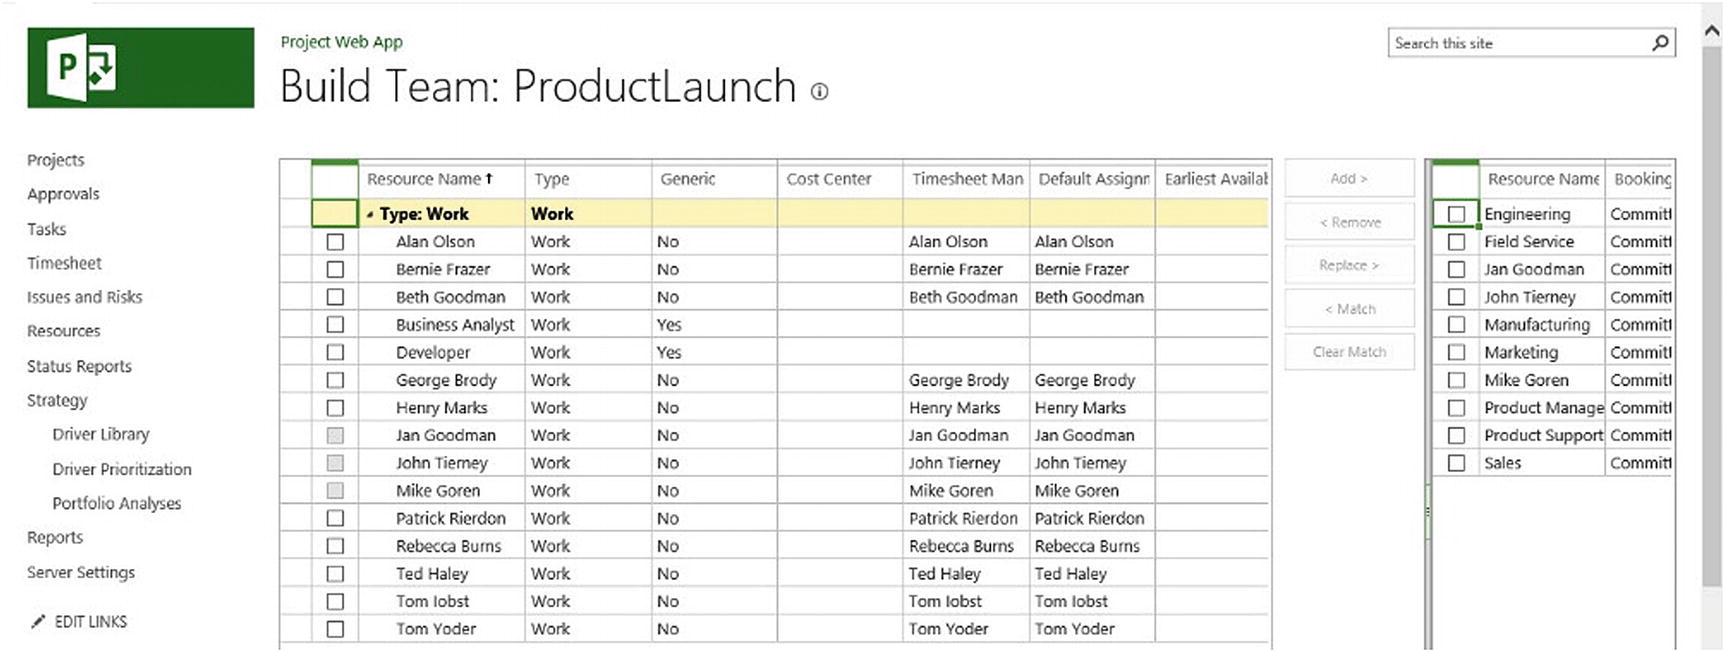 Figure 13-16
Build Team page
From this view, you have the following options:Add – Adds selected name(s) from the resource pool to the project team; the selected names will become grayed out in the resource pool.
Remove – Removes selected name(s) from the project team.
Replace – Replaces the selected name from the project team with the name from the resource pool; if the team member is assigned to any tasks, using Replace assigns the replacement resource to those tasks.
Match – Filters the displayed list of resource pool names to show only those with the same selection attributes as the selected project team name.
- Clear Match – Clears the filter from Match to display the entire resource pool.
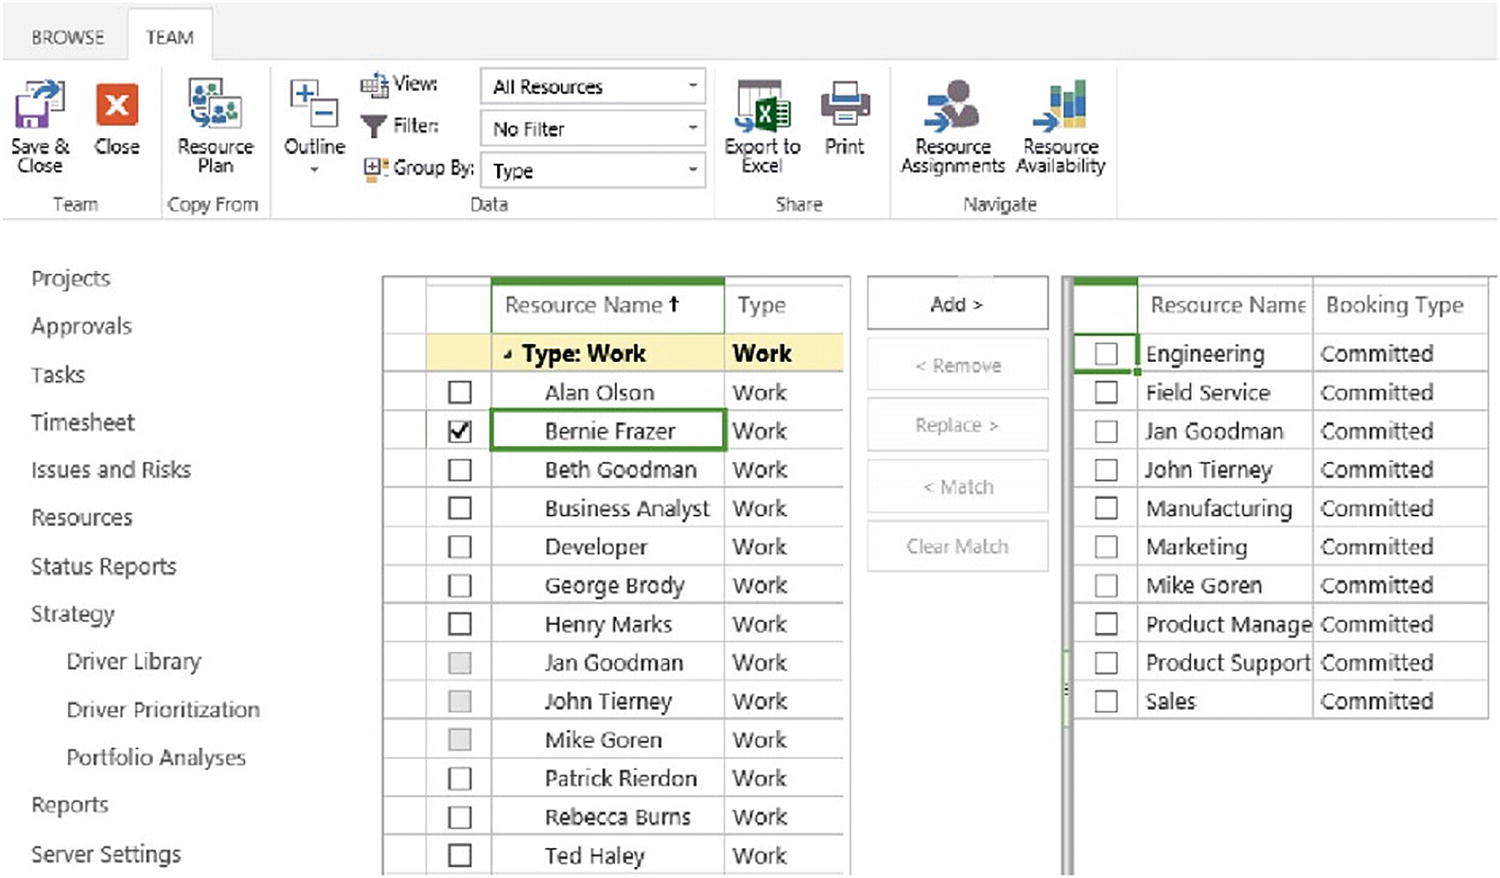 Figure 13-17
Select the names from the Resource Name to be added, from the Project Team to be removed, or one from each to replace the team member
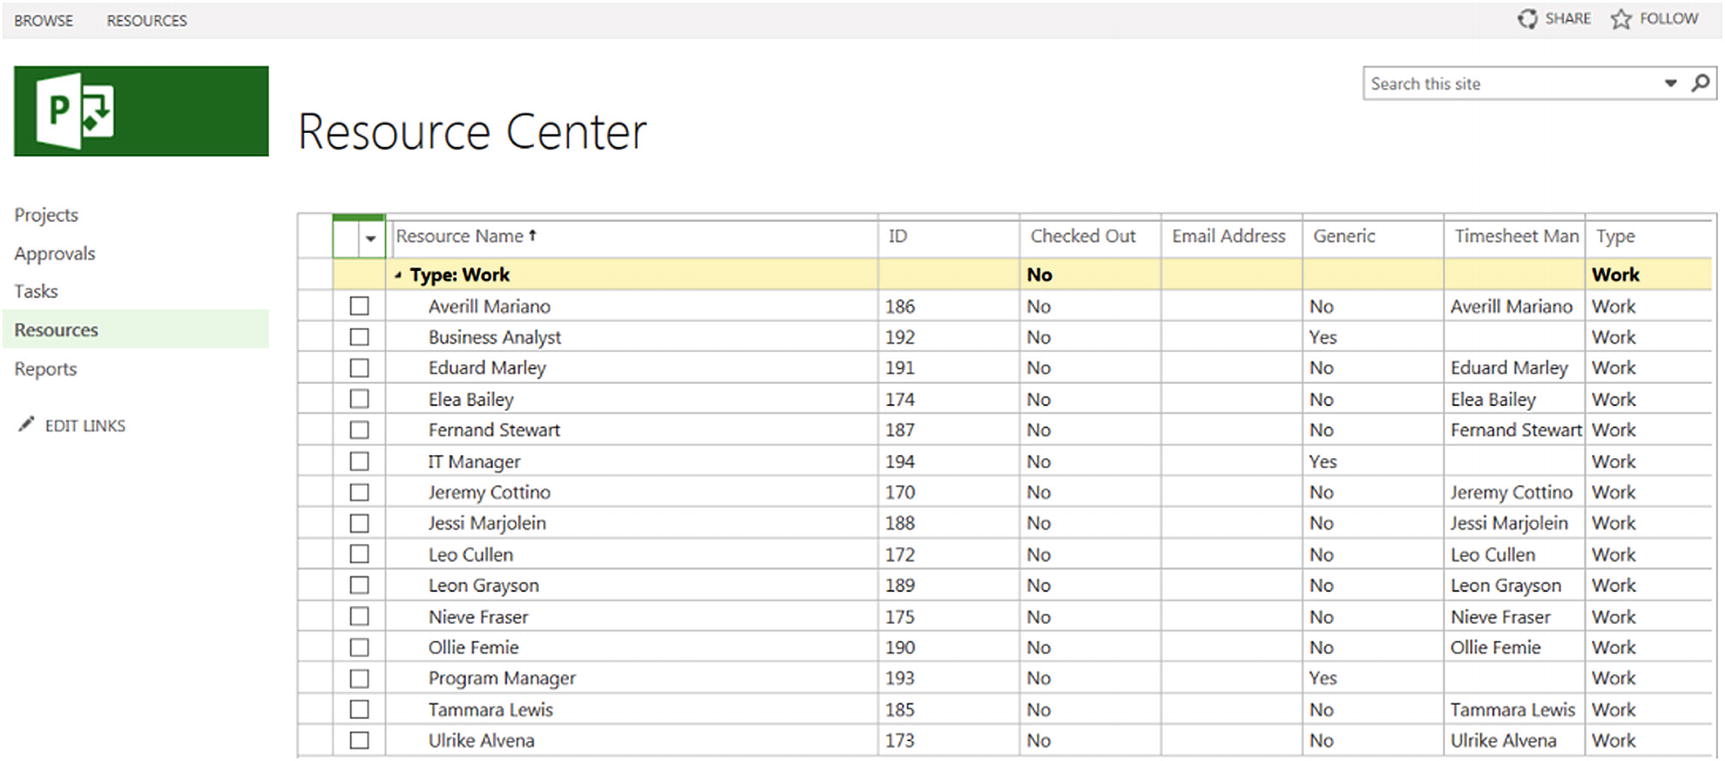 Figure 13-18
The Resource Center
- 5.
Once you have built the appropriate team using the functions noted earlier, click the Save & Close option that is under Team:Team.
13.4 Resource Engagements
A project’s initiation and planning stages may include an evaluation or approval step before a project is ready for execution. Resource planning is a helpful technique when developing a rough estimate of the resource load and cost of a project. These estimates provide high-level resource demand information at the project level.
Resource engagements is the way project managers and resource managers come to agreement on resource allocations. The resource engagement feature substitutes the resource plan feature you might know from older versions of Project Online or Project Server (pre-2016).
Checking Assignment Attributes
Before using resource engagements, resource managers have to assign resources that require approval to projects.
- 1.
To access the Resource Center, click the Resources link in the Quick Launch sidebar of the Project Web App Home page.
- 2.
Under the Editing tab, click Edit Resource. This will bring up the Edit Resource page.
- 3.Under Assignment Attributes, you will find Resource requires approval for all project assignments, as shown in the following figure.
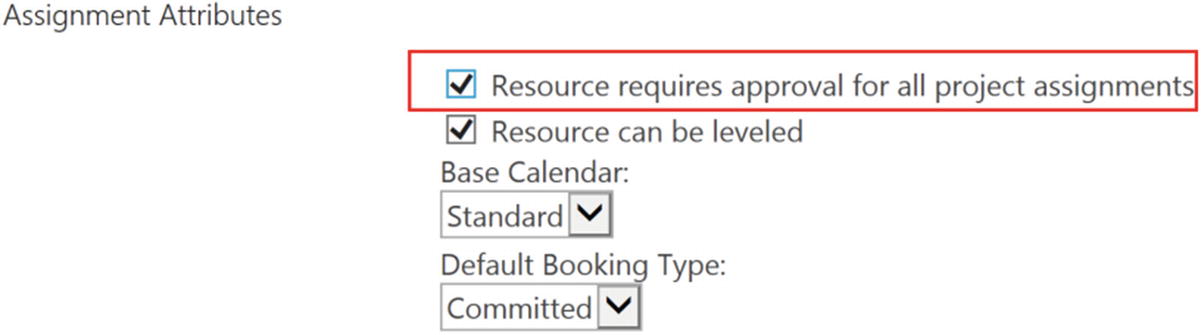 Figure 13-19
Property to define if resource requires approval
The Resource Engagement option will also need to be activated by your Microsoft Project Online administrator under Server Settings.
Resource engagements look and operate differently depending on the user’s role. The following exercises will show how to request, assign, and manage resource engagements from both ends.
13.5 Resource Engagements from the Project Manager’s End
Creating Requests Using the Task and Engagement Inspectors
- 1.From Task:View, click the arrow next to Gantt Chart and select the Resource Plan view. If you have, for the selected project, existing resource engagements or migrated resource plans, you can see their status.
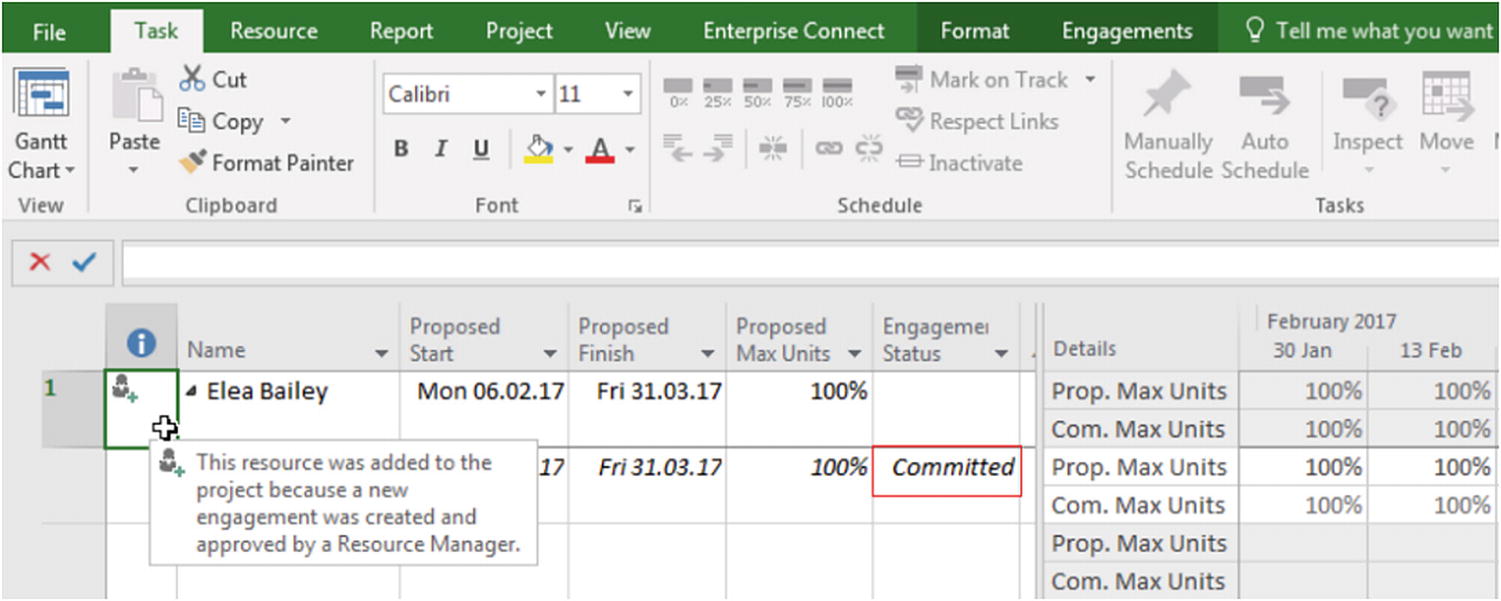 Figure 13-20
Viewing resource engagements and their status
When in Project Professional, the Engagements tab is available, as shown in the next figure.
Note Resource engagements are only available on Microsoft Project Professional 2019 or Microsoft Project Professional for Office 365, connected to Project Online or Project Server 2019. Project Standard 2019 does not support resource engagements.
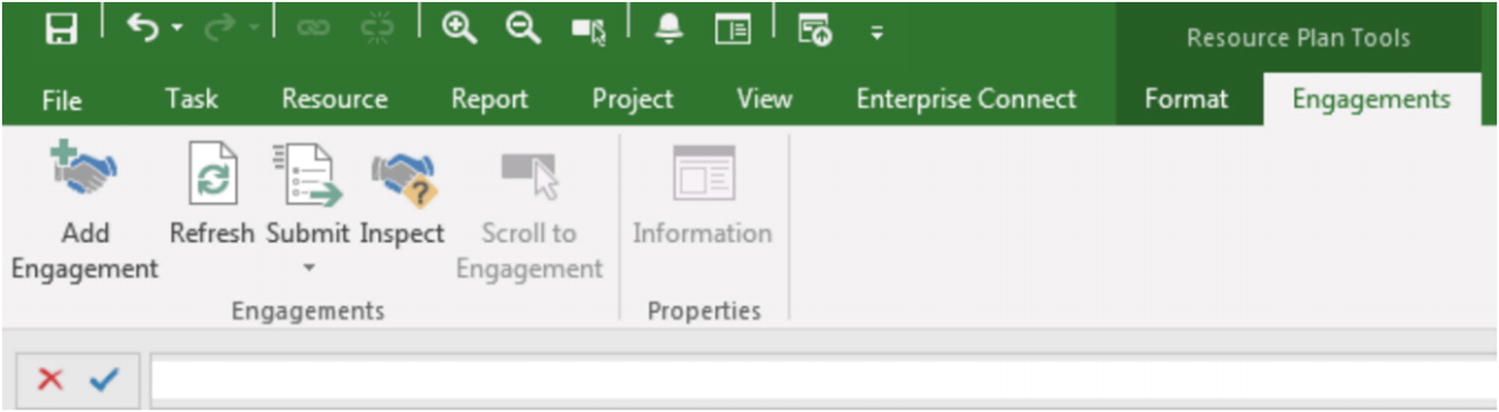 Figure 13-21
Engagements tab
- 2.
Now it’s time for the project manager to do the planning and assign resources to tasks. The project contains one engagement for user Elea Bailey and two simple tasks. You build your team from the enterprise resource pool. On the Resource tab, click Add Resources:Build Team from Enterprise….
Or add the resources to your Resource Sheet view as displayed in the following Project resources list.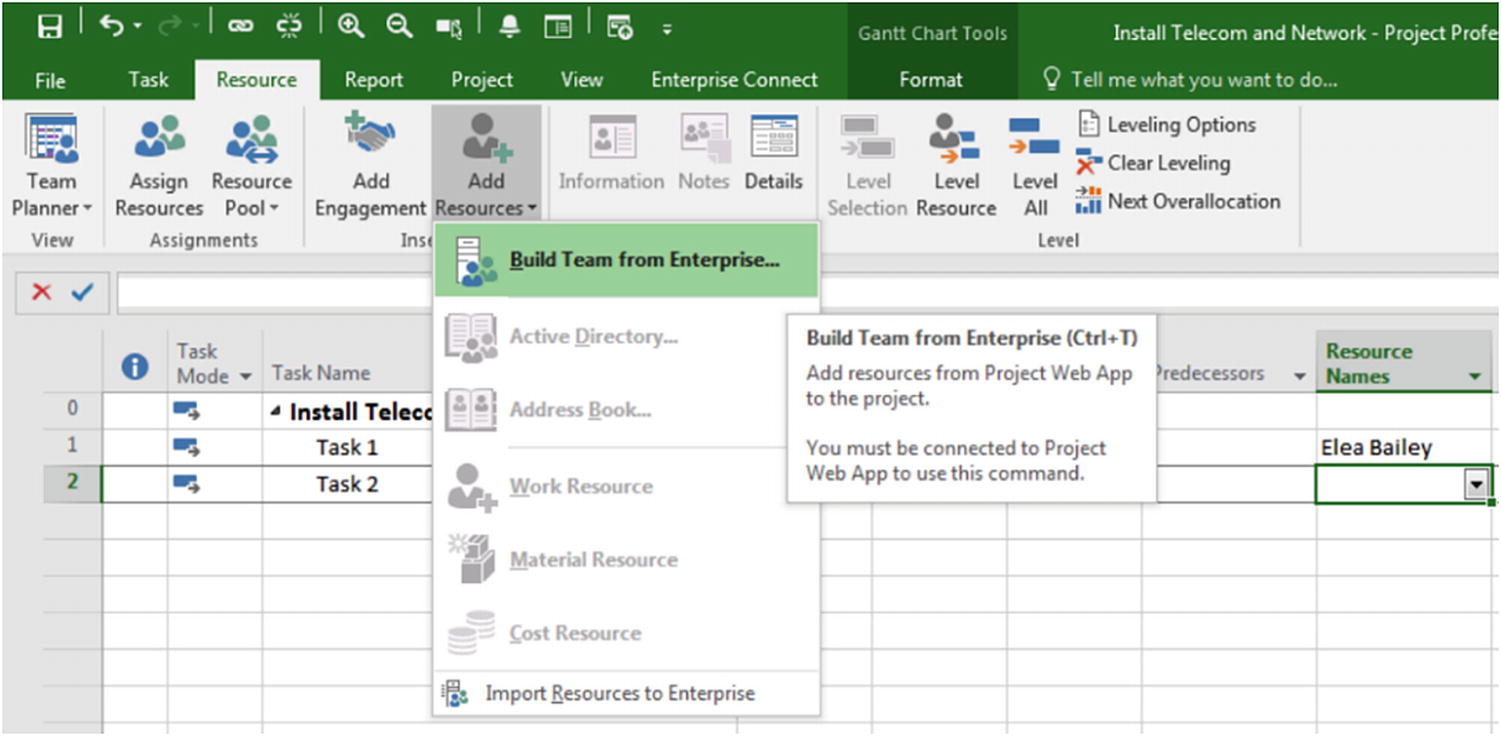 Figure 13-22
Build Team from Enterprise…
- 3.Select two more resources, both requiring approval.
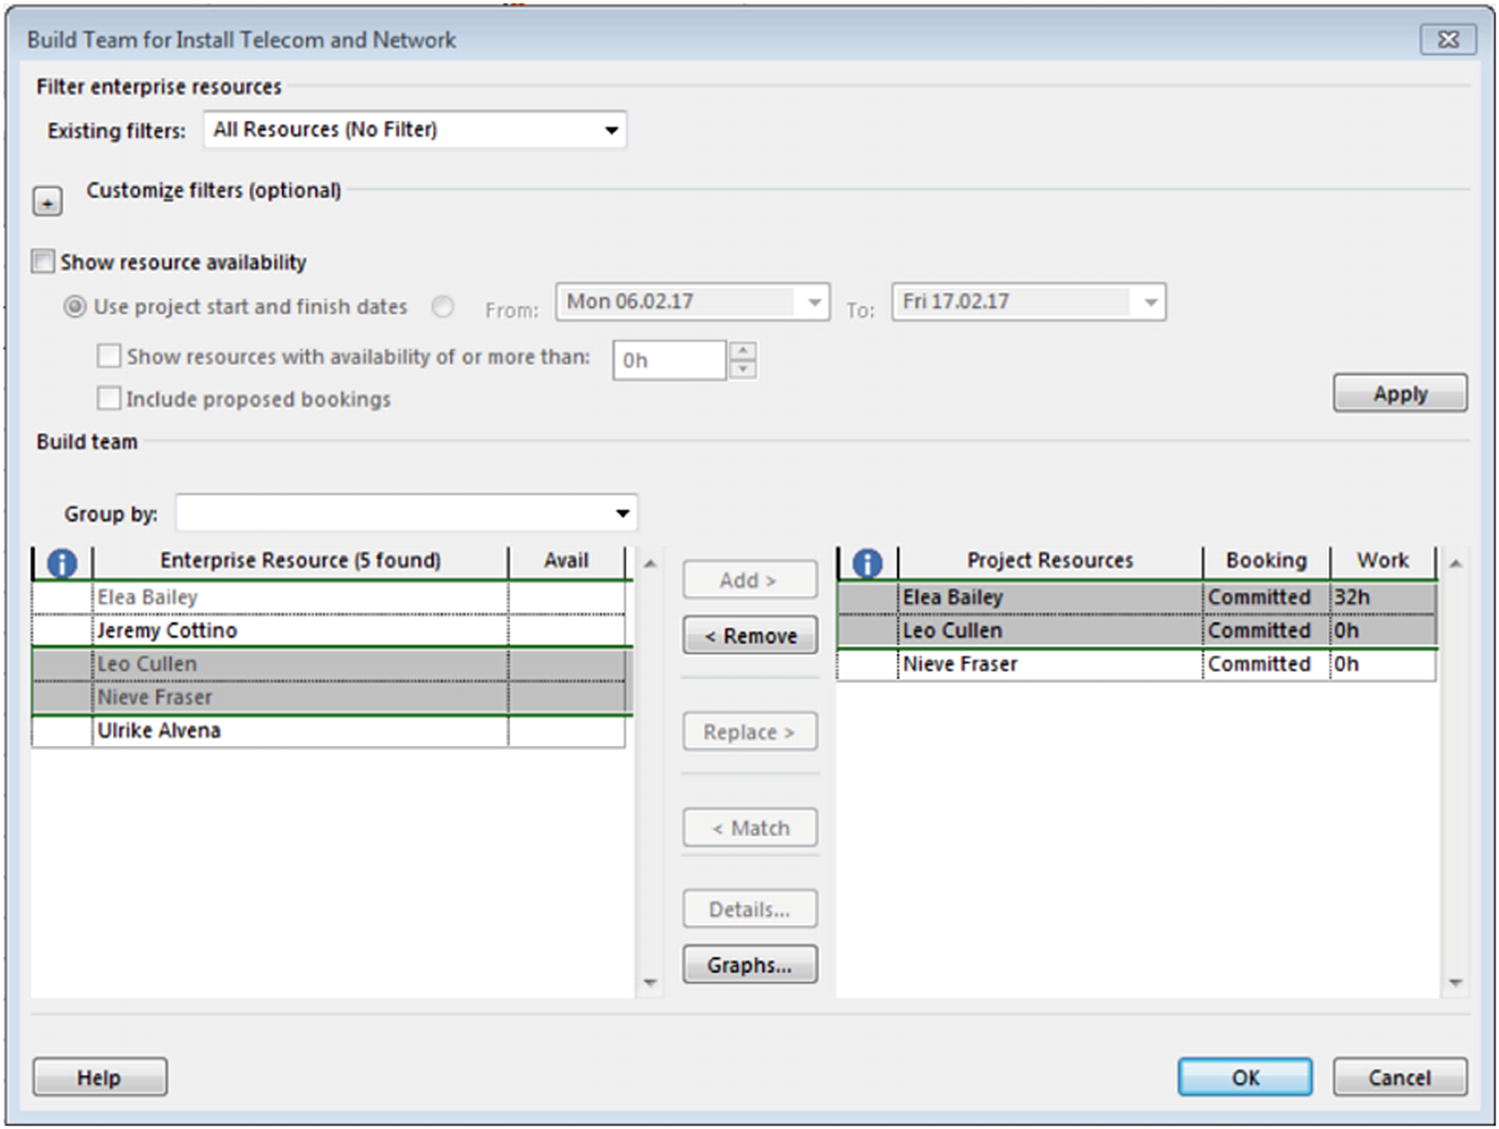 Figure 13-23
Build Team dialog box for a given project
- 4.
Assign Elea Bailey to the first task. Since she is already committed via a resource engagement, there is no specific action to perform.
Now assign Leo Cullen to the second task. Notice the warning message on the indicators column: An engagement is required for this resource. Figure 13-24
Engagement error indicator
- 5.To resolve this problem, right-click the icon and select Fix in Engagement Inspector.
 Figure 13-25
Opening engagement inspector
- 6.The engagement inspector opens in a pane on the left side of your screen. Click View engagement conflict in Task Usage.
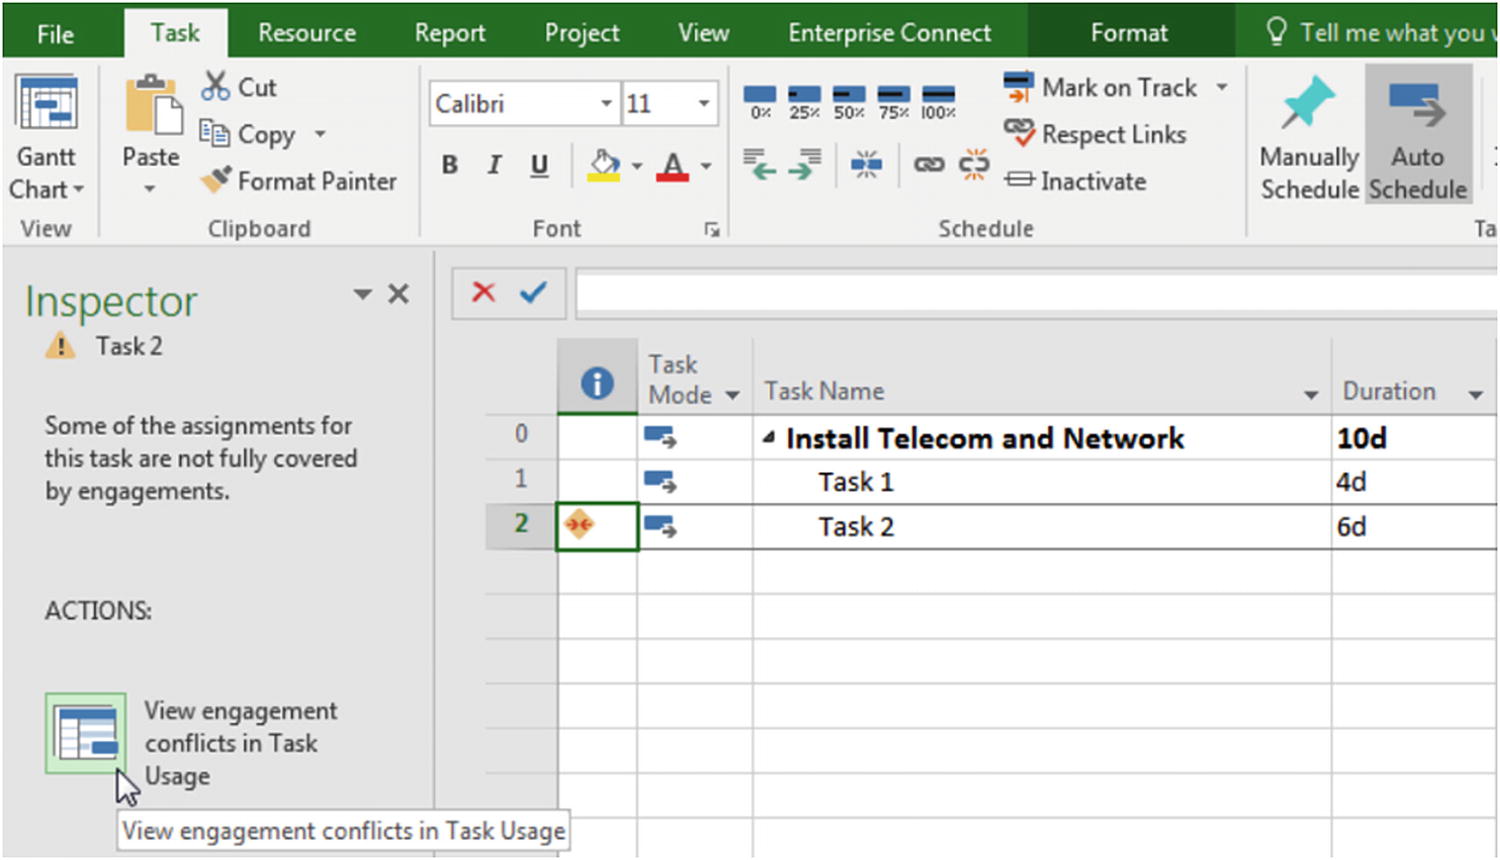 Figure 13-26
Engagement inspector pane with mouse over View engagement conflicts in Task Usage
- 7.The Task Usage screen will display with Leo Cullen highlighted and a message in the Inspector pane that says “This task assignment is outside of the boundaries of an engagement.” This means the assignment of Leo Cullen on Task 2 is not covered by a committed resource engagement.
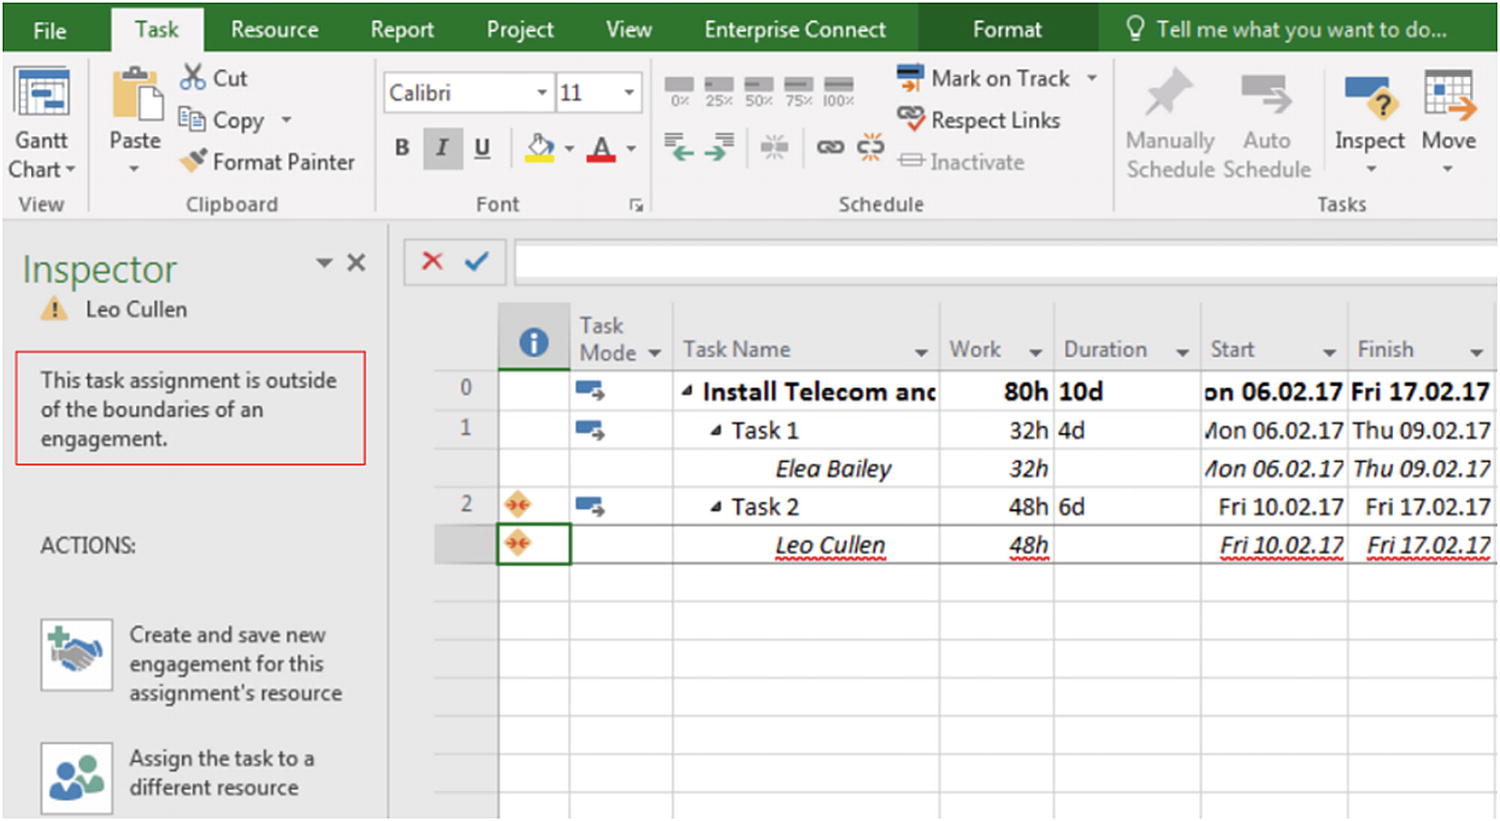 Figure 13-27
Task Usage screen with engagement conflict highlighted
Note The indicator for “This task assignment is outside of the boundaries of an engagement” [
 ] displayed on the Gantt Chart view is not displayed on the Resource Plan view.
 - 8.To create a new engagement, you can right-click the icon and select Create New Engagement. Alternatively, you can click the button Create and save new engagement for this assignment’s resource on the inspector pane.
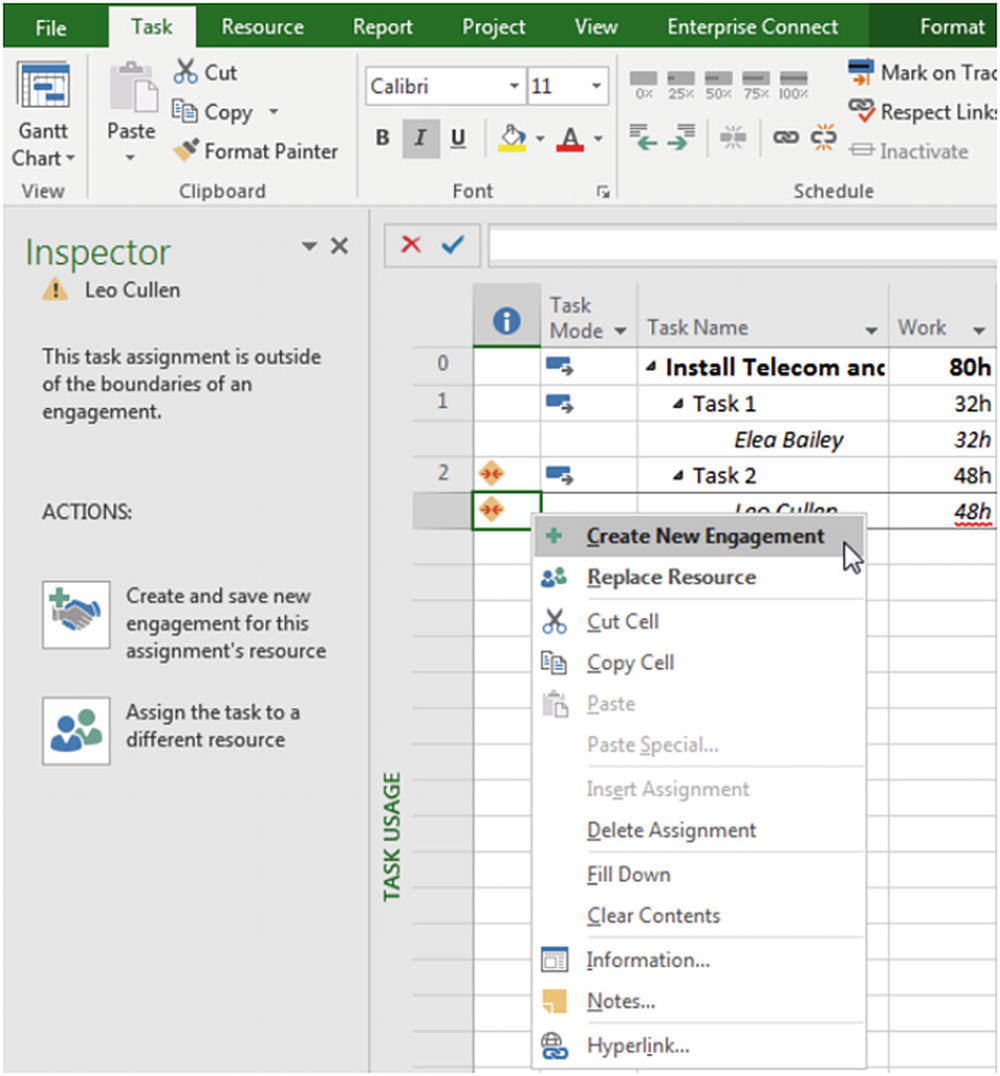 Figure 13-28
Creating a new engagement using right-click method
- 9.Set the engagement information following the example in the following figure. Enter the comment “Need Leo on this project to perform Task 2” for the resource manager who will review the request. Click OK.
 Figure 13-29
Engagement Information dialog box with adjusted information
- 10.The request is created as draft and needs to be submitted. Click Submit my engagement for review.
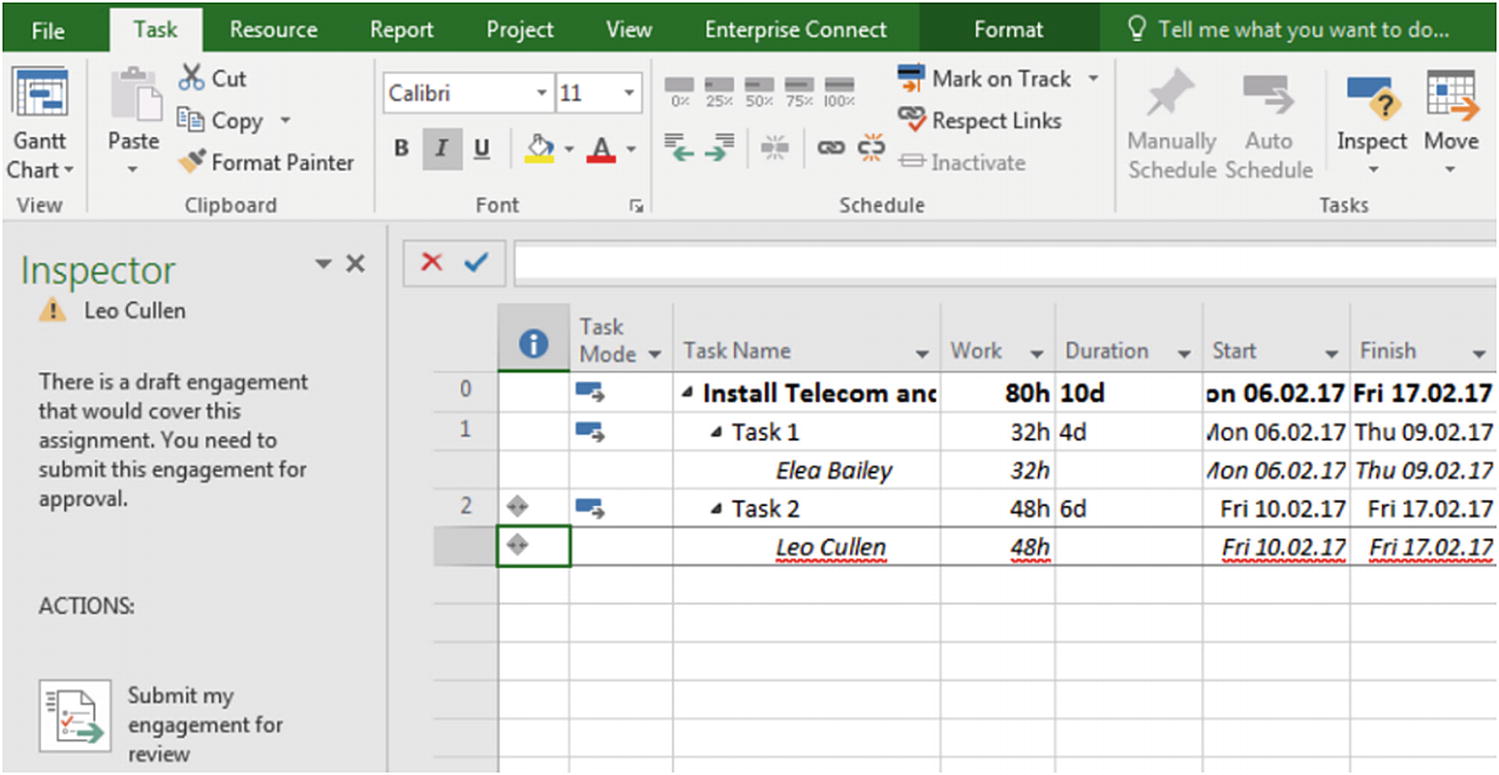 Figure 13-30
Submitting engagement
- 11.After the request is sent, assignment status is updated to “Proposed.”
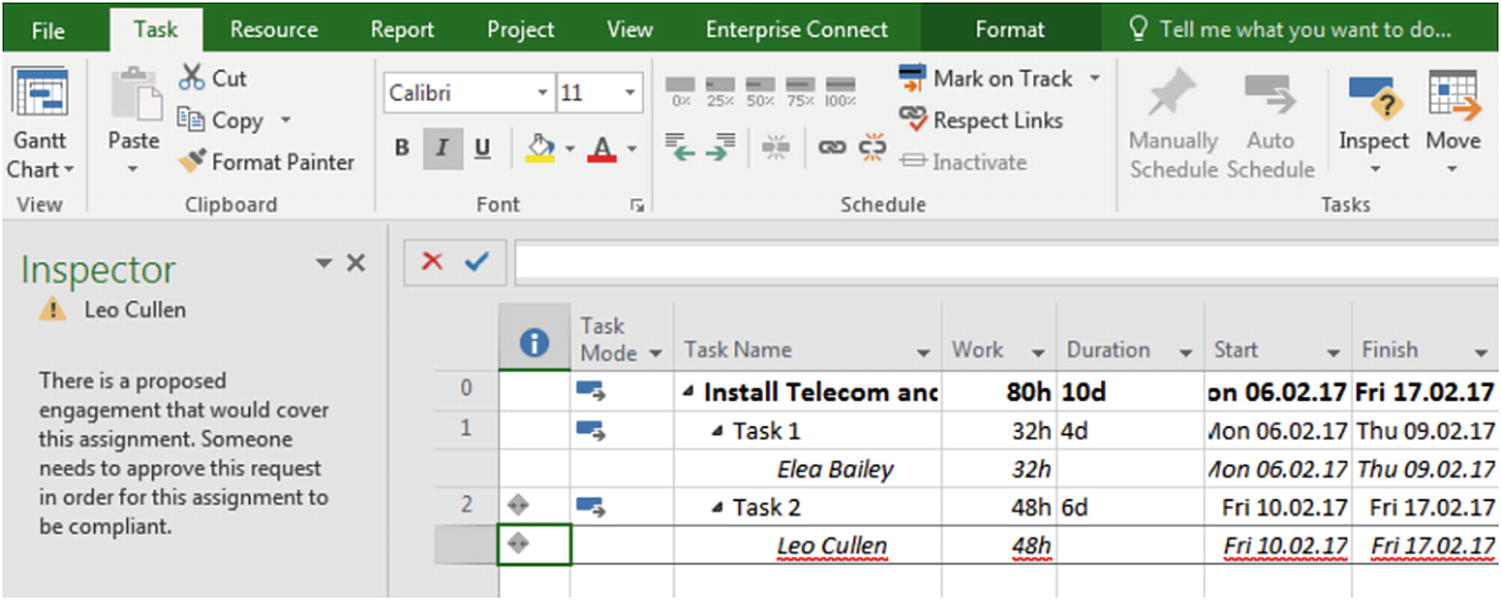 Figure 13-31
Proposed engagement
If you check on the Resource Plan view, you can see the “Proposed” status. The note (icon on the indicators column) contains the comment you set on the engagement request.
There is no need to publish or check the project in for the request to be sent.
Manually Creating Requests
- 1.
Go back to the Resource Plan view, and click Engagements:Add Engagement.
- 2.
The Engagement Information dialog box pops up. Fill in your request with the resource name, a description if required (this will be displayed into the Name field on the input table), start and finish dates, and finally the requested units (percentage) or work. You may put a comment for the resource manager who will review the request.
- 3.Click OK. The resource engagement is created with a status “Draft.”
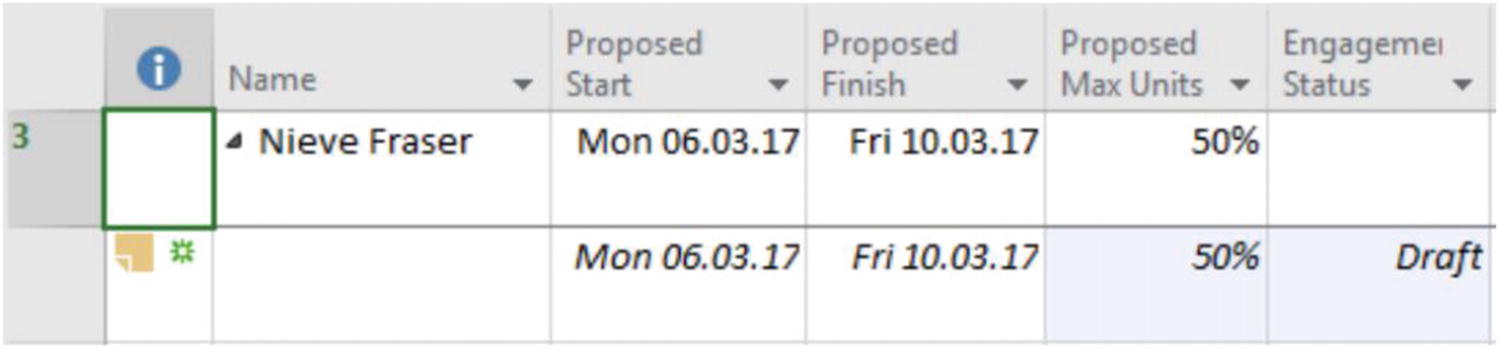 Figure 13-32
Resource engagement created with status “Draft”
- 4.Select the newly created resource engagement, and click Engagements:Submit:Submit Selected Engagements (in this case, you can also choose to Submit All Engagements).
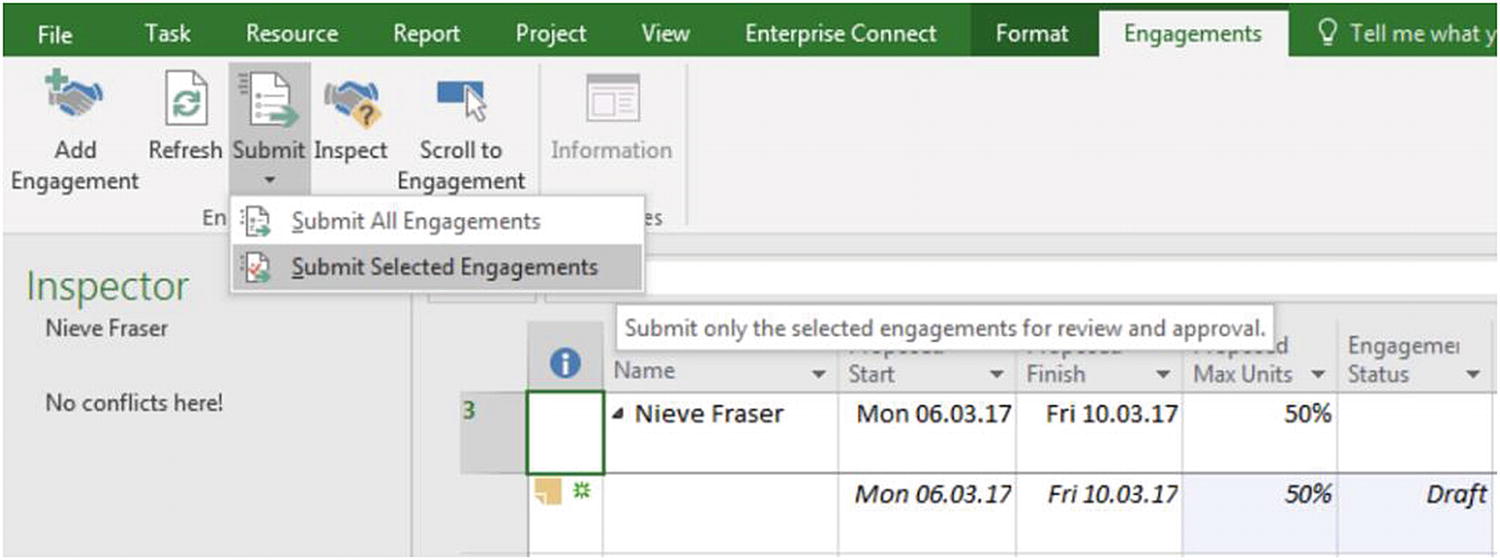 Figure 13-33
Submitting resource engagement
- 5.
The resource engagement status is updated to “Proposed.”
Creating the resource engagement from the Task Inspector or manually does facilitate the request creation, but the amount of work requested is spread evenly across date ranges. You can decide to split the work differently by manually creating the resource engagement.
Before submitting this resource engagement, you can edit the proposed work or proposed max units by using the Timephased Data view. Figure 13-34
Resource engagement: Original split of work
 Figure 13-35
Resource engagement: Updated split of work
An indicator [![]() ] appears that says “This engagement work contour has been edited….”
] appears that says “This engagement work contour has been edited….”
You then have to submit the resource engagement request as usual.
13.6 The Resource Manager’s End
The request is sent from the project manager to the resource manager, who will accept or reject the request using Project Online. Note that there is no individual resource “owner”; all resource managers are able to review any resource engagement, no matter who the resource is.
- 1.As a resource manager, go on the Resource Center. Let’s say you want to see resource requests for Leo Cullen. Click in his cell, then click Resource Requests under Resources:Navigate.
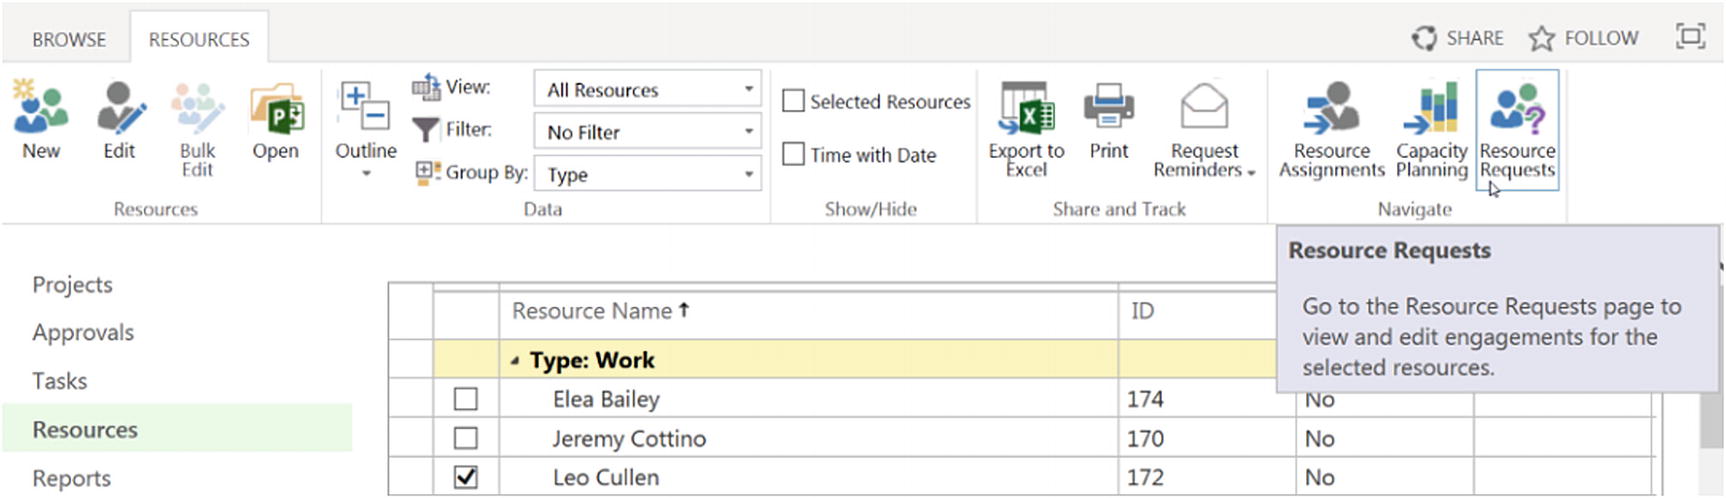 Figure 13-36
Resource Requests
- 2.The list of requests and their status is displayed, which you can view in either the Sheet or Timephased Data view. The previous request for Leo Cullen for the Install telecom and network project is pending approval with a “Proposed” state.
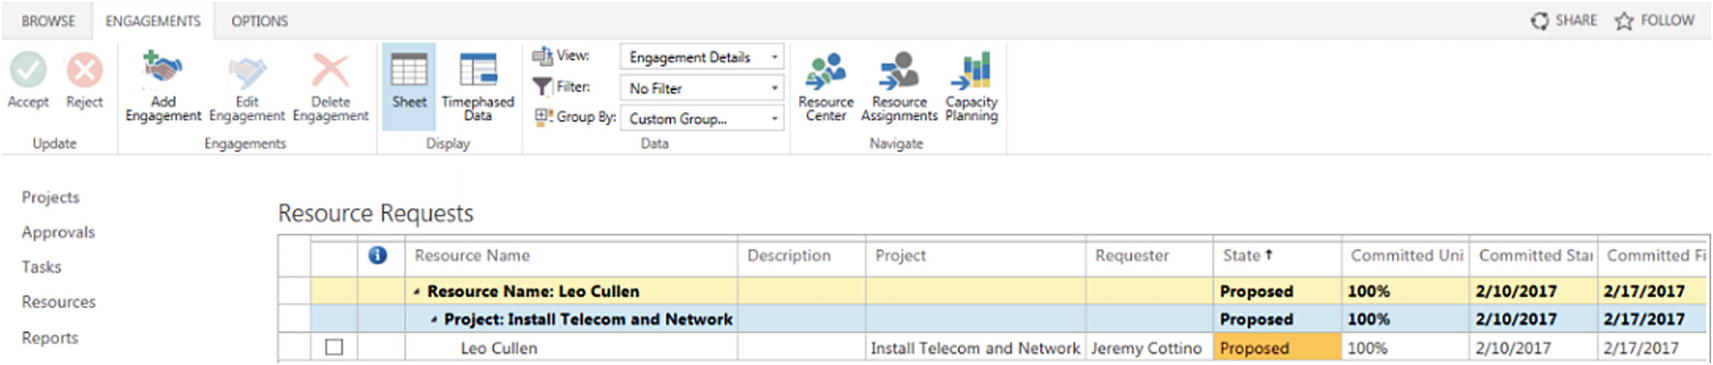 Figure 13-37
Resource engagement requests (Sheet view)
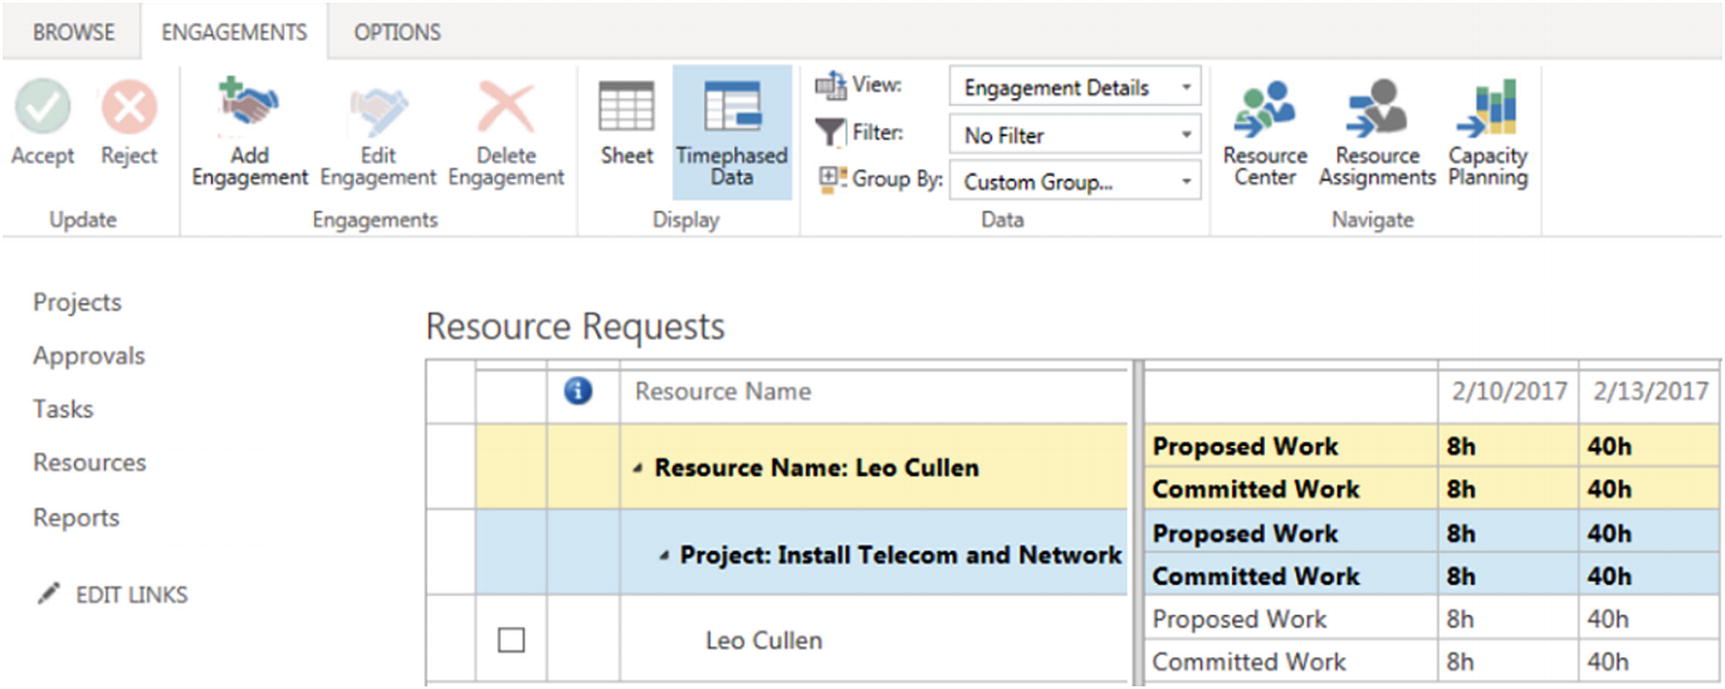 Figure 13-38
Resource engagement requests (Timephased Data view)
- 3.You can see request comments by ticking the checkbox for the proposed resource and clicking Engagements:Edit Engagement. This will bring up the Edit Engagement dialog box with comments at the bottom, as in the following figure.
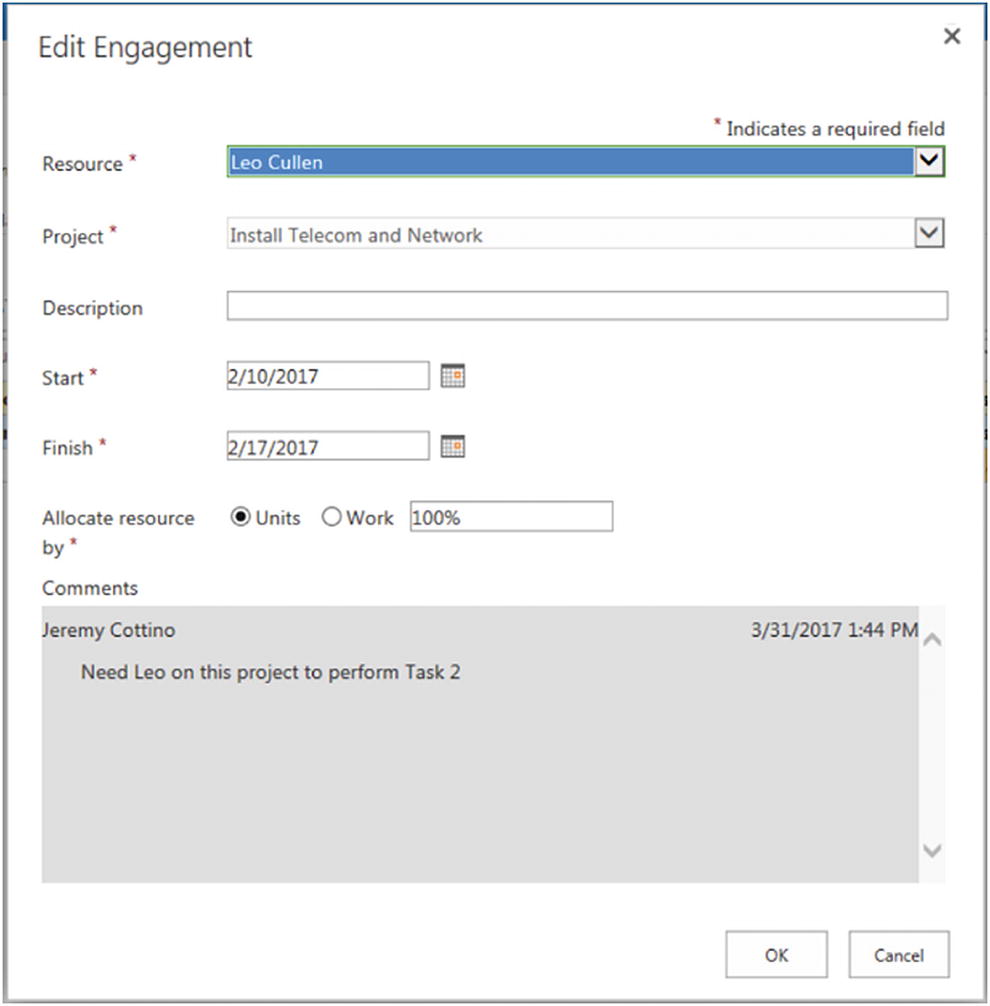 Figure 13-39
Edit Engagement dialog box
You can also update resource names, start and finish dates, and allocation information. Note: The pick list for resource names contains only resources you have selected on the Resource Center before clicking resource requests.
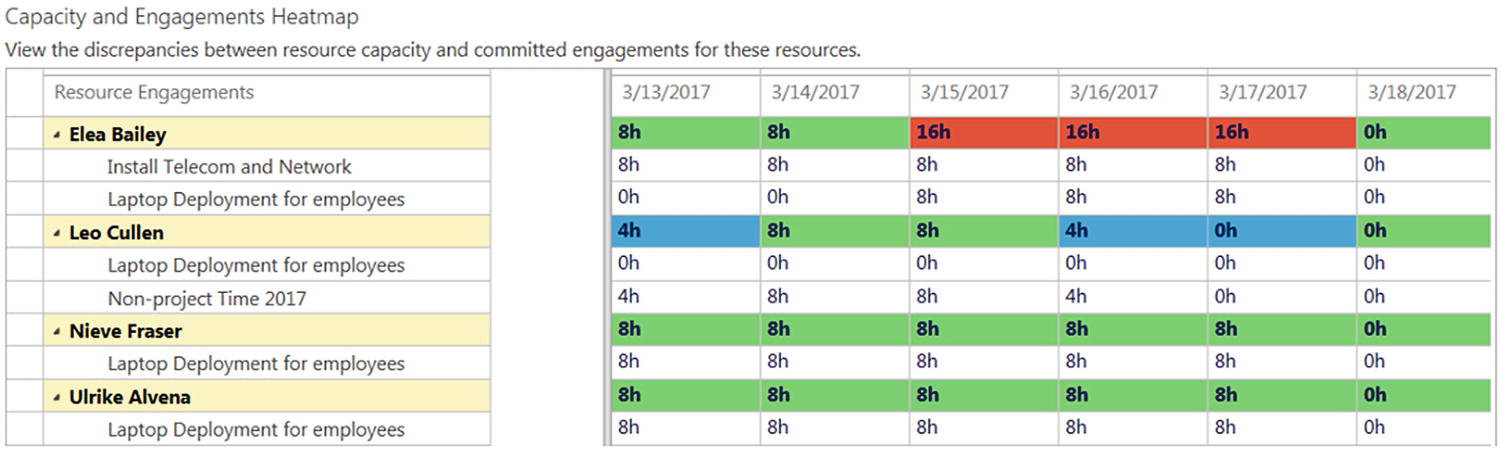
- 4.The Capacity and Engagements Heatmap allows you to see the discrepancies between resource capacity and committed engagements.
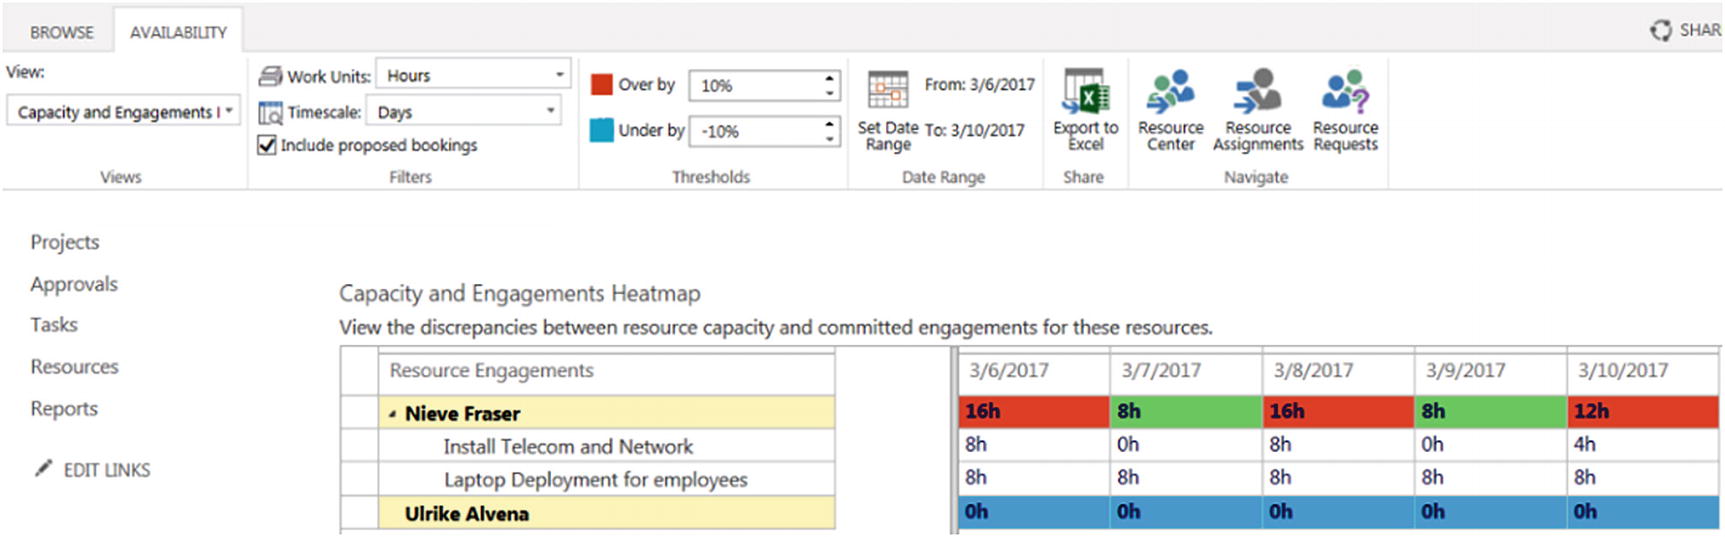 Figure 13-40
Capacity and Engagements Heatmap
In this example, we see that Nieve Fraser is not available to work on the project Laptop Deployment for employees, but Ulrike Alvena, who has the same role, has some availability in this period.
- 5.You can swap the two resources, either by editing the engagement or rejecting this one and creating a new one. (From Project Online, resource managers can create new engagements by clicking Add Engagement under the Engagements section of the Engagements tab.)
 Figure 13-41
Add Engagement
The screen to create a new engagement has all of the same fields as the one to screen for editing existing engagements, as you can see in the following figure. Figure 13-42
New Engagement page
When you select a proposed engagement, Accept and Reject actions become available on the ribbon under Engagements:Update.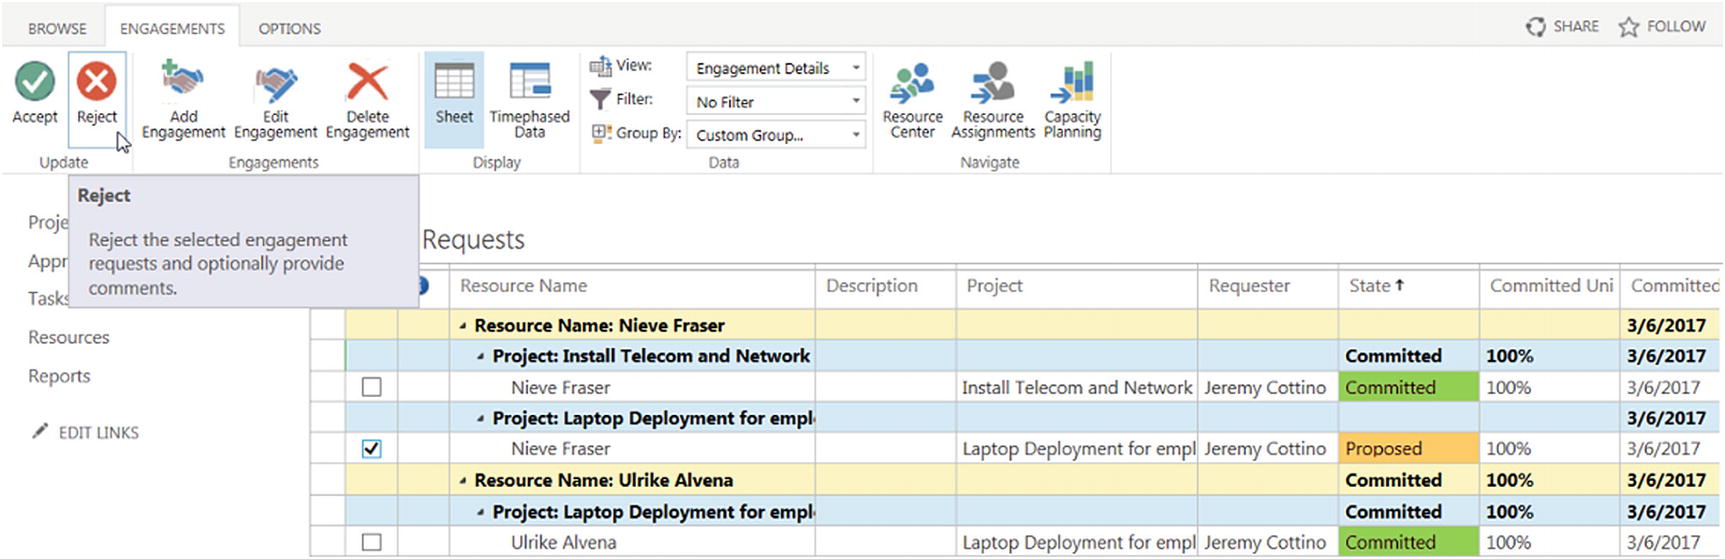 Figure 13-43
Accept or Reject engagements
- 6.Click Reject. You will be prompted with the Confirm Reject dialog box, which offers an opportunity to add a comment for the project manager who made the request.
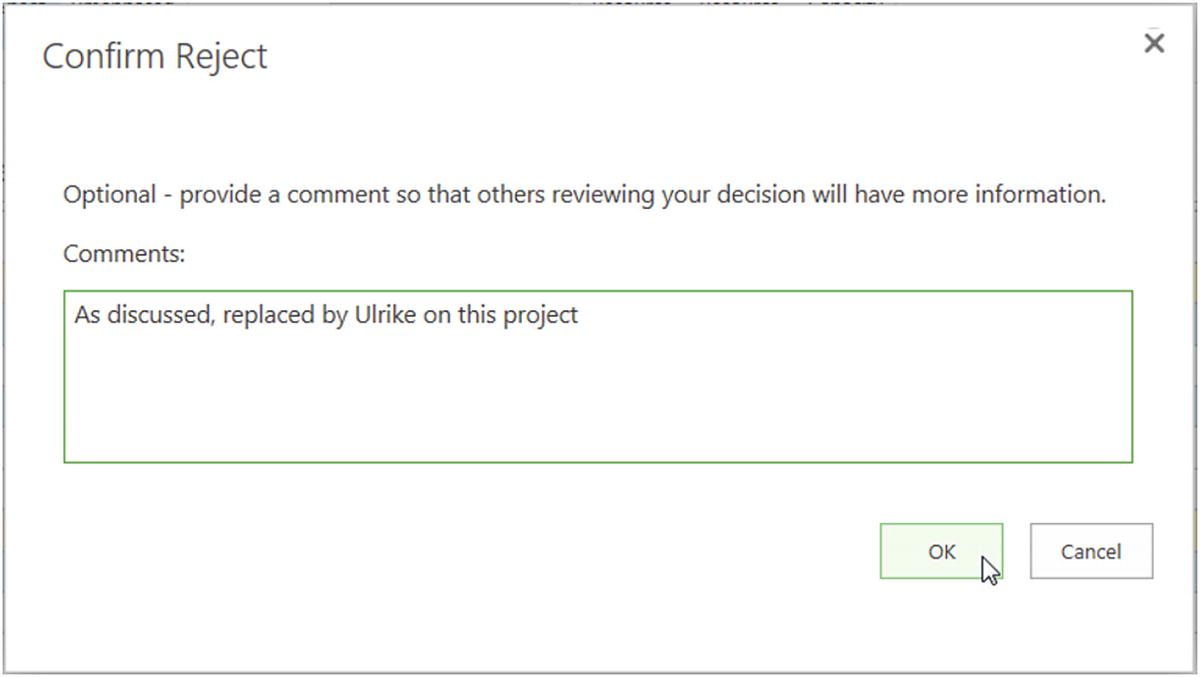 Figure 13-44
Confirm Reject dialog box with comment box
Committed (i.e., Approved)
Proposed
Draft (this only occurs when there is an engagement that hasn’t been submitted yet)
Rejected
You should be careful not to confuse the state “Committed” with regard to a resource engagement and the resource’s booking type “Committed.” A “Committed” resource engagement is an approved engagement. A “Committed” resource booking type (default booking type) is used for a resource you are 100% sure is available.
On the other hand, a “Proposed” resource’s booking type is used when you need to remove the planned workload from various calculations like portfolio optimization. This booking type is also used to remove the tasks from the resources’ My Tasks page (a best practice for closed projects) and to prevent the system from sending automated e-mails when the project is published.
13.7 Returning to the Project Manager’s View
- 1.Return to the Resource screen on Project Professional 2019. Note that you can see the rejected engagement for Nieve Fraser and the new one for Ulrike Alvena, which is already committed.
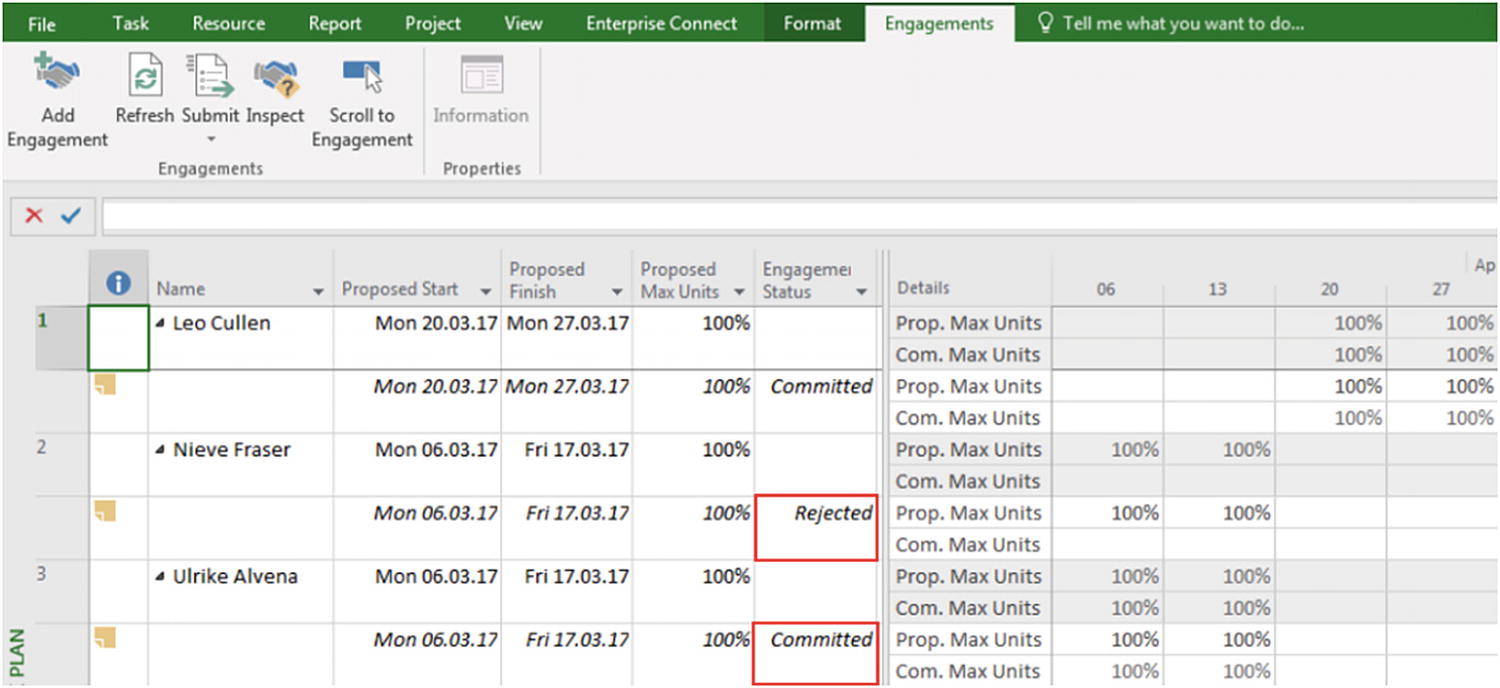 Figure 13-45
What the project manager sees after resource manager replies to requests
13.8 From a Portfolio Analysis Perspective
There are no big changes related to an assessment of resource capacity for the sake of portfolio analysis. When setting your portfolio analysis, you must be careful on how calculating resource utilization is defined.
In Project 2019, resource utilization is defined from Project Professional on the Project:Project Information form. This is a change from Project 2013 and earlier, where resource utilization was set when defining the resource plans.
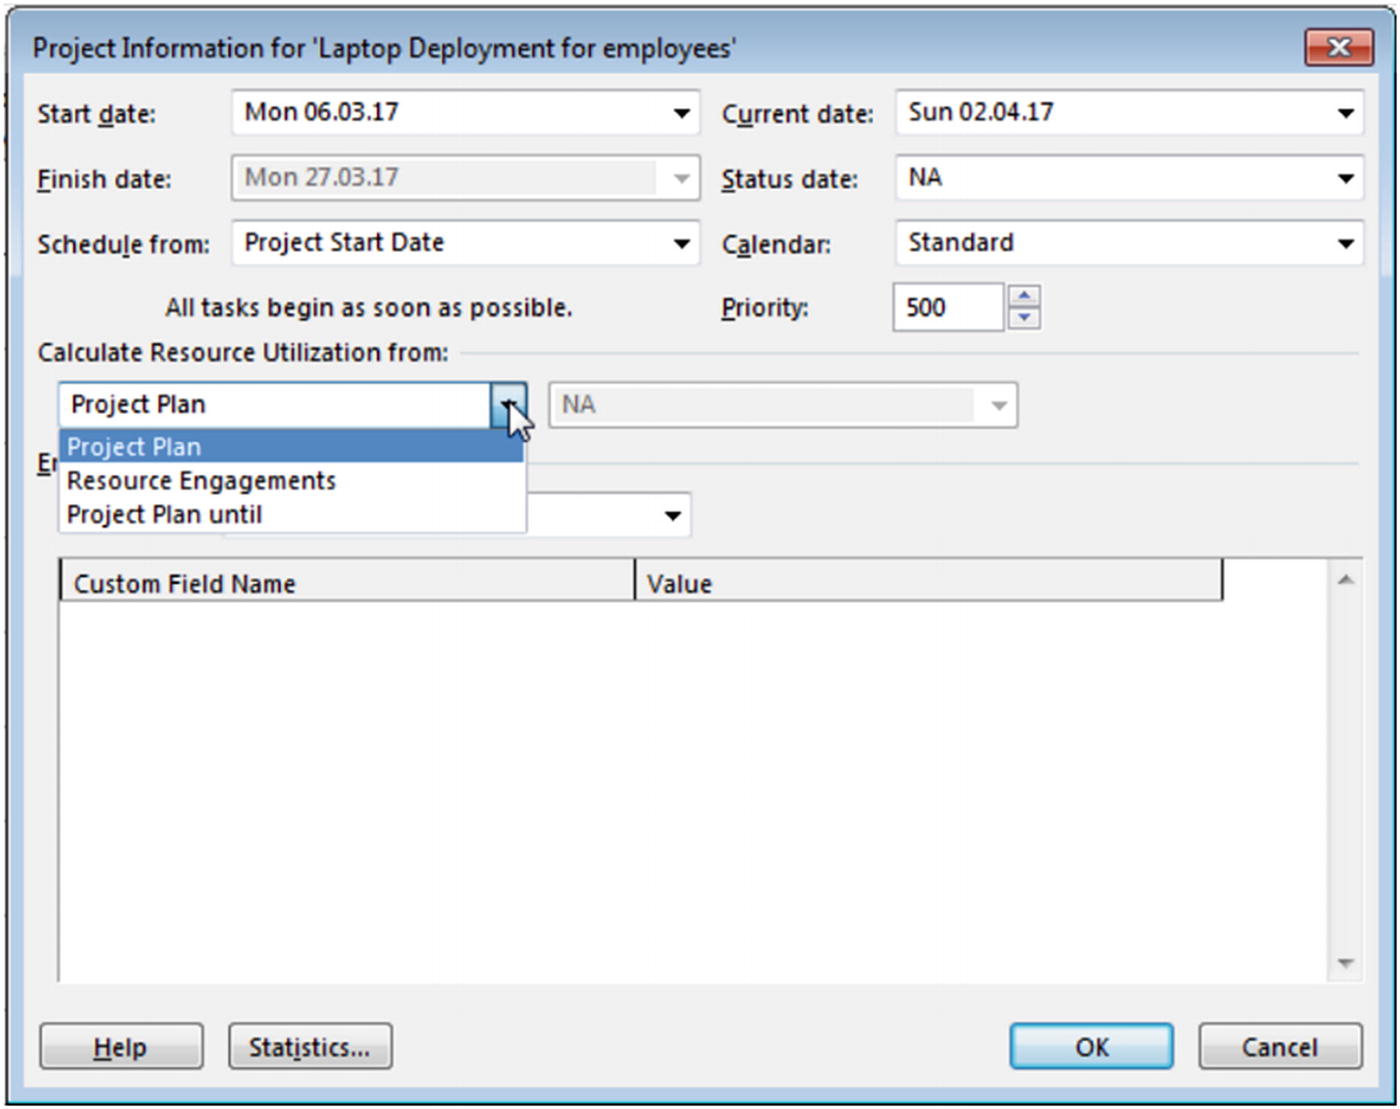
Calculate Resource Utilization from:
Project Plan – Resource workload is defined from tasks assigned to the resource in the project schedule.
Resource Engagements – Resource workload is defined from resource engagements (committed or proposed).
Project Plan until – This is used for rolling estimates. You will use resource workload defined from tasks assigned to the resource in the project schedule until the specified date (e.g., end of first phase) and resource workload defined from resource engagements for other parts (e.g., phase 2).
By default, resource utilization is calculated from Project Plan. Hence, if you have set resource engagements, you must manually select Calculate Resource Utilization from:Resource Engagements in order to use it. Otherwise, the resource utilization from Project Plan is used.
Request Reminders
- 1.In the Resource Center, select any resource. Under Resources:Share and Track, click Request Reminders:Subscribe to selected resources. A pop-up will confirm your subscription has been updated.
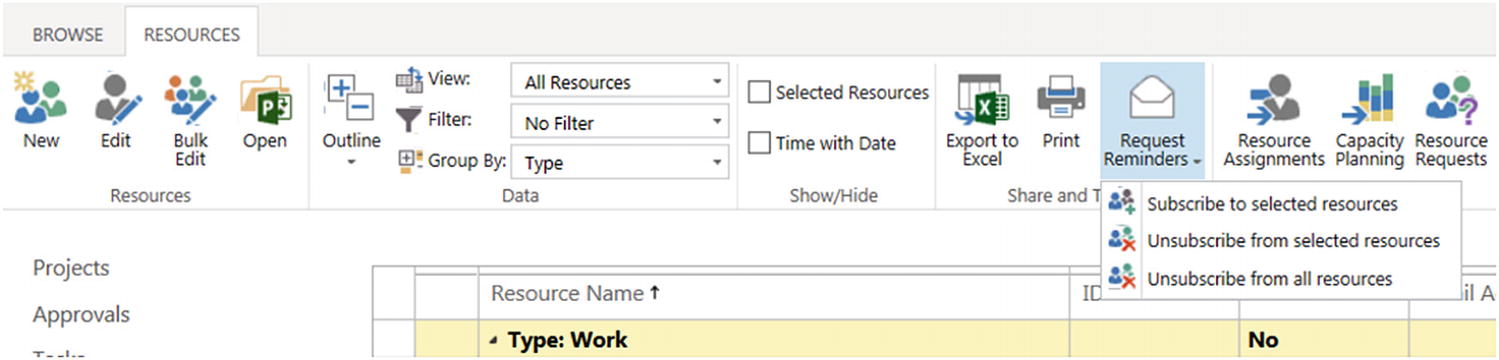 Figure 13-47
Request Reminders
- 2.Now you need to enable the e-mail alert and the frequency. Navigate to PWA Settings:Manage My Resources’ Alerts and Reminders:My Resource Requests.
 Figure 13-48
My Resource Requests
- 3.Set the frequency of e-mail alerts.
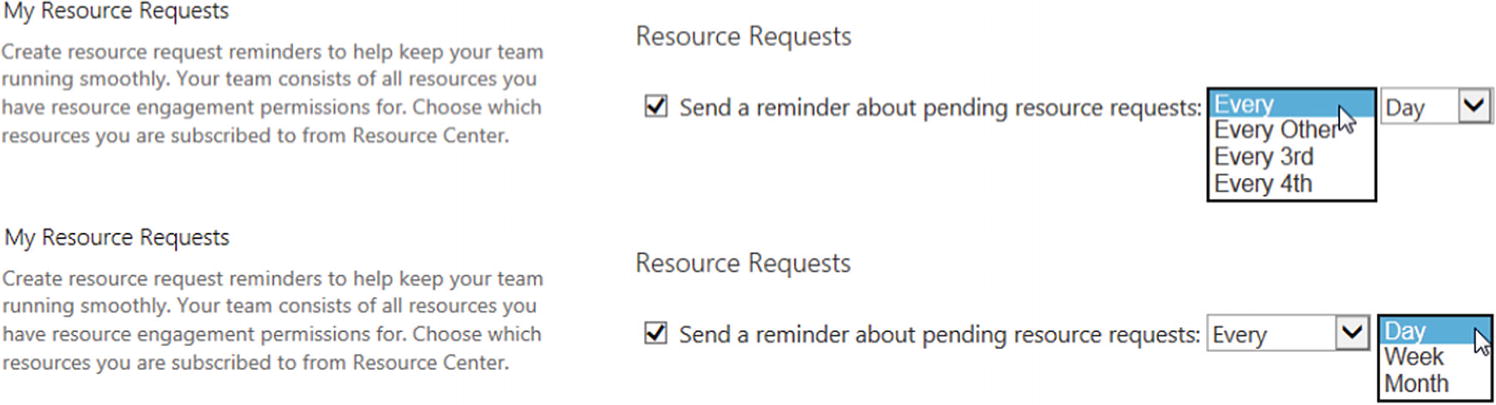 Figure 13-49
Setting reminder frequency
In order to use the request reminders feature, notifications should be turned on, on the Additional Server Settings page.

Notification Email Settings
13.9 Managing Non-project Time
Non-project time refers to activities that have an impact on the resource capacity but are not related to a specific project—for example, vacations, operational duties, sales, training, and sickness.
- Creating a separate project – You can create a stand-in project, then create a new task assigned to a specific resource to depict this non-project activity.
 Figure 13-51
Managing non-project time into a project schedule
Creating resource engagements – The resource manager can create a new engagement for his/her resource to depict this non-project activity. This is a good way to manage recurring tasks, such as operational duties (e.g., application support, help desk). The following exercise will demonstrate this option.
Using Administrative Time in timesheets – A resource can set time in the future when filling in their timesheet. This can be found in a category defined as Administrative Time. Note: This category work type must be set as “Working” if you want the time reported here to have an impact on the resource’s capacity.
Manually updating individual calendars – You can also update individual resource’s calendars for non-work time, such as vacations. This is our least recommended option, as it is not ideal for big companies with a lot of resources to manage.
Creating Resource Engagements to Manage Non-project Time
- 1.Create a new engagement by clicking Add Engagement under Engagements:Engagements.
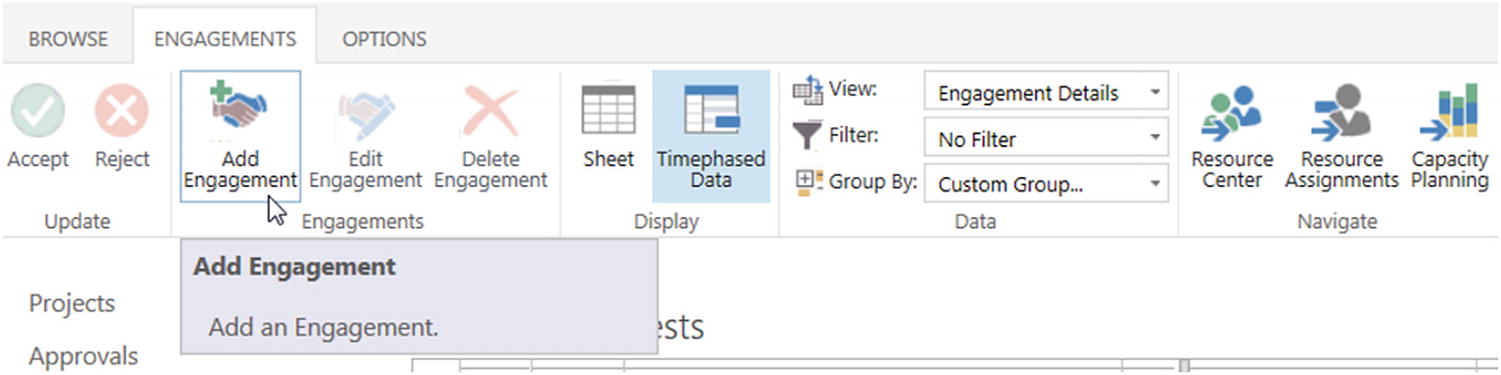 Figure 13-52
Creating new resource engagement from
- 2.
In the New Engagement dialog box that pops up, put “Leo Cullen” under Resource Name, and fill in the remaining fields as you wish. Click OK.
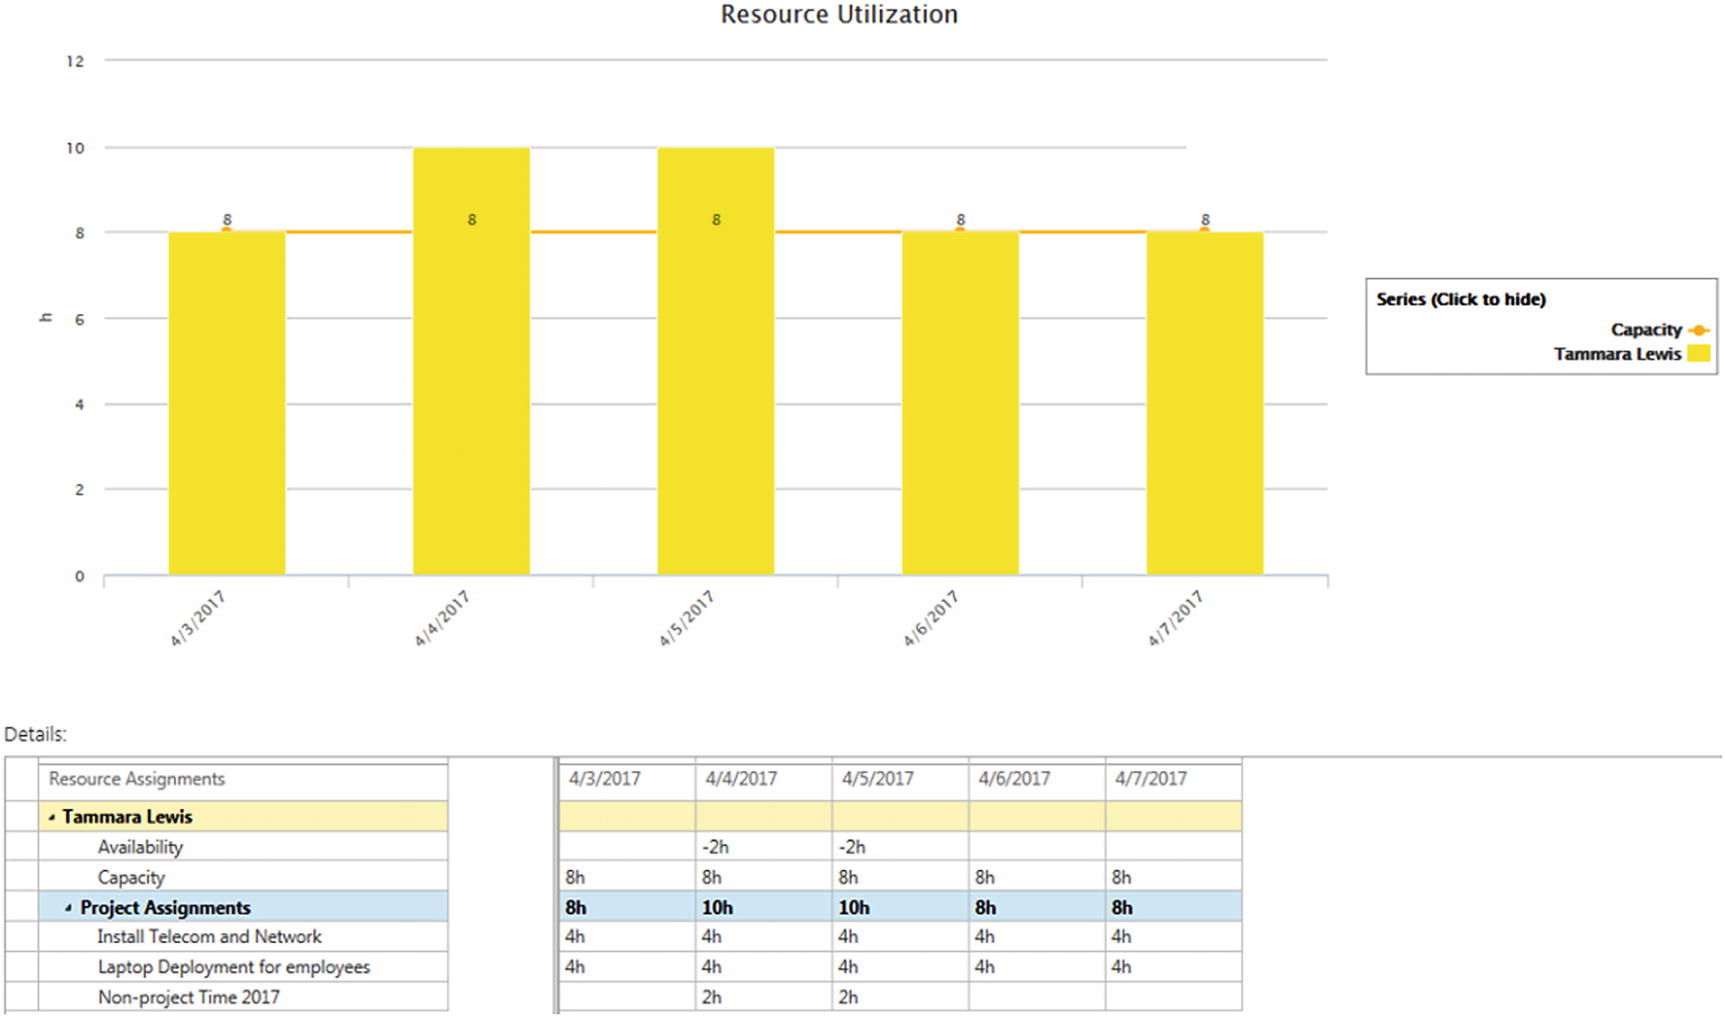
- 3.Navigate to Availability:Views and click Resource Utilization to see the following screen:
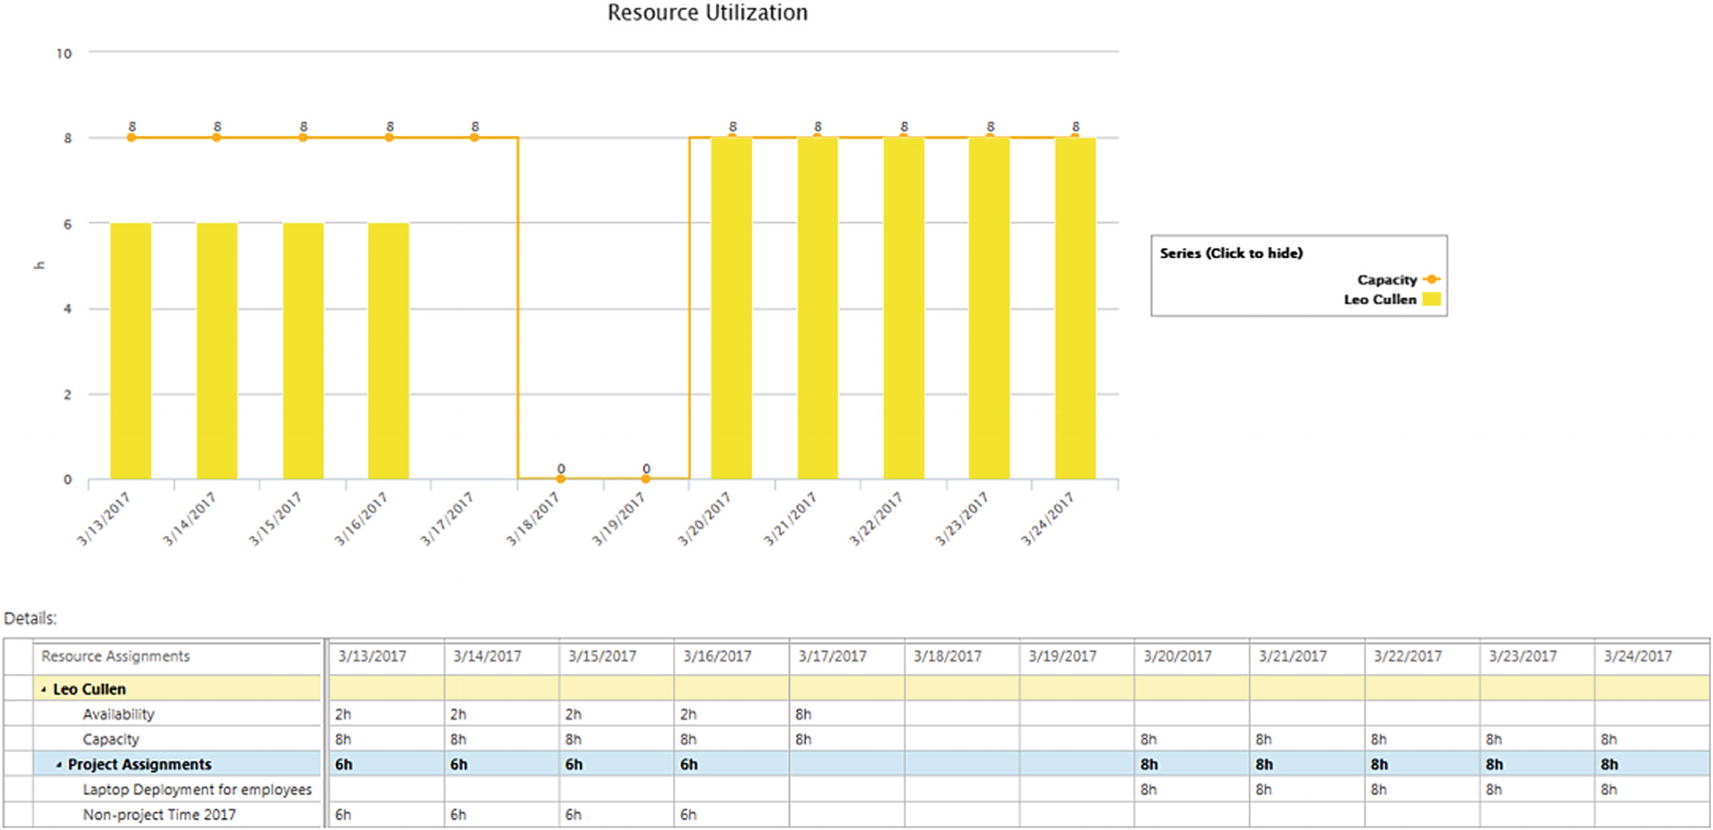 Figure 13-53
New resource engagement, as displayed in the Resource Utilization report
- 4.Similar to what we did as in the project manager end, we can edit the resource engagement request’s work distribution manually. First, select the Timephased Data view in the Engagement:Display section.
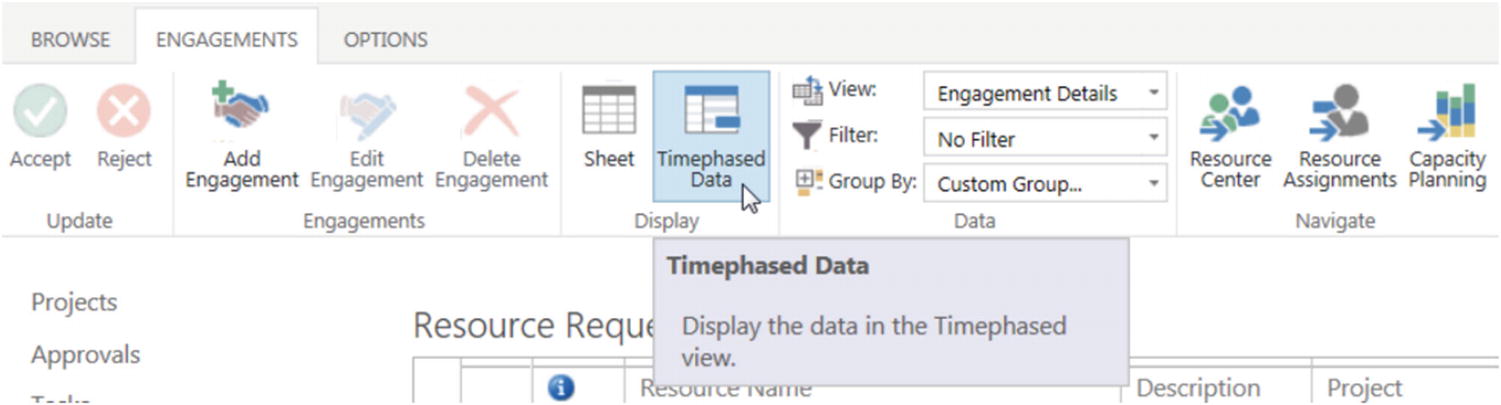 Figure 13-54
Switching to Timephased Data view
- 5.Input new values for your resource engagement request.
 Figure 13-55
Updated Resource Engagement work request
- 6.Repeat Step 3 to see your changes reflected in Resource Utilization.
 Figure 13-56
Resource engagement updated in the Resource Utilization report
Now, Leo Cullen is assigned to tasks in the Laptop Deployment for employees project and has a resource engagement for his operational duties linked to the Non-project Time 2017 project.
13.10 Resource Center
The Resource Center lists all enterprise resources you are authorized to see, as configured by the Project Server administrator.
- 1.
As we covered at the beginning of this section, you can access the Resource Center by clicking the Resources link in the Quick Launch sidebar of the Project Web App Home page.
- 2.Click the Resources tab at the top of the screen to display all Resources tab options.
 Figure 13-57
Resources tab options
- 3.From Resources:Data, click the View dropdown list to view all predefined resource views.
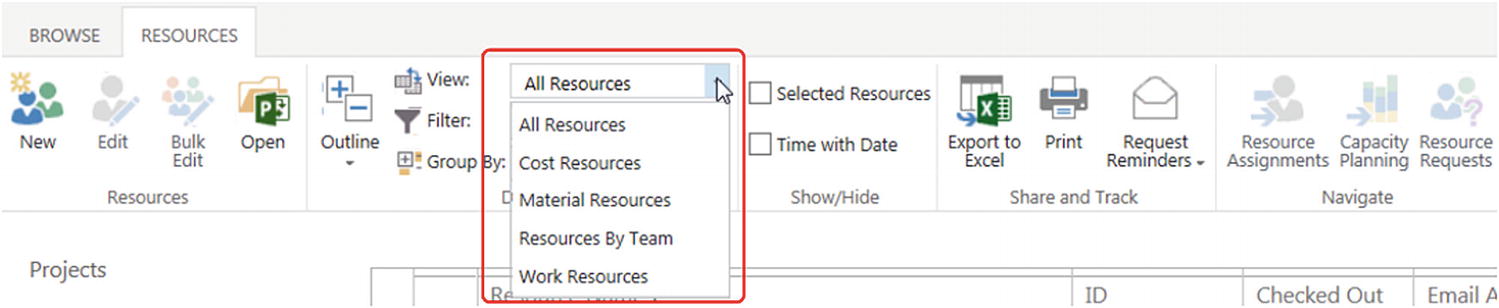 Figure 13-58
Default resource view options
Note The All Resources default is another way of describing a view without a filter applied.
- 4.
From the View dropdown list, click All Resources.
- 5.From Resources:Data, click the Group By dropdown list and select Generic (to separate generic resources from named ones). Your screen will resemble the following.
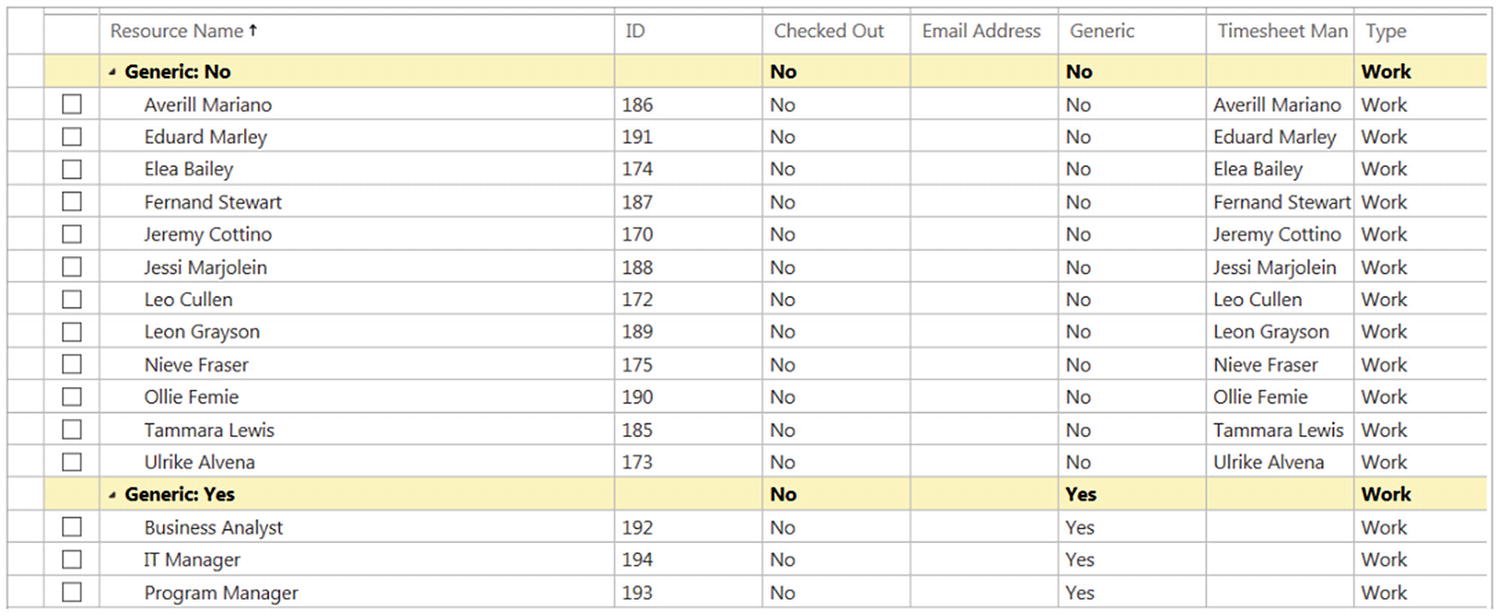 Figure 13-59
All Resources view with generic resources grouped separately
- 6.
In the All Resources view, check several boxes in the column to the left of the Resource Name column to select the associated resources, as in the previous figure.
Notice that the ribbon contains similar commands as those available in the Project Center, as well as the commands Resource Assignments and Resource Availability.
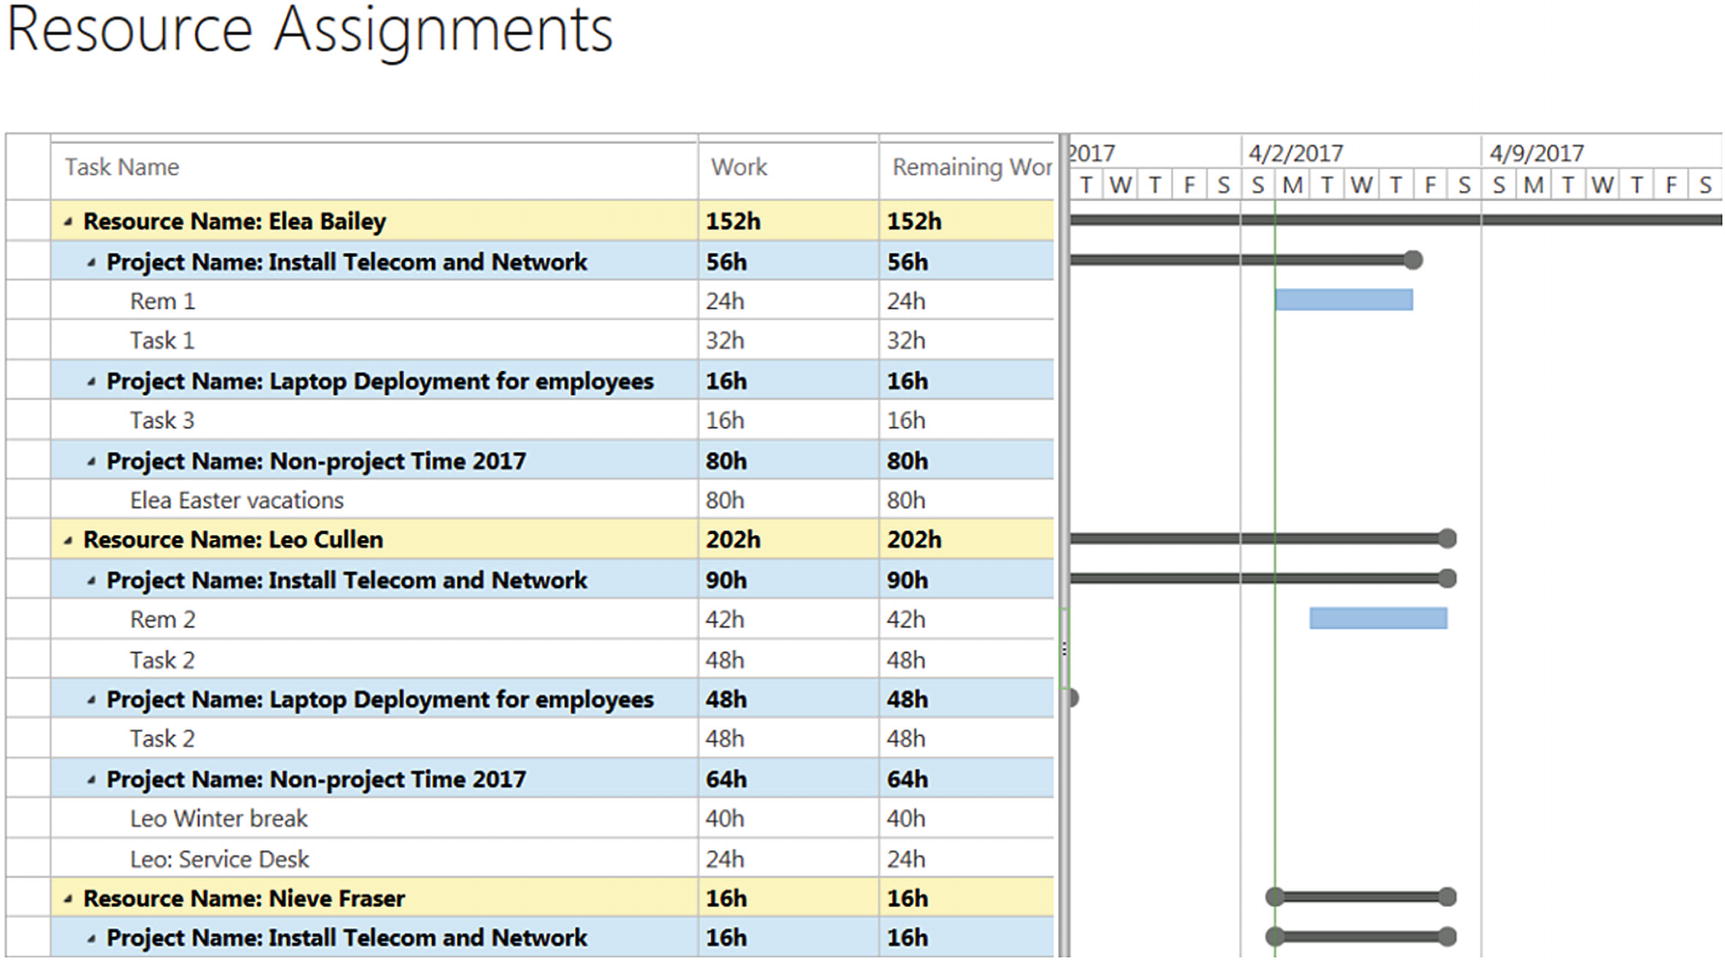
Resource Assignments page with Gantt Chart
Capacity Planning allows you to examine availability of one or more resources by selecting one of the five standard views: Capacity and Engagements Heatmap, Resource Utilization, Resource Utilization by Project, Remaining Availability, and Work by Resource.

Capacity planning view options
Capacity planning:Capacity and Engagements Heatmap
The timescale can be adjusted using the View Options selections in the lower-right corner of the view. The Assignment Work by Resource view shown in the following figure presents the data in both a histogram and a grid format. If multiple resources are selected, the view is color-coded.
Capacity planning:Resource Utilization
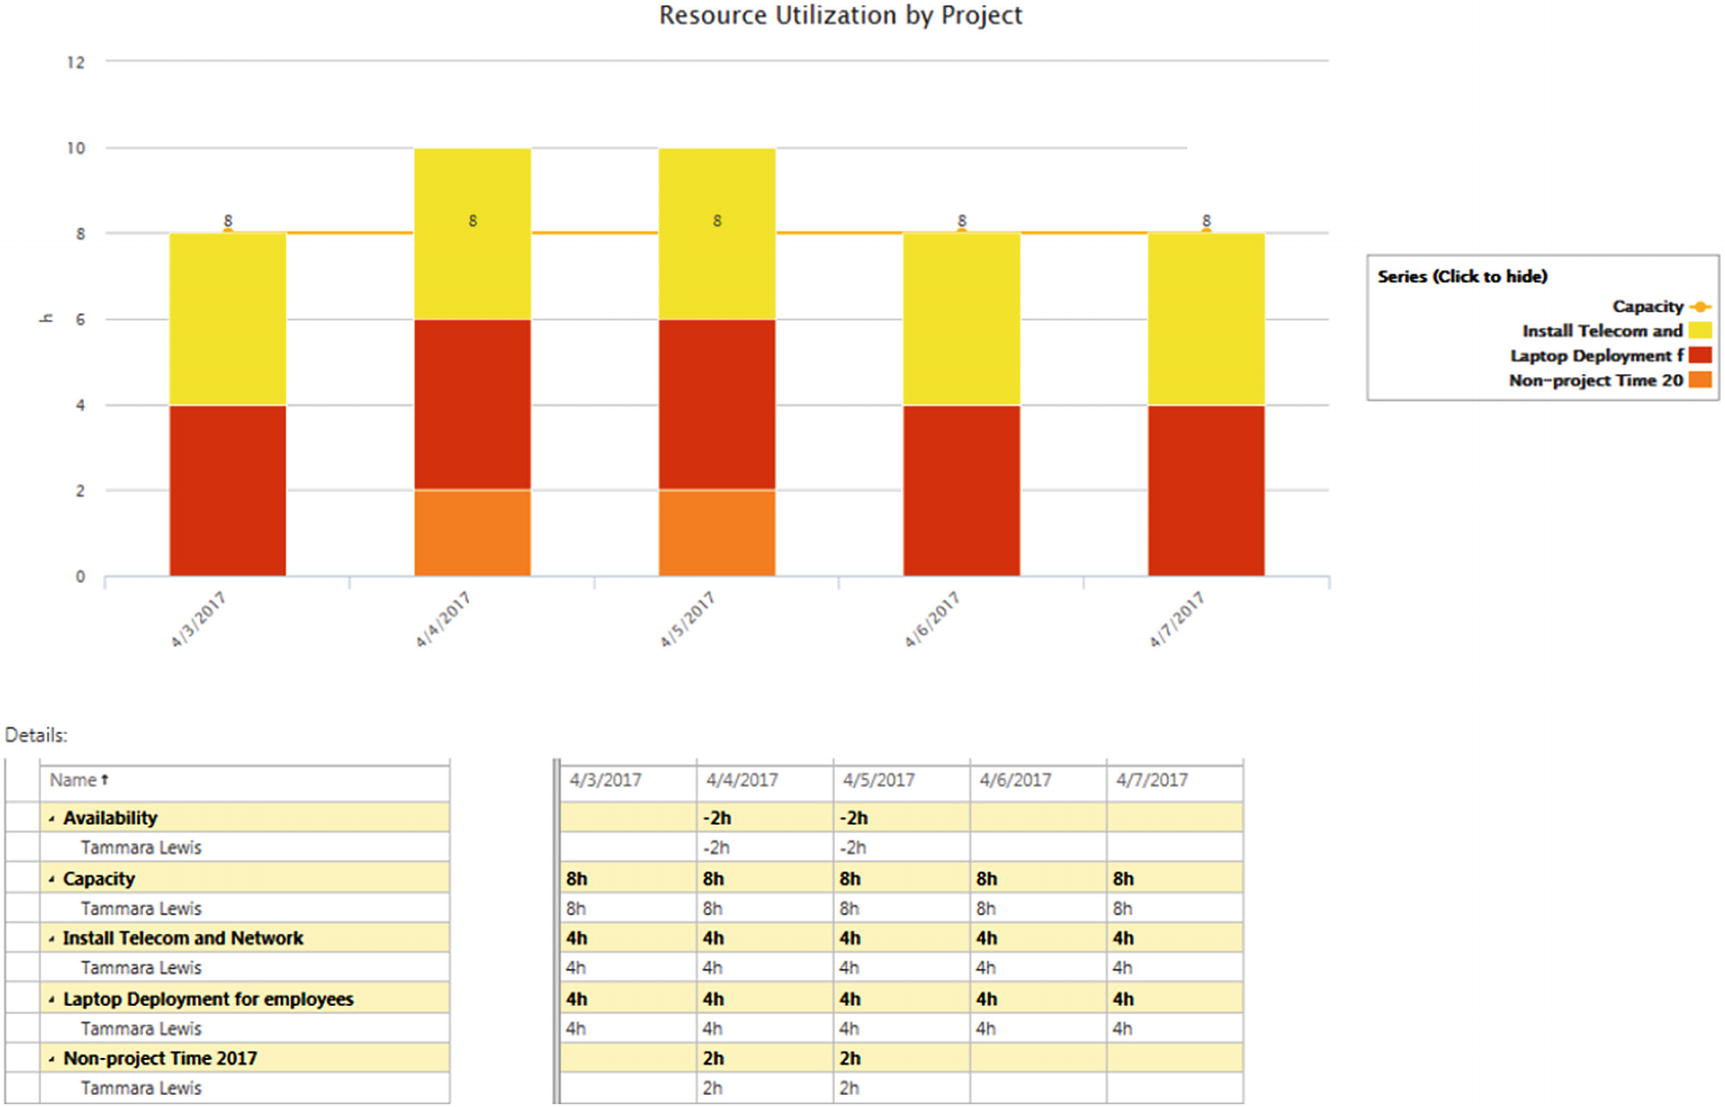
Capacity planning:Resource Utilization by Project
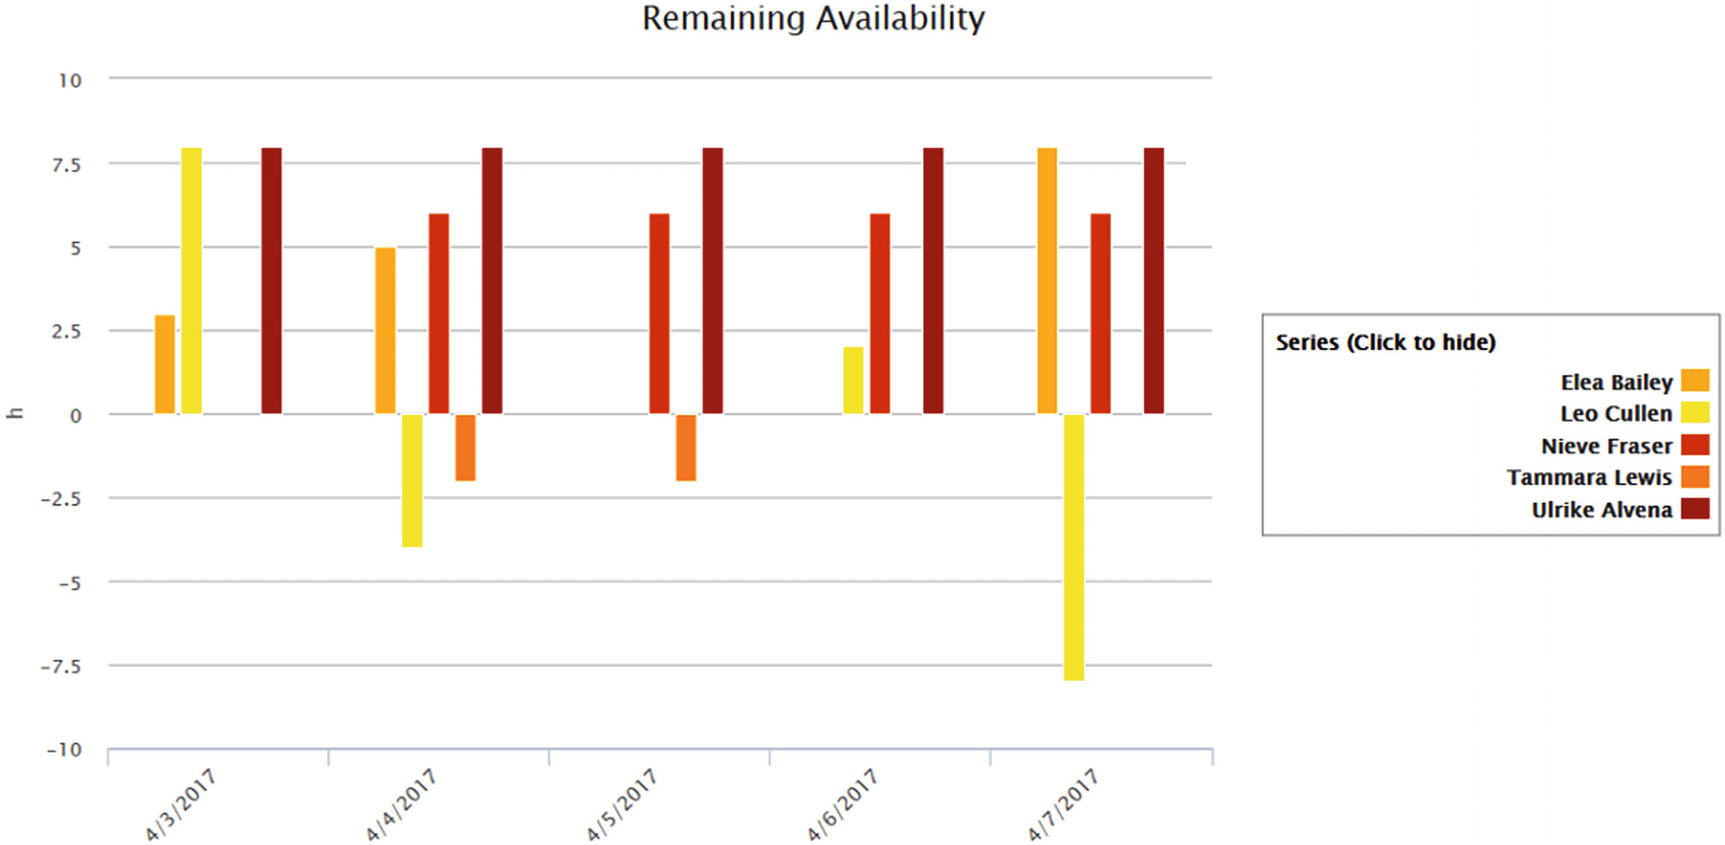
Capacity planning:Remaining Availability

Capacity planning:Work by Resource
13.11 Conclusion on Resource Engagements
- 1.
The resource manager sets resources requiring approval to be assigned to projects on the Resource Center (Edit Resource page).
- 2.
A project manager can request a resource.
- 3.
The timephased request is done in Project Professional 2019 or Project Professional for Office 365.
- 4.
It can contain a percentage of resource work required or a set of hours for the period.
The resource manager reviews the request and accepts or rejects it. Note that engagements aren’t fully editable. Depending on the change required, the request should be resent by the project manager. The resource can start working and the “contract” is signed.
Project managers manage resource engagement in Project Professional, while resource managers use only Project Online.
As was the case with resource plans, engagements don’t impact project schedule.
Generic or named resources can be requested using resource engagement.
Resource managers can also create resource engagements without a previous request from a project manager.
Resource engagements feature is activated by default on all new Project Online tenants. If you have an existing tenant, you can decide when to activate the new features (activation is done on Server Settings:Additional Server Settings). For an on-premises installation, options will be available when migrating to Project Server 2019. When activated, published resource plans will be converted into engagements, and the old resource plan view will be removed.
Resource engagement activated (Resource Plan button has disappeared)
13.12 Risks, Issues, Deliverables, and Documents
Project Web App 2019 includes other tools that extend the usefulness of project plans throughout the organization. Teamwork is critical in most projects, and the ability to view and work with project plans can be very helpful in building team involvement and commitment.
Project managers quickly learn that agreement is easy to get but commitment can be hard. It’s especially difficult in matrix organizations where the importance of a project manager’s good will to a person’s career isn’t as clear as their line manager’s. If you could only keep one of them happy, whom would you pick?
When a project is published, a project workspace is also created, along with tools to manage risks, issues, deliverables, and documents. These will be described in this lesson.
Project Sites
SharePoint can automatically create a project site when a project is published. The project site provides a focus for project-related functions as well as a cyberspace war room, which allows for the project team to work together. This is especially useful when true co-location is not possible.
- 1.Navigate to the Project Center. Click a Project Name from the list to go to the Project Details page for that project. From Project:Navigate, click the Project Site icon. Your screen will resemble the following.
 Figure 13-68
Project site home page
Just as your Project Web App Home page contains items specific to you, the project home page contains items specific to the project, which can be shared with all members of the project team. When a new project is first published, the project manager is prompted to create a project workspace for the project. This workspace is created from a template setup as part of enterprise configuration, so all workspaces initially look very similar.
Visual timeline of the project’s tasks
Complete task schedule for a project
Library for storing relevant project documents
Notebook for quickly capturing and organizing information about the project
Shared calendar for team events
Ability to connect to the Project 2019 client application
Ability to connect to Project Web App
As you can see in the preceding figure, the main window provides sidebar options, as well as typically including tiles that provide access to pages that allow you to customize, share, and brand the site. This page by default also allows you to add documents and other information to the site, including links to other web pages of interest.
Documents – Allows you to add, edit, view, track, group, and share project-related documents, workflows, notes, and other electronic artifacts.
Tasks – Allows you to add, edit, view, track, and annotate project task-related information. Provides a space for team “action items” that are important but not shown in the project plan itself.
Calendar – Shows the current month (by default), day, or week with project-related meetings, events, deadlines, and so on that have been added to the project.
Project Details – Links to the Project Details page, which provides a summary of basic project information (e.g., project name, description, start, finish, owner); also links to the project site, Build Team, and other resource-related functionality, and project-related documents, issues, and risks.
Deliverables, Risks, and Issues – Provides access to sites where you can add, edit, view, and track project-related Deliverables, Issues, and Risks.
- Site Contents – Provides access to all documents, site assets, calendars, issues, tasks, risks, deliverables, and other information related to the project; the add an app tile also provides the capability to create new items to this page.
 Figure 13-69
Site Contents page
Risks, issues, deliverables, and documents can be managed from the project SharePoint workspace or from Project Web App. In the following exercises, we will work with them from the appropriate location in Project Web App.
13.13 Project Details Page
- 1.Navigate to the Project Center and click a project in the table; for this example, we clicked ProductLaunch. You will see the Project Details page for this project.
 Figure 13-70
Project Details page for Product Launch, with high-level details
- 2.From File:Navigate, click the Project Site icon to navigate to the project site for your selected project, where you can access links that include Documents, Tasks, Calendar, Project Details, Issues, Risks, Documents, and Deliverables.
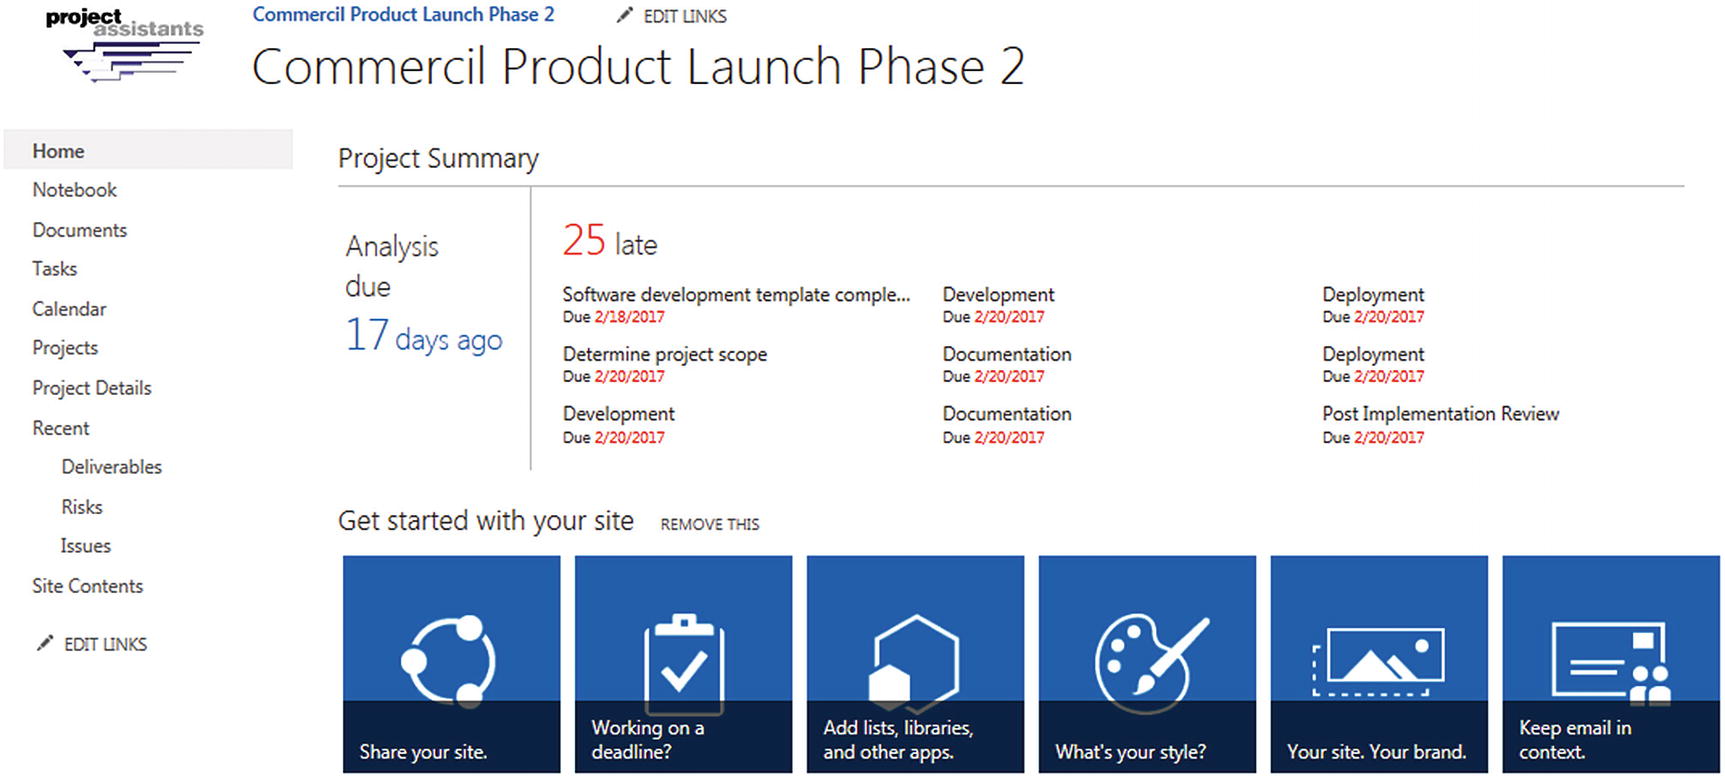 Figure 13-71
Project site options for ProductLaunch project
Issues
- 1.
Navigate to the project site for a project—Biothermal ear heating system for helmet in this case (see Steps 1 and 2 immediately preceding this section).
- 2.From the project site for this project, click the Issues link in the sidebar to see the project’s Issues page.
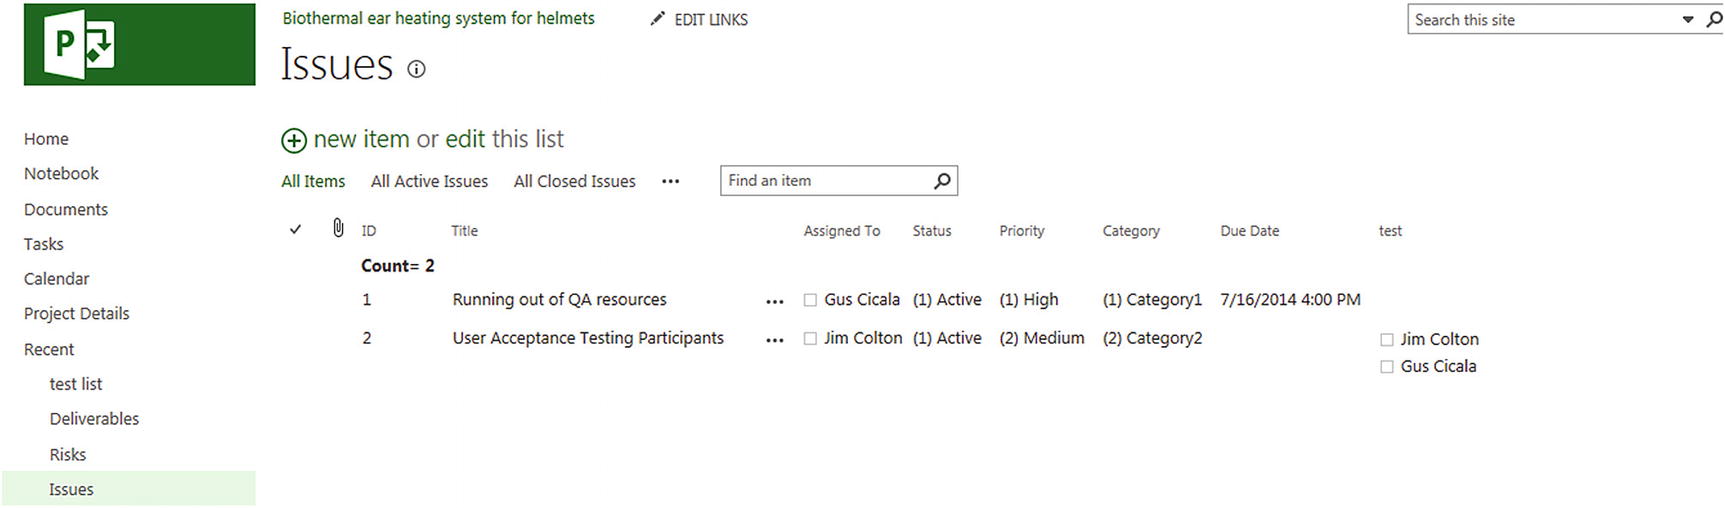 Figure 13-72
Issues page for Biothermal ear heating system for helmets
- 3.Click the plus sign by new item to add an issue to the list. Your screen will resemble the following.
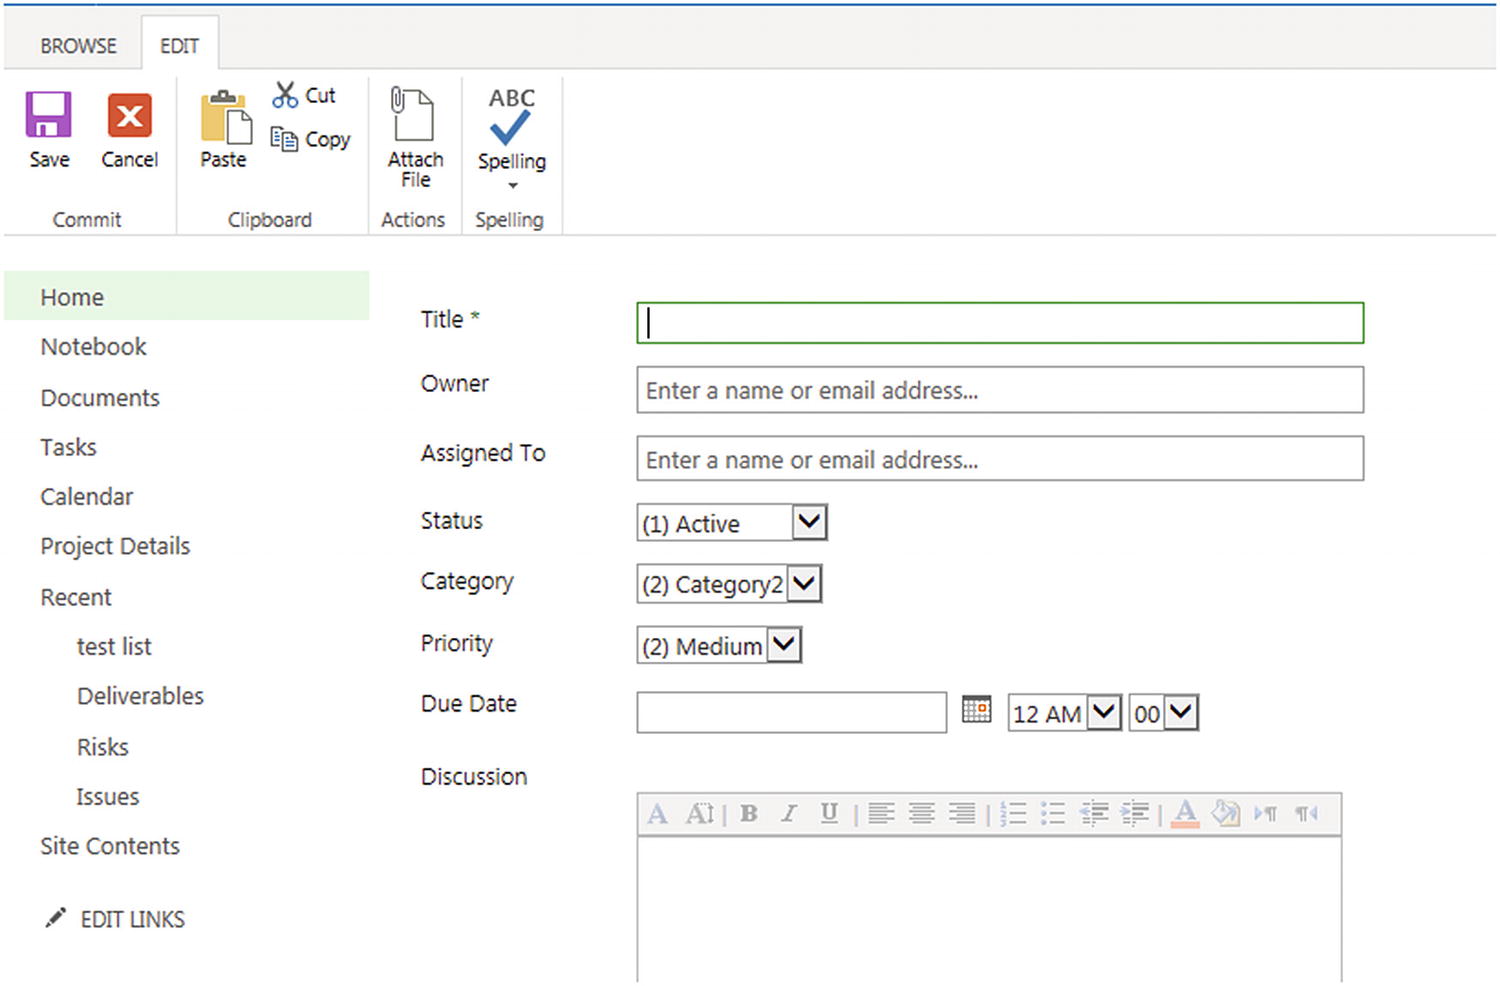 Figure 13-73
New issue entry screen
- 4.Enter data into this screen as follows:
Title (the only required field): “Does not have experience with this product”
Owner: “QA Hub”
Assigned To: “QA Hub”
Status: “Active”
Category: “Category1”
Priority: “High”
Due Date: “8/1”
Note Your training environment may be configured differently. Select options that are appropriate in your environment. Your Project Server administrator can configure many of these values to reflect your organization, such as Status, Category, and Priority.
- 5.From Edit:Commit, click Save. Your new issue will appear on the Issues page for your project.
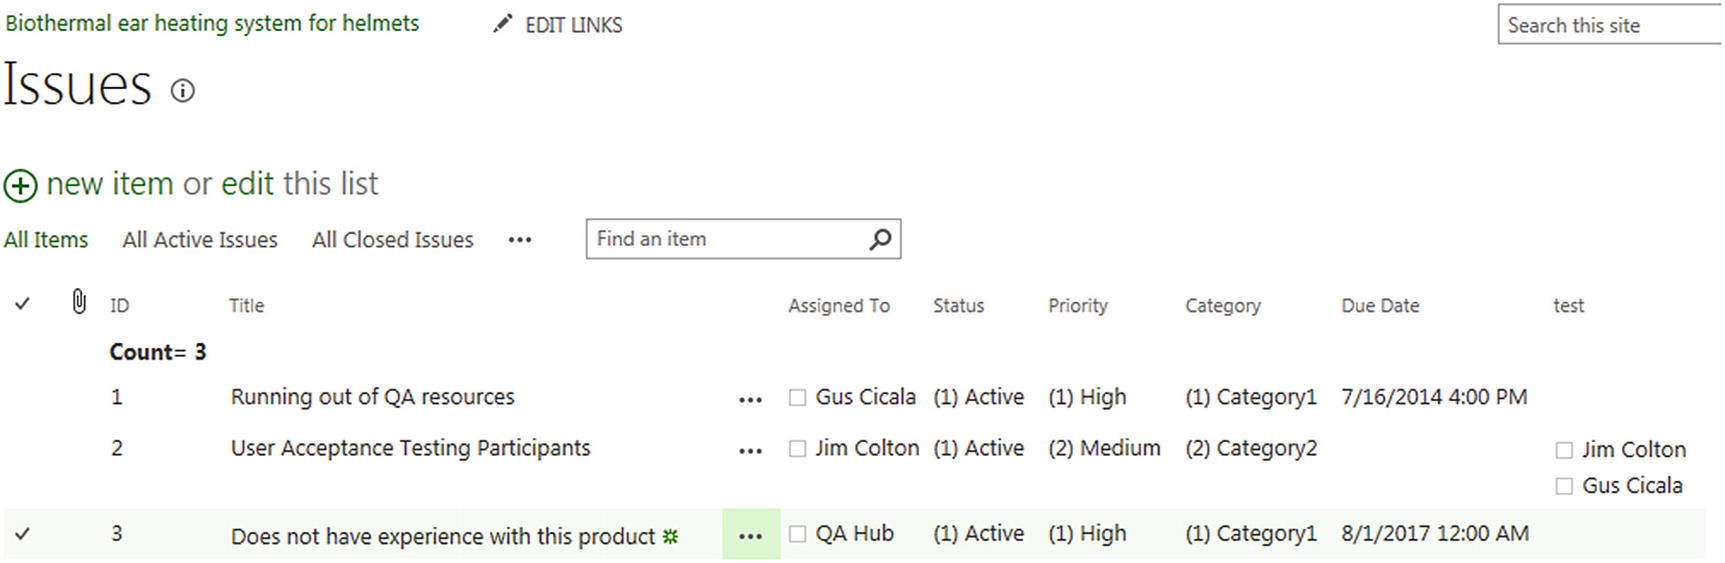 Figure 13-74
New issue
- 6.Click the Projects link in the sidebar to return to your Project Center page. An icon will notify you that there are issues associated with this project.
 Figure 13-75
Issue(s) indicator in the Project Center
Now that there are issues associated with your project, you may want to link the issues with a specific task that each impacts. The method for linking list items—such as issues, risks, or deliverables—to a task in a SharePoint task list or enterprise project plan has changed for those accustomed to versions 2013 and earlier. This is due to changes made to the architecture of SharePoint Server and Project Server in the last release.
- 1.
Again, navigate to the Project Center and click the ProductLaunch link to see the Project Details screen for your project.
- 2.Toward the top of the left sidebar, click the Schedule link. You will see the Schedule page for ABC Integration.
 Figure 13-76
ABC Integration Schedule page
- 3.
Select Task 10, Design, by clicking the Task Name.
- 4.Click the Options tab, and from Options:Link To, click the Related Items icon, as in the following figure. You will see the Task Detail screen for Design and order final packaging.
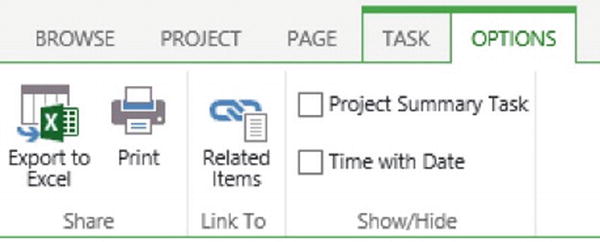 Figure 13-77
Options:Link to:Related Items
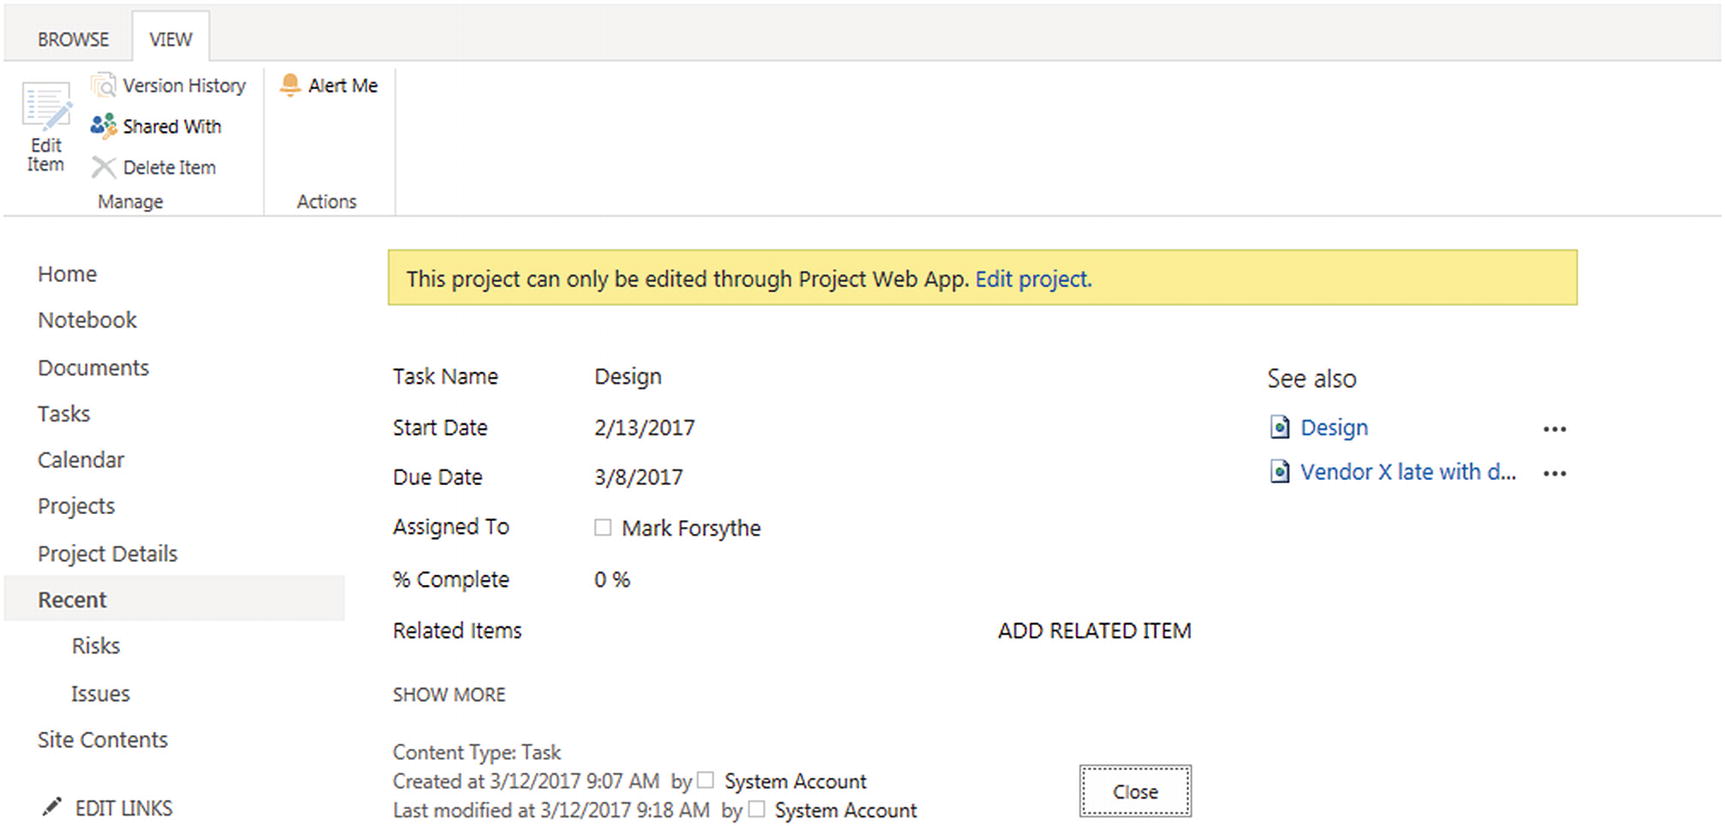 Figure 13-78
Task Detail screen for Design
- 5.In the Task Detail screen shown in the preceding figure, click ADD RELATED ITEM. It is in the resulting Select an Asset page that you can link issues (and other list items) to tasks in your project.
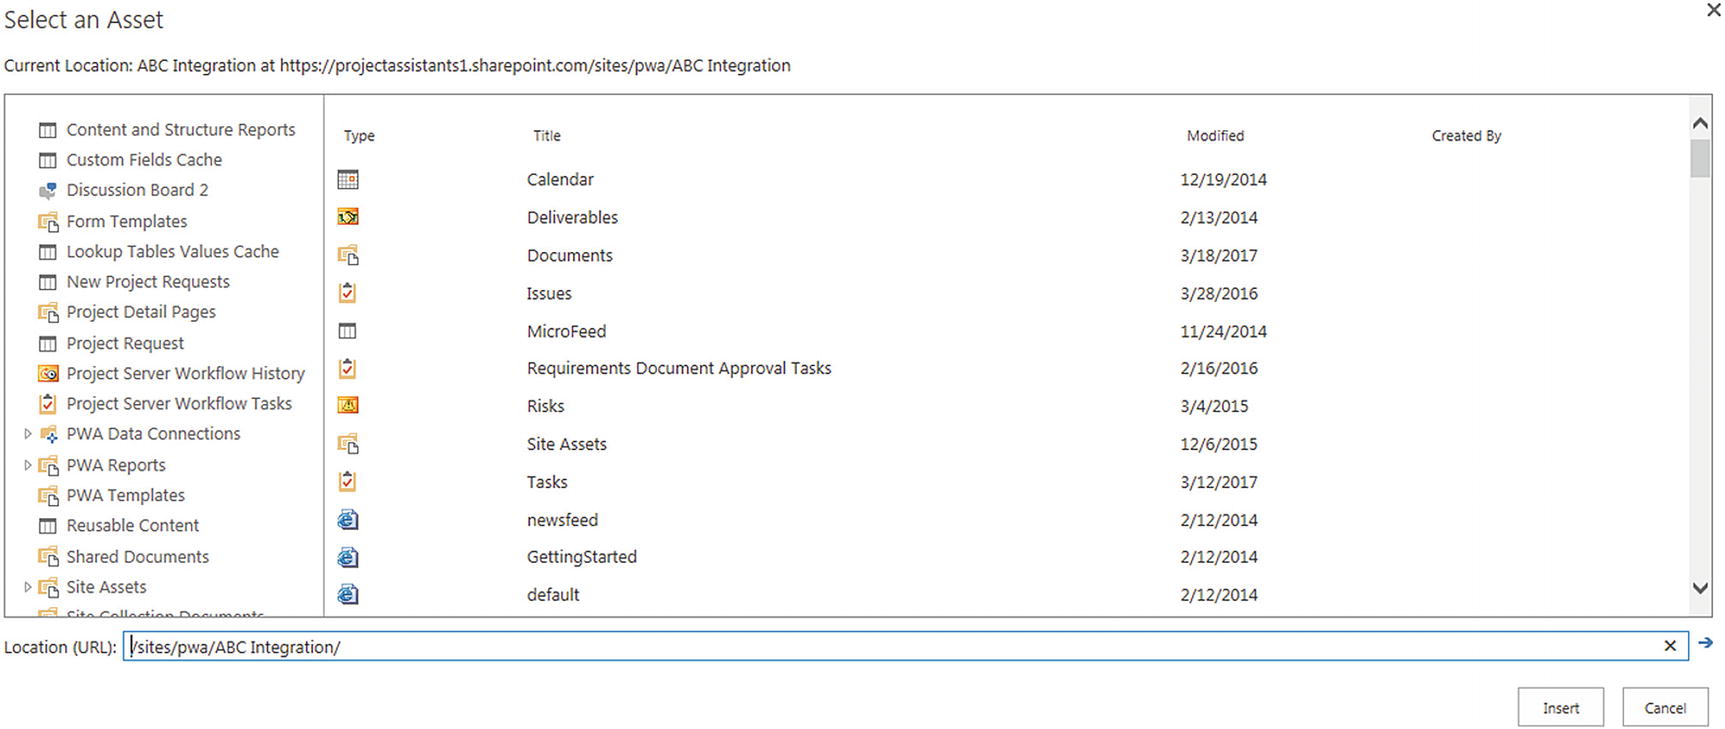 Figure 13-79
Select an Asset page
- 6.On the Select an Asset page, scroll down the left navigation list and find your project name. Click the Issues link under ABC Integration to see the Issues associated with that project.
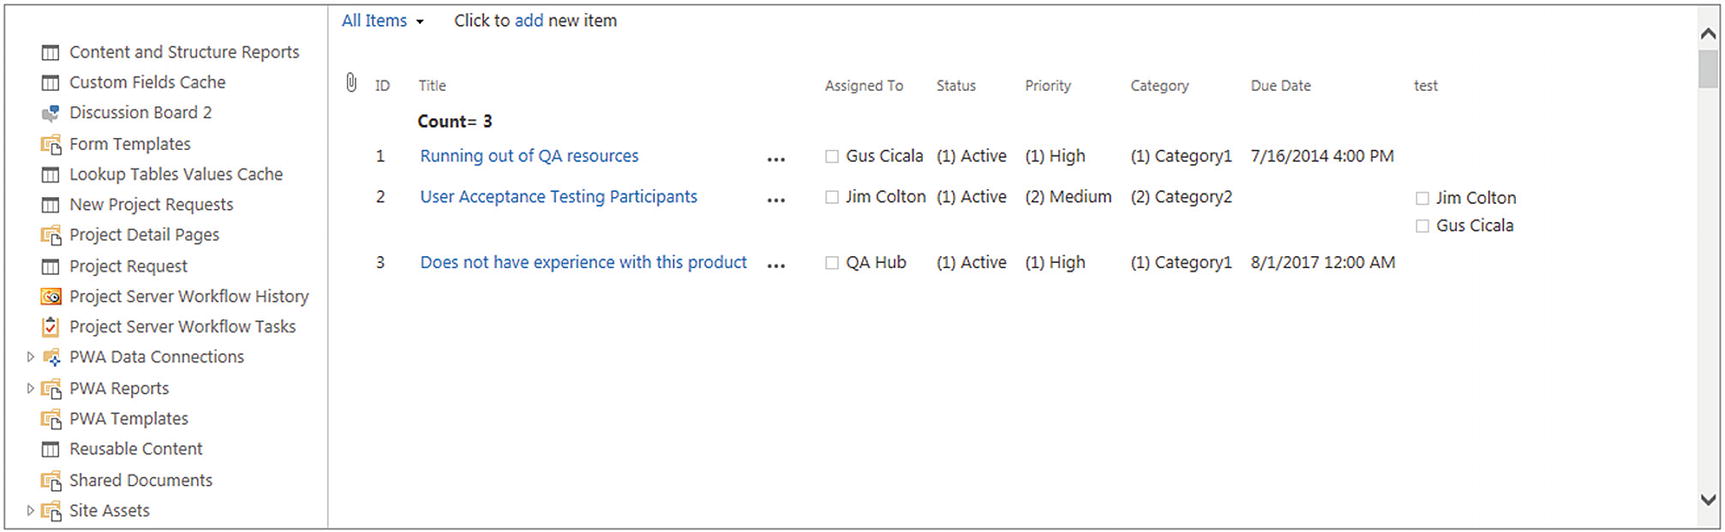 Figure 13-80
List of associated issues
- 7.Click the link for the issue you would like to attach to the task. You will be sent back to the Task Details page for the linked task, where you will see that issue is now linked to this task.
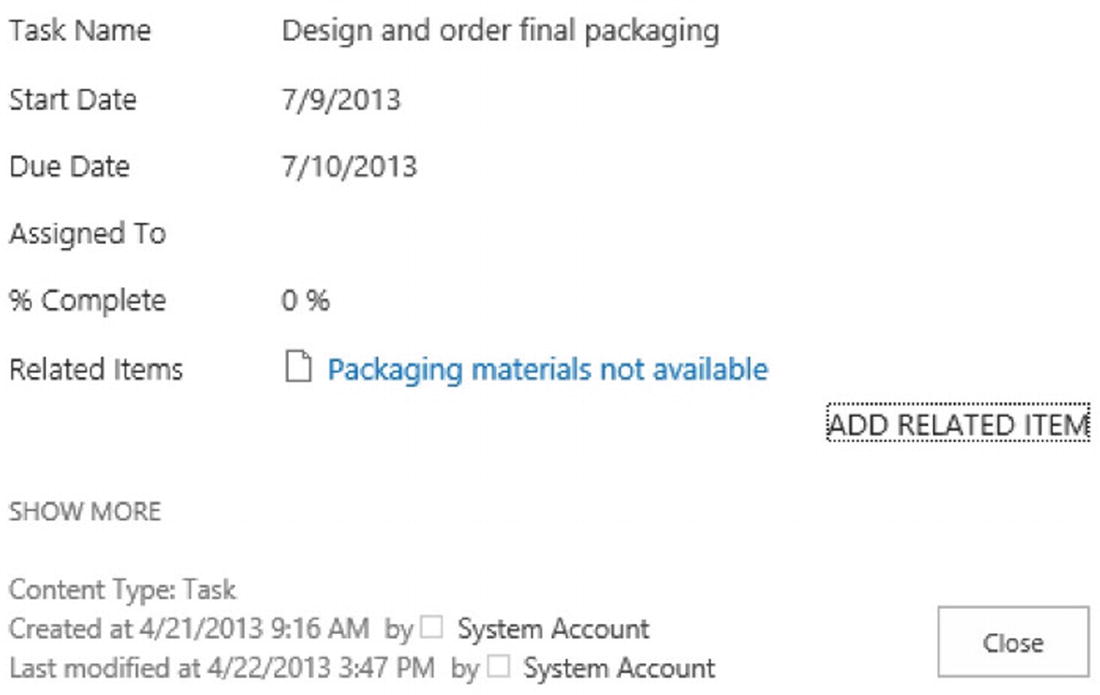 Figure 13-81
Issue successfully linked to task
- 8.You will be returned to the selected task and will see the issue linked with the Design task.
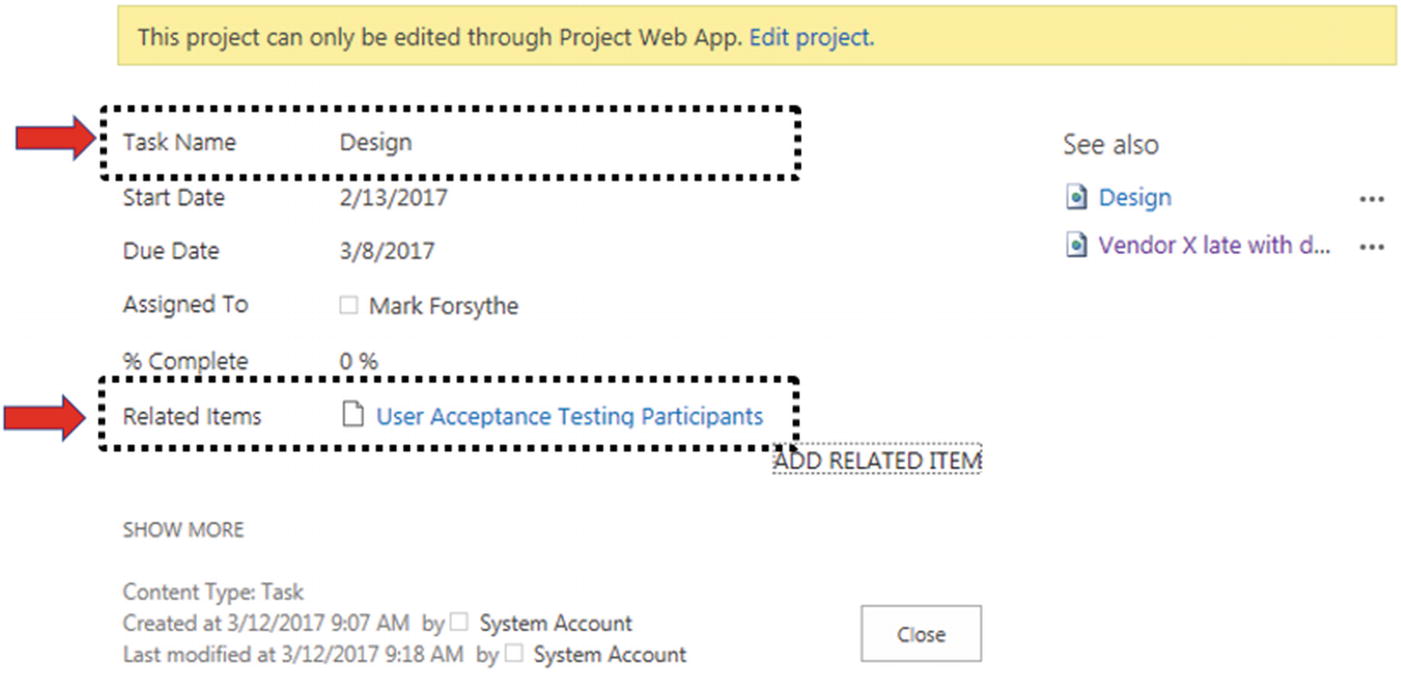 Figure 13-82
Issues linked to Design task
Risks
Risks are usually inherent to projects themselves. They may involve unavailability of a critical material or skill, lack of experience on the part of the project manager or team, the use of new or untested technology—the list is almost endless.
The Risks page interface resembles that of the issues page, which we just reviewed. The major difference is that Probability and Impact are new fields relating to Risks, and each is a required field.
Also, instead of Discussion and Resolution threaded discussion boxes, Risk fields include Description, Mitigation Plan (how will we decrease the probability or impact or both?), Contingency Plan, and Trigger (what will tell us that it’s time to activate the contingency plan?) fields. Items can be linked to the mitigation or contingency plan, or they can be flagged as affected by the risk or as triggers. Documents can also be attached to a risk entry.
You will also see a link to it on the Project Center page

Project Center page with risk assignment highlighted
- 1.Navigate to the Project Details page for ABC Integration, and from Project:Navigate, click the Risks [
 ] icon. You will see the Risks page for this project.
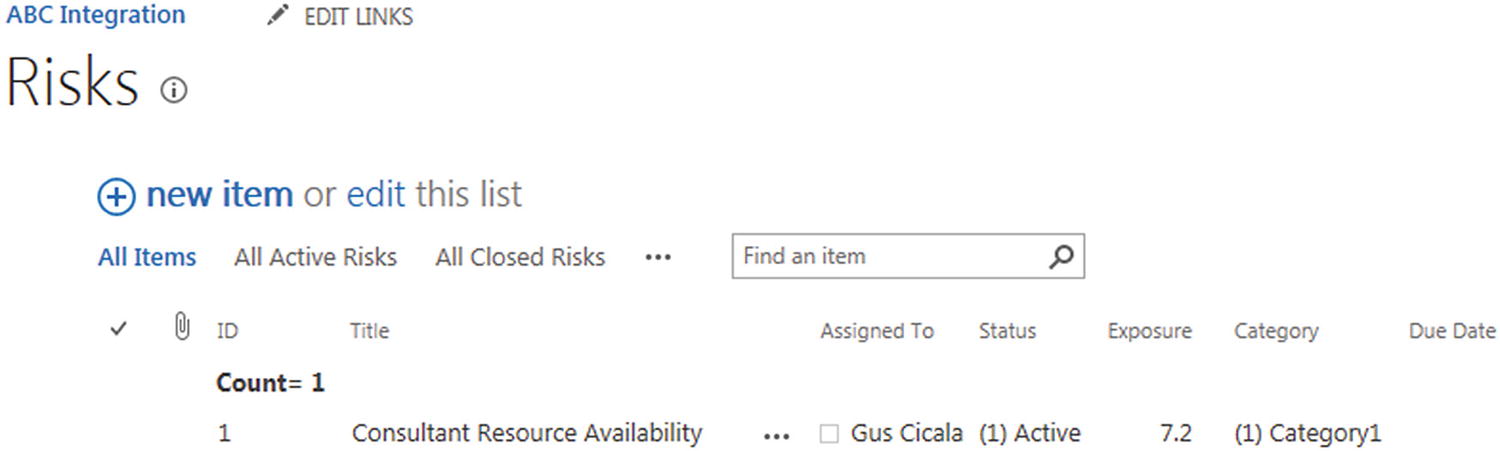 Figure 13-85
Risks page for ABC Integration
- 2.Click the plus sign by new item to add a new risk to your project. Your screen will resemble the following.
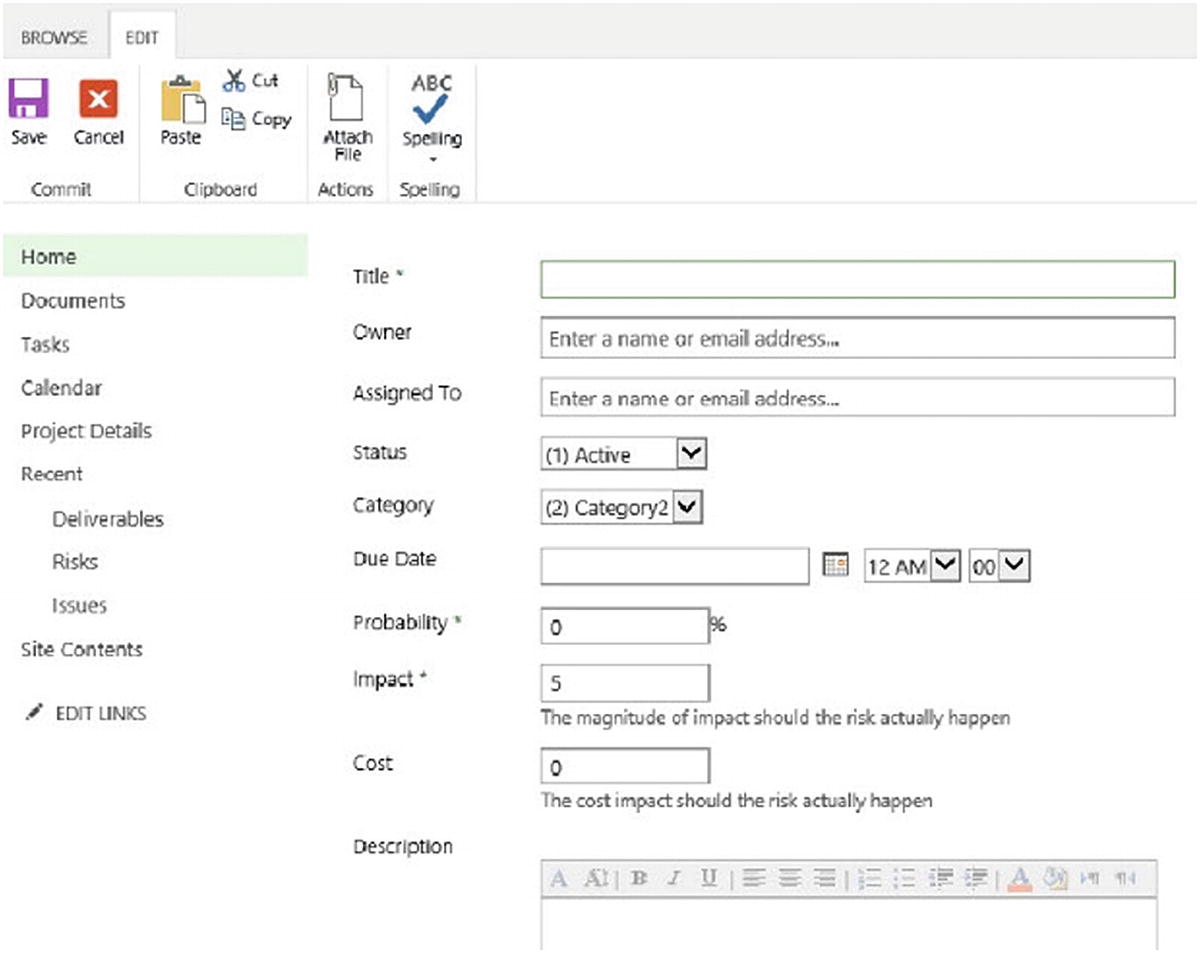 Figure 13-86
New risk entry screen
- 3.Enter data into this screen as follows:
Title (required field): “New risk”
Owner: “John Tierney”
Assigned To: “John Tierney”
Status: “Active”
Category: “Category1”
Due Date: “8/1”
Probability (required field): “50%”
Impact (required field): “2”
Note Your training environment may be configured differently. Select options that are appropriate in your environment. Your Project Server administrator can configure many of these values to reflect your organization, such as Status, Category, Probability, and Impact.
- 4.From Edit:Commit, click Save. Your new risk will appear on the Risks page for your project.
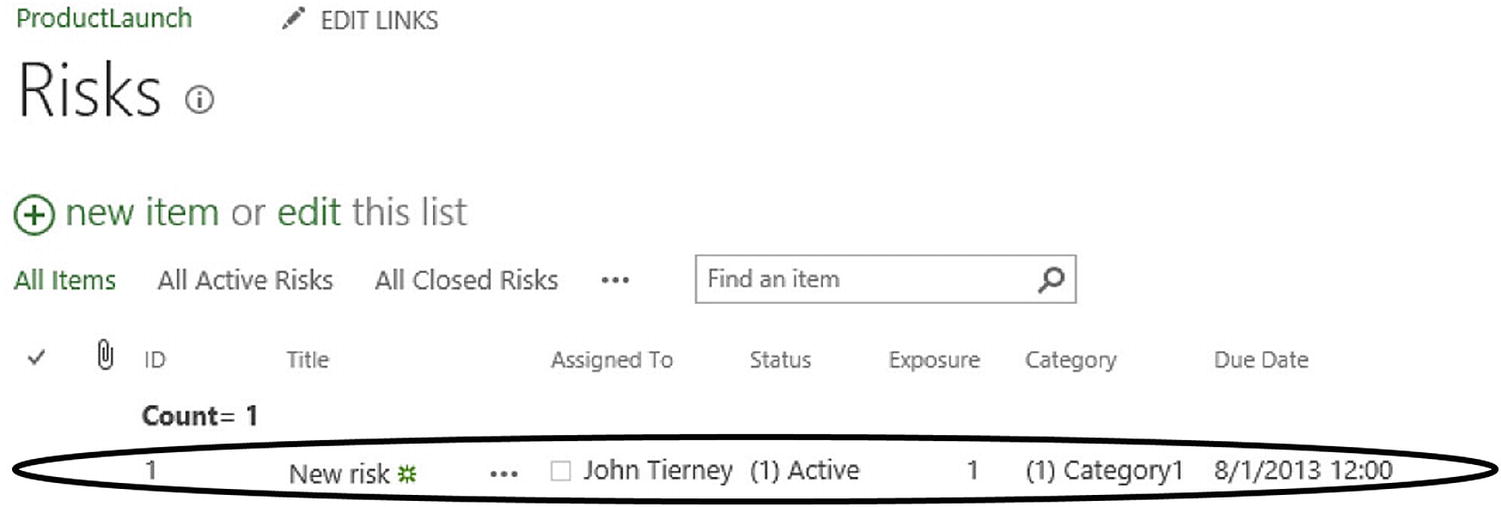 Figure 13-87
New risk
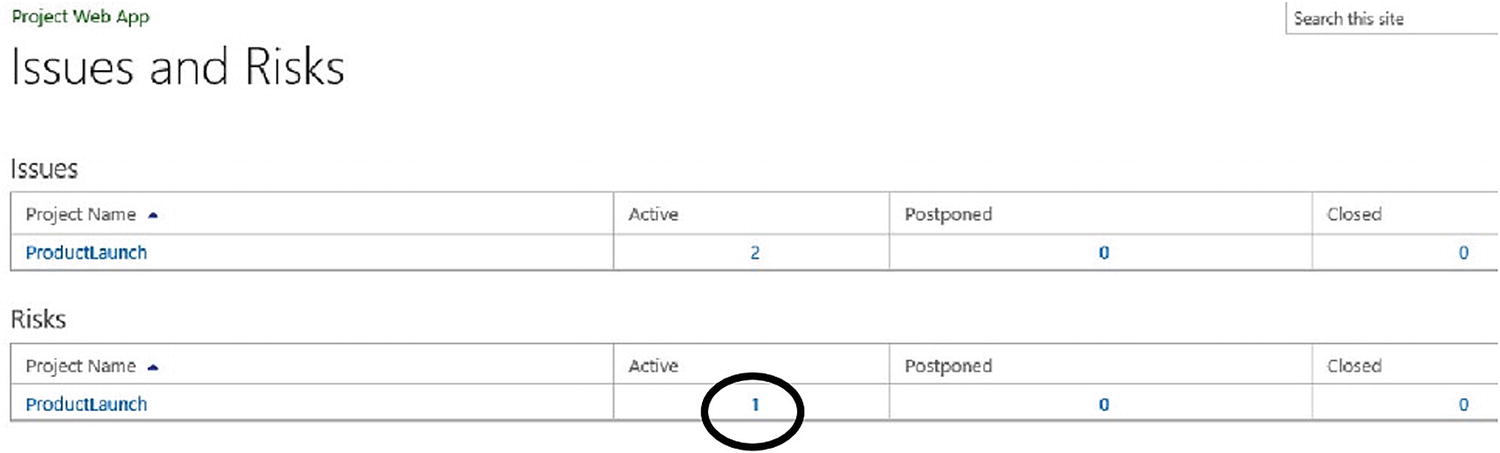
- 5.Click the Projects link in the sidebar to return to your Project Center page. An icon will notify you that there are risks associated with this project.
 Figure 13-88
Risks notification
Editing Issues and Risks
The value of managing issues and risks in a project site is that team members collaborate in their recognition, assessment, tracking, and resolution. Maintaining the status of each open issue and risk is part of the work of the people to whom they are assigned. Team members review and update their issue and risk entries via the project workspace. Reviewing their statuses is a regular part of project management.
Project Web App Home page sidebar with Issues and Risks highlighted
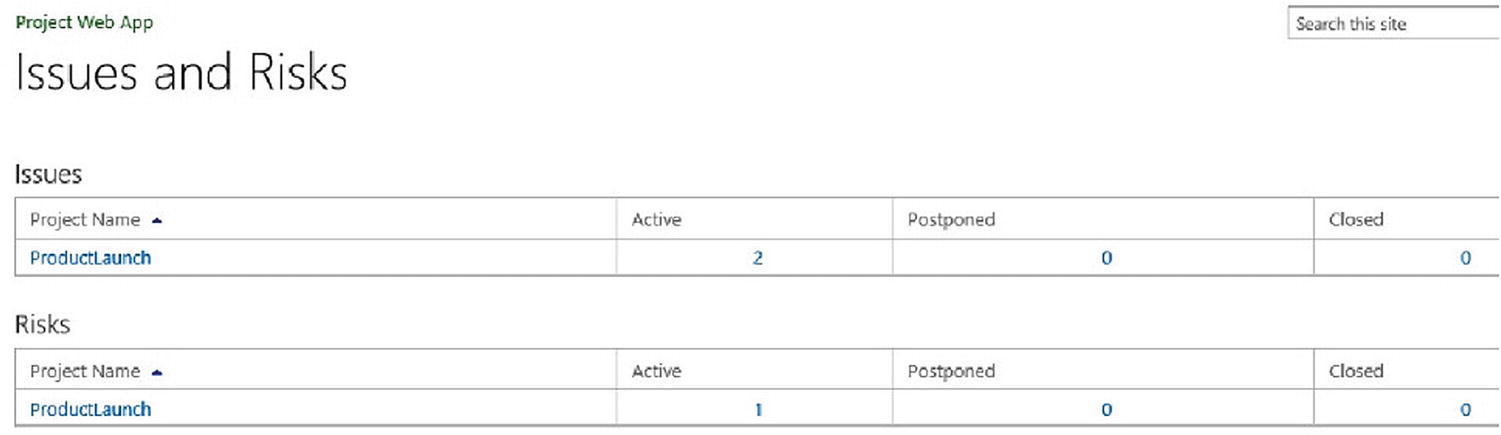
Issues and Risks page
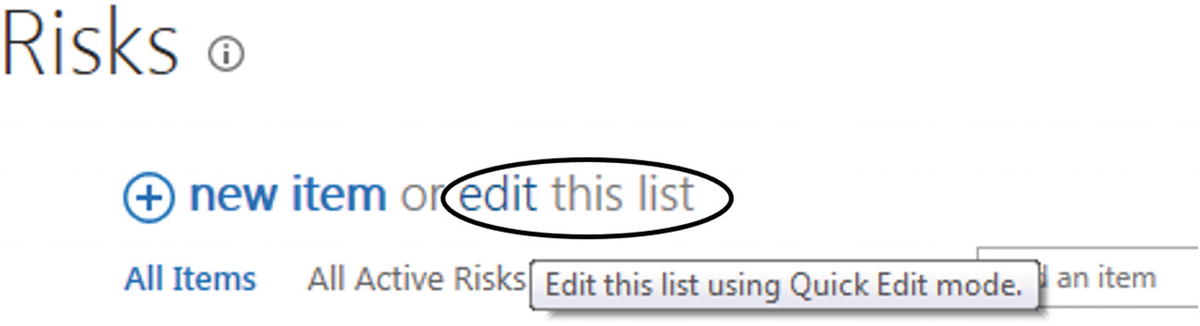
Issues page with edit this list message bubble
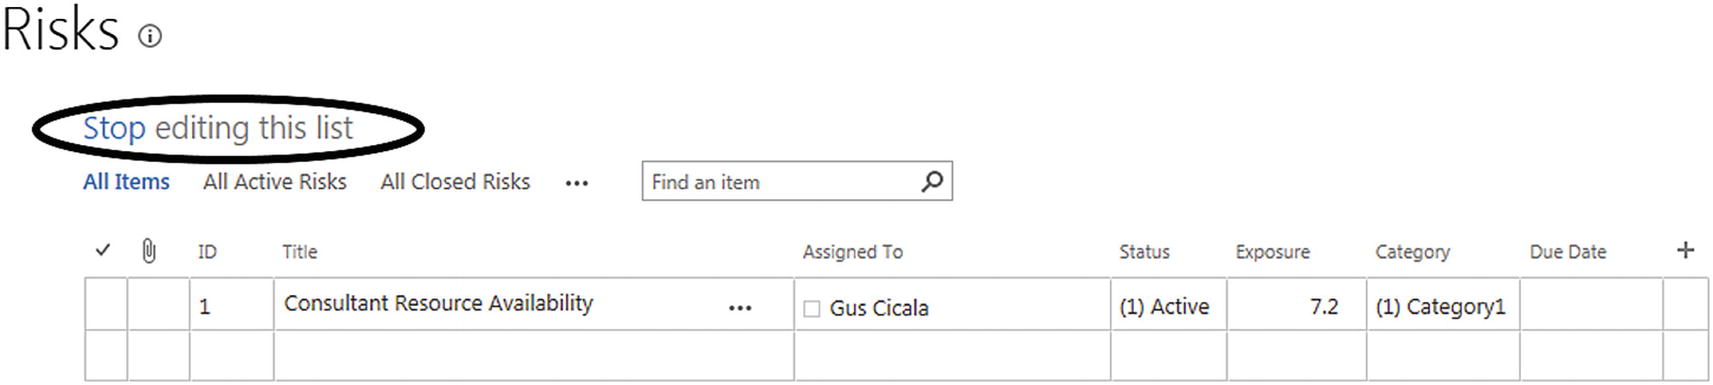
Stop editing this list
List Management
- 1.
Navigate to the project site for ProductLaunch.
- 2.Click the Issues link to view the list of issues associated with the project.
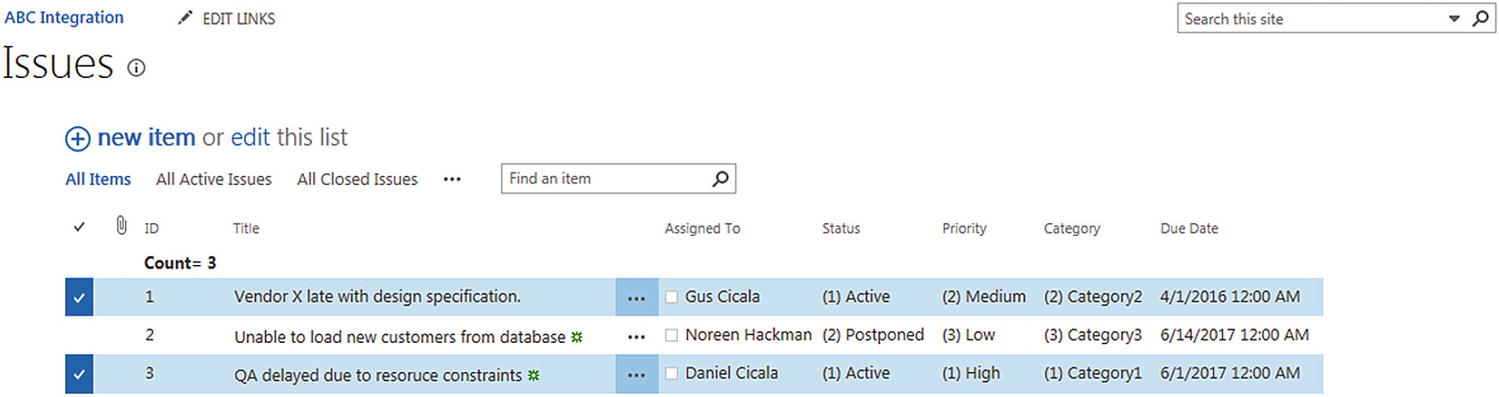 Figure 13-93
Issues selected
- 3.Click the List ribbon to reveal the function icons. From List:Settings, click the List Settings icon [
 ] to navigate to the Settings page for this issues list.
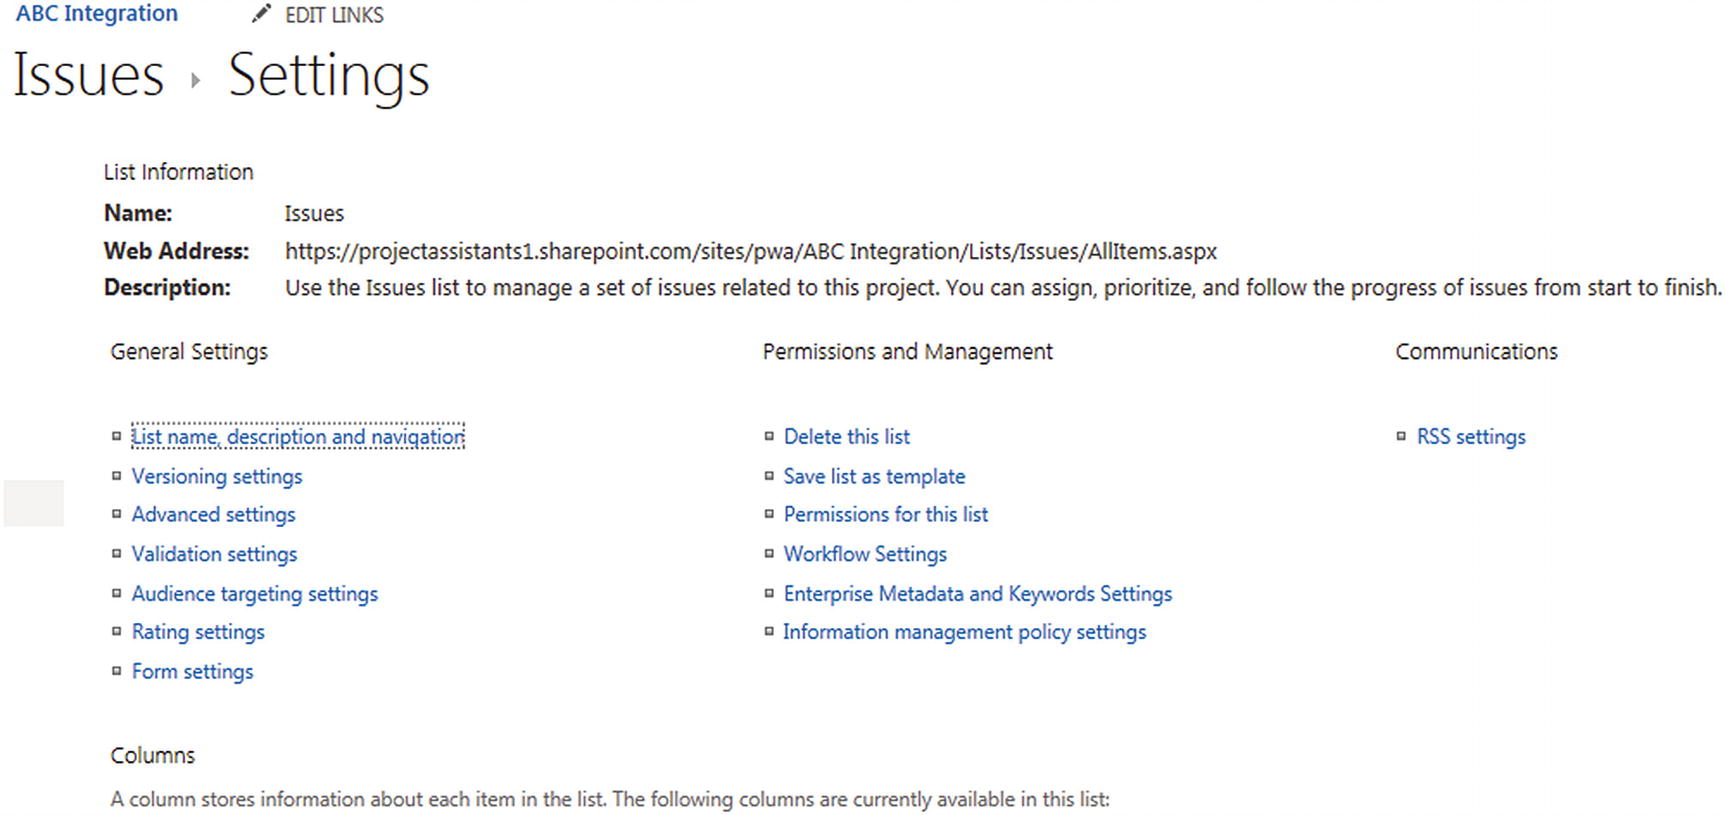 Figure 13-94
List Settings page
Selecting Versioning
- 1.To work with versioning, go to the List Settings page (shown in the previous figure) and click the Versioning settings link (in the General Settings section).
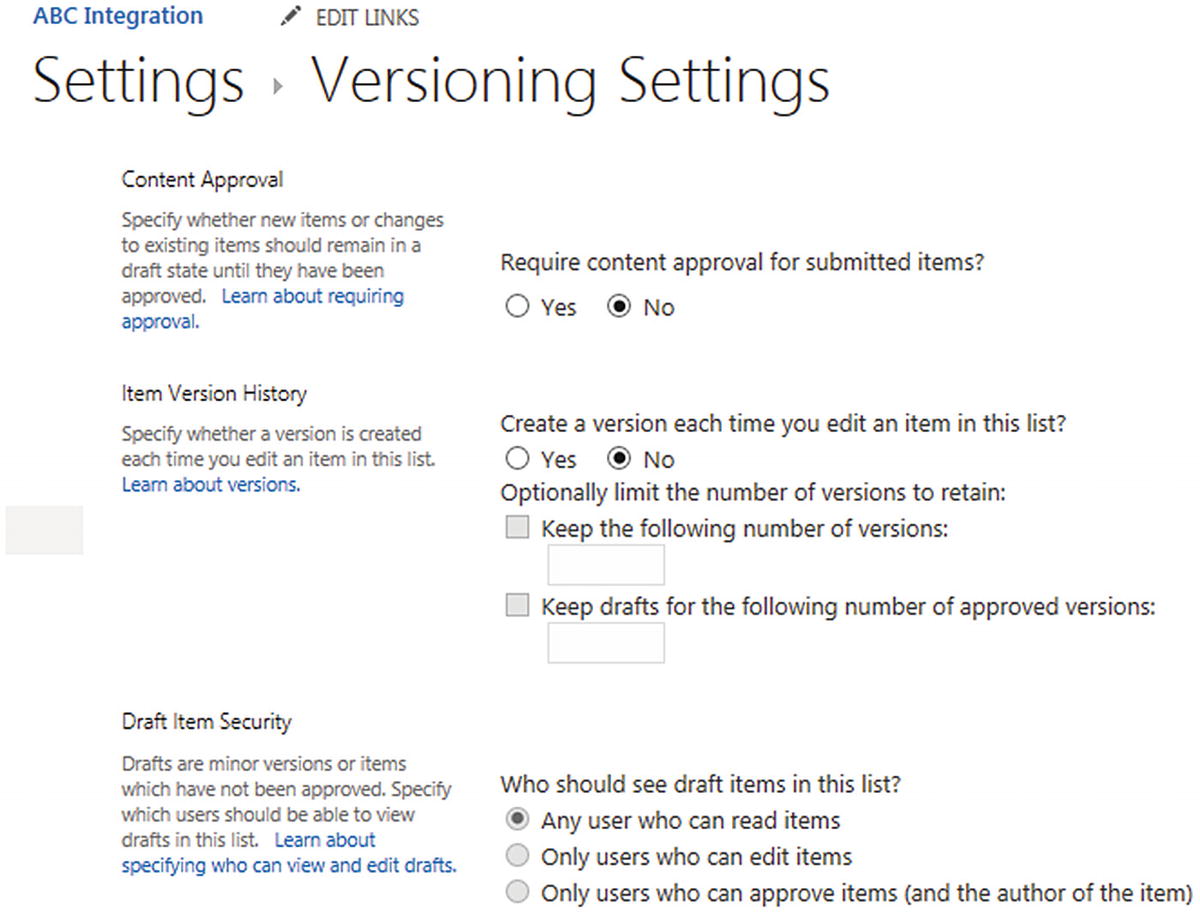 Figure 13-95
Versioning Settings
You will see the Versioning Settings page, where you can select the appropriate level of version retention.
- 2.
Click OK to save your changes, and return to the List Settings page.
Defining a List Column
- 1.In the Columns section of the List Settings page, you can click a column to be redefined or select the Create column option to make a new one.
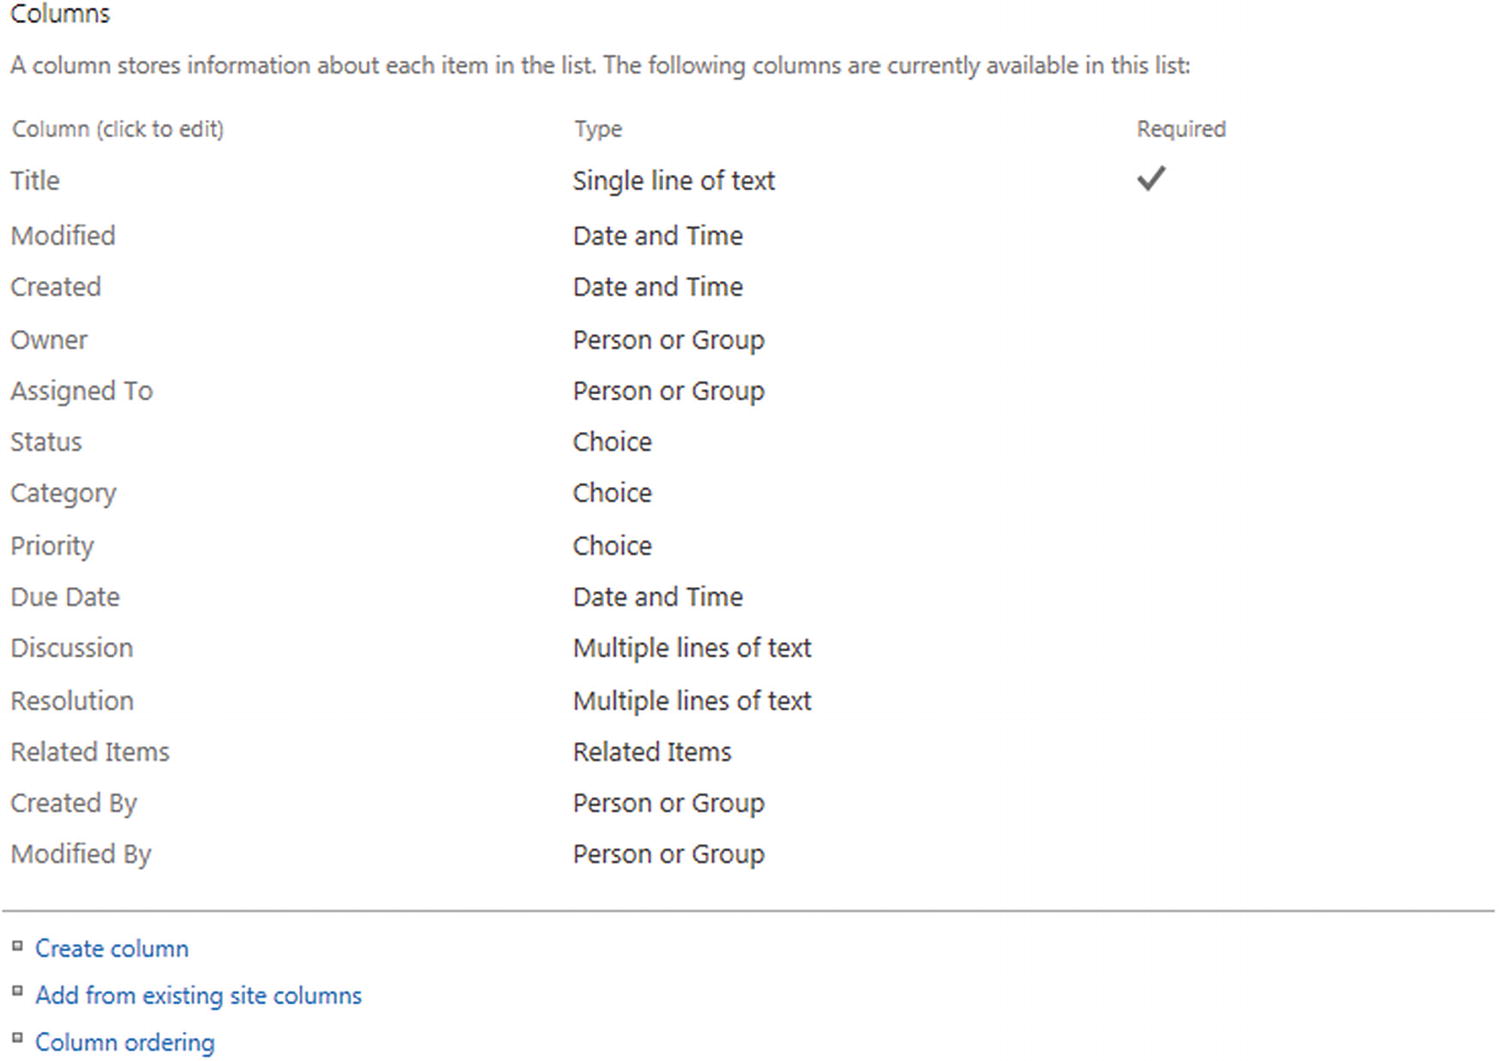 Figure 13-96
Columns section
- 2.
Clicking any attribute in the Columns list will take you to the Edit Column page, where you will be presented with a list of field attributes (appropriate to the field type, which cannot be changed) for the column you selected. Edit these attributes as appropriate.
In the following example, we are changing the Title field to have a maximum of 100 characters.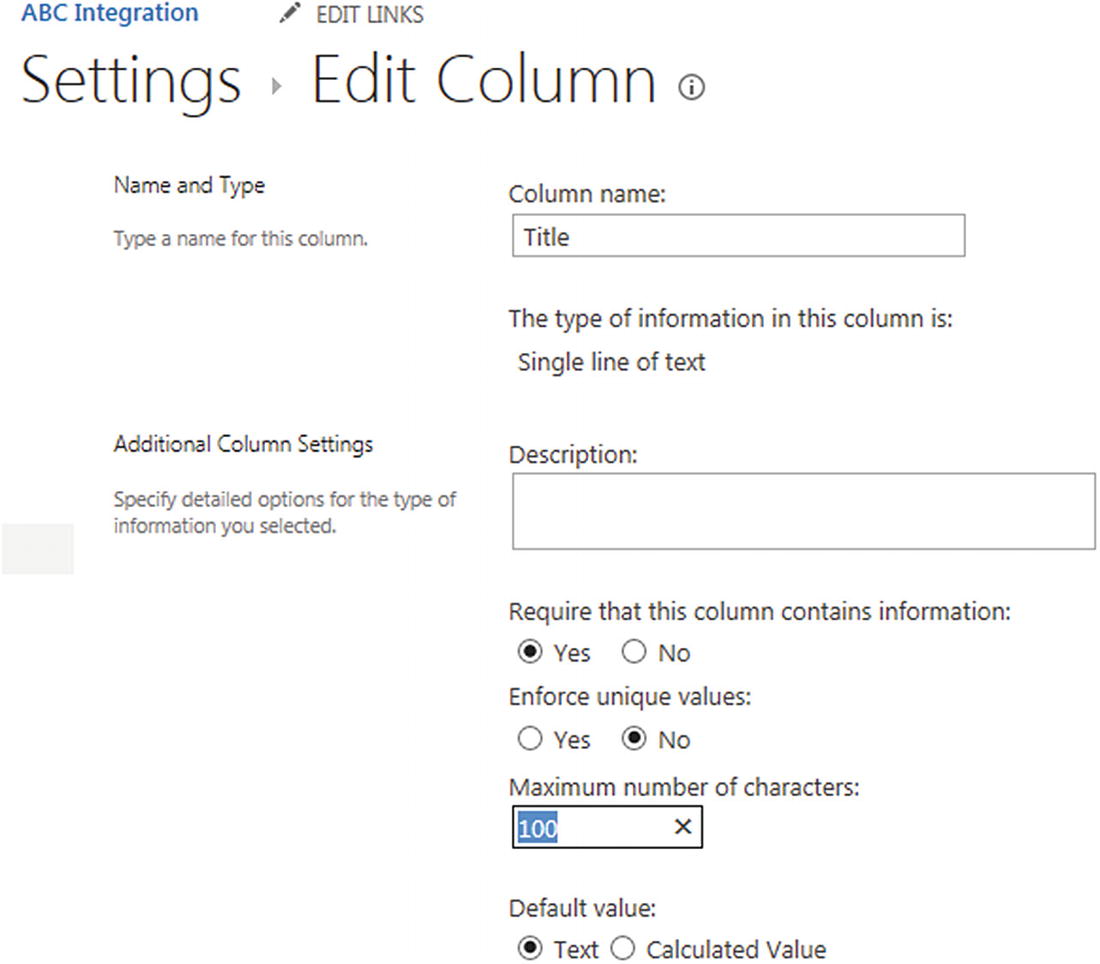 Figure 13-97
Edit Column page for Title field
- 3.
Scroll to the bottom of the screen and click OK to save the changes. Return to the List Settings page.
Defining a List View
Lists can be displayed in different layouts and with different parameters. They typically have one or two default views, depending on the type of data being displayed. For instance, one of the standard views for a calendar list is a monthly table, while a group discussion list has a threaded discussion view. You can create your own view to display relevant information.
- 1.From the List Settings page for ProductLaunch, click the Create view link located at the very bottom of the page. You will see the View Type page.
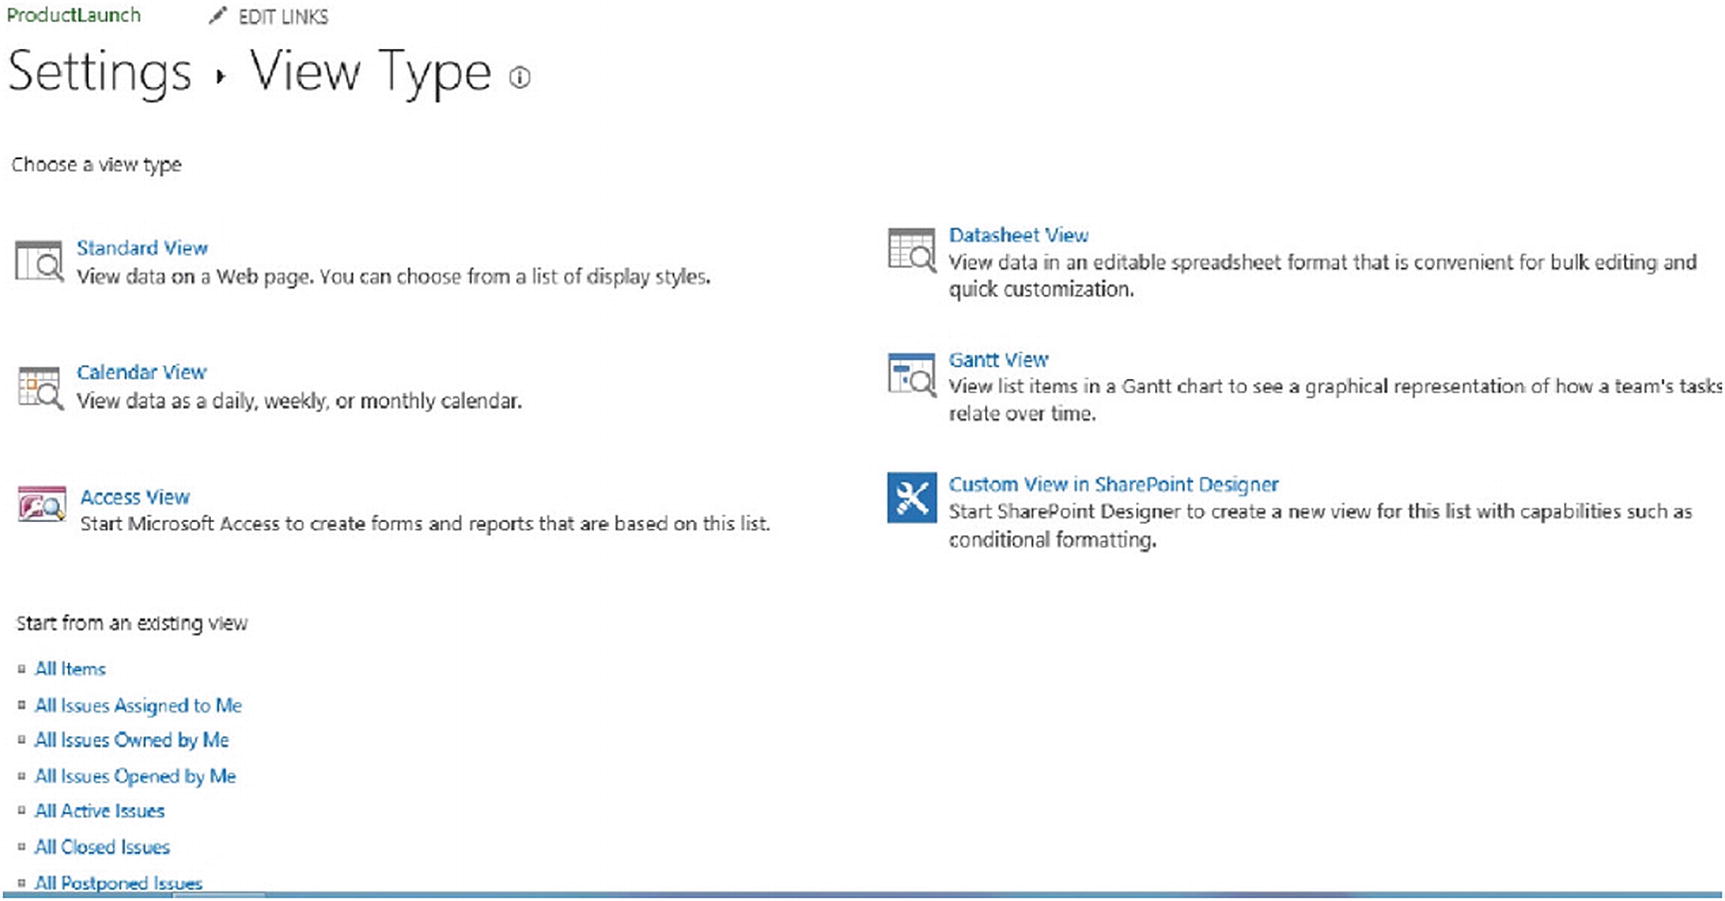 Figure 13-98
View Type page
- 2.On the View Type page, click the view style that best suits your needs. For this exercise, we clicked the Standard View link, which took us to the Create View page for this type of view.
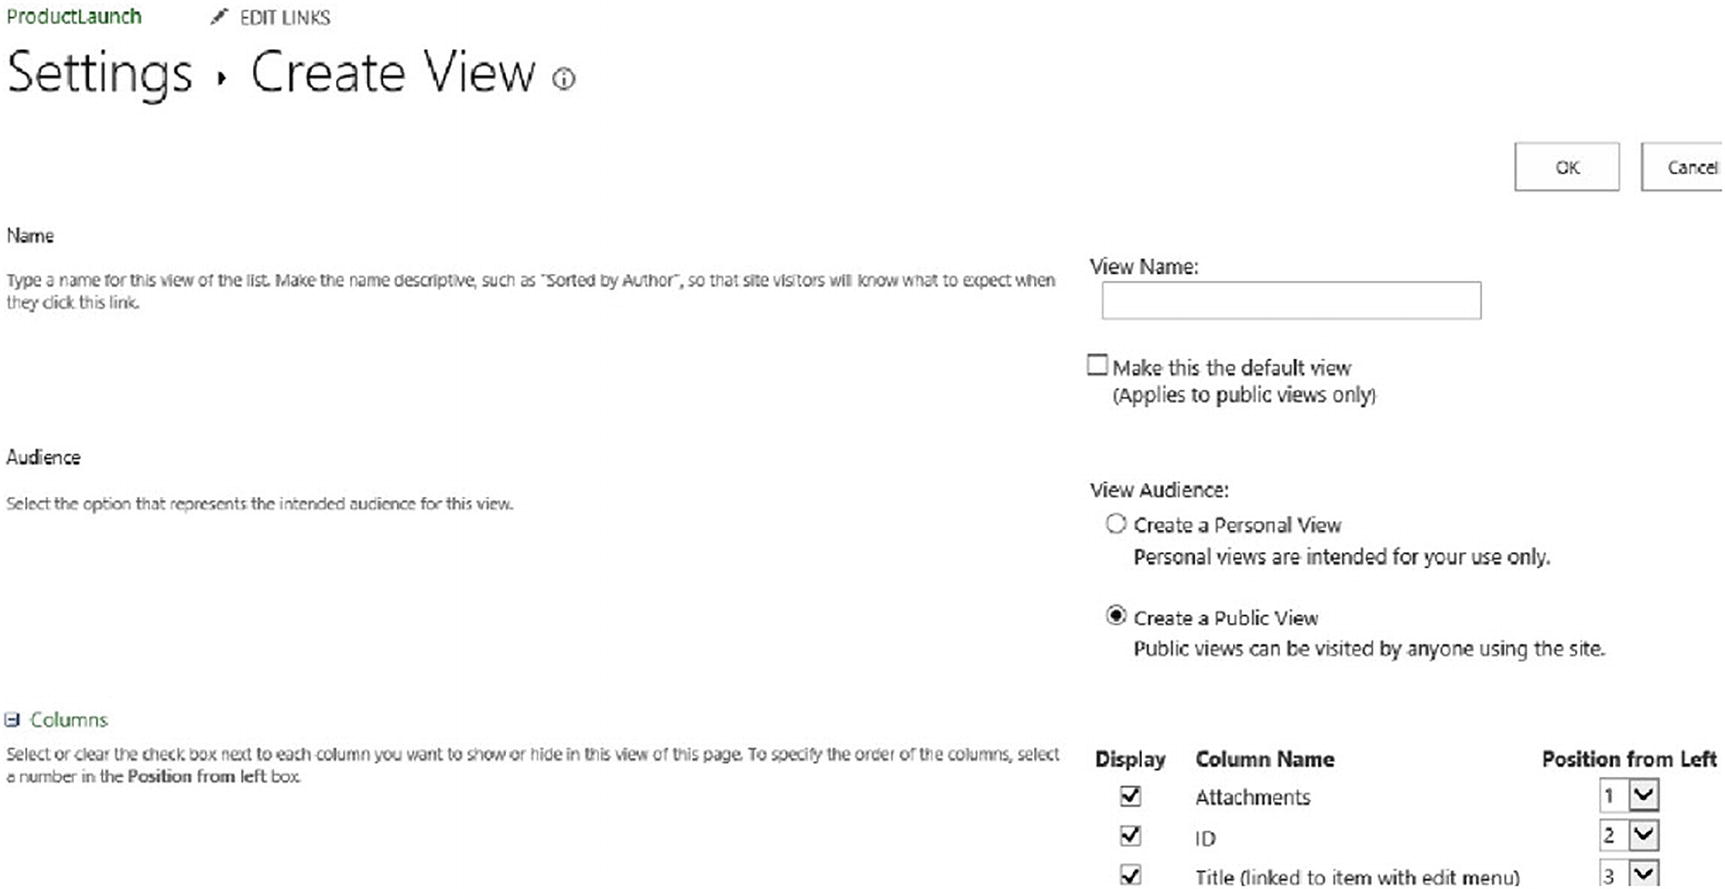 Figure 13-99
Create View page (for Standard View)
- 3.The Standard View presents data in a traditional table format. On the data entry page in the preceding figure, enter the following information:
View Name: “New ProductLaunch List View”
View Audience: Select Create a Public View so that anyone using the site can access the view.
Columns: Select the default Column Names for this view (Attachments, ID, Title, Assigned To, Status, Priority, Category, and Due Date).
- 4.Toward the bottom of this View Definition page, you will see sections for additional view parameters, such as Sort, Filter, and Group. Accept all of the default values in these sections.
 Figure 13-100
Sections on bottom of view definition page
- 5.
At the bottom of the view definition page, click OK to save this view.
- 6.Click the Issues link in the sidebar to navigate again to the Issues page for your project. From List:Manage Views, click the Current View dropdown list to select the view you just defined, as in the following figure.e>
 Figure 13-101
Newly created issues list view
Documents
Document libraries are used to store, organize, and share documents with people. By keeping documents in a central location, everyone who needs one has access at any time. You can also sync documents to your local computer so you have offline access to them.
Projects usually include documents, such as a project charter, statements of work, and closeout reports. Project Web App 2019 uses SharePoint to manage project documents.
Document libraries can either be shared by all who use your Project Web App site or can be specific to a project. In this section we will discuss how to view, edit, and add both types of libraries.
Shared Document Libraries
- 1.At the top-right corner of all Project Web App, you will see a Settings [
 ] icon. Click this icon to see the following options.
 Figure 13-102
Settings options
Note The options you see may differ slightly from the list in the preceding figure as well for following Project Web App settings, according to the permissions the Project Server administrator has granted to you.
- 2.In the Settings options list, click Site Settings to see the Site Settings page for your Project Web App site, similar to the following.
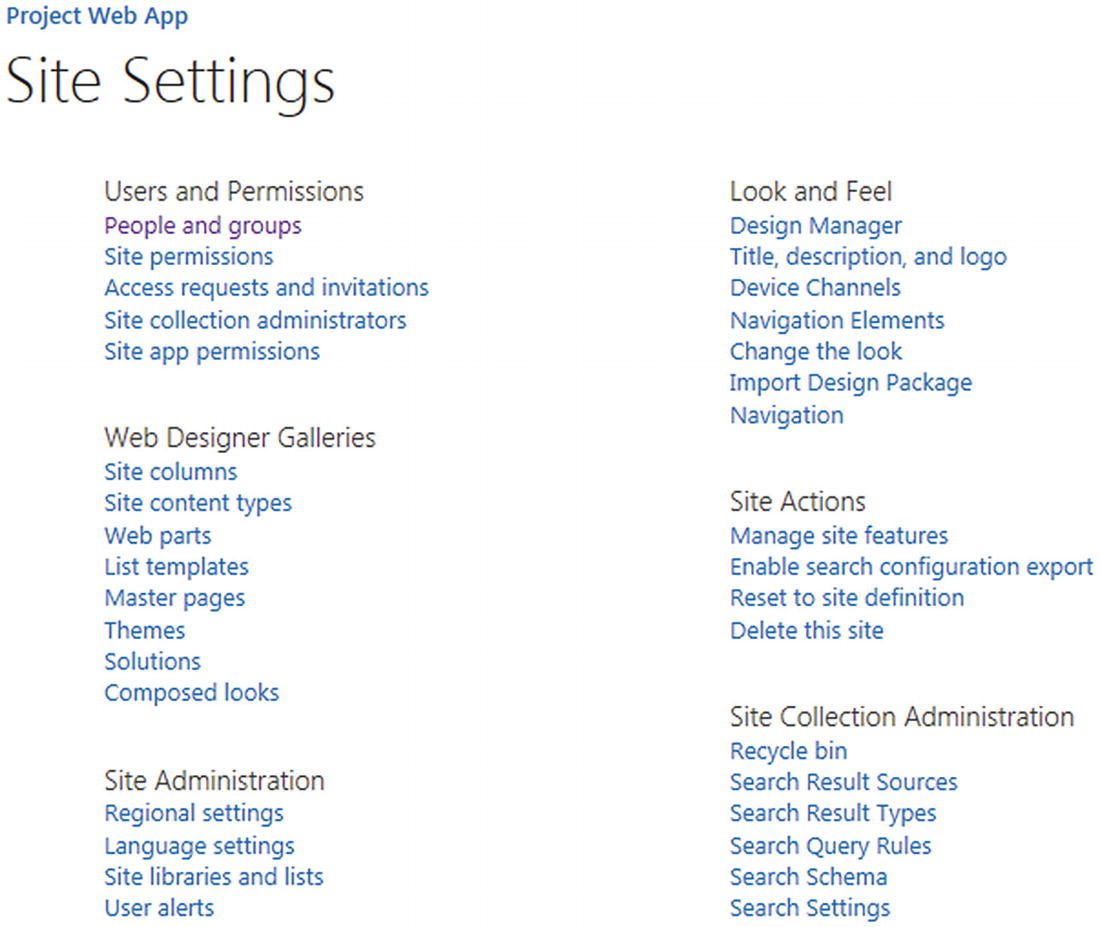 Figure 13-103
PWA Site Settings page
The Site Contents page provides a series of tiles that identify and provide links to all lists, libraries, and other apps associated with your Project Web App site.
- 3.Suppose you’d like to change the look of your Project Web App pages. To do so, click Change the Look under Look and Feel.
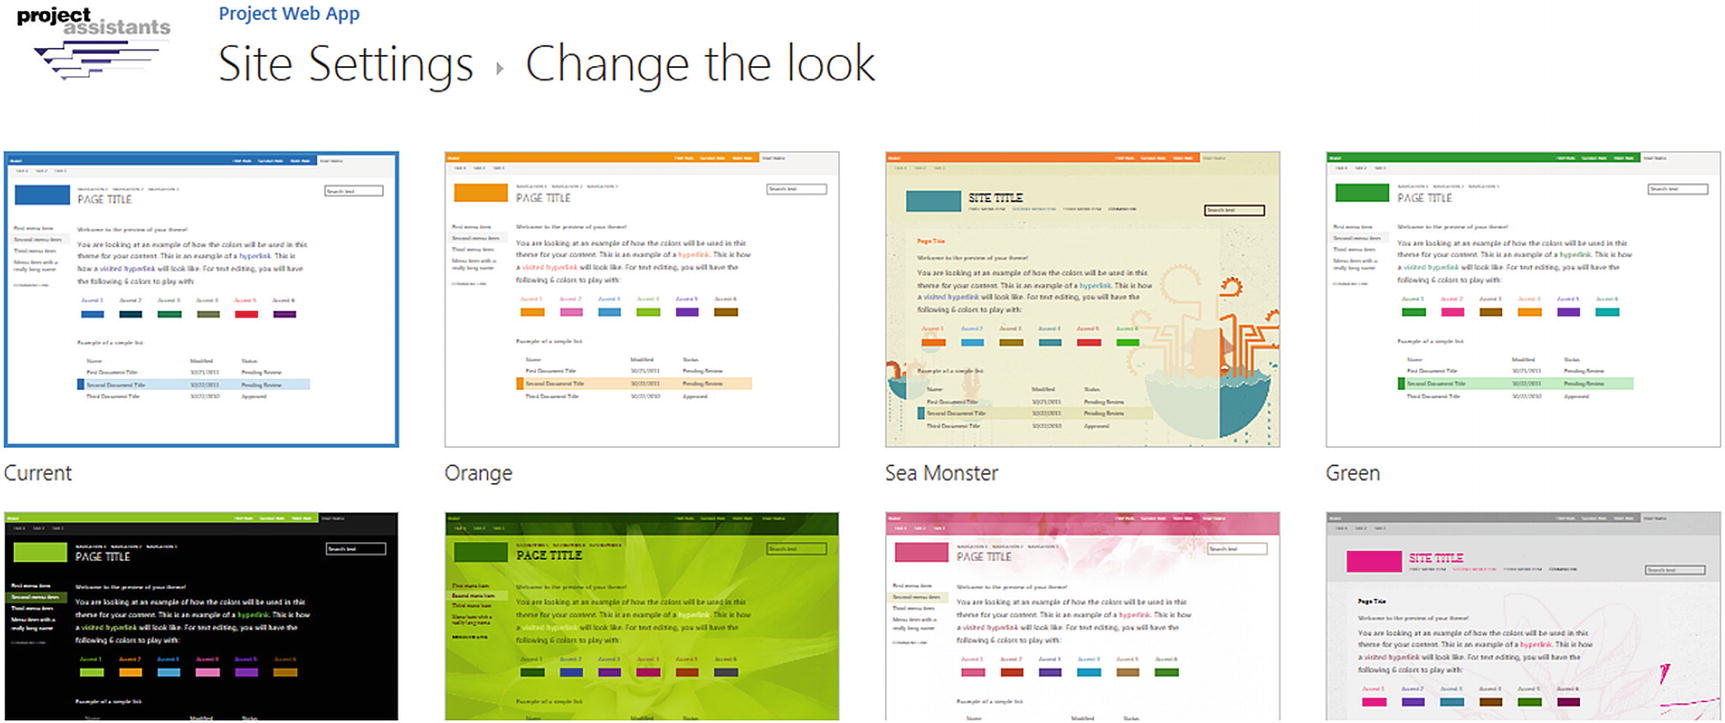 Figure 13-104
Change the Look of Project Web App under Look and Feel
You will see a page that offers a variety of options.
- 4.You can also select Title, Description, and Logo to customize your page for your organization.
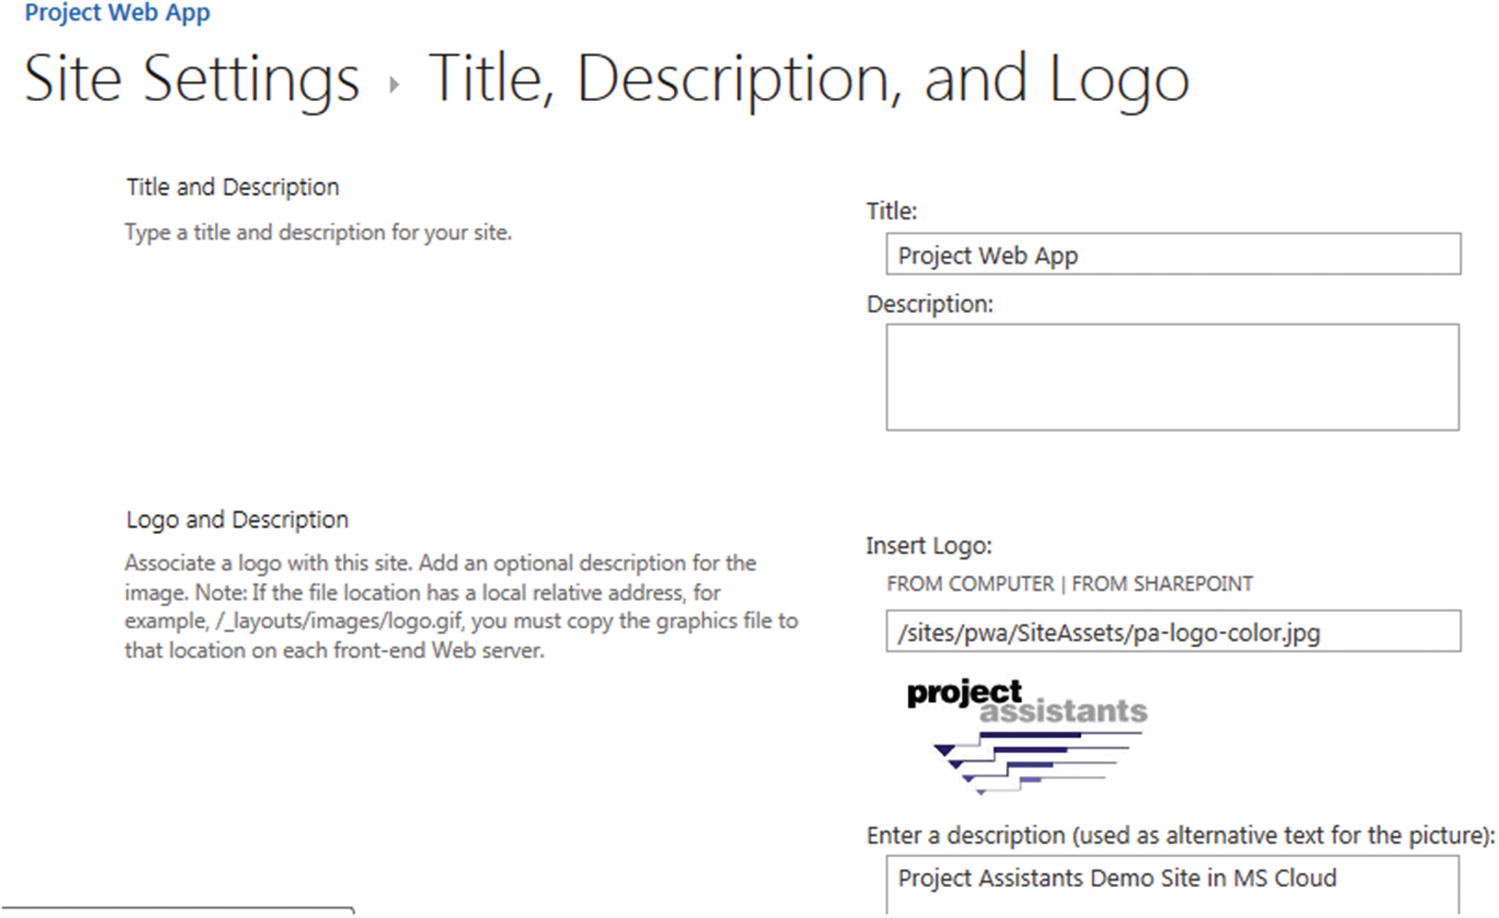 Figure 13-105
Title, Description, and Logo page
- 5.You can enter your company name or department in the Title to change the display on all Project Web App pages.
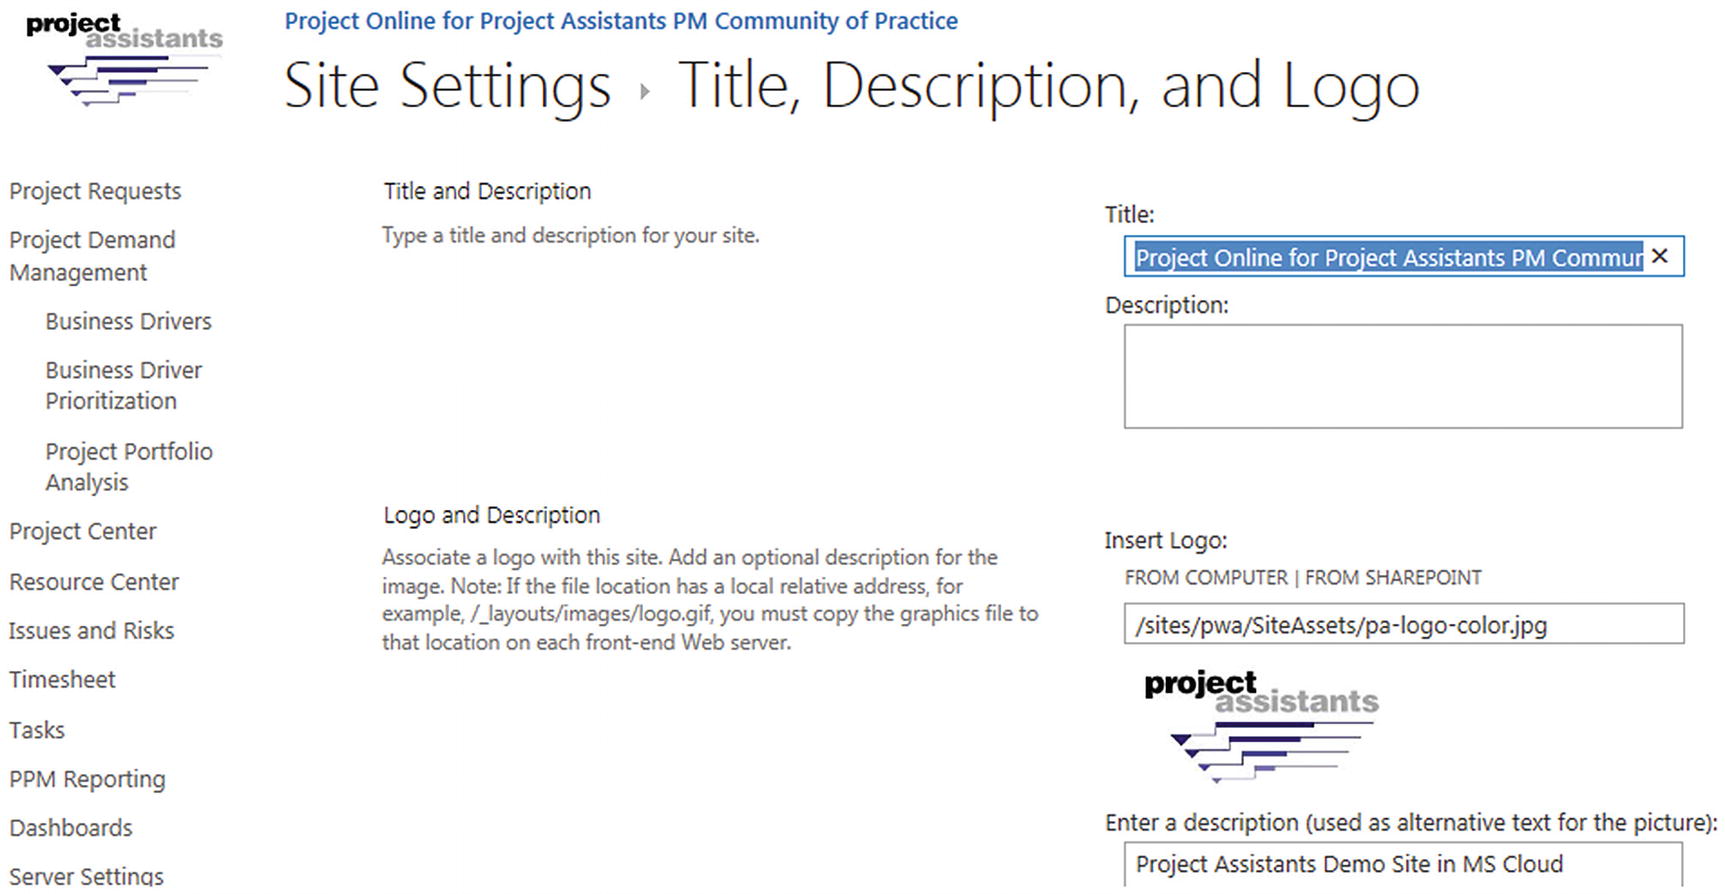 Figure 13-106
Change Project Web App title
- 6.
Click OK to apply the changes.
Project-Related Document Libraries
- 1.
From your Project Web App Home page, click the Projects link in the sidebar to navigate to the Project Center.
- 2.
Click the project ABC Integration to navigate to the Project Details page for the project. From Project:Navigate, click the Project Site icon. Note the Documents section toward the bottom of the screen.
Currently there are no documents in the default documents library associated with ABC Integration.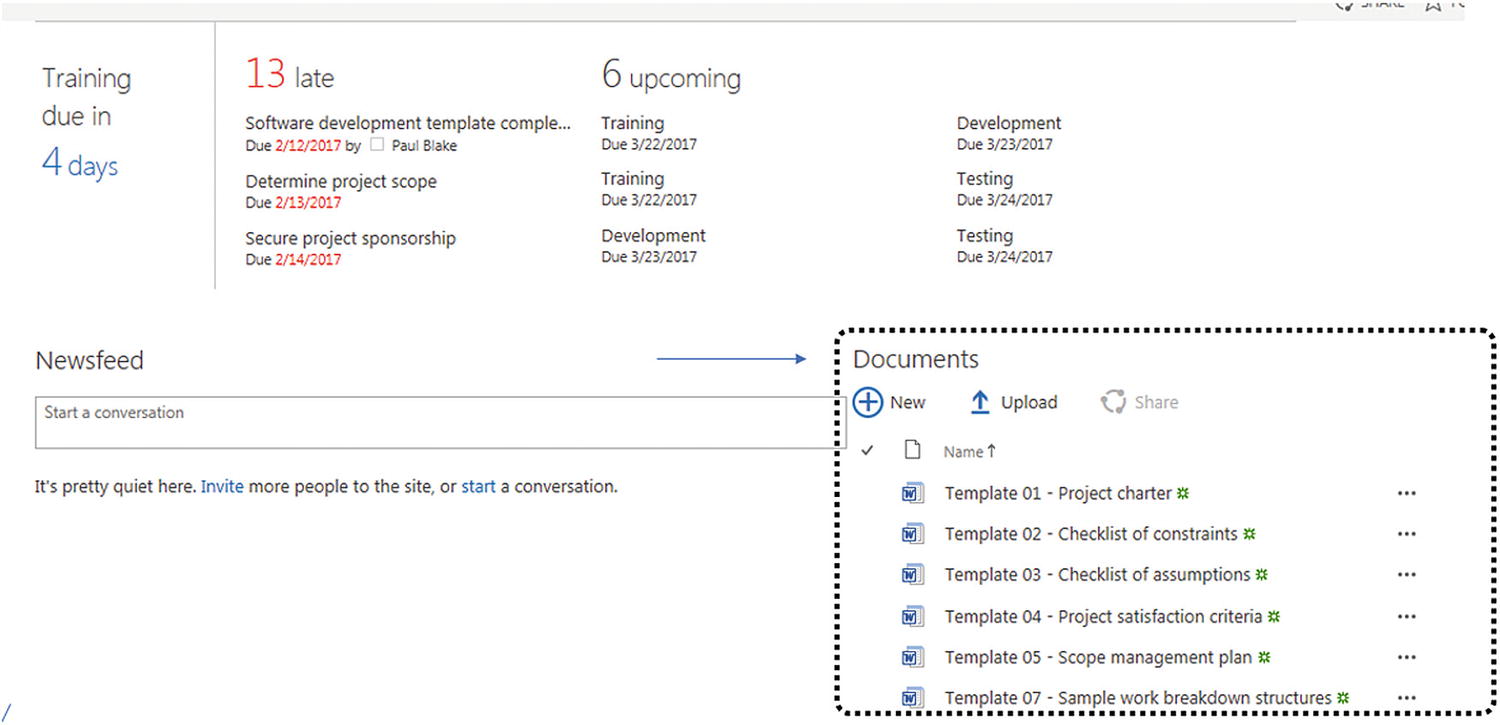 Figure 13-107
Documents for ABC Integration
Adding Documents to a Document Library
- 1.To view the documents in a document library, you can either click the sidebar link to the library or the appropriate tile on the project’s Site Contents page. For the purposes of this exercise, from a project’s project site (in this case ABC Integration), click the Documents link in the sidebar.
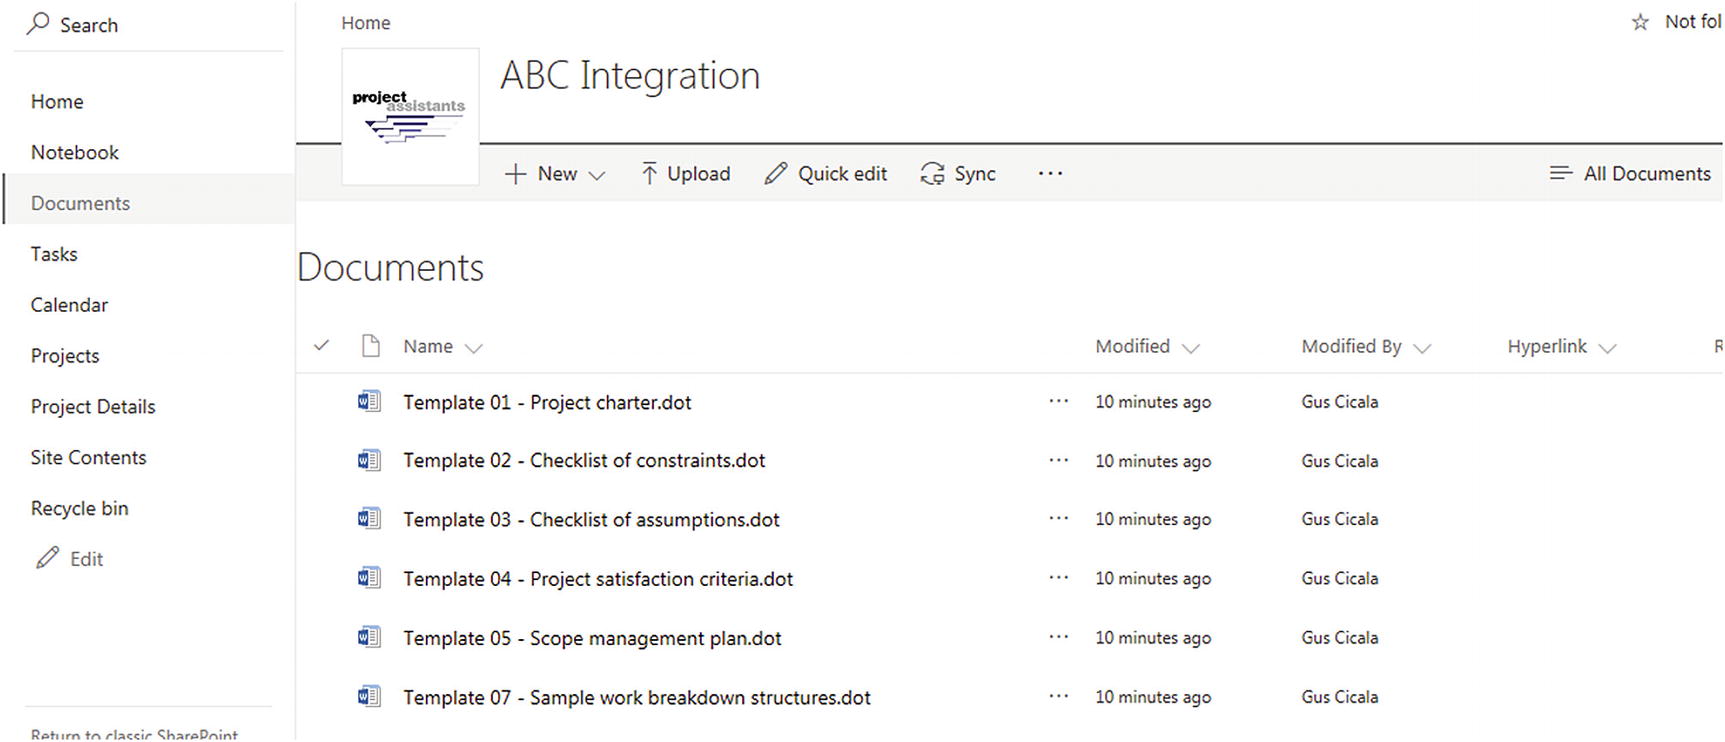 Figure 13-108
Default document library for ABC Integration
- 2.Click the Upload icon to add a new document to the document the library.
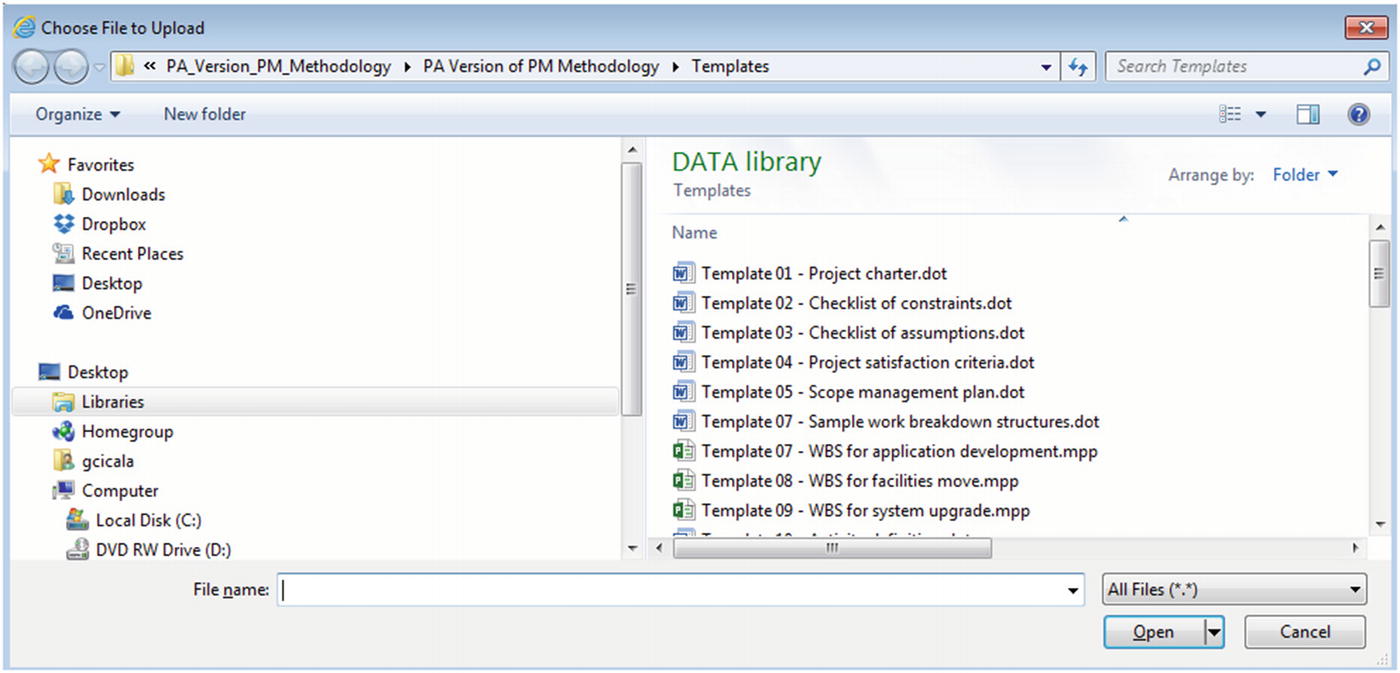 Figure 13-109
Upload file to document library
To create a folder in your library, from Files:New, click the New Folder icon to see the Create a new folder dialog box.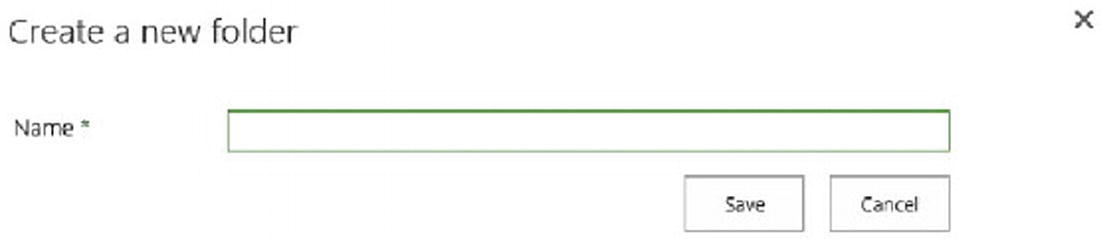 Figure 13-110
Create a new folder dialog box
- 3.Name your new folder and click Save. The newly created folder will appear in the library.
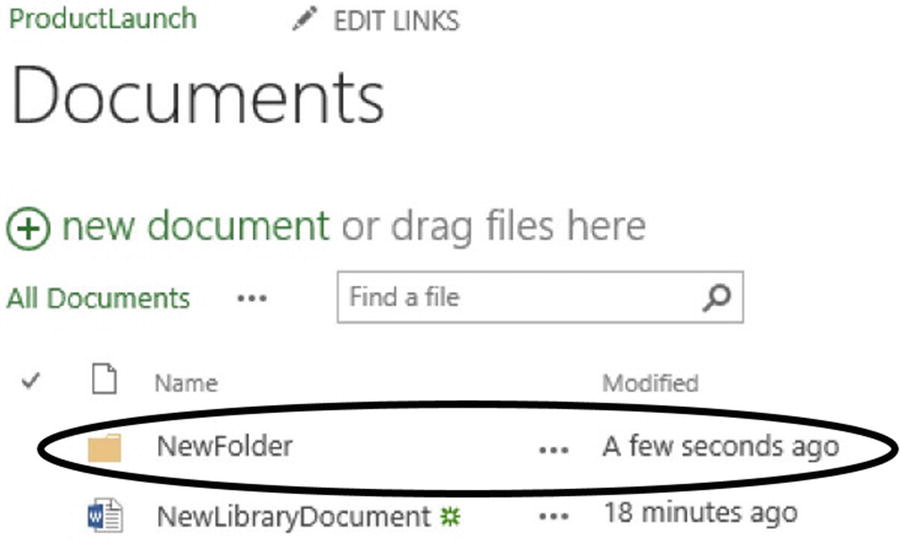 Figure 13-111
New folder in the library
- 4.
You can view and upload files to a folder in the same manner as you view and upload folders to a library.
 End of Chapter Quiz Questions
1. What is the difference between opening the project using the In Microsoft Project function and the In Microsoft Project for Editing function, and for both of these to work, what do you need to have?

2. What option takes you to a page where you can view and check in all of your checked-out projects?
___________________________________________________________
3. The options in which groups help you define the timescale displayed on your Project Center screen?
___________________________________________________________
4–7. Match the group option listed in the left column of the following table to the correct description from the right column by entering the letter that the step corresponds to in the blank line.
4. Outline ____ | A. Categorizes projects by any field in the selected view to three category levels |
5. View ____ | B. Allows you to select built-in filters, create a custom filter, or turn on Auto-filter |
6. Filter ____ | C. Provides options for adjusting the level of detail you wish to display in the projects listed in the Project Center |
7. Group By ____ | D. Allows you to customize the appearance of the Project Center list |
8. How can you sort projects by the entries in a particular field? ___________________________________________________________
9. How can you open the Project Details page from the Project Center, and what can the user see after it’s open?

10. What does clicking the empty box to the far left of the Project Name, in the Project Center, allow you to do, and why would it be necessary?

11. What do you need to do in the Project Center if you want to search for content across the site?

- 12. Which of the following has team building functions?
- a.
Microsoft Project Professional
- b.
Project Web App
- c.
Both a and b
- d.
None of the above
- a.
13. What are the options available from the Build Team view of PWA?
___________________________________________________________
14. What does the Match option in Team Builder do?

15. What can the default summary of the Resource Assignments view be used for?

16. What are the four standard Resource Availability views?

17. True or False: A “Committed” engagement means the resource’s booking type is committed.