
Defining Project Resource Types with Microsoft Project 2019
Assigning Resources to Tasks
Cost Planning
Task Constraints and Scheduling
Resource Assignment Review Exercise
 Learning Objectives for This Chapter
Define project resource types: work, cost, and material
Assign resources to tasks
Use cost features to develop a project budget
Set and modify task constraints
Split work on a task
Use the team planner
Effectively define task types using fixed work, fixed units, or fixed duration
Explain the effect of effort-driven scheduling on task assignments
Appropriately apply the task usage or resource usage view to display assignment information
Assign costs to tasks and apply cost rate tables
Determine which views are most appropriate to show relevant cost information by task, resource, or assignment
Understand and apply task constraints to develop a realistic schedule
Microsoft Project 2019 users will most often be working in an enterprise environment connected to Project Server. In this situation, the Project Server administrator creates a resource pool and modifies it as necessary, while project managers staff their projects from the resource pool. This allows the organization to track assignments for team members across all projects.
The enterprise resource pool and enterprise resource management will be addressed in Chapter 10 (Section 10.3, “Enterprise Resource Management”). In this chapter, we will focus on the various ways Microsoft Project 2019 enables you to assign resources to tasks, which will help you determine how long a task will take and how much the task will cost. As noted earlier, a resource can be a specific person, a generic group of people (e.g., programmer or carpenter), a piece of equipment (e.g., crane or computer), a material consumed in the course of completing the task (e.g., lumber, printer paper), or a cost associated with an individual task (or the entire project, if designated as a budget resource).
8.1 Defining Project Resource Types with Microsoft Project 2019
Up until this point, we’ve addressed the logic of project activities: What deliverables are required? In what order must they be completed? What affects the amount of work needed to complete them? Now we must consider the type and availability of resources required to accomplish the work and how this will affect the project schedule.
Note: Creating an internal resource list is useful when resources are to be used exclusively by your project. In the case of an enterprise resource pool, resources created within an individual project are flagged as local resources.
The first step in this process is to examine the tasks identified in your WBS and determine the skills and other resources needed to accomplish each task. You want to be certain the resources on your project team have the right skills. Keep in mind that some tasks must be performed by qualified professionals and/or specialists while others can be performed by generalists with broader capabilities.
Viewing Resources in the Resource Sheet
- 1.
From the Resource:View tab in the ribbon, use the dropdown list to select the Resource Sheet view.
- 2.
The first Resource Name field contains Patrick Rierdon.
- 3.Tab over to the Type dropdown list and notice the resource type options now available.
 Figure 8-1
Resource types
Work resources are not consumed by the project, material resources are used up, and cost resources only have costs associated with them and can be used for high-level project budgeting. Cost resources can be assigned to individual tasks (or to the project summary task, if they are flagged as budget resources).
- 4.
Tab through the default Resource Sheet fields for each of the three resource types and notice the differences.
- 5.
Add the following generic resources to your project by keying them into the Resource Name column in the lines following Travel:
Resource Name | Type | Initials |
|---|---|---|
Analyst | Work | Anlst |
Designer | Work | Dsgnr |
Project Manager | Work | PM |
Generic resources are almost always replaced with named resources as the project progresses. It is reasonable to assign a generic resource at more than 100% if you expect to be assigning multiple named resources to that task later.
- 6.Right-click in the Resource Name column header and select Insert Column. Choose Generic from the dropdown list. You will see a new column titled “Generic.” Use the dropdown list in each row to identify the three new resources as generic resources (Yes in the Generic column). Your screen will resemble the following.
 Figure 8-2
Adding generic resources
Adding a Local Resource to Your Project
- 1.
Click the first available Resource Name field and type “Susan Smith.”
- 2.
Press Tab and notice the default values assigned to a new resource.
Adding a Resource Through the Resource Information Dialog Box
- 1.Double-click a blank row in the Resource Sheet view. The Resource Information dialog box appears, showing the General tab by default.
 Figure 8-3
Resource Information dialog box
Notice you can provide the same kind of information entered in the Resource Sheet view. There are also tabs for Costs, Notes, and Custom Fields associated with the resource. The General tab also contains a Budget checkbox to allow you to flag a resource for high-level budgeting purposes.
Using the Resource Notes Button
- 1.
Click Cancel to close the Resource Information dialog box and return to the Resource Sheet view, and select Patrick Rierdon.
- 2.In Resource:Properties, click the Notes icon [
 ]
. You will be presented with the following dialog box.
]
. You will be presented with the following dialog box. Figure 8-4
Resource Information dialog box
- 3.
In the Notes field, enter the text “Patrick’s contract calls for payment at the end of each task he is assigned to, with a minimum payment period of two weeks.”
- 4.
Click OK. A resource note icon will appear in the Indicators field for Patrick Rierdon. Move your pointer over the icon to read the associated note.
- 5.Save your project.
 Figure 8-5
Note for Patrick Rierdon
![]() If you create a resource note that is too lengthy to view in its entirety as a ScreenTip, you can double-click the resource note icon in the Indicator field to read the entire note.
If you create a resource note that is too lengthy to view in its entirety as a ScreenTip, you can double-click the resource note icon in the Indicator field to read the entire note.
You can also include this note in a printed report or view.
8.2 Assigning Resources to Tasks
Microsoft Project 2019 enables you to assign resources to tasks in a variety of ways. Resource assignments clarify responsibility for doing tasks and also help you to determine how long a task will take and how much it will cost.
Microsoft Project 2019 uses two different fields to express the allocation of a work resource: maximum units and assignment units. The maximum units field represents the amount of a resource’s time that is available to accomplish any project tasks during any time period. The default value is 100%, which can be thought of as one full-time equivalent of the resource for the number of project hours in a day (by default, 8).
The assignment units value indicates the allocation of a resource to a particular task assignment. A specific resource can work full time (100%) on one task or half time (50%) on two tasks and so on before Microsoft Project flags that resource as over-allocated. You can also specify assignment units for material resources to indicate the quantity of material being used for the assignment, even though there is no maximum units value available for material resources.
The following exercise demonstrates how you can assign resources in various ways and avoid some over-allocations by using tools available through the Assign Resources dialog box. These techniques apply whether you are working with local resources or those from the enterprise resource pool.
Assigning a Resource to a Task
- 1.
From Task:View, apply the Gantt Chart view, and in Task:Properties, click Details. Select Task ID 2, Create Statement of Work.
- 2.Click the first Resource Name cell in the Task Details Form (bottom pane). Type “Frank Goren”. Your screen will resemble the following.
 Figure 8-6
Using a split screen view to add assignments
- 3.
Click OK in the Task Details Form to assign Frank Goren to the task and add him to your resource sheet. Note that the Microsoft Project scheduling engine automatically calculates the assignment effort (work) based on the task duration.
You can also add a name directly to the Resource Name field in the Gantt Chart Entry Table or in the Assign Resources dialog box. In these cases, just like in the preceding split screen example, the default values will be applied in the Resource Sheet until changed. Since these methods are only necessary for local resources, the Resource Sheet view is the most efficient approach to use.
The method of adding resources is dangerous as you could spell a name incorrectly and end up with two or more of the same resources on your project. It is a good practice to choose from resources, as in the following methods.
- 4.
If necessary, from Task:Properties, click the Details icon to split the window. Right-click in the gray area of the Task Details Form (lower pane) and click Cost from the dropdown list to view cost information.
- 5.
Select Task ID 3, Obtain approval of Statement of Work, in the upper pane.
- 6.In the upper section of the pane, click the Assign Resources icon [
 ] under Resource:Assignments. You will see the Assign Resources dialog box.
 Figure 8-7
Gantt Chart or Task Form with Assign Resources dialog box
- 7.Select Patrick Rierdon in the Assign Resources dialog box, and then click Assign. Your screen will resemble the following.
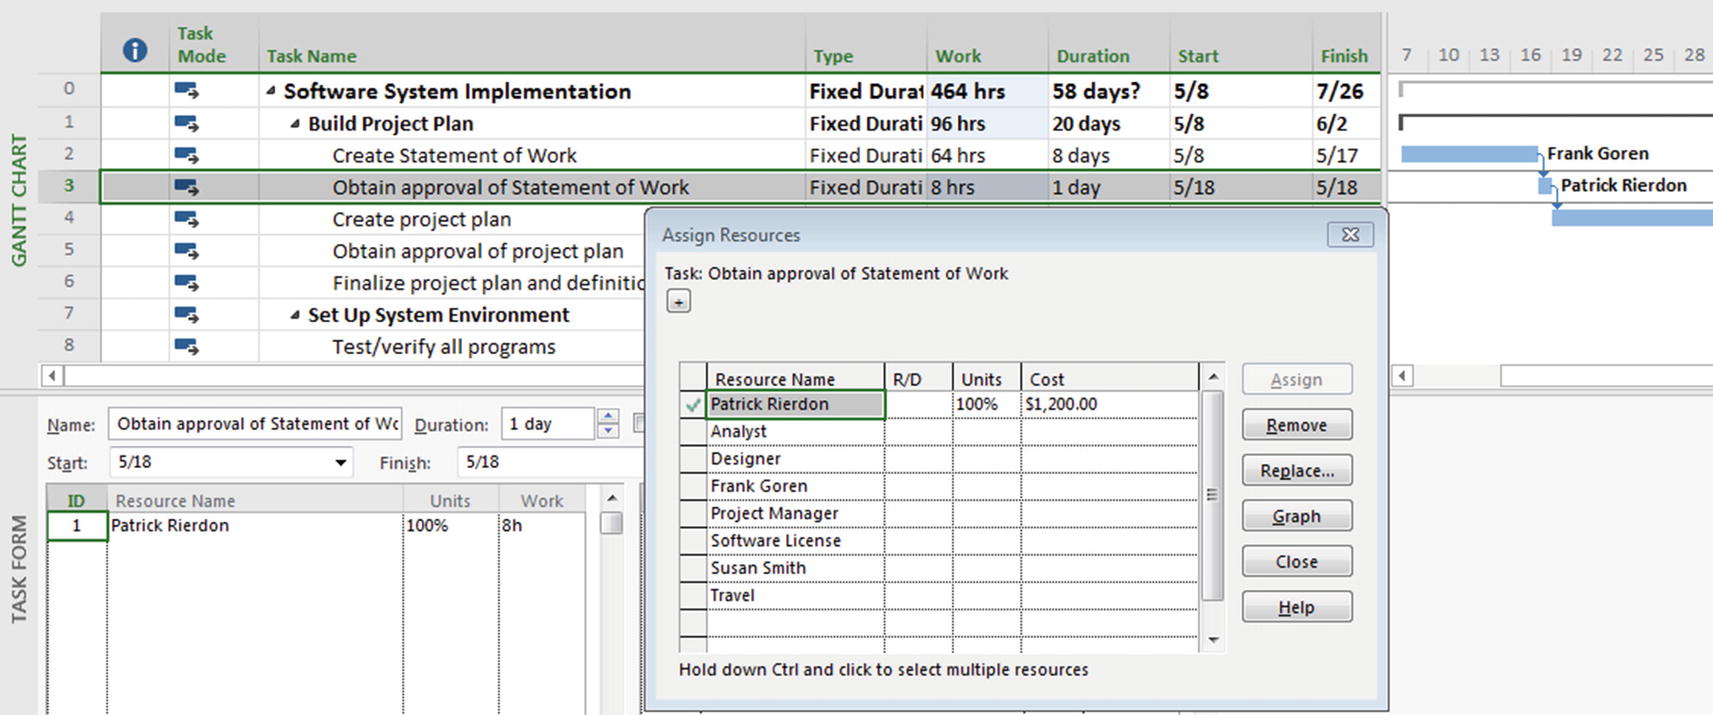 Figure 8-8
New task assignment
Notice in the bottom pane that Microsoft Project has automatically calculated the work at 8 hours based on the task duration of 1 day.
- 8.Click Create project plan (Task ID 4) and Ctrl-click Obtain approval of project plan (Task ID 5) to highlight both tasks. Then, click Patrick Rierdon in the Assign Resources dialog box and click Assign. Patrick Rierdon is now assigned to both tasks. Your screen will resemble the following.
 Figure 8-9
Multiple task assignment
Just as you can assign one resource to multiple tasks, you can assign multiple resources to one task or several tasks at the same time.
- 9.
Select the task Create project plan (Task ID 4). Notice that Microsoft Project has calculated work of 24 hours based on the task duration of 3 days. Note: If you use this method of assigning resources, you will only see this result if you have inserted the Work column in the Gantt Chart or show the details of assignment information in the lower pane.
- 10.Assuming that Patrick needs a software license for the task, click Software License in the Assign Resources dialog box, and then click Assign. Your screen will resemble the following.
 Figure 8-10
Material resource assigned
Notice that Microsoft Project has assigned one software license to the task (by default) and calculated the cost as $180.00. Patrick’s cost was also calculated based on his work and resource standard rate (as seen in the Resource Sheet). Cost calculations will be covered in greater detail later in this section.
- 11.
Because you think Patrick will need two licenses, change the value in the lower pane appropriately and click OK.
- 12.There will also be travel costs associated with this task. Click the Cost cell for Travel in the Assign Resources dialog box. Enter “$3,000.00” and click Assign. Your screen will resemble the following.
 Figure 8-11
Cost resource assigned
Notice the recalculated cost for two software licenses ($260.00) and the travel cost next to the Gantt bar for this task.
When assigning material resources to a task, assign the resource first, accepting the default units value, and then modify the Units field in the Task Form (lower pane). For cost resources, type the predicted value in the Cost cell for the resource and press Enter. Using the Assign button with a cost resource can lead to unexpected and undesirable results if other resources are already assigned.
- 13.
Save your project.
Replacing Resources on Task Assignments
![]() This exercise continues the use of ResourceAssignment.mpp from the previous section (or you can open ResourceAssignment_Inst2.mpp from your exercise directory).
This exercise continues the use of ResourceAssignment.mpp from the previous section (or you can open ResourceAssignment_Inst2.mpp from your exercise directory).
- 1.
Select Create Statement of Work (Task ID 2). In the Assign Resources dialog box, select Frank Goren and click Replace.
- 2.In the Replace Resource dialog box, click Susan Smith. Your screen will resemble the following.
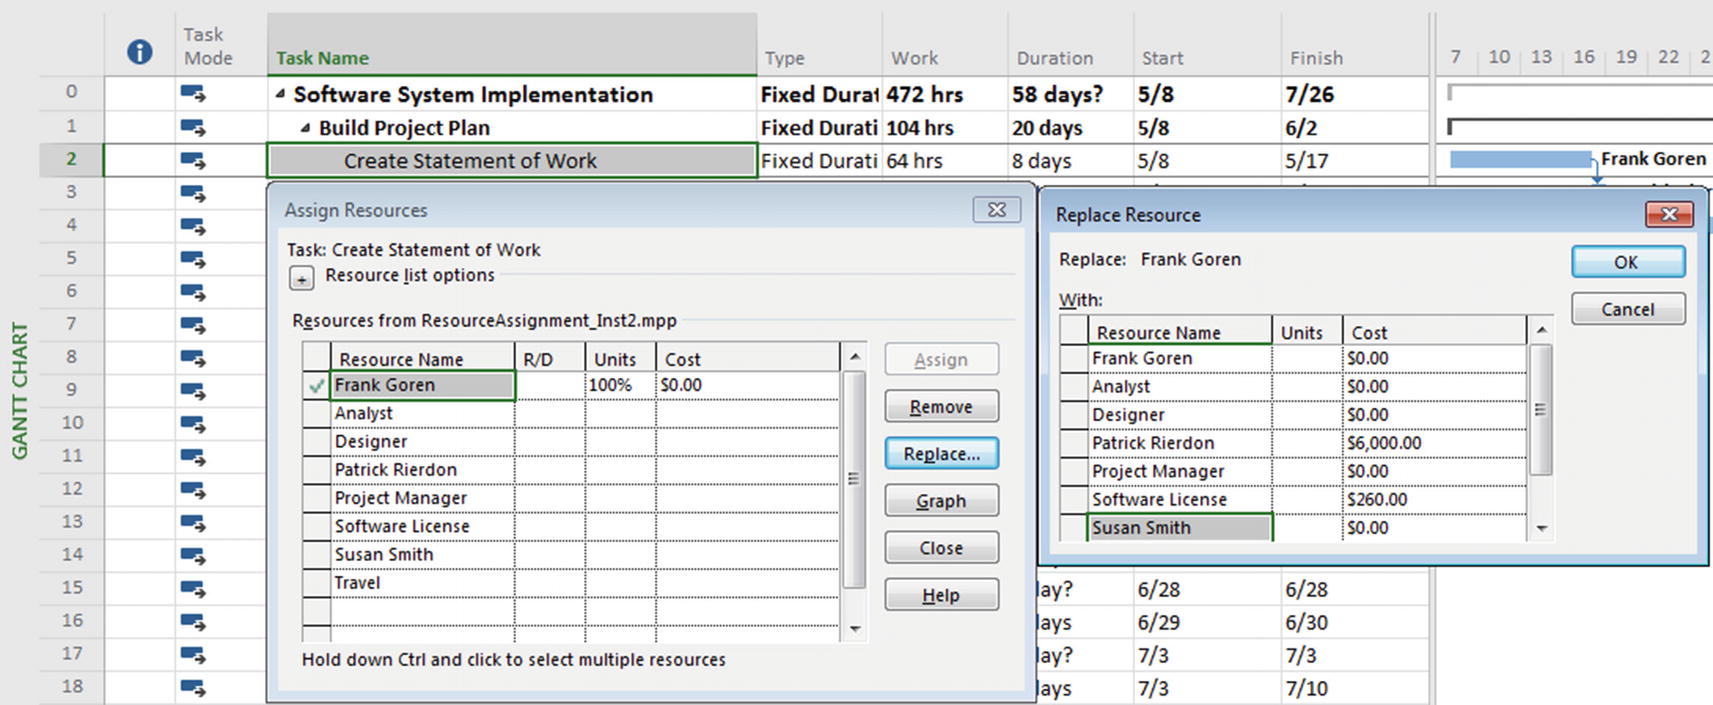 Figure 8-12
Replace Resource dialog box
- 3.
In the Replace Resource dialog box, click OK to complete the replacement process.
- 4.Choose View:Split view to verify Susan Smith is assigned to Task 2.
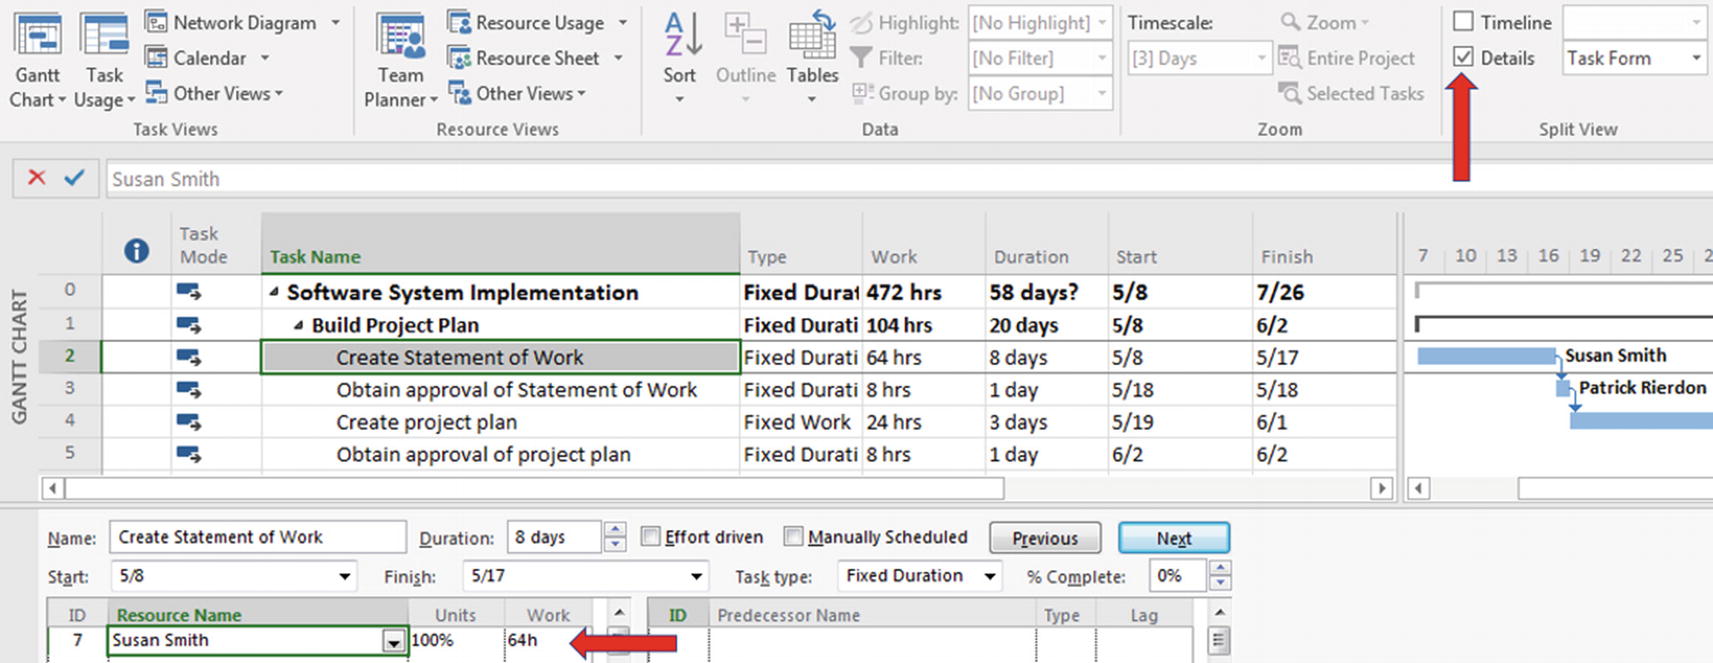 Figure 8-13
Verify resource assignment replacement
- 5.If you wish to verify the cost of this replaced assignment, right mouse click in the lower pane and choose Cost from the dropdown.
 Figure 8-14
Verifying the cost of a replaced assignment
- 6.
Save your project.
Generic resources are replaced by named resources in the exact same manner as named resources replace each other. So once you determine, for example, that John Smith is the analyst that will be assigned to this project, you would use the method just described to replace the generic resource “Analyst” with the named resource “John Smith.”
Also, Microsoft Project considers the specific resources calendar of all assigned resources when scheduling a task. Because of this, you will have to look into each resource’s calendar details to figure out why an assignment date might have changed when replacing an assigned resource with another resource who may have a different calendar setup. That might not be a problem (e.g., in the previous example, you might remember that Susan has vacation plans that may affect the scheduling of her new assignment), but over a long project, many of these details can get lost. When you’re in the middle of a stakeholder review with top management and someone asks, “Why does your Gantt Chart say 10 days duration but show 15 days?” it’s easy for your mind to go blank. You’d like to be able to show that the task takes 10 days of work, but there is a break in the middle.
We will see some ways to investigate these kinds of situations when we review the Task Usage and Resource Usage views. These views can show you how resource assignment work is spread over time.
Interrupting Work on a Task
![]() This exercise continues the use of ResourceAssignment.mpp from the previous section (or you can open ResourceAssignment_Inst3.mpp from your exercise directory).
This exercise continues the use of ResourceAssignment.mpp from the previous section (or you can open ResourceAssignment_Inst3.mpp from your exercise directory).
- 1.
Verify you can see the entire Gantt bar for Task 4. If so, scroll to the right side of the Gantt Chart (the timescale) to ensure that you can see all of Create project plan (Task ID 4).
- 2.From Task:Schedule, click the Split Task icon [
 ]. Position your mouse over the Gantt bar for task Create project plan (ID 4), until the Start Date on the ScreenTip reads “5/25” (the date you want the split to begin) and release your mouse button to initiate the task split function. The ScreenTip will resemble the following.
 Figure 8-15
Split task ScreenTip
- 3.Now, place your mouse over the right side of the split task. Continue to hold down the left mouse button and drag your pointer to the right. The dates in the ScreenTip will change to show the start and finish dates for the delayed segment of the task.
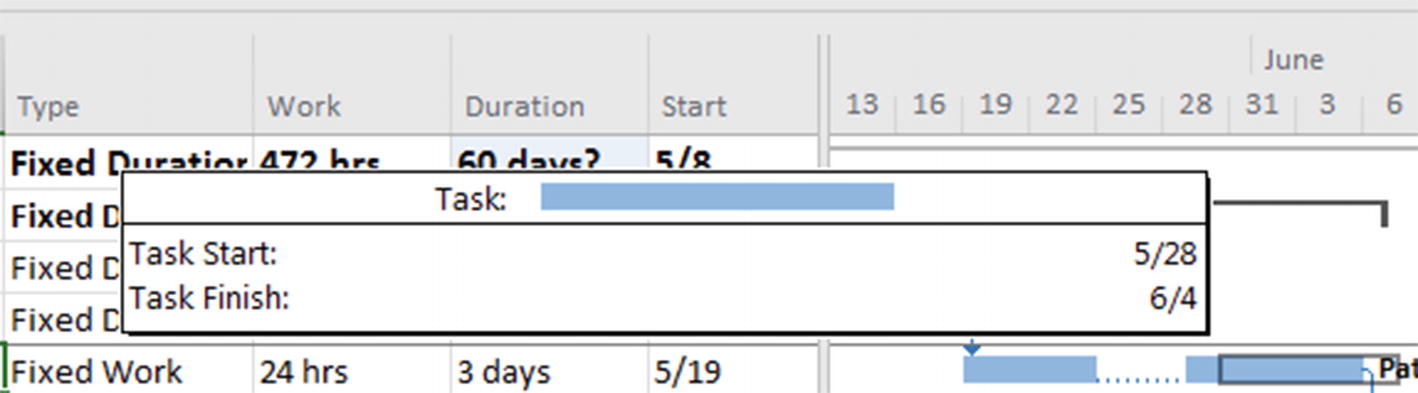 Figure 8-16
ScreenTip while dragging split task
- 4.When the start and finish dates on the ScreenTip read 5/28 to 6/4, release the mouse. The task will be split into two segments. Your screen will resemble the following.
 Figure 8-17
Successful split task (delays remainder of task segment that was split)
Notice that the task duration field in the Entry Table remains unchanged because no work is done during the gap in the task. This can be verified by displaying the Task Usage view.
Removing a Task Split
- 1.
Move your mouse pointer over the right-hand portion of the split Gantt bar for the task Create project plan (task ID 4) until the cursor changes into a four-way arrow.
- 2.Left-click the right-hand segment of the Gantt bar and drag it back toward the left half of the bar. Your screen will resemble the following.
 Figure 8-18
Removing task split
- 3.
Release the left mouse button when the two halves of the bar touch. The segments of the Gantt bar are reunited, and work on the task is no longer split.
- 4.
Save and close your project.
Team Planner
The Team Planner view allows you to easily see what tasks are assigned to resources. Using the Team Planner view, a simple dragging motion also allows you to change existing assignments to over-allocated resources or assign currently unassigned tasks to available resources.
- 1.From Resource:View, click Team Planner. You will see a timeline with tasks displayed. Resources and the tasks to which they are assigned are displayed on the top portion of the screen, and unassigned tasks are displayed in the bottom portion.
 Figure 8-19
Primary Team Planner view
- 2.
Hovering over a task bar displays information about the task. The task can be rescheduled simply by dragging the task on the timeline. The task can also be assigned to a different resource by dragging to the desired resource’s “swim lane.”
- 3.
To see the effects of rescheduling and reassigning tasks, click the Gantt Chart icon in Task:View.
- 4.
The Team Planner function has several limitations. There are more effective ways to identify and resolve resource over-allocations that will be covered later in this section.
- 5.
Save and close your project.
Modifying Assignments When Work Is the Basis for Your Schedule
![]() This exercise uses the file TaskTypes.mpp. Be sure this project is open before beginning.
This exercise uses the file TaskTypes.mpp. Be sure this project is open before beginning.
- 1.Split the window in the Gantt Chart view and select the task Locate new site (ID 4). Be sure the Resources and Predecessors option is showing in the Task Form view (lower pane). Your screen will resemble the following.
 Figure 8-20
Fixed work task with split screen
- 2.
Note the fields that have arrow pointers to follow how the information changes in this exercise.
What is the duration of the task?
What is Mike’s work assignment?
Mike has other obligations during this time, and he can only devote six hours each day to the task (75% of his time). Change the units for Mike Goren’s assignment to “75%” and click OK in the Task Form window. What is the revised duration for this task?
Did the work change?
- 3.
Return Mike’s assignment units value to “100%” and click OK. Now increase the task duration to “2w” and click OK.
Did Mike’s units change?
Did the work change?
If not, why not? (Hint: Should a fixed work task change its work?)
- 4.
Click in the Resource Name column directly under Mike Goren and use the pull-down menu to add Bernie Frazer to the task. What are you actually changing when you add a resource?
- 5.
Click OK. What happens to the task?
Since work is fixed, when you change units, Microsoft Project recalculates duration. This is why the Effort driven option (above Task Type) is grayed out—fixed work tasks must become shorter when resources are added.
Microsoft Project will not change the work value on a fixed work task, but you can. What happens if you do? Mike and Bernie have now estimated that they will need 40 hours each to complete the task.
- 6.
Change the Work value to “80h” for both Mike and Bernie. Microsoft Project could keep the equation in balance either by assuming each would work 16 hours per day (200% units) or by allowing the task to take twice as long. What actually happens to the task assignment when you click OK? Change the Work value for Mike and Bernie back to “40h.”
As a general rule, the Units value is preserved when possible, so the task became twice as long (back to one-week duration).
![]() When working in the Task Form or Task Details Form half of a split view, changes are not effective until you click OK or press Enter twice. Users occasionally get frustrated because they press Enter and nothing happens!
When working in the Task Form or Task Details Form half of a split view, changes are not effective until you click OK or press Enter twice. Users occasionally get frustrated because they press Enter and nothing happens!
Modifying Assignments When Task Duration Is the Basis for Your Schedule
- 1.Select the task Move into new location (ID 16). Your screen will resemble the following.
 Figure 8-21
Fixed duration task with split view
- 2.
The actual office relocation must occur over two days. On further consideration, you have decided the work estimates need to be increased.
What is the units value for the resources?
Increase the work effort for each resource from “8” hours to “12” hours and click OK.
What is the revised units value for the resources?
Did the duration change?
If not, why not? (Hint: Should a fixed duration task change its duration?)
- 3.
A few resources have volunteered to be fully available both days. Increase the units to “100%” for Bernie Frazer, Lee Tang, and Julie Pawlkowski.
What is the revised work effort for these resources?
Did the duration change?
- 4.
Return all the Work estimates to “8 hours” and all Units to “50%” and click OK to go back where we started.
Fixed duration means Microsoft Project won’t change the duration value for the task—but it doesn’t mean you can’t change it. Assume you were able to get the moving equipment rental extended for a third day. How would that affect the assignments?
- 5.
Increase the duration of Task 16 to “3 days.” What changes in the lower pane?
- 6.
Reset the duration to “2 days” to return to the original values.
- 7.
Save your project.
The Effect of Effort-Driven Scheduling
In addition to defining the task type, Microsoft Project 2019 allows you to define the scheduling type appropriate for each task—effort-driven or not effort-driven.
An effort-driven task goes faster with more resources. For example, if Steve is assigned full time to a task with 40 hours of work and you assign Mary to the same task, Mary will pick up 20 of Steve’s hours if the task is effort-driven, leaving the total work for the task at 40 hours. The duration of the task, however, will decrease by half since two people doing 20 hours of work at the same time can finish the task in half the time.
There are situations, of course, where assigning another person will not shorten the duration of the task. If the people involved have different skill sets, for example, the work is more likely to double than to be split between them.
The scheduling type becomes important mainly when adding or removing resources on a task. The first task assignment simply defines the starting point (work, units, and duration) for Microsoft Project and usually behaves simply. Later changes can cause frustration because the scheduling engine in Microsoft Project operates five different ways, depending on whether the task is fixed work, fixed duration effort-driven, fixed duration not effort-driven, fixed units effort-driven, or fixed units not effort-driven. All fixed work tasks behave as effort-driven tasks.
- 1.
For the fixed duration task Move into new location (ID 16), clear the checkbox next to Effort driven. (Navigate to View:Split view:Details to see the Task Type option in the lower Task Form pane.)
- 2.
Click to create a name cell directly under George Brody and type in “April Faraday.” Since duration is fixed and you are adding units, you might think that Microsoft Project will recalculate the work. Is that what happens when you click OK? (See the next figure for help to this question.)
- 3.
Click April Faraday in the lower Task Form and use the Delete key to remove her from the task. Click OK to get back to where we started with this task.
- 4.Switch Effort driven on by checking the box next to it, and add April Faraday back to the task again. This time her name will be on the pick list of names. Consider what’s happening—duration is fixed, and you are addin4g units, but effort-driven means more people get the work done faster. Click OK to see how Microsoft Project deals with this apparent contradiction. Your screen will resemble the following.
 Figure 8-22
Fixed duration task, with two different effort-driven scenarios
- 5.
Save your project.
This is one of the few occasions when Microsoft Project recalculates two of the three values (work, units, and duration) rather than just one.
Modifying Assignments When Assignment Units Is Set
Another way to think about the three task types is to associate fixed work with a situation where you know (or must forecast) the amount of work to be done. This is typically done when the client is paying for hours of work done on the task, not the duration (length) of the task. Fixed duration tends to be a characteristic of the task itself—certain things take a specific amount of time, no more and no less. Fixed units applies to situations where the project manager knows how much of each resource he/she “owns” for the project, regardless of work or duration for any specific task. Microsoft selected fixed units as the default task type because that is the most common situation in project management.
The assignment units field, simply labeled Units in the Task Form, determines what percentage of a resource’s available working time will be dedicated to the specific task. As demonstrated in the preceding exercises, if you change the duration on a fixed work task or change the work on a fixed duration task, Microsoft Project recalculates the assignment units.
Unless the (Assignment) Units value is changed when making an assignment, Microsoft Project uses the Max. Units value, which we saw in the Resource Sheet view (by default, 100%).
If using fixed work or fixed duration as the default task type, you would change to fixed units for those tasks in which a change to the duration or work should not modify the assignment units. One example would be a situation when a task spans the duration of the project and the resource will be working an established percentage of its time on that task.
- 1.Select the task Write proposal (ID 2). Choose View:Split View, then Details. Your screen will resemble the following.
 Figure 8-23
Fixed units task with details
- 2.
Note that the task duration spans the entire project duration and that 100% of Bernie Frazer time is allocated to the task.
- 3.
What is Bernie Frazer’s work effort?
Assume that a scope change request increases the project length by 5 days and increases the task duration to “10 days.”
What is Bernie’s revised work effort? (Did it increase?)
Why didn’t the assignment units change? (Hint: Should a fixed units task change its units?)
- 4.
Decrease the task duration to “2 days” and look at the assignment units and assignment work values. You should see the work increase and the units stay constant.
Microsoft Project selected effort-driven as the default scheduling type, since project managers most often assign additional resources to a task to get it done sooner. Let’s examine the effect of effort-driven scheduling on a fixed units task.
- 5.
For Resolve project issues (Task 2), deselect Effort driven in the lower pane (Task Form).
- 6.
Assign April Faraday to work on the task with Bernie Fraser. What happens to the work, units, and duration values for the task?
- 7.
Remove April Faraday from the task, select Effort driven in the lower pane (Task Form), and reassign April Faraday to the task. Click OK. What happens to the work, units, and duration values for the task this time?
Using Smart Tags to Simplify Making Changes
- 1.Remove the window split (deselect Details) and select Write proposal (Task ID 2). Increase its duration to “20 days” and press Enter. A Smart Tag indicator with a yellow caution icon will appear in the corner of the Duration field for Write proposal. Your screen will resemble the following.
 Figure 8-24
Smart Tag alert
- 2.
When you hover your cursor over the Smart Tag, you will see the following Smart Tag alert message: Click to set the reason for the duration change so that the task can be properly scheduled.
- 3.Click the Smart Tag alert to see the following scheduling choices.
 Figure 8-25
Scheduling options for Smart Alerts
It is not uncommon to increase the duration of a task and prefer the second option to keep work constant even though it is a fixed unit task.
If you’re not sure which option to select, split the screen (i.e., Details) as we did earlier and review the new calculations that resulted from your duration input of “20 days.”
- 4.
Save and close your project.
Viewing Your Resource Assignments
Microsoft Project 2019 gives the project manager several different options to look at resource assignments in a project. The two most useful assignment views are the Task Usage view (which lists tasks and the resources assigned to each one) and the reverse: the Resource Usage view (which lists resources and their assigned tasks).
The Task Usage View
- 1.
If the Task Usage is not already displayed, from View:Task Views, click the Task Usage icon to apply the Task Usage view to the project.
- 2.
Adjust the Task Name column to accommodate the task name text (if necessary) by dragging the right border of the column to the right. Alternatively, you can double-click the right border of the column title box.
- 3.
Select the resource Bernie Frazer under the task Write proposal (ID 2), and in Task:Editing, click the Scroll to Task icon [
 ].
]. - 4.Bernie’s planned work for the task is shown, as in the following figure. Notice these values are calculated from the work, duration, and units relationship previously discussed. The Task Usage view shows resource assignments listed by task in the same order as in the Gantt Chart view.
 Figure 8-26
Task Usage view
- 5.Double-click Bernie’s name to see the Assignment Information dialog box. This dialog shows Bernie’s specific assignment data for the Write proposal task. Notice that Bernie’s Units value is 75%, which explains the 6 hours per day calculated in the Task Usage view.
 Figure 8-27
Assignment Information dialog box
The Resource Usage View
- 1.
From Task:View, select Resource Usage.
- 2.
Locate resource number 1, Bernie Frazer, and select the task Write proposal.
- 3.From Task:Editing, click the Scroll to Task icon to view the work assigned to Bernie on this task on the week of March. Your screen will resemble the following.
 Figure 8-28
Resource Usage view
- 4.
In the preceding figure, Bernie is shown as having 14 hours of work to do on the Wednesday of the week of March 26, so he is marked as over-allocated on that date (boldface red). We will delve deeper into the value of using the Resource Usage view to identify and resolve resource over-allocations later in this section.
- 5.
Save and close your project.
8.3 Cost Planning with Microsoft Project
Assignment Work × Resource Cost Rate∗ = Assignment Cost
Task Cost = Assignment Cost∗∗ (summary of all assignments) + Fixed Cost∗∗∗
∗See Step 2 of the following exercise to learn how to view this information.
∗∗Summary of all assignments
∗∗∗Task-level field
Determining Costs in Microsoft Project
- 1.
Apply the Resource Sheet view to your project.
- 2.From View:Data, click Tables and select Cost to apply the cost table to the Resource Sheet view. Note you can now see the total cost for each resource.
 Figure 8-29
Resource Sheet view with Cost Table applied
- 3.
From Resource:Properties, click Details. You will see a split screen with the Resource Sheet view on the top and the Resource Form on the bottom.
- 4.
Right-click in the lower pane and select Cost from the dropdown list.
- 5.In the upper pane, select John Tierney. Note that John Tierney’s Cost in the upper pane ($12,000.00) equals the sum of the Cost of the individual assignments in the lower pane.
 Figure 8-30
John Tierney’s cost details
- 6.
In the upper pane, right-click Bernie Frazer, and from the dropdown list, select Information. You will see the Resource Information dialog box for Bernie Frazer.
- 7.In some cases, a resource may have different costs depending on the roles and tasks they are performing. Microsoft Project provides the capability to use different resource rates for different roles and assignments. In the Resource Information dialog box, select the Costs tab. You will see that in cost rate Table A (which is where Microsoft Project puts resource assignments by default), Bernie’s Standard Rate is $70.00/hour, as follows.
 Figure 8-31
Resource Information dialog box; Costs tab for Bernie Frazer
- 8.On the second line of the cost rate table, enter an Effective Date of “10/1” and a new Standard Rate of “$80.00”. This rate will be used for any task assigned after the new rate effective as of 10/1. Your screen will resemble the following.
 Figure 8-32
Additional cost rate effective 10/1 for $80.00/hour
- 9.
Click OK to accept the change and close the Resource Information dialog box.
- 10.Ensuring Bernie Frazer is selected in the upper pane, double-click Task ID 2 (Create Statement of Work) in the lower pane to see the Task Information dialog box for this task. Note Bernie’s work on this task: 10 days = 80 hours.
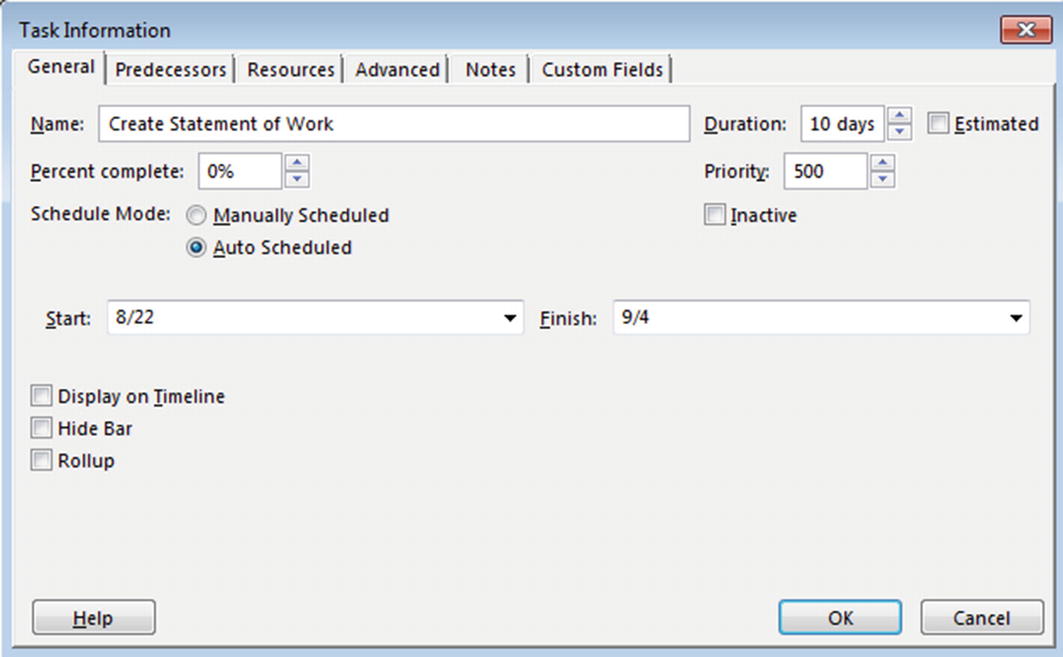 Figure 8-33
Task Information dialog box for Create Statement of Work
- 11.Click OK to close the Task Information dialog box. As you can see in the following figure, the total cost of Bernie’s work on this task is $5,600.00 (Bernie’s rate of $70.00/hour × 80 hours).
 Figure 8-34
Bernie’s cost at the assignment level, as shown on the Resource Form on the lower pane
- 12.In the lower pane, double-click Task 14 (Send out prep packet) to view the Task Information for this task. Note the task is scheduled to begin on 10/10, after the 10/1 hourly rate increase, and it’s expected to take 2 days (16 hours).
 Figure 8-35
Task Information dialog box for Send out prep packet
- 13.Click OK to close the dialog box. Look in the lower pane and note Bernie’s total cost for Task 14 is $1,120.00 (16 hours × $70.00/hour = $1,120.00).
 Figure 8-36
Bernie’s total assignment cost for Task 14
- 14.
Save your project.
Alternate Cost Rate Tables
Each resource can have up to five (5) separate resource rates, labeled A, B, C, D, and E. As mentioned earlier, when you assign a resource to a task, Microsoft Project will, by default, assign the resource rate using the value(s) in cost rate Table A. This information is typically entered on the Resource Sheet in the column called “Standard Rate.”
Additional rates can be assigned to a resource using cost rate Tables B, C, and D at the assignment level of detail. The following exercise will show you how to use rates from tables other than cost Table A.
- 1.
In the upper pane, right-click Joan Higgins and select Information to open the Resource Information dialog box.
- 2.Select the Costs tab and note that Joan’s hourly cost is $60.00/hour in cost rate Table A.
 Figure 8-37
Cost rate table
- 3.
In Joan’s Resource Information dialog box, select tab B (where cost rate Table B is displayed) and enter a Standard Rate of “$90.00/hour.” Click OK to save this change, and close the dialog box.
- 4.
Change the upper pane view to Task Usage (right-click Resource Sheet on the left side of the upper pane and select Task Usage).
- 5.
From View:Data, click the Tables icon, and from the dropdown list, select Cost to apply the Cost Table to this view.
- 6.
In the upper pane, scroll to Task 8, Determine current architecture. Note that the Total Cost for Joan’s work on this task is $3,000.00 (50 hours × $60.00/hour).
- 7.Right-click Joan Higgins under Task 8 to display the Assignment Information dialog box. Your screen will resemble the following.
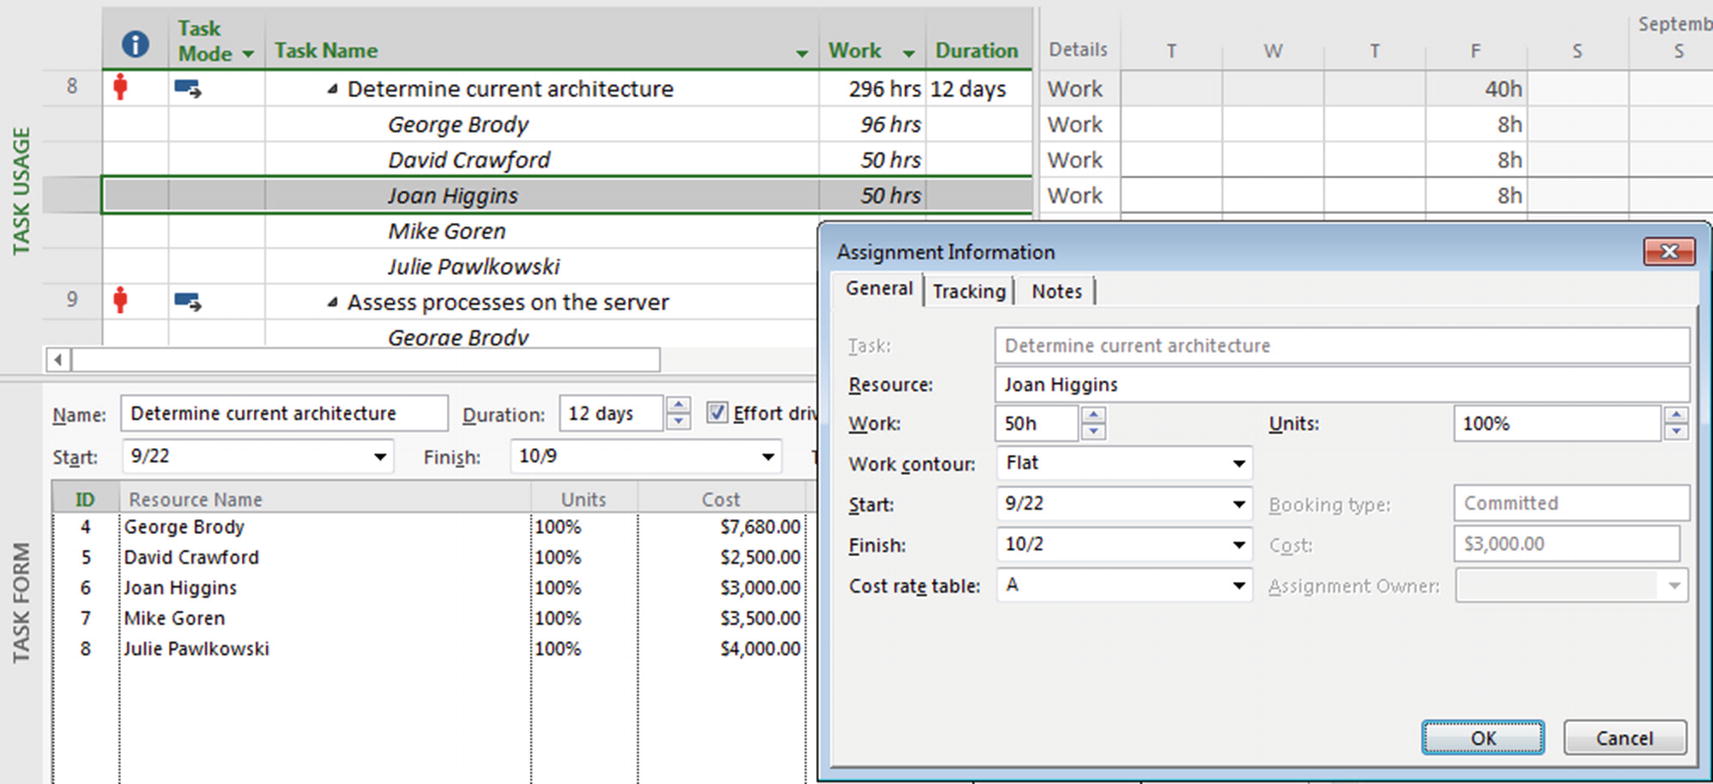 Figure 8-38
Assignment Information dialog box for Joan Higgins’ assignment to Determine current architecture
- 8.
In the Assignment Information dialog box, change Cost rate table from “A” to “B.” This directs Microsoft Project to calculate Joan Higgins’ cost for this task based on the information in cost rate Table B. Click OK to close the dialog box.
- 9.Note that switching the cost rate table changed Joan Higgins’ Total Cost for that task from $3,000.00 (see Step 6) to $4,500.00 (50 hours × $90.00/hour).
 Figure 8-39
Changed cost for Joan’s work on Determine current architecture
- 10.
Save your project.
Adding Fixed Cost to a Task
Assignment Work × Resource Cost Rate = Assignment Cost
Task Cost = Assignment Cost + Fixed Cost
- 1.
If your screen is still split, remove the split either by double-clicking the line between the panes or by deselecting the Details checkbox under View:Split View.
- 2.Apply the Gantt Chart view to the project. Then go to View:Data:Tables, and choose Cost from the dropdown list to apply the Cost Table to this view. Note the Total Cost for Task 18, Send out draft and review with key sponsors, is $9,120.00, per the following figure.
 Figure 8-40
Gantt Chart with Cost Table applied
- 3.In the Fixed Cost column for Task 18, enter “$2,000.00.” Note the Total Cost for this task is now $11,120.00.
 Figure 8-41
Fixed Cost impact on Total Cost
- 4.
Save your project.
Displaying Cost over Time, by Task (Or Phase)
- 1.
From Task:View, click the arrow by the Gantt Chart icon, and from the dropdown list, select Task Usage.
- 2.Right-click the right side of the vertical view divider (i.e., in the timescale data area). From the dropdown list, select Cost and deselect Work (Work is selected by default) to view cost details on this side of the view. Your screen will resemble the following.
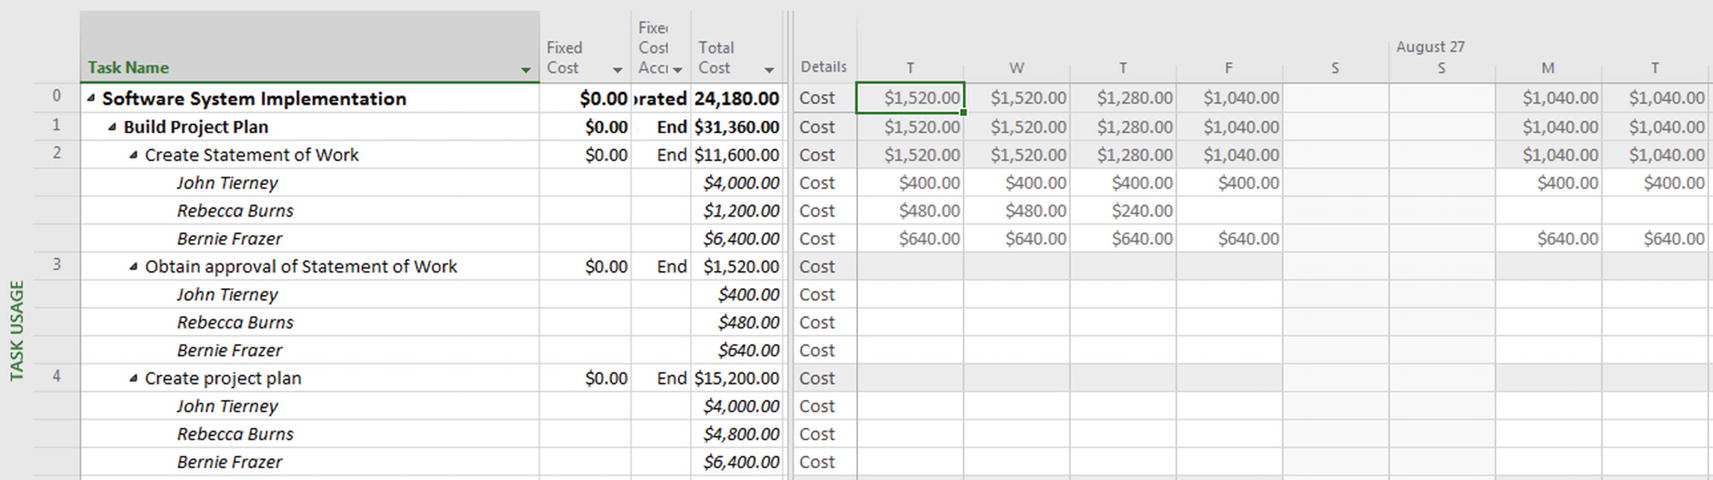 Figure 8-42
Task Usage view with Cost Table applied, showing Cost details
- 3.By default you will see a daily view of your project’s timescaled data, by days. To change the timescale, choose View:Zoom and click the dropdown under Timescale to change Days to Weeks, Months, and so on.
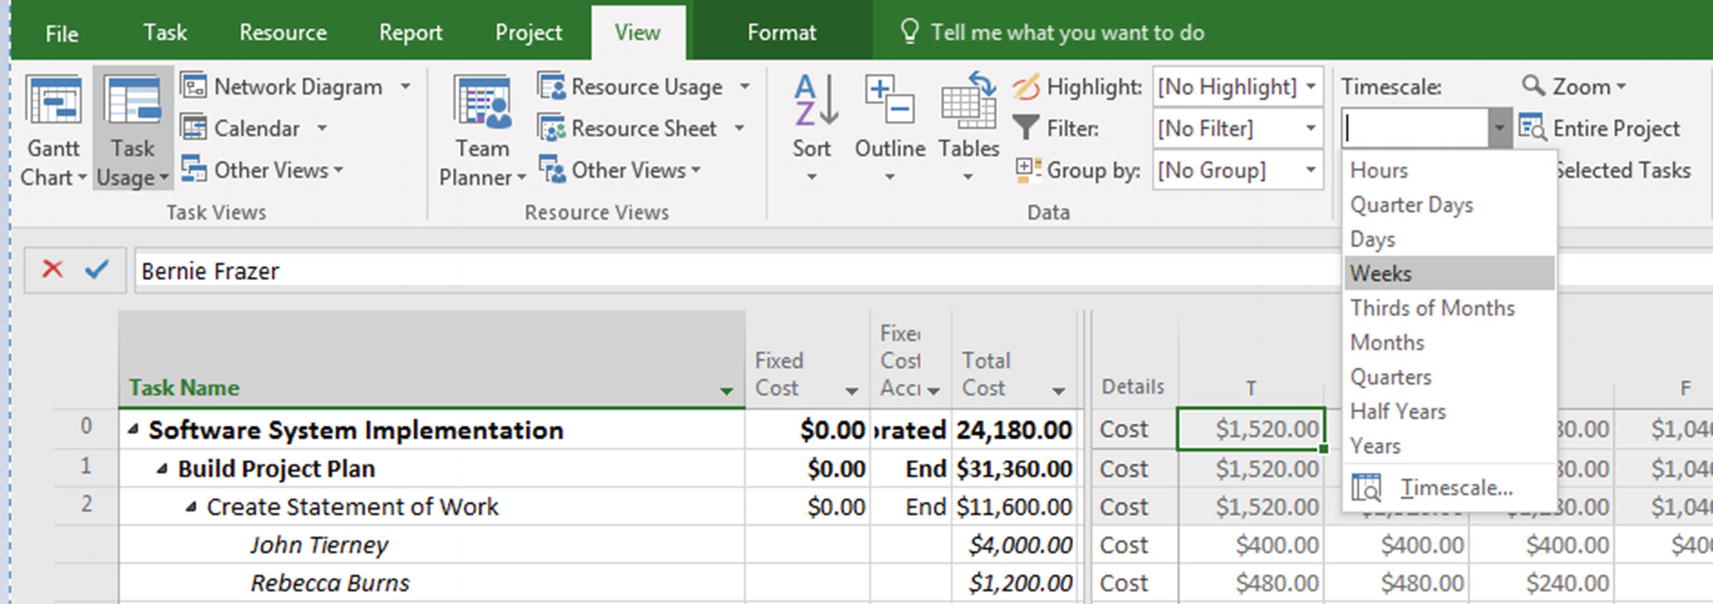 Figure 8-43
The Timescale setting dropdown
- 4.Select the Months setting. Your screen will resemble the following.
 Figure 8-44
Quarterly timescale on the top tier and monthly on the bottom tier of timescale
- 5.
Perhaps you would like to see a more high-level view of your project. Choose Select All above the ID column and left of the Task Name header. All tasks should become highlighted. From View:Data, click Outline, and from the dropdown list, select Level 1. This will display the highest-level phases of the WBS.
- 6.You are now presented a summary of total cost by phase of the left of the vertical divider and cost by phase by month on the right side of the vertical divider.
 Figure 8-45
Cost by phase by month
- 7.
Save your project.
Displaying Cost over Time, by Resource
- 1.
Apply the Resource Usage view to your project (from Resource:View, click the dropdown arrow and select Resource Usage).
- 2.
Use the method we covered in the preceding exercise (right-clicking in the Timescale Data area) to apply the Cost Table to the left side of this view, and show Cost details on the right; remove Work details.
- 3.
Change the timescale to show a quarterly view, by months, as we covered in the preceding exercise (View:Zoom:Timescale:Months).
- 4.Select all resources by clicking the little square that is above the ID column and left of the Resource Name header. This will highlight all tasks. From View:Data, click the Outline icon, and from the dropdown list, select Hide Subtasks. Your screen will resemble the following.
 Figure 8-46
View of Resource Usage summarized by resource, by month
- 5.Click the arrow to the left of David Crawford to see which assignments make up his total cost by month.
 Figure 8-47
Total cost for David Crawford per month, per assignment
- 6.
Save and close your project.
8.4 Constraints
Microsoft Project 2019 provides tools you can use to influence when project tasks occur. These tools provide the flexibility to adjust the project schedule more efficiently, which is required to support often-changing business requirements. This lesson will demonstrate how to apply constraints that limit the flexibility of task scheduling. It will also demonstrate how to set deadline dates that warn you when the project schedule has slipped to an unacceptable degree.
If you follow the logic of this course in developing a project plan, the only date you will have entered at this point is the project start date. If you want to change the project start date or switch to project finish date scheduling, this is the best time to do so. Your entire project schedule, based on durations and dependencies, will simply move across the Gantt Chart calendar presentation without change. Constraints limit your ability to relocate the project plan in time because they “lock” tasks to dates.
Applying Constraints to Tasks in a Project Scheduled from the Project Start Date
Based on the project start date, task durations, and task dependencies, Microsoft Project determines the start and finish dates for each task in the plan.
But some tasks in your plan may be tied to specific dates. For example, if the delivery of a piece of hardware or some other product from an outside company occurs on a specific date, any work using that equipment must consider the delivery date. Similarly, a new employee can’t begin work on project tasks until he/she actually joins the company. You can indicate these schedule-related situations by applying a constraint to the task.
Task constraints are used when you want to make sure that a task starts or finishes on, by, or no earlier than a particular date. By default, Microsoft Project 2019 schedules all tasks to start as soon as possible (when scheduling from a project start date). You can select specific limits on any task you feel needs a different schedule constraint.
In general, schedule flexibility is the project manager’s friend because external events will impact the schedule once a project starts. Task constraints are defined as flexible (soft constraints) or inflexible (hard constraints). Microsoft Project is designed to use a flexible constraint when it has a choice. The flexibility of the constraint varies depending on whether you are scheduling your project from a start date or from a finish date.
An example of a flexible constraint when you are scheduling from a start date is the Start No Earlier Than (SNET) constraint. The task cannot start earlier than the constraint date but, based on the scheduling of the predecessor tasks, it could start later.
While constraints are required for some tasks, it is common for new Microsoft Project users to inadvertently set constraints when they don’t mean to. For example, if you set a start date for a task, you are applying a SNET constraint.
Microsoft Project 2019 will not automatically apply an inflexible constraint to a task. The practical result of an inflexible constraint is to override the logical relationships you established between tasks. If the Planning Wizard message options are left turned on, Microsoft Project will warn you that applying an inflexible constraint could cause a scheduling conflict. In some situations, this is helpful because Microsoft Project will alert you before a constrained task is automatically rescheduled.
Constraint | Type | Constraint Behavior When You Are Scheduling from a Project Start Date |
|---|---|---|
As Soon As Possible (ASAP) | Flexible | Default constraint for a new task if no dates are entered; starts on day one of the project if there are no predecessors; if a task does have predecessors, the dependency will drive when the task can start |
As Late As Possible (ALAP) | Flexible | Always finishes the task on the project finish date; rarely used |
Finish No Earlier Than (FNET) | Flexible | Finishes the task on or after the date that you entered; if the task has no predecessor, the task will finish on the date you selected. The finish date can be driven to a later date based on the predecessor(s). FNET is the default constraint type assigned by Microsoft Project when you select a finish date for a task. Microsoft Project applies this flexible constraint so that it preserves the ability of the scheduling engine to automatically schedule the task finish to a later date. |
Start No Earlier Than (SNET) | Flexible | Starts the task on or after the date that you entered; if the task has no predecessor, the task will start on the date you selected. The start date can be driven to a later date based on the predecessor(s). SNET is the default constraint type assigned by Microsoft Project when you select a start date for a task. Microsoft Project applies this flexible constraint so that it preserves the ability of the scheduling engine to automatically schedule the task start to a later date. |
Finish No Later Than (FNLT) | Inflexible | Finishes the task on or before the date that you entered; if a task does have predecessors, the dependency will drive when the task can start unless the predecessor attempts to move the task beyond the planning constraint date. In this situation, you will be alerted to a scheduling conflict if the Planning Wizard is activated. |
Start No Later Than (SNLT) | Inflexible | Starts on day one of the project if there are no predecessors; if a task does have predecessors, the dependency will drive when the task can start unless the predecessor attempts to move the task beyond the planning constraint date. In this situation, you will be alerted to a scheduling conflict if the Planning Wizard is activated. |
Must Finish On (MFO) | Inflexible | Task cannot finish any earlier or later than the indicated date; if the task has a predecessor, the predecessor cannot indicate the finish date of the task. Instead, the Planning Wizard will alert you of a scheduling conflict. |
Must Start On (MSO) | Inflexible | Task cannot start any earlier or later than the indicated date; if the task has a predecessor, the predecessor cannot indicate the start date of the task. Instead, the Planning Wizard will alert you of a scheduling conflict. |
Entering Task Constraints

Schedule from options
If you choose to schedule from the Project Start Date, the default constraint for new tasks will be as soon as possible. If you choose to schedule from the Project Finish Date, the default constraint for new tasks will be as late as possible.
Once these constraints are set (according to the defaults described earlier), you can change them to suit how you wish certain tasks to behave as the Microsoft Project scheduling algorithms automatically update the schedule, which occurs each time a schedule is changed. Microsoft Project will also set some constraints automatically, based on user input.
If you schedule from the Project Start Date and you enter a task start date, Microsoft Project will change your constraint from ASAP to SNET (i.e., a “soft” constraint from scheduled start).
If you schedule from the Project Start Date and you enter a task finish date, Microsoft Project will change your constraint from ASAP to FNET (i.e., a “soft” constraint from scheduled finish).
Once these constraints are set, the operation of Microsoft Project’s scheduling algorithms may confuse you if you do not know that these constraints have been set. Because many Microsoft Project users don’t notice or understand why this scheduling behavior is happening, the constraint field in Microsoft Project is widely misunderstood and often avoided because of fear of unpredictable behavior.
The hard constraints—Start No Later Than, Finish No Later Than, Must Start On, and Must Finish On—can only be set by the end user hard constraints cause even more unpredictable behavior when set, which is why Microsoft Project does not automatically set it for you.
The best way to handle task constraints’ effects (or non-effects) on task scheduling behavior is to take the time to familiarize yourself with this feature of Microsoft Project.
Setting Task Constraints
In this exercise, the team assigned to create a project plan has to wait until all the management review comments have been received; if they start the task before the comments are in, they will undoubtedly have to throw out any completed work and repeat it. In a case like this, starting early will actually waste effort, not save time, so we want to make sure the task information in the plan reflects this practical constraint.
- 1.Go to the task Create project plan (ID 4) and enter a Start date of “10/26.” You should be prompted with a dialog box with an option Move the task, keep the link. The Planning Wizard presents this question because you are moving a linked task to a later date. The Microsoft Project scheduling engine had set the finish date to 11/6 based on the default constraint of “As early as possible” and the end of its predecessor task.
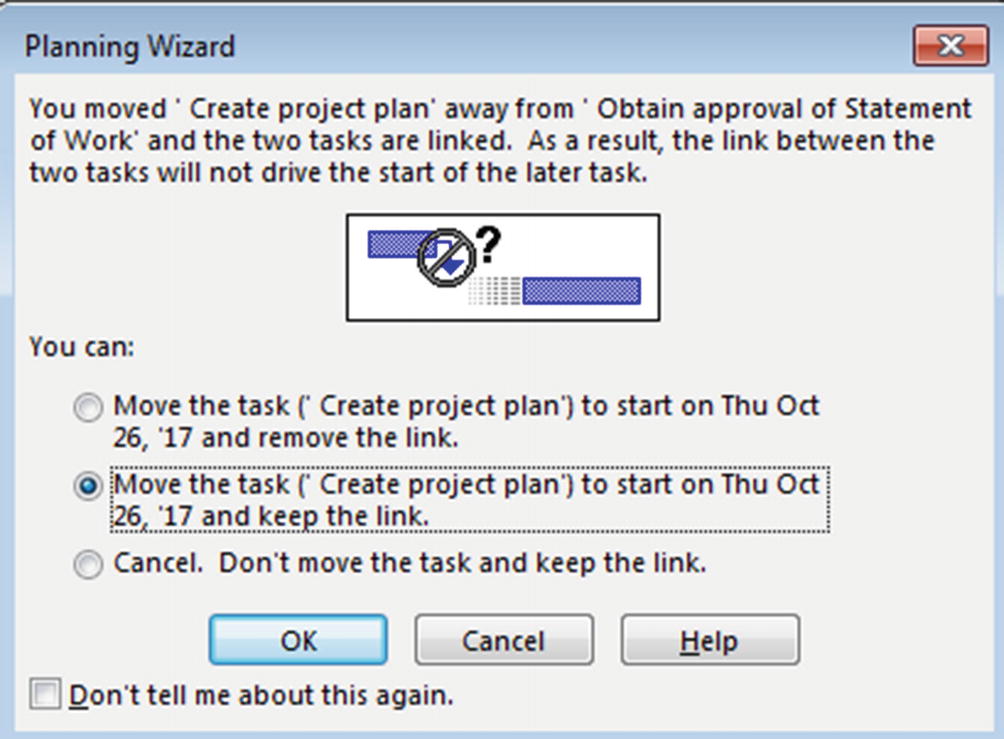 Figure 8-49
Planning Wizard constraint warning
- 2.
Click OK.
- 3.Notice the icon that appears in the Indicator field for Task 4—a calendar icon with a blue square [
 ]. Hover your mouse pointer over it to read the note.
 Figure 8-50
Constraint indicator message
- 4.
Double-click the task Create project plan (ID 4). You will be presented with the Task Information dialog box.
- 5.
Click the Advanced tab.
- 6.You will see that Microsoft Project automatically set the Constraint type to Start No Earlier Than. Also, the Constraint date was automatically set to 10/26. Your dialog box will resemble the following.
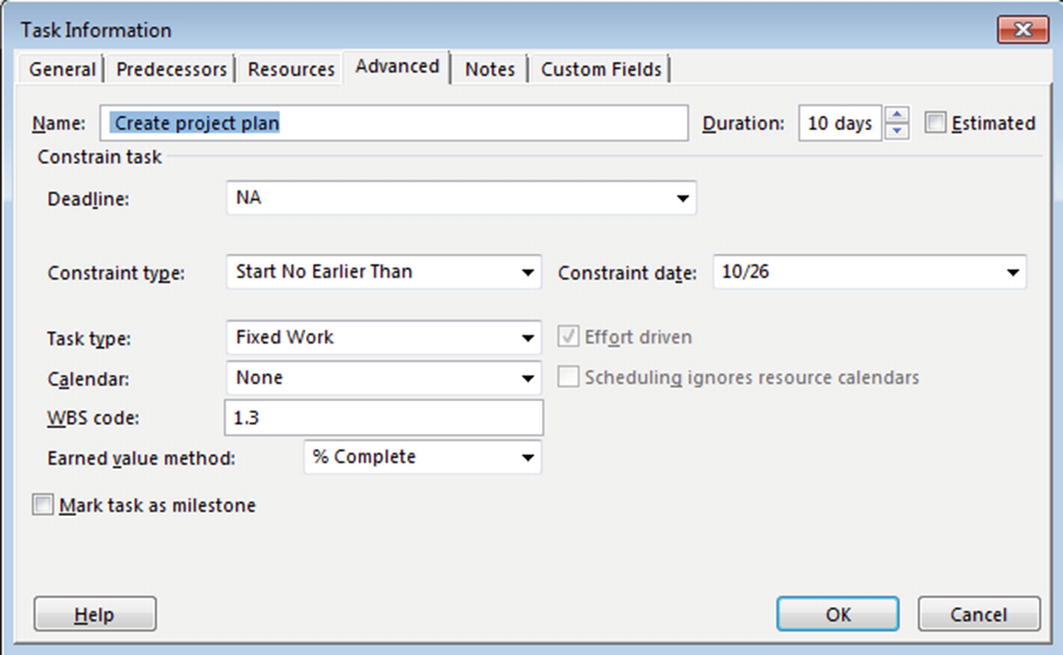 Figure 8-51
Viewing SNET constraint in Task Information
- 7.
Look at the Gantt Chart to see what appears to be a lag between Tasks 3 and 4. The gap between these tasks is a result of the SNET constraint you set by entering a different start date than what the scheduling had calculated.
Overriding a Task Dependency with a Hard Constraint
- 1.
Double-click the task Conduct session (ID 16). You will be presented with the Task Information dialog box.
- 2.
Click the Advanced tab.
- 3.
From the Constraint type dropdown list, select Finish No Later Than.
- 4.
From the Constraint date dropdown calendar, select December 12 of next year. You have indicated that the task Conduct session must finish on or before December 12.
- 5.Click OK. You will see the Planning Wizard dialog box.
 Figure 8-52
Planning Wizard alert
- 6.
Microsoft Project is alerting you to a potential scheduling conflict that has occurred because Conduct session is linked to another task. Click the Continue. A Finish No Later Than constraint will be set option button.
- 7.
Click OK. Notice the new icon in the Indicator column for Conduct session—a small calendar with one red square [
 ]. This icon indicates the task constraint is inflexible.
 - 8.Increase the duration of Conduct pre-interviews (ID 15) from 6 days to 10 days. Allow the schedule conflict and click OK. What happens to the link between Conduct pre-interviews and Conduct session?
 Figure 8-53
Schedule conflict caused by an inflexible constraint
- 9.
Notice the schedule conflict in the visual overlap (inside the rectangle) between Conduct pre-interviews and Conduct session.
- 10.
Save your project.
Setting and Clearing Constraints Using a Split Window
- 1.Select Create Statement of Work (ID 2). From Task:Properties, click the Details icon. Your screen will resemble the following.
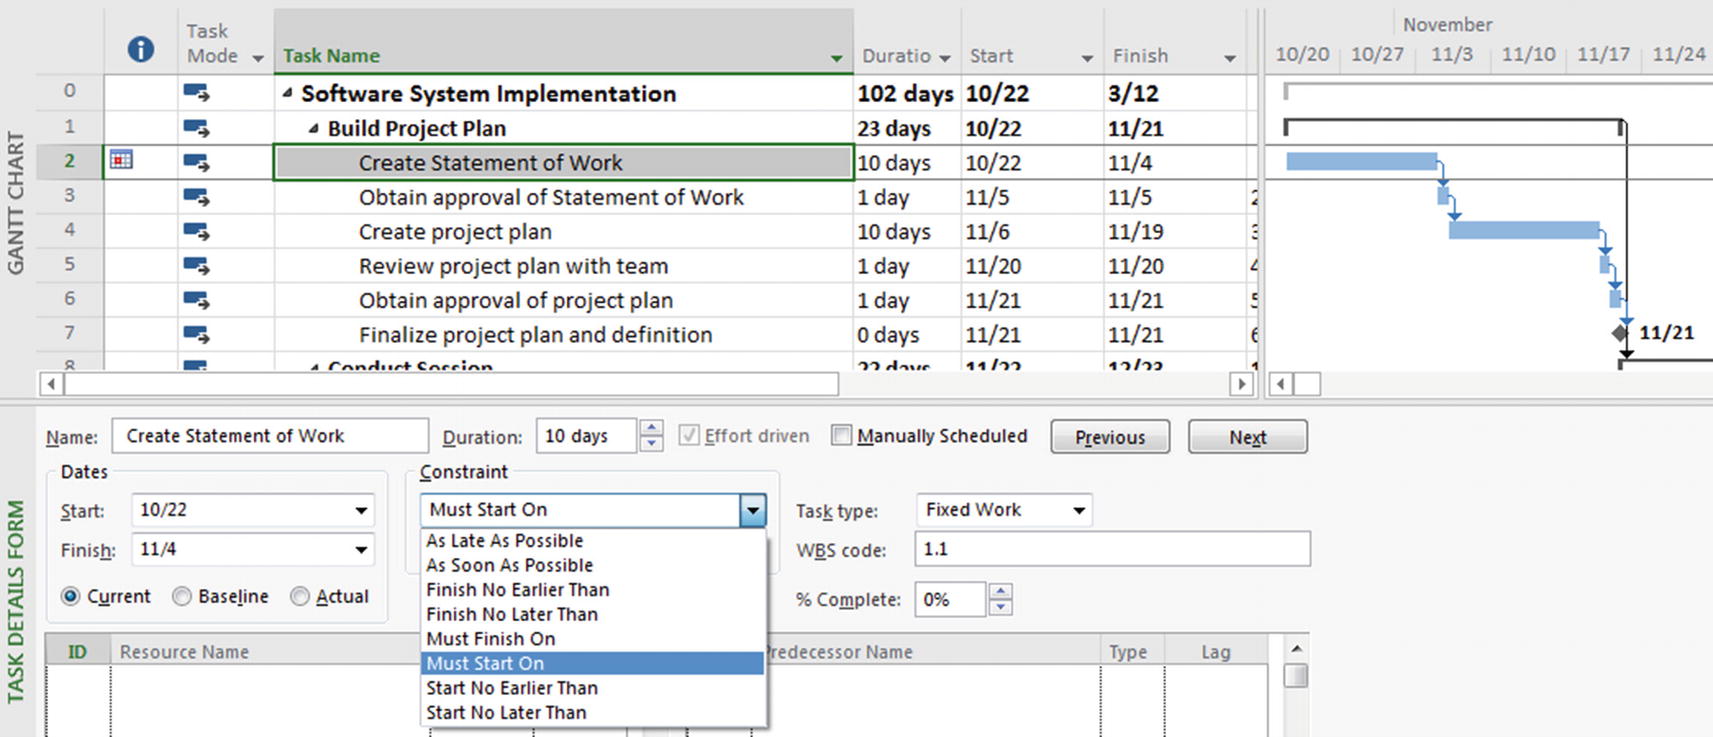 Figure 8-54
Gantt Chart and Task Details Form
- 2.
From the Constraint dropdown list in the bottom half of your screen, select Must Finish On for Task 2 and click OK. The button face will change from OK to Previous. If you do not assign a constraint date, Microsoft Project uses the already calculated date.
- 3.
In the top pane, select the task Create project plan (ID 4). Recall that we assigned a SNET constraint to it, but then decided it really was unnecessary.
- 4.
To remove the constraint, if it is not already removed, select As Soon As Possible from the Constraint dropdown list in the bottom pane. Click OK.
- 5.
Double-click the window split bar to remove the split.
Clearing Constraints for Multiple Tasks
- 1.
Make sure you are in the Gantt Chart view.
- 2.
Select the Task Name column by clicking the column header.
- 3.From Task:Properties, click the Information button. You will be presented with the following dialog box.
 Figure 8-55
Multiple Task Information dialog box
- 4.
Click the Advanced tab (if necessary).
- 5.
Select As Soon As Possible from the Constraint type dropdown list.
- 6.
Click OK. Notice that any remaining task constraints have been cleared.
- 7.
Save your project.
Deadline Dates
From time to time, you may want to track a deadline for an individual task without restricting the schedule with a constraint. Microsoft Project 2019 enables you to establish a deadline date for a task and shows an indicator if the task finishes after its deadline as the project file is updated.
- 1.
Confirm that you are in the Task tab and Gantt Chart view.
- 2.
Double-click the task Finalize project plan and definition (ID 7). You will be presented with the Task Information dialog box.
- 3.
Click the Advanced tab.
- 4.
From the Deadline dropdown calendar, select 11/10.
- 5.
Click OK. A deadline of 11/10 is set for Finalize project plan and definition, and a green arrow appears beyond the Gantt bar for the task.
- 6.For the task Create project plan (ID 4), increase the duration from 5 to 15 days. Since the finish date for Finalize project plan and definition now extends past the deadline date, an icon appears in the Indicator column alerting you to this information and the deadline arrow in the Gantt Chart graphic moves left of the milestone diamond.
 Figure 8-56
Deadline alert icon in the Indicator column
An Alternative to Deadline Dates
- 1.
Scroll to the task you are concerned about: Task 33 (Circulate for comments). Click in the next empty Task Name cell, and add a new task, Target finish date, with a duration of 0 days. Recall that a duration of 0 makes a task a milestone.
- 2.
Link Task 33 finish-to-start with the new milestone Task 34, which will be the trigger for our alert mechanism.
- 3.
Assign a Must Finish On constraint to the new milestone task, accepting the default constraint date of 3/4/14.
- 4.
Press F5 to see the Go To dialog box.
- 5.Enter “0” in the ID field and click OK to return to Task ID 0. Notice that the task we are interested in, Task 33, is off the screen. Increase the duration of Task 2, Create Statement of Work, to 11 days. What is the result?
 Figure 8-57
Planning Wizard alert
The Planning Wizard message not only tells you that something is happening, it tells you specifically where to look: “…Task 33 of … .” Select Continue. Allow the scheduling conflict. to allow the change, then F5 until Task 33 is displayed to see the effect.
- 6.
Save and close your project.
8.5 Resource and Assignment Review Exercise
If you are not working in the enterprise environment, connected to Project Server, this exercise will review how you will handle exercises manually. If you will be working in the enterprise environment, these functions will be performed by the Project Server administrator unless your project uses local resources.
- 1.
Switch to the Resource Sheet view and enter the following names and resource information:
Name | Initials | Group | Max. Units |
|---|---|---|---|
Vice President | VP | Management | 100% |
Office Manager | OM | Management | 100% |
Administrative Assistant | AA | Office Staff | 200% |
Intern | IN | Office Staff | 100% |
- 2.
Assign the resources to tasks as listed as follows, keeping task durations unchanged:
Task | Resource(s) |
|---|---|
Schedule conference date | Vice President, Office Manager |
Reserve conference center | Intern |
Book keynote speaker | Office Manager |
Develop letter | Administrative Assistant, Intern |
Get corporate approval | Vice President |
Plan food with caterer | Administrative Assistant |
Print catering menu | Intern |
- 3.
Enter the following cost information on the resource sheet:
Resource | Standard rate | Overtime rate |
|---|---|---|
Vice President | $75,000/year | – |
Office Manager | $45,000/year | – |
Administrative Assistant | $25.00/hour | $37.50/hour |
Intern | $15.00/hour | $22.50/hour |
- 4.
Effective April 1, the intern resource will have a pay increase of 4.9% for both standard and overtime rates. Prepare your project plan to account for this increase (Hint: See the Costs tab in the Resource Information dialog box for Steps 4 and 5).
- 5.
What is the total forecast cost for your project?
- 6.
Save and close your project.
 End of Chapter Quiz Questions
- 1.
What are the three resource types? ________, ________, and ________
- 2.
Which type of resource is not consumed by the project? ________ ________
- 3.
What’s an example of a case when it is reasonable to assign a generic resource at more than 100%?

- 4.
How do you change a resource to generic from the Resource Sheet?

- 5.
What does checking the Budget checkbox from the Resource Information dialog box (General tab) allow you to do?
___________________________________________________________
- 6.
What’s the danger of adding a name directly to the Resource Name field in the Gantt Chart Entry Table or in the Assign Resources dialog box?

- 7.
One of your resources has just informed you he will be on vacation a week when you have him/her scheduled to work on a task. How would you update his calendar to reflect the fact that he/she will not be available?

- 8.
What does the Team Planner view allow you to see and how does it work?

- 9.
What is the recommended task type if your resource demand and project budget are based on labor estimates? _________________
- 10.
What organizations most commonly use fixed work as the default task type and why?
- 11.
True or False: When work is fixed, Microsoft Project won’t change the work estimate, and you cannot modify the specific work value for a task.
- 12.
You are renting a piece of equipment for a few days, and therefore the resources using that equipment must complete the work during that time. What task type would be the best one to use in this scenario?__________________________________
- 13.
If you assign two resources to an effort-driven task, what happens to the duration? What if it is not an effort-driven task?

- 14.
True or False: All fixed work tasks behave as effort-driven tasks.
- 15.The default task type selected by Microsoft is
- a.
Fixed work
- b.
Fixed duration
- c.
Fixed units
- d.
None of the above
- a.
- 16.
What do Smart Tags do?
___________________________________________________________
- 17.
Which view lists tasks and the resources assigned to each one? ________________
- 18.
Fill in the blank: Microsoft Project calculates basic cost calculations at the ____________ level.
- 19.
What formula does Microsoft Project follow to calculate assignment cost?
___________________________________________________________
- 20.
What formula does Microsoft Project follow to calculate task cost?
___________________________________________________________
- 21.
Is it possible for a resource to have different costs depending on the roles and/or tasks they are performing in Microsoft Project? If so, how?

- 22.
Up to how many separate rates can each resource have? ______
- 23.
How can you apply the Cost Table to a view?
___________________________________________________________
- 24.
How can you display a high-level outline of your plan?
___________________________________________________________
- 25.Microsoft Project determines the start and finish dates for each task in the plan based on which of the following?
- a.
Project start date
- b.
Task durations
- c.
Task dependencies
- d.
All of the above
- a.
- 26.Which of the following constraints are inflexible?
- a.
As Late As Possible
- b.
Finish No Earlier Than
- c.
Start No Later Than
- d.
Start No Earlier Than
- a.
- 27.
Which constraint type starts on day one of the project if there are no predecessors? Is this flexible or inflexible? _____________________________; ___________
- 28.
With which constraint type can tasks not finish any earlier or later than the indicated date? Is this flexible or inflexible? _____________________________; ___________
- 29.
How do you set the constraint type and date of a task?

- 30.
True or False: A hard constraint will override a task dependency.
- 31.
Explain an alternative to deadline dates that provides more dramatic alerts.
