
Building the WBS
Modifying and Editing the WBS
Creating Task Dependencies
Task Types and Scheduling
Estimating Task Size
Manual Task Scheduling
Task Planning Review Exercise
 Learning Objectives for This Chapter
Build a basic task list into a WBS using the indent and outdent functions
Modify and edit the WBS
Create task dependencies (link tasks) using finish-to-start [FS], start-to-start [SS], finish-to-finish [FF], and start-to-finish [SF] link types
Use the Task Inspector to identify how the scheduling engine sets task dates
View task outline numbers
Insert and delete tasks
Understand scheduling
Import tasks from Microsoft Excel and Microsoft Outlook
Use the “split screen” (task details option)
Use the Task Information dialog box
Enter basic task estimates using the Work and Duration fields
Use the task types: fixed unit, fixed duration, and fixed units
Use Manual Task Scheduling
Now that we have described the theoretical background for developing a work breakdown structure and project plan, this chapter will describe how Microsoft Project 2019 can easily be used to create a project plan. This lesson will describe the best practices that experienced project managers generally use to accomplish the desired results.
7.1 Building the Work Breakdown Structure
Determining the Primary Goal and Creating the Project Shell
The project charter is a logical starting point when developing a WBS. The charter details the project’s objective(s), major constraints (such as cost or scope boundaries), the expected timescale, and the name of the person responsible for achieving each of the project’s goals.
For this exercise, we will use the following project charter:
- 1.Start Microsoft Project 2019, ensuring you are not connected to Project Server. If you do not see a blank project, click Blank Project or select File:New:Blank project to create one. Your screen will resemble the following.
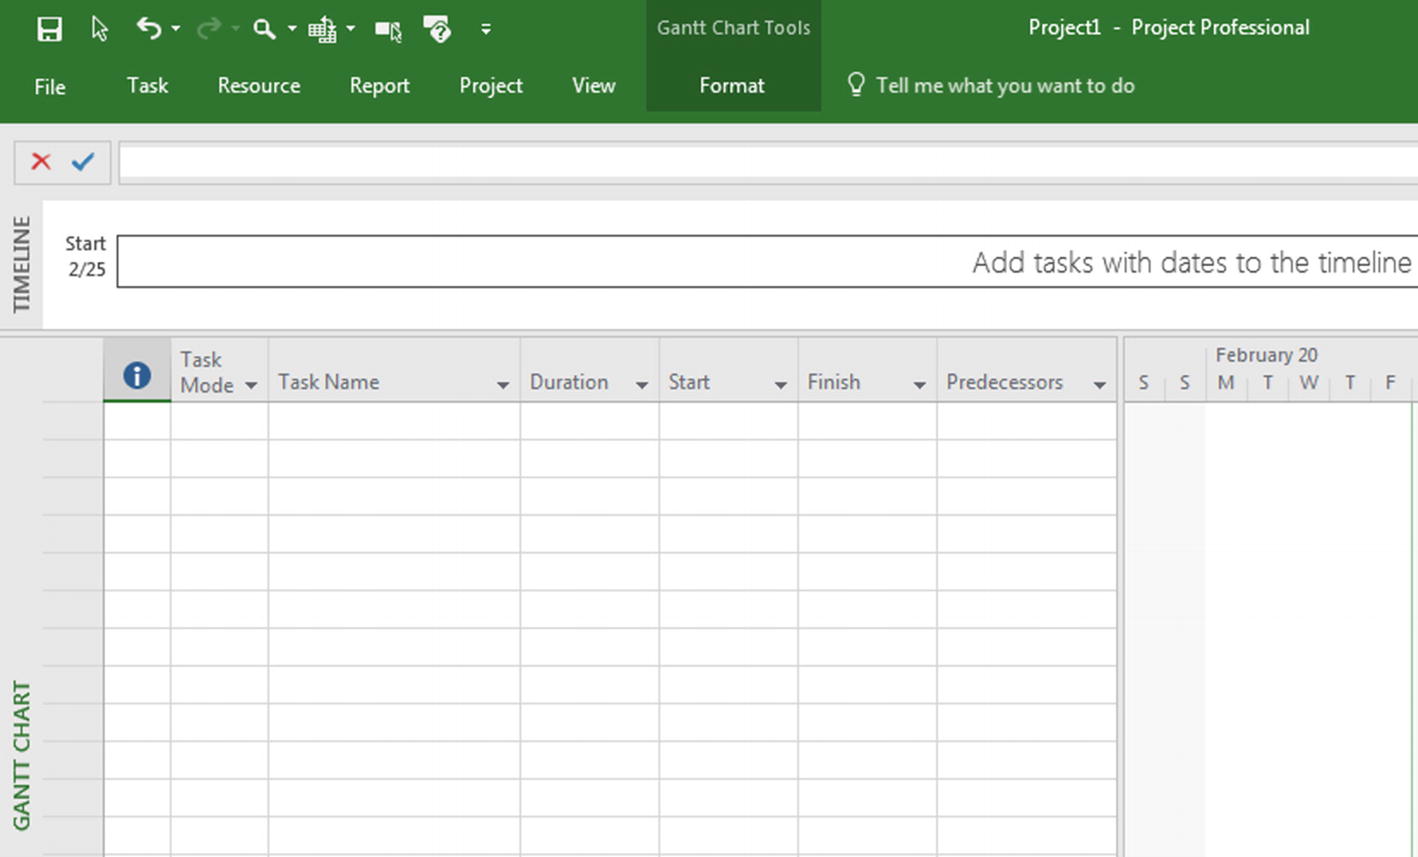 Figure 7-1
New blank project
- 2.
Select File:Save As to save this new project as PanTransConference.mpp. We will be using this project over the course of this chapter.
- 3.Navigate to Format:Show/Hide and ensure the Project Summary Task is selected. Your screen will resemble the following.
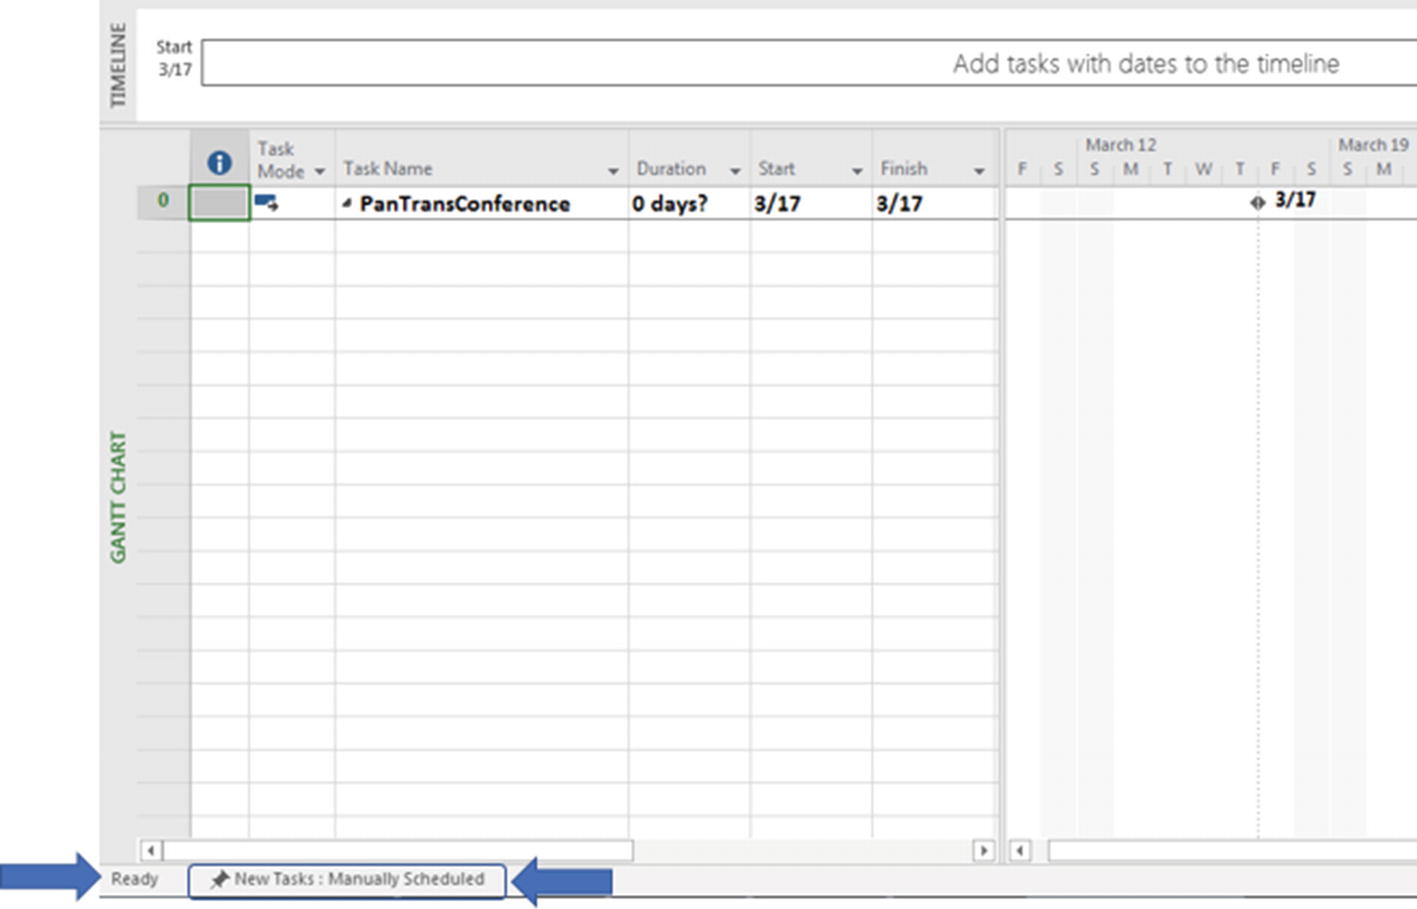 Figure 7-2
PanTrans Conference.mpp with summary task visible
- 4.
At the bottom-left corner of the screen, you will notice that new tasks are currently set to be scheduled manually. While there are some cases where you do not want the Microsoft Project scheduling engine to perform normal calculations, you generally want the software to schedule the dates of new tasks for you. Select Auto Scheduled – Task dates are calculated by Microsoft Project.
Determining the Project’s Sub-goals
Developing the sub-goals of the project is also known as developing the project’s initial scope. Typically this job is performed by a group that might include the project sponsor and others with expertise in the field. These people work together to outline the project’s general and more detailed requirements. They will also include additional information about limitations or assumptions.
For project PanTrans Conference, project requirements include the following:
- General planning: Board approval of plan and budget
Venue
Agenda and schedule
Budget
Communication plan
Personnel commitments
- Detailed planning
Venue arrangements
Attendance
Travel arrangements
Agenda planning and timetable
Meeting facilities
Contingency planning
Cost planning
Catering
Organizing the Project
The project processes, discussed in Chapter 2, affect how the project is structured and therefore what the WBS will look like. The goal, of course, is for the structure to be sensible and useful to the people who are managing the project or working with the WBS.
One common approach to organizing the WBS is to have a major section for each phase of the project, with the phases appearing sequentially. This is particularly valuable when there is a stage gate approval process or a portfolio management strategy with a metric for the number of projects in different phases.
Another common organizational strategy is often used for product development projects, when components of the final product are produced simultaneously by different groups working in parallel.
On larger projects, the structure is often phase- and product-based.
For our training project, the WBS will be organized by two sequential phases:
General planning, which is complete when the Board approves the general plan
Detailed planning, which is complete when the final arrangements are distributed and organization is handed over to the hospitality team
- 1.
Begin creating the WBS by entering the two project phases—General planning and Detailed planning—in the Task Name column of your project, as in the following figure.

PanTrans Conference.mpp project phases
Entering Project Tasks
Once the overall structure of the project is determined, the next step is to perform progressive elaboration of the WBS. This is the process of detailing the activities needed to deliver the required results. Depending on the scale of the project, this effort often requires several iterations with input from many subject matter experts and stakeholders. All but the smallest projects require more than two WBS levels.
In Step 5 you entered the top-level tasks or phases. Now it’s time to drill down to a second (and maybe third or fourth) more detailed level of task requirements. The following are several best practices to use when determining the level of detail required for each task in your project:
Every detailed task should belong naturally within the hierarchy. Tasks should not be isolated outside the main branches of the WBS.
The lowest-level tasks should be written in a way that the task’s current status is easy to determine. Resources and supervisors should be able to clearly determine how far the task has progressed and when it is likely to be completed. On the other hand, it should not be so detailed that you are spending more time planning and tracking the activity than is warranted. These boundaries are often represented as the 8-80 rule —that is, tasks should take not less than 8 hours of effort nor more than 80 hours. This is a spinoff of the Rule of 80 covered under the “Entering Project Tasks” sub-section of Section 7.1, “Building the Work Breakdown Structure.”
Required deliverables should be shown as resulting from specific, detailed tasks.
When writing the task names for detailed tasks, always include a verb and an object—for example, “Develop Phase 1 draft report” or “Approve budget for design work.” This is not always applicable to summary tasks.
- 1.Under General planning, in the Task Name field, key in the following tasks:
Venue arrangements
Attendance
Travel arrangements
Agenda planning and timetable
Meeting facilities
Contingency planning
Cost planning
Catering
Publish final detailed plan
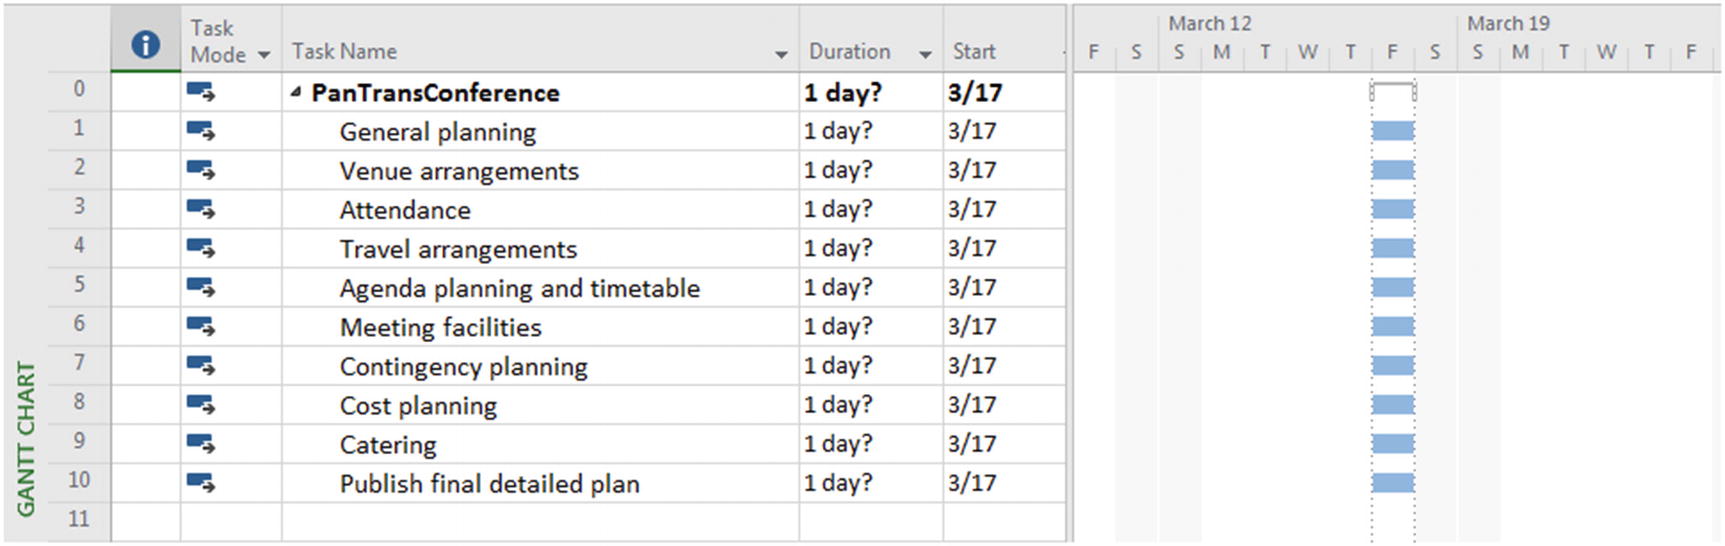
Sample of creating a new WBS
Right now each task in the project, including the top-level project phases, appears on the same level. To identify specific tasks as sub-tasks:
- 2.
Select the nine (9) tasks that follow General planning, and from Task:Schedule, click the Indent Task arrow [
 ].Your screen will resemble the following.
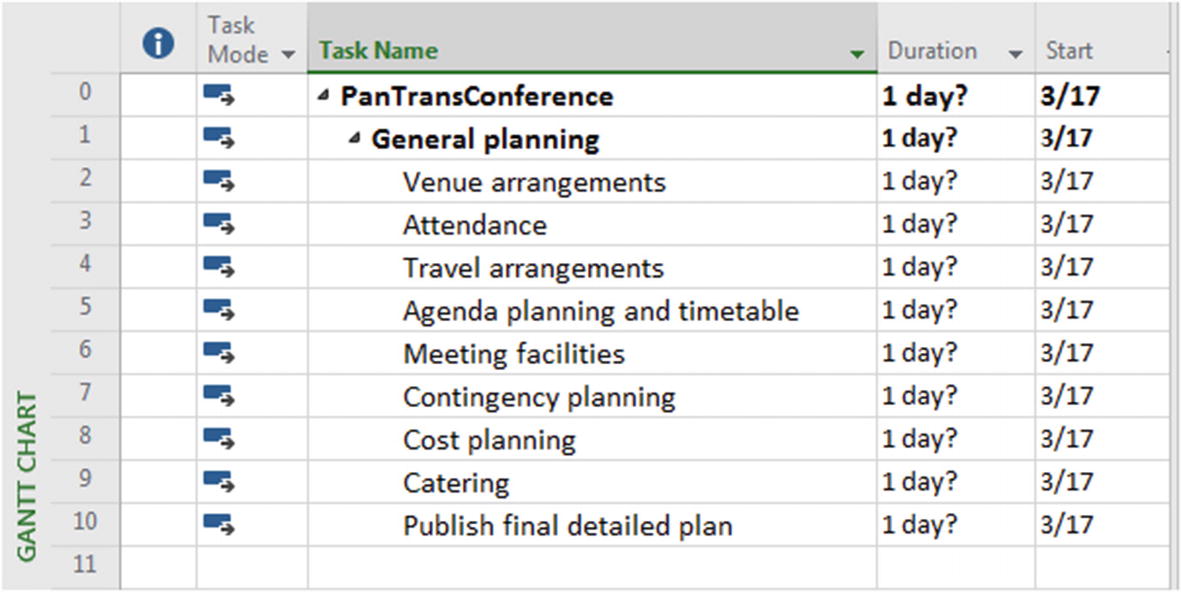 Figure 7-5
Creating a WBS by indenting tasks to create a summary task
At this point in the WBS development process, it is common to continue to enter detailed tasks and sub-tasks for the entire project. However, for large projects or ones where the scope of later phases depends on the outcome of earlier phases, you may adopt a rolling wave approach. As covered in Section 6.2, “Determining Logical Relationships of Tasks in Your WBS,” in the sub-section on baselining, rolling wave planning is the approach of developing the immediate next phases in detail and only covering the later ones generally.
For this exercise, we will now add a starting task for the project, as well as additional tasks under the first two General planning sub-tasks.
- 3.
Under General planning, add a new sub-task, Hold project kick-off meeting.
- 4.Under Venue, include the following sub-tasks, ensuring you indent the tasks properly:
Decide on venue criteria
Perform brief research on possible venues
Select top three potential venues
Perform detailed research on top three potential venues
Calculate cost and other criteria scores
Select winning venue
- 5.Under Agenda and schedule, include the following sub-tasks, ensuring you indent the tasks properly:
Develop list of key agenda items.
Develop draft agenda around key items.
Prepare list of secondary agenda item candidates.
Estimate time required for agenda.
Prepare list of presenters.
Develop list of entertainment events.
Develop draft agenda and schedule.
- 6.
At the beginning of your project, add a new top-level task called Project Management, and include the following two sub-tasks: Project tracking and Issue management.
Your screen will resemble the following.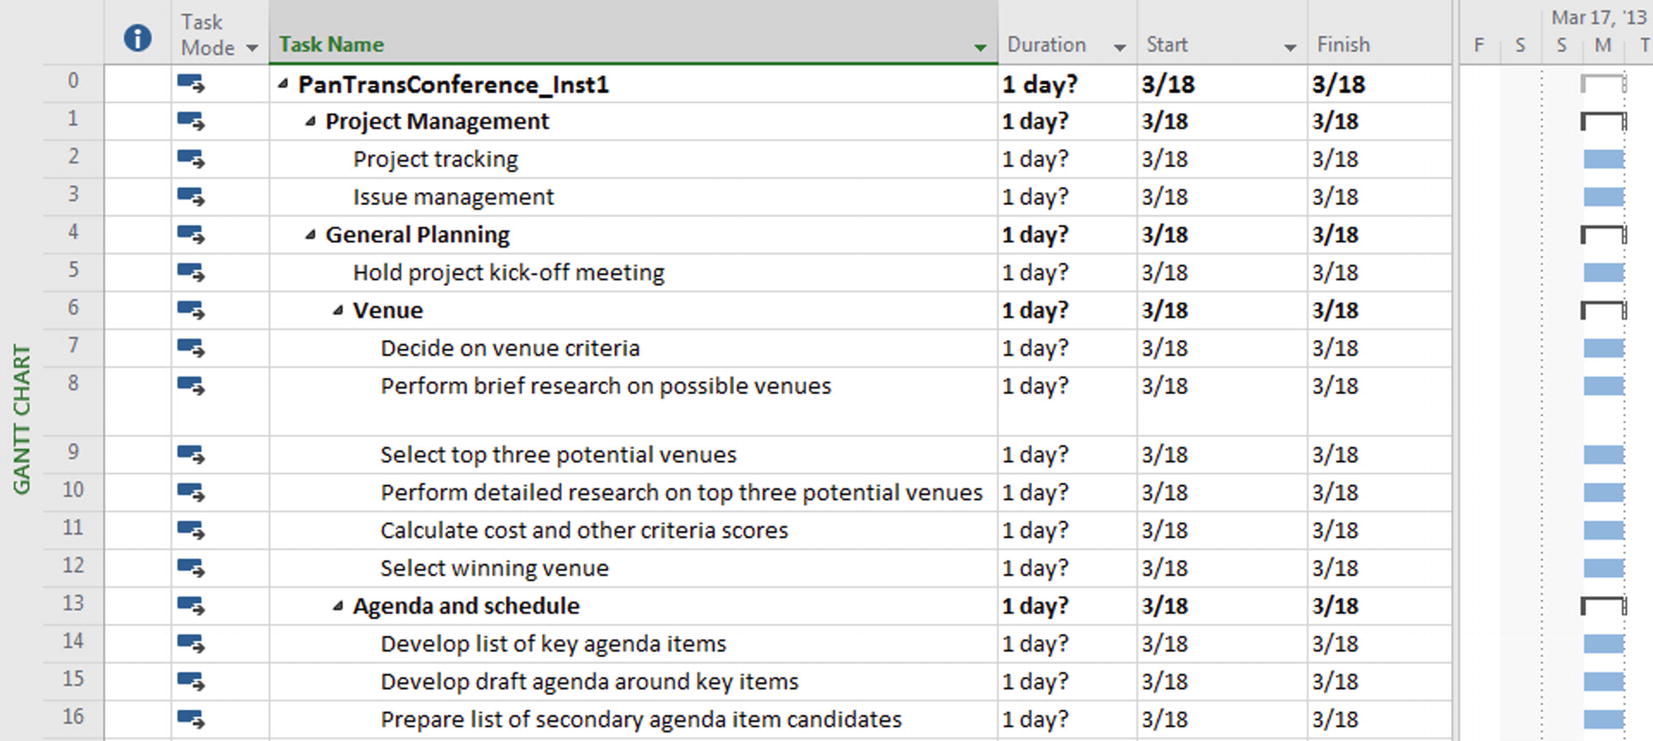 Figure 7-6
Sample WBS results
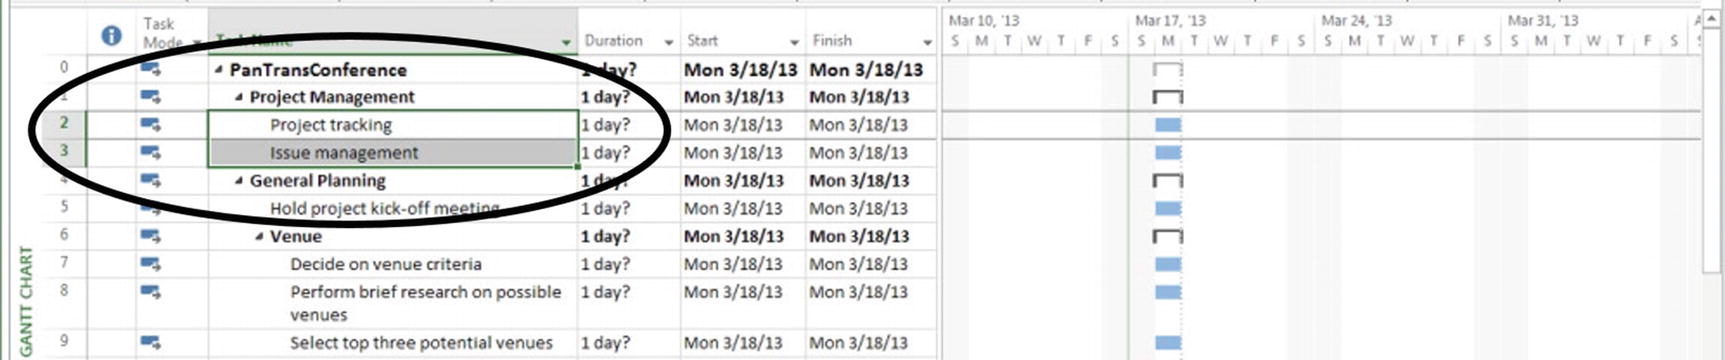 Figure 7-7
Highlighted Project Management tasks
Additional examples of tasks/phases without specific product-related deliverables—but that are important for successful project execution—include safety inspections and personnel management tasks.
You may notice that for all the tasks you have entered, the duration appears as 1 day? If you enter a task without a specific duration and your project is set to Auto Schedule new tasks, Microsoft Project 2019 assigns an estimated one-day duration to each task. The question mark, which remains in the Duration field until you adjust these values, indicates that the value is not a careful estimate and has a great deal of uncertainty. In other words, it is a guess. To show that a duration is uncertain, type the question mark when you enter the duration value.
- 7.
Select Task 30, Contingency planning, and from Task:Insert, click the Task icon. A new task line is inserted with the task name <New Task>. You can also use the Insert key on your keyboard and a blank line will be inserted above Contingency planning. In the newly inserted task line, type Arrange break-out rooms and press Enter. By default, new tasks in Microsoft Project assume the same outline level as the task displayed immediately above.
Your screen will resemble the following.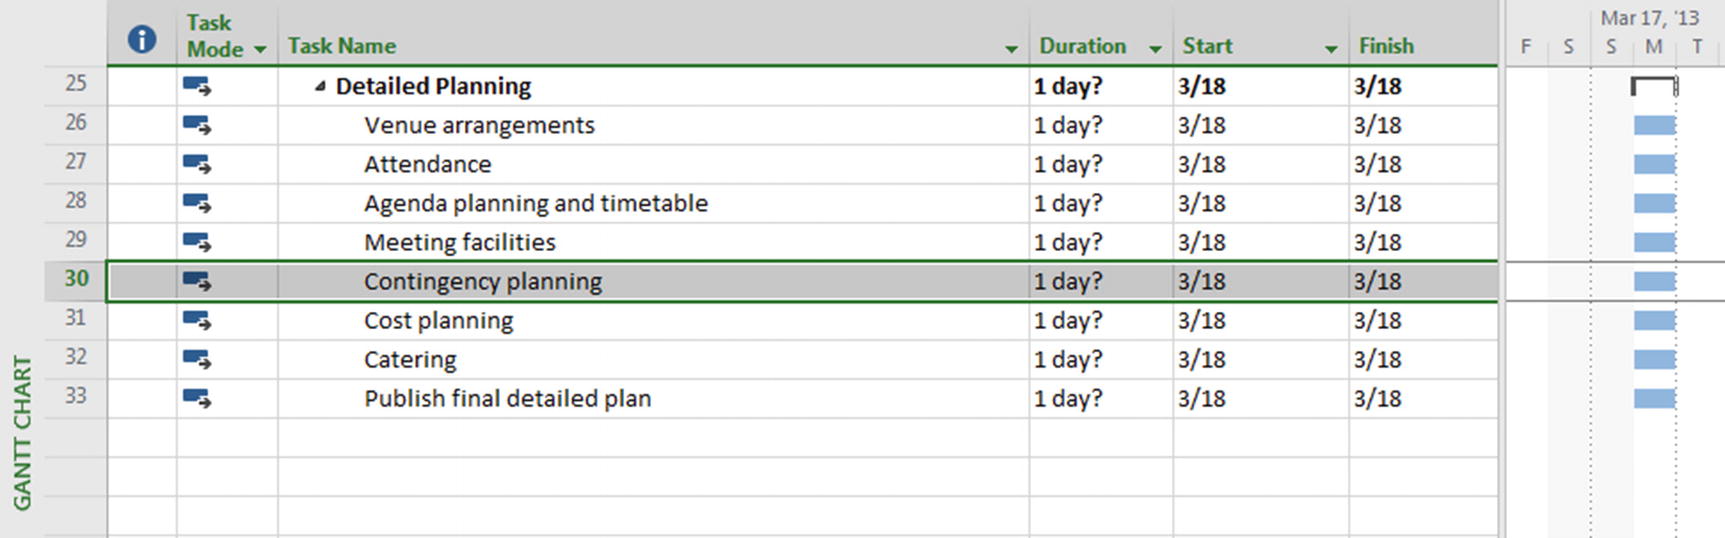 Figure 7-8
New task added
Notice that the new task Arrange break-out rooms is treated like all other tasks for the moment.
- 8.To make Arrange break-out rooms a detailed task under Meeting facilities, select the new Task 30, and in Task:Schedule, click the Indent Task icon . Task 30 has become a subordinate task of the new summary task Meeting facilities (Task ID 30). Your screen will resemble the following.
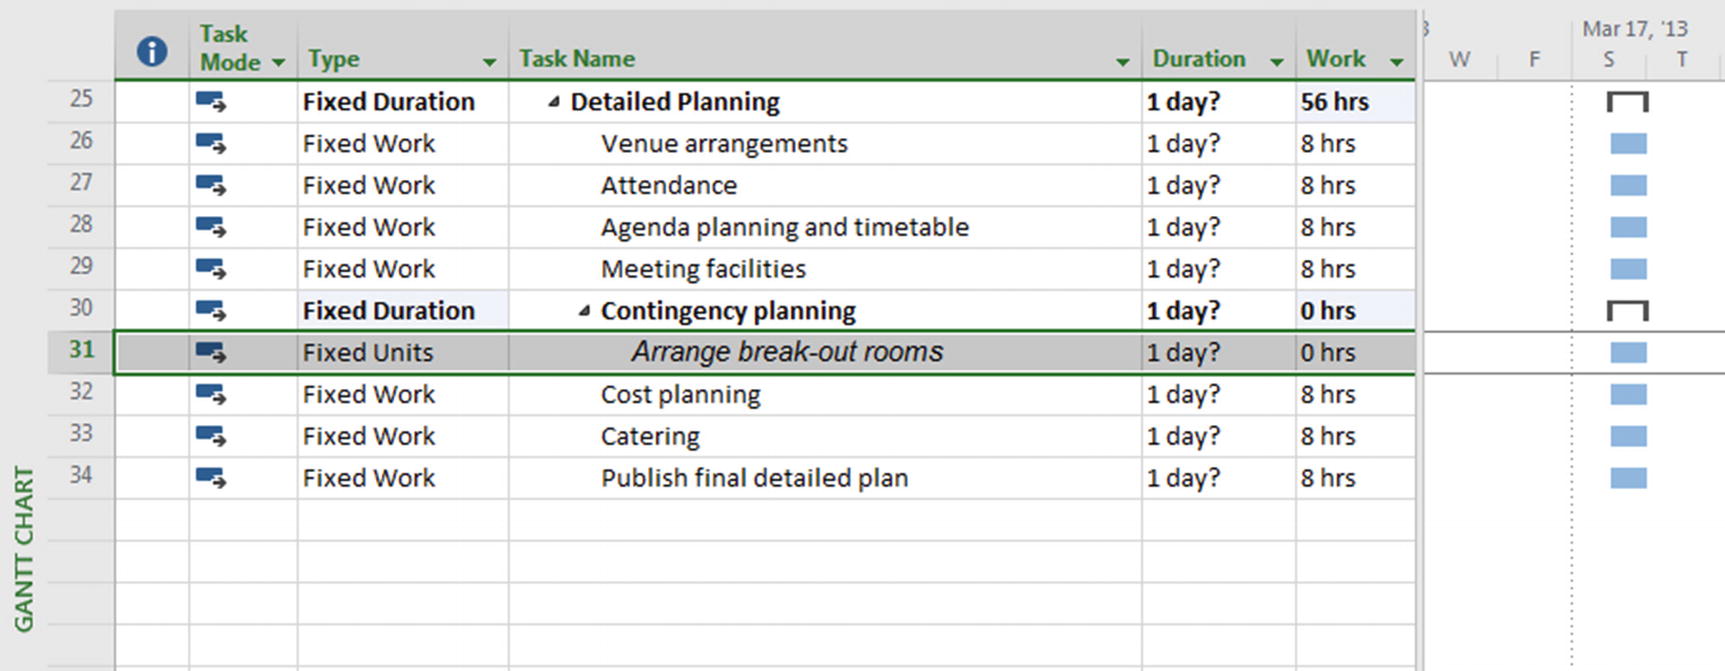 Figure 7-9
Creating a summary task
The left-pointing arrow next to the Indent Task icon is the Outdent Task icon [
 ], which can be used to reverse the outlining process or to promote a task to a higher outline level.
 - 9.
Select the task Arrange break-out rooms (Task ID 30) and click the Outdent Task icon. Notice the task is now at the same outline level as the task above it. Delete the task Arrange break-out rooms.
- 10.
Save and close your project.
7.2 Modifying and Editing the WBS
Microsoft Project 2019 provides several different methods to modify your work breakdown structure. You can insert, move, delete, and multiply the occurrences of tasks as your project plan undergoes changes. This lesson will review some of the alternate approaches available for working with project tasks.
Alternate Methods for Adding New Tasks to Your WBS
- 1.
Select the task Locate new site (Task ID 4).
- 2.Above Locate new site, insert Develop preliminary design and give it a duration of 5 days. Your screen will resemble the following.
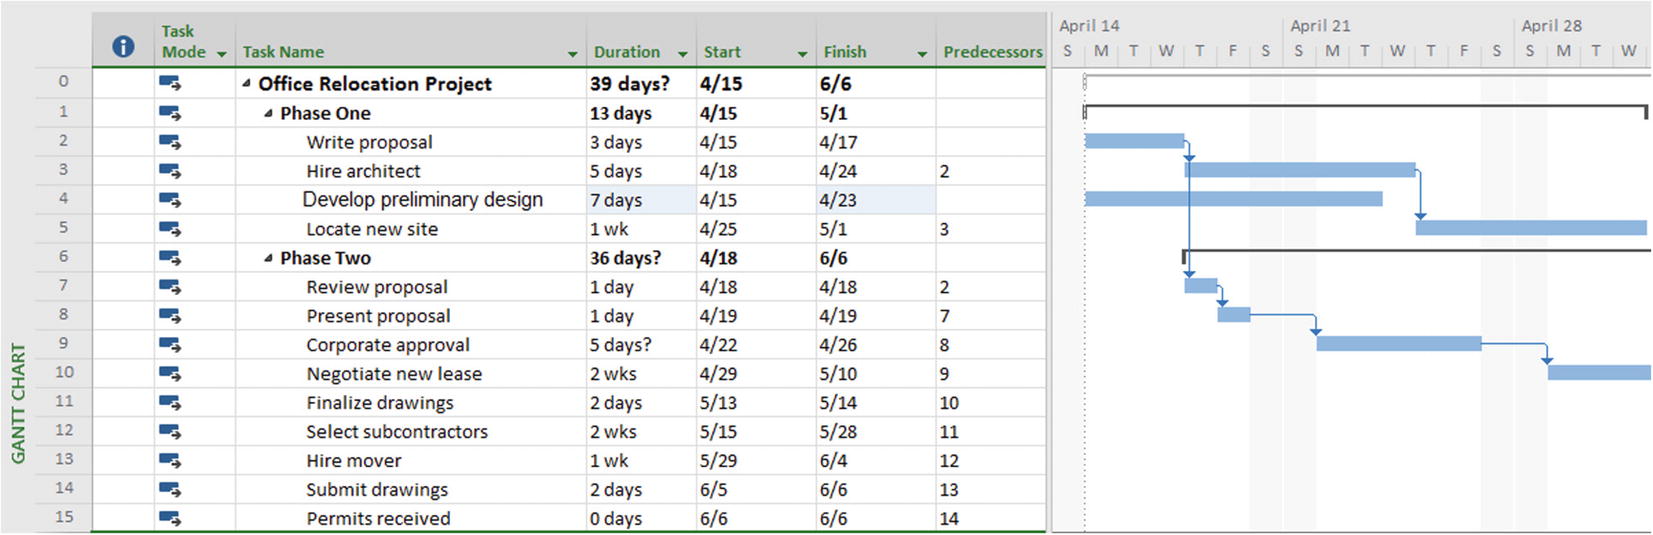 Figure 7-10
Inserted task
Several cells turned blue as a result of inserting this task, and they will remain blue until the project is saved or another change is made that affects the project schedule. This feature is designed to make it easier for users to identify changes caused by modification to individual cells.
- 3.
Insert the task Select target moving date (duration 1 day) above Hire mover (Task ID 13).
- 4.
On further thought, you have decided this doesn’t make sense; the possible moving date will be produced as part of the project and doesn’t need to be a separate task. Click the down arrow next to the Undo button [
 ]—located by default at the top-left corner of your screen—several times until your project plan reverts to its condition before you inserted Select target moving date. At this point, the Redo button [
 ] will become active, allowing you to change your mind back.
 - 5.
You’re curious about the task Negotiate new lease (Task ID 10) and wonder why it’s scheduled to start on April 29. The Task Inspector is a good way to see the factors affecting a task’s scheduling, as well as recommendations if there are conflicts with the task.
Select the task Negotiate new lease, and from Task:Tasks, click the Inspect icon [ ]. The Task Inspector sidepane will appear, similar to the following.
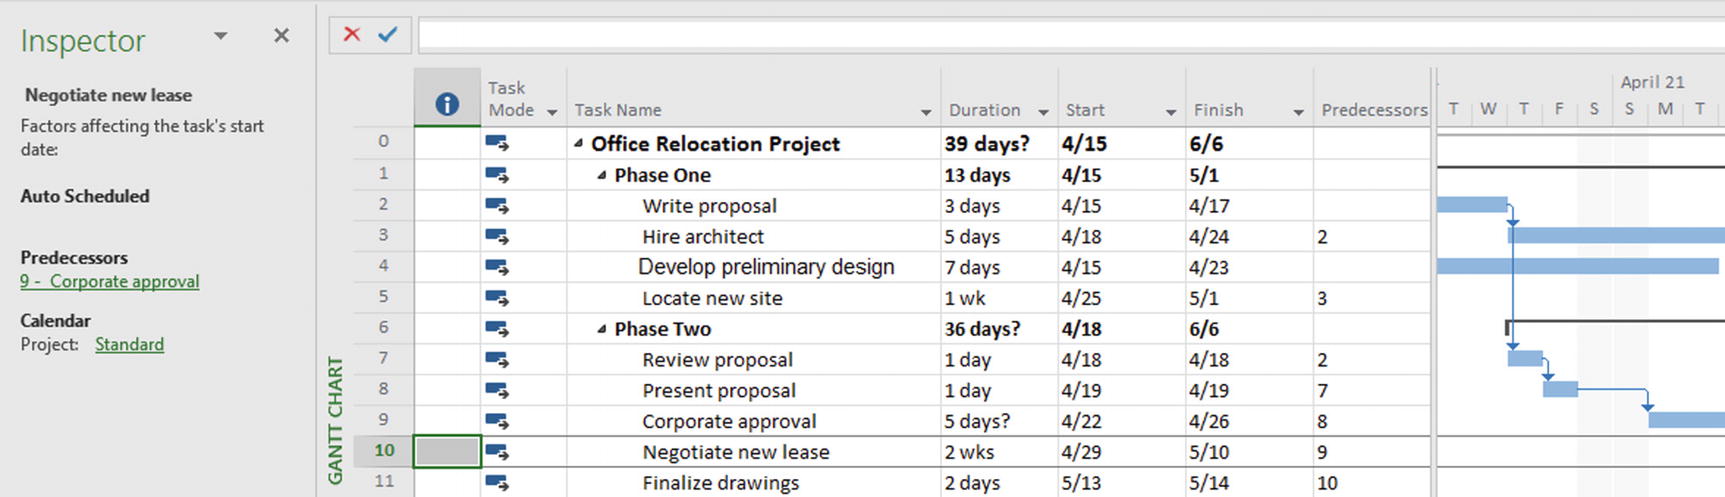 Figure 7-11
Task drivers for Task 10
- 6.
Click the X in the upper right-hand corner of the sidepane to close it and save your project.
Moving a Task in Your Task List and Cutting/Pasting a Summary Task
- 1.
Click to select the entire task row of Hire mover (Task ID 13). When using drag and drop, it is important to select the entire row by clicking the task number, not just the task name.
- 2.Click again and drag the row up until you see a gray line appear above Select subcontractors (Task ID 12). Your screen will resemble the following.
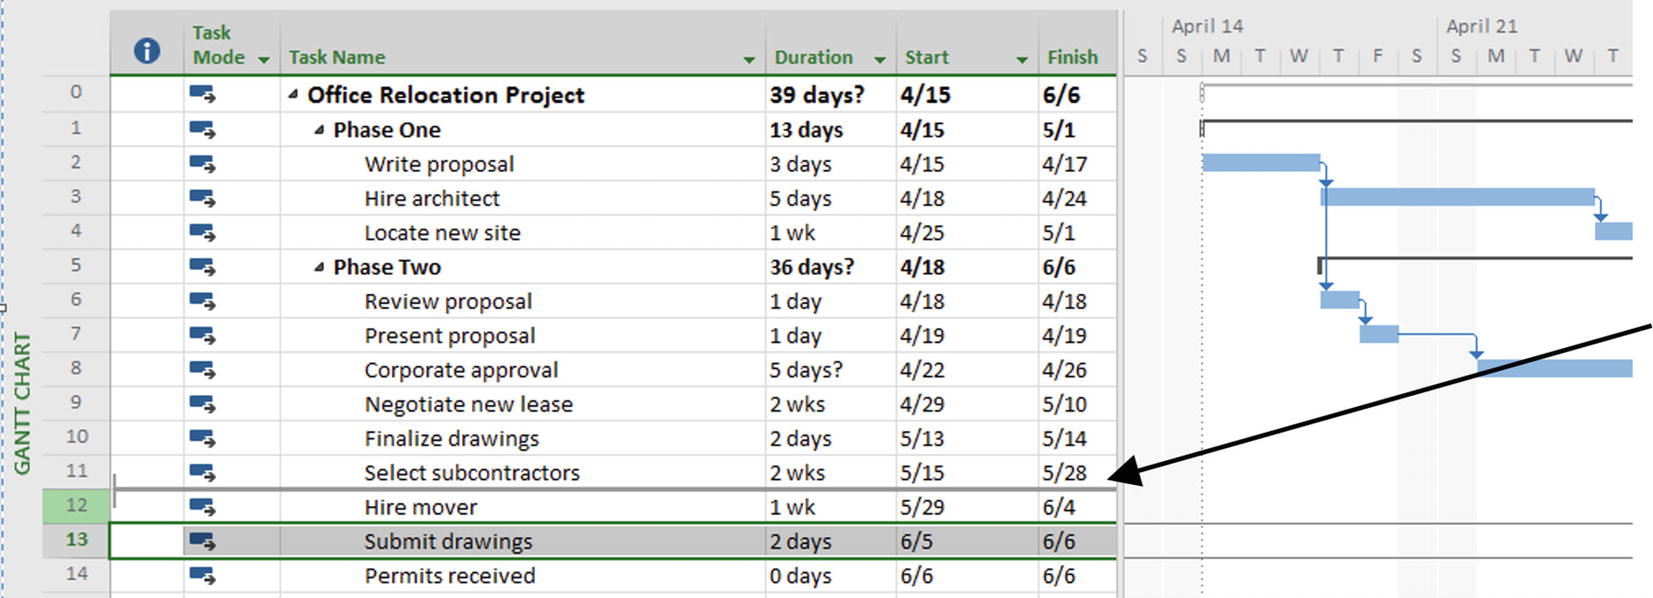 Figure 7-12
Using drag and drop to move a task
- 3.
Release your mouse button. Hire mover will replace Select subcontractors as Task ID 12, and Select subcontractors will become Task ID 13.
- 4.
Select the task row of summary task Phase Two (ID 6).
- 5.
From Task:Clipboard, click the Cut [
 } icon. The Planning Wizard dialog box will appear to remind you that because Phase Two is a summary task, deleting it will also delete all of its sub-tasks. (When you paste the summary task somewhere, all of its subordinate tasks will move with it.) From the Planning Wizard dialog box, select Cancel. Don’t delete any tasks. and click OK to close the box.
 - 6.What if you really wanted to delete a task? Select the task Hire architect (Task ID 3) and press the Delete key on your keyboard. Notice the “Smart Tag” (the large X) in the Indicator field of the following figure. This means Microsoft Project doesn’t know whether you want the task name or the entire task deleted.
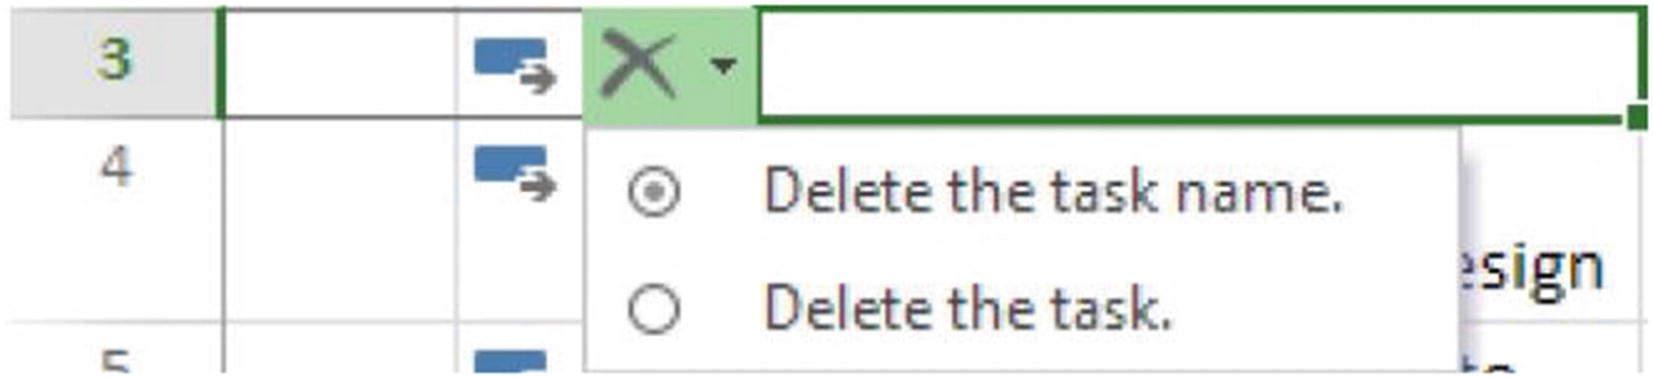 Figure 7-13
Smart Tag options
- 7.
Click the arrow by the X in the Indicator field to see your options. Select the default option: Delete the task name.
You will only see the Smart Tag if you select the Task Name cell. If you select the entire row by clicking the task ID number and then hit the Delete key, Microsoft Project will assume you know what you’re doing and delete the task without any questions. Thank goodness for Undo!
- 8.
Use the Undo button to restore the original task name.
- 9.
Save and close your project.
Using the Task Summary Name Field
Oftentimes, a task has so many sub-tasks that it gets cumbersome to scroll up and down just to see which summary task it’s listed under. The Task Summary Name is a new field in Project 2019 that addresses this problem.
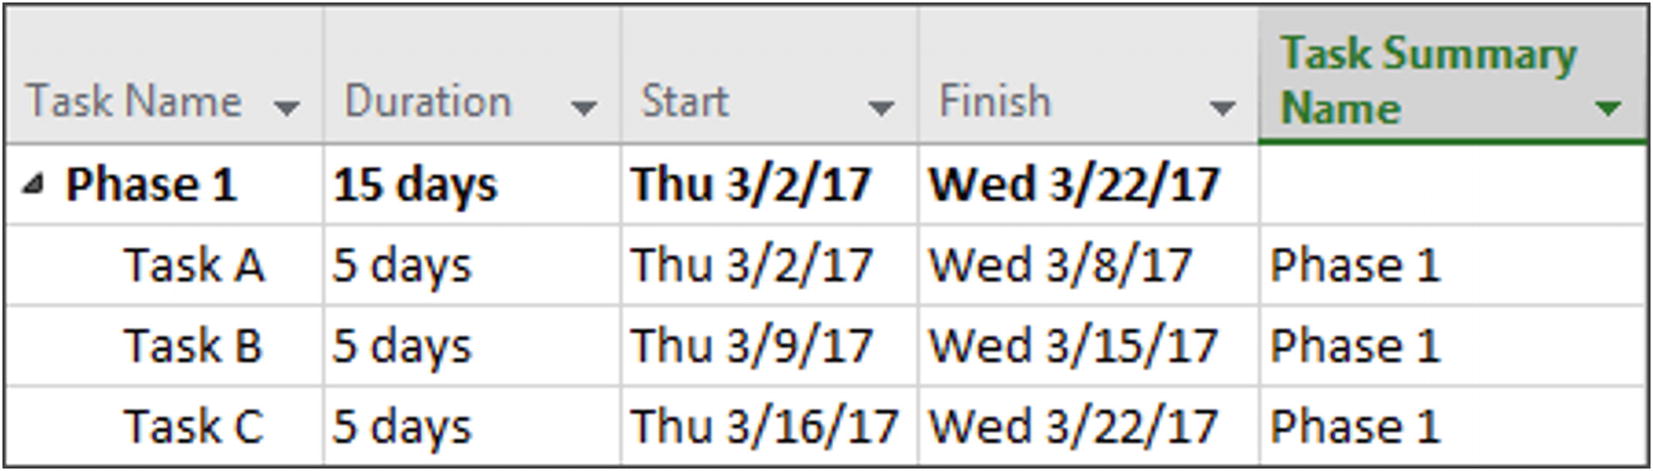
Task Summary Name field
Viewing Outline Numbers
When you create your schedule, Microsoft Project 2019 automatically assigns an outline number to each task, based on the outline structure. Each number indicates the task’s position within the outline hierarchy. The first task in the outline is assigned the number 1. The sub-task immediately below is then assigned the number 1.1, the next sub-task is assigned the number 1.2, and so on. Outline numbers can be useful for reporting purposes.
The outline number format is comparable to a WBS code, but outline numbers are created automatically by Microsoft Project, while the WBS code can be customized by the user. The number of digits in the code indicates the outline level; Task 1.1.1.1 is the first task in the fourth outline level, under Task 1.
- 1.From Format:Show/Hide, select the Outline Number checkbox. Outline numbers will appear in your project plan. Your screen will resemble the following.
 Figure 7-15
Outline numbers
- 2.If you prefer not to have outline numbers attached to the task names, you can insert the WBS field in the table to show the outline numbers in a separate column. To do this, right-click Task Name and select Insert Column… from the menu that appears. Then, select WBS as the title of your column. Finally, from Format:Show/Hide, uncheck the Outline Number checkbox. Your screen will resemble the following.
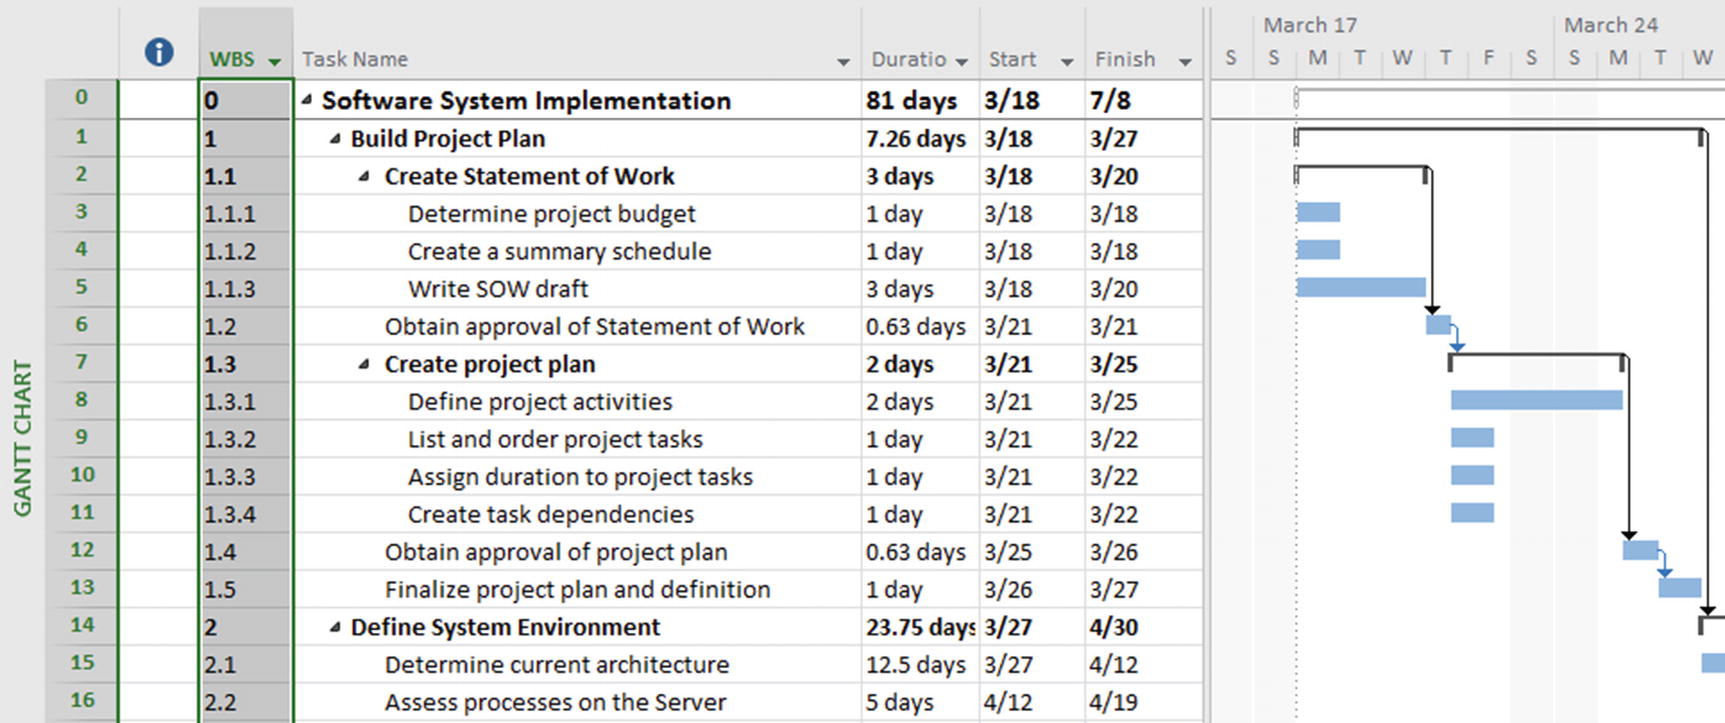 Figure 7-16
Separate WBS column showing task outline numbers
- 3.
Click Undo several times to remove the WBS column. Save and close your project.
Bringing in a Task List from Excel
You can import information from Microsoft Excel into any defined Microsoft Project field. Although you can enter values in some calculated fields, Microsoft Project may recalculate these values, either automatically or when you specify.
- 1.
Before beginning this exercise, confirm that you are able to import tasks from Excel spreadsheets that were created in an earlier version (pre-2013) of Microsoft Excel. To do so, open Microsoft Project, and from File:Options, select Trust Center. Click the Trust Center Settings… button and then click Legacy Formats in the sidebar.
- 2.Check the Allow loading files with legacy or non-default file formats. option. Your screen will resemble the following.
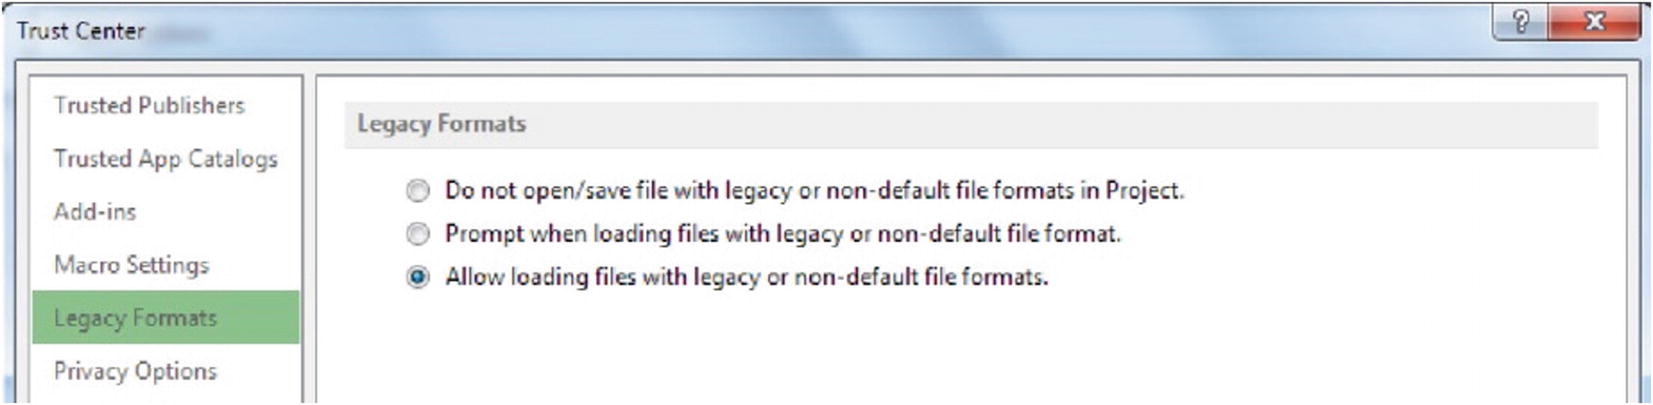 Figure 7-17
Trust Center (security) options
- 3.
Click OK twice to accept the new setting and close the dialog boxes.
- 4.
Now, from File:New, click New from Excel workbook.
- 5.You will be presented with the Open dialog box. Navigate to the Exercises Directory folder on your computer (if necessary), select Task List.xlsx, and click Open. You will be presented with the first Import Wizard screen.
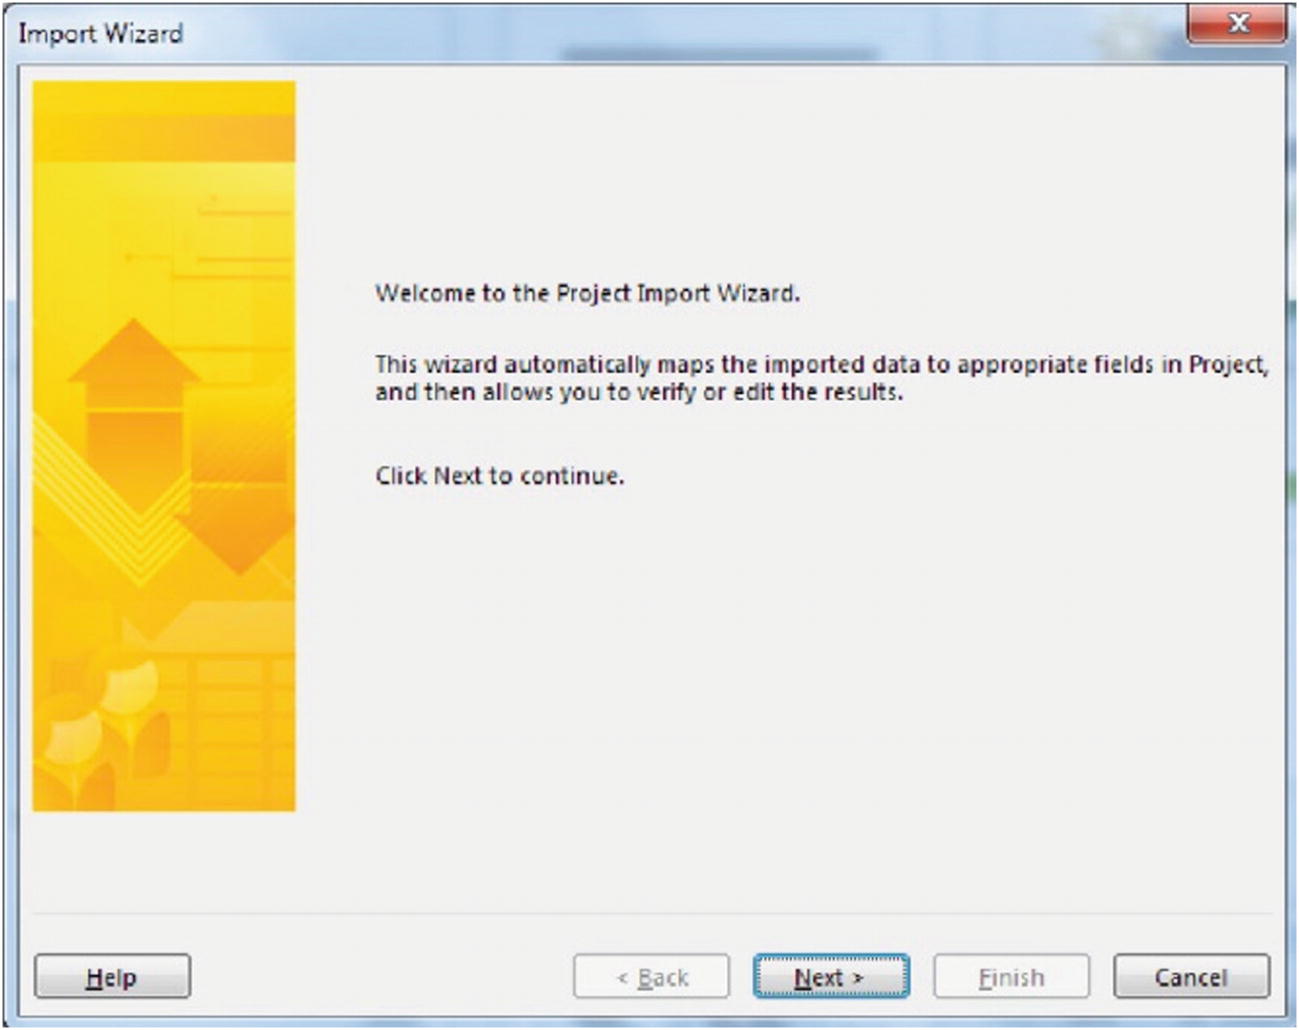 Figure 7-18
Import Wizard welcome screen
- 6.Click Next. The Wizard prompts you to select whether you want to use a New map or Use existing map.
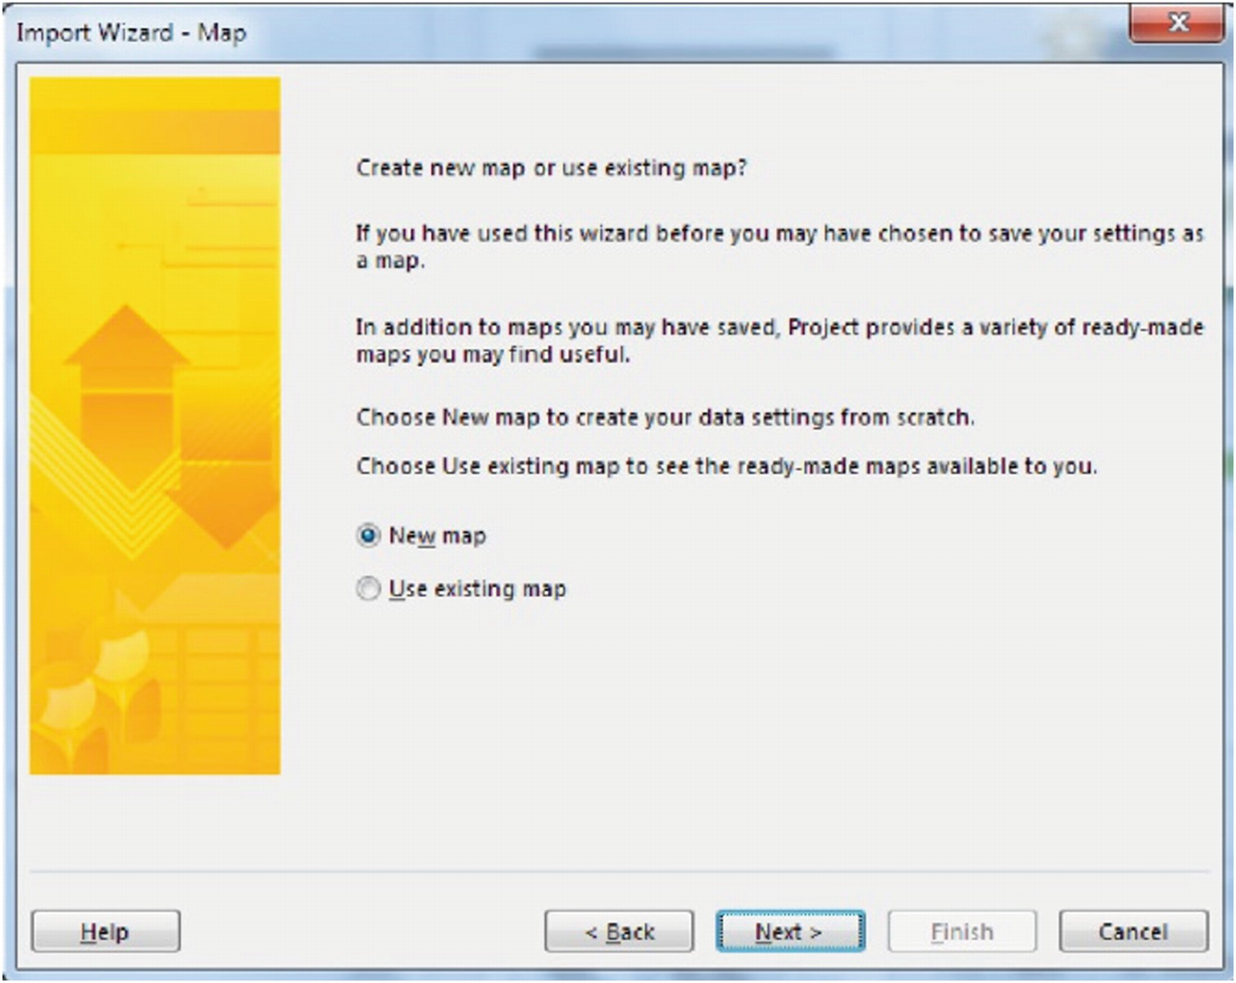 Figure 7-19
New or existing map prompt
- 7.
Accept the default New map option and click Next to see the Import Mode screen.
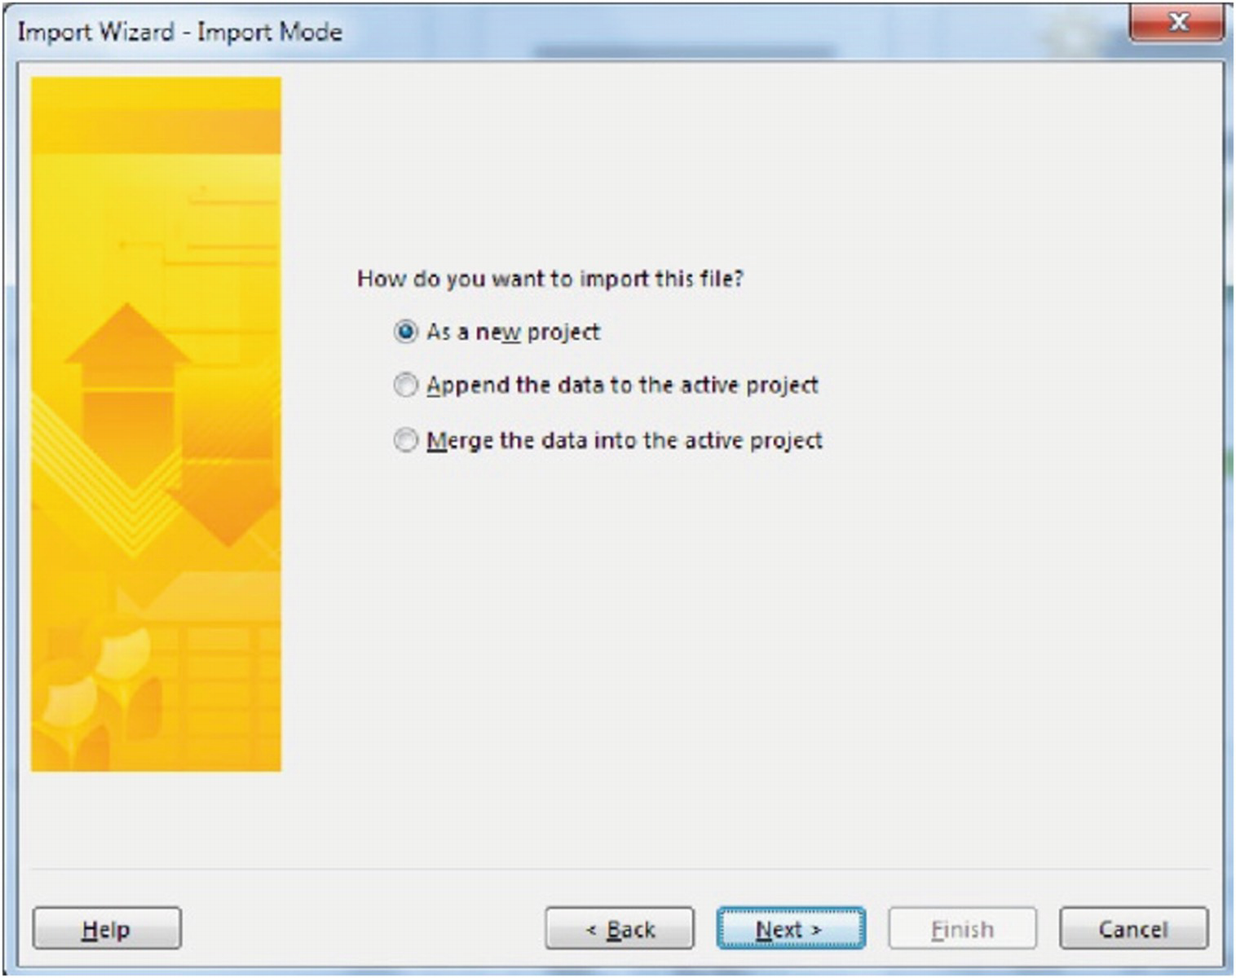
Import Mode choices
Microsoft Project 2019 enables you to append or merge Excel data to an existing project file, as well as create a new project file.
- 8.Ensure the default As a new project option is selected and click Next to see the Map Options screen.
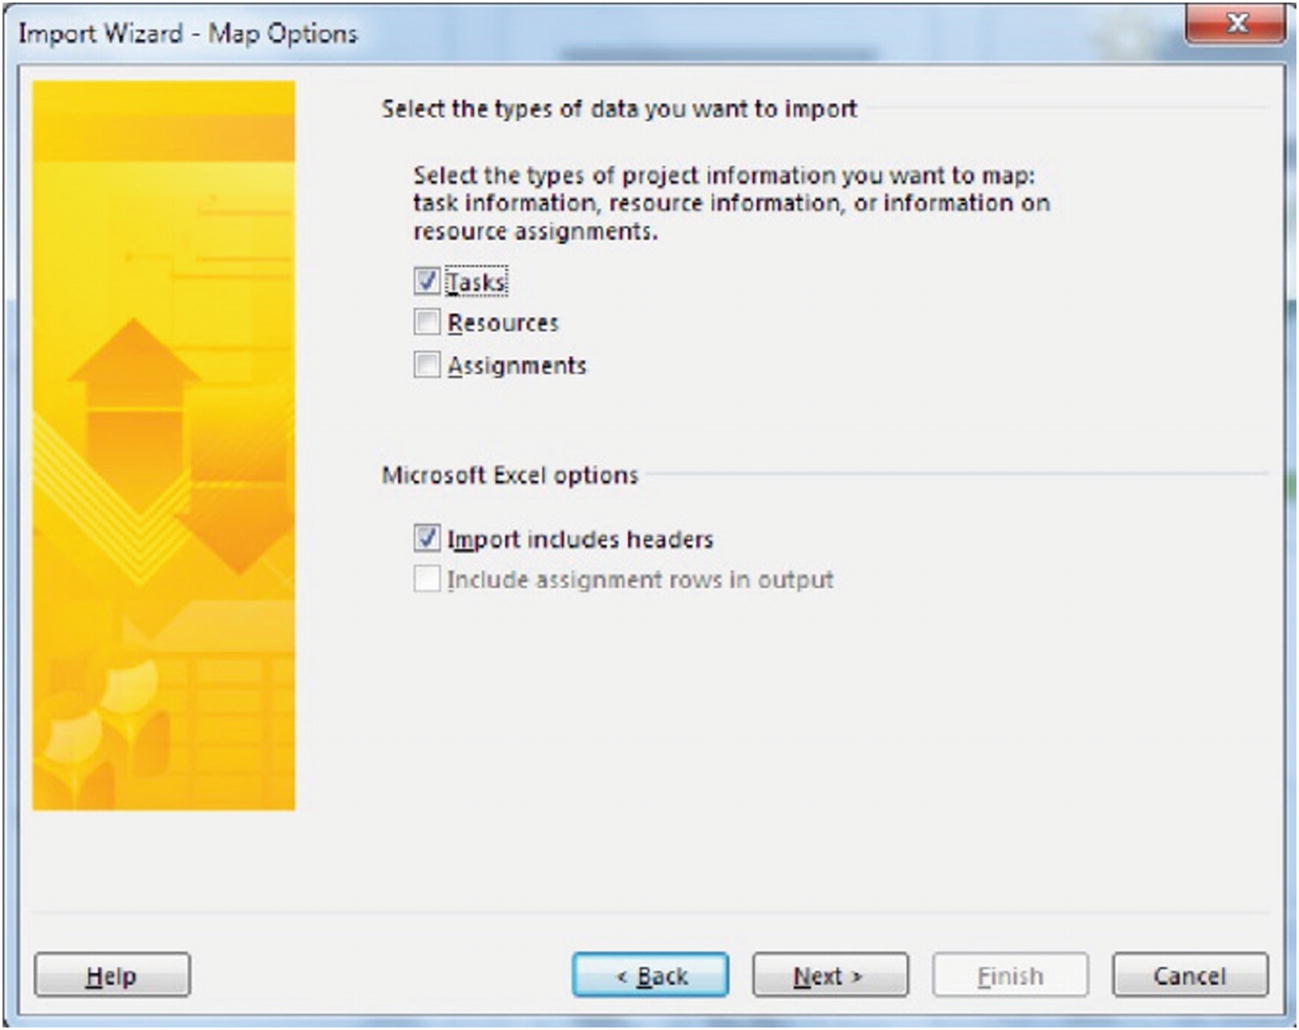 Figure 7-21
Import Map options
Each type of data (tasks, resources, assignments) imported will require a separate mapping screen to define where each Excel field corresponds to which Microsoft Project field.
- 9.Select Tasks in the top section and Import includes headers in the bottom section, and click Next to see the Task Mapping dialog box. From the Source worksheet name dropdown list, select Sheet 1 as follows.
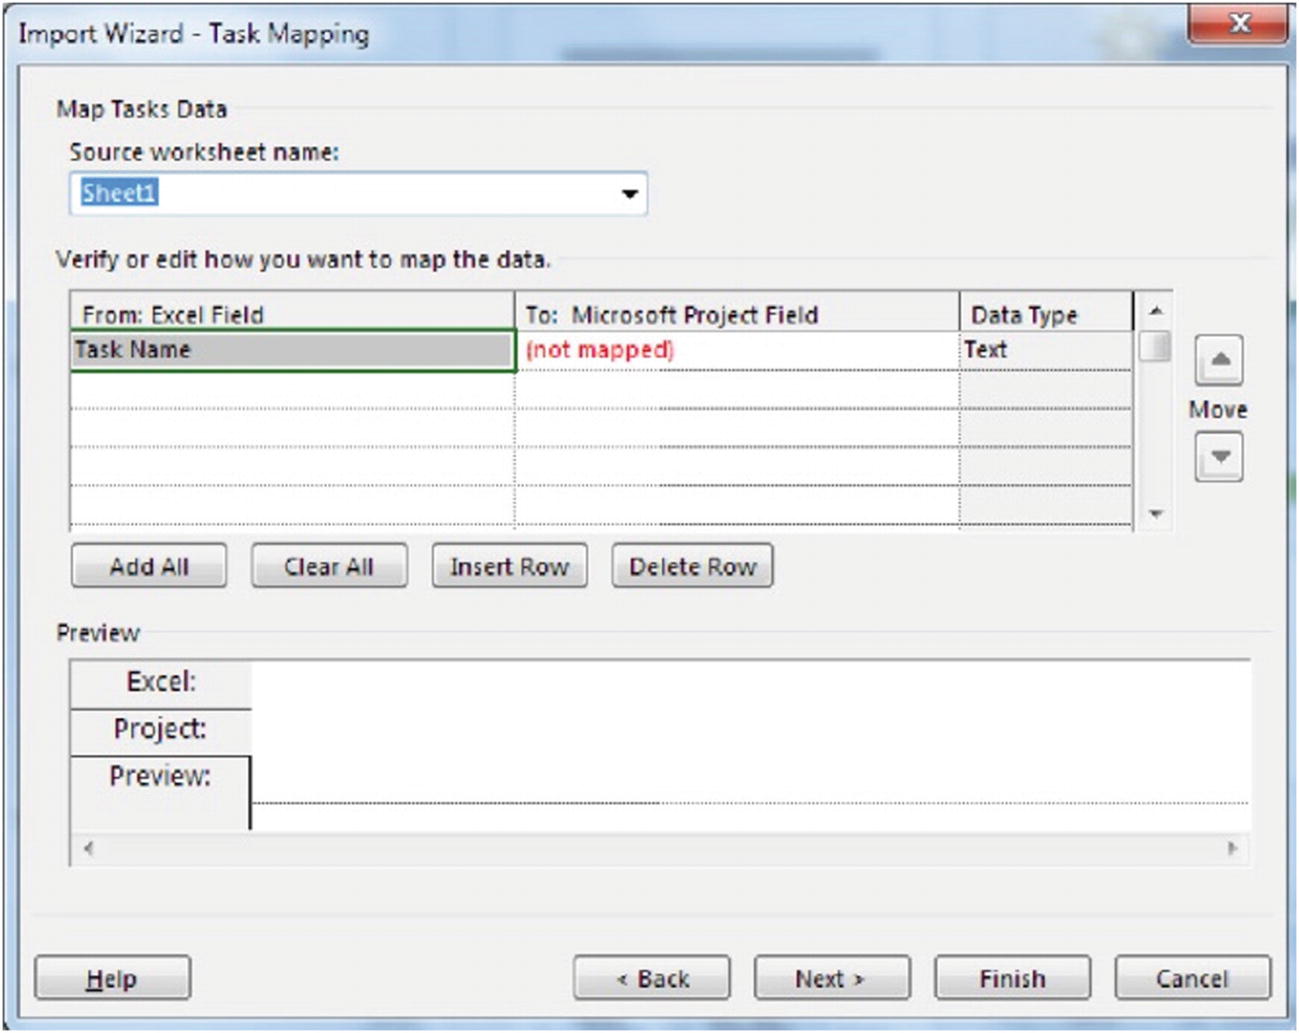 Figure 7-22
Task Mapping dialog box
- 10.In the To: Microsoft Project Field dropdown list, select Name. To see a preview of the mapping, press Enter or click in the cell below the field.
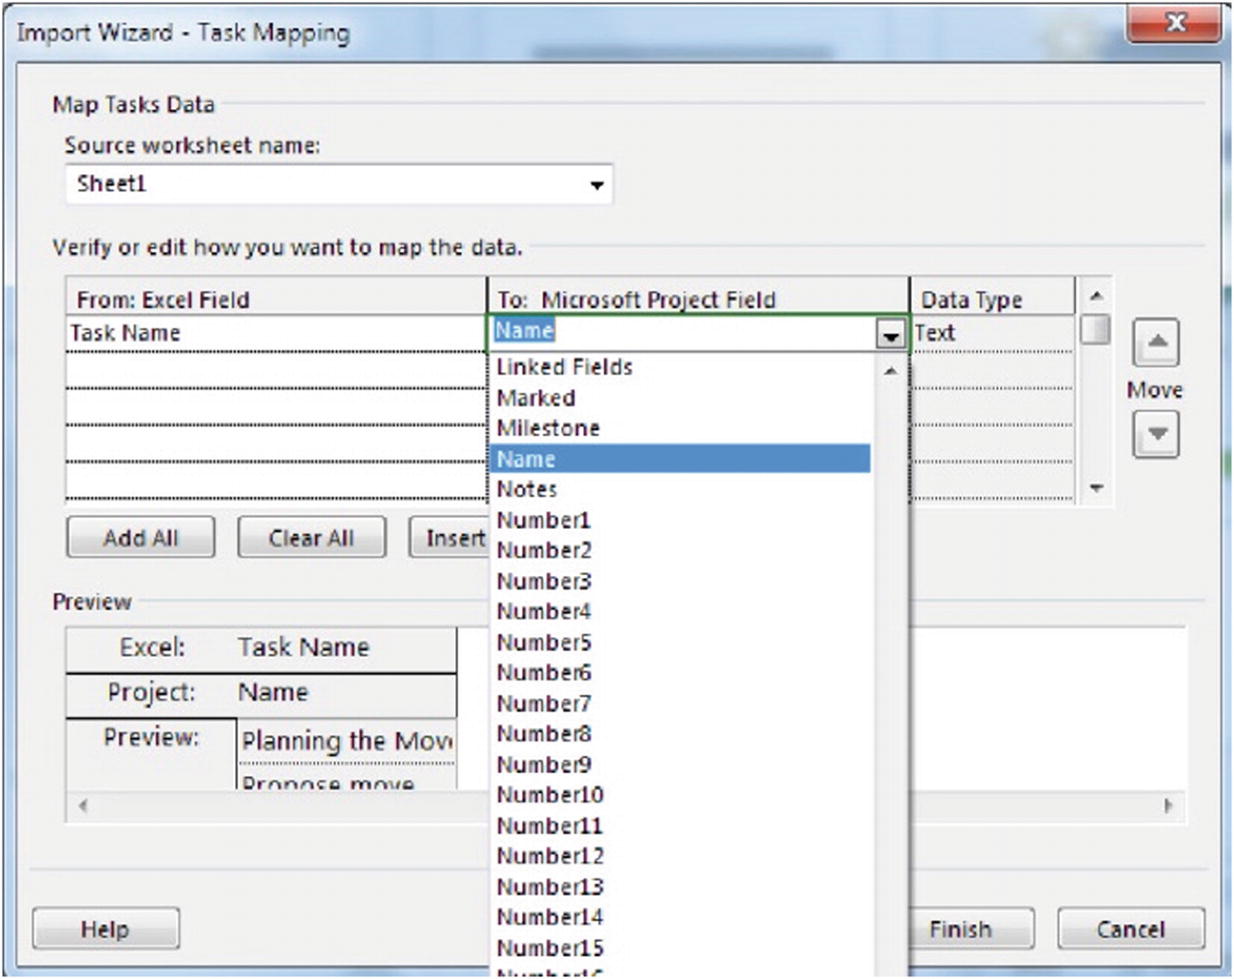 Figure 7-23
Selecting the project field
- 11.Click Next to see the End of Map Definition screen.
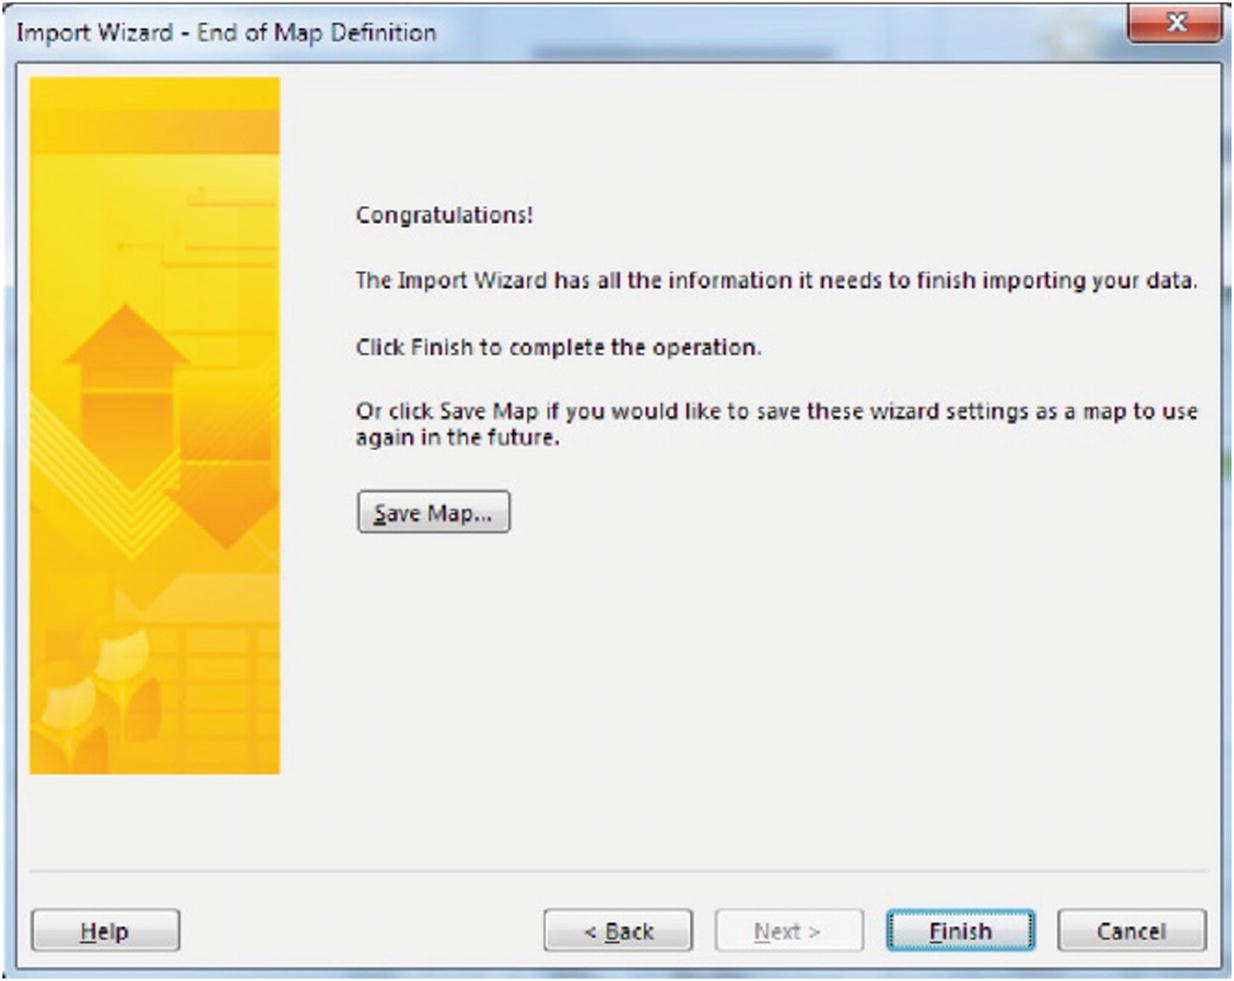 Figure 7-24
End of Map Definition screen
Notice this screen gives you the option to save and re-use your map.
- 12.Click Finish. The task list from Excel will import to your new project plan. Your screen will resemble the following (only the first 15 tasks are shown in this figure).
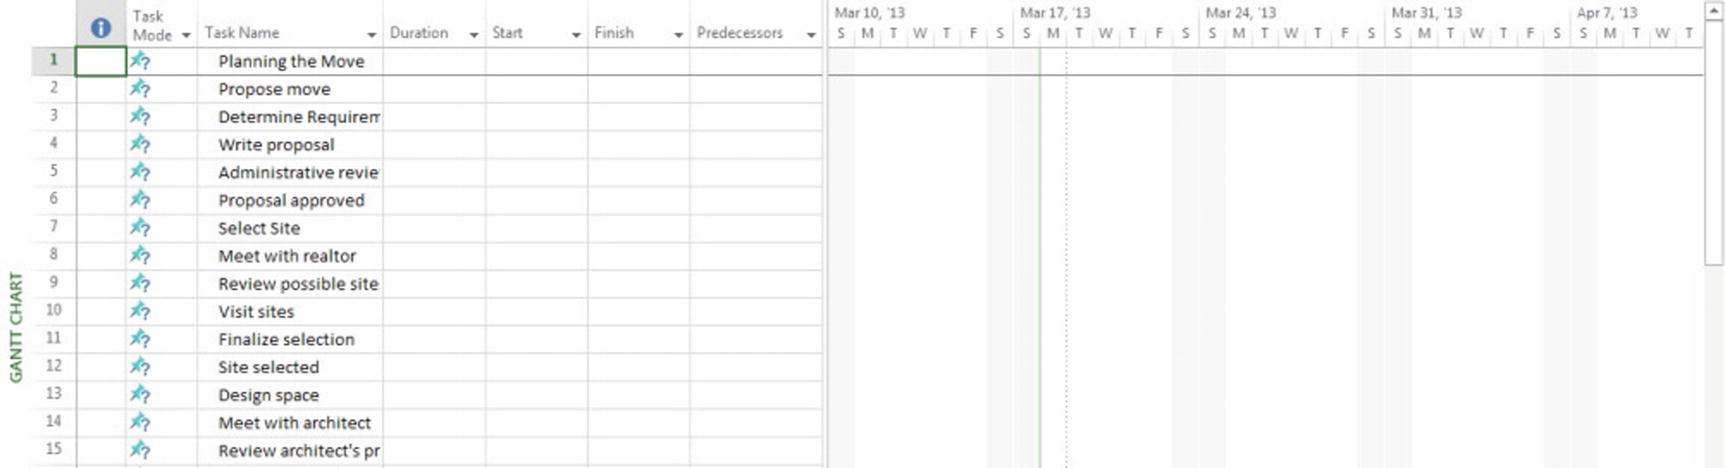 Figure 7-25
New Project file from Excel
- 13.
Save your new project plan with the default name TaskList.mpp.
- 14.
Close your project.
Import Outlook Tasks Dialog Box
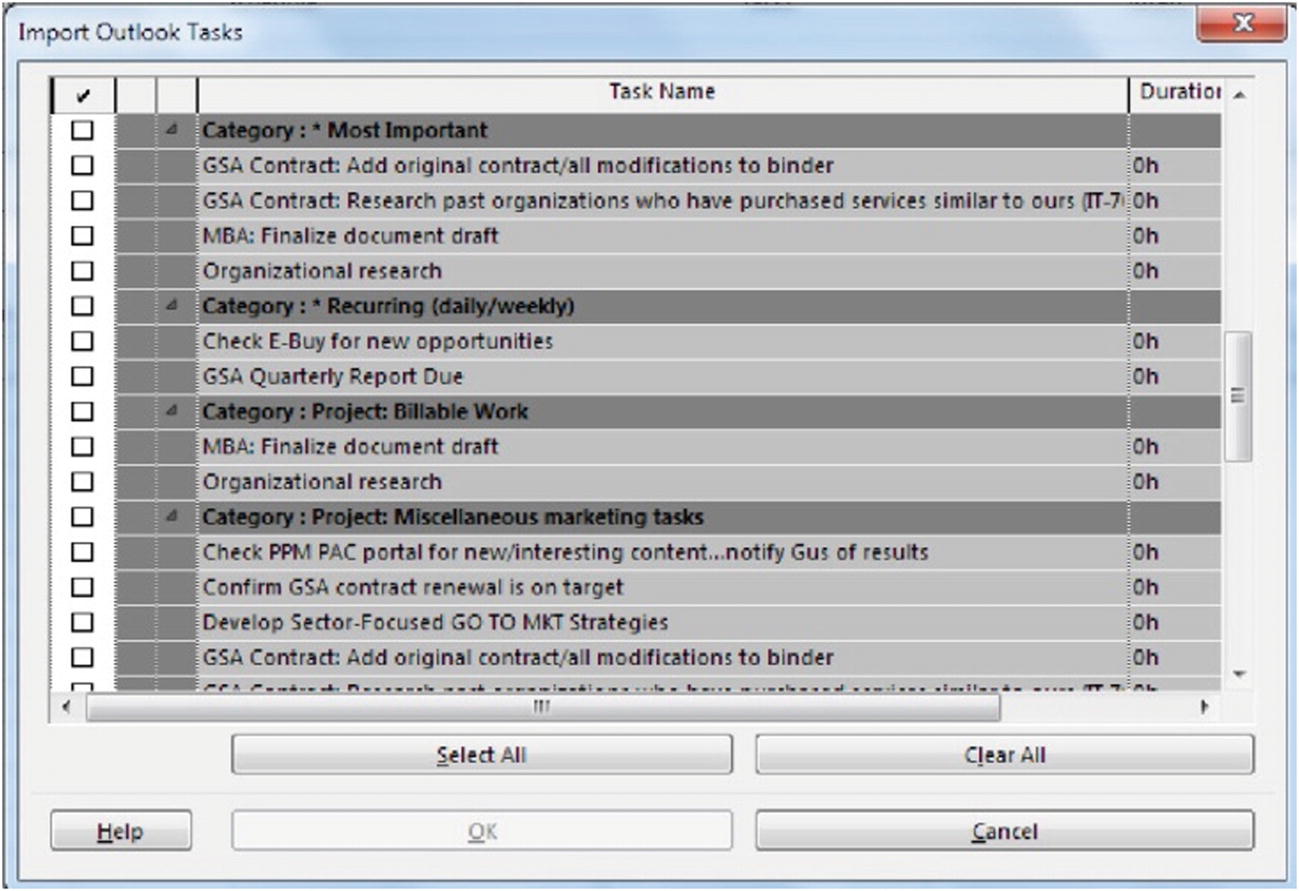
Import Outlook Tasks dialog box
This box displays all your task folders from Outlook, but not tasks from public folders. The tasks are grouped by folder name and then category name.
Select tasks to import by clicking the checkbox to the left of the task name. Multiple tasks can be selected by holding down the Control or Shift key while selecting the tasks or by choosing a group of tasks (click the checkbox next to the category name). There is a Select All button as well as a Clear All button for more efficiency.
Once you’ve made your selections for import, click the OK button. The Outlook tasks will be appended into the currently open project.
7.3 Creating Task Dependencies
Setting Task Dependencies
- 1.Click the Task Name column header to select all tasks in the project, and then from Task:Schedule, click the Link Tasks icon [
 ]. Your screen will resemble the following.
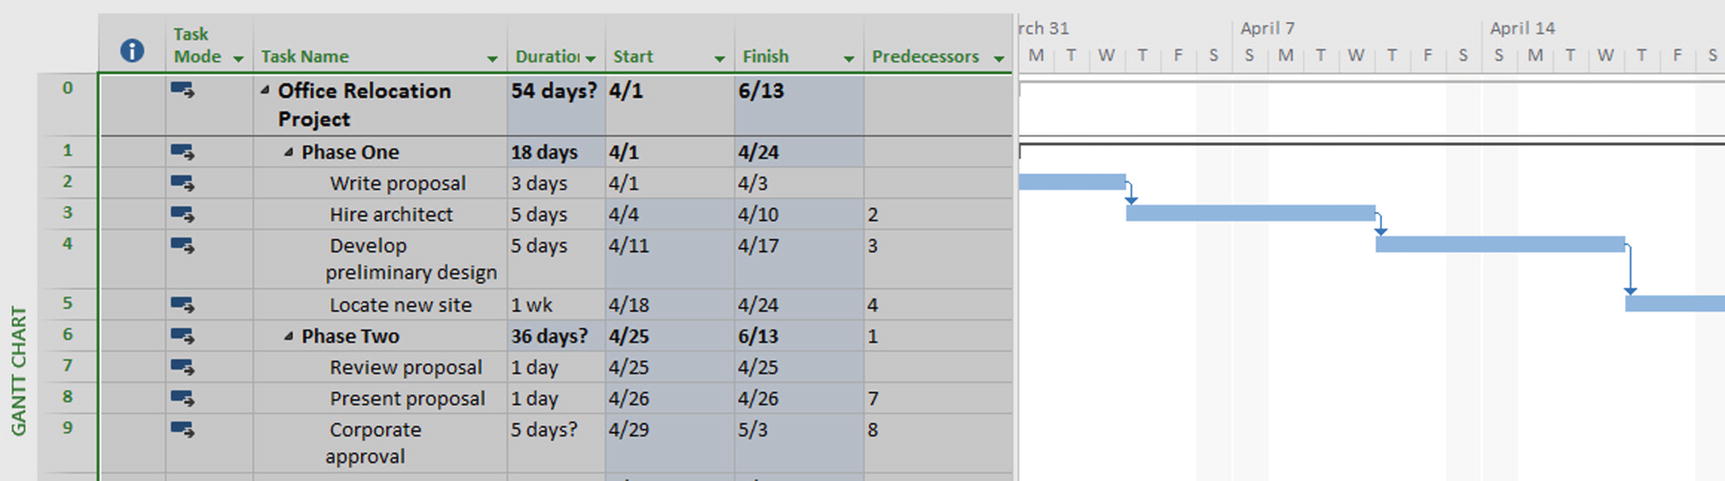 Figure 7-27
All tasks linked
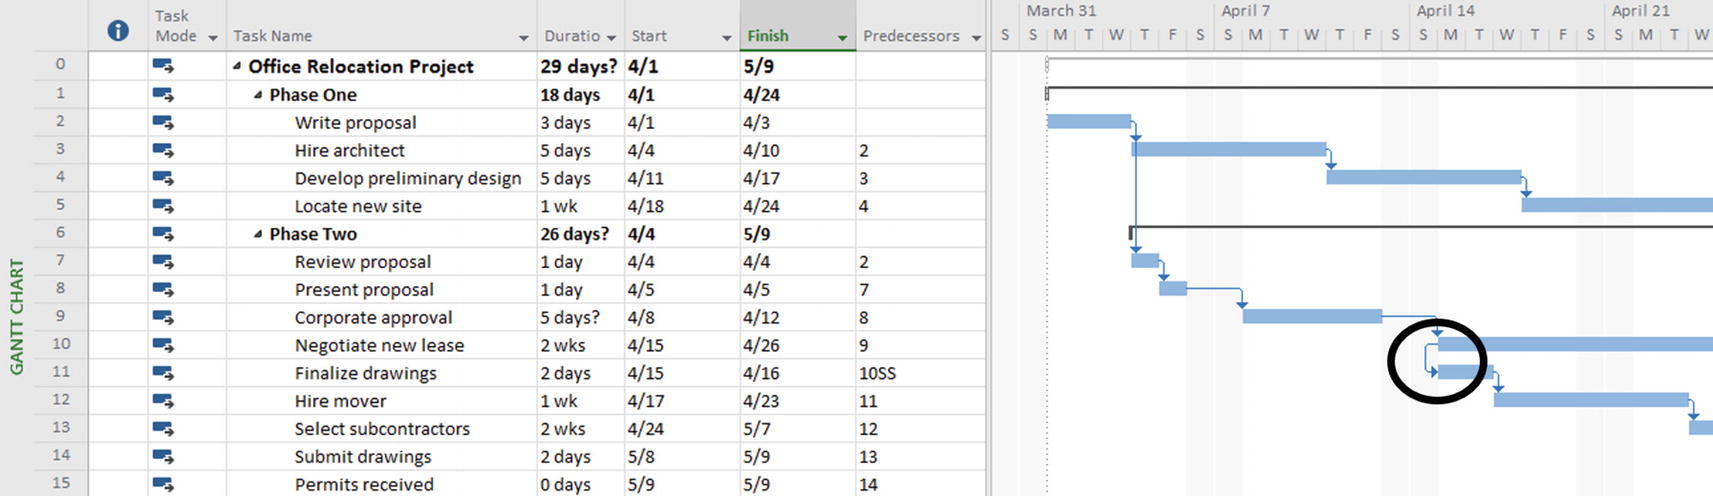
Notice that by linking all the tasks in this way, the project’s duration jumped from 36 days to 54 days. Ideally, the new project finish date would be acceptable to the client, but it’s far more common for project managers to have to look for ways to speed up the schedule.
The way the tasks are linked above, all tasks in Phase One must be completed before any task in Phase Two can begin. You might decide that you could speed up the project by doing Phase One and Phase Two at the same time.
- 2.To do so, double-click the black line linking the bars for Phase One and Phase Two. The Task Dependency dialog box will appear.
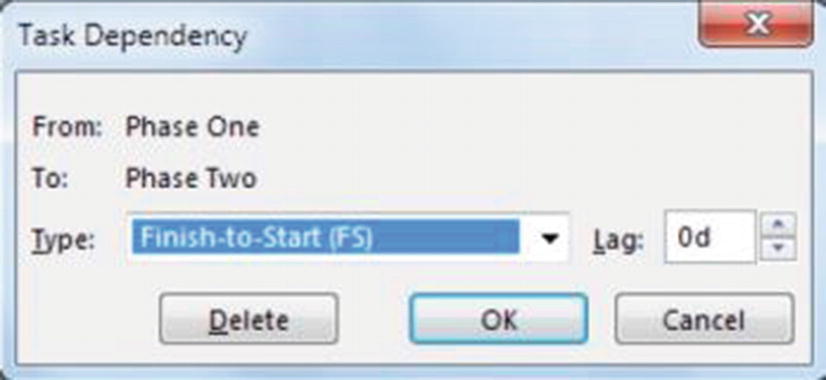 Figure 7-28
Phase link
- 3.Click Delete to remove the link. Your screen will now resemble the following.
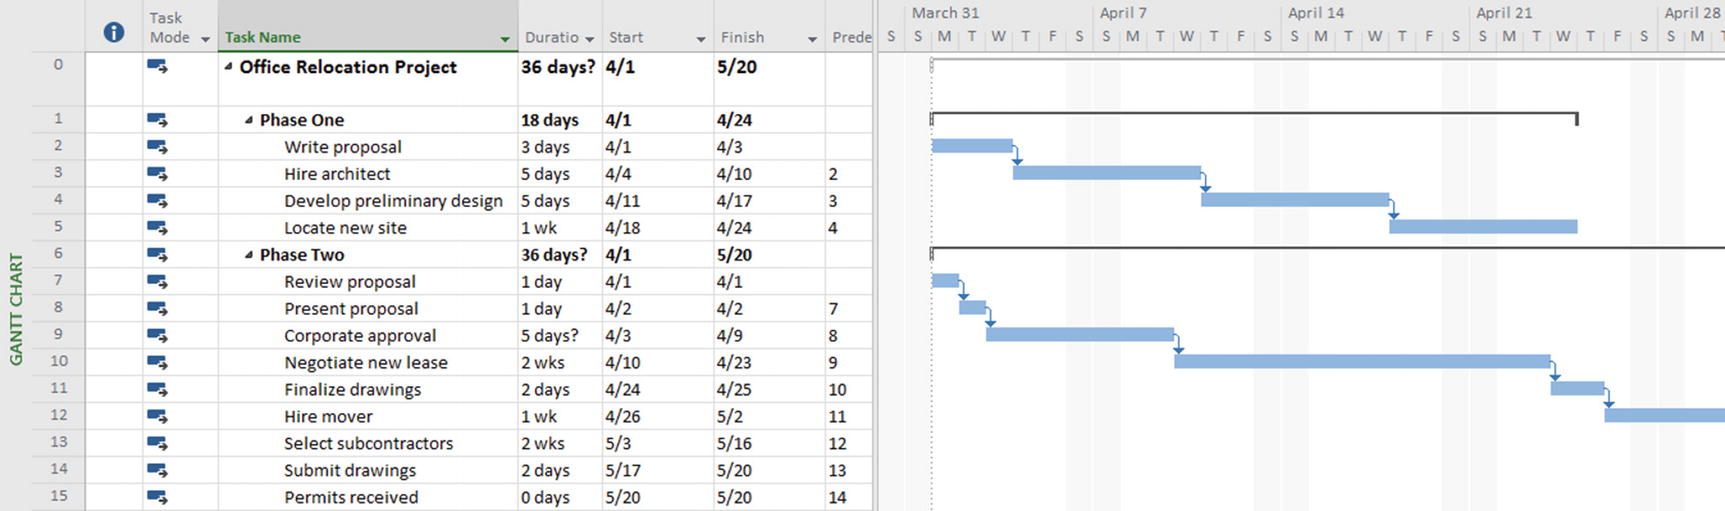 Figure 7-29
Unlinked phases (summary tasks)
Another way to remove the link is to click Phase One and Ctrl-click Phase Two to select the noncontiguous tasks. Then, from Task:Schedule, click the Unlink Tasks icon [
 ].
]. - 4.
Although you have saved some time (the project duration is now 36 days instead of 54 days), you realize this work schedule is impossible. According to this logic, we can review the proposal (Task ID 7) before we’re done writing it (Task ID 2). Click Write proposal and Ctrl-click Review proposal to select only those tasks, and then click the Link Tasks button to link them.
Your screen will resemble the following.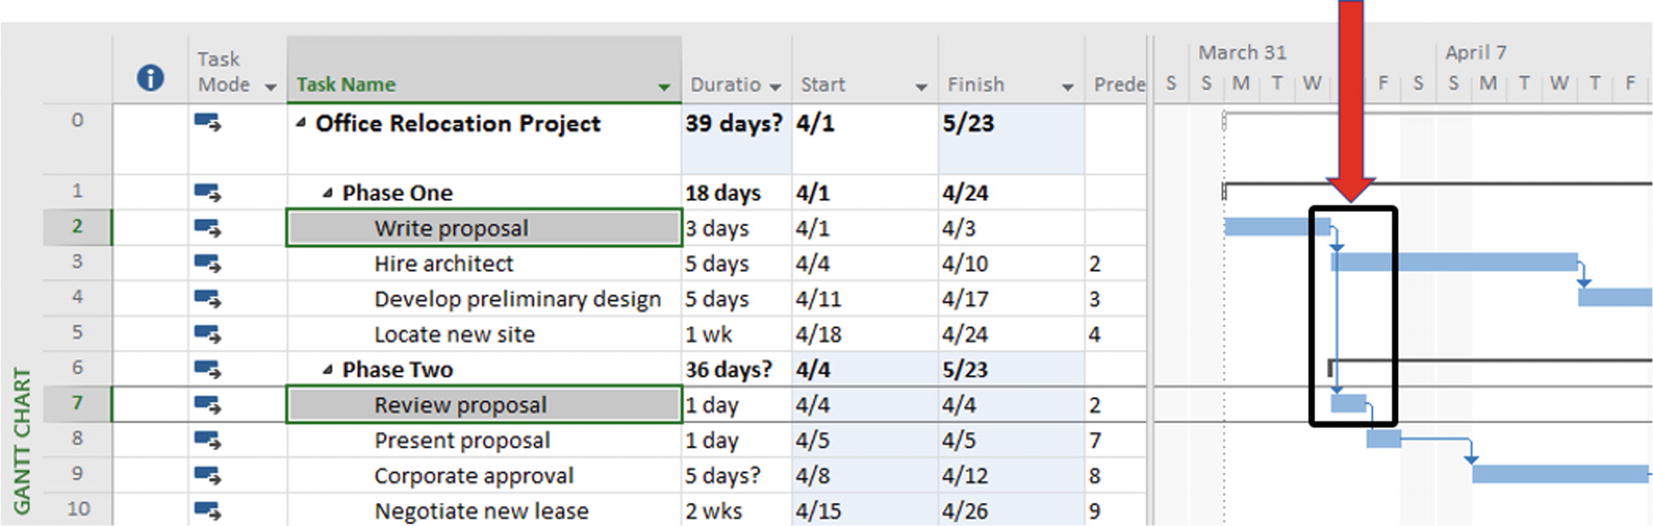 Figure 7-30
Corrected link logic
The process of shortening a project by doing tasks at the same time (in parallel) is called fast tracking. Fast tracking is the most common method used for shortening a project because it appears to be less expensive than the only alternative: crashing. Crashing requires applying additional resources to critical path tasks to shorten individual tasks. We will present a more detailed discussion of this concept in Section 14.2, “Plan Revision and Scope Management.” Unfortunately, risk increases when tasks are done at the same time.
- 5.
Click the Undo button in the upper-left corner of your screen, and save and close your project.
Microsoft Project 2019’s default when linking tasks is to create a finish-to-start task dependency since it is the most common type of task dependency. You can begin by selecting the preferred dependency or start with the default link and change the dependency type later. In the long run, it may be less work to link groups of tasks finish-to-start and modify the exceptions rather than establish all task dependencies individually.
Alternate Ways to Link Tasks
In this lesson we’ll examine additional ways to create and modify logical task links.
![]() This exercise uses the file TaskDependencies.mpp. Be sure this project is open before beginning.
This exercise uses the file TaskDependencies.mpp. Be sure this project is open before beginning.
Dragging the Link Line from One Task to Another
- 1.
Place your mouse pointer over the Gantt bar for Write proposal (Task ID 2) so that the cursor turns into a four-way arrow.
- 2.Click and drag the link line to the Gantt bar of Review proposal (Task ID 7). Your screen will resemble the following.
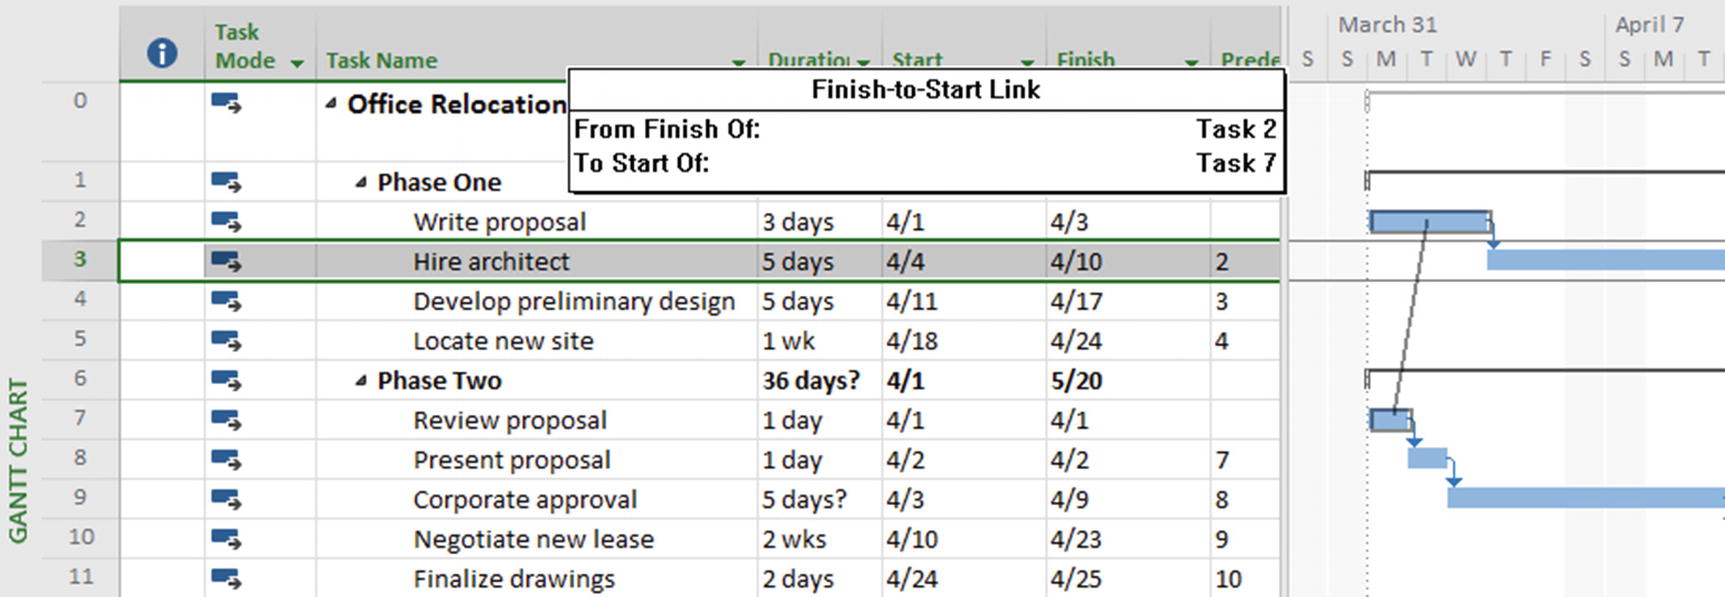 Figure 7-31
Link path (linking by mouse)
- 3.
Release your left mouse button. You have successfully linked Task 2 with Task 7 in a finish-to-start fashion.
Task dependencies rely on the order you selected. For example, if you had selected Review proposal (Task ID 7) first in the previous exercise and dragged its link line to Write proposal (Task ID 2), Review proposal would be shown as the predecessor of Write proposal.
Linking Tasks in a Split Screen
- 1.
From Task:Properties, select Details to see the split Gantt Chart view.
- 2.Right-click in the Task Details Form (bottom pane). Click Predecessors & Successors from the resulting menu. Your screen will resemble the following.
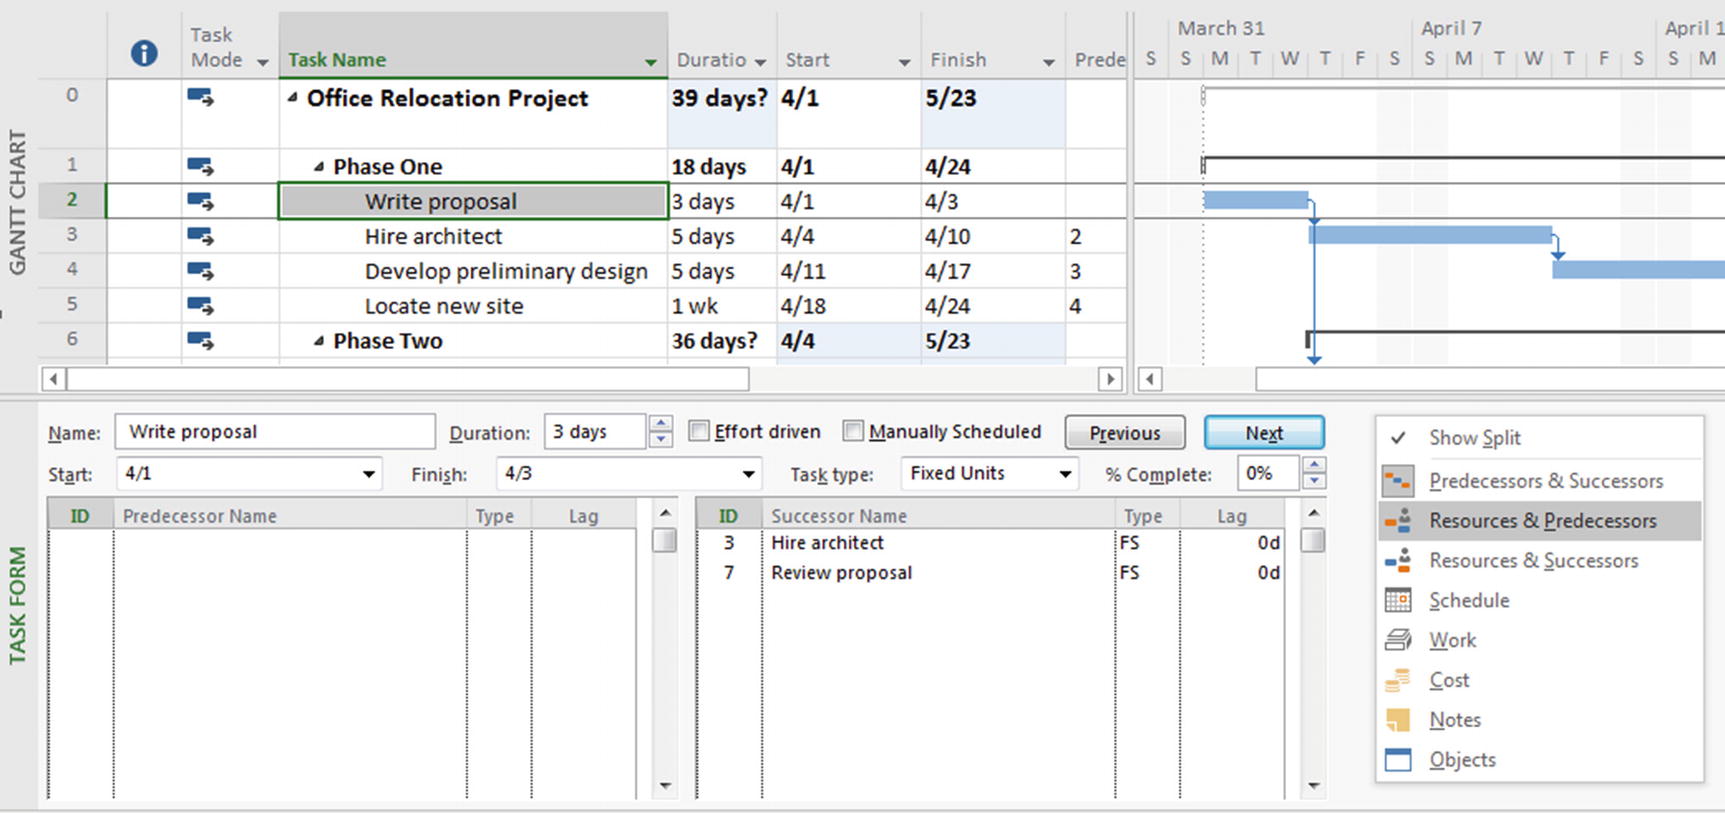 Figure 7-32
Split screen view for linking tasks
- 3.
Click in the Predecessor Name field and then click the dropdown arrow to see the list of tasks in the project.
- 4.
Select Hire architect (Task ID 3) in the Gantt Chart (top pane). Notice that its predecessor and successor are listed in the Task Details Form (lower pane). From this pane, you can delete predecessor or successor tasks or add new ones.
When working in this split view, changes made in the Task Details Form (lower pane) are not implemented until you click OK or hit Enter twice in succession (with no changes between hits).
- 5.
Double-click the window divider to remove the split, or click the Details icon again.
Linking Tasks in the Entry Table
- 1.
Move the vertical divider bar to the right until you can see the entire Entry Table. You can assign predecessors (only) by typing the task ID number in the Predecessors field for a task.
Using the Task Information Dialog Box
- 1.
Double-click any task name to see the associated Task Information dialog box, or select a task and click the Information icon found in Task:Properties.
- 2.Select the Predecessors tab to assign a predecessor or modify the type of dependency. Click OK to close the dialog box.
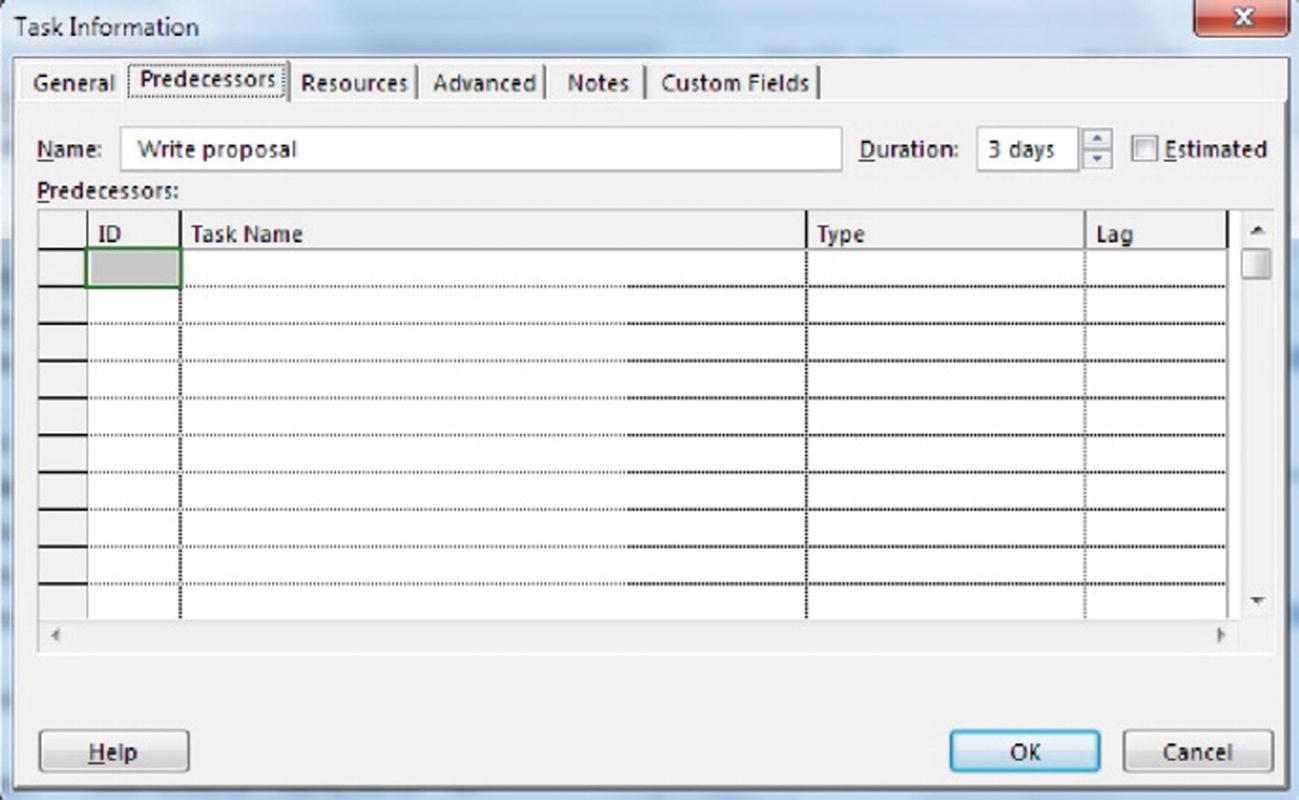 Figure 7-33
Task Information dialog box
Linking Tasks Using a Dropdown Menu
In previous versions of Microsoft Project, you had to remember the task ID each time you wanted to link it. New to Project 2019, you can select the tasks directly in the Predecessors and Successors columns.

Link tasks dropdown
Establishing Other Types of Dependencies
If a finish-to-start task dependency does not accurately reflect the relationship between two tasks, you can use the Task Dependency dialog box to select a different type. To access the Task Dependency dialog box, simply double-click the dependency link line between the tasks in the Gantt Chart.
- 1.Double-click the link line between Negotiate new lease and Finalize drawings. In the resulting dialog box, click the down arrow in the Type: window. Your screen will resemble the following.
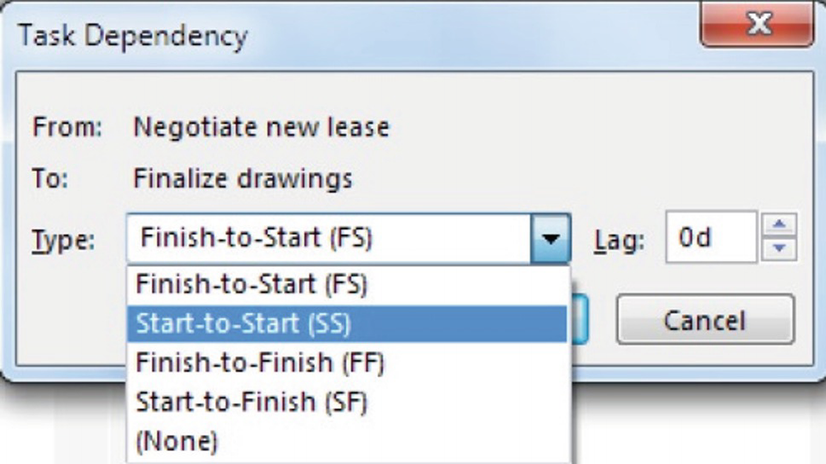 Figure 7-35
Task Dependency dialog box
- 2.
From the Type: dropdown list, select Start-to-Start (SS) and click OK. The two tasks are now shown to start at the same time. Your screen will resemble the following.
Start-to-start task dependency
Dependencies can also be changed in the Task Details Form (in the split window) by clicking in the Type column for a dependency. They can also be changed in the Task Information dialog box; be sure to work with the successor task, since only the predecessor tasks are shown in this dialog box. Double-click the successor task name to open the Task Information dialog box easily.
Adding Lag or Lead Time
In addition to establishing task dependencies, you can specify any necessary delay between tasks by inserting lag. As covered in Section 6.2, “Determining Logical Relationships of Tasks in Your WBS,” lag is a required waiting period, generally used to allow something to happen—concrete to set, paint to dry, and so on. Lag time lengthens the project duration, but it is logically necessary.
- 3.
Double-click the link line between Negotiate new lease and Finalize drawings, then in the Task Dependency dialog box, enter “3d” in the Lag field.
- 4.Click OK. Task 11 now starts three days after Task 10 starts. Your screen will resemble the following.
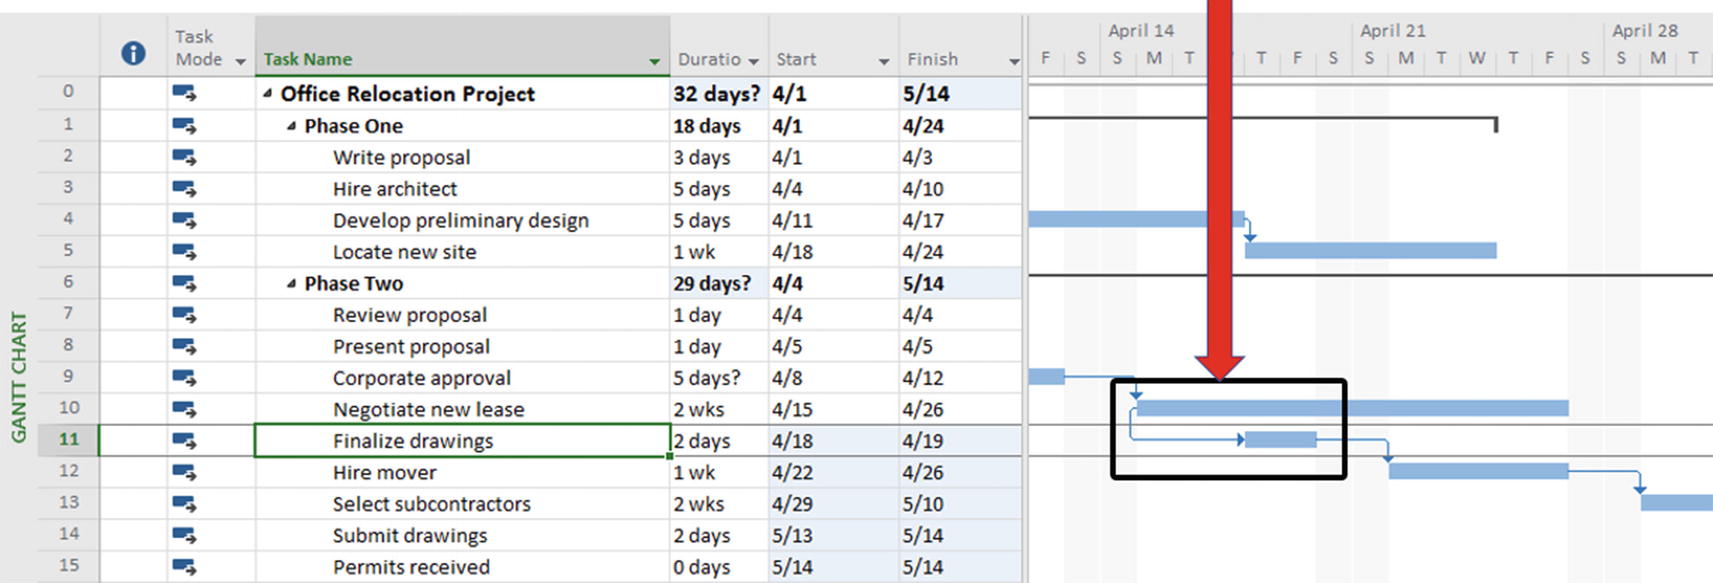 Figure 7-37
SS dependency with lag
Even when tasks are linked finish-to-start, it is not always necessary for the first task to completely finish before the second task can begin. To show that two tasks can overlap, you can specify lead time after establishing a task dependency such as finish-to-start. Ultimately, lead time shortens the duration of a project.
Lead time is expressed as a negative number in the lag field.
- 5.
Save and close your project.
Determining the Proper Order of Tasks in a Project
The order in which tasks are performed is an important piece of the logic for a project.
![]() This exercise uses the file PanTransConference.mpp which you created earlier in this chapter. Be sure this project is open before beginning, or open PanTransConference_Inst1.mpp.
This exercise uses the file PanTransConference.mpp which you created earlier in this chapter. Be sure this project is open before beginning, or open PanTransConference_Inst1.mpp.
- 1.We will first identify tasks where the outcome of one task is used directly by another task. For instance, Decide on venue criteria and Develop list of key agenda items should immediately follow Hold project kick-off meeting. Using the methods discussed earlier in this chapter, link these tasks by establishing two finish-to-start dependencies.
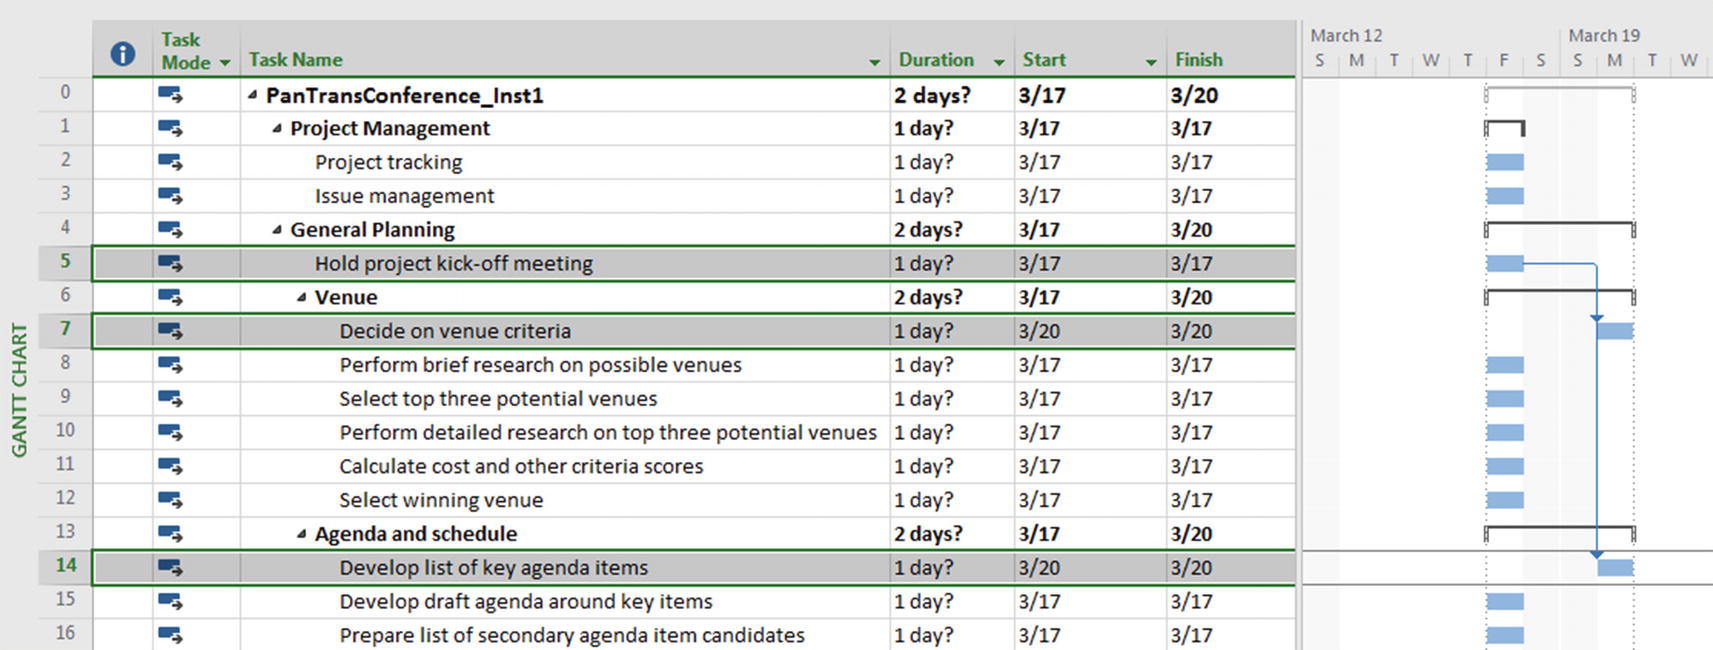 Figure 7-38
Linking tasks using finish-to-start dependencies
- 2.It is also possible to link several tasks at one time. Select all the Venue sub-tasks (Task ID 7 through Task ID 12), and from Task:Schedule, click the Link icon. Your screen will resemble the following.
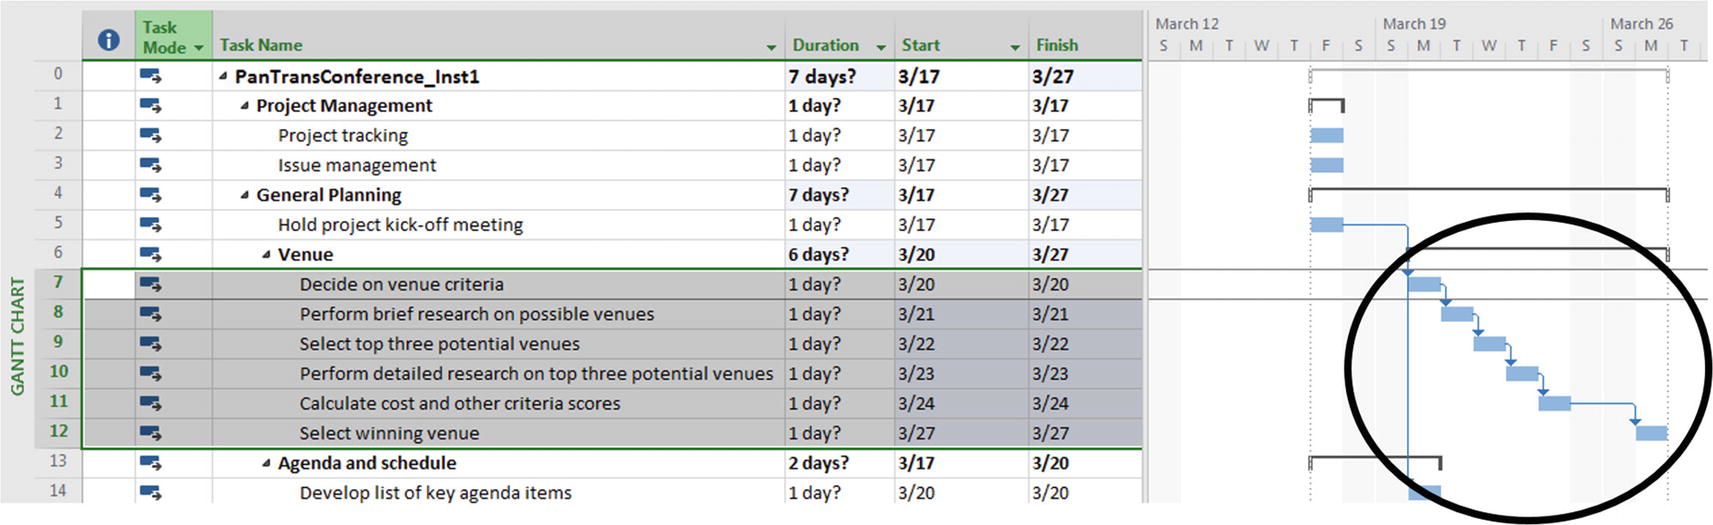 Figure 7-39
Linking a series of tasks
- 3.
In the same manner, link all the Agenda and schedule sub-tasks (Task IDs 14 to 20).
Hold project kick-off meeting (Task ID 5) now has two successors (Task IDs 7 and 14). Tasks may also have multiple predecessors.
- 4.
The WBS structure often becomes even more complicated. Develop list of entertainment events (Task ID 19) is dependent on the venues being considered and so must be a successor to Perform detailed research on top three potential venues (Task ID 10). Update the project accordingly.
- 5.Because it is necessary for the first five General planning sub-tasks (Task IDs 7, 14, 21, 22, and 23) to be completed prior to completing the final sub-task, link each of these tasks as a predecessor to Present general plan (Task ID 24). Your screen will resemble the following.
 Figure 7-40
Linking multiple predecessor tasks to key successor tasks
- 6.Sometimes, it can be difficult to discern the many predecessors to a key successor by looking at the links in the Gantt Chart. When that happens, choose View:Split view and click Details. Next, right-click in the lower pane of the split window to select the Predecessors & Successors details. Click Task 24, Present general plan, to see a list of the task’s predecessors.
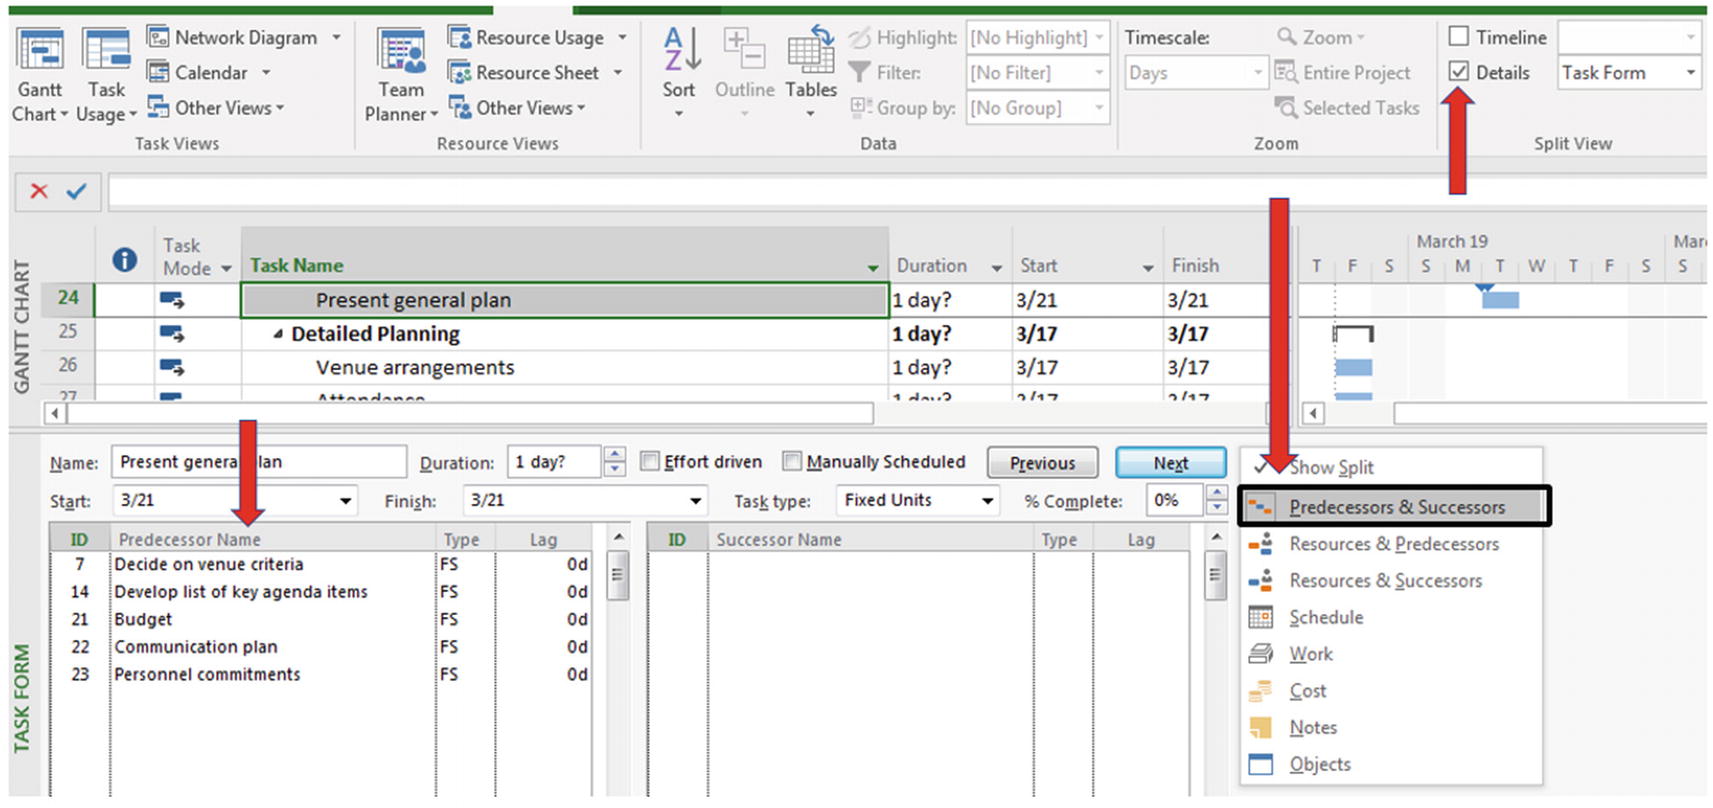 Figure 7-41
Detailed list of Predecessors & Successors in the lower pane
- 7.
Save your project.
7.4 Task Types and Scheduling
Work = Duration × Units
As covered in the “Schedule Development” sub-section of Section 6.2, “Determining Logical Relationships of Tasks in Your WBS,” work is the effort that will be expended by a resource to complete the task. Units refers to the percentage of the resource’s working time (as defined in their calendar) that will be allotted to the task. Duration is the number of days it will take to complete the task.
For example, if a resource is assigned 40 hours of work at 100% units, the duration of the task will be 40 hours, or 5 days. If the resource is working only 50% of their time on this task, then the duration is 80 hours, or 10 days.
As there are three variables in this equation, the simplest rendering you can produce is a solid three-dimensional curve showing the relationship of the variables—not terribly useful for practical answers. By eliminating a variable, the equation becomes simple algebra and can easily be solved for concrete values, which is much more useful to a project manager.
You can decide which value should be a constant by determining which of the three you could estimate most accurately during planning. Microsoft Project will then calculate the other two values as assignments are made. (Using the approach in this course, until an assignment is made, the only value Microsoft Project has for each task is its duration.) Once an assignment is made, all three values for this formula are known, and Microsoft Project will continue to calculate the values when changes are made.
You control which value is treated as a constant and which can be recalculated by Microsoft Project by the use of task types. To do so, a clear understanding of how this process works is necessary; otherwise, it will appear that Microsoft Project is misbehaving when it is actually working perfectly.
Fixed units – The default, unless you change Microsoft Project’s options; assumes you know each resource’s % availability for project work
Fixed work – The most common in a consulting environment
Fixed duration – Determined by the nature of the task
If one of the three values (work, duration, or units) is fixed and you change a second value, the third will be recalculated and changed by Microsoft Project.
This rule works predictably and is fundamental to understanding how Microsoft Project manipulates resource assignments.
For example, for a fixed units task, if you modify an assignment’s work, the task duration will be recalculated. Or, if you modify the task duration on a fixed work task, the resource assignment’s units will change.
The Smart Tags feature of Microsoft Project 2019 makes this process easier because Microsoft Project asks you what you have in mind when you make a change in a resource assignment, as you’ll see shortly.
Determining Task Types
As we continue to develop the WBS for our project, it is important to understand the kind of things that influence the effort required to perform a task. With this information, we are better able to determine the task type: fixed work, fixed duration, or fixed units.
Fixed work tasks are the most common. The size of a fixed work task is driven by how much effort is needed to complete it. Remember the school mathematics exercises: “If it takes 3 men 7 days to dig a ditch 50 feet long, how long will it take 4 men to dig a ditch 70 feet long?” This type of problem refers to a fixed work task. The assumption is that the task only progresses while resources are actively working on it.
Fixed duration tasks are performed over a specific period of time, regardless of how hard the resources are working. Natural processes, such as growing a culture in a Petri dish, tend to be fixed duration tasks. There is likely to be involvement of resources for supervision or maintaining the environment for the culture to grow, but typically adding extra resources does not affect the speed at which the task progresses.
Changing the task type
- 1.Double-click Hold project kick-off meeting to view the Task Information dialog box for this task.
 Figure 7-43
Task Information dialog box
- 2.In the Task Information dialog box, select the Advanced tab and use the dropdown arrow in the Task type field to select Fixed Duration. Click OK to close the dialog box.
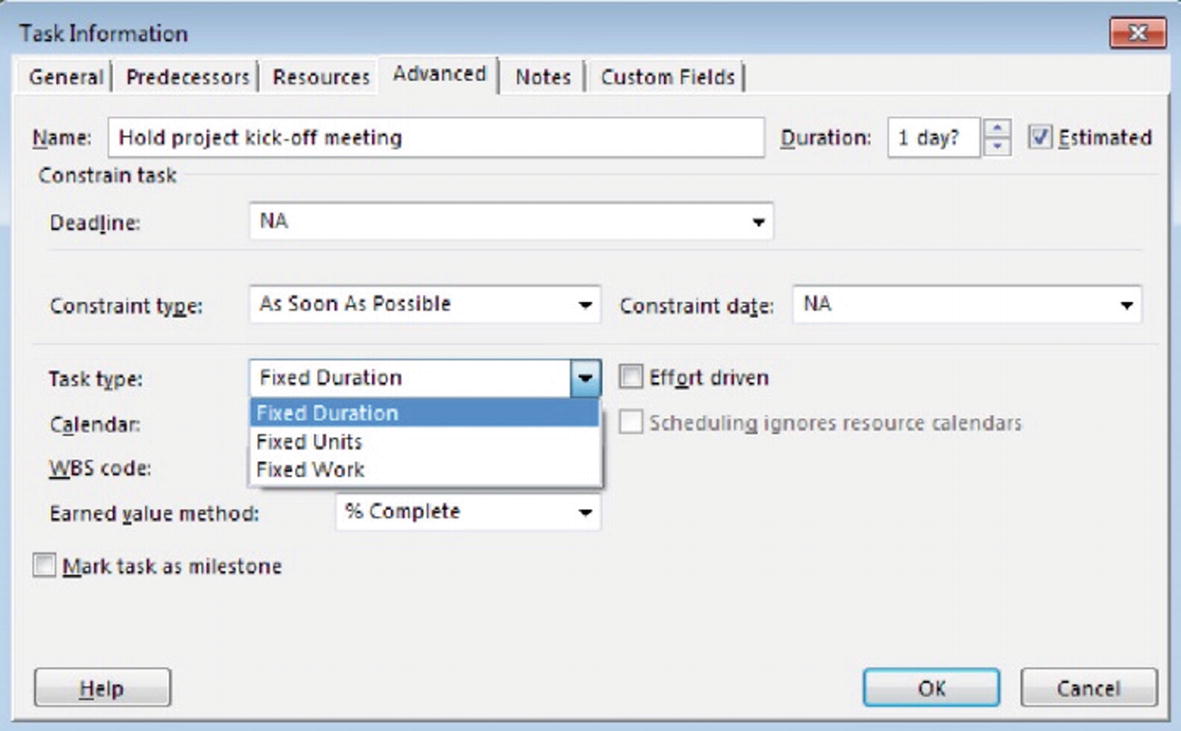 Figure 7-44
Selecting Fixed Duration in the Task Information dialog box
- 3.
Select Project tracking and Issue management, and from Task:Properties, click the Information button to view the Multiple Task Information dialog box.
- 4.Select the Advanced tab and use the dropdown arrow in the Task type field to select Fixed Units. Click OK to close the dialog box.
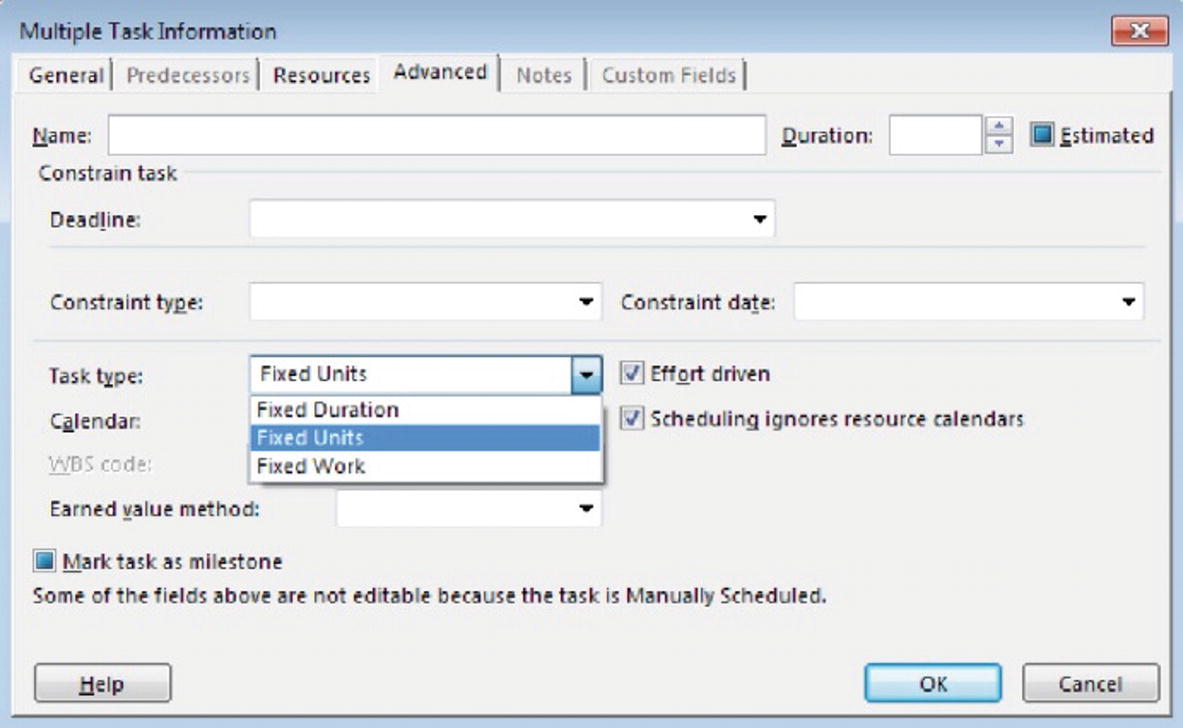 Figure 7-45
Multiple Task Information dialog box
Another method for identifying a task’s type is to insert a new column (Type) in your Gantt Chart view.
- 5.Right-click in the Duration column header and select Insert Column. In the new column, select Type. Your screen will resemble the following.
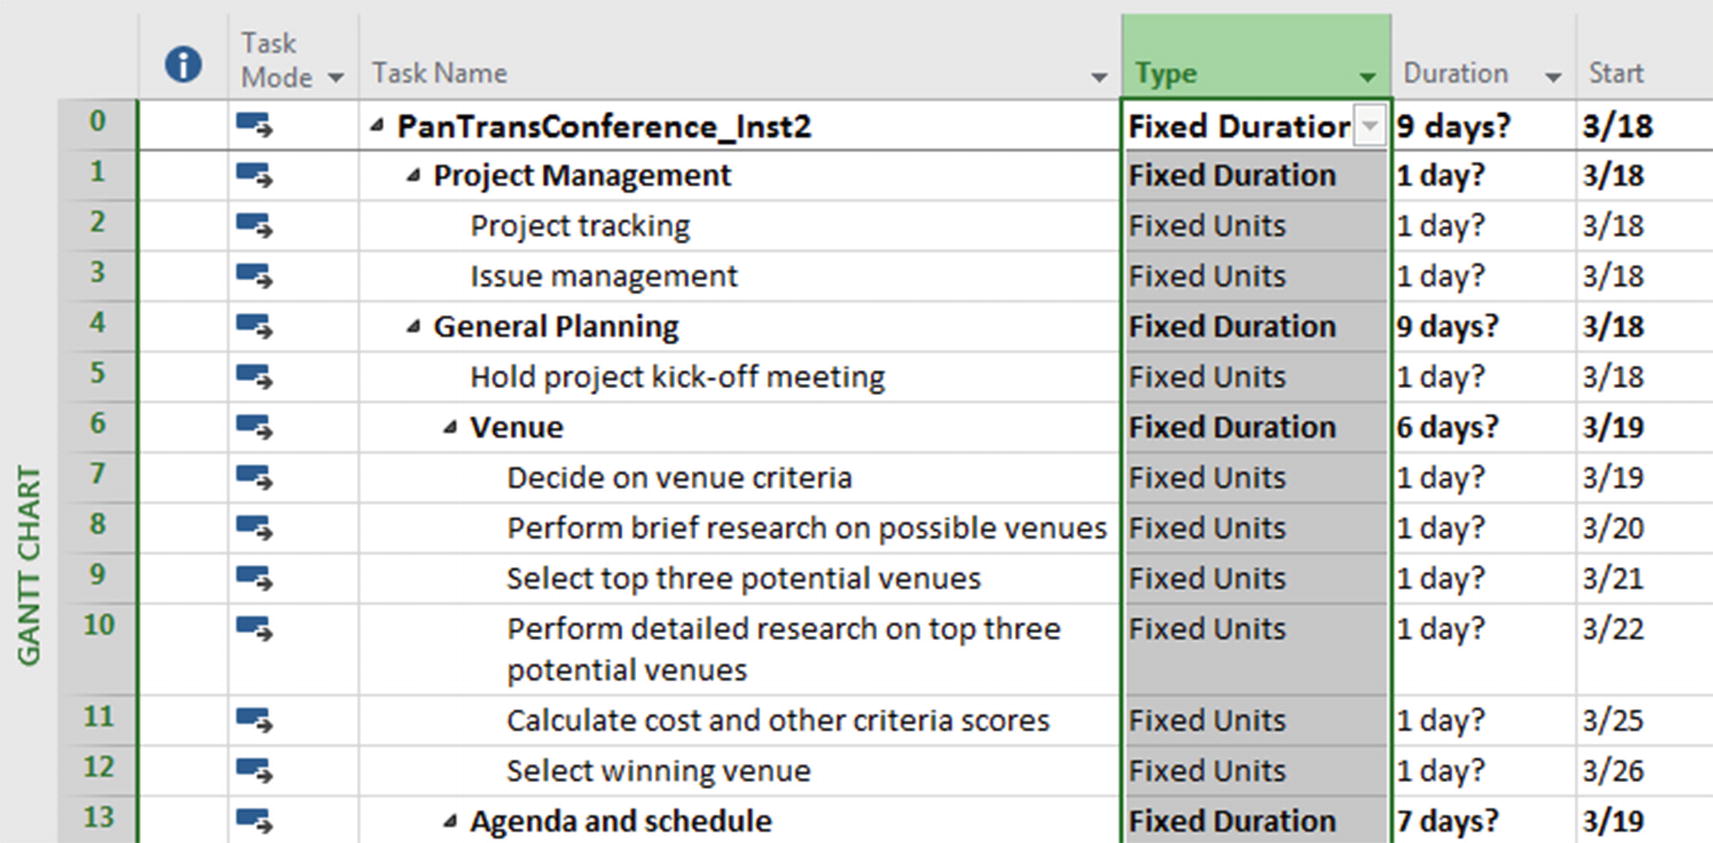 Figure 7-46
Display the task Type column
- 6.For the purpose of this exercise, use the dropdown arrows in the Type column to change the task type to Fixed Work for all remaining detailed tasks. Try changing a few task types to get a feel for how this feature works. Note: We can change the task types any time, as we progress through the planning process.
 Figure 7-47
Using the dropdown to set task type
- 7.
Save your project.
7.5 Estimating Task Size
Once you identify tasks, the next step in developing a WBS is to estimate the size, or duration, of each task. You must gather estimates for all fixed work tasks (how much resource effort is required during task performance?) and fixed duration tasks (how much time will elapse during task performance?).
- 1.Right-click in the Start column header and select Insert Column. In the new column, select Work. Your screen will resemble the following.
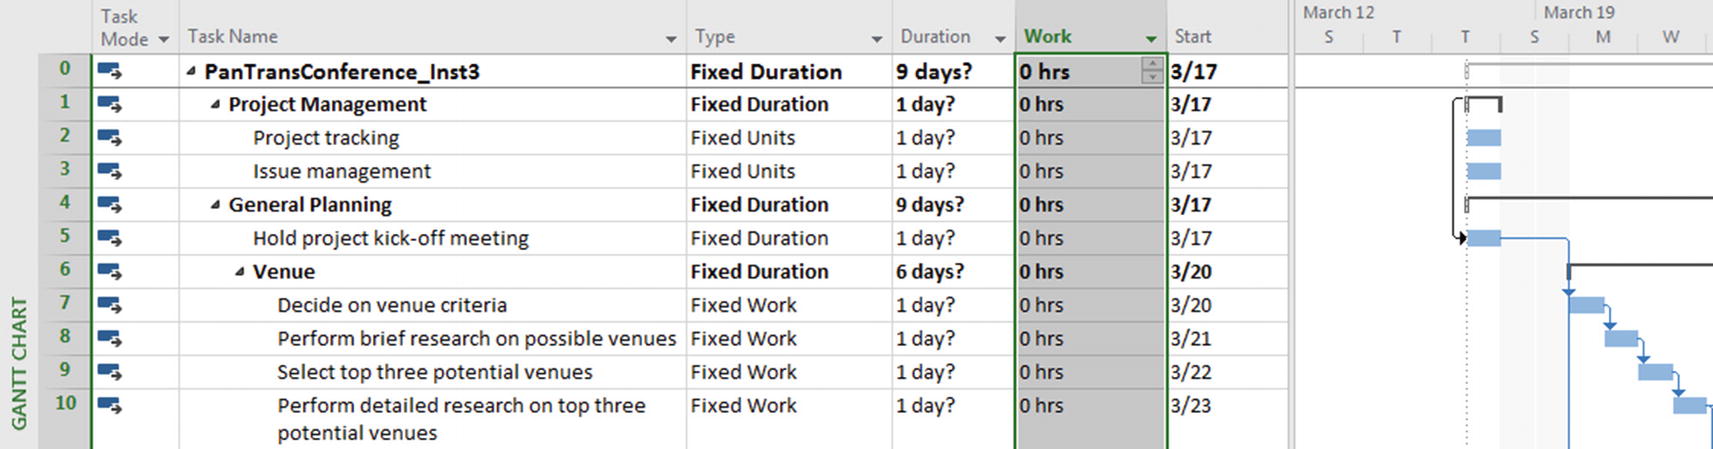 Figure 7-48
Inserting the Work column to the Gantt Chart view
- 2.
For Hold project kick-off meeting (currently our only fixed duration task), enter a task duration of “0.5 days” in the Duration column.
Microsoft Project 2019 will accept duration estimates in minutes (type an “m”), days (d), weeks (w), and months (mo). The default value is days, so typing “3” or “3d” will both result in a duration of 3 days. It’s best to use the same setting to avoid confusion from task to task, particularly if working with multiple projects or if others are reviewing your project.
- 3.
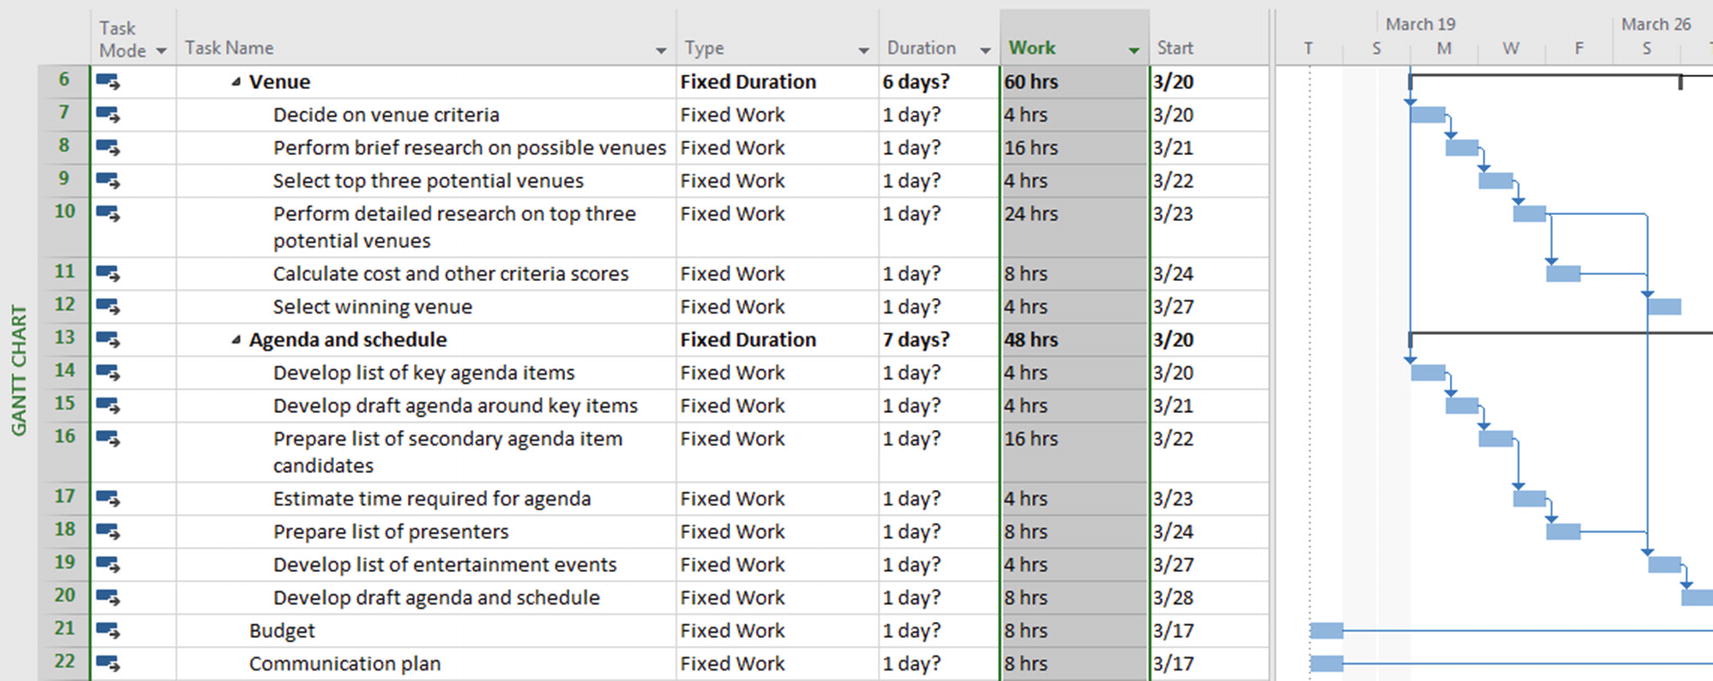
For each of the fixed work tasks, enter the work required in the Work column according to the following table:
Task Name | Work |
|---|---|
Decide on venue criteria | 4 hours |
Perform brief research on possible venues | 16 hours |
Select top three potential venues | 4 hours |
Perform detailed research on top three potential venues | 24 hours |
Calculate cost and other criteria scores | 8 hours |
Select winning venue | 4 hours |
Develop list of key agenda items | 4 hours |
Develop draft agenda around key items | 4 hours |
Prepare list of secondary agenda item candidates | 16 hours |
Estimate time required for agenda | 4 hours |
Prepare list of presenters | 8 hours |
Develop list of entertainment events | 4 hours |
Develop draft agenda and schedule | 8 hours |
Budget | 8 hours |
Communication plan | 8 hours |
Personnel commitments | 8 hours |
Present general plan | 8 hours |
Venue arrangements | 8 hours |
Attendance | 8 hours |
Agenda planning and timetable | 8 hours |
Meeting facilities | 8 hours |
Contingency planning | 8 hours |
Cost planning | 8 hours |
Catering | 8 hours |
Publish final detailed plan | 8 hours |
Entering work at the task level
Note that because resources are not yet assigned to the tasks in this project, the Units value does not yet apply and Duration has not yet been calculated (1 day?) for fixed work tasks.
- 4.
Currently the General planning phase of the project has a scheduled duration of 8.5 days, so set the duration of the fixed units tasks to 8 days each.
- 5.
Save and close your project.
7.6 Manual Task Scheduling
Microsoft Project 2010 introduced a major shift in how projects are scheduled. Since then, project managers have been able to choose to manually schedule individual (or all) tasks in a project.
When a task is manually scheduled, changes due to factors such as task dependencies (covered in Section 6.2, “Determining Logical Relationship of Tasks in Your WBS”) and the project calendar (covered in the “Schedule Development” sub-section of Section 6.2, “Determining Logical Relationships of Tasks in Your WBS”) no longer automatically adjust task dates. You can also place a manually scheduled task anywhere in your schedule, and Microsoft Project won’t move it.
Project managers who prefer automatic scheduling can turn off the new manual scheduling feature for specific tasks or for the entire project. Some projects, especially complicated ones, may still require Microsoft Project’s powerful scheduling engine.
Except for in the following exercise, it is still recommended that you use auto-scheduling for new tasks.
Manually Scheduling New Tasks
- 1.
To change the default manual setting for scheduling of new tasks, at the bottom left of your screen, click New Tasks and select Auto Scheduled – Task dates are calculated by Microsoft Project. Alternatively, from Task:Tasks, use the Mode dropdown to select Auto Schedule. For this exercise, we will continue to use manual scheduling, so ensure this setting is restored.
- 2.Insert a new task before Review project plan with team (Task ID 5) and call it Edit project plan. As you can see at the bottom left of your screen, the default scheduling setting for new tasks is Manually Scheduled.
 Figure 7-50
Default scheduling setting for new tasks
- 3.In Manually Scheduled mode, tasks can be used as placeholders when schedule details are not yet be known; in this case, text can be added to the scheduling fields. For your new task, Edit project plan, enter “tbd” in the Duration field. Enter “After July” in the Start field. Enter “December” in the Finish field. The task will retain the text entries and Microsoft Project will not automatically schedule the task.
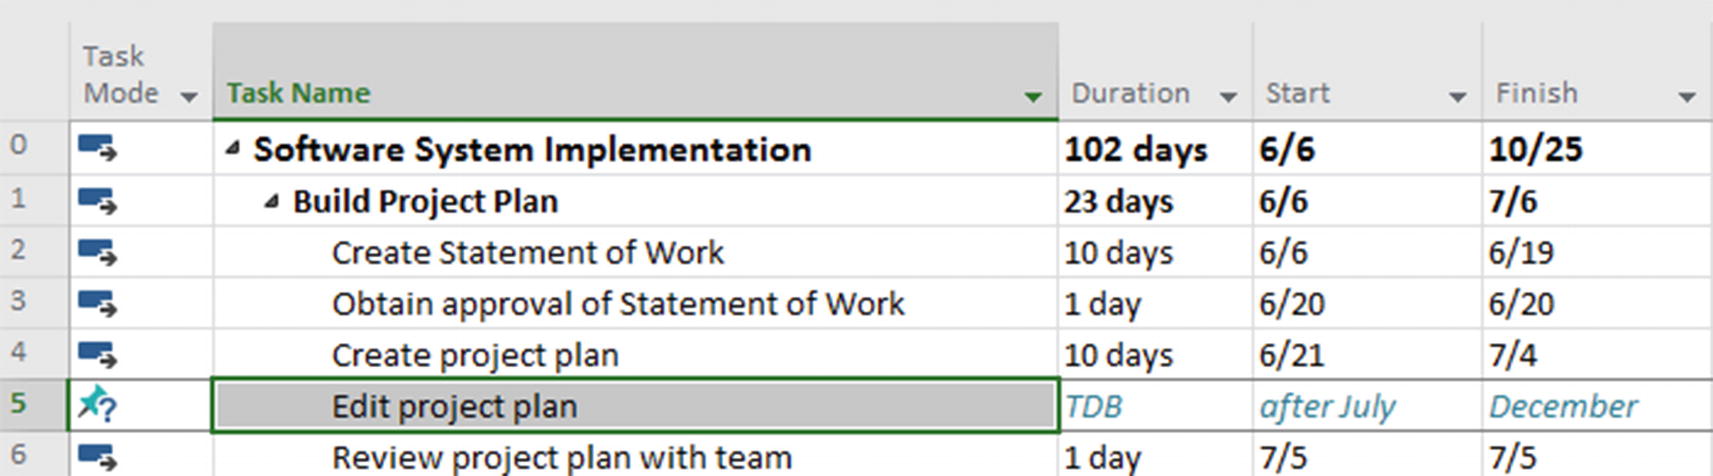 Figure 7-51
Inserting and entering information for a manually scheduled task
- 4.
Select Edit project plan again, and from Task:Tasks, click the Auto Schedule icon. Notice the task now has scheduled dates. Click Undo in the upper-left corner of your screen to return to the manually scheduled task.
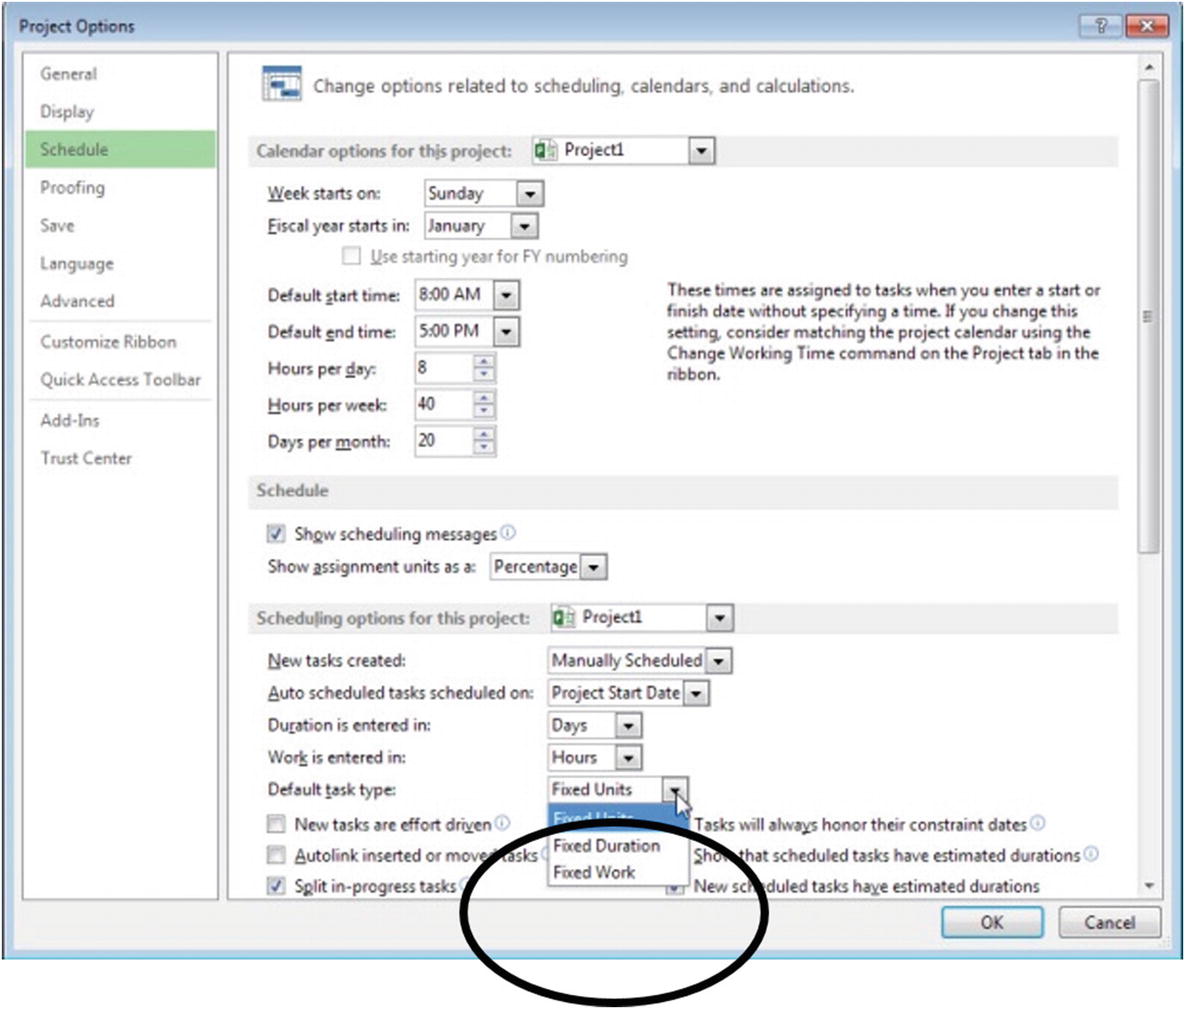
- 5.To change the default task mode for all projects, from File:Options, click Schedule, and then by the Scheduling options for this project section, use the dropdown arrow to select All New Projects, as in the following figure.
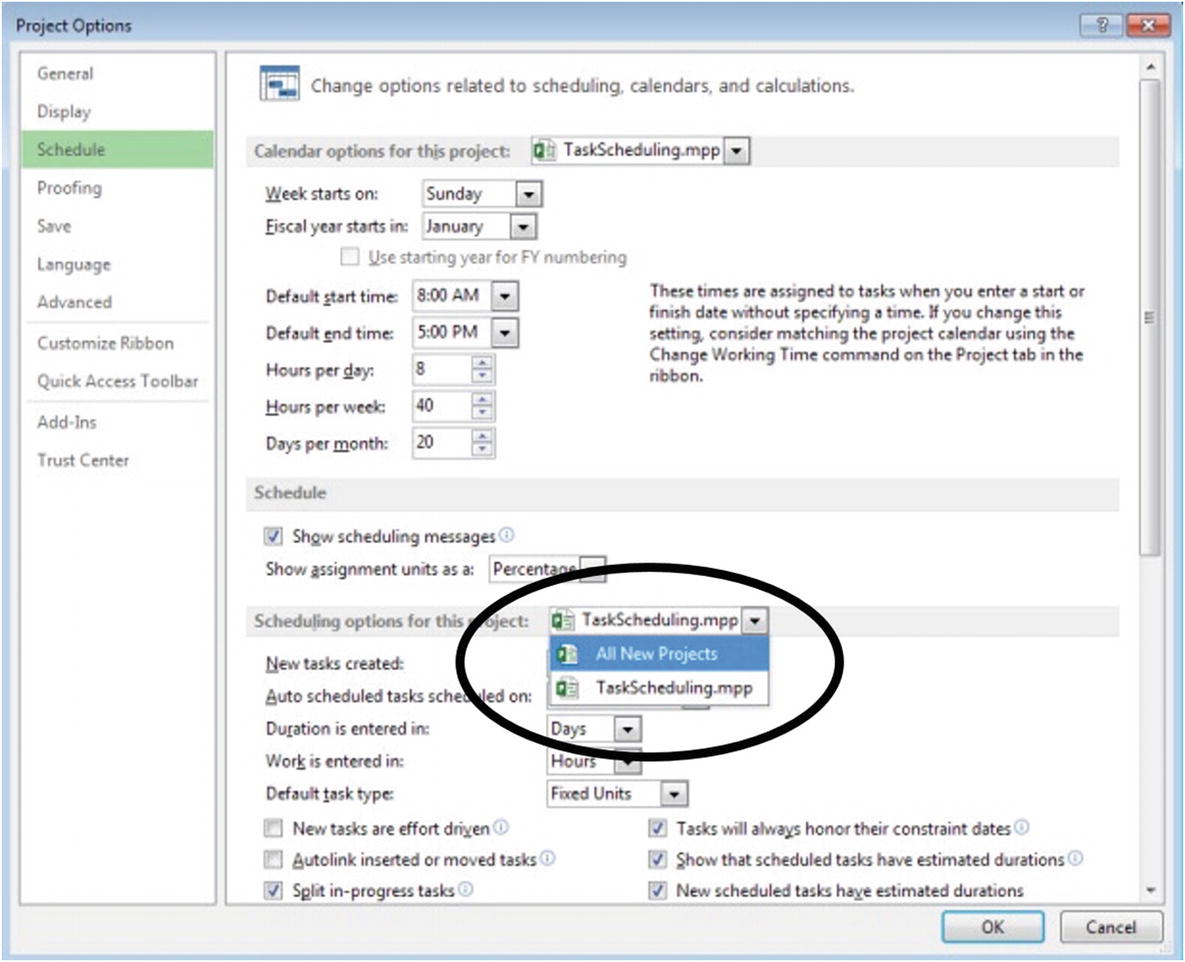 Figure 7-52
File:Options:Schedule:Scheduling options for this project:All New Projects
- 6.
Click Cancel (we do not want to save this option).
Top-Down Summary Tasks
- 1.
Select Edit project plan and change the new task scheduling mode to Auto Schedule. To make this task a top-down summary task, enter a new task immediately following it called Review project plan edits.
- 2.Select the new task, and from Task:Schedule, click the Indent Task icon. Edit project plan becomes a summary task with rolled-up schedule information. This allows detailed tasks to be planned and executed within a summary task, while the summary task can represent higher-level schedule goals.
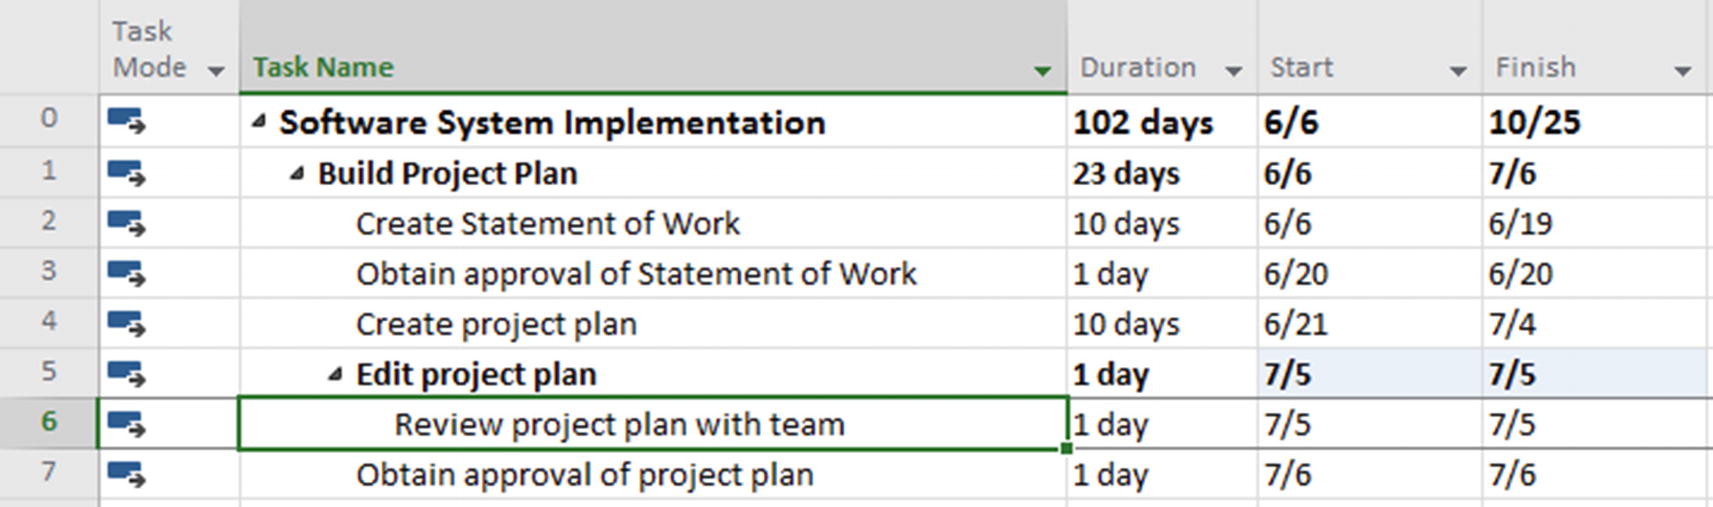 Figure 7-53
Converting a new task to a summary task
- 3.
Save your project.
Respect Links
When you are using manual scheduling, Microsoft Project 2019 does not automatically reschedule tasks when you edit predecessor information. If you want Microsoft Project 2019 to do this, you must change the task mode to auto-scheduled or, as an alternative, from Task:Schedule, click the Respect Links icon [![]() ]. This reschedules the task but keeps it manually scheduled.
]. This reschedules the task but keeps it manually scheduled.
Inactive Tasks
The inactive tasks functionality allows you to remove tasks from your project while maintaining a record of the tasks you’ve removed.
- 1.Continuing our work with TaskScheduling.mpp (or open TaskScheduling_Inst1.mpp), select Review project plan edits (Task ID 6). Go to Task:Schedule and click the Inactivate icon [
 ]. Your screen will resemble the following.
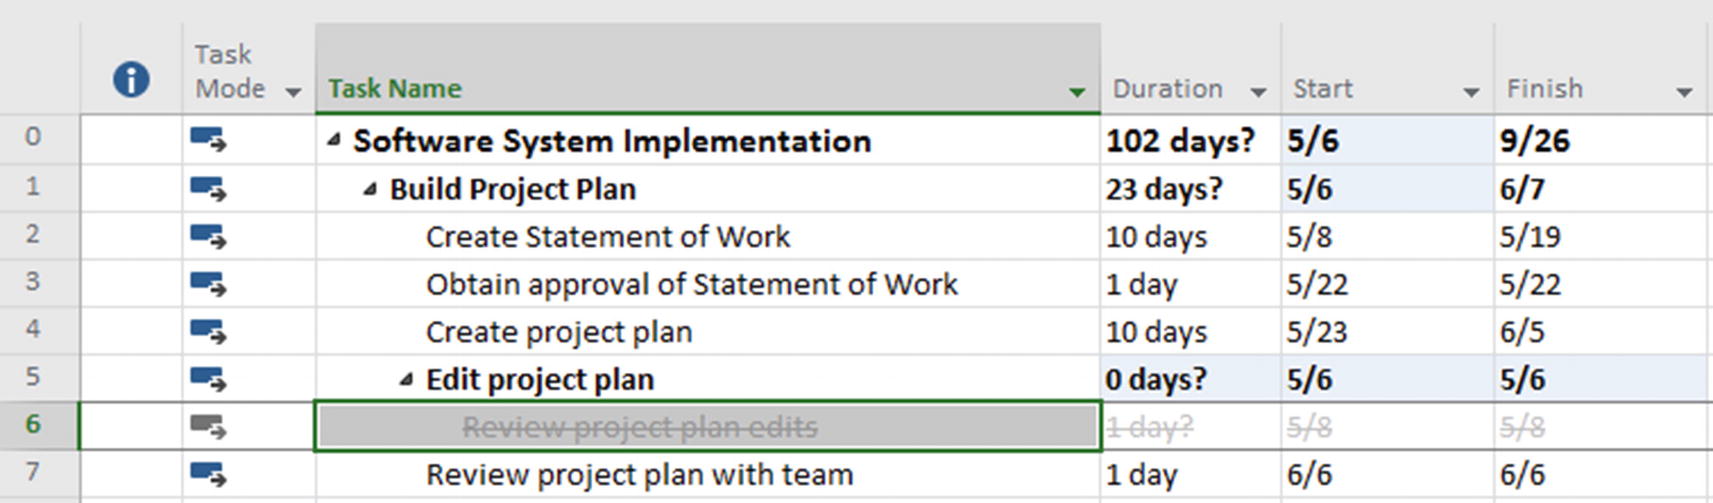 Figure 7-54
Setting an inactive task
Notice that the inactive task no longer affects the schedule and is not able to be updated. This change also triggered a recalculation of the summary task above (Task 5 Edit project plan), and its duration was set to 0 days.
- 2.
To reactivate this task, right-click the task, and from the dropdown list, click Inactivate Task to uncheck it.
- 3.Save and close your project.
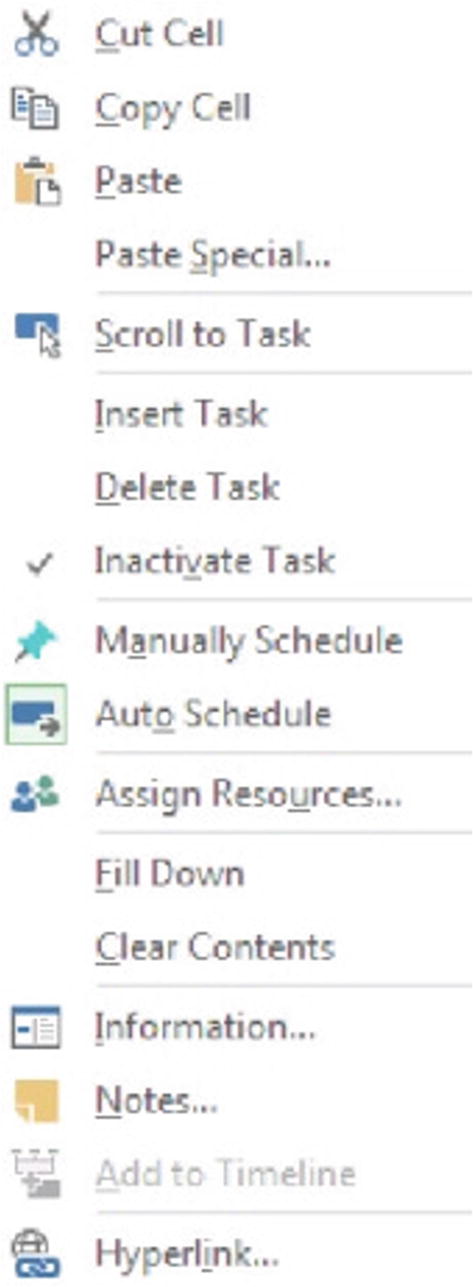 Figure 7-55
Inactivate Task in the task right-click menu
7.7 Task Planning Review Exercise
- 1.
Start a new project to begin one week from today and save the file as MeetingTasks.mpp in the exercise directory.
- 2.
Enter “Shareholders Meeting” as the project title, “2012 Annual Report” as the subject, and your name as author and manager. Show the project title as Task 0 in the Gantt Chart view.
- 3.
Enter the following tasks and durations in the task list:
Task | Duration |
|---|---|
Schedule conference date | 1 day |
Print letter | 2 days |
Book keynote speaker | 2 days |
Develop letter | 1 day |
Get corporate approval | 1 week (estimated) |
Plan food with caterer | 3 days |
Print catering menu | 1 day |
Meeting occurs | Milestone |
- 4.
Insert a new task, Reserve conference center, with a duration of 2 days before Task 2 (Print letter).
- 5.
Move Task 3 (Print letter) after Task 6 (Get corporate approval) using drag and drop.
- 6.
Insert a new Task 1, Meeting Details, and make all following tasks part of this phase (i.e., indent them).
- 7.
Link all tasks in the Meeting Details phase finish-to-start, and then change the link for Print letter and Plan food with caterer to start-to-start.
- 8.Show a delay of 2 days between Reserve conference center and Book keynote speaker. Overlap Plan food with caterer and Print catering menu by 1 day. Your screen should resemble the following.
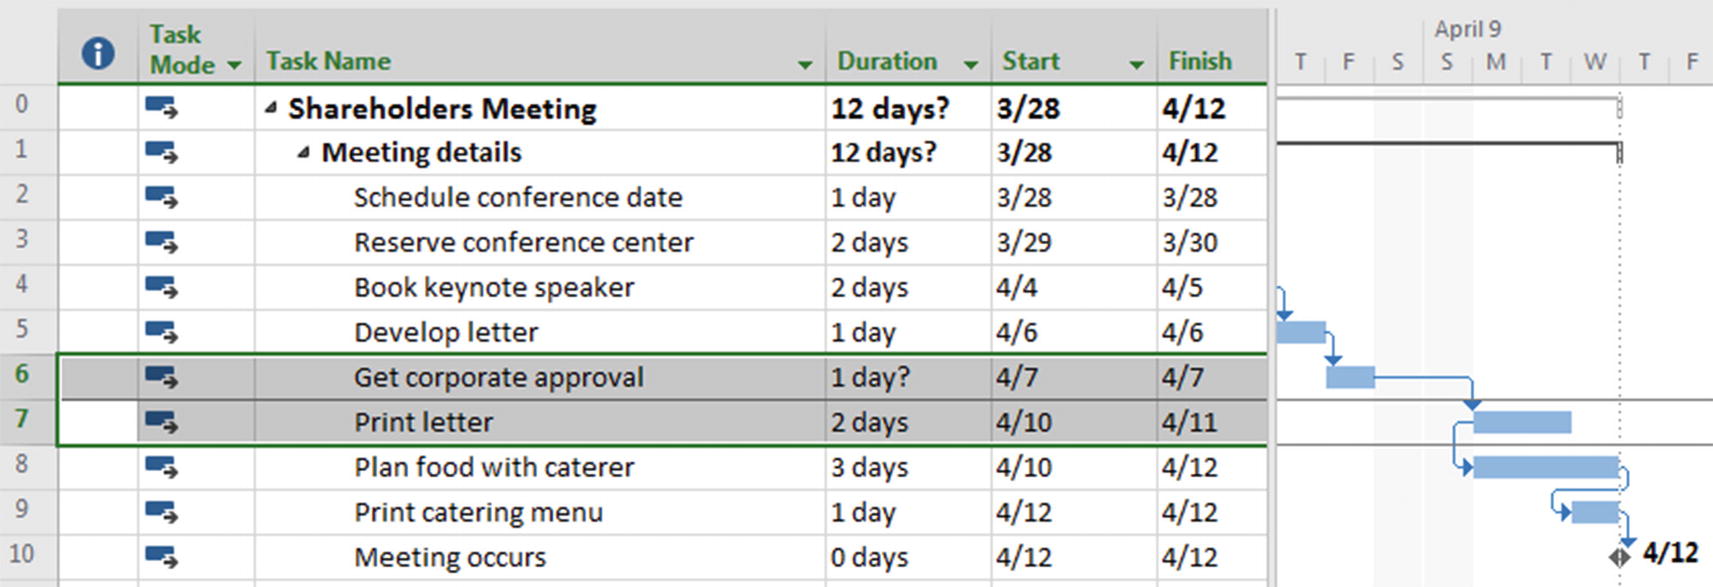 Figure 7-56
Tasks with lag
- 9.
Save and close your project.
 End of Chapter Quiz Questions
- 1.What four things does the Project Charter include?
- 1.
________________________________________________
- 2.
________________________________________________
- 3.
________________________________________________
- 4.
________________________________________________
- 1.
- 2.
How can you display the project summary task?
______________________________________________________________________________________________________________________
- 3.
When could organizing the WBS to major sections for each phase of the project with the phases appearing sequentially be valuable?

- 4.
What is the next step after the overall structure of the project is determined?

- 5.
Describe the “8-80 rule.”

- 6.
What are some of the best practices to use when determining the level of detail required for each task in your project?

- 7.
Why does the duration appear as “1 day?” by default when you start entering tasks in your project plan?

- 8.
What is the Task Inspector?
___________________________________________________________
- 9.
You accidently delete a task that was not supposed to be deleted. What can you do?
_________________________________________________________
- 10.
What is the difference between the outline number and the WBS code?
___________________________________________________________
___________________________________________________________
- 11.
How can you get outline numbers to appear in your project plan attached to the task names? How can you get them to appear not attached to the task names?
___________________________________________________________
___________________________________________________________
- 12.
True or False: You can import information from Microsoft Excel into any defined Microsoft Project field.
- 13.
When mapping fields, each type of data imported will require a separate ________ _________ to define where each Excel field should correspond to which Microsoft Project field.
- 14.
What is fast tracking? ________________________________________
- 15.
What is crashing? Why is it generally a secondary option to fast tracking?
___________________________________________________________
- 16.
What kind of dependency is the default when linking tasks in Microsoft Project 2019?
___________________________________________________________
- 17.
If you had selected Review proposal (Task ID 7) first in a project plan and dragged its link line to Write proposal (Task ID 2), which task would be shown as the predecessor?
___________________________________________________________
- 18.
How can you display the split Gantt Chart view?
___________________________________________________________
- 19.
When working in split Gantt Chart view, what do you have to do in order to ensure that the changes made in the Task Details Form are implemented?

- 20.
What are some of the ways that task dependencies can be changed (list at least two different ways)?

- 21.
Task A has to start 3 days after Task B starts. How can you make this happen?
______________________________________________________________________________________________________________________
- 22.
Fill in the blank: Lead time is expressed as a ________ number in the lag field.
- 23.
What is the duration if a resource is assigned 40 hours of work at 100% units? What happens to the duration if the resource is working only 50% of their time on this task?

- 24.
What are the three different task types as defined by Microsoft Project 2019?

- 25.
Fill in the blank: If one of the three values is fixed and you change a second value, the third will be ________ by Microsoft Project.
- 26.In which of the following units will Microsoft Project 2019 not accept duration estimates?
- a.
Minutes (m)
- b.
Days (d)
- c.
Weeks (w)
- d.
Months (mo)
- e.
None of the above (it will accept all of these)
- a.
- 27.
True or False: You can place a manually scheduled task anywhere in your schedule, and Microsoft Project won’t move it.
- 28.
What are two ways to change the default setting for scheduling new tasks?

- 29.
What is the benefit of using the inactive tasks feature?

- 30.
How do you inactivate tasks?
