Getting Started with Processing
This project covers everything you need to get Processing up and running before you dive in to the first project; that’s why it’s called Project 0. I’ll introduce you to Processing, tell you how to install it, and help you make sure it works. At the end of the project, you’ll have a working Processing environment and, hopefully, a sense of Accomplishment. Here we go!
So you bought this book about Processing, perhaps after hearing that you could use it to make art with code. But where did Processing come from, and what exactly can you do with it?
A Programming Language
First and foremost, Processing is a programming language, which means it provides a way for you to interface with a computer and give it instructions. You can use programming languages like Processing to teach a computer to do some pretty cool tricks! But just like learning Spanish, English, or Swahili, learning Processing takes time and patience. You’ll make mistakes, and some programs will act oddly at first. You’ll have burning questions, and you’ll need to look up answers. And that’s all okay!
A Tool for Art and Design
Processing was created to make computers and programming more accessible as creative tools for artists and designers. It was developed in 2001 at the Massachusetts Institute of Technology (MIT) by Casey Reas and Ben Fry, while they studied under John Maeda in the Aesthetics and Computation research group. Since then, Processing has developed quite a following, and it even has its own foundation to manage and continue the good work Casey and Ben started.
Before Processing, the few people who wrote programs to generate artwork mostly had backgrounds in computer science, not art. Today, artists, designers, and engineers have embraced Processing for creating graphics, modeling physical objects (see Figure 0-1), designing architecture, building electronics, and more. Processing can communicate with hardware and with other software packages, which has also made it useful in performing arts, lighting, and other physical installations (see Figure 0-2).
Processing’s role as a creative tool is summed up in the Processing Foundation’s mission statement.
Processing seeks to ruin the careers of talented designers by tempting them away from their usual tools and into the world of programming and computation. Similarly, the project is designed to turn engineers and computer scientists to less gainful employment as artists and designers.
FIGURE 0-1: City Symphonies, created by Mark McKeague, is a simulation in which traffic patterns and vehicle movement dictate sounds.
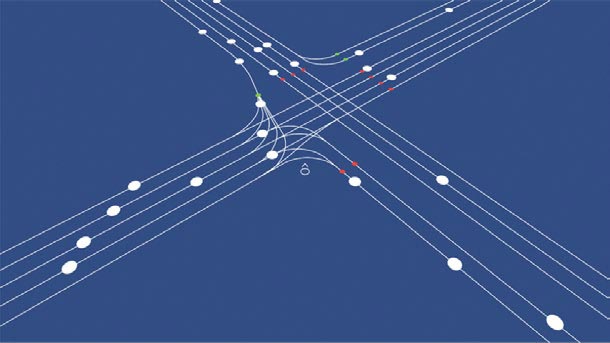
FIGURE 0-2: In his piece Fragmented Memory, Phillip Stearns created the pattern for this triptych of woven tapestries using Processing and data dumped from his computer’s physical memory.

An Open Source Project
The Processing language and its environment are free to download and use, but Processing is so much more than a free tool. It’s an open source project, which means that you are free to modify it. You can remix the base code that makes up the language and the programming environment, add new tools to improve it, or even use the platform as a basis for an entirely new project! In fact, others have done this already. If you’ve ever programmed an Arduino microcontroller board, you’ll feel right at home when you start up Processing, because Arduino—another open source project—adopted Processing’s programming language and environment.
The catch is that when you use or modify open source material in a project, you agree to give credit to the original owner of that material. You can find out more about open source licenses, such as Creative Commons, at http://www.opensource.org/.
Since its inception, Processing has been adapted for a number of applications, including a JavaScript library called Processing.js (developed by John Resig) and an Android mode, which ports Processing sketches over to Android applications for phones and tablets. In the future, you might even see versions of Processing that support other programming languages, such as Ruby or Scala.
Now that you have a better idea of what Processing is, it’s time to download and install it.
INSTALLING PROCESSING
Visit http://www.processing.org/download/to download and install Processing. The website will ask if you want to donate to the Processing Foundation; I’ll let you decide how to answer that. Next, click Donate & Download to reach the download page, and download the latest stable release of Processing.
Once you have downloaded your version of Processing, unzip or unpack the compressed folder to a safe location that you’ll remember, and don’t remove any files from it. In Windows, I usually place this unzipped folder in my Programs or Documents folder to keep it handy; in OS X, you might put yours in the Applications folder. You could also leave it on the Desktop.
Unzip the folder, and your installation should be complete! Processing doesn’t require a full installation process, unlike many other applications, so you don’t have to deal with an installer program or be the administrator of the machine.
In Linux, your downloaded file will be a .tar.gz file instead of a .zip file. Place this in your home directory, and open a terminal. Then enter the following command, where processing-xxxx.tgz is a placeholder for the name of the file you just downloaded:
$ tar xvfz processing-xxxx.tgz
Now, if you move to the newly created directory, you should be able to enter ./processing to run Processing.
If you want to make Processing more accessible, you can always create a shortcut in Windows or drag it to your Dock if you are using OS X.
Now that you have Processing installed, you’re ready to get it up and running.
THE IDE
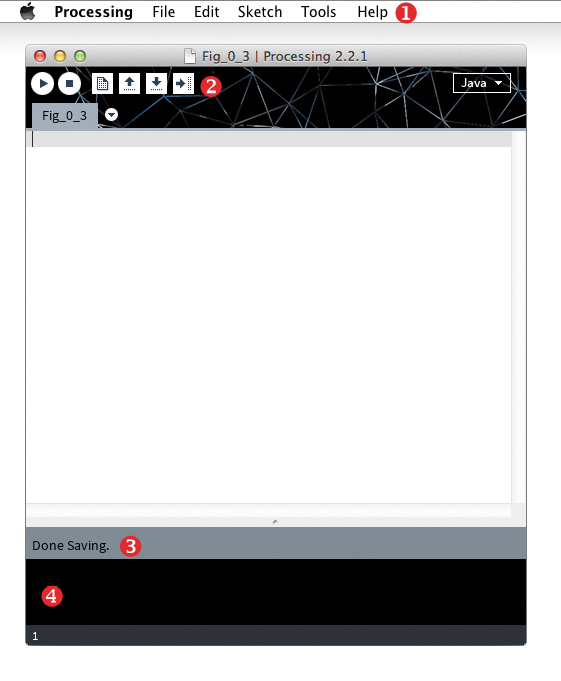
Open the Processing 2.2.1 folder (the unzipped folder you just downloaded) and double-click the Processing executable. This should launch Processing, and after a splash screen, you should see the integrated development environment (IDE), which looks something like Figure 0-3.
FIGURE 0-3: The Processing IDE
An IDE is simply a place for you to write code and test it out; it is really nothing more than a word processing tool that allows you to write instructions for your computer. Just like a word processing application, the IDE has tools for making corrections, formatting, and entering text, but its focus is on the Processing language rather than the English language. What separates an IDE from the word processing program I am using to write this book is that an IDE allows me to run the set of instructions as a program on my computer.
A Quick Tour
Take a look around the IDE now. The majority of the area is whitespace; this is where you’ll write your code. At the top of the interface is a menu bar ❶, where you can save and open files, export your code, and more. Underneath the menu bar, you’ll find a set of graphic buttons ❷; from left to right, those buttons are Run, Stop, New, Open, Save, and Export. You’ll explore the menu bar and those six buttons throughout this book.
Before you write any code, go ahead and click the Run button. Processing will work a bit and then display a window with a gray square in it, as shown in Figure 0-4. Not very cool, is it? Don’t worry—you’ll fix that soon!
FIGURE 0-4: The sketch window

For clarity, I’ll refer to the window where that square appeared as your sketch window, and I’ll refer to the IDE as your code window. Close the sketch by clicking the Stop button.
You can click New to create a blank sketch, Open to work on previously saved sketches, and Save to save your current sketch. The final button, Export, is for exporting the application when you’re done developing your sketch. You can export your sketch to a number of different formats depending on your operating system and how you plan to use it.
When you save your sketch, it is placed in your sketchbook. The sketchbook is a set folder where your sketches are automatically saved. By default, on a computer with multiple users set up, your sketchbook is placed in the Documents folder for your specific user.
Below the code window, you should see the alert bar ❸ and the console ❹. Type your name in the code window and then click Run. You’ll get an error, and your alert bar will turn red. In my case, I saw the error message Syntax error, maybe a missing semi-colon? in my alert bar, and my console printed expecting SEMI, found 'Runberg' (see Figure 0-5).
This is how Processing displays errors—without frills. Processing tells you what you are probably missing and where the error occurred by highlighting the error’s location in your code.
FIGURE 0-5: Syntax error displayed in the console and alert bar

The Preferences Window
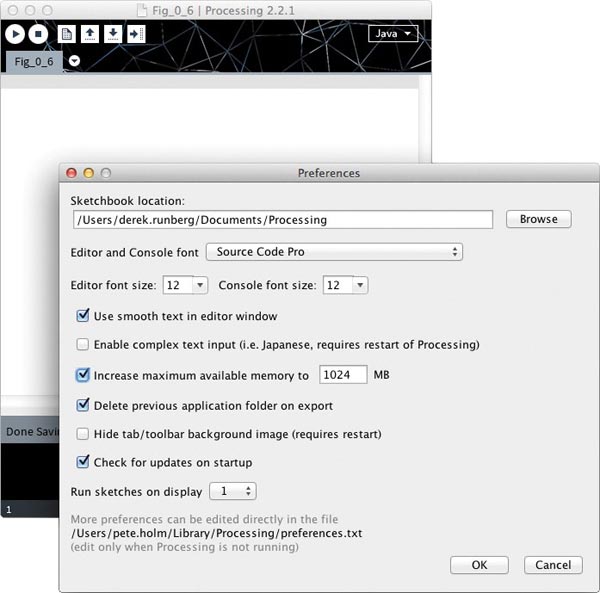
You can make a few changes to the Processing IDE by opening the Preferences window (Figure 0-6) under the File drop-down menu. Within Preferences, you can change the location of your sketchbook folder, the font and font size of the text editor window, and many other options.
You can see from my Preferences window that my font size is much larger than the default and that I increased the maximum amount of memory allocated to Processing to 1GB (1,024MB). Depending on your changes here, you may have to close and restart Processing before they take effect.
FIGURE 0-6: The Preferences window
That concludes your brief Processing IDE tour. Now you’ll create your first Processing sketch!
HELLO WORLD
Programmers who are just learning a new language usually write a little test program after installing any necessary software, just to make sure that everything is set up correctly. Such a program is often called Hello World.
Processing has a number of basic functions you could use in a Hello World program, but I like to draw a simple line. Type the following in the code window, and click the Run button.
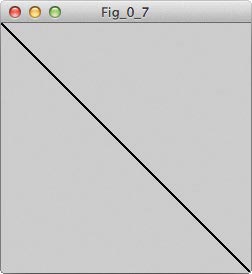
Congratulations: you’ve written and run your first Processing sketch! You should see a sketch window that is larger than the one in Figure 0-4, and it should contain a diagonal line from the upper-left corner to the lower-right corner, as shown in Figure 0-7.
FIGURE 0-7: Hello World sketch
Next I’ll walk you through this Hello World sketch in a bit more detail.
ANATOMY OF A SKETCH
Go back to your code window and take a closer look. The Hello World sketch contains three functions: setup(), size(), and line(). A function is a named set of instructions that accomplishes a task. These three functions were written by the designers of Processing, but later in the book, you’ll write your own. You can find the basic structure, or syntax, of a Processing sketch in the Hello World program.
A Two-Part Recipe
In the Hello World code, there are two structural functions (functions that every Processing sketch has): setup() and draw(). To visualize how these functions work, imagine making a batch of cookies. When you bake cookies, you have a recipe, and a recipe has two parts. The first part covers everything you need to prepare: ingredients, equipment, and even the time you need to set aside. The second half contains the step-by-step instructions to make a single batch of cookies. In a Processing sketch, setup() and draw() are just like those two parts of a recipe. These two functions make up the organizational order of the sketch and dictate how the sketch runs. You can play around with the code that goes under setup() and draw() to achieve different outcomes.
void setup()❶
{
}
void draw()❷
{
}
The setup() function ❶ is the first part of the recipe: it includes all the things that you will do to prepare to make the cookies. This function runs the functions inside it (between the curly brackets) only once at the beginning of the sketch. The draw() function ❷ is the second part: the act of making the cookies. In Processing, the draw() loop repeats over and over again, 60 times a second. The main difference between these two functions is that your draw() function is a loop—a piece of code that repeats itself—and setup() runs only once. In essence, you are telling Processing to make batches of cookies at 60 times per second until you tell it to stop. That is really fast baking!
In every sketch you create, you’ll include a setup() function because leaving it out would be like baking cookies without any ingredients or tools—you just can’t! You can, however, have a sketch without a draw() loop and place all of your functions inside setup(), but then they would all run only once. That’s fine, but only one batch of cookies is no fun, so for most of this book, you will make use of the draw() loop.
Syntax
Processing knows which parts of your code are functions only if you follow the correct syntax. Syntax is a set of rules that describes the correct way to put together a program, like the grammar rules that dictate the right way to construct a sentence. For example, in the English language, you capitalize the first letter of a sentence and put a punctuation mark at the end. And just like written languages, all programming languages have their own syntax.
In the Hello World sketch, the pair of curly brackets, { }, groups all of the functions or commands that should be executed as part of the preceding function, so setup() contains size(), and the draw() function contains line(). All function names are followed by a pair of parentheses, (), and depending on the function, you’ll often include parameters inside those parentheses. Parameters contain information that functions need to do their jobs.
For example, size() specifies the size of your sketch window, but you have to use parameters to tell it how big to make the window. In this project, you set the window size to 250 pixels wide (the first parameter) by 250 pixels high (the second parameter). The line() function draws a line between two points, and you told it to draw from point (0,0) to point (250,250). But not all functions take numbers as parameters, and some (such as the setup() function) don’t need parameters at all!
The semicolon, ;, is another important part of the Processing syntax: all functions should end with a semicolon. Don’t forget it, or Processing won’t know where your function stops. This is a common error, even among veteran programmers. Just like a period at the end of a sentence, a semicolon denotes the end of a function and tells the computer to go to the next one.
These basic syntax structures should be enough to get you started. As you work through more projects, I’ll address other parts of the syntax as necessary. The major thing to focus on is the error messages; they tell you what you are missing and where!
Data Types
Just like a good cookie recipe, any program you want to produce meaningful results needs ingredients—that is, data to manipulate. You’ve already seen one type of data that you can use in Processing; just look at the parameters in line(0,0,200,200). Processing classifies each number there as an int, short for integer, which is just a whole number without a decimal point.
You can also work with floating-point numbers (those with a decimal point); Processing would recognize a number like 3.14 as the float data type. Processing has several more data types, which I’ll introduce as needed throughout this book.
Now that you understand the structure of a sketch, it’s time to explore the sketch window on which it’s drawn in more detail.
CARTESIAN COORDINATE PLANE
Your sketch window is measured in pixels. A pixel is a single dot of color on your monitor or TV. In fact, if you have a magnifying glass, you can see individual pixels on your monitor. In Processing, pixels are the unit of measurement. Anything that has a dimension— including the width and height you gave the size() function, as well as length, depth, and so on—is given in pixels.
Processing treats the sketch window like a Cartesian coordinate plane, and every pixel corresponds to a coordinate in that plane (see Figure 0-8). In two dimensions, you’ll work with x-coordinates (width) and y-coordinates (height).
FIGURE 0-8: A sketch window with x- and y-axes
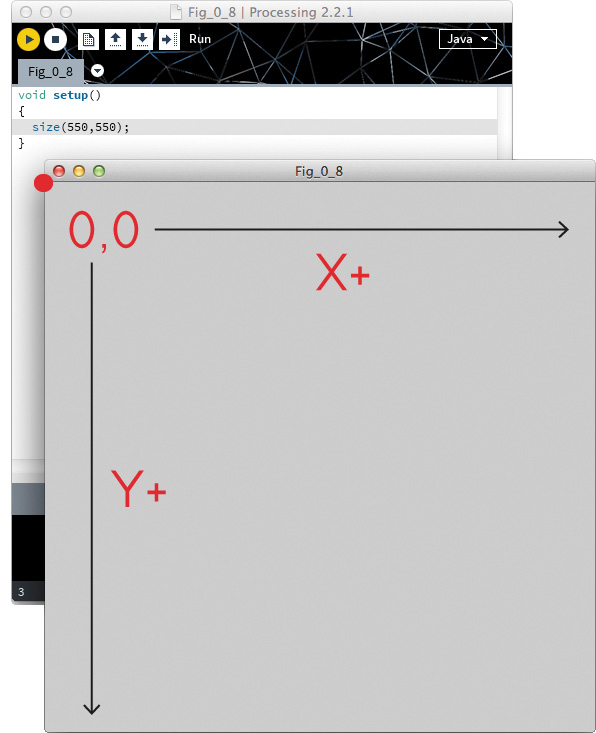
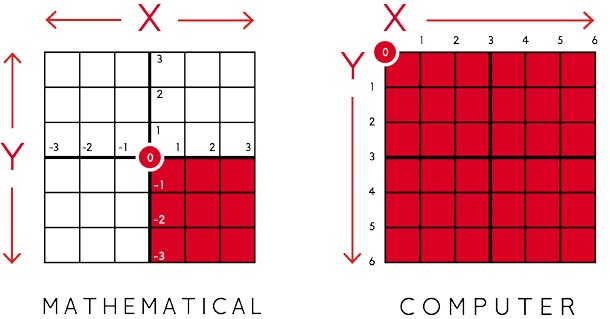
Click Run on your sketch again. Recall that the line goes from (0,0) to (250,250). The upper-left corner is the origin of the sketch window, or (0,0). As you move to the right, the x-value (or the width) increases. As you move down the sketch window, the y-value (or the height) increases. You might remember from math class that the y-axis usually increases as you move up in a graph. Processing flips that graph concept upside-down, as shown in Figure 0-9.
To sum up the Cartesian coordinate plane in Processing:
• The origin, (0,0), is in the upper-left corner.
• Distance and position are given in pixels.
• The y-axis increases as you move down the sketch window.
In the next project, you’ll put this new knowledge to good use!
FIGURE 0-9: Mathematical Cartesian coordinate plane vs. computer Cartesian coordinate plane