
In Project 5, you stamped shapes based on your mouse’s position, and in Project 7, you created a simple sketch to display typed text. Both projects relied on user input, and for the next few chapters, we’ll explore more input options, organized by the types of peripherals you can use with your computer and their level of difficulty.
You met event functions in Project 8, but so far, you’ve used only the mouse. In this chapter, you’ll tackle the keyboard! First, I’ll introduce you to a new keyboard variable as well as some keyboard event functions. Once we’ve covered the basics, you’ll write a maze game that players can navigate with the arrow keys. You’ll use your knowledge of if() statements, image processing, and incrementing and decrementing variables to create this game.
After you write the sketch, I’ll also show you how to add an external controller made with the MaKey MaKey, a little circuit board that can turn just about anything (including Play-Doh or a banana!) into a key on your keyboard.
The MaKey MaKey controller is optional, but if you want to add one, you’ll need the following supplies:
• One MaKey MaKey
• Four alligator clip wires (included with MaKey MaKey kit)
• Four assorted fruits or vegetables
• One mini USB cable (included with MaKey MaKey kit)
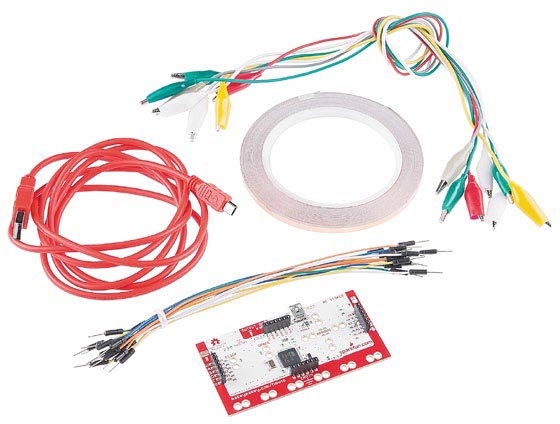
If you buy the MaKey MaKey kit, shown in Figure 9-1, from SparkFun (product WIG-11511), you should have everything you need, except the fruits and veggies. For those, just pick your favorites!
Before we put these materials to use, though, let’s review the basics of event functions, system variables, and keyboard input.
FIGURE 9-1: The MaKey MaKey kit
You used key and keyPressed in Project 7, but there’s one more system variable you’ll find invaluable: keyCode, which returns the value for any key you press, including the up arrow, ENTER, and so on. When you pair these variables with keyboard event functions, you can take input from your keyboard with a lot less code.
Keyboard event functions work just like mouse event functions. They allow you to interrupt the top-to-bottom flow of code execution and trigger an event “out of order.” In this project, you’ll encounter three keyboard event functions:
keyPressed()Triggers an event when a key on the keyboard is pressed
keyReleased()Triggers an event when a key on the keyboard is released
keyTyped()Triggers an event when a key is pressed and then released
NOTE
The event keyPressed() is different from the keyPressed system variable that returns a Boolean (true or false). You can tell them apart because the keyPressed system variable is not followed by parentheses.
But to implement game controls, you need to be able to do more than detect keypresses; you also need to be able to find out which key was pressed. Fortunately, Processing can help you with that, too.
Working with ASCII and keyCode
The American Standard Code for Information Interchange (ASCII) is the standard for encoding the letters and numbers on your keyboard so that your computer will know which key you’re pressing. ASCII uses the numbers 0–127 to represent 128 different characters: the numbers 0–9, the letters of the English alphabet in both upper- and lowercase, and a few punctuation symbols, including the space character. Each character has an ASCII code associated with it, and when your computer receives that code, it recognizes the number as that specific character. For example, the character A has an ASCII value of 65.
You can search online for “ASCII table” to see a complete list of ASCII codes, but you can also whip together a little Processing sketch to check the ASCII value of a given key. Write the following sketch in a new code window:
void setup()
{
size(200,200);
}
{
background(150);
textSize(50);
fill(355,0,0);
if(❶ key == CODED)
{
text(keyCode,50,100);
}
else
{
text(❷int(key),50,100);
text(key,150,100);
}
}
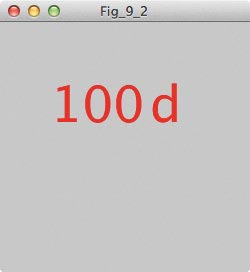
The first three lines of the draw() loop paint the background, set a text size, and pick a fill color for your text. The if()/else() statement displays one of two things, depending on which kind of key you’ve pressed. First, it checks to see if key is equal to CODED ❶, a constant that indicates special keys (like the arrow keys) in Processing. If Processing sees a special key, we print the keyCode to the sketch window, because that key has no ASCII value to print. Otherwise, the last key pressed must have been a key with an ASCII value, so we print that value by converting key into an integer ❷; then, we print the actual character pressed. As you press different keys on your keyboard, you should see those values change. For example, after you press the D key, your sketch window should look like Figure 9-2.
FIGURE 9-2: Displaying the ASCII code and character for the D key
One great way to use these variables is by creating a shape you can move with the arrow keys, a skill you’ll later apply to the maze game too. Processing assigns the arrow key codes to the global variables UP, DOWN, LEFT, and RIGHT. This makes checking for the arrow keys much easier than checking for some random ASCII value that would be impossible to remember.
Driving Shapes
Making something move on the screen in response to the keyboard or mouse is a basic building block of video game development. Let’s start simple and use the arrow keys to send an ellipse zooming around the sketch window.
Since you want to move the ellipse, you need to be able to change its x- and y-coordinates. First, in the code window, create global variables for those values:
int x = 300;
int y = 300;
Start your ellipse in the middle of the sketch window. In my example, the center is (300,300). Yours may be different, if you change the size of your sketch window.
Now write the setup() and draw() calls:
void setup()
{
size(600,600);
}
void draw()
{
background(150);
fill(255,0,0);
noStroke();
ellipse(x,y,50,50);
}
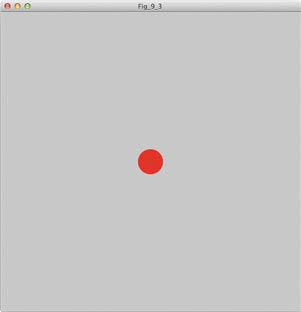
In the setup() function, I set my sketch window size to 600×600 pixels. The draw() loop sets the background color and draws the ellipse using the x and y variables as the x- and y-coordinates of my ellipse. Click Run, and you should see your ellipse, as in Figure 9-3.
FIGURE 9-3: An ellipse waits patiently in the middle of the sketch.
Once you’ve drawn your ellipse, add a keyboard event function to implement movement. Outside of your draw() code, create the keyPressed() event function as shown in Listing 9-1.
LISTING 9-1: Using keyPressed() to make an ellipse respond to keypresses
void keyPressed()
{
if(❶(key == CODED) && ❷(keyCode == UP))
{
y--;
}
if((key == CODED) && (keyCode == DOWN))
{
y++;
}
if((key == CODED) && (keyCode == RIGHT))
{
x++;
}
if((key == CODED) && (keyCode == LEFT))
{
x--;
}
}
Any code inside the keyPressed() event function will be run only when someone presses a key on the keyboard, and there are two movement requirements. First, we want the ellipse to move only in response to the arrow keys; and second, we want it to move in certain directions depending on which arrow is pressed.
The trusty if() statement, compound logic, and a few handy built-in constants make up this event function. You might envision a mess of if() statements, but using the keyPressed() event function lets you get away with only a few. Each if() statement checks whether a coded key was pressed, using the key == CODED ❶ condition. We then check whether the keyCode was UP, DOWN, LEFT, or RIGHT ❷ (as mentioned earlier, these constants represent the arrow keys). If both conditions are true, keyPressed() increments or decrements the x and y variables accordingly.
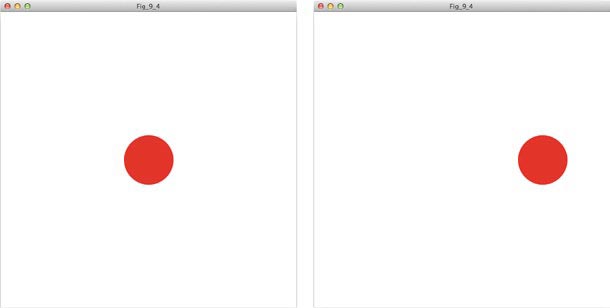
Run the code, and when you press the arrow keys, your ellipse should move in the direction of the arrow you press. Try moving it to the positions shown in Figure 9-4!
FIGURE 9-4: Pressing the up arrow should move your ellipse up.
Hold the arrow keys down, and the ellipse should glide smoothly where you direct it. If you want your ellipse to move faster, increment and decrement your x- and y-coordinates by larger values. For example, swap each ++ and -- with += 5 and -= 5, respectively. This will increment and decrement the ellipse’s coordinates by 5 rather than 1. If that’s still not enough for the speed demon in you, make the numbers even bigger!
When you’re done playing with the ellipse, put your newfound superpower to good use by making a game!
BUILDING THE MAZE GAME
You implemented the basic mechanics for a maze game when you created your keyPressed() event function. In this section, I’ll show you how to create a maze, add it to your ellipse code, and make a simple game.
First of all, we need a maze! Go to http://www.nostarch.com/sparkfunprocessing/, download the resources for this book, and open the Project 9 folder. The file maze.png is the maze used in this project. You can follow along with that file, or go to Maze Generator (http://www.mazegenerator.net/) to generate your own. I’ll walk you through that now.
Maze Generator’s interface (shown in Figure 9-5) lets you set the dimensions, shape, and difficulty of your maze.
FIGURE 9-5: Maze Generator settings and the maze they generated

For this project, leave all settings at their defaults except for three: change Style to Theta (Circular), which creates a more challenging circular maze; select Always use PNG so that Maze Generator produces an image you can use in Processing; and set Starts At to Bottom or center so that you can easily specify the starting point for the maze as width/2 and height/2 in code.
Click Generate, right-click the maze that appears, and save the image as a PNG file called maze. Once you save your maze image, add it to your sketch by clicking Sketch ![]() Add File. . . and selecting maze.png. Now you can bring your maze into Processing!
Add File. . . and selecting maze.png. Now you can bring your maze into Processing!
Writing the Sketch
Once you have a maze, it’s time to write your game in Processing. The sketch window will display both the maze and an ellipse that players will move around, so first you’ll create variables for both.
PImage maze;
int x = 162;
int y = 162;
Your maze is just an image, so you’ll need a PImage variable to load it; I called mine maze. You’ll also need variables for the ellipse’s x-and y-coordinates; set x and y to your maze’s start position, in pixels. I used 162 pixels for both because my maze starts in the middle, and the default size of a maze from Maze Generator is 324 pixels square.
Next, write your setup() and draw() loops.
❶ void setup()
{
maze = loadImage("maze.png");
size(324,324);
}
❷ void draw()
{
background(150);
image(maze,0,0);
fill(255,0,0);
noStroke();
ellipse(x,y,10,10);
}
In the setup() loop ❶, load maze.png into maze and set your sketch size to the size of your maze. Here, the maze’s dimensions are 324 pixels square. In your draw() loop ❷, use image() to draw the maze on the sketch window, and then draw your ellipse.
Outside your draw() loop, add the same keyPressed() function you created in Listing 9-1:
void keyPressed()
{
if((key == CODED) && (keyCode == UP))
{
y--;
}
if((key == CODED) && (keyCode == DOWN))
{
y++;
}
if((key == CODED) && (keyCode == RIGHT))
{
x++;
}
if((key == CODED) && (keyCode == LEFT))
{
x--;
}
}
After adding the event function, run your code. If your ellipse isn’t at the start of your maze, adjust your x and y variables to be the starting point of the maze. You may also want to change the diameter of your ellipse, if your maze’s walls are too close together.
You should be able to press the arrow keys and move the ellipse around the maze too. There’s just one problem: you can just pass through the walls to get to the finish! You need a way to figure out whether the ellipse is touching a wall.
Detecting Wall Touches with get()
Your maze’s walls are black, so if the ellipse hits one it will be touching the color black. Let’s use that information to stop the ellipse from passing through walls! Fortunately, Processing’s get() function makes it easy to determine what color the ellipse is touching.
The get() function retrieves the color of a pixel at a given position. Then, you can extract the pixel’s red, green, or blue value from that color by passing it to the red(), green(), or blue() functions, respectively. Try it by adding this line to your existing draw() code:
println(red(get(mouseX,mouseY)));
This code prints the red value of the pixel at (mouseX, mouseY). If you move your mouse around, the value printed should be 255 while you mouse over white, for which all color values are 255. When you move your mouse to a line of the maze, the value should be 0. Now change mouseX and mouseY to your x and y variables and move that println() function one line above the ellipse() function. Move your ellipse around; do you see a difference?
You can use the value from get() to detect a touch! Modify your draw() loop like this:
void draw()
{
background(150);
image(maze,0,0);
fill(255,0,0);
noStroke();
❶ float touch = red(get(x,y));
ellipse(x,y,10,10);
❷ if(touch < 255)
{
x = 162;
y = 162;
}
}
Create a new variable called touch of type float ❶ and set it to the value you printed earlier, red(get(x,y)). Using an if() statement ❷, test whether touch goes below 255. If so, the ellipse touched a wall! In that case, assign x and y their original values to return the ellipse to the start of the maze.
Now players can’t get through the walls, but what happens when they actually finish the maze correctly?
Adding the Victory Condition
You can see the end of the maze in your image, but you also need to create a finish line in your code. You can use a compound if() statement to check if the ellipse is within an invisible bounding box, and if so, end the game.
First, you need to define the finishing box. To determine where the maze ends, print mouseX and mouseY to the console window. Add this line to your draw() loop:
println(mouseX + "," + mouseY);
Restart your sketch, and as you move the mouse, you should see its x- and y-coordinates in the console window. Hover your mouse over the area where your maze’s finishing box should be, and note the coordinates. In this book’s maze, the box is roughly centered at (170,8). Create your bounding box with a compound if() statement in the draw() loop.
void draw()
{
image(maze,0,0);
if(❶(x > 165) && ❷(x < 180) && ❸(y < 10))
{
❹ textSize(48);
textAlign(CENTER);
fill(255,0,0);
text("YOU WIN!",width/2,height/2);
}
fill(255,0,0);
noStroke();
float touch = red(get(x,y));
ellipse(x,y,10,10);
if(touch <= 200)
{
x = 162;
y = 162;
}
println(mouseX + "," + mouseY);
}
First, create the box’s left and right boundaries. For this maze, I tested whether x is greater than 165 ❶ and less than 180 ❷. Then, add one more condition for the y boundary. My if() statement looks for anything less than 10 ❸. If all three conditions are true, it displays a victory message ❹. This code draws text in the middle of the screen that says, “YOU WIN!”
The placement of this if() statement is important because Processing layers materials based on their position in the code. Make sure the if() statement comes after the image() call so the text appears on top of the maze image.
Run the completed code to see if you can reach the victory message shown in Figure 9-6. When you’re confident the game works, I’ll show you how to leave the keyboard behind and add a controller.

ADDING A MAKEY MAKEY CONTROLLER
In this section, I’ll teach you to take your maze game to the next level with a custom controller. Make sure you have the materials listed in “Gather Your Materials” on page 148, and let’s use a MaKey MaKey to replace your arrow keys with fruit!
Meeting the MaKey MaKey
The MaKey MaKey (Figure 9-7) is an invention kit that tricks your computer into thinking that almost anything is a keyboard. For example, you could play Super Mario with a Play-Doh keyboard, or play a digital piano with keys made of fruit!
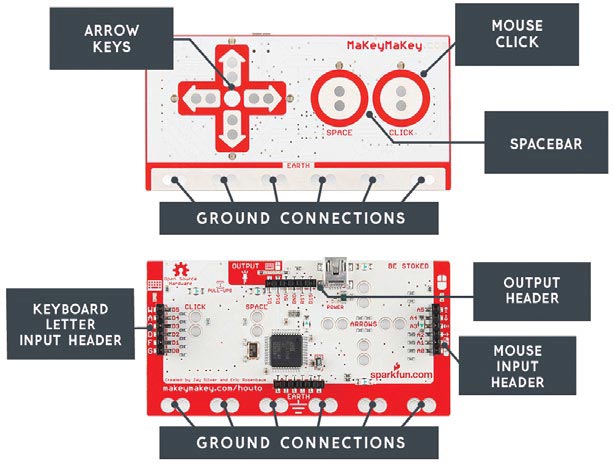
FIGURE 9-7: The MaKey MaKey. Most connections are pairs of metal-rimmed holes, where you’ll clamp alligator clips. You can also plug stiff jumper wires into the mouse input, keyboard input, and output headers on the back of the board.
If you already know how to use an Arduino (http://www.arduino.cc/), you can have even more fun with the MaKey MaKey. It’s Arduino-compatible, and it runs the Arduino Leonardo bootloader. If you wish to use a different set of keys, or otherwise change the behavior of your MaKey MaKey, just reprogram it!
You can connect the MaKey MaKey to objects with alligator clip wires, and it detects when you’ve touched those objects even if they’re materials that don’t conduct electricity very well, like leaves, pasta, or people. The MaKey MaKey’s brain is an on-board ATMega32U4 microcontroller that communicates with your computer using the Human Interface Device (HID) protocol, which means you can use the MaKey MaKey as a keyboard or mouse without having to install any drivers or other software.
Each pair of metal circles on the MaKey MaKey in Figure 9-7 (six at the bottom, one in each arrow, and one in each circle) is an input you can attach to with alligator clips, solder, and other connectors. It has another 12 inputs on the back: 6 for keyboard keys, and 6 for mouse motion.
Now that you’re acquainted with the MaKey MaKey, I’ll show you how to turn it into a controller for your maze.
Building a Controller
The wonder of the MaKey MaKey is that you can turn almost anything into a game controller, a keyboard, or a mouse. The key is closing the circuit between the input and the ground connections at the bottom of the board.
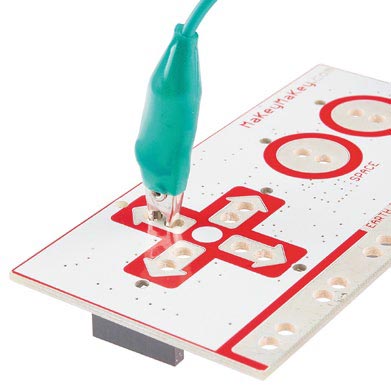
For my controller buttons, I used fruit from my refrigerator. (Don’t tell my wife!) The maze game requires only the arrow keys, so I chose four different fruits: a banana, an orange, and two apples. To attach the fruits to the contact points, connect one end of an alligator clip wire to the MaKey MaKey button point, as shown in Figure 9-8, and connect the other end to the fruit in any way you can.
FIGURE 9-8: You can use alligator clips to connect objects to the MaKey MaKey.
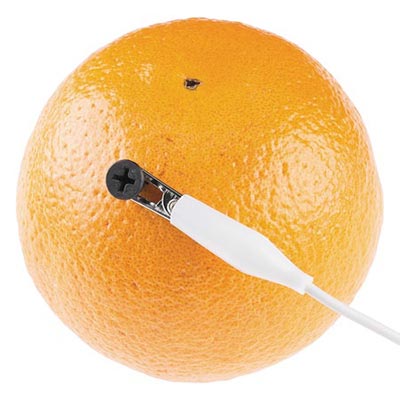
Sometimes it’s a little tough to connect a fruit to the alligator clip, so I suggest sticking a screw or nail into the fruit and attaching the alligator clip to that, as shown in Figure 9-9.
FIGURE 9-9: This orange has a screw in it to make the connection easier.
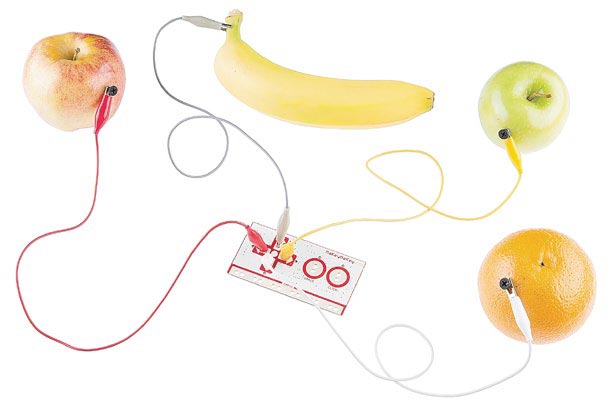
The MaKey MaKey should look something like Figure 9-10 when you have all of your fruit attached.
FIGURE 9-10: It’s a fruit controller!
For a great demonstration of ways to hook up a MaKey MaKey, check out our guide at https://learn.sparkfun.com/tutorials/makey-makey-quickstart-guide. It leads you through the basics and includes the original video that creator Joy Labs used to launch MaKey MaKey on Kickstarter.
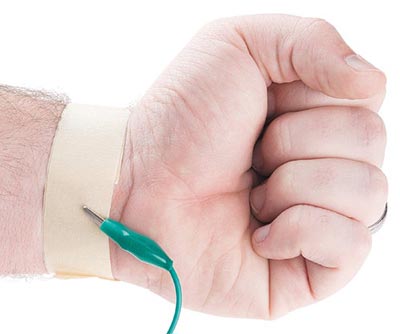
Now, just attach yourself to a ground connection on the MaKey MaKey! You could just connect an alligator clip to ground and hold the other end in your hand, but you’ll need both hands to work the controller. Instead, we’ll build a bracelet out of aluminum foil and masking tape, and attach the alligator clip to that.
Tear off a length of tape that is roughly the circumference of your wrist. Starting at one end, add aluminum foil to the strip of tape, leaving about an inch of the sticky side open at one end. Then wrap the bracelet around your wrist with the foil touching your skin, and fasten your bracelet. Finally, attach the alligator clip to the bracelet, making sure it contacts the foil and that the foil contacts your skin, as in Figure 9-11.
FIGURE 9-11: Connection made to my tape bracelet
Congratulations, you’ve taken your first step on the road to cyborgdom! In the next section, we’ll introduce your new controller to Processing.
Connecting the MaKey MaKey to Your Computer
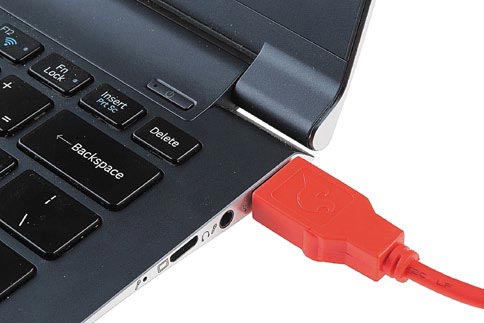
Now that you’ve built your controller, let’s hook it up to your computer. Grab the USB cable, plug the mini USB end into the port at the top of the MaKey MaKey board, and plug the rectangular end into a USB port on your computer, as shown in Figures 9-12 and 9-13.
Once you plug in the MaKey MaKey, you should see the board flashing—that’s good! Wait a bit, and your computer should tell you that it sees a new piece of hardware.
FIGURE 9-12: Connecting the MaKey MaKey to the USB cable
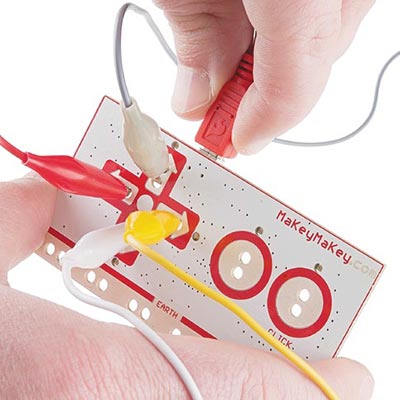
FIGURE 9-13: Connecting the USB cable to a laptop
At this point, the MaKey MaKey should be ready to use. Run your maze game sketch, and with your bracelet attached to ground on the MaKey MaKey, touch one of the four pieces of fruit. The ellipse in your maze should move in the direction of the key to which that piece of fruit is connected. Pretty cool! Now, see if you can beat your maze using your fruit controller.
NOTE
Be gentle with your new controller! If you get too excited and press the fruit buttons hard, you may turn it into a fruit-salad controller.
You can take this project further in both the hardware and software directions. In terms of hardware, try creating a more elaborate MaKey MaKey controller. Make your sketch into a party game by replacing your fruit with friends: just give each person a bracelet like yours (I don’t think they would enjoy getting stuck with a nail). Try playing with other conductive materials such as copper tape, aluminum foil . . . and even pizza!
You could also improve the maze program itself. You know how to add images, so try replacing the ellipse with a character of your own design. Then, create places that teleport your character to another spot in the maze. (Use code similar to the code you added in “Detecting Wall Touches with get()” on page 156, but change the location from your maze’s start to some other location.) And dare I suggest drawing your own maze and importing it as a scanned picture? The possibilities are limitless!