
You met your first Processing library in Project 10, and now you’ll tackle minim, an audio Processing library. You can use minim to make sketches that play songs or react to input with sound effects, and in this project, you’ll make a simple audio player and an interactive soundboard that reacts to keypresses.
When you’re done with the sketch, I’ll challenge you to take it further with some hardware, too! Are you ready to rock?
Note that Processing 3 has its own audio library; you can read about it at https://processing.org/reference/libraries/sound/index.html. You should still be able to use Minim with Processing 3, however. This book covers Minim instead of the default library so that readers using Processing 2 can do the projects, and because Minim gives you a different degree of control over your audio content.
GATHER YOUR MATERIALS
You can just use your keyboard for all of the inputs in this project, but if you want to create a MaKey MaKey controller for the challenge I set out in “Taking It Further” on page 206, you’ll need the following parts, which are both included in the SparkFun MaKey MaKey kit (product WIG-11511):
• One MaKey MaKey
• One mini USB cable
You may also want to have some copper tape and a small cardboard box handy for that challenge; the copper tape also comes with the SparkFun MaKey MaKey kit, and any old box will do.
INTRODUCING THE MINIM LIBRARY
From audio recording and playback to audio synthesis and processing, you can do just about anything with sound using Minim, a wonderful audio processing library created by Damien Di Fede. Depending on what you want to accomplish, Minim probably has the perfect class for your sketch:
AudioInputReceives mono or stereo input
AudioMetaDataStores meta and ID information about your track
AudioOutputSynthesizes mono or stereo input
AudioPlayerPlays mono and stereo sound in many popular formats
AudioRecorderRecords mono or stereo audio to a buffer or file
AudioSampleSimilar to AudioPlayer, allows for buffered playback
BeatDetectLets you detect beats in audio files
FFTEnables frequency and spectrum analysis
You can read about Minim in more detail at http://code.compartmental.net/minim/, where Damien has documented the library so well that pretty much anyone can pick it up and play with sound. For this book, I’ll focus on the basics of accessing a sound file and triggering It for the project, but I’ll also discuss a few other classes and how you can apply them In Processing.
NOTE
Many of the example sketches that I show in this chapter are based on the examples that come with the Minim library You can find more information about Minim and its other classes and more example code at http://code.compartmental.net/minim/.
To get a feel for using Minim, you will create a basic audio player application that plays a song when you run your sketch. First, click Sketch ![]() Import Library
Import Library ![]() Add Library. . . to launch the Library Manager. Look for the Minim library, and click Install to add it to Processing.
Add Library. . . to launch the Library Manager. Look for the Minim library, and click Install to add it to Processing.
Then, open a new Processing sketch and add the following to the top:
import ddf.minim.*;//import library
Minim minim;//minim library class object called minim
AudioPlayer song;//AudioPlayer object called song
Your import line for the Minim library is pretty much the same as the ones you used for the Video library; it just replaces processing with ddf. After the import line, create a Minim object and an AudioPlayer object; I named mine minim and song, respectively.
NOTE
If you import the Minim library through the menu (Sketch ![]() ImportLibrary) instead of adding the line manually, Processing will automatically import a number of other library utilities. You can leave them in, and they shouldn’t affect your sketch.
ImportLibrary) instead of adding the line manually, Processing will automatically import a number of other library utilities. You can leave them in, and they shouldn’t affect your sketch.
Once you’ve created the two library objects, instantiate them in a new setup() loop as follows:
void setup()
{
//instantiate the minim library class
❶minim = new Minim(this);
//load the mp3 file to the song object
❷song = minim.loadFile(“song.mp3”);
}
First, instantiate the minim object ❶, which allows the library to access the data folder and any other content within your sketch. Notice that to instantiate song, you call loadFile() on minim ❷, rather than creating a new AudioPlayer, which would more closely mirror what you did to instantiate Video library objects.
Unlike the Video library, which has classes that do not depend on one another, the Minim library has an overarching class. The overarching class is named Minim, and it contains the functions you need to use the other classes, including the loadFile() function. That’s why you instantiate the minim object first; otherwise, you won’t be able to load other objects to play songs! In general, larger libraries tend to have classes like minim that act as utility classes or help you to use other classes.
Now that you have some code in place, save your sketch and add an MP3 file called song.mp3 to your sketch’s data folder. You can either download the file with the rest of this book’s resources at http://www.nostarch.com/sparkfunprocessing/, or rename any MP3 file you like to song.mp3. When you’ve picked a file, click Sketch ![]() Add File and select it.
Add File and select it.
Once you’ve loaded your song, you can play it by adding a call to the AudioPlayer class’s play() function. Update your setup() function, as shown in Listing 11-1.
LISTING 11-1: A basic sketch to play your song
import ddf.minim.*;//import library
Minim minim;//Minim library class object called minim
AudioPlayer song;//AudioPlayer object called song
void setup()
{
//instantiate the minim library class object
minim = new Minim(this);//initialize minim as a
//new Minim object
song = loadFile(“song.mp3”); //load mp3 to song object
❶song.play();//play song
}
void draw()
{
;//nothing in draw loop
}
Here you call play() on song ❶ , and add an empty draw() loop. I placed this call in the setup code, so the song will play only once, at the beginning of the sketch. If you want it to repeat, place it in your draw() loop. Run this sketch now, and your song should play!
Now that you’ve seen how to get the AudioPlayer class up and running, here are a few more class methods that will be useful for you in your endeavors as an audiovisual artist:
cue()Set where in the file to start playback
length()Fetch the length of the audio file
pause()Pause the audio file
mute()Mute the audio
position()Fetch the current position in the audio file
rewind() Rewind the audio file back to the beginning
skip() Skip a certain amount of the song
unMute() Unmute the audio
You’d call these functions on an AudioPlayer object, so in the sketch you just made, you’d call them on song, like this:
song.rewind();
The Minim library is designed with a wide spectrum of audio use in mind, so try these out on all kinds of sound files, and check the Minim website to find more functions and classes to try. I’m no expert in audio synthesizing or processing and haven’t fully explored Minim, so I’m still finding really cool things to do with it every time I use it. In fact, this chapter took the longest to write because I couldn’t decide on a project to share with you!
CREATING A SINGLE-SONG AUDIO PLAYER
With Minim, you can do more than just start an MP3 file. In this part of the project, you’ll create playback controls. Add some of your favorite songs, sound effects, podcasts, or other files to your sketch folder (just make sure they’re WAV, AIFF, AU, SND, or MP3 files), and I’ll show you how to make a single-song audio player.
NOTE
If you don’t want to use a song of your own, visit http://www.nostarch.com/sparkfunprocessing/, download the examples for this book, and use the MP3 files in the Project 11 folder.
To start, let’s get one audio file playing. Create a new sketch, add some audio files to its data folder, and add the following to the code window; if you’re adding your own song, replace 01 Radioactive.mp3 with your own filename.
import ddf.minim.*;
Minim minim;
AudioPlayer song;
void setup()
{
size(500,500);
minim = new Minim(this);
song = minim.loadFile(“01 Radioactive.mp3”);
song.play();
}
This sketch is nearly the same as Listing 11-1. After importing the library and creating your objects, you start the song in the setup() function again to make the song play right away when someone starts the sketch.
LEARNING A NEW LIBRARY
There are a lot of libraries out there that make Processing more powerful, and like Processing itself, these libraries are open source. They’re written by people just like you, who were looking for functionality in Processing that wasn’t there initially, so they created it for themselves!
Each library is a little different in its functionality, documentation, and ease of use. Here are a few tips to figure out if a library is right for you:
Documentation Check out the library’s web page or GitHub page, and if you can’t envision how to use it in a “Hello World” sketch from the documentation provided, then you may want to try another library. Many libraries have what are called javaDocs; you’ll find Minim’s javaDocs at http://code.compartmental.net/minim/javadoc/. These describe details of the library (for example, the classes and functions it contains), much like the Reference page of the Processing website.
Example sketches The library should come with a good set of example sketches that demonstrate its breadth and the functionality of each class and its functions. If there is a small number of examples, don’t fret: it may just be a small library. Always open the examples and play with them before diving in to writing your own sketch.
Check the Library Manager Processing’s Library Manager (under Sketch ![]() Import library
Import library ![]() Add a Library. . .) houses an ongoing list of libraries that have been vetted by Processing.org and approved in terms of functionality, documentation, and example sketches. The Library Manager is probably the safest place to find and install new libraries, so check it out!
Add a Library. . .) houses an ongoing list of libraries that have been vetted by Processing.org and approved in terms of functionality, documentation, and example sketches. The Library Manager is probably the safest place to find and install new libraries, so check it out!
LISTING 11-2: Adding a keyPressed() event function to pause and play the song
Now you’ll add some playback controls to this example with a keyboard event function. At the end of your current sketch, add an empty draw() function followed by a keyPressed() event function that uses a couple of keys and an if() statement to pause and play the song, as shown in Listing 11-2:
void draw()
{
;//nothing in draw()
}
void keyPressed()
{
if(key == ‘s’)
{
❶song.pause();//if S key is pressed, stop the song
}
if(key == ‘p’)
{
❷song.play();//if P key is pressed, play the song
}
}
Once you add this event function to your sketch, run it. Let it play for a bit, and then press the S key. The song should stop, thanks to the pause() function ❶. To play the song again, press the P key, which should call the play() function ❷.
Now you’ll show information about the song in your sketch window. Enter this code in the draw() loop between your setup() function and the keyPressed() function:
void draw()
{
background(150);
fill(0);
text(❶song.position() + “ out of “ + ❷song.length(), width/2,height/2);
}
First, set a fill color of 0 to make black text. Then, use the text() function to print the position of the song. I concatenated some string labels with both the current position ❶ and the total length ❷, at a position of width/2 and height/2. This begins the text in the center of the sketch window, as you can see in Figure 11-1.
FIGURE 11-1: Displaying a song’s current position in playback

Run your sketch to confirm you can fetch information about your song. Then, show that data graphically using a horizontal bar display. Update your draw() loop as follows:
void draw()
{
background(61,147,76);
❶noStroke();
❷float pos = map(song.position(),0,song.length(),0,300);
❸textAlign(CENTER);
fill(0);
text(song.position()/1000 + “ out of “ + song.length()/1000,width/2,height/2);
❹fill(255);
rect(100,110,300,50);
fill(255,0,0);
rect(100,110,pos,50);
}
First, you set the background color and turn off stroke outlines for both rectangles ❶. Next, you create a local float variable called pos and set the value of pos to the mapped value of song.position() ❷, which ranges from 0 to 300.
The map() function scales a value x from xMin and xMax to zMin and zMax:
map(x,xMin,xMax,zMin,zMax);
This function will save you a lot of time and effort when you need to scale and divide more complicated numbers, such as song lengths.
Now to display the text values: this part works the same way it did in earlier projects. At ❸, you align your text, set the color, and then display it. Finally, you draw two rectangles ❹. The first shows the maximum value of the song length, and the second is the gauge rectangle that will grow based on the mapped val of the song length. When the song ends, the second rectangle should completely cover the first rectangle.
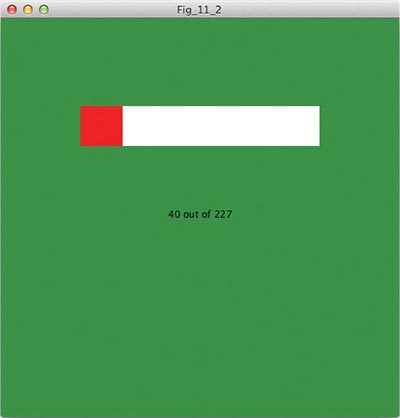
Run your sketch. As the song plays, a red rectangle should grow in width, and the text readout should increment, as shown in Figure 11-2.
FIGURE 11-2: Adding the time bar with the song length in text
As you’ve seen, AudioPlayer has some useful and creative applications. It isn’t the only fun class in the Minim library, though—in the next section, I’ll introduce you to AudioSample and show you how to use it.
The one negative side of the AudioSample class is the large amount of buffer or memory space it takes up when you have multiple samples ready to be played.
INTRODUCING MINIM’S AUDIOSAMPLE CLASS
For the rest of this project, you’ll also use the AudioSample class, which is very similar to the AudioPlayer class you just practiced with. An AudioSample object keeps a sound file in an internal buffer so that it can be triggered quickly. While AudioPlayer is used to play whole songs or longer tracks, AudioSample is often used as a mixing tool. Each instrument might be a sample, and you can play several instruments over one another quickly, enriching the audio in your sketch. You can have up to 20 separate audio samples in your sketch at once.
Let’s compare some setup and playback code for an AudioPlayer object and an AudioSample object. To refresh your memory, here’s a working AudioPlayer sketch:
import ddf.minim.*;
❶Minim minim;
AudioPlayer song;
void setup()
{
minim = new Minim(this);
❷song = minim.loadFile(“song.mp3”);
}
void draw()
{
❸song.play();
}
Now, here’s a working AudioSample sketch:
import ddf.minim.*;
❹Minim minim;
AudioSample sample;
void setup()
{
minim = new Minim(this);
❺sample = minim.loadSample(“sample.mp3”,512);
}
{
❻sample.trigger();
}
NOTE
Always look at the length of your audio file before deciding what Minim class to use. If your file is longer than 15 seconds or so, use AudioPlayer; if it’s shorter, use AudioSample. Also keep in mind how you want to use the file in terms of agility and audio layering.
You need to create a Minim object (❶ and ❹) and a class object to use both AudioPlayer and AudioSample. Then, for an AudioPlayer file, you instantiate your class object with a call to loadFile() ❷, which takes the file and loads it for use. With AudioSample, you use the loadSample() function ❺ instead, which requires you to also pass a buffer size. I used 512 as my buffer size, but you may need to make this number larger depending on your system. The buffer size determines how responsive the sound will be: the larger the buffer, the more responsive the trigger. Finally, to actually play a song, you use play() function ❸ in the AudioPlayer class, as opposed to the AudioSample class’s trigger() function ❻, which triggers a sample.
As you can see, you follow roughly the same formula to use both classes; their functions just work a little differently. I’ll opt for the AudioSample class from here on because I’m looking for sounds that have quicker response and loading times.
IMPROVING YOUR AUDIO PLAYER WITH METADATA
NOTE
Metadata can differ from song to song, based on whether you ripped the song from a CD and filled in the data by hand or bought the song through a service like iTunes, which usually includes all the metadata. For this project, I assume that you’re using a song that has all of its metadata.
In this section, we’ll explore the AudioMetaData class included in Minim. Your audio player now has a nifty little progress bar. But who is singing? What is the name of the song? What album is it from? Most media players display this information, called metadata. Metadata is all of the background and contextual data that goes along with a song or album, including the song titles, album title, and artist. Many songs even include copyright information, publication dates, and the record company in the metadata.
To access metadata in a Processing sketch, you use the AudioMetaData class of the Minim library. Remember that to add a class object, you have to create the object at the top of your sketch. For simplicity, I’ll start a new sketch now, though enough code is the same here that you could work from your single-song audio player and just add the new parts.
Here’s what the beginning of your sketch should look like:
import ddf.minim.*;
Minim minim;
AudioPlayer song;
❶AudioMetaData data;
I placed my AudioMetaData object ❶ underneath my AudioPlayer object and called it data. Once you have created the object, instantiate it in the setup() function, along with the minim and song objects:
void setup()
{
size(500,200);
minim = new Minim(this);//create minim object
song = minim.loadFile(“01 Radioactive.mp3”); //load song
❶data= song.getMetaData();//get metadata from song object
song.play();//play song
}
Instantiate the AudioMetaData object ❶ after instantiating your AudioPlayer object, because the AudioMetaData class needs to know which song is being used by the AudioPlayer object in order to access the information from the correct file. For the song file, you can either load the MP3 file you used in the previous example code into your new sketch folder or use a new one. I recommend using a professionally produced song, downloaded from a service or ripped from an album, so that it will have sufficient metadata available for you to use.
Now you’ll display some basic information about your song in the draw() loop and use the keypressed() event function from Listing 11-2 to add playback controls. Fortunately, Minim returns all of the metadata in a string format, which is nice because you can just display it with the text() function, as follows:
void draw()
{
background(l50);
noStroke();
//map position to 0-300
float pos = map(song.position(),0,song.length(),0,300);
textAlign(CENTER);//align text to center
fill(0);
❶text(data.title(),width/2,55); //song title
❷text(data.author(),width/2,70);//artist
❸text(data.album(),width/2,85); //album title
//position
text(song.position()/1000 + “ out of “ + song.length()/1000,width/2,100);
fill(255);
rect(100,110,300,50); //base rectangle
fill(255,0,0);
rect(100,110,pos,50);//song position rectangle
}
void keyPressed()
{
if(key == ‘s’)
{
song.pause();//if S key is pressed, pause the song
}
if(key == ‘p’)
{
song.play();//if P key is pressed, play the song
}
}
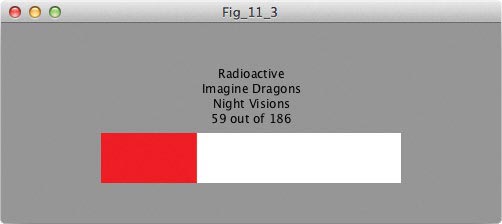
Add the song title ❶, author ❷, and album name ❸ to the sketch with the text() function, placing each 15 pixels lower than the previous one. Run your sketch with the new code, and you should see something like Figure 11-3.
FIGURE 11-3: The simple single-song player with metadata added
Congratulations! You just made an audio player that displays the metadata associated with the file you play.
You can also use your microphone as an input device in Processing, and in the next section, we’ll do that with the Minim library. If you’re on a laptop with a built-in microphone, you should be just fine, but if you are working on a desktop computer, plug in an external microphone before you begin.
The AudioMetaData class has methods for retrieving nearly any data you could think of about a song. Check the Minim website for a complete list, but here are some key methods you might use:
album()Returns the album title as a string
author()Returns the artist name as a string
date()Returns the publishing date as a string
fileName()Returns the filename as a string
genre()Returns the genre as a string
title()Returns the song title as a string
VISUALIZING SOUND
Using the microphone on your computer is a great way to bring real-world interactivity to your Processing sketches, and it is also relatively painless. The first step to using sound as an input is to check your chosen sound’s amplitude, or how loud it is.
NOTE
We’ll measure only amplitude, because the audio concepts involved to measure frequency— which dictates the pitch of a sound—are beyond the scope of this book. But the Minim library includes great example code for visualizing both amplitude and frequency for a given audio input. That code isn’t complicated, so I encourage you to play with it on your own. The example sketch name is PlayAFile.pde, and you should find it in the examples folder that comes natively with Processing.
Setting Up Audio Input
Now you’ll bring audio input into a Processing sketch. Begin a fresh sketch, and as always, start by creating class objects and global variables:
import ddf.minim.*;
Minim minim;
AudioInput mic;
int x = 1;
To use a microphone, you need to create an AudioInput class object as well as a Minim object, so import the Minim library and add both class objects. My Minim object is called minim and my AudioInput object is called mic to keep everything straightforward. Then, create a variable called x and initialize it as 1. You’ll use this variable later to create a graph visual, but since it needs to be global, it belongs at the top of your sketch.
LISTING 11-3: Instantiating an audio input using an external line in
Next, add your setup() function, as shown in Listing 11-3.
void setup()
{
size(500,200);
minim = new Minim(this);
❶mic = minim.getLineIn();
❷frameRate(120);
background(150);
}
Create a sketch window first. For this application, I recommend a window that’s wider than it is tall. Next, instantiate the Minim library object and the AudioInput object ❶. If no other devices are plugged in to your computer, the result of minim.getLineIn() should be your microphone, so leave everything else unplugged when you first run this sketch.
To increase your sample rate to make your visualization a lot closer to real time, bump up the frame rate of the sketch ❷. Last, set the background in the setup, because the graph you’ll draw depends on the stamp effect of not redrawing the background with every frame.
NOTE
Amplitude is the measured and literal loudness of a sound, whereas volume is the perceived loudness. You can have two frequencies that have the same amplitude but different volumes; one sounds louder even though they have the same amplitude.
Drawing Sound
Now, on to the fun part: visualizing sound! You’ll create a scrolling bar graph that will show the real-time loudness (amplitude) of sound around you. This graph is not to scale in terms of decibels; you’ll just see change and reaction.
Most of the magic happens in the line() function itself. In Project 3, you made an ellipse bounce back and forth when its x-position went beyond the width of the window. You’ll revisit that concept here to make a simple area graph made up of a series of adjacent vertical lines.
Add the following draw() loop after your setup() function now:
void draw()
{
stroke(0,0,255);
line(x,❶(height - 20), x, ❷((height - 20) - abs(mic.left.get(0) * 200)));
x = x + 1;
❸if (x >= width)
{
background(150);
x = 0;
}
}
Draw a line where both x-coordinates are the same value, in this case the x variable. The y-values of the line make the graph move up and down, and they’re tied to your audio input. Y1 is the baseline of the graph and is equal to height - 20 ❶. In other words, it’s 20 pixels up from the bottom of the window. You can tweak the 20 to move the entire graph up or down.
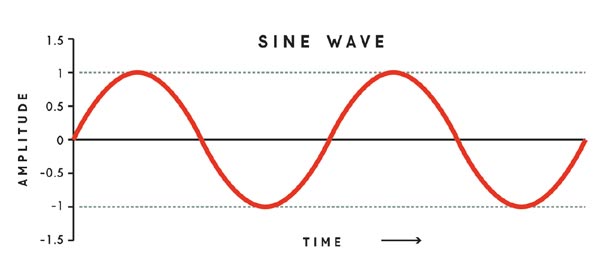
The Y2 value is (height - 20) - abs(mic.left.get(0) * 200) at ❷. Y2 is the point that will move up as the sound gets louder. To get the sound amplitude, you use the mic.left.get() function. This checks the audio sample from the buffer storage and returns a number between -1 and 1, as shown in Figure 11-4, which is the amplitude of the sound wave. But that number isn’t very big, so loudness changes would be really hard to visualize as is. To scale that value up, multiply it by 200 for a range of -200 to 200.
FIGURE 11-4: An audio sine wave that ranges from -1 to 1
ADVANCED DETAILS ON THE GET() FUNCTION
The 0 inside of the get() function you used to fetch the amplitude is the position within the audio buffer that you are sampling. The audio buffer holds 1,024 sample bytes, and this sketch just takes the first one (the 0th sample). This is a really simplified way to use an audio sample, but I wanted a simple piece of example code to play with. If you are interested in sampling all of a buffer, the PlayAFile.pde sketch in the Minim library’s example code uses a for() loop to sample all of the buffer and produce a waveform from those values. With the Minim library installed, you can click File ![]() Examples, browse to the Minim library, and find this code from Processing.
Examples, browse to the Minim library, and find this code from Processing.
Since you are looking for a loudness level, not a mathematical amplitude, you also need to take the absolute value of the range given. (Taking the absolute value of a negative number removes the negative sign, making it positive.) To get the absolute value, pass the whole function of mic.left.get(o)*200 to the abs() function.
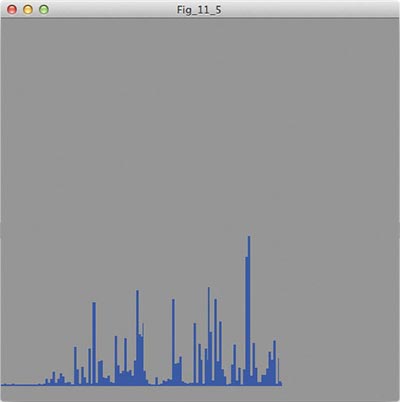
To calculate a line height, take your baseline value (height - 20) and subtract the absolute value function. This should produce a graph that spikes the louder the sound gets. The last bit of the draw() loop increments the x variables and checks for the graph’s width by using an if() statement to compare x to width. If x is equal to or greater than the width of the sketch window, the background is redrawn and the line moves back to 0 ❸. Run the sketch and make some noise (for example, sing and stomp your feet), and you should see an active graph similar to Figure 11-5.
Before moving on, try using the audio input to also change the color of the graph. You can just copy the absolute value of the scaled input and paste it as any R, G, or B value of your stroke color for the line in your draw() loop. For example, tweak your stroke() function as follows:
stroke(abs(mic.left.get(0) * 1000),0,255);
FIGURE 11-5: A simple graph of an audio input from my laptop microphone
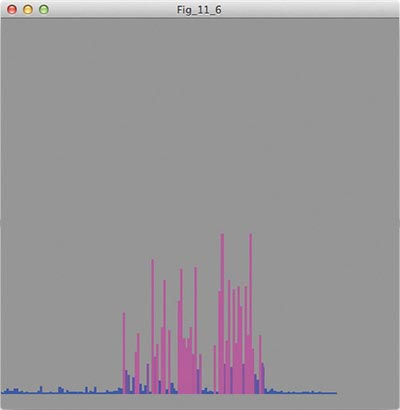
Here, you keep 255 as your blue value, but now the red value changes with the loudness level. So instead of staying blue, as your sound gets louder the graph should turn purple! Check it out in Figure 11-6.
FIGURE 11-6: Now the stroke value changes with the amplitude in the sound graph
RECORDING AUDIO TO CREATE A SOUNDBOARD
The final class you’ll explore within the Minim library Is AudioRecorder. I am not going to lie: I love this class and have put it to some interesting uses, such as recording a song, doing some sneaky sleuthing, and making a fun soundboard. AudioRecorder allows you to capture audio input and save it as a WAV file. This is a huge win in my opinion, because it allows for some really interesting sketches that can record audio to use later or with a different interaction.
You can create a simple soundboard with the AudioRecorder class. For now, you’ll just use the arrow keys to get all of the software working, but later you can add a MaKey MaKey and some fun craft materials.
Creating the Class Objects
Start a new sketch, import the Minim library, and create your class objects:
import ddf.minim.*;
❶Minim minim;
❷Audioinput mic;//for microphone input
❸AudioRecorder left;//left record
AudioRecorder right;//right record
AudioSample Pright; //right playback
AudioSample Pleft;//left playback
Just as before, start a new sketch to work with recordings. Import the Minim library and create all of your class objects. Remember that to use the microphone you need to create a Minim object called minim to start with ❶, followed by an Audioinput object ❷ and then two AudioRecorder objects and two AudioSample objects ❸.
Writing the setup() and draw() Functions
Once everything is created and named, dive in to the setup() for this sketch. Here, you’ll set the window size and instantiate your class objects:
void setup()
{
size(800,900);
❶minim = new Minim(this);
❸right = minim.createRecorder(mic,”data/right.wav”);
left = minim.createRecorder(mic,”data/left.wav”);
}
The first object is minim ❶, which is pretty self-explanatory; it’s been used in all of the example code in this chapter. The mic object ❷ is instantiated the same way as in Listing 11-3. Finally, you have two separate createRecorder() functions ❸, which each take a directory path and filename. This lets you record two separate audio tracks, one for each arrow key. For every audio file you want to record, you need to have a separate AudioRecorder object. Since this sketch needs to access the file you record, structure the directory path as /data/filename.wav. This will put the recorded audio file in your data folder with a specific name and location, versus just floating in your sketch folder.
Now, add an empty draw() loop after your setup() function:
void draw()
{
;//nothing here!
}
My draw() loop is empty because the real magic happens in an event function, which I’ll show you next.
Recording and Playing Samples in an Event Function
What about instantiating the AudioSample objects? They’ll be instantiated within a keyPressed() event function. When your sketch starts, there’s no audio file to load to either object, so you have to wait until something is recorded first, and then you can instantiate the object and trigger it. Create the following event function now:
void keyPressed()
{
//record and stop/save controls for the left sample
if(keyCode == LEFT)
{
❶if(left.isRecording())
{
left.endRecord();
left.save();
}
{
left.beginRecord();
}
}
//record and stop/save controls for the right sample
if(keyCode == RIGHT)
{
❷if(right.isRecording())
{
right.endRecord();
right.save();
}
else
{
right.beginRecord();
}
}
//play the right sample
❸if(keyCode == UP)
{
Pright = minim.loadSample(“right.wav”);
Pright.trigger();
}
//play the left sample
❹if(keyCode == DOWN)
{
Pleft = minim.loadSample(“left.wav”);
Pleft.trigger();
}
}
This might look like a mess of if() statements, but it’s not that different from the keyboard event functions you used in your MaKey MaKey controller in Project 9. There are just a few new functions, but don’t worry: you can tackle it.
First, create if() statements that check keyCode for the four arrow keys (UP, DOWN, LEFT, and RIGHT). Then, add functionality to each statement. I set it up so the RIGHT and LEFT keys start and stop the recording process for my two audio samples, while UP and DOWN trigger the freshly recorded audio samples.
To create the Record and Stop/Save controls, you’ll use a new concept called latching, which refers to something that’s turned on when triggered and stays on until triggered again, at which point it turns off. We’ll use the isRecording() function to check whether an AudioRecorder object is recording or not and then switch to the opposite state, as in the left and right if()/else() statement pairs at ❶ and ❷. In English, the right statement might read, “If right is recording, then end the recording and save it; else, start recording.”
Finally, instantiate the two AudioSample objects. In the UP and DOWN key if() statements, instantiate the given sample, and directly afterward, trigger that sound, like I’ve done at ❸ and ❹. Notice that the audio filenames are exactly the same as the files created by the recorders. This code will not work if the filenames are not identical.
Once you get your keyPressed() event function programmed, run your soundboard sketch. You shouldn’t see anything but a small sketch window. Press the left arrow key, and then make a funny noise into the microphone. Once you are done, press the left arrow key again. Do the same for the right arrow. Now, press your up and down arrows. You should hear the noises you just recorded!
Remember that my draw() loop is pretty simple; there’s nothing in it. I suggest you add an image and some text instructions for anyone using your simple soundboard app. If you are looking for a real challenge, think about how you could animate or change your image when each keyPressed() event is triggered.
This has been a huge chapter, and the content is really dense, yet you’ve only scratched the surface of the Minim audio library. I highly recommend exploring other possibilities that the library offers, too. Try adding a theme song to your maze game from Project 9, or record a greeting for your holiday card from Project 2. I’m sure you could find a fun way to add audio to any project in this book! To see the example code for the theme song I added to my maze game, go to https://nostarch.com/sparkfunprocessing/.
With what you have learned and built so far in this book, you also have the skills and knowledge to take on a small project on your own. My challenge to you is to build a musical synthesizer using the Minim library and your MaKey MaKey.
There are a couple of ways to tackle this project. You could use the AudioPlayer class to play a song of your choice, and then have prerecorded sounds you can trigger using keyPressed() event functions and the AudioSample class you used in “Recording and Playing Samples in an Event Function” on page 204.
An extension of this idea would be to add a recording option and build an audio looping system, where you can record sounds and then play them later as audio samples during your song. Really explore the MaKey MaKey this time—look at the back of the board for inputs beyond the basic arrow keys and mouse clicks on the front. In a way, your mission is to combine concepts from each piece of example code in this chapter to build a project that puts your MaKey MaKey to use again. If you need inspiration, check out what Komag did with a MaKey MaKey (https://www.youtube.com/watch?v=Aq-xBatZx7Q), or if you are looking for a simpler and well-documented project, check out our sound page tutorial (https://learn.sparkfun.com/tutorials/sound-page-guide/); you can see the result from the latter in Figure 11-7. Both examples are similar to this challenge and give you different options in terms of scale.
FIGURE 11-7: A wall-sized soundboard at SparkFun headquarters

If you need a piece of code for this project to get you started, take a look at this book’s resource files at http://www.nostarch.com/sparkfunprocessing/. Head to the Project 11 folder and open ExampleSoundBoard.pde to see one solution.
At this point, you can say you’re a veteran at using sound in Processing and controlling it through your keyboard. Besides the synthesizer challenge, try creating more visuals that respond to songs or sound samples. You could show album art, or even a slideshow of concert photos you took from the mosh pit. Enjoy being the hit of the party, and go make some beautiful music! When you’re done, share it with us at [email protected].