
In your sketches up to this point, you’ve made the decisions, and you’ve done the math. But computers are much faster than you are at both of those tasks. It’s time to set up variables, tackle some logic, and get the computer to do the heavy lifting rather than doing it yourself.
In Project 2, I showed you how to use some of Processing’s built-in variables (mouseX and mouseY) to figure out exactly where to put the pieces of your snowman. In this project, you’ll take variables a step further: you’re going to create your own!
Anatomy of a Variable
First, let’s crack open a variable and see what it’s made of. This variable, called x, contains the number 23.
int x = 23;
A variable has three parts, and the first is the data type. There are a whole slew of data types in Processing, but I’ll use only a handful in this book. Here are the primary data types you’ll use and a quick definition of each.
intAn integer (whole number), for example 35
floatA number with a decimal point, for example 3.5
charAn alphanumeric character, for example 'a'
StringA group of characters bound by quotation marks (""), for example "This is a string"
booleanA value of true or false, or 1 or 0
Think of data types as different types of dishes. Each dish has its own use and designated function. For example, you eat soup out of a bowl. If you tried to eat soup off a plate, you would make a mess! The same is true of data types: if you try to store a String in an int, it just won’t work. Processing doesn’t like messes, so it is really picky about data types.
The second part of a variable is its name. You could use generic letters, as in algebra, but some situations call for more descriptive names. For example, the x-coordinate of a shape might be named shapeX. A good variable name gives a clue as to what that variable is used for so that your code makes sense not just to you, but also to anyone else who might read it.
The final part of a variable is its initialization value. Initializing a variable is essentially giving it a starting value.
int x = 3; //initialized with the value 3
int x;//to be initialized later
You don’t have to initialize right away unless the variable needs a value when the sketch makes its first cycle through the draw() loop. If you are going to initialize the variable somewhere else in the code, you can give it a data type and a name at the beginning, and give it a value later.
Where to Use a Variable
You can create a variable anywhere you want in your code; however, that doesn’t mean that variable is accessible everywhere in your sketch. When you create a variable outside the setup() function or the draw() loop—say, at the top of your code window—it is called a global variable. A global variable can be used and accessed anywhere in the sketch, by any function.
If you create a variable inside a separate function, it is called a local variable, and it can be used and referenced only within that function. If you try to use that variable within a different function, Processing will throw an error telling you the variable doesn’t exist.
int G = 29; //G is a global variable
void setup()
{
int L = 300; //L is a local variable
size(100,L);
}
void draw()
{
background(G,200,0);
}
In this example, the global variable G is initialized at the very top of the sketch, outside the setup() and draw() functions. The variable L is a local variable that you can use only inside the setup() function, where it was initialized inside the setup() function itself.
MATH IN PROCESSING
There are several ways to work with variables in Processing. For example, you can perform different math functions on them. You can multiply, subtract, and so on in your head, but fortunately, you can also let Processing handle the math for you using the mathematical operators listed here.
+Addition
-Subtraction
*Multiplication
/Division
In your first dynamic sketch, you’ll use basic math to manipulate variables, but first, take a look at how logic works in Processing.
LOGIC
In programming, the basic level of logic is the if() statement. You probably even used this construct as a kid without knowing it! Have you ever played Simon Says? The rules are basically an if() statement. Players should follow Simon’s commands only if Simon says the words “Simon says” first. The if() statement works the same way, but your computer will never lose.
Inside if() Statements
if() statements begin with if(), where the parentheses contain a condition that can be true or false, such as x > 100.
if(x > 100)
{
//execute if statement inside parentheses is true
}
else
{
//execute if statement inside parentheses is false
}
If the value of x is greater than 100, Processing will implement the code between the curly brackets just below the if() statement. If the statement is false (that is, if x is less than or equal to 100), Processing will implement the else portion of this code. The else is not required; if it is not present, Processing just moves to the next line of code.
If you have previous programming experience, you may have noticed that I place my curly brackets differently than the standard convention. I give each curly bracket its own line, whether the brackets are used in an if() statement or for a draw() loop.
//standard convention for bracket placement
if(statement) {
//your awesome code here!
}
//my unconventional brackets
if(statement)
{
//your awesome code here
}
I position my brackets this way so that when I’m debugging, I can easily find each one. Both placements are correct, and you can use whichever style you’re more comfortable with. You’ll often find that there are multiple ways to structure your code, so don’t worry too much about following convention if you find a style that works for you!
My preferences for how I structure my code stem from being a teacher and wanting to check for correct structure and quickly be able to debug a student’s sketch. The style has stuck with me ever since and has become the standard way we structure code here at SparkFun.
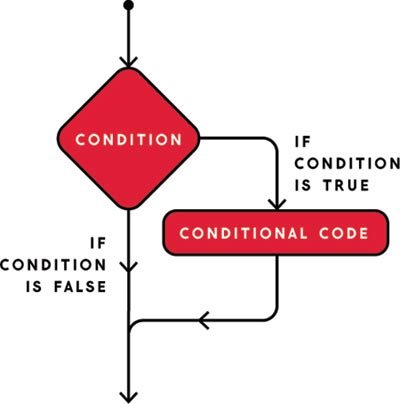
The if() statement is the basis for how your sketch starts to make decisions, but its power is all in the conditional argument that you give it. In the previous example, x > 100 was a conditional argument, and the code inside the if() statement would have run only if that condition were true, as shown by the branches in Figure 3-1.
FIGURE 3-1: Flowchart of an if() statement
A Refresher on Relational Operators
Notice the greater-than sign in x > 100. If you haven’t used relational operators such as greater than and less than in a while, here’s your chance to brush up on them and put them to good use!
In Processing, you’ll use relational operators to create conditional arguments. These allow you to test if something is greater than a value, less than a value, and so on. You can harness the power of these statements to make events happen only if a value equals a certain number or falls within a specified range of numbers.
Relational operators are at the heart of computational thinking and logic. If you take just one skill away from this book, it should be the concept of computational logic with an if() statement. As a refresher, here’s a list of relational operators and how they are stated in Processing.
a > bGreater than
a >= bGreater than or equal to
a < bLess than
a <= bLess than or equal to
a != bNot equal
a == b Equal to
Logical Operators
After a while, you’ll start to see that you may need more than one argument for a piece of logic to really work. In Simon Says, there’s usually a number of people who will never mess up if you stick with one instruction at a time. You want to be able to combine arguments to create compound logical arguments.
Compound logic uses more than one conditional argument and combines those arguments into logical operators. Processing includes three logical operators: OR, AND, and NOT.
a || b OR
a && b AND
!a NOT
The compound argument a || b resolves to true if either a or b is true; a && b is true only if both a and b are true. The last statement, !a, is true only if a is false.
To combine logical arguments, just place each argument on one side of a logical operator, as in this example.
if((x > 100) && (x < 200))
{
//true argument code
}
else
{
//false argument code
}
If the variable x is greater than 100 and less than 200, Processing should execute whatever code is in the if() statement. If the variable falls outside of those values, then Processing will execute the else statement code.
FOLLOWING THE BOUNCING BALL
With those fundamentals in mind, let’s get coding! For this project, I’ll teach you to create some basic animations using if() statements to manipulate variables. First, create two global variables: one for the starting x-position of an ellipse you’ll draw (x), and one to control how fast the ellipse moves (grow).
int x = 400;
int grow = 5;
Next, create your setup() code, and specify the size of your sketch window and background. Also add a call to a function named smooth(), which simply smooths the edges of shapes. The resulting effect looks nice, especially when a shape is moving.
My background() function paints a black backdrop to set the stage for the real magic, which happens inside the draw() loop. In Project 2, your snowman remained static, but that’s not where the true power of draw() lies. It’s time to unshackle your draw() loop to create animations.
Moving in One Direction
You added noLoop() to the end of the draw() loop in Project 2 to prevent the loop from repeating, which created a completely static sketch. But draw() really shines when you want to create a dynamic sketch.
First, add a draw() loop to your sketch, after the setup() code. Select a fill color and draw an ellipse, using the x variable for the ellipse’s x-coordinate.
void draw()
{
fill(255,0,0);
ellipse(x,400,100,100);
❶ x++;
}
I created my ellipse with a y-coordinate of 400 and a 100-pixel diameter, but you could use any values you like for the other three parameters. At the end of the loop, add 1 to x ❶.
Most of the code elements at this point should look familiar. The one part that may be new to you is the x++, which is shorthand for x = x + 1. Every time Processing reads that line of code, it increases the value of x by 1. So every frame, or every time the draw() loop is run, x increases by 1, and the ellipse should move to the right. Figure 3-2 shows my ellipse in action.
FIGURE 3-2: This bright red ellipse leaves a pretty obvious trail at the moment.
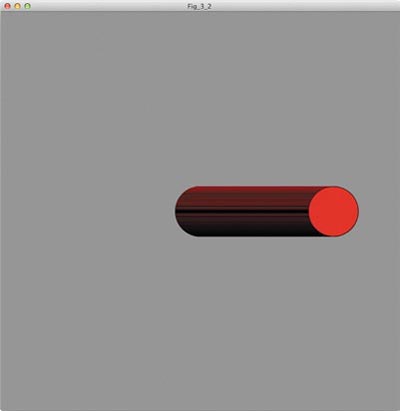
Notice the trace following my ellipse in Figure 3-2. Since you’re drawing the background in setup() rather than in draw(), every version of the ellipse that Processing adds to your sketch remains visible. To remove the trace, cut the line background(150); from your setup() function and paste it into the draw() loop. Click Run to see the outcome.
Creating Walls
The ellipse should move to the right of the sketch window, eventually moving outside your specified sketch area. But why just let the ellipse disappear? You can make it bounce off the edge of the window and change directions instead. Enter the if() statement!
void draw()
{
background(150); //drawing the background after every loop
fill(255,0,0);
ellipse(x,400,100,100);
❶ x = x + grow; //assigning x
❷ if(x >= width)
{
❸ grow = grow * -1;
}
}
Instead of just incrementing x by 1, this draw() loop now increments x by grow (with x = x + grow ❶). I’ve also added an if() statement ❷ that basically reads, “if x is greater than or equal to width, then multiply grow by –1.” The value width is built into Processing, and it always equals the width of your sketch window; in this case, it’s 800 pixels. If the statement is true, grow will become negative ❸, changing the direction in which the ellipse moves. Your ellipse should bounce off the right side of the screen. Success!
But keep watching that ellipse. Eventually, you’ll see it zoom straight out of the window on the left side. The problem is that the argument you pass the if() statement accounts only for the right side of the sketch window. The conditional statement x >= width establishes the boundary for the right side of the window but not the left side. You need to add another conditional statement to the argument using an OR logic operator, as shown in Listing 3-1.
LISTING 3-1: A bouncing ellipse
void draw()
{
background(150);
fill(255,0,0);
ellipse(x,400,100,100);
x = x + grow;
if((x >= width - 50) || (x <= 50))
{
grow = grow * -1;
}
}
The new conditional statement, x <= 50, checks the left boundary of the sketch window. Thanks to the || operator, the code inside the if() statement will execute if either of those two conditionals is true. I could have left it at x <= 0, but I changed it to x <= 50; note that I’ve also subtracted 50 from the width in the first argument. I’ve done this to compensate for the distance between the origin of the ellipse, which is the center, and the edge of the ellipse, which has a radius of 50 (100/2 = 50). If you make these modifications to your sketch, you should have a satisfying bouncing ellipse.
The if() statement is really powerful for getting your sketch to make decisions. Once you get the hang of it, you will be thinking in terms of if() in no time at all. You can use it to change colors, sizes, shapes, and, as you have done already, motion. Try tackling these options with an if() statement on your own!
For a challenge, try to create an ellipse that grows in diameter and then shrinks again in a pulsing manner. How could you increase or decrease the speed at which it grows or shrinks? Could it grow faster and shrink slower? A pulsating shape has a number of different applications in programming, so once you get it working, keep it in your coder tool belt.
TRAILS OF COLOR AND MULTIPLE VARIABLES
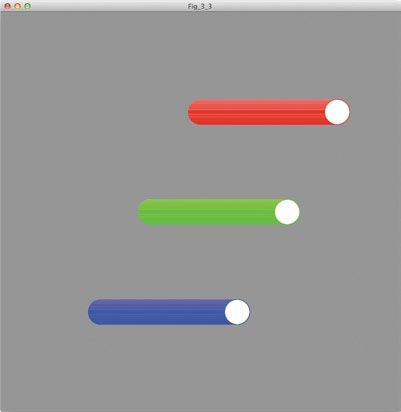
A single ellipse moving back and forth can teach you a lot, but you can extend this project to make something more colorful without too much extra work. It’s time to add more bouncing ellipses! I’ll only show you how to get them bouncing horizontally (as in Figure 3-3), but if you’re looking for a bit of a challenge, create a few more and make them bounce vertically.
FIGURE 3-3:
Final version of the multiple ellipse bounce
Reusing Code
Of course, I’m all about working smart and not hard . . . so let’s use cut and paste!
Each ellipse needs its own set of x and grow variables, so create those now. You can type these out or cut them from Listing 3-1, paste them, and make changes. The important part is that each variable needs to be different from the others. I just gave each copy a number that represented which ellipse it would be assigned to. Here is my list of variables; delete the original x and grow, and add these (or your own!) to the top of your sketch.
int x1 = 400;//x-coordinate for ellipse 1
int x2 = 300;//x-coordinate for ellipse 2
int x3 = 200;//x-coordinate for ellipse 3
int grow1 = 1; //grow variable for ellipse 1
int grow2 = 1; //grow variable for ellipse 2
int grow3 = 1; //grow variable for ellipse 3
All three x variables are assigned different numbers, but the grow variables all start at the same value. You may think that you could get away with using just one variable for grow, but that’s not the case. Since each ellipse will collide with the edge of the sketch window at a different time, each needs its own variable for direction; otherwise, one ellipse would trigger the other two to change direction early.
Manipulating Individual Shapes
Once you’ve taken care of all of the variables, your code will pretty much stay the same for your setup(); the only difference is that you’ll set the background there again. But you do have some big changes to make in your draw() loop.
void setup()
{
size(800,800);
background(150);
smooth();
}
void draw()
{
stroke(255,0,0);
ellipse(x1,200,50,50);
stroke(0,255,0);
ellipse(x2,400,50,50);
stroke(0,0,255);
ellipse(x3,600,50,50);
}
First, write three ellipse() functions to create two more ellipses than you had before. To spice up the visuals, I also changed the stroke color of each ellipse; make those anything you like. With the background placed in setup(), the ellipses will leave streaks of color across the screen. Make sure that you test your code at this point to see if you like where you’ve placed your ellipses. Move their starting positions or vertical placement around as you see fit.
When you get everything where you want it and the colors suit you, move on to the if() statements and the increment equations. Replace x = x + grow; and the original if() statement (as shown in Listing 3-1) with the following:
x1 = x1 + grow1;
x2 = x2 + grow2;
x3 = x3 + grow3;
if(x1 >= width - 25 || x1 <= 25)
{
grow1 = grow1 * -1;
}
if(x2 >= width - 25 || x2 <= 25)
{
grow2 = grow2 * -1;
}
if(x3 >= width - 25 || x3 <= 25)
{
grow3 = grow3 * -1;
}
Just as you did with the single bouncing ellipse, you need to modify the if() statement to account for the width of the ellipse. The origin of the ellipse is at the center, so you have to use the radius value to find the edge of the ellipse. Here, the radius is 25 for all of the ellipses. As you can see, I have already added the math to the bounding if() statements for each ellipse. If you use a differentsized ellipse, just swap out the 25 for whatever your radius is.
Each ellipse needs not only its own equation but also its own if() statement so that you can control where your ellipses go and how fast they get there. I have each shape at a different starting point, which means they hit the edge of the window at different heights and different times.
If you think you might want to change each shape individually, then build that into your sketch from the beginning. For example, you could change the speed of an individual ellipse by making a single value change at this point. If you had one equation to control all of the motion, you’d have to rewrite or add a bunch of code later.
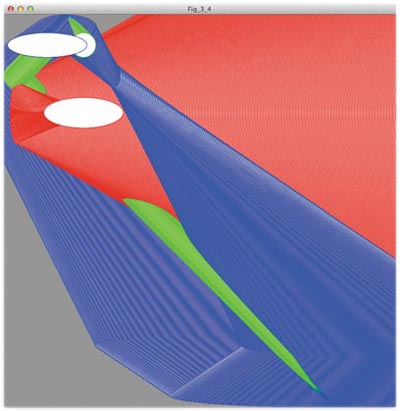
Once you get your code in place, run it, and as you watch those colored circles bounce, think about how you can remix the code. What change would you make to control the speed of each ellipse? What about its direction of travel? What if you use the x variables as more than one parameter, as I did to create Figure 3-4?
FIGURE 3-4: Which parameters would you replace with x variables to create an image like this?
TAKING IT FURTHER
You’ve successfully created shapes that bounce in a single direction—along the x-axis. How might you go about getting a shape to bounce along the y-axis? Once you figure out how to get a shape bouncing in both directions, try making multiple shapes that bounce in different directions! How could you get them moving diagonally?