
In Project 5, you stamped shapes based on your mouse’s position, and in Project 7, you created a simple program to display typed text. Both projects relied on user input, and for the next few chapters, we’ll explore more input options, organized by the types of peripherals you can use with your computer and their level of difficulty.
In this project, I’ll introduce you to two more mouse input variables, after which we’ll cover event functions. Event functions will launch you to the next level in Processing, as they allow you to create much more robust functionality while reducing the amount of code you have to write. Finally, you’ll learn to harness mouse clicks to create two simple drawing programs that work a lot more efficiently than what you’ve created in previous chapters.
MORE MOUSE VARIABLES
You’ve already used a few of Processing’s built-in system variables, but there are others that can make your sketches respond to physical inputs, including mousePressed and mouseButton.
The mousePressed variable is similar to the keyPressed variable from Project 7: it returns True if either mouse button was pressed and False if neither button was pressed. The mouseButton variable tells you which button (LEFT or RIGHT) was pressed.
These variables are handy when you only need to detect button presses, but as you’re about to learn, event functions offer even more input-based functionality.
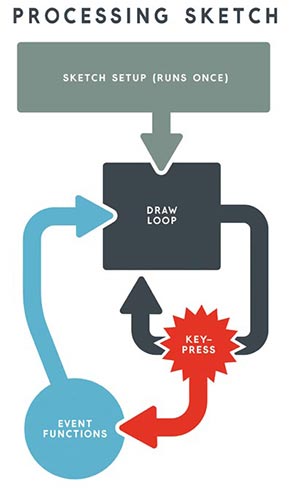
An event function executes only when a certain event happens. You implement your event function outside the basic draw() loop in your sketch, and when it is triggered by the event (i.e., the user input), it will run in parallel with the draw() loop until the event is no longer active. Then the sketch should return to solely running the draw() loop. Figure 8-1 illustrates this process.
Event functions allow your sketch to listen for user input while executing a draw() loop. They reduce the number of if() statements you need, and they’re much more responsive because they’re always listening for an input. By contrast, if() statements are run only once per draw() loop, and they must wait for the draw() loop to repeat to check again for the input.
Your mouse has several event functions associated with it, including the following:
mouseClicked()The event triggers when the mouse button is clicked.
mouseDragged()The event triggers when the mouse moves while a button is held down.
FIGURE 8-1: Flow of an event function
mouseMoved()The event triggers when the mouse moves.
mousePressed()The event triggers when the mouse button is pressed.
mouseReleased()The event triggers when the mouse button is released.
When you want to use an event function, just create another function of the void type underneath your draw() function. A complete Processing program with an event function would follow this structure:
void setup()
{
//your usual setup code goes here
}
{
background(255); //the background is white
}
void mouseClicked()
{
background(0); //the background turns black!
}
NOTE
If you place an event function within the draw() loop, you’ll just get an error.
In this example, I used only the mouseClicked() function, but you can add multiple event functions, as I’ll show next.
In this section, we’ll explore the mouseDragged() and mousePressed() event functions to write a program that lets you create rainbow-colored drawings.
Implementing mouseDragged()
First, add the usual setup() and draw() sections, and then implement the mouseDragged() event function outside of your draw() loop as follows:
void setup()
{
size(850,1100);
background(255);
}
void draw()
{
//no code needed here!
}
void mouseDragged()
{
strokeWeight(50);
stroke(random(255),random(255),random(255));
line(pmouseX,pmouseY,mouseX,mouseY);
}
Inside mouseDragged(), set a stroke weight, apply a random() stroke color, and call the line() function to draw your line. Pass line() the previous and current mouse coordinates—(pmouseX,pmouseY) and (mouseX,mouseY), respectively—as its start and end points. You should have no code inside of your draw() loop, because your line should be drawn only when you click and drag your mouse.
You might be wondering, if there’s no code in the draw() loop, then why include the loop at all? The reason is that if you have no draw() loop, your sketch will just run your setup() function and then stop. Your sketch needs to be actively running for event functions to work. An empty draw() loop lets your sketch actively wait for something to happen.
NOTE
Some programmers like to leave a single semicolon in an empty draw() loop to show that the loop is meant to be blank.
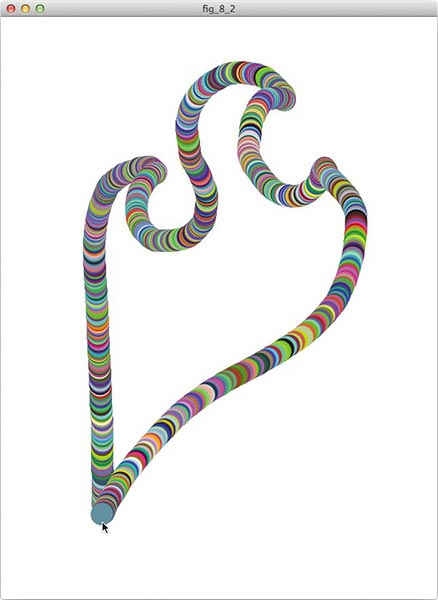
Click the Run button to run your code. You should be able to click and drag when you want to draw, and release the mouse button to pick up your pen. Now, move the mouse to a different spot, press the button to put your pen down, and draw again. For my first drawing, I made a horrible version of the SparkFun flame logo (Figure 8-2).
FIGURE 8-2: A rainbow-colored drawing in Processing
The only problem is that you have to start your sketch over to erase anything. Let’s add another event function to fix that!
We’ll use the mousePressed() event function, paired with your right mouse button, to redraw the background and clear your drawing. Add the new function after mouseDragged().
void mouseDragged()
{
if(mouseButton == LEFT)
{
strokeWeight(50);
stroke(random(255),random(255),random(255));
line(pmouseX,pmouseY,mouseX,mouseY);
}
}
void mousePressed()
{
if(mouseButton == RIGHT)
{
background(255);
}
}
The mousePressed() event function has an if() statement that checks which mouse button you’re pressing, left or right. It redraws the background only when the right mouse button is pressed. Run your code again, and any time you want to start over, just click the right mouse button!
Save your project now, because you’ll enhance it in the next section.
Now that we’ve explored mouse event functions, let’s make our drawing application a little more useful and creative. We’ll tweak the draw() loop to let you change the color of your pen on the fly from the keyboard.
To add this functionality, start with the code you had at the end of “Rainbow Doodles” on page 138. First, add three integer variables as global variables, named r, g, and b, at the top of your sketch:
int r = 10;
int g = 10;
int b = 10;
Each new integer represents one piece of an RGB color: r is red, g is green, and b is blue. I gave them all an arbitrary starting value of 10.
After creating these new variables, we’ll modify the draw() loop to create a feedback box that shows our current pen color and its RGB value.
Creating a Color-Changing Feedback Box
Inside the draw() loop, create a small feedback box that displays the current pen color and its RGB setting as follows:
void draw()
{
fill(r,g,b);
noStroke();
❶ rect(0,0,100,12);
fill(255);
❷ text((r + "," + g + "," + b),10,10);
}
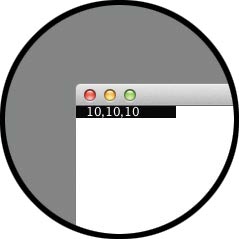
Set a fill color using the variables r, g, and b, and draw a rectangle ❶ in the upper-left corner of the sketch. This rectangle’s color will change when you press the R, G, and B keys. To display the current RGB setting, pick another fill color and call the text() function ❷; this prints the RGB values as a concatenated string inside the new rectangle. You can see the finished product of this nifty feedback tool in Figure 8-3.
FIGURE 8-3: The RGB color setting for your pen. Use the R, G, and B keys to change the color.
The rectangle and text will display the hardcoded color values, but how do you change the color on the fly? We’ll put if() statements to good use to increment the color variables r, g, and b. Add the following code to your draw() loop:
if(key == 'r')
{
r++;
if(r > 255)
{
r = 0;
}
}
else if(key == 'g')
{
g++;
key = ' ';
if(g > 255)
{
g = 0;
}
}
else if(key == 'b')
{
b++;
key = ' ';
if(b > 255)
{
b = 0;
}
}
These if() and else if() statements check which key is being pressed. If it’s one of the color keys (R, G, or B), then we increment the corresponding color variable. If any of the values becomes greater than 255, then it is reset to 0, because Processing has no RGB values greater than 255.
Notice, too, that once you increment r, g, or b, key is set to ' ' (the space character). This funky assignment is a quick hack, and without it in the if() statement, the color variable you just changed would continue to increment until you pressed another key. By setting key to ' ' (or really, anything but 'r', 'g', or 'b'), you stop the incrementing process and gain more control over the color.
Run your sketch to make sure that you can change the color of the rectangle. You may notice that your pen color doesn’t change yet; we’ll add that functionality next.
To change the color of your pen, find the stroke() function in the mouseDragged() event function and modify it to use your new color variables:
void mouseDragged()
{
if(mouseButton == LEFT)
{
strokeWeight(50);
❶ stroke(r,g,b);
line(pmouseX,pmouseY,mouseX,mouseY);
}
}
Set a stroke weight you like, and replace the three random() arguments to stroke() with r, g, and b ❶. Since these three variables are global, you can use them in any function, anywhere in your sketch.
Now when you run your sketch, you should be able to change the color of your pen using the R, G, and B keys, and make the most beautiful drawing ever. Figure 8-4 is a drawing of my friend Brian.
FIGURE 8-4: A lovely picture of Brian, created with the paint tool from this project by our senior designer Pete Holm

Think about other drawing programs you’ve used, and reproduce some of their tools in your sketch. For example, you could use event functions to change the background color, add an eraser to one of your drawing programs, or even change the stroke weight.
To get you started, I’ve provided some skeleton code to add a way to change the pen size in your project. Processing actually has another mouse event function, called mouseWheel(). I left it out of the discussion in “Event Functions” on page 136 because not every mouse has a scroll wheel, but if your mouse does, you could use mouseWheel() to change your pen size.
First, create a global variable called penSize at the top of the sketch you finished in “A Simple Painting Program” on page 140 and initialize penSize to 2, a good standard line thickness. Next, below your existing event functions, create the mouseWheel() event function:
void mouseWheel(MouseEvent event)
{
penSize = penSize + event.getCount();
println(penSize);
}
This code simultaneously creates and passes the mouseWheel() function a MouseEvent object called event. You can then set your penSize to event.getCount(), which returns the number of mouse wheel clicks. Scrolling away from yourself increases the value, and scrolling toward yourself decreases the value.
Even once you add this new variable and event function to the drawing program, it won’t quite work. How will you make penSize become the stroke weight of your pen? Watch penSize change in the console; how can you limit penSize to only positive numbers to prevent your sketch from crashing?
I leave both of these questions as exercises for you to answer. Have fun, and please share your beautiful drawings with SparkFun at [email protected]!