
You’ve created a number of wonderful things from shapes and lines, and even moved shapes around using an if() statement. Now I’ll cover how to combine the concepts you’ve learned to create images and transform all the pieces of your sketch at once, rather than transforming individual shapes.
When you create individual shapes with Processing, you’re actually placing them on a matrix. In simple Processing projects, you can think of a matrix as a way to group a lot of shapes and treat them as a single object. It’s a bit like drawing on a piece of paper: if you wanted to move the picture, you could erase it and redraw it—or you could simply move the whole piece of paper.
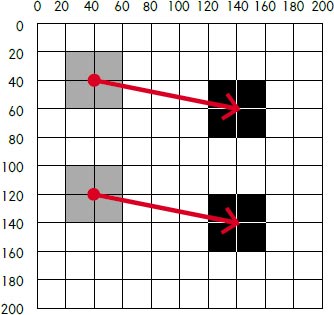
Without a matrix, you’d have to move every single shape, one at a time, whenever you wanted to move your picture, as shown in Figure 5-1.
FIGURE 5-1: Moving individual shapes
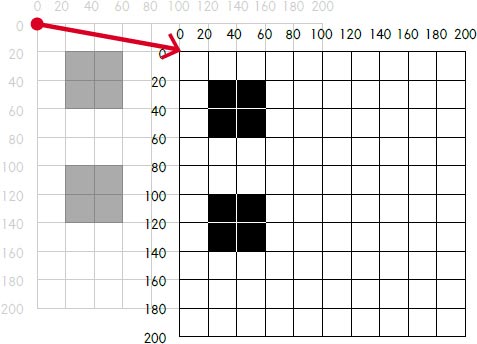
But if you use a matrix, you can just move the whole picture all at once instead, as Figure 5-2 shows.
FIGURE 5-2: Moving shapes by translating a matrix
To be clear, this definition of a matrix is not mathematically correct. Matrices are actually much more complicated, but this simplified definition corresponds to the one you’ll find on the Processing website, and it should give you just enough information to build some cool projects. If you’re eager to dig in to the math behind matrices, then read more about them at Wolfram MathWorld (http://mathworld.wolfram.com/) or Khan Academy (https://www.khanacademy.org/).
For now, think back to your snowman from Project 2. If you wanted it to bounce back and forth, writing all of the if() statements needed to get each shape (let alone the lines) bouncing correctly would drive you crazy! With a matrix, you can capture the whole snowman and treat it as one single shape, and then move it with a single if() statement.
You’ll use two functions to define a matrix. The first function, pushMatrix(), defines the start of a matrix. Any shapes or lines that you want to group together go in between pushMatrix() and the terminating function, which is called popMatrix().
void setup()
{
size(250,250);
}
void draw()
{
pushMatrix();
fill(255,0,0);
ellipse(0,0,25,25);
ellipse(0,25,25,25);
ellipse(0,50,25,25);
popMatrix();
}
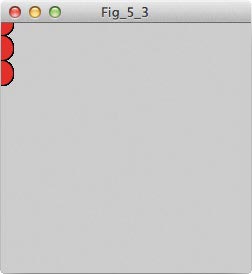
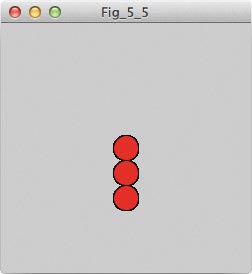
In this program, I created a single matrix, set the fill to bright red, drew three ellipses stacked on top of each other, and popped the matrix when I finished. You can see the resulting sketch in Figure 5-3.
These ellipses are partially hidden at the moment, which is okay; they’re supposed to be. Note that the top ellipse is centered on the origin of the sketch, (0,0). Now, you can move the entire matrix that holds the ellipses when you want to change their position.
FIGURE 5-3: These ellipses may look normal, but they’re really in the matrix!
THINKING WITH MATRICES
To create sketches with matrices, you’ll have to change how you approach the drawing process. The origin of a matrix is the same as the origin of your sketch, which affects how and where you should draw a shape with a matrix.
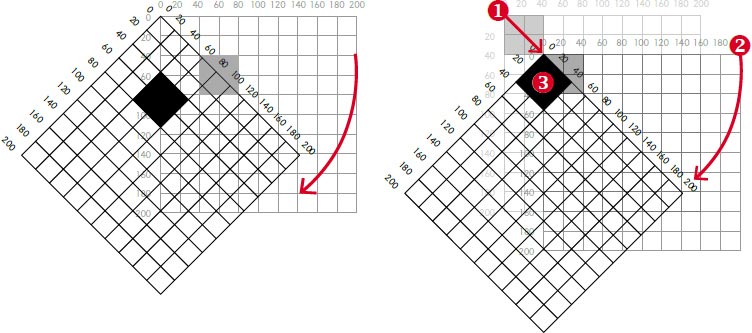
For example, if you just draw a rectangle in a matrix and then rotate the matrix as shown on the left in Figure 5-4, the rectangle will rotate in a wide arc around the origin of the sketch because the rotate() function rotates around the origin. If you want that rectangle to spin around its own origin, as shown on the right in Figure 5-4, you’ll need to make the rectangle and matrix origins the same ❶ and then rotate the matrix ❷. Your rectangle’s final position is shown at ❸.
FIGURE 5-4: Shape transformations work differently when you use a matrix!
This principle applies to all of the transformations you’ve seen so far, so let’s explore how that works.
If you apply the translate() function to a matrix, it’ll move the entire matrix, which is exactly what you need to do to give the matrix and a particular shape the same origin. For example, Listing 5-1 uses translate() on the matrix you created to move all of the ellipses to the center of the sketch.
LISTING 5-1: Translating a matrix to move ellipses to the center of the sketch
pushMatrix();
❶ translate(width/2,height/2);
fill(255,0,0);
ellipse(0,0,25,25);
ellipse(0,25,25,25);
ellipse(0,50,25,25);
popMatrix();
The values width and height are both system variables, and they contain the respective dimensions of your sketch window. Add the translate() function to the matrix inside your draw() loop ❶, and pass it half the height and width of the sketch to move the matrix to the center of the screen. Figure 5-5 shows the result.
FIGURE 5-5: Now the program draws the first ellipse at the center of the sketch and continues from there.
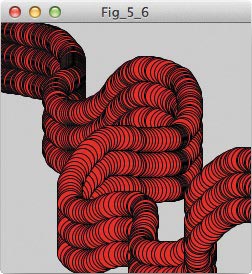
The power of the matrix is much clearer with one small change to your translate() function. Instead of using width/2 and height/2 for the coordinates, change them to mouseX and mouseY.
translate(mouseX,mouseY);
Click Run, move your mouse around, and watch the entire group of ellipses follow your mouse! Check out Figure 5-6 for the result.
That’s the simplistic power of a matrix, and you can add other transformational functions to this entire group of ellipses, too.
FIGURE 5-6: Drawing with a matrix of three stacked ellipses
Rotation Revisited
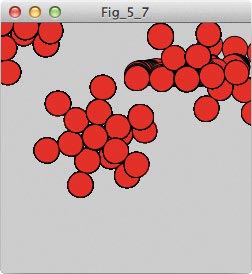
If you add rotate() to your matrix and pass it the value of second(), all of the ellipses will rotate around the mouse cursor. For example, wrap your matrix in an if() statement as follows:
if(mouseX == pmouseX || mouseY == pmouseY)
{
pushMatrix(); //create matrix
translate(mouseX,mouseY); //follow mouse
rotate(second()); //rotate over time
fill(255,0,0); //fill red
ellipse(0,0,25,25);
ellipse(0,25,25,25);
ellipse(0,50,25,25);
popMatrix(); //end matrix
}
The if() statement looks for when you stop moving your mouse, and then it rotates and draws the group of ellipses over time, forming the flower pattern shown in Figure 5-7. If you move your mouse continuously, nothing happens, but if you keep it still, the drawing starts again.
FIGURE 5-7: When Processing draws these three ellipses repeatedly in a circle, it creates a flower pattern.
NOTE
Try changing your logic operators within the if() statement. Instead of ==, try >= or <=. How could you tell Processing to draw the flower only when your mouse is on the right side of the sketch window?
If you haven’t clicked Run yet, please do! The group of ellipses will still follow your cursor, but now they should rotate around it, too.
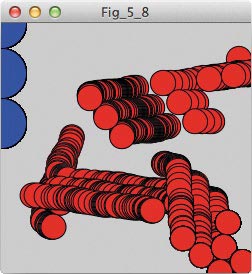
You can further see the usefulness of a matrix when you add something outside of the matrix. Copy the ellipse code from inside your matrix and paste it after popMatrix() as follows:
pushMatrix();
translate(mouseX,mouseY);
rotate(second());
fill(255,0,0);
ellipse(0,0,25,25);
ellipse(0,25,25,25);
ellipse(0,50,25,25);
popMatrix();
❶ fill(0,0,255);
ellipse(0,0,50,50);
ellipse(0,50,50,50);
ellipse(0,100,50,50);
To make the ellipse groups distinct, change the fill color for the set you pasted outside the matrix to blue ❶. Click Run, and you’ll see that the blue ellipses stay put and the red ones still follow your mouse, as Figure 5-8 shows.
FIGURE 5-8: The blue ellipse matrix stays in place, but the red matrix moves with the mouse.
Scaling Revisited
If you create a second matrix around the blue group, you can transform those ellipses separately from your original matrix. Add a matrix around the blue ellipse group, translate it to the center of the window just like you did in Listing 5-1, and then try out the scale() function.
translate(width/2,height/2);
scale(second()/3);
fill(0,0,255);
ellipse(0,0,25,25);
ellipse(0,25,25,25);
ellipse(0,50,25,25);
popMatrix();
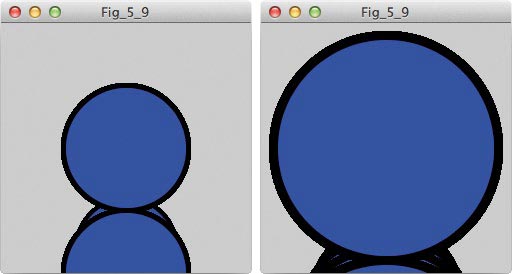
Recall from Project 4 that you can pass a percentage in decimal form to the scale() function. I passed in the second() value divided by 3, which will result in scales between 0 and 2; that is, either the ellipse group will be normal sized, or it will be blown up to 200 percent of its usual size, as shown in Figure 5-9.
FIGURE 5-9: The blue ellipse group at left is normal sized, while the one at right is twice as big.
You should now have two different groups of ellipses: one that changes size over time, and one that rotates over time and follows your mouse. As you practice using matrices, you’ll be able to make great use of them in future sketches. They’re handy for organizing your code as well: I tend to group characters or groups of shapes together and manipulate them as a matrix. Now let’s tackle some more complex sketches!
HACKING YOUR PREVIOUS PROJECTS
In Project 3, you learned how to bounce a shape back and forth or up and down. The goal of this project is to animate your sketch from Project 2 by using if() statements and a matrix to keep your holiday image intact. Then you can add more elements to your image and animate them as well. For example, you could add snowflakes that fall as your snowman slides back and forth.
Here’s one way to combine the concepts from Projects 2 and 3 using the matrix concepts from this project. My code draws a snowman similar to the one from Project 2 (it’s not identical, but it should give you an idea of what yours should look like).
int x = -300; //necessary integers from Project 3
int grow = 5; //variable to increment by
void setup()
{
size(900,900); //900x900 window
}
void draw()
{
background(0,255,0); //green background; it’s spring!
pushMatrix(); //beginning of matrix
❶ translate(x,0);
noStroke(); //hack your “holiday image” snowman into
//the matrix!
fill(255); //white fill
ellipse(400,350,125,125);
ellipse(400,500,200,200);
ellipse(400,700,300,300);
fill(255,141,0);
triangle(340,345,300,350,347,354);
fill(0);
ellipse(350,325,10,10);
ellipse(375,325,10,10);
ellipse(400,500,20,20);
ellipse(400,550,20,20);
ellipse(400,600,20,20);
stroke(121,85,17);
strokeWeight(10);
line(300,500,200,400);
line(500,500,300,600);
line(223,423,228,398);
line(336,585,337,605);
x = x + grow;//x-coordinate code from Project 3
if(x >= width || x <= -300)//keep x between 0 and width
{
grow = grow * -1;
}
popMatrix();//end of matrix
}
The holiday image in Project 2 was a basic snowman. Just wrap your original code inside a matrix: place a pushMatrix() on the line before the snowman code starts, and place a popMatrix() at the end. This will retain your snowman but allow you to manipulate it. Since the snowman is inside a matrix, it should move left and right across the sketch window as a single shape when you apply the translate() function ❶, using the x value from Project 3.
TAKING IT FURTHER
Matrices are key when you want a specific group of shapes to do something without manipulating other parts of your picture. Start a new image (or open any other project you’ve made so far) and put a matrix or two to good use!
An interesting mashup of projects would be to combine your pixel art project with your time-based art to make a Space Invaders–themed abstract clock. You could draw each shape of the abstract clock as an alien and then translate each one in a matrix at certain time intervals. Now that’s a clock I would want! Here’s some skeleton code for you to fill in when you take on this challenge.
void draw()
{
pushMatrix();
translate();
//write the code for your first space invader drawing here
popMatrix();
pushMatrix();
translate();
//write the code for your other space invader drawing here
popMatrix();
}
As you move forward in this book, always be looking for opportunities to use a matrix to simplify your code and its functionality. When it makes sense, I will use a matrix by default, as it tends to reduce the total amount of code I need to get something working.