In Chapter 3, you learned about scale as you created a small-scale train station for a small-scale LEGO town. In this chapter, we’ll do the opposite: build a model that’s larger than life.
One way to illustrate this technique is to use LEGO bricks to make jumbo bricks that look just like the regular LEGO bricks but are many times larger, as you can see in Figure 5-1.
To build a jumbo brick we scale up by multiplying the dimensions of the real-life object by a scale factor (as discussed in Chapter 3). For example, in Chapter 3 we said that minifig scale should be around 1:48. That is, models or vehicles in a minifig world are 48 times smaller than the same object in the real world. In this chapter, you’ll explore macroscale, where models might be 10 times larger than real life, like the macroscale brick in Figure 5-1. This macroscale brick is built to a scale of 10:1 or ten times scale or 10X.

Figure 5-1. This jumbo model of a 1×1 brick dwarfs the real 1×1 that served as inspiration. It is ten times larger and stands nearly 4.5 inches tall.
When building to macroscale we multiply each dimension (width, depth, and height) by the scale factor. So in Figure 5-1, the 1×1 brick is 10 studs wide by 10 studs deep by 10 bricks (or courses) high.
Figure 5-2 shows a 1×1 brick scaled up to a factor of 4 (4:1 scale) to make it a little easier to see the relationship between the two numbers that make up the scale. As you can see, it would take four of the 1×1 bricks shown on the left to equal the height of the macro model on the right.

There isn’t much to building a 4X jumbo 1×1 brick like the one on the right of Figure 5-3. In Step 1, build two courses of bricks. Next, in Step 2, add a third layer of 1×2s and 1×4s and then cap the model off with two 2×4 bricks. (To make jumbo bricks look even more like giant LEGO bricks, build them using the same color, like all red or all yellow.) In Step 3, a 2×2 cylinder finishes our model. Sure, we could have covered the studs with tiles, but then we’d have to use more pieces—and by leaving exposed studs on the top of each jumbo brick, we can build with them just like we would with real bricks.

Now you’re ready to build a jumbo brick. We’ll build a 2×4 brick to 4X scale by multiplying each of the brick’s original dimensions by a factor of 4, as shown in Table 5-1.
Table 5-1. Dimensions for Building a 2×4 Brick to 4X Scale
Real Brick | Jumbo Brick Model | |
|---|---|---|
Width | 2 studs | 8 studs |
Length | 4 studs | 16 studs |
Height | 1 brick | 4 bricks |
This tells us that our model will be 8 studs wide, 16 studs long, and 4 bricks high.
To begin building, lay a foundation layer of 8×16 studs, as shown in the first step of Figure 5-4. (I’m using 1×8 and 1×6 bricks, but you can use whatever pieces you have as long as the result is the same.) Next, build a course on top of the foundation, as shown in Step 2. (Don’t forget to overlap as much as possible!) Then build a third layer, as shown in Step 3.
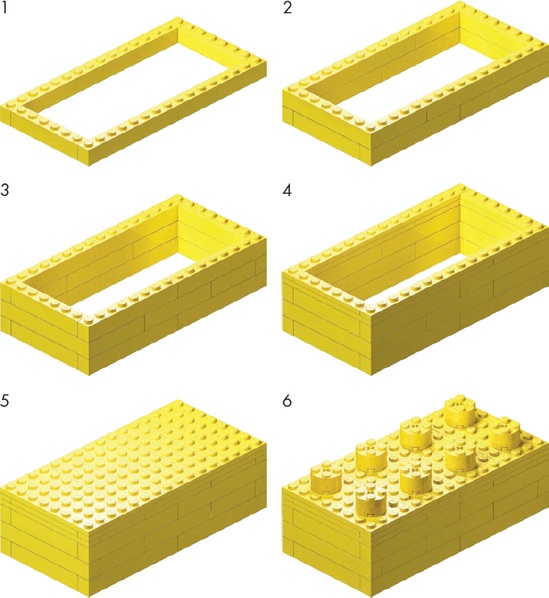
For the fourth and final layer, we cover the top of the jumbo brick completely. You can do this either by using two layers of 1×N plates around the top of the model (Step 4) and then topping things off with some 2×8 and 4×8 plates (as I’ve done in Step 5), or by using just 2×8 bricks and no plates.
Finally, you need eight studs on top of this jumbo brick. But where?
Look at an actual 2×4 brick. Notice that the studs are evenly spaced and that they are closer to the edge of the brick than to each other. In fact, as you can see in Figure 5-5, the distance from the edge of a stud to the edge of the brick (A) is only about half the distance between studs (B).
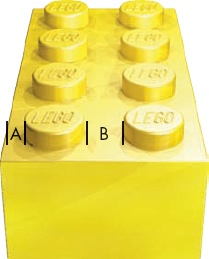
Figure 5-5. By studying actual elements, you can learn how to make your jumbo models more realistic.
With the dimensions of the studs on a real brick in mind, look at the top of the finished jumbo brick. To make this look more like a real brick, the 2×2 cylinders that we’ve used for the studs should be one stud away from the edge of the brick and two studs away from the nearest 2×2 cylinder, as shown in the last step of Figure 5-4. In other words, the cylinders, representing the studs, should be twice as far from each other as from the edge of the brick, just like the real studs on the actual 2×4 brick.
Our finished jumbo version of the 2×4 brick isn’t a perfect copy by any means, but it has the right look and feel, and that’s what you’re aiming for with macroscale.
When we scaled up a 2×4 brick by a factor of 4, we used 1×N bricks for its side walls, just like we did with the 1×1 brick in Figure 5-3. Why? Even though the scaled-up 2×4 is bigger than the 1×1, the thickness of the sides of the pieces is the same on each in real life (about 1/16 of an inch), as you can see in Figure 5-6.
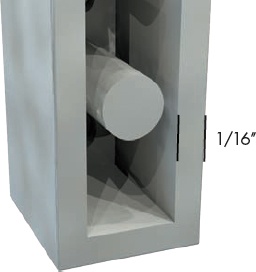
Multiplying 1/16 of an inch by a factor of 4 gives us 4/16, or 1/4 inch. Because real 1×N bricks are just about 1/4 inch wide, they’re just the thing to make the outer wall of a jumbo brick built to 4X scale.
For the 10X example in Figure 5-1, we used 2×N bricks for the walls, but 2×N bricks would look really clunky in the 4X version. Figure 5-7 shows 1×4 and 1×2 bricks used in the jumbo brick on the left; the brick on the right uses 2×N bricks and, as you can see, the walls are much too thick. In fact, there’s no opening at all for a stud, so this is obviously a bad choice!
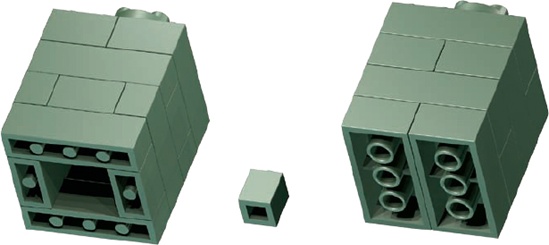
Figure 5-7. One of these things is not like the others, and it might not be the one you think! The version on the right was built with the wrong bricks. It lacks the open core of the jumbo version (left) and the real 1×1 (center).
As you build, you’ll constantly be faced with these sorts of decisions. Sometimes it makes sense to do a test build to see if a particular solution will work. By tinkering and experimenting during a test build, you can save yourself a lot of frustration later on.
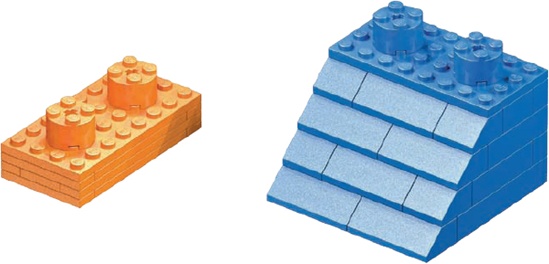
You might be wondering, “Are there parts besides standard bricks that make good jumbos?” The answer is “yes.” You can scale up many other LEGO elements. Standard slopes and plates are relatively easy since their geometry is simple, as you can see in Figure 5-8.
Here’s how to make your own plates or slopes as jumbo models.
If you’re looking for a small but interesting element to get started with jumbo building, try a 1×2 plate. Then, once you’ve finished building the large-scale version, hold it in one hand while you hold a real 1×2 plate in the other. The sense of scale becomes obvious when you realize that a tiny piece that you can normally pinch between two fingers is now big enough to nearly cover your palm!
Figure 5-9 shows you how to build a plate in 4X scale.
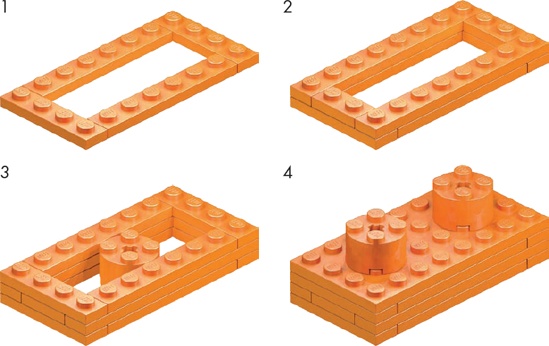
The studs on the final jumbo plate model may seem large, but they’re built from a fairly common 2×2 cylinder. (If you have 2×2 cylinder plates, you can substitute two of them for each of the 2×2 cylinders to make the size appear more accurate.)
When choosing which elements to scale up, keep in mind that you may need large quantities of certain pieces. For example, the 2×2 45-degree slope uses several 45-degree slopes to create the angled side of the jumbo brick, as you can see in the building steps that follow (Figure 5-10). This model requires four 2×2 slopes and six 2×4 slopes. And, as you can imagine, building the same element to a larger scale (10X or 12X) requires many more actual 45-degree elements.
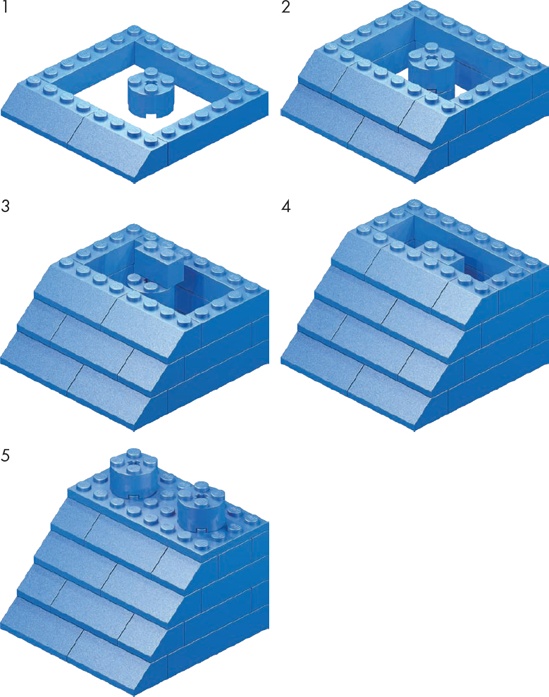
Notice in this example how easy it is to use a 2×2 cylinder to represent the tubes in a brick. The tube isn’t hollow, as in a real brick, but the size is perfect.
You’ll find that the jumbo 1×2 plate and the 2×2 slope shown in the preceding pages can connect in almost the same way as their regularly sized versions. The only real difference is the way in which they grip in order to stick together. Normal-sized bricks use the friction between the studs on top and the tubes inside other pieces to lock together, but jumbo elements lock together differently.
Remember when I mentioned earlier that you were leaving the small-sized studs exposed on the top of each of your jumbo elements? That was because it’s the normal-sized exposed studs that work to hold the jumbo bricks together, not the studs you built (the scaled-up versions).
This is not unlike the idea of submodels that I talked about in Chapter 3. In the case of building an entire LEGO model out of jumbo elements, you could consider each of the jumbos to be a submodel, so the building process is twofold. First, re-create each individual piece in a jumbo size. Then assemble the set exactly as you would the normal-sized version.
When you put them all together, you end up building a complete LEGO model to jumbo scale, such as the one shown in Figure 5-11. The little plane in the lower right is made from regular LEGO pieces. The larger model is made of jumbo-sized elements (in this case 4X versions) that match each of the pieces in the little version.

As you work through your LEGO projects, you’ll often question the usefulness of a particular part in a certain situation. You’ll have to choose between various techniques and decide on scale for building. But no matter what you build, keep this one principle in mind:
Make things only as complicated as they need to be and no more.
For example, when we used the 2×2 cylinder to represent the stud on a 4X model (Figure 5-3), we chose to use the minimum number of pieces required to complete the task and no more.
In theory, you can build a jumbo brick to just about any scale you like. In practice, some scales work better than others.
The smallest scale that works well is 4X, which is why I’ve used it several times in this chapter. In fact, most even-numbered scales work well because it’s much easier to center the studs on the tops of elements built to even-numbered scales. It’s more complicated to put studs on top of a brick that has odd lengths for sides.
Scales such as 4X, 6X, 10X, and 12X (shown in Figure 5-12) all offer easy solutions for making jumbo LEGO elements. The math is easy to figure out: For example, at 10X, the jumbo model of a standard brick is ten real bricks high. A jumbo plate, regardless of which scale you choose, will always be one-third the height of a jumbo brick at the same scale. Therefore, a 10X scale plate is three real bricks and one real plate high. Similarly, at 12X, the jumbo model of a standard brick is 12 real bricks high, and a 12X scale plate is four real bricks high.

The other tricky thing about building jumbo-sized studs has to do with finishing off your jumbo-sized elements. You’ll need to figure out how to make studs for different scales, since the same solution won’t work across the board. For example, at 4X scale you can easily use 2×2 cylinders as studs. But at 6X scale, the 4×4 cylinder is the right shape but not quite tall enough.
For 10X and 12X scales, you will almost certainly find yourself creating studs out of square bricks rather than cylindrical ones. How? By approximating, which you’ll learn about next.
When building, you’ll often find that in order to make your models as realistic as possible, you need to approximate certain features to get the look of the original. Sometimes just coming close is enough.
Take jumbo bricks. It’s hard to build the studs on each element.
I’ll use a 10X-scale stud to demonstrate. But first, turn to Appendix B and follow the directions for printing out a model design grid. Print Design Grid #1, and you’ll see that it looks like traditional graph paper. The design grids can be used to create a preliminary sketch of an entire model, or in this case, of part of a model. They’re an optional tool, but one that you may find useful at times, especially if you’re thinking about buying some extra bricks for a model. Sketching out a design first can let you know if you’re ordering the right parts and enough of each.
On your design grid, draw a square to represent the top of a brick, and then draw a circle with the correct diameter to represent the stud. Imagine you’re looking down at the top of a 10X jumbo 1×1 brick, like the one shown in Figure 5-1.
Now start shading in squares until you almost fill the circle without really going outside of it. Your drawing should look like Figure 5-13, with the shaded squares not quite filling the circle. This exercise tells us that this example of a jumbo stud will be just a bit smaller than if you could make it perfectly cylindrical.
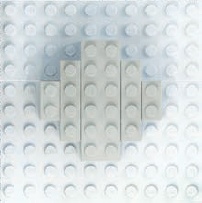
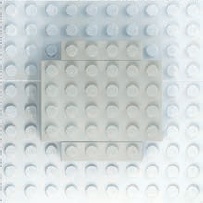
Now shade in additional squares until your drawing looks like Figure 5-14. This version of the stud is slightly larger than if you could make it exactly cylindrical. Of course, neither technique produces a perfect jumbo copy of the original; we’re approximating.
Figure 5-15 and Figure 5-16 show how the two different studs look when we actually build them. As you can see, both techniques will work, so just choose one. Approximation is more about what you feel looks best for your particular model than what is technically correct.
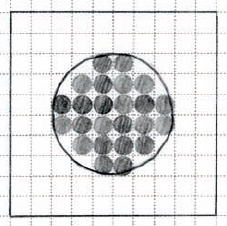
Figure 5-13. The small shaded circles inside the larger circle represent the tops of bricks that we’ll use to re-create the jumbo stud.

Figure 5-14. In the second example, more real bricks are added. This makes the jumbo stud appear larger than in Figure 5-13. You can use either version.
You’ve built a few jumbo bricks, and you understand the concept of macro building. When it comes to building using the jumbo technique, only one rule really applies and it has to do with choosing the subject of your macro models:
Start small and don’t build too big.
First, try re-creating other elements you have in your collection. For example, you might build a 1×1 headlight brick or see if you can build the texture on the face of a 1×2 grille brick. (See Appendix A for illustrations of these and many other pieces.) Pick pieces that you find interesting and that you know you’ll enjoy seeing in large scale. And remember to try smaller elements first. Don’t try building a 1×16 Technic brick right away; try a 1×1 first to see if you can figure out how to make the hole appear round.
Regardless of the scale or subject matter you choose, you’ll find that jumbo bricks are eye-catching and fun to build.