For millions of people around the world LEGO bricks have a common meaning: creativity. Regardless of age, we all recognize the sound those bricks make as we rummage through a bucket full of them or a pile on the floor.
Whenever you look at a pile of LEGO pieces, you’re looking at something remarkable and yet at the same time remarkably simple. You’re looking at the different parts of a system. The LEGO system is a collection of bits and pieces, and they connect with each other to become a larger object or series of objects.
In this chapter, you’ll learn about the LEGO system and what makes it so amazing. I’ll show you a number of the pieces that make up the system and how they relate to each other, and I’ll look at how geometry and color come into play as you’re building with LEGO pieces.
The LEGO system is made up of an enormous number of different pieces, or elements. Every piece is an element. Every element (with a few exceptions) can connect to any other element in an almost infinite number of ways. A handful of pieces can be combined to form a wall. Add a few more to create a roof, a complete house, and maybe a car and a driveway to park it in. Tomorrow you can take those elements apart and recombine them to create a deep space cruiser, a sculpture of a calico cat, or even a fortress with medieval knights. The LEGO system is really remarkable, isn’t it?
Take another look at that pile of LEGO pieces, and you’ll notice that they’re not all brick shaped. Some have sloping sides, some are cylindrical or cone shaped, and some are thinner than others. Without a way to identify different features of bricks you’ll have a tough time learning how to build with them. This section describes the key attributes of LEGO bricks and puts them into categories.
As you read about the different types of LEGO pieces, you’ll undoubtedly find many that are familiar to you and that are already in your collection, but you’ll probably meet some new ones, too. That’s part of playing with the LEGO system. As you buy new sets or find used pieces at yard sales or thrift shops, you’ll discover new parts that open up new building options.
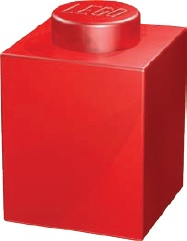
Throughout this book, I’ll refer to the size and shape of various LEGO pieces. Let’s begin with the basic 1×1 brick, as shown in Figure 1-1.
The 1×1 (pronounced “one by one”) brick is the standard upon which I’ll base all other measurements. If you put two 1×1 bricks next to each other, you’ll see that they’re the same size as the next largest standard-sized brick: a 1×2, as shown in Figure 1-2. If a piece is the same height as a 1×1, it’s “one brick high.” A brick that’s the same height as a 1×1 brick but twice as long is a 1×2 brick.

Usually, we put the brick’s shorter dimension (the width) ahead of its longer one (the length). In other words, the element in Figure 1-3 is a 2×4 brick (the equivalent of two 1×1s wide and four 1×1s long). The LEGO building community uses these measurement standards, and I will, too, throughout this book.
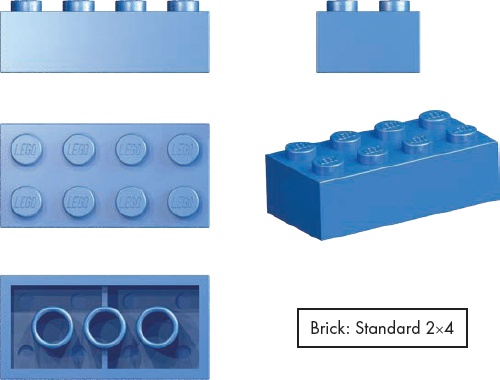
Figure 1-3. Anatomy of a 2×4 brick. When you look at this brick from all sides you get a sense of its general size and shape.
Another important standard is the use of the capital letter N as a substitute for a brick’s length. For example, when I talk about a bunch of 1×N (pronounced “one by en”) bricks that I used to make the outer wall of a building, the N represents a number of possible brick lengths, such as 1×2, 1×4, 1×8, and so on. Rather than list all of the sizes, it can be easier to replace the last number with an N and allow the description to apply to a range of brick sizes.
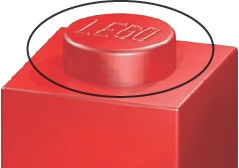
The stud (shown circled in Figure 1-4) is part of almost every LEGO piece, and we use it to measure the length or width of the piece. The stud helps define the look of a LEGO element and is integral to how the entire system functions.
The 1×1 brick shown in Figure 1-4 has one stud and is one stud wide by one stud long. The element shown in Figure 1-3 is a 2×4 brick: two studs wide by four studs long.
The tube in the brick helps bricks stick together. Tubes capture the studs so that you can join LEGO elements. You can see the tubes by looking underneath most LEGO pieces, like the ones shown in Figure 1-5.
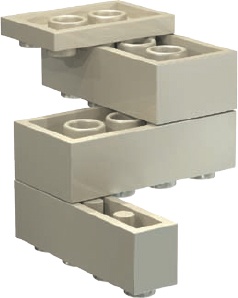
Figure 1-5. The underside of LEGO elements reveals the other half of the secret that locks bricks together.
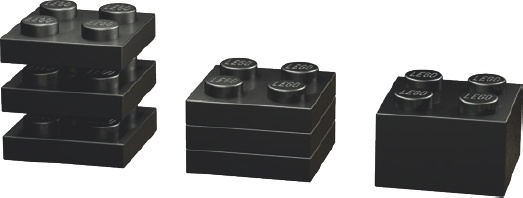
Figure 1-5 uses a simple upside-down assembly of pieces to demonstrate the way in which the tubes work with the studs. Different elements vary the tube design. For example, in Figure 1-5, the thinnest piece (at the top) has shortened tubes, while the 2×4 bricks beneath it have longer tubes. The 1×4 brick (at the bottom of the sculpture) has thin posts rather than hollow tubes. Despite these differences, all tubes serve the same purpose: They press against the studs of the piece attached to them with just the right amount of force to hold the bricks together.
Although it’s tempting to refer to all LEGO pieces as bricks, the term “brick” really applies only to certain elements. In general, a brick is a LEGO part that is the same height as a standard 1×1 element, like the ones in Figure 1-6. A brick has straight sides and a rectangular shape when you view it from the side.

LEGO bricks are like the real bricks that you might use to build the walls of a real house, and they can be used to create the walls of buildings. But you can also use them to create vehicles, cities, moats, airplanes, and many other things you can’t make with real bricks.
You will use 1×1 bricks in many ways. You’ll see how to use them in miniland style figures (Chapter 4), mosaics (Chapter 8), small-scale animals, or just about any model where small detail work is required. In some ways, the 1×1 is an extremely flexible brick that is sometimes overlooked. The 1×2 and 1×3 bricks are handy for creating columns for either true structural support or just for ornamental purposes, as you’ll see in Chapter 2. The longer bricks in the 1×N category are the backbone of the detail-building portion of the LEGO system. They have an enormous number of uses, one of which is as the standard walls for virtually any small building. They provide a reasonable to-scale rendition of the thickness that you would find in real-world walls.
When it comes to wider pieces, one stands out from the rest. For many builders, the 2×4 represents a standard image of a LEGO brick. This piece finds its way into models of every size and theme you can imagine. For many projects, they represent the core material onto which other elements can be added. They are the true “bricks” of the LEGO system.
At first glance, the common plate (shown in Figure 1-7) may not seem as useful as its big brother, the brick. After all, it takes three plates stacked on top of each other to equal the height of any regular-sized brick. But that’s exactly what makes the plate such an effective building tool: Because it’s only one-third as tall as a full-sized brick, you can use it to add subtle detailing, internal bracing, or realistic scaling to your models.
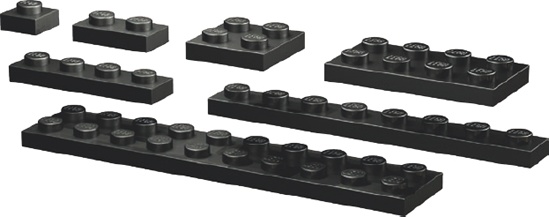
The plate is often the little piece that could. Plates are found in many of the same length and width combinations as bricks—1×1, 1×4, 2×2, 2×4, and so on.
The 1×1 plate can find its way into any model, from the smallest automobile to artistic mosaics (Chapter 8) to the largest of sculptures (like those in Chapter 7). You can also find 1×2 and 1×3 plates in a range of applications and in just as many colors.
You can use longer 1×N plates in all sorts of projects ranging from building helicopter blades for small-sized rescue machines to creating long colorful stripes on the sides of a locomotive. They’re also great for helping tie together several columns of bricks or other plates stacked vertically to create an interesting pattern (as you’ll see in Chapter 2). If the 2×N bricks are the foundation of the brick class, the 2×2, 2×3, and 2×4 plates are the working class elements that allow you to accomplish a lot with a little.
When you dig through your LEGO collection, you’ll probably find pieces that look like ramps for tiny cars. These are called slopes because one or more of their sides are on a slant (Figure 1-8). Slopes come in a variety of angles from 18 to 75 degrees, but 33- and 45-degree angles are the most common.
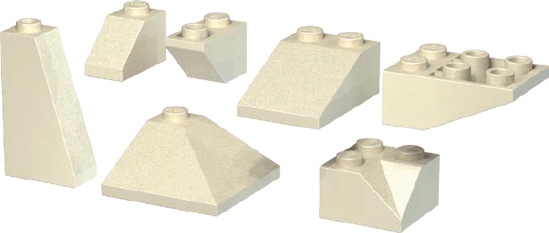
Slopes are sometimes called roof bricks, but they can do a lot more than simply cap off LEGO houses. They can add character to a model by helping to soften harsh square edges, give beveled wings to an airplane, create a reasonable facsimile of an evergreen tree, or put the roof on just about any building. Slopes also come in an inverted variety with the slant found under the brick, like what you would see if you put a regular slope on a mirrored surface (see Figure 1-9). (You can put your LEGO elements on a mirror, but don’t expect them to realize how gorgeous they are.)

Certain elements in the LEGO system defy easy classification, like the ones shown in Figure 1-10. These pieces are either unique or just different enough from other elements that they require their own category. Many of these pieces have a unique shape or an unusual stud orientation. The pieces in this category usually offer some type of extra functionality, and they’re useful in many ordinary and special situations.
Some classification systems (typically those used to catalog, track, or sell elements) may sort specialized pieces into existing standardized categories even if they don’t fit, which can make it hard to find some of these pieces. For example, the offset plate (shown on the left in Figure 1-10) is often described as a plate with a single stud in the center, but you’ll sometimes find it labeled as a modified plate or a jumper plate. You could just as easily call it a tile with a stud in the center, because its surface is more tile-like than plate-like. Without a specialized category, it is not the easiest part to classify.

The arch pieces (like the ones in Figure 1-11) may seem too specialized to be of much use other than for architectural detailing, but they can add character and shape to all kinds of models.

Figure 1-11. Among the most graceful of LEGO elements are the arches. They come in several sizes and styles.
Using an arch as an arch is a no-brainer, but using arches of varying sizes and shapes is a little more difficult. It’s usually best to draw your inspiration directly from the building you are attempting to copy or from a similar structure if you’re building something new. Picking out the many ways arches are used on buildings can be like working on one of those brain-teasers where you have to figure out how many triangles are created by the dozens of intersecting lines on the page.
Standard tiles are easy to spot (see Figure 1-12) because they’re like plates without studs. Cylinder tiles look like tiny, smooth manhole covers.

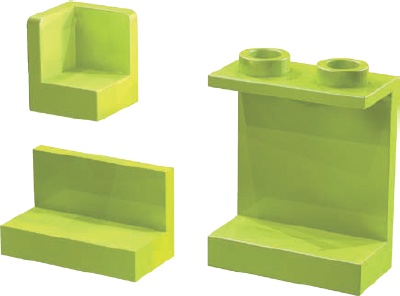
Panels, on the other hand, come in more shapes and sizes (see Figure 1-13). Panels are kind of like tiles with other tiles attached at right angles to form a thin vertical wall or two. Panels may or may not have studs.
Cylinder elements have a cylindrical shape, like a coffee can or a drum (see Figure 1-14). Cones, on the other hand, are sort of like upside-down ice cream cones. Although only a few elements fall into the standard cylinder or cone categories, what they lack in number they make up for in usefulness.

Figure 1-14. The standard vertical-walled elements are cylinders, and the sloped versions are cones.
From tree trunks to light posts to the nozzles on the ends of water cannons, you’ll find lots of uses for cylinders and cones.
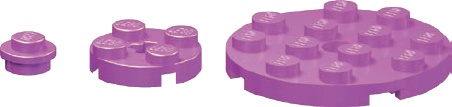
Cylinder plates are just shorter versions of their full brick-height cousins. The tiny 1×1 cylinder plate (sometimes called a pip), the 2×2 cylinder plate, and the 4×4 cylinder plate (all shown in Figure 1-15) are the only elements in this tiny subcategory.
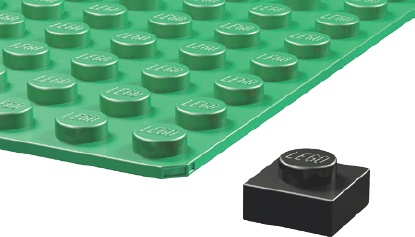
It’s easy to confuse large standard plates with small baseplates, so where do large plates end and baseplates begin? For our purposes, assume a baseplate is an element that’s one full brick in height and larger than 8×16 studs in size or has a waffled underside to which no other bricks can be attached. The latter type of baseplate is thinner than even a standard plate, as shown in Figure 1-16. They may be plain (with only regular studs on top), or they may have designs (like roadways) printed on them.
Baseplates can be used as the foundation for a model, whether it’s a building, a machine, or a sculpture. They’re useful for anything that requires a platform to steady, transport, or display it.
When it’s time to add a bit of character to your creations, decorative elements can be used to add realistic-looking windows, doors, trees, and so on. These elements often provide a one-element solution to a building need, and as you can see in Figure 1-17, they take many forms.

Now that you have a handle on basic LEGO-related terminology and some sense of how parts are categorized, let’s look at the importance of precision, geometry, and color in the LEGO system.
It doesn’t take long to realize something really important about LEGO pieces: Every element is manufactured to a very high degree of precision, not unlike the accuracy seen in the manufacture of aircraft parts. This may not be so important to you if all you’re doing is snapping a few bricks together and they’re off by a hair. But what if you want to stack up more and more bricks? How long will it be before even a small difference in quality control begins to show itself?
Take Figure 1-18 for example. Imagine you’re making a doorway. On the right, you use properly made bricks, each exactly the height it’s supposed to be. On the left, you use a handful of bricks that don’t meet that same standard. Maybe they’re just a tiny bit too short, say the thickness of a pencil mark. As you can see, only a few layers of imperfect bricks would begin to play havoc with your construction. How would you join these two mismatched walls to create a stable model?
Height is just one of three dimensions that have to match in every element. Differences in length or width would also quickly become apparent because you’d find that a brick wouldn’t press down securely onto the pieces beneath it. Studs would be out of alignment and finishing even a modest-sized model would become nearly impossible.

The LEGO Group applies the same attention to detail to things like the height and width of the studs themselves, the height and thickness of inner tubes, the diameter of the walls of bricks and plates, and so on. The care that goes into the manufacture of LEGO elements is a testament to the company that’s been making them for so many decades.
Look at the base measurement piece (the 1×1 brick) and you’ll see that it’s a vertically oriented rectangle with a ratio of 5:6 (width:height) as shown in Figure 1-19.
This ratio means that five 1×1 bricks stacked on top of each other are exactly the same length as a standard 1×6 brick, as shown in Figure 1-20.


Why? Because the five 1×1 bricks are each six units high and 5 times 6 equals 30. Similarly, each stud of the 1×6 brick represents five units of width, and 6 studs times 5 equals 30 again. (We consider only the dimensions of a brick’s walls, not the height of the exposed studs.) We’ll see this geometry at play a bit more in Chapter 8 when we look at mosaics.
There are other interesting geometries in the system. For example, the tubes under a standard brick or plate are the same distance apart as regular studs, and the inner diameter of the tube is the same diameter as the stud itself. This feature allows you to place a brick or plate on top of exposed studs where the number of studs is equal to or less than the number of tubes available, as shown in Figure 1-21.

This represents one of the few times, other than when you are using offset plates, that you can offset elements from one another by a value of one-half of a stud rather than a full stud.
Consider, too, the relationship between the height of a standard plate and a standard brick, as shown in Figure 1-22.
Notice that three plates equal one brick. This means that in a pinch three plates stacked together can be used as a substitute for the same sized standard brick. You can also use plates to create visual illusions within walls or other structures. For example, the white stripe in the fire truck in Figure 1-23 shows how you can stagger plates through several layers of other plates and bricks to create the illusion of an angle.

For many years, LEGO bricks came mostly in red, yellow, and blue. In fact, in 1958, when the original patent was issued for the basic design, there were only seven colors: white, black, red, blue, yellow, green, and clear. Of course, today’s sets have many colors, like mossy green, maroon, pale blue, dark grey, bright orange, and pink!
Given the original color limitations, builders improvised to create new colors from the existing ones. Their trick was to place one or more colors next to each other to create a kind of blending. For example, a white brick takes on a subtle grey tone when placed next to a black element, as shown in Figure 1-24. A yellow piece would shift slightly toward orange when placed next to a red brick, as shown in Figure 1-25.

Figure 1-24. White bricks next to dark grey or black may take on a slightly grey appearance. You can use the same technique to tone down bright colors.

The colors you choose to use in your models can add realism, character, or even a sense of humor. For example, a fire engine you model in red or bright yellow will probably look more like the real thing than if you build it with blue or grey bricks. A snowman sculpture will look more accurate if it uses a traditional white scheme. (You could add red horns to his head to create something playful or mischievous.) A fairground ride will look more exciting and fun if it uses a variety of colors in playful patterns of reds, blues, and yellows. Color plays an important part in almost everything you build.
One problem that new or younger builders often have is that they don’t have enough bricks in any one color to give a model a consistent look. This can be frustrating, but don’t let it stop your plans to build sophisticated models.
There are two ways to make the most of your bricks, no matter their colors, without spending a fortune building up your stash.
Match your models to the bricks you have. Build small models that let you stay within a single color or two.
Use multiple colors as a design element to maximize your collection. Many vehicles, buildings, animals, and other subjects are naturally multicolored or can be modeled in other colors.
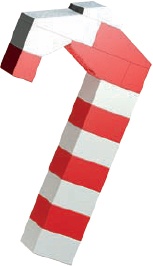
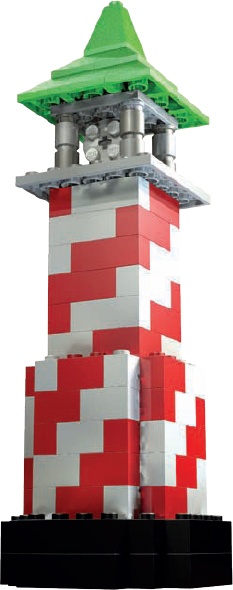
Even official LEGO sets use limited color schemes to great effect. Some contain only a few colors and can be a great way to learn how to use limited colors effectively, or to add healthy quantities of two or three colors to your collection. Do you have sets with a lot of red and white elements? Aside from the models shown in the instructions, why not build a candy cane in time for the holidays, like the one shown in Figure 1-26? Or use a similar color scheme to build a small lighthouse like the one shown in Figure 1-27.
Note
When building your LEGO collection, it may make sense to buy more than one of the same set to build up your collection of a certain color, especially if you can find the set on sale.
You didn’t learn much about actually building with LEGO pieces in this chapter, but there’s lots to come. You learned about the basic framework and terminology of the LEGO system, and you’ll use that knowledge to work through the construction techniques and ideas in later chapters. Your ability to tell a brick from a plate will make all the difference as you learn how to create a minifig-scale train station, a three-dimensional sphere, or even a mini space shuttle.