The term mosaic describes artwork consisting of patterns or pictures created with tiles, bricks, glass, or even stone, like the example shown in Figure 8-1. As you’ll learn in this chapter, LEGO pieces are a perfect medium for creating mosaics.
LEGO elements offer you two ways to create mosaics. The first, studs-out, is formed by attaching smaller bricks or plates (often 1×1s or 1×2s) to a baseplate with their studs exposed, or “out,” like the mosaic shown in Figure 8-2.
Studs-out mosaics tend to look blocky, but they’re fairly easy to plan and build. I’ll show you a couple of simple ways to turn an image into a mosaic in Creating Photo Mosaics in Creating Photo Mosaics.
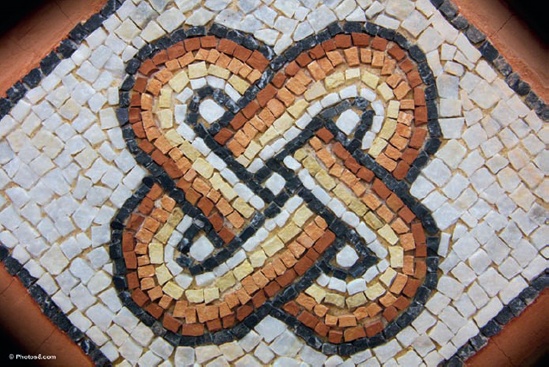
Figure 8-1. A Roman-style mosaic made of stone pieces. You can find similar patterns on the Internet to use as inspiration for mosaics you can make out of LEGO elements. (Photo by Photos8.org)
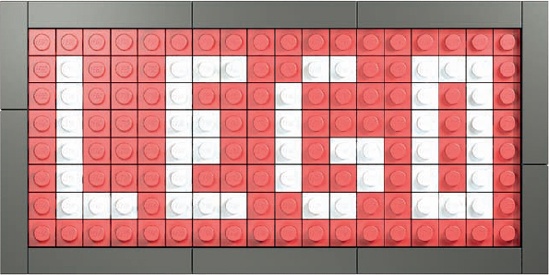
Figure 8-2. The elements making up the main image are studs-out, whereas the border is made up of standard tiles.
Then there’s the studs-up approach, shown in Figure 8-3. Here the bricks and plates are viewed from the side with their studs pointed toward the top of the picture.

Figure 8-3. You can use studs-up mosaics to create interesting, artistic stand-alone pieces or to add lettering or images to a larger model.
A more advanced version of this technique involves turning some of the plates (or tiles) 90 degrees to create more subtle shapes. We’ll look at the basic technique and then create a more complicated pattern in Mosaics on Edge in Mosaics on Edge.
You can use the mosaic technique to create interesting and artistic panels for display, just like a painting or photograph. But you can also incorporate a mosaic section into a larger model, using it to spell out a company name on the side of a cargo truck or a locomotive, for example. Or, you could use the technique to simulate a painted mural on the side of a building.
First, you’ll need to choose a baseplate. This will be the foundation of your studs-out mosaic. Figure 8-4 shows the two most common waffle-bottom LEGO baseplates. The blue one is 32×32 studs, and the grey one is 48×48 studs. The rest of this section will focus on creating mosaics on the 32×32 version.
You’ll also need lots of 1×1 elements. If you can get enough 1×1 standard plates, you can create a very thin picture; otherwise, you’ll probably build studs-out with 1×1 standard bricks. Although the mosaic will be thicker, the resulting image will be the same when viewed from the front. (You may also want to use other standard bricks, or even slope elements, to create a frame around your image.)
Before you begin creating your mosaics, see the design grids in Appendix B and print at least one copy of Design Grid #1 from http://nostarch.com/legobuilder2/. This grid looks a lot like traditional graph paper, except that each square is the size of a standard 1×1 LEGO element as seen from above. To plot the location of different colored bricks, you’ll simply shade in the squares.

As a first attempt at mosaic building, we’ll create a geometric pattern. You can use the design grid to plan this mosaic. Try a repeating pattern at first: Outline a small set of squares (say 6×6, 8×8, or 10×10) like the ones in Figure 8-5, and then use this small area to create a patterned tile.

Figure 8-5. Planning a mosaic tile doesn’t need to be complicated. You can plan your design as a pattern alone, without thinking about color. Or you can start blending colors together to form your pattern right from the start.
The next step is to use your sketch as a pattern to create the actual mosaic. Use a 32×32 stud baseplate if you have one, or use smaller waffleplates and simply join them together. Figure 8-6 and Figure 8-7 show how building a mosaic is simply a matter of attaching your 1×1 elements to a baseplate.

Figure 8-6. If you have enough 1×1 plates, you can make a very thin mosaic. If not, you can always use 1×1 bricks.
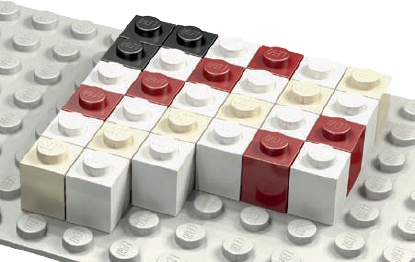
Figure 8-7. 1×1 bricks work as well as plates when creating a studs-out mosaic. The resulting mosaic will be a bit thicker, but it will look the same when viewed from the front.
The mosaic in Figure 8-6 uses 1×1 standard plates while the one shown in Figure 8-7 uses 1×1 standard bricks to create the same pattern. From this point forward, I’ll assume you’re using 1×1 bricks for your mosaic since they’re much more common and inexpensive than 1×1 plates.
When you’re done attaching your elements to the baseplate, your first tile might look like Figure 8-8. This isn’t a complete work of art (yet!); it’s one of many sections that will make up the final mosaic.
Compare the sketch in Figure 8-5 to Figure 8-8, and you’ll see that I’ve replaced the shaded squares with similarly colored LEGO pieces.
Figure 8-9 shows what happens when I repeat the 6×6 pattern from Figure 8-8.
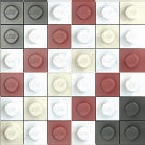
Figure 8-8. A small grouping of 1×1 pieces creates a tile that you can repeat to make more complex patterns.
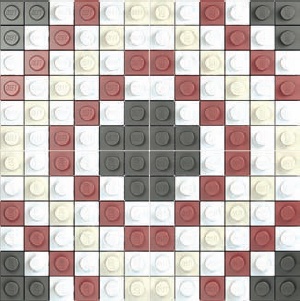
Figure 8-9. Four tiles grouped together to make a larger mosaic. Repeat this pattern to make even bigger images.
The mosaic in Figure 8-9 is made up of four copies of the 6×6 tile in Figure 8-8. I’ve rotated a couple of the tiles to make the black corners meet in the middle. This helps create a more pleasing pattern, one that can be repeated many times.
In Figure 8-10, I’ve created four more copies of the 6×6 pattern and placed them next to the first four.
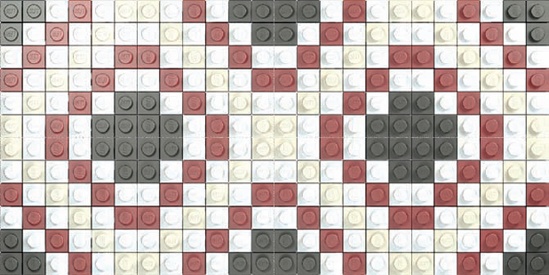
Maybe this could be the ballroom floor for a minifig-scale hotel. Or, you could simply repeat the pattern until it fills a large waffleplate to create a pleasing image of nothing but patterns. Try designing your own tile pattern. Then, see what it looks like when you put multiple copies side by side.
There are a couple of interesting ways to create this type of mosaic. The first, print and trace, is a fairly low-tech approach that has you print a photo and trace over it. It allows a bit of room to add your own artistic flair. The second involves using a computer to produce a highly pixelated copy of your image. You can use either method to create realistic-looking photo mosaics.
In order to use the print-and-trace method, you’ll need a photo of what you want to turn into a mosaic. If the photo is digital, make sure it’s loaded onto your computer. If it’s a printed photograph, first scan it so that you can manipulate it digitally. You’ll also need to print your picture, but before you do, crop the image so that the picture is more or less square on all sides. Then, resize the image so that its length and width are as close to 6.5 inches (16.5 cm) as you can get (assuming you are making a 32×32-stud mosaic).
You’ll also need a copy of Design Grid #2 from Appendix B, which you can find at http://nostarch.com/legobuilder2/. This should be printed on paper that is as thin as possible.
To create the pattern for your mosaic, place your photo under the copy of the printed design grid. (Staple or clip the two sheets together so that they don’t slide apart.) Now shade in the squares on the grid to match the light and dark patterns you see through the paper. In Figure 8-11, I’ve used this technique to trace an image of a fish that I found on the Internet.
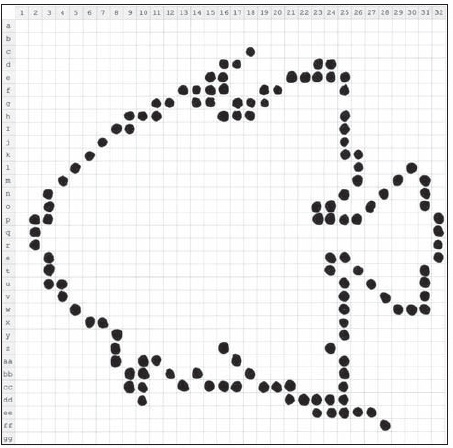
Figure 8-11. An angelfish begins to emerge from the design grid. Plan this way to get a sense of what your final mosaic will look like.
Although the studs-out technique tends to look a bit blocky, it works reasonably well for subjects with strong shapes, outlines, or patterns. When selecting a picture to use, make sure that the important part of the image fills as much space as possible. A close-up of a friend’s face will work better than a picture of a car driving on a bridge far away.
Notice in Figure 8-11 that the illustration of the fish mostly fills the 32×32 grid. This reduces the amount of background and presents a stronger subject, making it easier to identify, despite the low resolution of this small mosaic. Remember, when creating a studs-out mosaic, you won’t end up with smooth, flowing lines. The challenge is to see just how natural you can make your design despite creating it with square pieces.
The numbers and letters along the top and side of the design grid are there to make it easier to match a location on your paper design to where that element will go on your actual baseplate. For example, in the fish outline shown in Figure 8-11, the tip of the fin starts at C18. That tells you that on the actual baseplate you should count down three rows: A, B, and C, and then count across to the 18th column. That’s the spot on the baseplate where the fin starts and where you should put the element that you sketched on the design grid. From there, you can keep using the grid references, or you can use the first element you place as a guide to where each of the subsequent pieces should be placed.
In Figure 8-12, I’ve begun to add some of the details within the outline of the fish. I’ve used different shades of pencil and even different types of shading to suggest differences in color. (Of course, you could always use colored pencils to make your sketches.)

Figure 8-12. A close-up of just the face and mouth of the angelfish. Coloring within the lines is optional.
Use the legend printed at the bottom of the design grid (Figure 8-13) as a reminder of which symbol represents which color. Simply draw a symbol (or shading pattern) in a box and then write the name of the color it represents next to it.

Figure 8-13. It takes only a minute to jot down the legend for your design. This will help make the actual building much more enjoyable.
It really doesn’t matter how neat your design looks on paper because the design grid version is just a rough sketch of what your final LEGO mosaic will look like. The important thing is that you be able to tell which color you intended to go in each square. No one will see the paper version, so be as messy as you like.
Note
It can be a challenge to see through the printed Design Grid to know which boxes to shade. If you’re having trouble, try holding the original image up to a window; then place the Grid on top of it. The light shining through should help you see where you want to sketch. If the sun’s not shining, grab a translucent plastic storage container—like the one you might use to store your LEGO bricks—and turn it upside down. Put the grid over your original image and lay them both on top of the container. There should be enough light filtering up from below to help you see what the original image looks like.
Figure 8-14 shows my finished angelfish design. Although it’s far from photorealistic, it looks like a fish!
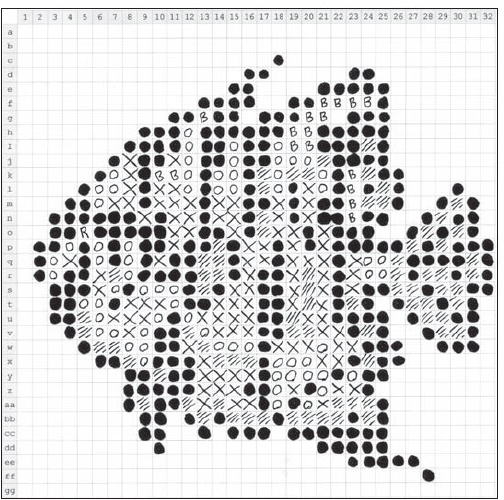
Figure 8-14. Although a bit rough around the edges, the blueprint for my fish mosaic still gives me a good starting point.
As you start turning your paper design into actual LEGO elements, make changes as needed. The pattern you’ve drawn is an excellent starting point, but you don’t need to follow it exactly. Sometimes seeing the actual pieces on the baseplate will suggest places to make changes; make as many as you need to until the picture feels right.
If you’re having trouble seeing what the mosaic looks like before it’s complete, try one of two things:
Stand up your work and step away from it. Most mosaics are best viewed from a distance, which helps the lines and rough edges blur together to form a smoother image.
Squint. Squinting for a few seconds will make things blur together so that you can get a better sense of how the overall design is progressing.
The second way to create the blueprint for your mosaic is to use software to apply a mosaic effect directly to a digital image. Figure 8-15 shows a picture of one of my cats. The original image of Izzy was taken with a digital camera; the modified version has a mosaic effect applied to it.
To create the mosaic effect I used GIMP (http://www.gimp.org/) to add a mosaic filter. This special effect turns an ordinary image into a series of square blocks of color—in this case dark grey, white, and hints of orange. You can also create photo mosaics using other software such as Photoshop.
To get the mosaic effect I wanted, I played around with the size of the blocks that GIMP uses for the effect. When I was done, the image on the right had exactly 32 squares across and down—just like the LEGO waffleplate.

Figure 8-15. The real Izzy meets the pixelated Izzy: a side-by-side comparison of an original photo and the same photo with a mosaic filter.
Once you’ve created the mosaic effect, print out the modified image for use as your blueprint. You can use this like a map to show you which squares should be which colors. If you use a color image and a color printer, you can create a mosaic with many different colors.
Because the mosaic image doesn’t have the row and column labels of the design grid, you need a way to track where you are on the baseplate versus the printout. One way is to divide your image and baseplate into quarters, like I’ve done in Figure 8-16. Figure 8-17 shows the Izzy mosaic at the beginning of construction.
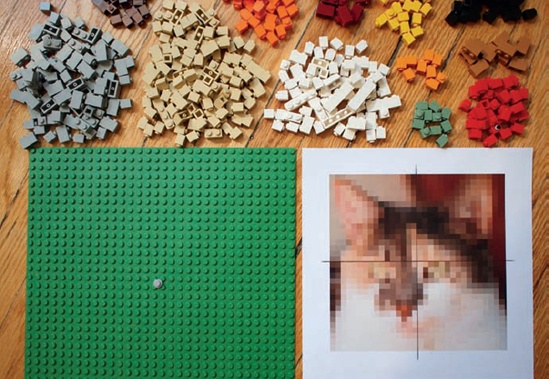
Figure 8-16. The grey 1×1 cylinder plate in the center of the baseplate represents the point on the printout where the four quarter sections meet.
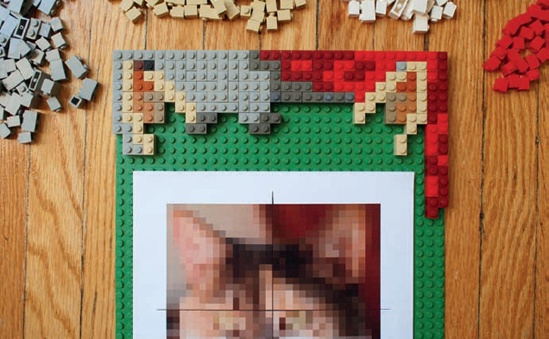
Figure 8-17. Starting at the top, you can see I’ve begun to fill in some of the background behind her head. I’ve also started to outline her ears, comparing against the printout of the pixelated image as I go.
Use each quarter of the printout to represent each quarter of the baseplate. In other words, if there is a dark red square in the top-right corner of the image, make sure the top-right corner of the baseplate gets a dark red element. Then see what color goes next to that piece and build the mosaic accordingly.
Once you’ve attached all the bricks to the baseplate, the result is a real-life mosaic that looks more or less like the plan I started out with and, as you can see in Figure 8-18, like my original subject.
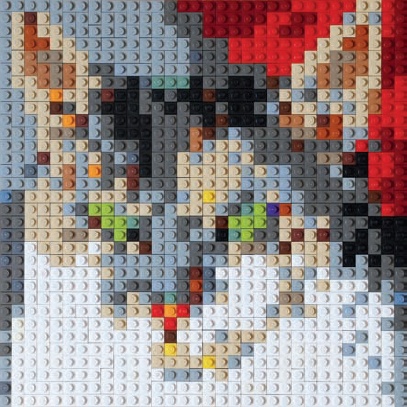
Figure 8-18. Izzy the cat becomes Izzy the LEGO mosaic. Remember to step back a few feet and let your eyes see the bricks as one image and not as individual elements.
If your mosaic doesn’t look the way you want it to, don’t give up. Try standing it upright and stepping back. Look at the entire image and try to see which parts don’t look right, then replace a few bricks at a time until the problem areas disappear.
Studs-up mosaics offer some subtleties that studs-out mosaics don’t. Because you’re using plates as seen from their sides, rather than the square tops of bricks, you can create more subtle changes in color and shape. In Figure 8-19, we compare Figure 8-2 (a studs-out mosaic; left) to Figure 8-3 (a studs-up mosaic; right). As you can see, the word LEGO is a little more natural looking in the studs-up version. The ability to incorporate simple shading or highlighting techniques (such as the yellow highlights above the letters in the studs-up version) gives you more control as a builder.

Figure 8-19. A comparison of the two basic mosaic techniques. The studs-up version (right) offers some advantages when it comes to lettering.
Before designing your studs-up mosaic, have a look at Design Grids #3 and #4 in Appendix B, and then go to http://nostarch.com/legobuilder2/ and print out copies of each. Both of these grids show LEGO elements from the side, as shown in Figure 8-20.
These plate view versions of the design grids allow you to plan your work as seen from the side in order to help you establish shapes and angles. They’re the perfect grid to use when designing a studs-up mosaic. When you use these grids to create your design, you can sketch more subtle patterns, like the example shown in Figure 8-21, than you can with a studs-out approach. In fact, when used in a larger mosaic and viewed from a short distance, this letter will look almost hand drawn. Compare it with the chunky lettering of the studs-out technique shown on the left in Figure 8-19 to see the difference.

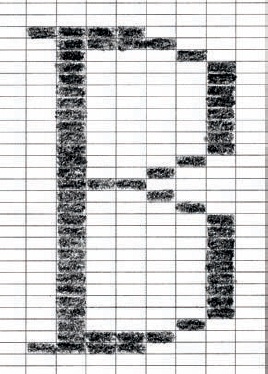
It helps to turn a mosaic on edge from time to time, especially when you’re trying to create letters or complete words. For example, look at the small mosaic in Figure 8-22.

When you first look at Figure 8-22, it’s hard to even tell what letter, if any, it’s supposed to be. But flip it around, orient the studs to the right, and look at it again. You should recognize the symbol now (see Figure 8-23). It’s a dollar sign. But now there’s a problem. What do you do with a small mosaic like this when its studs are turned the wrong way?
Rather than build an entire model turned on its side like this, you can easily incorporate this submodel into a larger work. For example, say you want to build a bank or a casino to add to your LEGO town. You could use the dollar sign mosaic to help indicate the nature of the building you’re constructing. In fact, with just a bit of planning, you could make the dollar sign part of the wall of the building, as you see in Figure 8-24.
As you can see, I’ve built a portion of the wall surrounding the dollar sign mosaic to give you an idea of what the final model might look like. But what makes it stay in like that? The answer is a bit of geometric trickery that is surprisingly easy to accomplish.
What you don’t see in Figure 8-24 are the two 1×1 Technic bricks that are helping to hold the mosaic section in place on either side. To give you a better idea of what’s really going on, Figure 8-25 shows that the right side of the mosaic is supported by a 1×1 plate (in yellow) that fits perfectly into one of the two Technic bricks. The plate is oriented horizontally, like the rest of the mosaic submodel, whereas the Technic brick is oriented with its stud up, like the rest of the main wall.
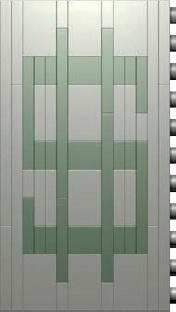
Figure 8-23. Turning a letter or symbol the right way makes it easier to read. But how do you add it to a model where the other bricks are pointing in different directions?
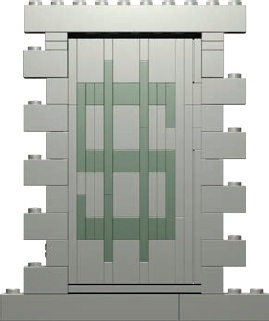
Figure 8-24. Up close, you can see the different orientations of the bricks and plates. From a short distance away, though, the model looks more uniform and realistic.
The left side of the mosaic (Figure 8-25) is supported by a Technic half pin (shown in yellow) that connects to the bottom side of the plate to its right, which is turned 90 degrees like the rest of the mosaic-related pieces. When viewed from even a short distance away, the mosaic section looks like it’s just part of the wall. The delicate lines that form the dollar sign become natural looking and easy to read.

Remember, there is no one correct size or shape for a mosaic. The techniques I’ve discussed in this chapter can be applied to complete pictures (like Izzy the cat) or to a much smaller arrangement of pieces that you use to embellish a model (like the dollar sign).
If you add a mosaic section to a larger model, the work will display itself. If you decide to try your hand at an image, be sure to show it off once you’re done, like in Figure 8-26. Let people know what interests you, and show them how you’ve captured that in LEGO pieces.

Figure 8-26. A finished mosaic can be displayed along with books, games, and other things that interest you.
There is no one rule to guide you in determining how large a mosaic should be or which of the two basic techniques you should use. Let the requirements for each project guide your decisions. If you need to spell out a company name on the side of a building, then build your mosaic letters to an appropriate size. If, on the other hand, you’re creating a portrait of a favorite relative, be sure to make the mosaic large enough to capture his or her entire personality.