In Chapter 5, I showed you some macroscale building techniques that you can use to make models much larger than real life. In this chapter you’ll learn how to build things that are smaller than real life using a technique called microscale building.
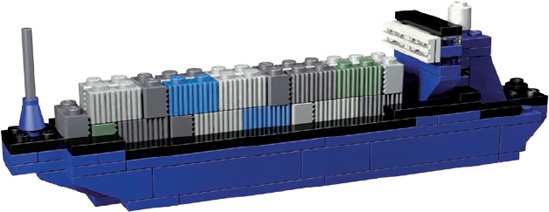
If you’ve got a limited supply of LEGO bricks, or if you build in a confined space, microscale might work well for you. You’ll still be able to create interesting models, but they’ll use fewer pieces than larger versions and take up less space—sometimes a lot less space. Just 7 inches long, the microscale cargo ship in Figure 6-1 captures many of the details of the real thing, including shipping containers, the bridge, and a smokestack.
In order to standardize the scale for microscale building, some LEGO builders have decided to use a 1×1 cylinder to represent the size of a person within the microscale world. In other words, one brick in model height equals roughly 6 feet in the real world.
In fact, the actual scale of microscale building can vary from model to model, but the principle is always the same: Microscale models are extremely small versions of very large things.
In Chapter 5, we discussed approximation: the building method that gives things the look and feel of real life without necessarily duplicating every detail. That same principle can apply to microscale models. Just look at the thing you are modeling and try to see only the characteristics that stand out the most.
But how do you do that? Let’s use the Empire State Building as an example. If you tried to create a minifig-scale version of the Empire State Building, it would have to be more than 26 feet tall! (Minifig scale is about 1:48. Because the real building is 1,250 feet tall, you would divide that number by 48 and end up with 26.04 feet as the height of your model.)
Most people don’t have enough LEGO bricks to tackle a project that big, but just about everyone has enough bricks to build a microscale version, which requires far fewer bricks. You’ll just need to leave out details like windowsills, decorative statues, and signs because you won’t find bricks small enough to create those details.
One reason that the Empire State Building is relatively easy to build in microscale is that it has a recognizable shape. Bringing it to life in microscale involves re-creating that shape with as few elements as possible. Remember, you’re trying to achieve the feeling of the real thing, not building an exact replica.
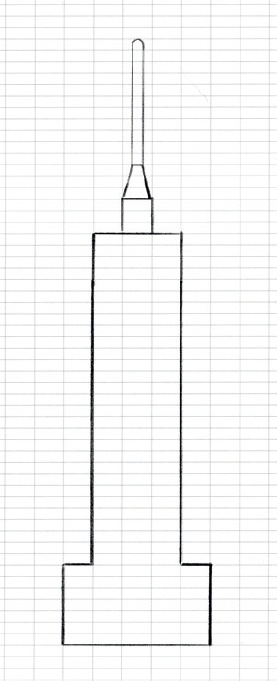
To begin building a microscale model of the Empire State Building, I first sketched the shape of the building on graph paper, as you can see in Figure 6-2. I based my drawing on some images of the actual building that I found on the Internet.
Note
For this next example, I’ve used one of the model design grids (see Appendix B). This is graph paper with lines drawn to the same size and shape as real LEGO elements. Notice that I’ve drawn only the outline of the building in this first sketch. The silhouette is the most important part of this model, so I’ve essentially left out all the details.
How did I know how big to draw my sketch? I didn’t. I just guessed, though I knew that I wanted to make it fit on one page or less.
If you find that your first few drawings are too large or too small or that they don’t capture the profile you want, don’t give up. Make a second or third sketch, and your plan will likely improve each time.
Next, I began adding the major details, as you can see in Figure 6-3.

Here, I’ve drawn in the main entrance, shaded an indent near the top of the tower, and added the shape of the channel that runs vertically up the center of the building.
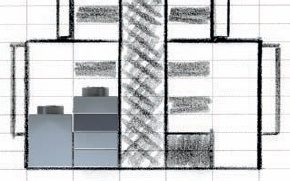
Notice that I’ve used different shades of pencil to represent different parts of the building. In some cases, this is to remind me that even though this is a two-dimensional drawing, it’s the plan for a three-dimensional model. I shaded certain areas darker to remind me that they will be closer to the back of the model, like the center channel that runs up most of the building. (I’m not too careful about how my lines meet or how each area is colored in. This is just a sketch; it isn’t meant to be perfect.) Finally, as you can see in Figure 6-4, I added some boxes to suggest windows.
Interestingly, this model really does look good in light and dark grey. The simple two-tone effect is just what I’m looking for.

Now that we have a drawn plan, how do we make this a LEGO model? As you look at the drawing, remember that the main idea of microscale building is to make something as small as possible but still recognizable. Remember, too, that each of the boxes (or cells) on the design grid is the same height as a standard 1×1 plate. Therefore, three boxes are the height of a standard 1×1 brick (see Figure 6-5).
To me, the bottom left and right corners of my sketch (Figure 6-5) look a lot like 1×1 LEGO bricks. Using this relative measure, I can quickly figure out which bricks and plates to use to construct the rest of the building. As you can see in Figure 6-6, I’ve put some light and dark grey plates on my sketch to try out the elements I’ll use to build the real model. Although these may not be the exact pieces I’ll use, they give me a sense of which types of elements I’ll need.
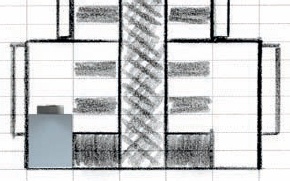
Notice in Figure 6-6 that I have represented only some of the windows, and even then I’ve used only dark grey plates to give the feel of windows. As I continue to match the sketch with appropriately sized elements (based on the 1×1s I started with), it doesn’t take long for a little building like this to come together as the finished model shown in Figure 6-7.

Notice that this model is constructed almost entirely of plates. You won’t build every micro model out of plates, but in general, the smaller size of plates offers you greater creative control at microscale.
Of course, you may not have the right number of light and dark grey plates to make this replica of the Empire State Building, but don’t let that stop you. Try building one from bricks alone to see if you can match the shape. Or try using other colors to come up with your own version.
Note
You can find complete instructions for both the cargo ship in Figure 6-1 and the Empire State Building in Figure 6-7 at http://nostarch.com/legobuilder2/.
When building microscale models you’ll follow three simple steps:
Sketch out the object’s edges. Identify the outline of the object you’re building and ignore the details to get the basic shape.
Identify the features. Look for major features, especially interesting shapes or patterns that help give the object its characteristic look.
Discover the details. Choose some of the object’s finer details to model. Be careful to select only things that are critical to its overall feel.
You don’t really need to use paper and pencil to work out the design of your model. Sometimes you’ll find it more fun to just dig through your LEGO bricks and work through the steps with the real elements in your hands. When you make mistakes, take things apart and rebuild. And look for those mistakes that actually end up being better solutions than the ones you originally had in mind. Whether you decide to plan your model with paper and pencil or choose to jump in and start building, the benefit is that you are thinking in three dimensions and solving problems as you go.
Now for a couple more microscale techniques. In this section we’ll look at two different classes of parts (wheels and windows) and learn how to simulate them at microscale.
Most LEGO wheels are the appropriate size for minifig or miniland scale, but they are much too large for microscale. As an alternative, try using 1×1 cylinder plates turned so that they are sitting on edge, as shown in Figure 6-8.

The transport truck shown in Figure 6-8 shows not only how to create microscale wheels but also how to turn bricks on their sides to create certain shapes or patterns. See how I’ve created a white stripe down the length of the trailer?
The trailer portion of the truck is created by stacking 1×2 bricks on top of each other. Those stacks are then sandwiched between 2×3 plates. The entire trailer section is then turned so that the studs are facing the back of the vehicle.
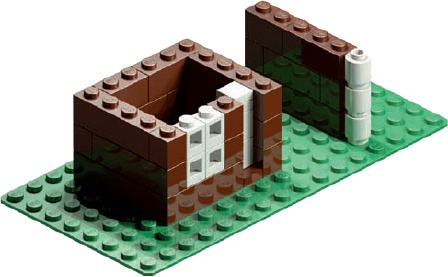
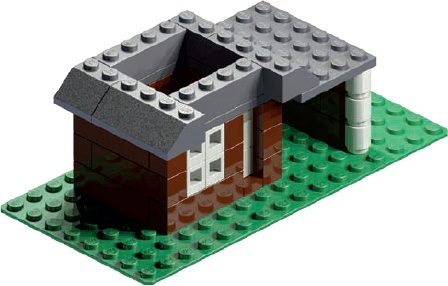
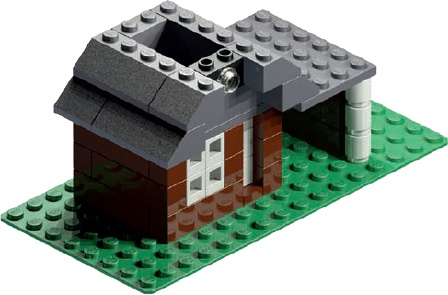
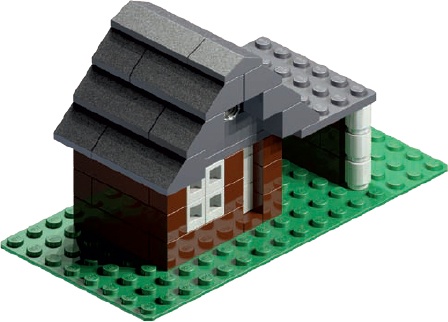
Like the wheels, many LEGO window elements just won’t look right as windows at microscale. You saw that I used plates as windows in the Empire State Building earlier in this chapter. For models based on smaller buildings, you can use something like the 1×1 headlight brick with its side stud facing inward to create a window. Several of them placed together create the impression of a picture window in the house shown in Figure 6-9.
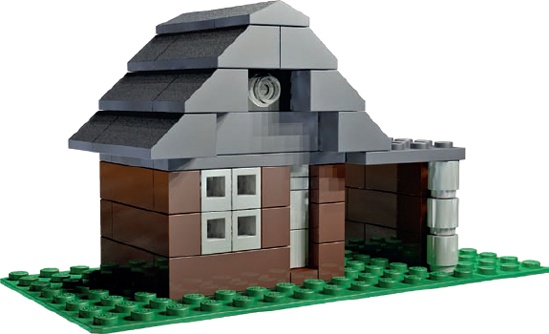
Notice that the door to the house is merely suggested by the white area to the right of the windows. This is really just another example of the technique I used to suggest the windows for the Empire State Building. Sometimes a change in brick color or depth is all it takes to give the illusion that a particular feature exists when it really doesn’t.
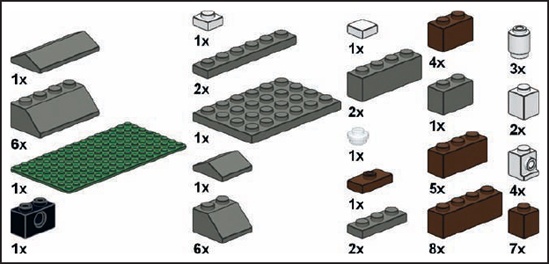
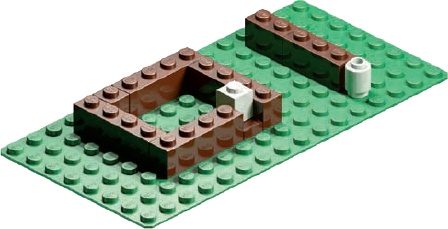
The little house shown in Figure 6-9 is a simple model you can probably build from pieces in your collection. Figure 6-10 shows the Bill of Materials for this micro-mansion. This is followed by a series of figures (Figure 6-11 through Figure 6-16) that show the building steps.

When building in microscale, you may find it best to pick objects that are naturally very large for your models, like a car, a skyscraper, or even an aircraft carrier. Here’s a short list of things that might make good subjects for microscale building:
Automobiles | Houses |
Trucks | Apartment buildings |
Buses | Dinosaurs |
Locomotives | Zoo animals |
Train cars | Amusement park rides |
Spaceships from movies | Skyscrapers |
Stores or a mall | Pyramids |
Construction equipment | Ships |
Hotels | Aircraft carriers |
Castles | Bridges |
Monuments |
Of course, these are just suggestions, and like everything else in the LEGO system, there are no limits to how you apply your own imagination and creativity. Microscale building is an excellent technique to explore when your collection of LEGO elements is limited in size. As you’ve seen, this restriction doesn’t have to limit the scope of your microsized LEGO world.