No matter how old you are, when you sit down with a pile of LEGO bricks, one thing never changes: You want to connect a few. LEGO bricks, like grains of sand on a beach, are meant to be together.
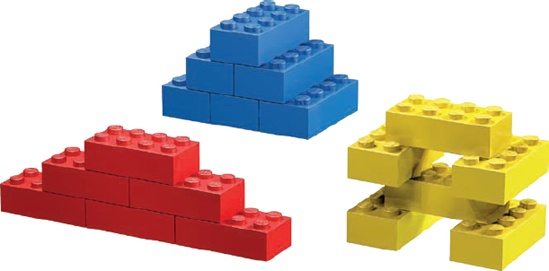
But what are the best ways to join bricks? That depends, of course, on what you’re building. Official LEGO literature describes the many possible ways to connect bricks. For example, they say that six 2×4 bricks can be arranged in 102,981,500 different patterns. (Someone at the LEGO Group has a very good understanding of geometry and mathematics or just way too much time on his hands.) Figure 2-1 demonstrates just three of the millions of possible combinations. I’d need an enormous number of pages to show pictures of every pattern.
Perhaps more important than the number of ways in which you can fasten bricks together are the principles behind how to connect them.
For example, you can connect any two 2×4 bricks in three basic ways, as shown in Figure 2-2 through Figure 2-4. You can stack them, overlap them, or stagger them.

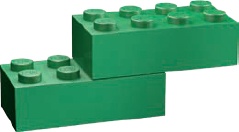
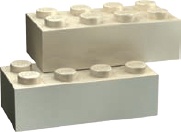
Each illustration represents a different type of bond, or way of joining LEGO bricks. Bond patterns are the ways in which bricks are arranged or connected. Let’s look at each pattern individually to get a sense of its strength.
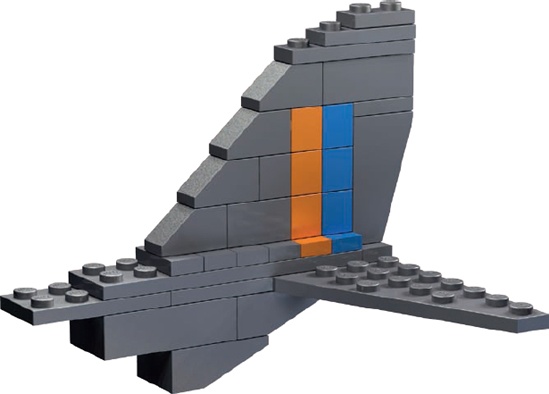
Although not the most common or sturdiest way to build, stacking bricks one on top of the other can be necessary. For instance, a small shop in your LEGO town might have vertical stripes of color that you wish to appear painted on the sides of the building. Or perhaps an airplane needs to have a colorful pattern of lines on its tail section.
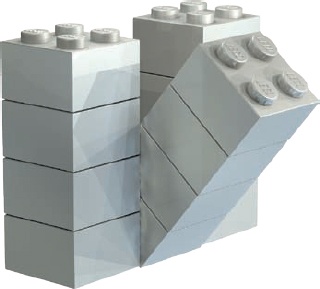
Typically your decision whether or not to use vertically stacked bricks will be driven by aesthetic rather than structural needs. The reason is simple: As you can see in Figure 2-5, stacks of bricks, unsupported by surrounding pieces or layers, are generally not very stable.
When you need to stack bricks, make sure that you secure the stacks—both above and below—with longer bricks or plates. For example, in Figure 2-6, stacked 1×1 bricks create the vertical stripes on the tail section of a plane. The vertical part of the tail sits on several offset plates, but below that, the stripes are held together by a 2×8 plate. Near the top, the stacked bricks are locked together by the 1×4 plate just above the highest slope piece.
No building technique will add as much strength to your models as overlapping. As with real brick walls, LEGO bricks work best together when they sit on top of each other in overlapping patterns, like the ones shown in Figure 2-7. These overlapping connections strengthen the structure of your models and prevent them from falling apart.
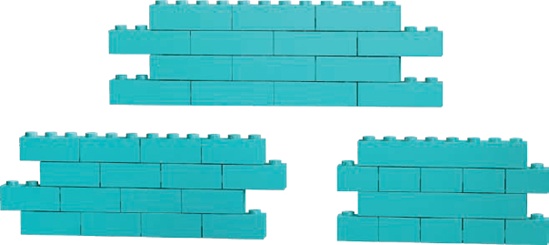
Overlapping bricks strengthens your models and allows you to make full use of one of the primary features of the LEGO system: the interlocking feature of elements. Models containing standard bricks and plates almost always use one or more overlapping patterns. (Later in this chapter, I’ll show you how to build walls and connect them using overlapping bricks.)
Other elements need to be overlapped as well. Doors and windows should be secured using this technique to make sure they won’t fall out of your wall, as shown in Figure 2-8.
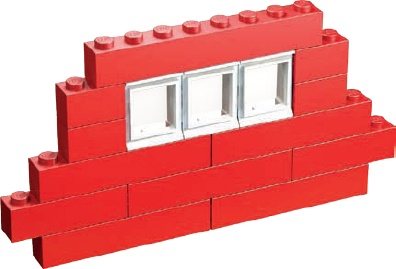
Notice in Figure 2-8 that the 1×8 brick at the top of the wall overlaps both the windows and the bricks to either side of them, locking them all together. This helps create a solid structure.
The best way to achieve good overlapping is to avoid stacking too many bricks on top of one another, which creates vertical seams like the ones in Figure 2-9.
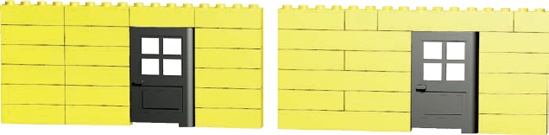
Figure 2-9. A poorly designed wall (on the left) is shown with a properly designed wall (on the right).
The wall on the left in Figure 2-9 uses stacking. You can see how unstable the door would be if you tried to open it, because the 1×4 brick on top isn’t attached to anything else. On the right, the 1×8 brick over the door is also attached to bricks on either side, like the brick above the windows in Figure 2-8. This helps anchor the door to the wall and ensures that the two won’t come apart when you least expect it.
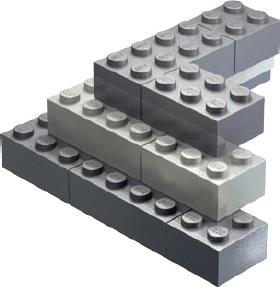
When you stagger bricks, you set one layer of bricks back from the front edge of an adjoining layer to produce a stair-step pattern, like the one shown in Figure 2-10.

Staggering is particularly important when building sculptures (covered in Chapter 7) because it allows typically square or rectangular bricks to produce more organic shapes when used in the right combinations.
By staggering the bricks in the house shown in Figure 2-10, you can create a roof out of nothing more than standard bricks; you don’t need to use slopes.
Figure 2-11 shows the stagger technique used to create the roof in Figure 2-10. I’ve alternated the colors of the layers to show you how to stagger. (Obviously 2×N-sized bricks work best for this technique.) Notice that even though I stagger the bricks to create the slope, I still overlap them from layer to layer to create an even sturdier model.
When building with LEGO bricks we always seem to be making walls. Walls of a fire station, a hospital, a police department, a medieval castle, or even an alien base on some far-off planet. In Overlapping in Overlapping, you learned how to build a strong wall that stands by itself. Now let’s connect two or more walls together.
In Figure 2-7 through Figure 2-9 you learned how to build simple walls with the overlap technique. But, a lone wall isn’t much good if you intend to create a realistic-looking building (unless you’re building a ruin, of course!). The inhabitants of your LEGO world will enjoy their buildings a whole lot more if you give them rooms, doorways, and walls that won’t fall down.
But don’t expect to connect two already-built walls to each other to make a strong pair; build the walls at the same time and have them draw on each other’s strength. Walls should be joined to each other from the very first layer, or course, of bricks, as shown in Figure 2-12.
The next course of bricks begins to lock the first layer in place by overlapping, as shown in Figure 2-13. The orange 1×4 brick ties one blue wall to another, locking the 1×6 to the 1×8.
This particular overlapping technique is key to building solid models. As you can see in Figure 2-14, as you add the remainder of the second course, the other bricks (in this example) aren’t quite as important as the orange one in Figure 2-13. They are part of the walls, but not part of what is holding the two walls together.
In Figure 2-15, notice that the overlapping technique is still used to connect the two walls to each other, but it is also used within each individual wall. For example, the blue 1×4s in the third layer cover the gaps in the orange bricks below them, just as the orange layer connected the gaps between the blue bricks below them. When layers of bricks are overlapped with each other in this way, you get the strongest possible model in the end.
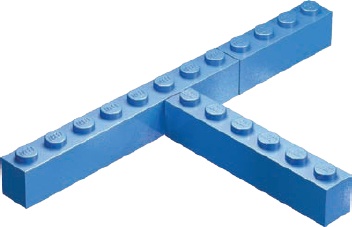
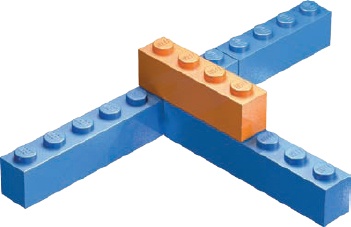
Figure 2-13. The orange 1×4 brick is the cornerstone of the overlap. It connects the two blue walls beginning with the second course.


After just a few layers, you should find that your two walls are firmly supporting each other. Try pushing on either wall, and you should find it hard to move. The overlap pattern creates strong walls, made even stronger by using the same overlap technique to connect the walls to each other.
Of course, you won’t always want perfectly straight and perfectly interlocked walls. Sometimes you’ll want to create a model that’s a little more organic or, at the very least, less than square.
How can you use straight bricks to form a curved wall? One fun technique is to dig up as many 1×3 bricks as you can find and link them together, as shown in Figure 2-16.
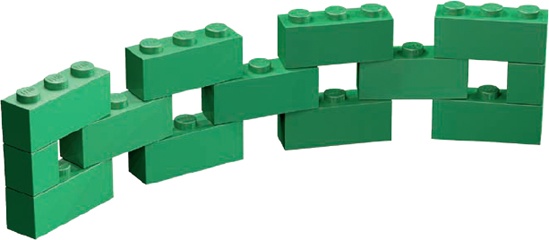
Figure 2-16. 1×3 bricks joined in this fashion make it possible to create curved or even completely circular walls.
This method allows you to curve a wall, even to the point of creating a complete circle. You may find yourself using this technique to make a pen for barnyard animals, the body of a rocket, a fence around a house, and so on.
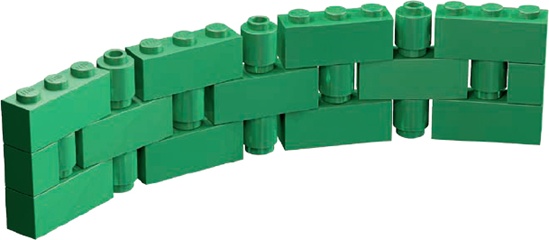
To create a different look, try adding 1×1 cylinders to the openings between the 1×3 bricks. As you can see in Figure 2-17, this makes the wall appear more solid. You won’t be able to curve it as much as the example in Figure 2-16, but it’s still a great way to add new shapes to your models.
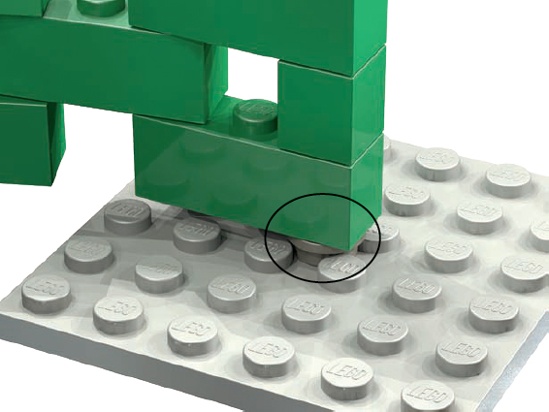
By playing around with the length of your wall and the curve of the bricks, you may find that you can even link the ends of the wall into existing square structures (as shown in Figure 2-18). For example, you might take two castle walls and create a rounded corner that connects them. Or, create a guard tower using this technique and set it on a castle made from regular walls that meet at 90 degrees. By placing 1×1 round plates at various points under the 1×3s, you’ll find combinations that allow you to connect your round wall to the other parts of your model.
Bracing is the art of reinforcing your models, typically on the inside, to make them stronger and more stable. The bracing itself can be as simple as adding a few long bricks to strengthen an otherwise unsteady structure, or as involved as building columns and beams within a larger model to allow it to be handled or transported or to simply stand up without falling down.
Figure 2-19 shows some simple walls, which could be the walls of an office building, the sides of a grandfather clock, or even the beginnings of a tall but slender air traffic control tower. The bricks marked A and B seem to connect the other walls. This reinforcement or bracing, made up of a central column and two horizontal beams, strengthens the model.
The amount of bracing required varies from model to model—from none for smaller models to lots for large buildings and towers. Bracing your model properly can give it a very solid structure that will come in particularly handy when transporting it, whether to a public display or a friend’s house, or even when you’re just playing with it.
Why not just fill in the area inside the building completely and make it solid? Although this might work for some smaller models, doing so makes larger ones heavier than they need to be and uses more bricks than necessary. Why hide your bricks needlessly? Use what you need for support and no more. Use the bricks you save to build other parts or other models.
Bracing is meant to be functional, and it doesn’t have to look pretty. The great thing about it is that you can brace with just about any brick to beef up a model from behind or underneath. After all, no one will see the bricks, so you can use whatever colors you have handy.
In Figure 2-19, the column (A) stands away from the walls of the building. The beam (B) extends from the column to the outside wall (D). The dark red square (C) is really the end of beam B. It’s built into the wall to create a strong link between A and D.
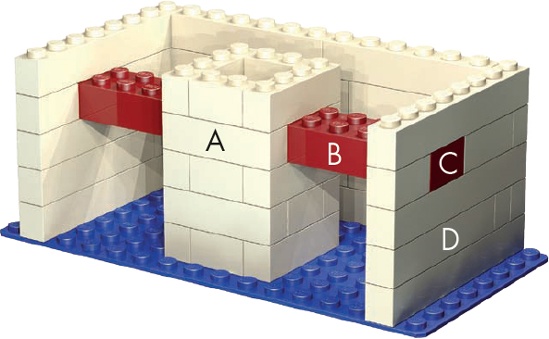
Figure 2-19. A peek behind the scenes shows how columns and beams come together to form bracing for this representative building.
To better understand bracing, you need to learn a bit more about columns and beams.
You saw one form of columns (the stacked 2×2s) in Figure 2-5. Normally, though, you wouldn’t expect to see columns lined up next to each other like that. Instead, you’d find them as the corners of buildings, the structures on either side of doorways, or as supports for wide floors or ceilings.
One reason that the columns in Figure 2-5 tumbled was that nothing held them together. That’s where beams come in. Beams are the horizontal equivalents of columns, and they work with columns to form strong structures.
A beam can be as simple as a single brick (like the one shown in Figure 2-20) connecting two parts of a structure that would not otherwise touch. Or, a beam can be a much larger and much more complicated submodel; a submodel is a portion of a model that you build separately then join to the main model (like the composite beam shown in Figure 2-21 or the ladder on a fire truck). Submodels are also known as substructures.


You can make composite beams (see Figure 2-21) from a mixture of bricks and plates or several layers of bricks. You can build them very long, and they’ll still remain strong.
Notice in Figure 2-21 that the black plates overlap the gaps between the yellow bricks, just as they would if you were building with bricks alone. The overlap technique can be used when snapping any type of element onto any other: Look for the gaps in each layer and close them with pieces you place above them in the next layer.
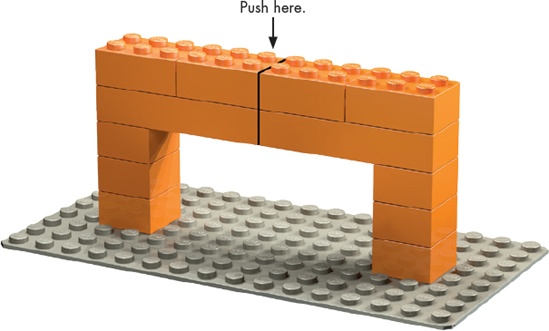
Set up a few bricks as in Figure 2-22. To conduct this experiment, push down with your finger on the brick. With little effort, the bricks you set up between the two columns will quickly break apart and fall down. The structure fails, something you want to avoid in most models.
Now try setting up a similar set of bricks in a slightly different pattern, as shown in Figure 2-23. Carefully note the positions of the bricks and where they overlap. Now when you push down, it should be nearly impossible to make the beam fail. See why it’s so important to overlap bricks?
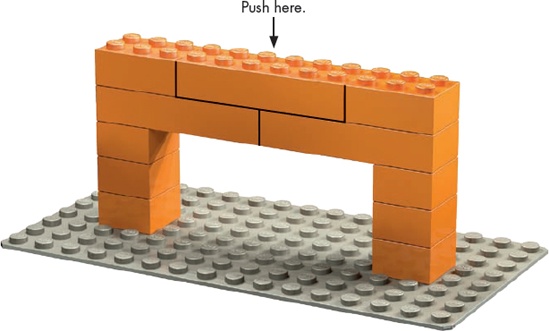
Figure 2-23. This example uses a simple overlap pattern to ensure the beam won’t buckle under pressure.
You could use the beam in Figure 2-23 to connect the outer walls of a large building, or you could place it over top of the large opening at the front of a LEGO aircraft hangar.
Columns can be used with beams to provide side-to-side stability. They can also be used to create open space, between the floors of an office building, for example, or between the decks of a space station diorama to give the walls the height you want without blocking the space in between layers. Columns can take many different forms, as shown in Figure 2-24 through Figure 2-27.
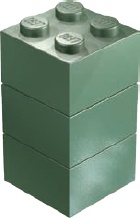
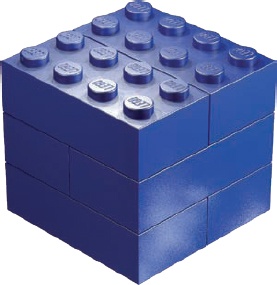
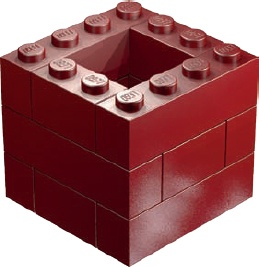

Figure 2-24 shows 2×2 bricks stacked on top of each other. A simple column like this might suit some of your projects, but if you make the post too high you’ll end up with a weaker column than the ones I’ll introduce next.
In addition to the 2×2 bricks in Figure 2-24, you could also make a simple post from 2×3s, 2×4s, or just about any other size of brick.
Figure 2-25 shows a compound post, a sturdier column that also uses more bricks. Unlike the 2×2 version, this 2×4 column can withstand a certain amount of pressure from any side without crumbling. It’s also very simple to build, which makes it an excellent way to create several columns quickly (even as temporary supports).
The chimney column in Figure 2-26 is about as strong as the compound post, but it offers some weight and brick savings. Because its core is hollow, you get much of the horizontal stability of the 2×4 version at only 75 percent of its weight, which may be important if you are building a large model that you want to transport.
One drawback to the chimney pattern is that you must check it regularly to make sure that its core stays square. To do so, make a 2×2 column of six or more pieces and, as you build, insert it into the core from time to time.
What do you do with all those leftover 1×2s? Make them into a keyhole-patterned column! The keyhole column shown in Figure 2-27 can be varied in both size and shape. The arrangement shown here is just one possible pattern based on creating composite walls out of mostly smaller (1×3 or less) bricks. You can change the pattern slightly and grow the column to suit your needs.
Like the chimney pattern, use a square of bricks that fits the shape of the core to make sure that it stays aligned. Because it uses many components, the keyhole column tends to warp and twist as it rises. But, if you can keep it reasonably straight, you’ll find it both functional and attractive.
You’ll create an interesting new pattern when you mix the compound post column with the chimney pattern, as you can see in Figure 2-28.
By using this hybrid column, you immediately resolve one of the major problems with the hollow-core chimney: By adding a layer or two of 2×4 bricks (as shown in Figure 2-29) every few layers, you help keep the 1×2 and 1×4 bricks aligned.

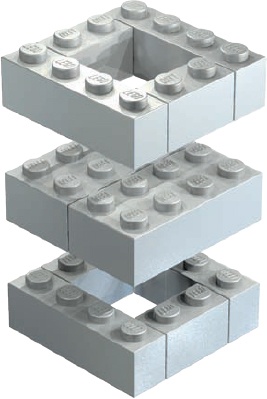
Figure 2-29. An “exploded” view of the hybrid column design shows the orientation of the different layers.
Given the bricks that most builders have in their inventory, this hybrid version may be more realistic for you to build. You probably won’t build a large-scale model entirely of 2×4, 1×2, or 1×4 bricks. Usually you’ll mix and match bricks of different sizes as you need them. When it comes to having bricks left over for your columns, you’ll probably have a good mix of the three sizes.
If you’re like most builders, not all of your models will need internal bracing. Still, the construction techniques you’ve learned here will be useful in many other ways. In Chapter 3, you’ll see just how useful a simple post-style column can be for creating a small building. You’ll also learn how you can use beams to support the floors in a building or to create a solid structure for a roof. Keeping these basic construction techniques in mind gives you the tools you need to be a successful LEGO builder.
We’re still learning techniques for putting bricks together, but sooner or later you’ll want to take one of your LEGO creations apart. Whether it’s an official set that you built out of the box and put on a shelf for a few months, or a robot that you built last weekend, you’re eventually going to want to reuse its pieces. The first step is to pull off large sections of bricks. Then, break those down into smaller chunks, and finally separate individual bricks from one another.
At some point, you’ll likely come across two or more pieces that are stuck together so tightly that you can’t pry them apart or even get a fingernail between them. Often these will be two small plates (proving just how well the stud and tube mechanism works). Despite their best efforts to stay together, you know they need to come apart.
In some official LEGO sets and assorted tubs of bricks, you’ll find a rather odd-looking piece of plastic (Figure 2-30). This isn’t quite a brick, but it does have some studs on it. It’s a brick separator.
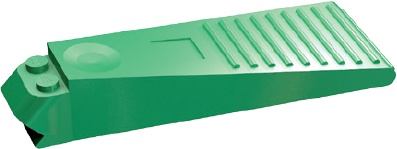
If you haven’t got a brick separator, consider buying a couple since they’re often used in pairs. If you haven’t found one in a LEGO set, you should be able to purchase them directly from the LEGO Group’s Shop at Home service, http://shop.lego.com/, item #630. They sell for about three dollars each and will save you much more than that in dental fees by helping you separate bricks and plates without resorting to yanking them apart with your teeth.
Take, for example, two 2×2 plates stuck neatly together. Start by taking one of your brick separators in one hand, and then place the 2×2 stacked plates studs down on top of it. Next, bring the second separator down from above; this creates something that looks like the handles of a pair of pliers (see Figure 2-31). Squeeze the separators together gently, and you’ll find the two plates begin to disconnect.
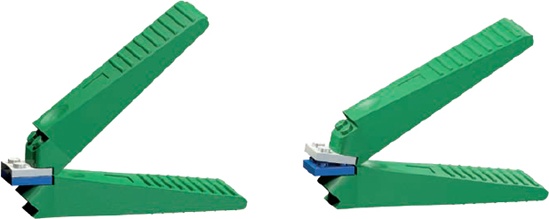
Figure 2-31. Two brick separators working to take apart two 2×2 plates. Gently squeezing the two handles is usually enough to quickly separate even the most stubborn pieces.
Or say you need to remove a small part from a larger one, like the 1×2 plate stuck in the middle of a 4×6 plate, as shown in Figure 2-32. You can use a single brick separator here to free the little piece. Figure 2-33 shows the separator working its magic.
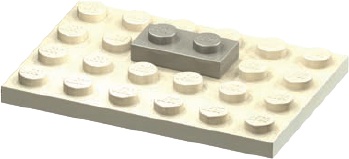
Figure 2-32. Sooner or later you’ll find yourself trying to remove a 1×2, like the one shown here, from the middle of a much larger piece.
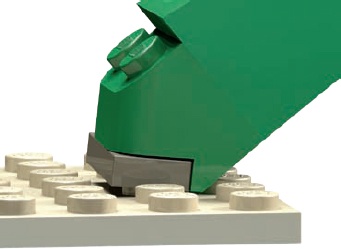
Figure 2-33. The brick separator’s unique design allows it to get close to the 1×2 plate and then lever it away from the larger plate beneath it.
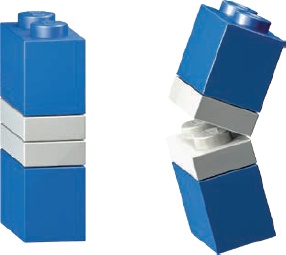
Figure 2-34 shows a trick for removing pieces when you don’t have a brick separator. Here we have two 1×2 plates stuck together. Instead of scratching away with your fingernails at the joint between them, try placing a 1×2 brick on the top and bottom of the plate combination. The bricks give you enough leverage to cause a small separation between the plates. The gap that forms should allow you to separate the plates completely.
You could also use a brick to separate pieces like the ones shown in Figure 2-32. Put the brick on top of the 1×2 plate (Figure 2-35) and gently press down as you tilt the brick toward the surface of the larger plate. If you do this without lifting up on the brick, you should find that the 1×2 plate loosens from the studs of the 4×6 plate.

Now that you know some of the best ways to connect bricks to make your models strong, it’s important to understand how to plan your constructions. When building, it’s always a good idea to try to minimize problems so that you’ll enjoy your building sessions to the fullest. Here are a couple of basic principles to help you do that.
No matter how big you think your model might end up, consider breaking the work into smaller sections that will be easier to work on. Doing so will make the project seem less daunting and will make it easier to figure out how to build very high sections or ones built at different angles from the rest of the model. For example, if you’re building a skyscraper, think about building sections of a few floors each and then attaching these sections to each other.
If you’re making a model of a real-life object, like a building or a vehicle, examine the object and try to find natural separations, like where the object’s size or shape changes dramatically or where one color ends and another begins.
Existing separations can help you determine how to build your model in sections. For example, if you’re building a pickup truck, try building the cab separately from the box section.
Your choice of bond patterns (Figure 2-2 through Figure 2-4) will vary from model to model and even within the same model. You won’t always want to use overlapping, despite its obvious strengths. Sometimes you’ll want to stack bricks and other times stagger them. Throughout this book, I’ll point out which pattern I’m using and why so that when you design and build your own models, you’ll have a better sense of the pattern to use at any given time.