Some hobbies are limited in just how much you can do with them. For instance, if you’re a coin collector, you can collect coins, look at them, catalog them, and sell or trade them, but not too much more. The LEGO system, on the other hand, allows for activities beyond merely building with bricks.
In this chapter, we’ll look at two activities that go beyond building with LEGO pieces and put your creative and analytical skills to the test.
One way to expand your LEGO building hobby is to share your building instructions. When you create a model, why not share the build information with others so that they can build your model too? Sharing is an integral part of joining the worldwide LEGO community.
Given all the techniques you’ve learned in this book, you’ll soon be building original models that have never existed before. Once you end up building a space shuttle, a bulldozer, or a sculpture of a dragon, you may want to document your building process in order to share your model with the world or just to ensure that you can rebuild the model. Having the steps of your model recorded makes it easy to pull out the right bricks and build that same project again any time you like.
One easy way to create plans for your models is to photograph your building process step by step with a digital camera. Take as many pictures as you need to fully explain how to build the model, and then share your photos.
First, take a shot of the parts used to build the model, as shown in Figure 10-1.
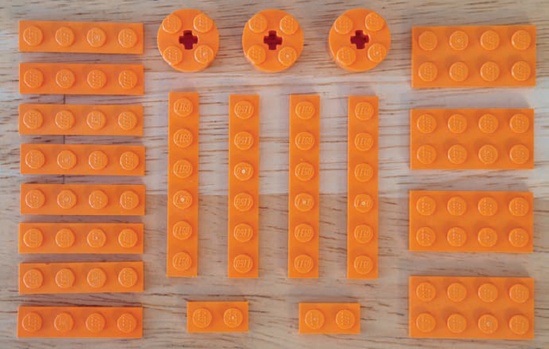
Figure 10-1. Set out the parts for the model and photograph them before beginning construction. Here, I show the pieces needed to build a 4X 1×2 plate.
A photo like Figure 10-1 will give other builders a clear picture of the parts they’ll need to build your model.
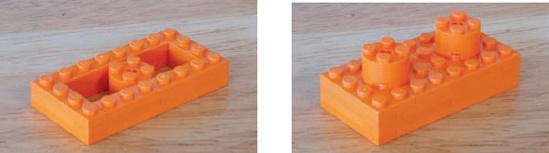
Next, capture each step, right after you add the parts it calls for to the model. Figure 10-2 and Figure 10-3 show sequential steps for building a 1×2 plate in 4X scale.
You can then import these pictures into a word processor or layout program to create a single set of instructions, or you can just post them online for people to view one at a time.

Throughout this book, you’ve seen many examples of building instructions. Most of these images were created using computer-aided design (CAD) software, like the programs used to design cars and airplanes. These amazing tools provide an endless supply of LEGO bricks in every color you need. You can design and build an entire model using this software, as shown in Figure 10-4.
These programs also let you track each building step as you go, so you can create step-by-step instructions for other builders to follow, like the example shown in Figure 10-5.
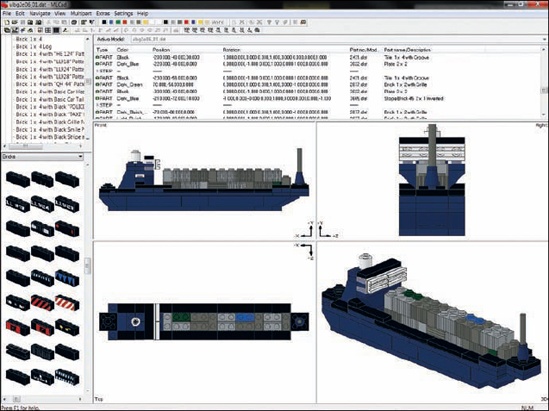
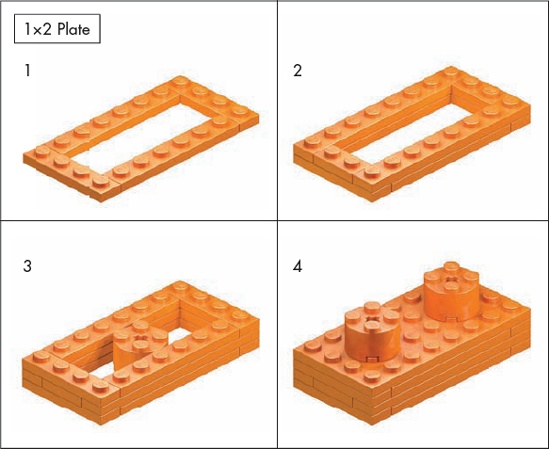
Figure 10-5. These building instructions were created using software. Notice how similar these images appear to Figure 10-2 and Figure 10-3.
The word fun is often associated with the LEGO hobby. To take the fun even further, you can combine your LEGO elements with games you already know (by re-creating them in LEGO pieces), or you can create games that are completely original.
Many traditional games are played on a checkerboard with eight squares along each side, for a total of 64 squares. One easy project to tackle is to make your own checker (or chess) board from LEGO pieces. Conveniently, LEGO makes a waffled baseplate that is 32×32 studs—perfect for making checkerboards. If you do some quick math, you’ll find that you can break up the board into eight rows and eight columns, just by adding tiles in the right pattern.
As you can see in Figure 10-6, it takes only four 2×2 tiles to create each square on the game board. And with very little effort, you’ve got your own custom game board, ready to play!

Note
If you don’t have as many tiles as you need to cover a 32×32 baseplate, use two different colors of standard plates. Your board won’t look as smooth, but it should be just as useful for playing games.
Once you’ve made your board, you can use it to play games like checkers or chess. To play a game of checkers all you’ll really need are simple playing pieces, like 2×2 bricks in two different colors. But if you want to play chess, consider creating your own custom set of chess pieces.
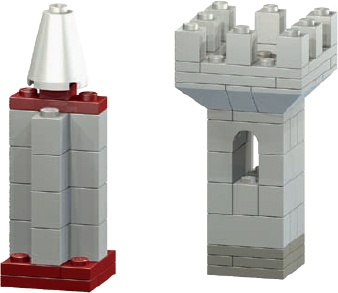
Figure 10-7 shows a simple pawn. It uses mostly common parts, so building 16 of them shouldn’t tax your collection too much. Figure 10-8 shows what a rook and bishop could look like.

Here’s a game that I originally designed to be played on wooden tiles using glass beads as markers. It’s called Connect-Across, and it works just as well with LEGO bricks.
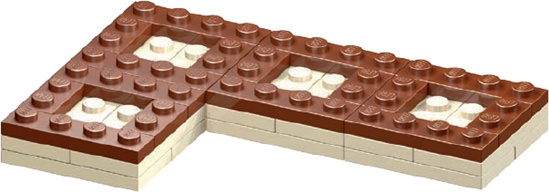
First, make 30 tiles like the ones in Figure 10-9. (Their style and color isn’t important, as long as they’re the same size.)

Figure 10-9. These are two examples of how to create the game tiles. You’ll need 30 identical tiles.
You’ll also need two 15-piece sets of playing pieces, for a total of 30 pieces. Pick one of the styles shown in Figure 10-10 or design your own. The main thing is that the two sets should look different from each other.
For example, for the first set, you could use 15 upside-down wheels (with or without the rubber tires), like the one shown on the far left of Figure 10-10. Then, for the second set of pieces, you could make 15 copies of the marker shown on the far right.

Connect-Across combines the basic goal of tic-tac-toe with the strategy of checkers. You and your opponent both build and fill the board as the game progresses while trying to get four of your pieces aligned in a row. Any tiles that you add to the board must touch another tile on the side or corner.
To begin your game, first decide who will use which set of markers, and then have the players set their markers near themselves on the table. Now set aside four of the square tiles, and then divide the remaining ones.
Flip a coin to see who goes first. The player who goes second arranges the four tiles set aside earlier in the center of the table (as shown in Figure 10-11). The tiles can be arranged in any pattern, as long as each tile touches another on the side or corner.
Note
You might use a large 48×48 waffled baseplate as your board to keep things from shifting around too much, but you can play on any level surface.
There are really only three basic rules for playing Connect-Across. When it’s your turn, you can do one of the following:
Place one of your markers on any open tile on the board.
Place a new tile on the table, making sure that it touches the side or corner of another tile on the board.
Move one of your markers on the board a single space (to an adjacent and empty tile), or capture another piece, just like in checkers. To capture a piece, move your marker over an opponent’s piece and land on an empty square. Remove the piece you’ve jumped over from the board. Return the captured piece to your opponent, to be used again during subsequent turns.
To start playing, the first player places one marker on any of the four empty squares or places a tile on the table to increase the size of the game board, as shown in Figure 10-12.

Figure 10-12. The upside-down wheel makes a simple marker, and it fits perfectly in the center of a tile.
The second player can place a marker or a tile, and game play continues, in turns. The board will grow as you move, with rows and columns branching out in different directions. For example, in Figure 10-13 you can see that the player using the red markers has a good chance of making four in a row diagonally, through the middle of the board.
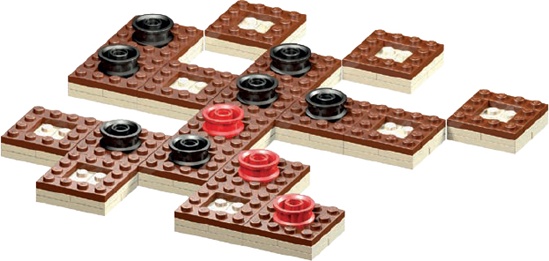
Players add tiles or markers and make single or capture moves until one player lines up four markers in a row vertically, horizontally, or diagonally, and wins. Notice in Figure 10-14 that the player using the red markers has created a diagonal row.

How you choose to enjoy LEGO as a hobby is up to you. As you’ve seen in this chapter, there are ways to add interest to your LEGO elements that don’t simply involve building models. As with the building techniques you’ve explored in this book, there is no one right or wrong way to enhance your participation in this hobby. That’s why things like playing LEGO-based games or creating instructions can be just as rewarding as building the models themselves.