Chapter 3. Rate and Tag Photos

Even if I were to do nothing else with photos on my iPad, I would want to perform my first round of rating and keyword tagging. I’d much rather spend time in front of my computer editing the photos than sorting them, especially since rating and tagging can be done with the iPad during downtime like waiting for a flight, chilling out in a coffee shop, or sitting on the couch in the evening.
Actually making that possible, however, is a difficult task, which explains why there are only a few apps capable of doing it. The one I’m focusing on is Photosmith by C2 Enterprises, which lets you rate photos you’ve imported, assign keyword tags, and then sync to Adobe Photoshop Lightroom. Taking a slightly different approach, Code Foundry’s Pixelsync pulls photos from Apple’s Aperture or iPhoto, lets you work with them on the iPad, and then puts them back onto the computer festooned with metadata. Several image editing apps also now offer tools for rating and tagging.
Rate and Tag Using Photosmith
Apple introduced the iPad Camera Connection Kit at the same time as the original iPad. In the two years since, we’ve seen all kinds of software innovations with Apple’s tablet, but surprisingly, being able to rate and tag photos hasn’t quite succeeded until now. It seems like a natural request: Take the images you imported onto the iPad; assign star rankings to weed out the undesirable shots and elevate the good ones; add important metadata such as keywords; and, lastly, bring the photos and all that data into a master photo library on the computer.
Photosmith 2, in my opinion, finally delivers those capabilities. When you’re shooting in the field, you can act on those photos instead of keeping them in cold storage. Back at the computer, that work flows smoothly into Photoshop Lightroom, so you don’t have hours of sorting ahead of you.
Import Photos
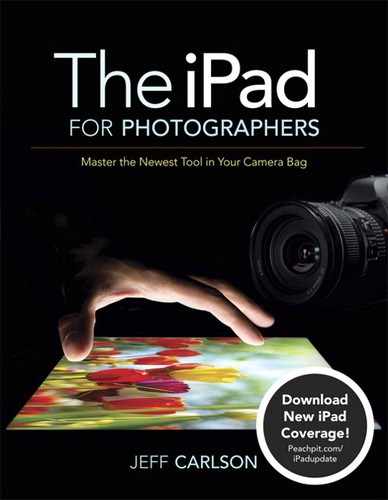
When you launch Photosmith, it scans your iPad’s Photo Library and displays thumbnails sorted by the photos’ capture date (3.1). Tapping one of the Smart Collections buttons in the sidebar narrows the field; for example, I often want to just work with the Last Imported collection.

3.1 Photo library in Photosmith 2
If, for some reason, you don’t want Photosmith to scan your library automatically, you can turn that feature off. Tap the Services button at the bottom of the sidebar, then tap the iPad Photos button under Import, and switch the feature to Manual. The next time you add photos to your iPad, you would then need to return to the iPad Photos drawer and tap the Import Now button. This control also lets you include only specific photo albums from your library.
Photosmith can also import photos directly from an Eye-Fi card. Go to the Services pane, tap the Eye-Fi button, and set the service to Enabled.
Rate Photos
As you’ll learn in the pages ahead, Photosmith features several ways to organize and group your photos. But let’s start with the most likely first action: reviewing and rating the images you imported. The app supports ratings (1–5 stars) and color labels that track with those features in Lightroom. You can also mark photos that don’t make the cut as rejected.
To rate photos, do the following:
1. Double-tap a thumbnail to expand the photo in Loupe view.
You can also tap the Fullscreen button to hide the sidebar and review each photo larger. Pinch to zoom in or out to view more or less detail.
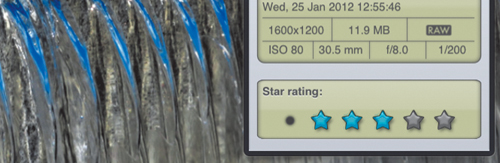
2. Tap a star rating on the QuickTag bar to assign it to the photo (3.2). Or, if the shot isn’t salvageable, tap the red Reject (X) button to mark it as rejected.
3.2 Rating a photo in Loupe view
3. If you use colors to label your shots, tap one of the color buttons.
4. Use the Rotate buttons to turn photos that arrived with incorrect orientation in 90 degree increments.
5. Swipe left or right to switch to the next or previous photo.
6. Continue until you’ve rated all the photos you want.
To return to Grid view, tap the Grid button; the photos are marked with stars to indicate their ratings (3.3).

3.3 Ratings and color assignments appear on thumbnails in Grid view.
The values of the stars are up to you. My approach is to rate anything that looks promising (which sometimes means, “Oh hey, that one’s in focus after all!”) as one star. Photos that strike me more creatively get two stars. On rare occasion I’ll assign three stars at this stage, but usually I reserve stars three through five for after I’ve edited the photos in Lightroom.
Rate multiple photos simultaneously
For an even faster initial review pass, you don’t need to enter the Loupe or Fullscreen views. Select the photos you want to rate or categorize in Grid view, and apply the information at once, like so:
1. In Grid view, tap once on a photo to select it. Tap to select others.
2. Tap the rating or color label in the QuickTag bar to apply it to each selected photo.
3. To let go of your selections, you can tap each one again, but there’s a better way: Swipe up on the QuickTag bar and tap one of the selection buttons—All, None, or Invert (3.4).

3.4 The filter controls in the expanded QuickTab bar include buttons to select all thumbnails or none, or to invert the selection.
Assign Keywords
In the interests of speed and convenience when reviewing photos, one task that’s often ignored is assigning keywords to the images. On the computer, it’s a mundane but important task (especially if you’ve ever found yourself trying to find an old photo and ended up just scrolling through thousands of shots); on the iPad, it was darn near impossible to do until only recently. Photosmith makes it easy to apply tags to a single photo or to all photos you’ve selected.
Assign existing keywords
If any of your photos already contain keywords, Photosmith pulls that information when it first scans your library. So, most likely, you’ll start with a populated list of keywords.
Bring up a photo in Loupe view or select one or more photos in Grid view, and then do the following:
1. Tap the Tags button in the sidebar.
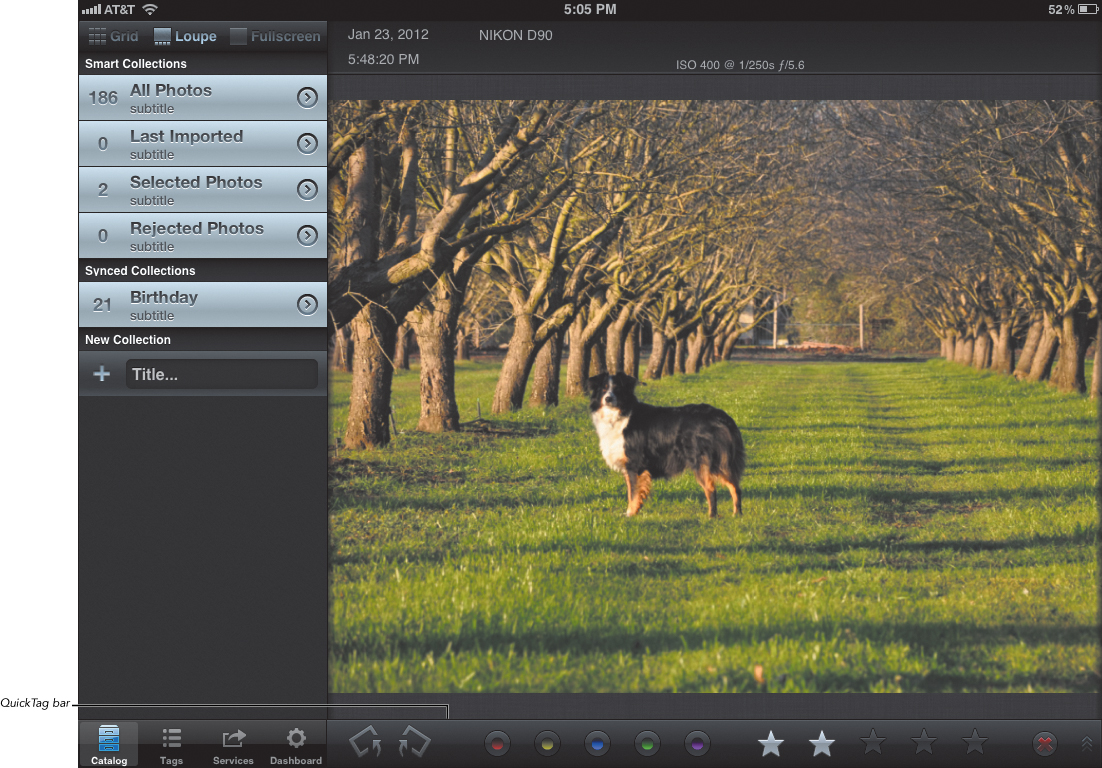
2. Tap the Keywords field to bring up the Keywords editor (3.5).
3.5 The Keywords controls
3. To assign an existing keyword, locate it in the list on the left and tap its button. You can also choose from the lists of Recent and Popular keywords that appear to the right.
To quickly locate a keyword, begin typing it in the Search field at the top of the screen.
4. Tap Done when you’re finished.
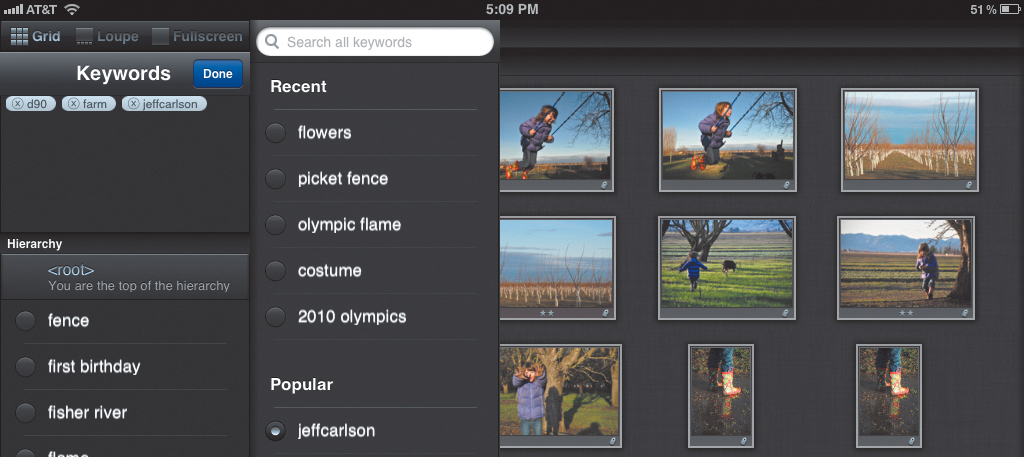
Create new keywords
The Search field also acts as the control to define new keywords. As you type, in addition to listing matches to existing terms, the text also appears under a Create New Keyword heading. Tap the tag that appears to add it to the selected photo or photos and to the keyword list.
Build keyword hierarchies
Keywording is a form of organization, and organization varies from person to person. While I prefer a single list of tags, you may be more comfortable with multiple levels of parent and children terms. Photosmith caters to both styles, letting you build keyword hierarchies that Lightroom understands, like so:
1. With the Keywords editor open, tap the Detail (>) button to the right of any tag to set that tag as the parent.
2. Type the name of the child keyword in the Search field. As the child keyword appears under the Create New Keyword section, Photosmith notes that it will belong to the parent tag (3.6).

3.6 Creating a new child keyword, “winter,” under “farm”
3. Tap the new keyword to add it to the list and to the selected photo or photos.
Remove keywords
Suppose you mistype a keyword or apply it to a term by accident. To remove a keyword from those already applied to a photo, tap and hold it and then tap the Remove button (3.7). Or, if you want to just remove a keyword from the hierarchy, swipe left to right over it and tap Delete.
3.7 Removing a keyword from a photo
When multiple photos are selected and some contain keywords that are missing from the others, an asterisk (*) appears on any term that isn’t shared by all. To quickly add it to the rest of the group, tap and hold the keyword and choose Apply to All from the group of commands that appears.
Edit Metadata
Keywords are essential for locating your images later and for assigning terms that can be found in photo-sharing services and commercial image catalogs, but you should also take advantage of other metadata while you’re processing your photos in Photosmith.
With one or more photos selected in your library, go to the Tags panel of the sidebar and tap any field to enter text (3.8). The Photo Title and Caption fields, for example, are used to identify images on Flickr and other sites. The IPTC fields are also important, because they embed your contact information, copyright statement, and job-specific metadata into the image file.

3.8 Add metadata to multiple selected photos.
Tip
Set up metadata presets so you don’t have to enter common information (like Creator and Copyright) for every photo. Create a new preset in the Tags pane of the sidebar, and then populate the data to as many photos as you’d like with just a few taps.
Filter Photos
Now that you’ve rated and tagged the photos and applied metadata to them, you can take advantage of Photosmith’s filtering tools to customize which images appear based on all that information. Swipe up on the QuickTag bar to reveal the filtering options.
Note
Naturally, you don’t need to apply every last bit of metadata before you can start filtering your library. Particularly when I want to share something online quickly, I’ll do a pass of reviewing and rating my imported photos and then filter that group to view just my two-star picks. But for the purpose of explaining how the features work, it made sense to cover it all before talking about how to filter against it.
Filter by metadata
Here’s where that rating and tagging pays off on the iPad. To display photos that match certain criteria, do the following in Grid view:
1. Swipe up on the QuickTag bar to reveal the filter options.
2. Tap the Filters button to reveal more specific filter controls.
3. Tap the criteria you wish to filter against (3.9). Selecting a star rating, for example, displays only images matching that rating. You can also filter by color labels and rejected status, or you can enter text that would match titles, captions, or keywords.

3.9 Using filters to view only photos marked with two or three stars
4. Tap Done to apply the filters.
5. To toggle filtering on and off, tap the button to the left of the Done button.
Filter using Smart Groups
Here’s an issue I run into often when importing photos into Lightroom. The pictures on my memory cards tend to span several events, or even days if I haven’t been shooting regularly. Lightroom sees the photos as one big collection, regardless of their contents. If I want to split them out into groups—and more importantly, apply accurate metadata during import—I need to bring them over from the camera in several batches.
Photosmith’s Smart Groups feature enables you to view those photos in separate batches, adjusted on the fly using a simple slider control. Even if the photos cover one larger event, it’s likely they represent distinct experiences. For example, when I’m on vacation I don’t usually sit around and shoot in one place. I could be fly-fishing in the morning, sightseeing in town in the early afternoon, hiking later in the day, and waiting for the sunset at a scenic overlook in the evening.
When I bring the photos I took during that day into the iPad, I get them all in one event based on the date they were shot. Even importing in batches doesn’t help, because I end up with just the iPad’s Last Imported and All Imported smart collections, not the groupings I prefer (and I can’t assign metadata anyway).
A better and faster workflow instead works like this:
1. Import all the photos into the iPad.
2. In Photosmith, swipe up on the QuickTag bar to make the Smart Groups slider visible (3.10).

3.10 The Smart Groups slider at its default position
3. Drag the slider to the left to break the library down into finer events (3.11). Or, to group more photos together, drag to the right.

3.11 Selecting a finer setting (drag to the left) breaks the shoot into groups. In this case, the different stages of a birthday party are split apart: riding a pony, eating cupcakes, and then grooming the horses.
Although this grouping doesn’t change the locations of the files in the Photos app—they’re not put into new albums or anything like that—it does give you the oppotunity to select ranges of photos by tapping the button to the left of the date stamps. Then you can apply ratings and keywords in batches that better match the grouping of real-life events.
Tip
The Smart Groups slider doesn’t have to be tied to capture dates. It takes its cues from the Sort criteria that are to the left of the slider (and discussed in more detail two pages ahead).
Change the sort order and criteria
Normally, photos appear in Grid view based on their capture date, with the newest additions at the bottom of the list. To change the order in which they appear, or to list them by import date, star rating, or color label, do the following:
1. Swipe up on the QuickTag bar to reveal the filter options.
2. To toggle the sort order between descending and ascending, tap the arrow to the right of the Sort button (3.12).

3.12 Swipe up on the QuickTag bar to reveal the filter options.
3. Tap the Sort button itself to reveal more sorting options.
4. Tap the button for the sorting criterion you wish to use (3.13).

3.13 Tapping the Sort button reveals more sorting options.
5. Tap Done to go back to the filter options.
Group Photos into Collections
I mentioned earlier that people organize photos in different ways—and that includes how they group photos. For some, having metadata in place is good enough to locate photos using filters and searches. Other people prefer to store images in albums, folders, or other types of digital shoeboxes. Photosmith’s collections scratch that itch, giving photos an address within the app where they can be easily found, versus being scattered throughout the larger library. (Collections also play an important part in syncing between the iPad and Lightroom, as I’ll discuss shortly.)
Follow these steps to add photos to a collection:
1. Select the photos in your library that you want to include in a collection.
2. If you need to create a collection from scratch, tap the New Collection button and give the collection a name.
3. To add the selected photos to the collection, take one of two actions:
• Drag one of the photos onto the collection’s name in the sidebar; all selected photos will accompany it.
• Tap the collection’s Detail (>) button to view its options in the sidebar drawer, and then tap the Add Selected Photos button (3.14).
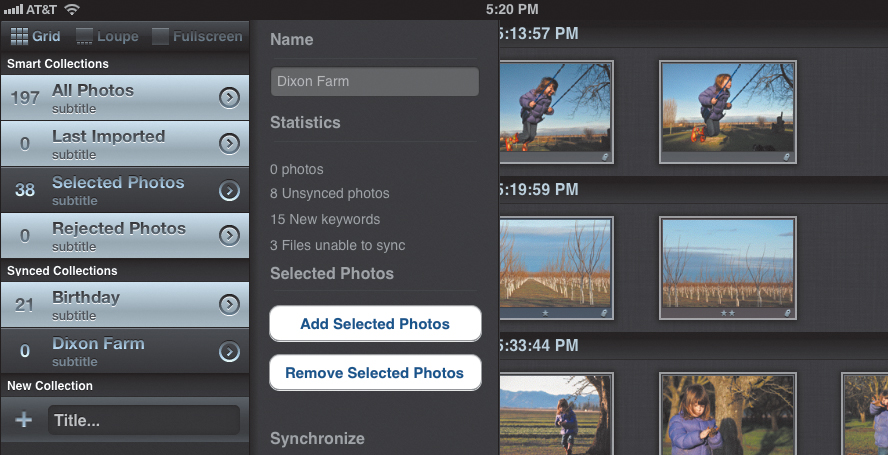
3.14 Adding selected photos to a collection using the sidebar drawer
Deleting photos from a collection is just as easy: Select the photos you wish to remove, tap the collection’s Detail (>) button, and tap the Remove Selected Photos button.
Sync with Photoshop Lightroom
And now we get to the whole point of using an app like Photosmith. Rating and tagging is helpful, but if you can’t transfer that metadata with your photos to Lightroom, all the work you put into it ends up being futile. Photosmith offers two methods to synchronize your images and data.
Photosmith publish service
Lightroom’s Publish Services panel lets you sync photos to your libraries on Flickr, Facebook, and others. Photosmith takes advantage of this conduit, enabling two-way synchronization between the iPad and the desktop. Download the free Photosmith plug-in at www.photosmithapp.com, and install it in Lightroom using the Plug-in Manager.
Any collections you create in Photosmith show up in Lightroom as well, and the photos and metadata remain in sync when you click the Publish button in Lightroom (3.15). Or, synchronize a collection from within Photosmith by tapping its Detail (>) button and then tapping the Synchronize Now button (3.16).

3.15 Photosmith’s collections appear in Lightroom.

3.16 Synchronize a collection from within Photosmith.
Tip
The Photosmith publish service includes options such as specifying image size and format and applying Lightroom metadata presets.
Photosmith Plug-in Extras
If you’d prefer to transfer photos one-way from Photosmith to Lightroom, use the Plug-in Extras functionality:
1. In Lightroom, choose File > Plug-in Extras > Photosmith, and then choose one of the following options:
• Sync Keywords: Transfers only the keyword list.
• Sync Multiple Collections: Transfers one or more collections that you choose.
2. Click the Sync Now (for keywords) or Sync Collections Now (for collections) button to perform the transfer (3.17).

3.17 Sync just the collections you choose from Lightroom.
3. Click Close to exit the dialog.
Export to Photosmith
If that isn’t enough options, you can also set up Photosmith as an export target. In Lightroom, choose File > Export and then specify Photosmith from the Export To menu. You can specify the image format and size, and you can choose whether to sync keywords for the entire library (slower) or just the keywords in use by photos (faster). The export settings can also be set up as a preset for easier export later.
Tip
Want to speed up Lightroom import? Of course you do! Here’s a clever way to copy your photos faster. When you get to your computer, connect the iPad via USB (even if you normally synchronize over Wi-Fi), and use Lightroom’s standard import process to pull the photos from the Photo Library; transferring files over USB is much faster than over Wi-Fi. Next, use the Photosmith publish service in Lightroom to sync it with Photosmith (or initiate a sync from Photosmith). The sync copies only the metadata between iPad and computer; it doesn’t re-copy the image files.
Sync to a Hard Disk
Although Photosmith was designed to work with Lightroom, you can still take advantage of its features if you don’t use Adobe’s software. Export your tagged photos to your computer for later processing in other software. Photosmith offers two paths for doing this.
Dropbox
If you’re on a robust Internet connection, copy images from Photosmith to Dropbox, which makes them automatically appear on any computer on which you’re running the online service.
1. Select the photos you want to transfer.
2. Tap the Services button at the bottom of the sidebar.
3. Under Export, tap the Dropbox button to reveal the Export to Dropbox drawer (3.18).

3.18 Send photos to your Dropbox account.
4. Choose which photos to send (such as “Send 24 selected photos”).
5. Tap a button under Upload Size if you want to resize the photos.
6. If you want metadata saved in separate files alongside the image files, select the Create XMP/Sidecar button. Metadata is also written to the image files themselves.
7. Tap the Send Photos button to start copying.
Seagate GoFlex Satellite
Seagate’s GoFlex Satellite is a portable hard drive that also includes the ability to create its own Wi-Fi network. The Satellite was designed for people who want to carry a lot of media but don’t have a high-capacity device. You load up the drive with your entire movie collection, connect your iPad (or iPhone, iPod touch, laptop, or whatever) to the Satellite’s Wi-Fi network, and then stream the content. No syncing, no juggling media files to make room—simple.
Photosmith takes that concept and pushes it in the opposite direction. Apple makes it impossible to copy files to a device connected via the USB portion of the Camera Connection Kit, but that limitation doesn’t extend to the air surrounding the Satellite. Copy your photos from Photosmith to the drive, with ratings and keywords intact, and then import them into the software of your choice.
1. Press the power button on the Satellite to start it up and activate its Wi-Fi network.
2. On the iPad, go to Settings > Wi-Fi and select the name of the Satellite’s network.
3. Switch to the Photosmith app.
4. In the Photosmith catalog, select the photos you want to copy.
5. Tap the Services button in the sidebar.
6. Tap the GoFlex button to view options for the GoFlex.
Tip
You can also drag the selected photos to the GoFlex button to bring up the drawer that contains the export options.
7. At the top of the drawer, choose which photos to send (all viewed, selected, or dragged).
8. Specify a folder on the drive where the photos will reside.
9. To save the metadata in separate related files, select the Create/Update XMP Sidecar File button.
10. Tap the Backup/Update Photos button to initiate the transfer (3.19).

3.19 Copy photos wirelessly to a GoFlex Satellite drive.
Rate and Tag Using Pixelsync
Every application starts with assumptions. Photosmith assumes you’re importing photos directly from the camera and preparing them for the eventual transfer to the computer. Code Foundry’s Pixelsync assumes your images are aleady on the computer and that you want to take them along on your iPad to sort and rate when you’re out and about—think of it as the reviewing environment you work on during the bus ride to work. In fact, it entirely ignores the photos stored in the iPad’s Photo Library. When you’re finished reviewing, the expectation is that you’ll bring your metadata back to the computer. If you store photos in Aperture 3 or iPhoto ’11 (or later versions of each), Pixelsync is an elegant way to work on them without being tied to your Mac.
Tip
Pixelsync works with both Aperture and iPhoto, not just one or the other. In the Pixelsync Helper on your Mac, go to the application’s preferences and add both library files to the Libraries list. Then, in Pixelsync on the iPad, choose whichever library you want in the Select Library dialog.
Import Photos
In addition to the Pixelsync app for the iPad, you need a small utility called Pixelsync Helper to direct communications between the iPad and the Mac. Download it for free at www.pixelsyncapp.com. Once it’s installed and set up (you’ll need to specify where your Aperture or iPhoto library resides), do the following to import photos from the computer into the iPad:
1. Tap the Photos button to bring up the Hosts popover (3.20).
3.20 Getting started in Pixelsync
2. Tap the Import button (the down-facing arrow).
3. In the Select Library dialog, tap the name of your Aperture or iPhoto library.
4. Tap the Browse Library button.
5. Locate a project, event, or album to import, and tap its checkmark icon to add it to the import queue (3.21). To preview a picture, tap the name of the library item to view its files, and then tap a filename.
3.21 Choose an event or album to copy.
6. Tap the Home button.
7. Tap the Import button to start transferring the photos.
Tip
Did nothing transfer from Aperture? Pixelsync doesn’t generate image previews from raw files, so you need to make sure Aperture is doing that job first. In Aperture’s preferences, click the Previews category and make sure “New projects automatically generate previews” is selected.
Review and Rate Photos
With photos loaded into Pixelsync, you can take your iPad anywhere and start reviewing them. To open one of the sets you imported and start assigning star ratings, do the following:
1. Tap the Photos button to view the navigator, displaying libraries stored on the iPad.
2. Open a library in Pixelsync’s Light Table by tapping its name (3.22).
3.22 Choose a library from the navigator popover.
3. Tap a thumbnail to open the photo in the detail view.
4. Tap one of the rating dots to assign a rating, or tap the X to reject the photo (3.23).
3.23 Tap a star rating in the detail view to assign it to the current photo. Aperture libraries also include a control to assign color labels in this subpanel.
After rating a photo, swipe left and right to scan through your photos and assign ratings, or use the thumbnail strip to jump to other images in the library. However, to speed up reviewing, go to Pixelsync’s preferences (tap the gear button in the navigator popover) and select the “Scroll to next image after rating” option. You can also opt to display a temporary large star overlay to help you verify you tapped the rating you wanted; select the “Visual feedback after rating” option.
Assign ratings in the Light Table
When you’re really in a hurry, you can assign ratings directly in the Light Table. Instead of tapping a photo thumbnail, tap and hold anywhere for a second until the rating subpanel appears. You can then tap thumbnails to select them (which adds a soft outer glow to each) and assign a star rating that applies to them (3.24). Tap and hold to dismiss the subpanel.
3.24 Rate photos in the Light Table.
Assign Keywords
A list of available keywords appears along the left side of the screen, pulled from iPhoto or Aperture. Assigned tags show up in blue to the right of the keywords panel. To locate and add a tag to a photo, do one of the following:
• Scroll through the list and tap a term.
• Better yet, start typing in the Search field to locate a term (3.25). If you have hundreds of keywords, this is the best approach.
3.25 Type to search for existing keywords.
• Aperture libraries can include root keywords as well as child terms. When children are available, tap the expansion triangle to the right of the tag name to reveal them (3.26).
3.26 A child keyword in an Aperture library
• If a term isn’t listed, type it in the Search field and tap the plus (+) button to create a new keyword. You’re then asked to save the keyword, but to add it to the photo you need to locate it again and tap it.
• To add a new child keyword, tap and hold a root keyword in the list. In the dialog that appears, type the name of your term and then tap the Save button.
If you need to remove a keyword you added, tap the X button to the right of the tag name.
View and Edit Metadata
For any photo I plan to share online, I like to include a caption and definitely a title (so the first thing someone sees isn’t “IMG_5744”). Pixelsync lets you edit these two values and, in the process, peek at the EXIF data about the current photo:
1. Tap the Info (i) button on the top panel to bring up a popover containing all the nitty-gritty shot data (3.27).
3.27 Metadata for the current photo
2. Tap one of the Edit buttons to the right of the Version Name or Caption fields to edit them. (Tapping either button brings up the same dialog containing both fields.)
3. Tap outside the popover to dismiss it.
Filter Photos
When you want to step back and see which photos have risen to the top of the list, use the Filter Photos feature to show only those images with the ratings you choose.
1. In either the Light Table or the detail view, tap the Filter Photos button in the bottom panel. A list of filter options appears.
2. Tap a rating level to define which photos remain visible (3.28). Tapping “Two stars or better,” for example, hides everything but those images ranked two, three, four, or five stars.
3.28 Select a filtering option.
You can also choose to display only unrated photos, only rejected photos, or Aperture images matching one of the available color labels.
3. To go back to viewing everything, tap the Show All button.
Tip
Combine the filter and sorting tools to display the photos based on star rating. Tap the Rating button on the bottom panel, and then tap Asc (ascending) or Desc (descending) to list photos from highest to lowest or vice versa.
Sync with Aperture or iPhoto
Back at your computer, it’s time to sync the ratings, keywords, and other metadata you’ve assigned. As long as your iPad and Mac are on the same Wi-Fi network and Pixelsync Helper is running, Pixelsync handles all of the necessary communication. All you have to do is tap the blue Sync button, which appears in the top panel (3.29) as well as in the navigator popover.
3.29 Before (top) and during (bottom) a sync operation
Rate and Tag Using Editing Apps
I’ve spent this chapter focused on Photosmith and Pixelsync because they both work with many photos at once. The way I prefer to work, I first review and rate my photos, find the ones that are worth spending more time on, and then bring them into an editing program (on the iPad or on the computer) later. Sometimes it feels as if I can fire off 200 shots just watching dust migrate, so sorting images one at a time just isn’t practical.
However, if you’re under the gun to process a few shots and share them with an editor or with friends online, running them through Photosmith is overkill. That’s why some editing apps now offer the ability to edit various metadata and save that information to the exported image file.
By way of example, I’m using the image editor Photogene, which I cover in more detail in the next chapter. Although the app contains some metadata support, the pro version adds star ratings and the ability to create IPTC sets that you can apply, which allows you to avoid the drudgery of entering the same information repeatedly.
Rate Photos
Photogene (in its pro mode) offers two methods for assigning star ratings:
• While you’re viewing photos in their albums, tap and hold a photo until an options bar appears, and then choose View Metadata.
• Open and edit a photo in Photogene’s editing environment, and tap the Metadata button.
Tap the General heading in the popover that appears, and then select a star rating (3.30).
3.30 Assign a star rating in Photogene.
Add IPTC Information
Much of the IPTC information that gets embedded with the photo is specific to the shot. In the Metadata popover, tap to edit any of the text fields (3.31).
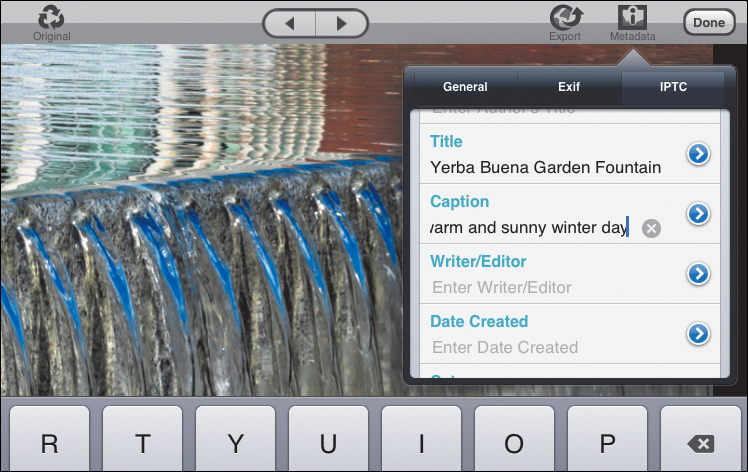
3.31 Add descriptive information to the photo’s metadata.
However, the core data about you presumably stays the same, in which case you’ll want to create IPTC defaults and sets that you can easily copy and paste to new photos.
Create and use IPTC sets
The advantage to creating sets is that you might want most of the same information (such as contact info) but need something about it tailored for specific uses. In my case, I shoot with two cameras: a Nikon D90 and a Canon PowerShot G12. So, I’ve set up separate IPTC sets that are nearly identical except for the camera-specific information.
1. In the Metadata popover, tap the IPTC heading and then tap the IPTC Sets button.
2. Tap the plus (+) button to create a new set. Tap the name of the new set to reveal its information fields.
3. Enter the relevant information in the IPTC fields. When you’re done, tap the IPTC Sets button in the popover’s menu bar.
The next time you need to quickly add metadata from one of your sets to a photo, tap the Metadata button, tap IPTC Sets, and then tap the Use Set button belonging to the set you created.
Tip
Using the pro version of Photogene, you can also apply IPTC sets to several photos in a batch. After you fill in the values in one photo, scroll to the bottom of the Metadata window and tap the Copy IPTC button. Then, when viewing your library, tap the SelectCollage button. Tap to choose one or more images, and lastly, tap the Paste IPTC button.
Export IPTC Information
When you’re ready to export the photo, make sure the IPTC data goes along with it. Tap the Export button and set the Preserve IPTC switch to On (3.32). The information is written into the file that gets exported.

3.32 Make sure Preserve IPTC is turned on.