Chapter 2. The iPad in the Studio
An iPad is a great photographer’s companion in the field, but it doesn’t have to sit dormant when you’re back at home or in a studio. The techniques covered in Chapter 1, such as importing photos using the iPad Camera Connection kit or an Eye-Fi card, still apply when you’re no longer on location. When you’re not trying to minimize your equipment footprint, though, other possibilities open up.
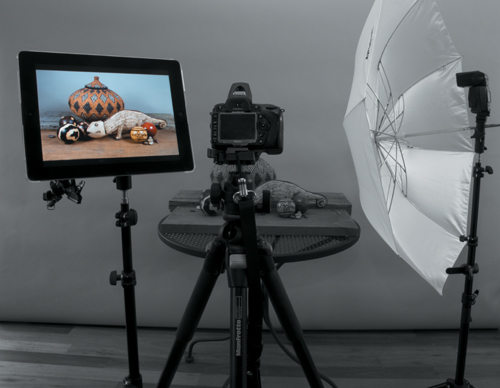
The iPad can work alongside your camera and computer, triggering the camera shutter, providing clients or visitors a window to a photo shoot (without them peeking directly over your shoulder), or even controlling a remote iPhone or iPod touch to capture photos or create stop-motion or time-lapse movies.
Control a Camera from the iPad
Often when you’re working in a studio, the camera is tethered to a computer. This arrangement allows you to import photos directly into software such as Lightroom or Aperture, review shots as they come from the camera, and skip the separate import step entirely. So where does the iPad fit in this situation?
Just because your camera is tethered doesn’t mean you need to be. Especially if you’re shooting products, food, or other compositions that require the camera to remain locked down, you can trigger the shutter, change exposure settings, and more from the iPad without touching the camera.
An iPad also works well when clients or others want to see your output as the photo shoot progresses. If it’s inconvenient to have them hovering over your shoulder or the tethered computer, you can hand over the iPad and encourage them to relax on a couch situated a comfortable distance away from the camera. (Just remind them to keep their fingers off the button that fires the shutter.)
DSLR Camera Remote HD
OnOne Software’s DSLR Camera Remote HD ($49.99) assumes most of the control over a tethered DSLR. (A $19.99 version for the iPhone or iPod touch is also available, which includes most of the same features except, of course, the iPad’s large-screen preview.)
Note
Be sure to check onOne’s list of compatible cameras to make sure DSLR Camera Remote HD will work with yours (www.ononesoftware.com/products/dslr-camera-remote/specs.html). Even if it’s listed, some features may not work; my Nikon D90 can do Live View, for example, but not Video Mode.
Connect the camera and iPad
In addition to the iPad app, DSLR Camera Remote HD requires a free server application that runs on the computer; download DSLR Camera Remote Server from the onOne Web site (www.ononesoftware.com). With that in hand, do the following:
1. Make sure the computer and the iPad are on the same Wi-Fi network.
2. Connect your camera to the computer via a USB cable.
3. Launch DSLR Camera Remote Server on your computer (2.1).
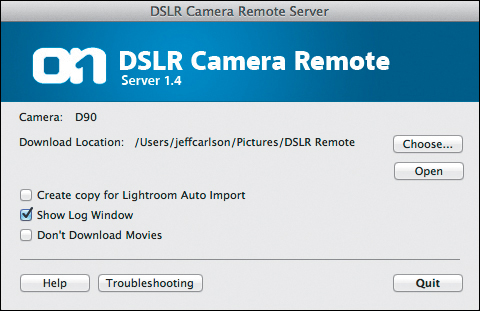
2.1 DSLR Camera Remote Server on the computer
4. Specify a folder on the computer’s hard disk where photos are stored by clicking the Choose button under Download Location.
OnOne recommends that you clear out that folder (by importing the files into your photo organizing software or moving them manually) to avoid overwriting between capture sessions.
5. Open the DSLR Camera Remote HD app on the iPad.
6. Tap the name of your computer in the list that appears. After a few seconds, the DSLR Camera Remote HD camera interface appears.
Tip
If you’re having trouble connecting to the DSLR Camera Remote Server application on your computer, try turning Bluetooth off for nearby devices (the iPad, an iPhone, etc.). The short-range wireless technology could be causing enough interference with the Wi-Fi connection that a solid connection can’t be made between the iPad and the computer.
The server app includes an option to make a copy of each photo and store it in a separate folder for automatic import into Photoshop Lightroom. Set up Lightroom’s auto-import feature to watch that folder and import its contents when photos appear. (It sounds redundant to make a copy of each image file, but pointing Lightroom’s auto-import feature at the DSLR Camera Remote HD folder moves the files, making them unavailable for review on the iPad.)
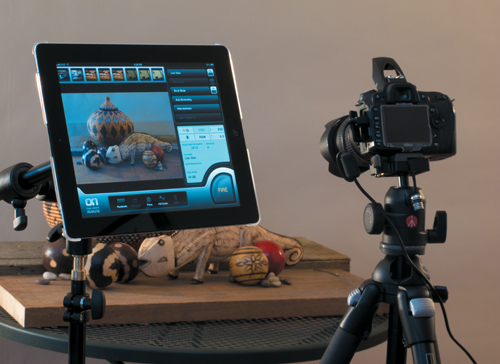
Compose and shoot
In many respects, your digital camera is already a computer, so why not use another computer to control the camera’s settings and fire the shutter? With DSLR Camera Remote HD running, use the following controls (2.2). Some items can’t be adjusted, depending on the camera model. Using my D90 as an example again, I can’t change the exposure mode in software, because that setting is a physical knob on the camera. Also, as you would expect, the mode determines which settings are active—in shutter priority mode (“S” on Nikon models, “Tv” on Canon cameras), the aperture can’t be set, because that’s a value the camera calculates based on the desired shutter speed and ISO.

2.2 The DSLR Camera Remote HD interface
A. Aperture. Tap the current Aperture setting to choose an f-stop from the list of possible values. The popover that appears shows only the settings that are available to the current lens.
B. Shutter Speed. Tap the Shutter Speed button to specify how long the shutter remains open.
C. ISO Speed. Tap this button to choose a level of light sensitivity.
D. White Balance. Tap to select one of the color temperature presets.
E. Image Quality. Switch between available quality and format options.
F. Exposure Compensation. Choose from the range of positive and negative exposure adjustments.
G. Fire. Tap this giant button when you’re ready to capture a shot.
Use Live View
On supported cameras, tap the On/Off button to the right of the Live View button to get a live feed of what the camera’s image sensor is seeing.
The software can take advantage of the camera’s auto-focus features: Tap the Focus button at the bottom of the screen, or tap the image preview. Unfortunately, you can’t specify a focus area by tapping, as you can in the iPad’s Camera app; doing so just relies on the camera’s auto-focus mode. However, you can choose which focus priority is used (2.3):
1. Tap the Live View button (not the On/Off button).
2. Choose a mode:
Canon cameras options are Quick Mode, Live Mode, or Live Face Mode.
Nikon camera options include Normal Area, Face, and Wide Area.
3. Tap the Focus button to focus the frame.
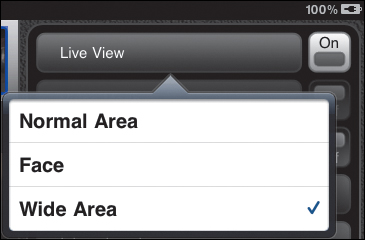
2.3 Choose a focus priority for Live View.
Use Burst Mode
In Burst Mode, the camera captures a specified number of frames when you tap the Fire button once (2.4).

2.4 Set the number of frames to capture in Burst Mode.
1. Tap the Burst Mode button.
2. Drag the slider to set the number of shots to take. The maximum number depends on the current Image Quality setting and your camera’s image buffer; for example, shooting in JPEG format yields more shots than shooting in raw format.
3. Tap the Burst Mode’s On/Off button to switch it to On.
Use Auto Bracketing
DSLR Camera Remote HD taps into your camera’s ability to shoot a succession of three photos with different exposures (the current one, overexposed, and underexposed), a feature known as “bracketing.” HDR (high dynamic range) images, for example, are created with three or more images at varying exposures.
1. Put the camera into its manual shooting mode.
2. In DSLR Camera Remote HD, tap the Auto Bracketing button to reveal the feature’s options (2.5).
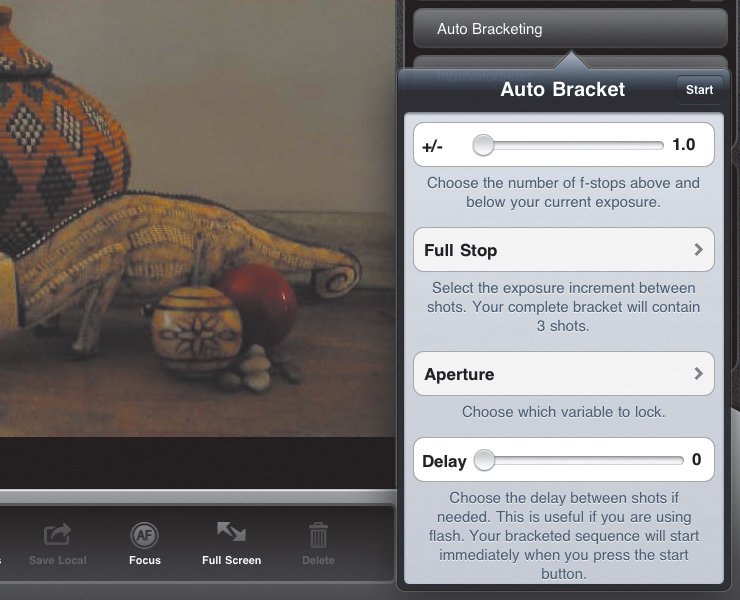
2.5 Auto Bracketing options
3. Drag the first slider to specify the variance in f-stops between each shot. The default is 1, which would give you an image at the current exposure, one at +1, and one at −1. The higher the value, the broader the difference in exposure will be in the set of shots.
4. Tap the next button to control whether the variance applies to full f-stops (Full Stop) or to thirds of a stop (1/3 Stop).
5. Set which variable is locked using the third control: Aperture, Shutter Speed, or ISO Speed. If Aperture is selected, for instance, the camera will adjust the shutter speed and ISO to achieve the exposure change, leaving your chosen aperture constant.
6. Drag the Delay slider if you want to pause between shots (to recharge a flash, for example).
7. Tap the Start button at the top of the popover to fire the trio of shots.
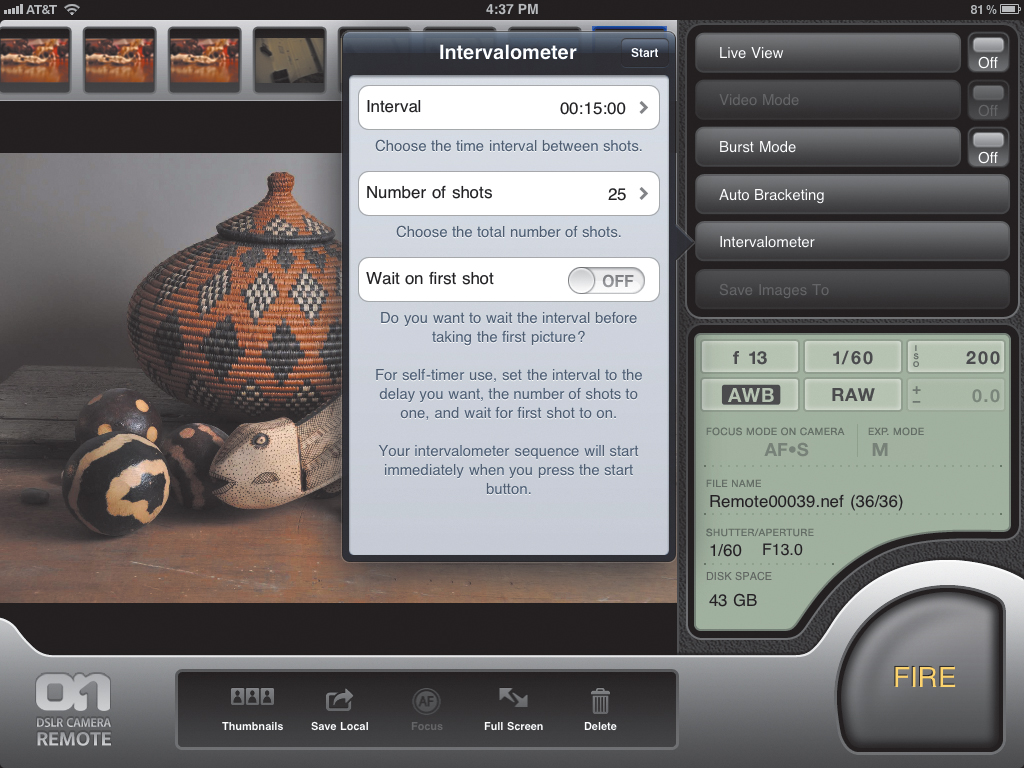
Shoot at specified intervals
DSLR Camera Remote HD includes an intervalometer, which captures a series of shots at a specified interval.
1. Tap the Intervalometer button (2.6).
2.6 Intervalometer controls
2. Tap the Interval button, and choose the duration between shots in hours, minutes, and seconds (up to 23:59:59 for extreme time-lapse series of shots).
3. Tap the Number of Shots button, and enter a number in the text field to dictate how many captures are made at the interval.
4. Switch the Wait on First Shot option to On to pause before the initial capture.
5. Tap the Start button in the upper-right corner of the popover to start the Intervalometer.
Tip
The Intervalometer feature can double as a self timer: Set the Interval setting for the time you want before the camera fires, specify the number of shots as 1, and enable the Wait on First Shot switch.
Record video
If your camera shoots video and is a model supported by DSLR Camera Remote HD, you can switch to Video Mode and direct the video capture from your iPad. (Visit onOne’s Web site to check camera compatibility.) As with shooting in Live View mode, you can see what the camera is recording, start and stop the video capture, and tap to auto-focus. However, you can focus only before or after recording, not during capture. Also, you’re not able to play back a video file on the iPad once it’s recorded.
Note
Another intriguing app is ioShutter (www.ioshutter.com), which works with a custom cable that connects the iPad or iPhone to a DSLR or some supported prosumer compact cameras (like the Canon PowerShot G12). It offers timed shutter release, bulb mode, and time lapse features, controlled from the iOS device without requiring a computer in between. However, the cable is not yet available at the time of this writing, so I haven’t used it.

Remote Shutter
I’ve focused on controlling a DSLR so far in this chapter, but if you own an iPhone, you already have a pretty good camera available. Remote Shutter, by iAppCreation, is an app that runs on the iPad and iPhone, connecting them both via Bluetooth. Choose one to act as the camera and one to act as the remote, and you can then fire the shutter; lock focus, exposure, and white balance; and set a timer (2.8). And, of course, it offers a range of filters to change the look of the captured photo.
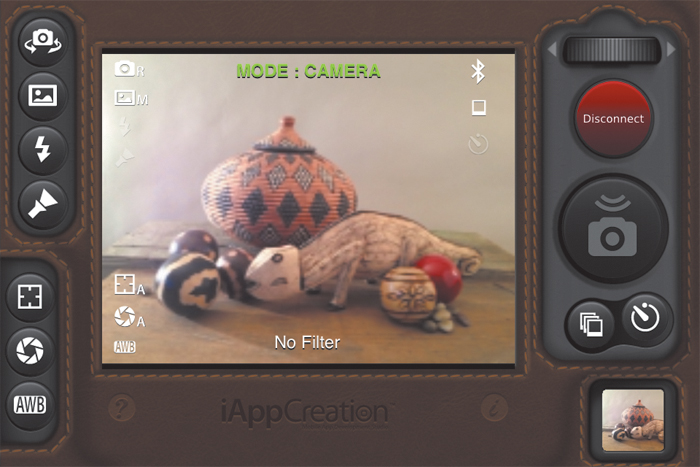

2.8 Remote Shutter controls an iPhone (top) from the iPad (bottom).
Mount the iPad
The iPad’s portability can sometimes be a hindrance when you’re shooting in the studio. Your hands are probably already full with camera gear—you don’t want to set that down to pick up the iPad, or have to crane over a tabletop to view the screen without reflections from overhead lights. That’s when mounting the iPad is useful.
Although there are no shortages of cases and stands for the iPad, I favor two options: a secure mount that was designed to integrate into a photographer’s collection of stands and arms, and a simple desk mount that props up my iPad nearly all the time it’s close to my computer. I encourage you to explore the market for options, which change often. For example, if you also dabble in music, a number of attachments designed for performance stands could also work to hold the iPad in place, to set it up as a tele-prompter, to play relaxing music for clients or subjects, and for other uses.
Tether Tools Wallee System
The Wallee Connect system from Tether Tools (www.tethertools.com) consists of two parts: a case that connects to the back of the iPad (see the next page), and the Wallee Connect, a sturdy adapter that secures to the case and features holes and threads to connect it to tripods, heads, and lighting stands (2.9). The Connect Kit, which includes the case and the Connect, costs about $120.
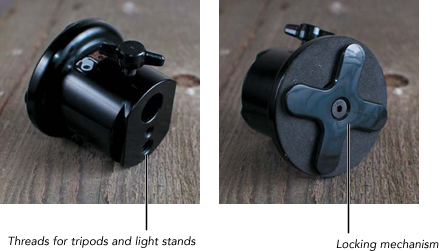
2.9 Wallee Connect

The Stump
Hundreds of iPad stands exist on the market now, ranging from simple plastic kickstands to large suction cups, but there’s one that’s proved invaluable to how I work. I often want to prop the iPad next to my computer or on a shelf or table near where I’m shooting. The Stump (www.stumpstore.com) is a $25 angled piece of heavy material covered in rubber that puts the iPad into three positions, in either portrait or landscape orientation (2.10).
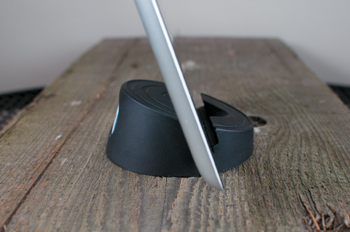
2.10 The Stump is simple, portable, and quite useful.
It sounds almost too simple, I’ll grant you. I received one in a bag of goodies for speaking at a conference and figured I’d toss it fairly soon. However, it’s currently lifting my iPad 2 more often than the Smart Cover I bought. Whether it’s for during a shoot or for working next to your computer later, the Stump is a great little addition.
Make a Stop-Motion or Time-Lapse Video
Since a studio offers a controlled workspace, you don’t have to deal with the whims of natural light or environment. The DSLR Camera Remote HD app features an intervalometer for firing off shots at specific intervals, which can then be combined into a time-lapse video later. But here I want to focus on a clever app that makes the process of creating time-lapse or stop-motion videos easy on the iPad. iStopMotion for iPad by Boinx Software ($9.99) can use the iPad 2’s built-in camera or an iPhone 4, iPhone 4S, or iPod touch (fourth generation) with the help of a remote app.
Note
Boinx also sells iStopMotion Home for the Mac for $49.99, which is a more comprehensive tool for shooting stop-motion and time-lapse movies.
Create a Stop-Motion Video in iStopMotion
Although you could use the iPad or an iPhone to snap a bunch of photos and then stitch them together later to make a stop-motion video, iStopMotion makes the process much less painless.
1. In iStopMotion, tap the New (+) button to create a new project.
2. Initially, the app activates the front-facing camera, so don’t be surprised when your face suddenly appears. Tap the Cameras button at the top right area of the toolbar.
3. Choose the front or back camera.
If you’re using another iOS device as a remote camera, first launch the free iStopCamera app there. Then, on the iPad, select the name of the camera device. Lastly, tap the Accept button on that device to establish the connection. The camera’s settings screen appears.
4. On the iPad or the other device, drag the Focus indicator to a spot where you want the focus to be locked (2.12). You can also tap the Exposure button at the top of the screen and identify an area on which to base the exposure level.
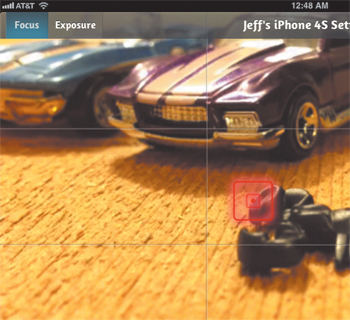
2.12 Lock focus in iStopMotion for iPad.
You’ll want to shoot where the lighting is consistent, but also make sure you set the Exposure indicator to an area of the scene that’s not likely to contain moving elements in your video; they’ll throw off the color in those frames.
5. Tap Done to exit the camera settings screen.
6. Tap the Clip Settings button (the gear icon) to set playback speed (frames per second) and how the editing environment appears. Tap the Show button, which uses an “onion skin” mode to show the last frame and a ghosted rendition of the live video so you can see what the next frame will look like (2.13).
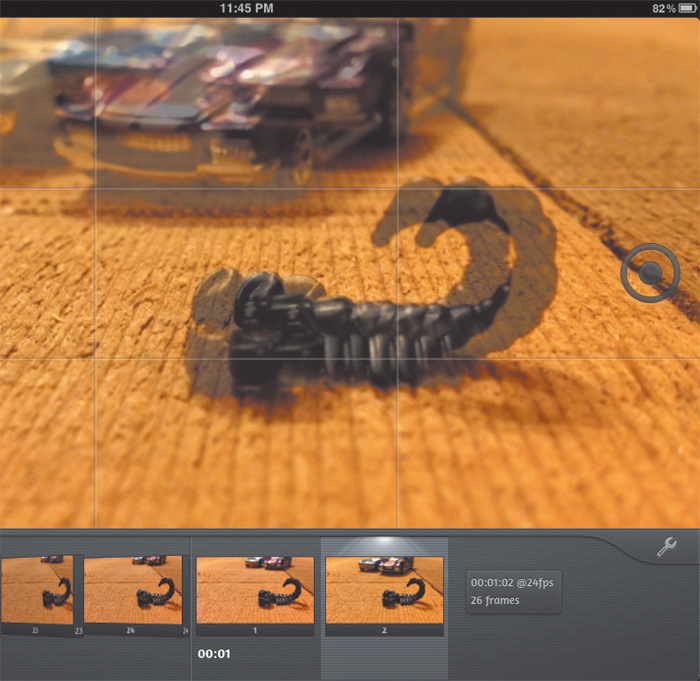
2.13 See the relative position of objects between shots.
7. Set your scene, and then tap the Capture button to take a shot.
8. Reposition elements in the frame.
9. Tap the Capture button to grab the next frame.
10. Continue adjusting your elements and capturing photos until the scene is complete. Tap the Play button at any time to review what you’ve shot so far.
You can jump back to any frame to re-take it (make sure you line up your elements accurately), or you can delete a frame by selecting it, tapping the Actions button (the wrench icon at bottom right), and then tapping the Delete Frame button.
Create a Time-Lapse Video in iStopMotion
Stop-motion animations require a lot of work and even more patience to do well. A time-lapse video, by contrast, needs just patience and an interesting enough place to point the camera. iStopMotion can automatically fire off a shot at an interval you choose, ranging from 1 second to 59 minutes and 59 seconds.
1. Set up your iPad, iPhone, or iPod touch where you want to capture action over a period of time.
2. Choose a camera from the Cameras popover.
3. Tap the Time Lapse button to the right of the Cameras button.
4. Make sure Time Lapse is selected under Mode (2.14).
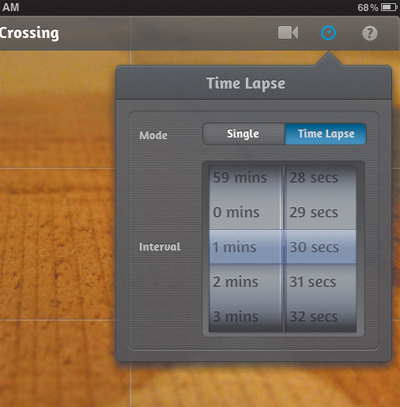
2.14 Specify Time Lapse settings.
5. Drag the minute and second dials to select an interval, then tap outside the popover to dismiss it.
6. Tap the Capture button to start capturing the scene. The button doubles as a countdown timer while waiting for the next shot (2.15).
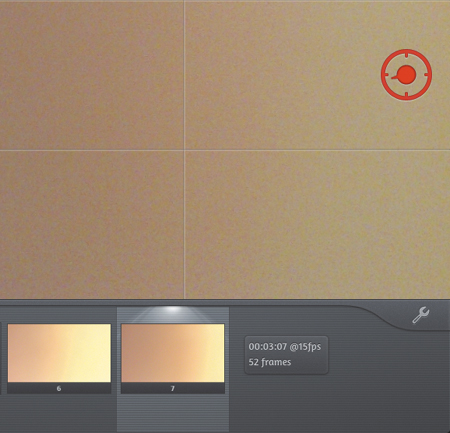
2.15 The Capture button counts the time to the next shot.
7. Tap the Capture button again to stop recording frames.
Tip
Tapping anywhere near the Capture button works, too—you don’t have to hit the button perfectly centered.