Chapter 7. Share Photos
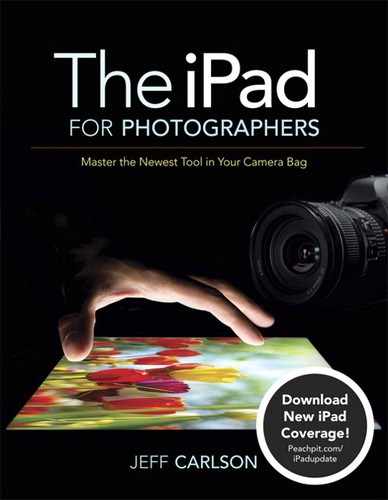
Yes, it’s true. I do, on occasion, import photos from my camera into the iPad, sort and edit them, and then upload selected shots to photo-sharing services...from my couch. Even when my laptop is sitting just a few feet away, I don’t want to retreat to my upstairs office and get into working mode. I want to browse shots from the day, get feedback from my family there in the same room, and put something up that friends can view online.
You needn’t aspire to be as lazy as me, but there are many opportunities to share photos directly from the iPad before they inevitably end up on a computer. You may want to post shots from a just-concluded wedding, or maybe a client located elsewhere needs to review and rate images quickly. Several options for sharing your photos from the iPad are available beyond simply syncing the photos to a computer.
Upload Images to Photo-Sharing Services
In the early days of the Web (I’m dating myself here), when you wanted to publish a photo online you needed to be savvy enough to upload the image to a server and write the HTML code necessary to make it appear. Now, with popular photo services such as Flickr, Facebook, and others, you can let the software handle all of that.
Upload from Editing Apps
Most of the photo-editing apps allow you to upload your images directly to Facebook, Flickr, Twitter, Dropbox, and others. The steps are similar in most apps, but since I focused on Snapseed and Photogene in Chapter 4, I’ll detail those steps here.
Upload from Snapseed
Snapseed uses the iOS convention of making exporting options available from the Share button; it supports Flickr, Facebook, and Twitter.
1. With a photo already loaded in Snapseed’s initial screen, tap the Share button (7.1).

7.1 Snapseed’s sharing options
2. Tap the name of the service you want to use.
The first time you share something, you need to log in to the service to grant the app permission to add items to your account. Twitter support exists at the operating system level, so if you haven’t done so previously, go to Settings > Twitter and enter your account information. Also make sure that the Allow setting for the app is set to On.
3. Depending on the service, enter a caption, a description, a destination, and privacy options. Facebook, for example, is limited to a caption and choice of album (7.2); if you don’t choose an album, it creates a Snapseed Photos album. Flickr, on the other hand, lets you add keywords and specify who gets to view the photo once it’s uploaded.

7.2 Choose a Facebook photo album.
4. Tap the Publish button to upload the image.
To control who views your photos on Facebook, you need to set up privacy options in your Facebook account. Locate your photo albums, and then click the drop-down menu just below each one to specify Public, Friends, Only Me, or Custom. (Facebook changes its interface often enough that I’m not even going to try to walk you through the steps of locating that control. But once you get to the albums, it should be obvious.)
Upload from Photogene
Photogene offers more services to upload to, and it also gives you options such as image size and, in the pro version, a watermark.
1. Open a photo and edit it as you wish.
2. Tap the Export button (7.3, on the next page).
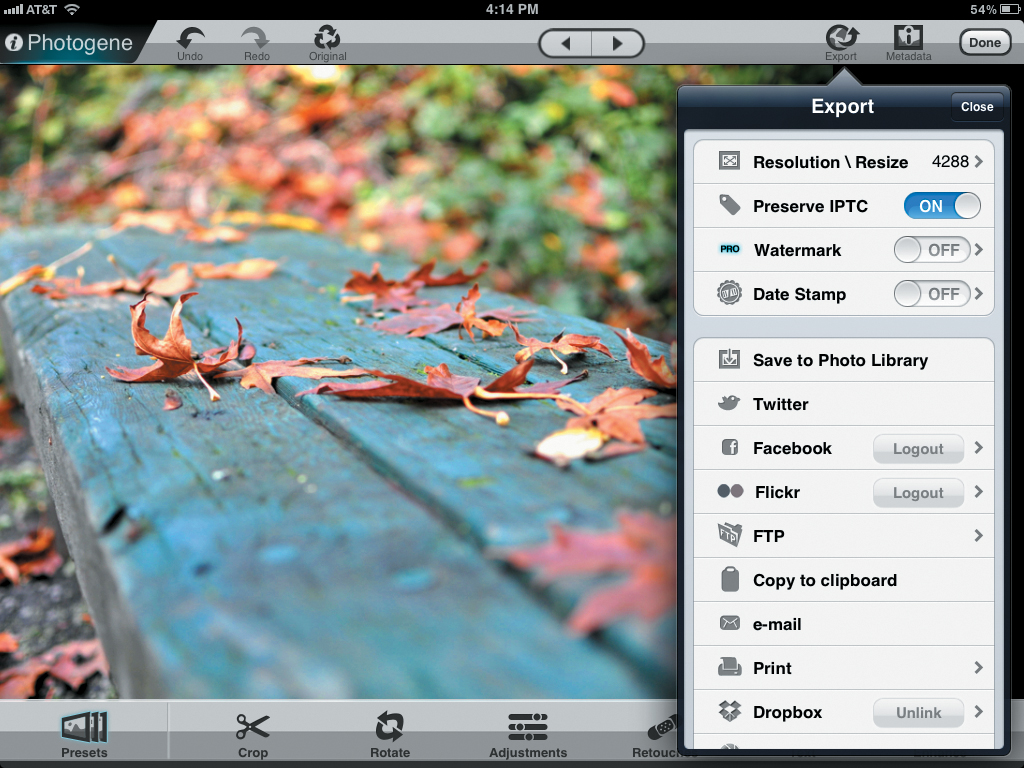
7.3 Export options in Photogene
3. Tap the ResolutionResize button to specify the image size. In most cases you’ll probably want to choose Original, but not always; you may want to upload a smaller version when you don’t have much available bandwidth (or maybe you just prefer not to upload full-size photos). The numbers in the ResolutionResize popover represent the image’s longest dimension. Choosing 1024, for example, resizes a landscape photo to 1024 pixels wide but resizes a portrait photo to 1024 pixels tall.
The pro version of the app adds the ability to set the JPEG quality by specifying the level of compression that’s applied.
4. If you want to strip any metadata you added before uploading, switch the Preserve IPTC option to Off.
5. Tap the name of the service or feature you want to use. If you haven’t previously set up a service, you’re asked to log in and grant Photogene permission to add photos.
6. In the service’s details panel, enter a title, a description, and other information that applies, including the privacy level.
7. Tap the Share button. Photogene prepares the photo and uploads it.
1. Tap the Watermark button.
2. Tap Select Image and choose the watermark image you created.
3. Using the sliders in the popover, adjust the opacity of the image and the amount of padding around it (7.4).

7.4 Setting a watermark
4. Choose a position for the mark by tapping one of the boxes in the proxy grid. Note that the preview doesn’t accurately convey the size of the mark; it’s enlarged to show relative position.
5. Tap the Export button at the top of the popover to return to the rest of the Export options.
6. To include the watermark, switch the Watermark option to On. The watermark appears on the photo that’s exported (7.5).

7.5 Watermark applied
Upload Photos Using Services’ Apps
Photo services have been quick to create their own iOS apps, mostly for use with the iPhone so people can upload the shots they take with its camera. For snagging pictures that you have imported and don’t need to edit, a dedicated app provides a more direct path from your iPad to your online photo album. In some cases, you can upload photos in batches instead of one at a time.
The first step is to visit the iTunes Store and see if your preferred photo service offers an iOS app. You’re also sure to find third-party apps that view photos and upload them to the services. Here are a few that I use, both “official” and third-party apps.
Flickr
Despite the fact that Flickr is one of the largest photo-sharing sites on the Web, its iOS app hasn’t changed much in several years. Still, even though it’s not optimized for the iPad, the app does make it easy to upload multiple photos to your Flickr photo stream.
1. At the opening screen, tap the Upload button and choose Upload from Library.
2. Choose the album that contains the photos you want to upload. At this stage, you can choose photos only from one album, but you’ll have a chance later to add more photos.
3. Tap to choose photos, which gain a green checkmark, and tap Done to continue.
4. On the Details screen that appears, optionally assign the photos to sets, add tags, and specify whether to upload them at full resolution or medium resolution (7.6). You can also tap a photo thumbnail to edit details for just that item.
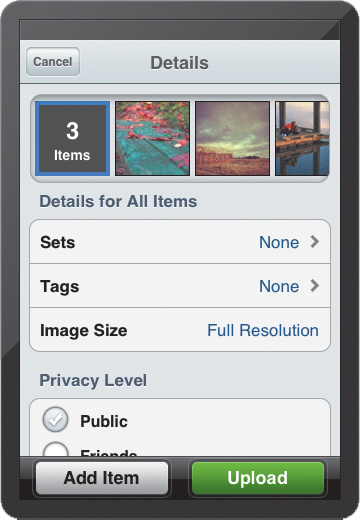
7.6 Uploading photos in the Flickr app
5. Decide who can see the photos online by choosing a setting in the Privacy Level area.
6. If you want to include other photos in the upload, tap the Add Item button and select them.
7. Tap the Upload button to transmit the photos.
SmugShot
SmugMug, a popular site for more-experienced photographers, offers an official SmugMug app, but it’s geared toward viewing photos by you and others. Since I’m focusing on sharing in this chapter, go get SmugShot, an iPhone app that is designed to upload photos you capture or pull from your Photo Library. You can add several photos to the queue and then upload them all at once (7.7).

7.7 SmugShot’s upload queue
PhotoStackr for 500px
The newest entrant in the photo-sharing field is 500px, a site that boasts a great viewing experience and a growing number of professionals. The company’s 500px app is a model for how to browse photos on a tablet, but it doesn’t offer any way to upload new photos to one’s account.
Instead, turn to PhotoStackr for 500px, which adds uploading and a few other features to the browsing experience. As with the Flickr and SmugShot apps, you can queue several photos to be uploaded together.
Photoshop Express
The Photoshop Express app acts as the window to Photoshop.com, Adobe’s own photo-sharing and editing Web site. The Photoshop Express app will prove particularly useful if you use Photoshop Elements, which ties into Photoshop.com.
1. In the app, tap the Share button in the toolbar.
2. Tap the Select Photo button.
3. Choose a photo from your library.
4. Tap the Photoshop Express button to view a list of online albums.
5. Select an album and optionally enter a photo caption in the text field at the bottom of the popover (7.8).

7.8 Uploading a single image to Photoshop.com using the Photoshop Express app
6. Tap the Share button to begin uploading.
Tip
Although you must pick photos one at a time for uploading, the Photoshop Express app builds a queue of jobs to send. Tap the Share Progress button to see what’s been uploaded and what’s pending.
Email Photos
A fallback for getting your photos out there is to send them as email attachments. This capability is built into the core of iOS and is available from nearly every app.
I call this approach a “fallback” because, honestly, the current state of email makes it difficult to guarantee that the message will get through. Image attachments are usually large, which increases the chances that the message will stall at a server en route from you to your recipient. Or, the message could be marked as spam and shunted into a person’s queue of suspect emails with the usual assortment of get-rich-quick scams and unwanted product solicitations.
Share a Single Photo
Still, email is convenient and widely supported. But there’s a trick. Unlike most desktop email programs, where you compose a message and then attach a photo to it, on the iPad the process is reversed: You start with the photo first and then choose to send it via email, like so:
1. Open the Photos app to view your image library. (If you’re in a third-party app that offers email as an export option, follow its steps. I’m starting here as if you have just picked up the iPad and want to share a photo from the built-in library.)
2. Locate the photo you want to share, and tap to view it full screen.
3. Tap the Share button and choose Email Photo from the popover list of options. A new outgoing message appears, with the photo in the body of the message.
4. Fill in the To and Subject fields to address the message.
5. Tap the “Images” text to the right of the Cc/Bcc, From field to specify the size of the outgoing image (7.9).

7.9 The image-size control is almost invisible.
6. Choose one of the Image Size options by tapping it (7.10).
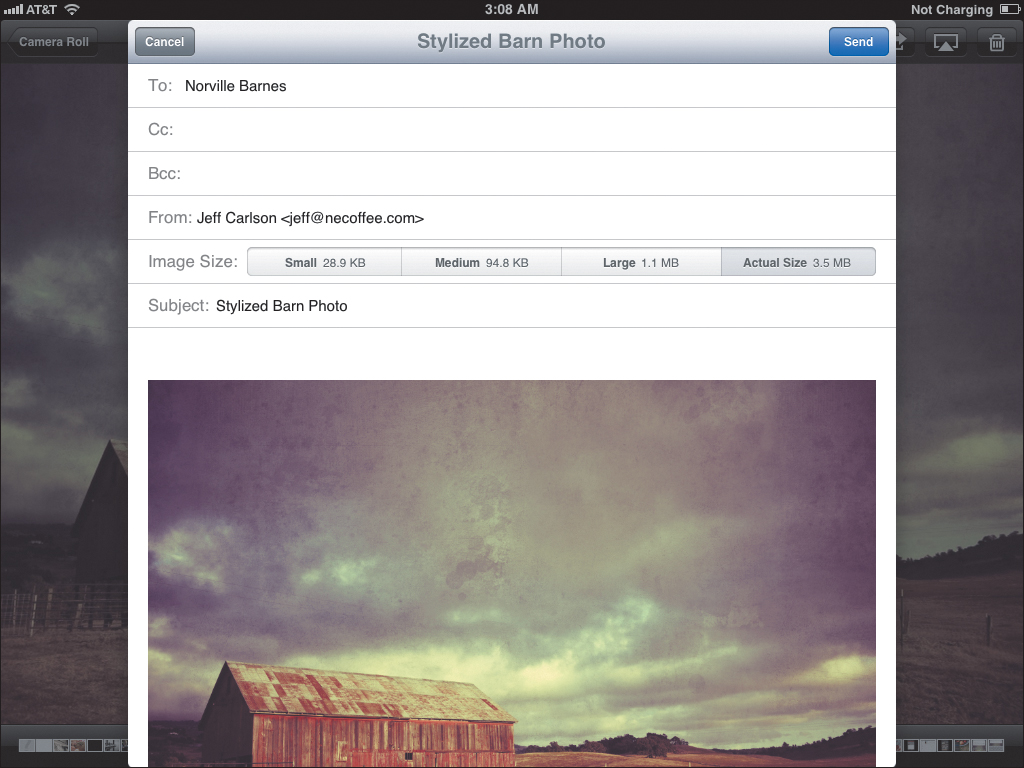
7.10 Choose an image size to send.
7. Tap the Send button to dispatch the message.
Share Multiple Photos
To attach more than one photo to an outgoing message, you need to follow a slightly different approach:
1. In the Photos app, open the album containing the images you want.
2. Instead of viewing one full-size, tap the Share button. The toolbar reads Select Photos, and the buttons there change.
3. Tap to select the photos you’ll soon be sending.
4. Tap the Share button—this time, a button labeled “Share,” not the pervasive icon with an arrow coming out of a square.
5. Choose Email from the popover that appears (7.11). The photos become part of an outgoing message.

7.11 Mark multiple messages and attach them to one outgoing message.
6. Fill in the To and Subject lines, set an image size (which applies to all of the photos), and then tap the Send button.
One way to circumvent email but deliver a photo to a specific person is to use MMS (Multimedia Messaging Service) or iMessage instant messaging. In the Messages app, tap the camera icon to the left of the text field, locate your image, optionally write a note, and tap the Send button (7.12).

7.12 iMessage or MMS is often a faster way to get a photo to someone.
Tip
One advantage to email is that it can act as a workaround when other uploading options fail. My Flickr account, for example, gives me a personal email address. Any image attachment I send to that address is added to my photo stream, which uses the contents of the Subject field as the photo’s title and the text in the body of the message as the description. Check your favorite service for a similar option.
Share Photos Using Adobe Revel
As you’ve no doubt discovered, many photo-sharing services vie for your attention and image libraries. Adobe, digital imaging powerhouse that it is, jumped in with Photoshop.com and Photoshop Express for iOS. However, late in 2011, it also started a separate service called Adobe Revel, which doesn’t currently communicate with Photoshop.com (although it is integrated into Photoshop Lightroom 4, which is in public beta as this book goes to press).
Revel offers a very cool feature that soothes a photography pain point. You can share a set of photos, called a carousel (reminiscent of the circular trays of slides you’d load into a slide projector), with other people. They can rate the photos, and even use the software’s editing tools, without stepping on your versions of the images. So, when I come back from vacation and my wife wants to look through my library and pick out her favorites, I can create a new carousel for her to browse on her computer or iOS device. I can see her picks in my library, but they don’t overwrite mine.
The Adobe Revel software is free, but the service costs $5.99 a month (a 30-day trial period is free). It’s currently available for iOS and Mac OS X; Windows and Android versions are still in development.
Import Photos to a Carousel
After you install the app and log in with your Adobe ID (or create a new ID if you don’t currently have one), do the following:
1. Tap the plus sign (+) button to create a new carousel.
2. From the popover that appears, choose Choose Existing Photos.
3. Navigate to an album, such as the Camera Roll, and tap to select the photos you wish to import.
4. Tap Done to begin importing the photos, which appear grouped by date (7.13). Revel also uploads the images to Adobe’s servers for backup and syncing to other devices on which you install the software.

7.13 A carousel of photos in Adobe Revel
Rate and Edit Photos
When I say “rate” in regards to Revel, what I really mean is to mark a photo as a favorite; there are no multiple-star rankings. Instead, tap a photo to open it, and then tap the star button in the lower-left corner of the screen.
To edit photos, tap the Develop button and use the controls in the toolbar to apply preset looks, adjust color and tone, or crop and rotate the image. (See Chapter 4 for more detail on these types of tools, though I don’t cover Revel specifically there.)
Note
In the spirit of sharing, Revel also enables you to upload a photo via Facebook, Twitter, Tumblr, and Flickr or to send it via email. Tap the Share button and choose an option.
Collaborate with Others
Here’s where I find Revel the most interesting. From within Revel, you can share a carousel with someone else who has an Adobe ID, even if they don’t subscribe to Revel. Here’s how:
1. On your iPad, tap the Settings button (the gear icon) to view your list of carousels in a popover.
2. Tap the Detail (>) button for the carousel you intend to share.
3. In the Sharing With section, tap the Add User button (7.14). (You can share a carousel with up to five people.)

7.14 Share the carousel with someone else.
4. Type the email address of the person who will share the carousel, and then tap Done.
5. Tap Done at the top of the popover to send an invitation.
When the other person installs the Revel software and signs in, they’re asked if they want to join your carousel. After they do, the same rating and editing features are available. Images are updated nearly in real time, so when they mark a photo as a favorite, a gray flag indicates it’s been marked by someone else (7.15). (The number in the flag tells you how many people have marked it.)
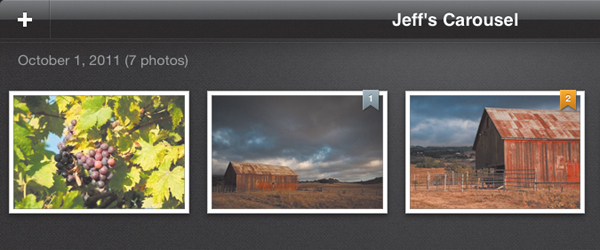
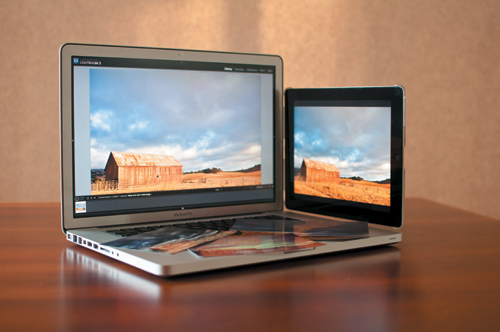
7.15 The other reviewer marked these two barn photos as favorites.
And because Revel also works on the Mac, when I get back to my computer, the files are already present in the desktop version of Revel, and they reflect the ratings and edits made while reviewing.
Print Photos from the iPad
When you think of printing from the iPad, you probably envision making a paper copy of an airline boarding pass or a text-only page of notes. Or, your first thought is, “The iPad can print?” The options for taking content from the iPad and putting it on paper are still relatively slim—a few Wi-Fi–enabled printers support Apple’s AirPrint technology, for example. However, photos originated in the print world, and it is possible to transfer your images into ink-on-paper reproductions.
Note
Keep in mind that the iPad doesn’t offer color management, so I wouldn’t rely on it for professional output. Run your photos through a color-managed desktop workflow for the best results for clients, gallery shows, and the like.
Print from Nearly Any App
Since it’s not possible to plug a printer into an iPad, any printing you do must occur wirelessly. If you own an AirPrint-compatible device, that’s no problem: Tap the Share button in the Photos app, tap the Print button, and configure any printer-specific options.
If you own a perfectly good printer that doesn’t support AirPrint, it’s still possible to make it work. Using a utility called Printopia under Mac OS X, any printer on the network that’s accessible by your Mac is available (7.16). In fact, Printopia can also “print” to your Dropbox account, to folders on your computer, or directly to applications (7.17). Under Windows, check out Collobos Software’s FingerPrint utility, which does the same thing.

7.16 Choose a printer and the number of copies, and hit Print.

7.17 Printopia prints to destinations other than printers.
The major printer manufacturers, like Epson, Lexmark, and HP, also offer free printing utilities for iOS that take advantage of their devices’ features. (Make sure you check compatibility with your printer.)
Order Prints
A few companies are getting wise to the fact that some people use their iOS devices more than computers (or own just iPads), so they’re developing apps that send images directly to print vendors. The app for the drugstore Walgreens, for example, lets you upload photos and then order prints or cards that you can pick up at the closest location.
Other fun apps include PopBooth, which takes photo booth–style snapshots and gives you the option of ordering a physical photo strip, and Sincerely Ink, which makes greeting cards from templates and your photos (7.18).

7.18 Sincerely Ink orders printed cards containing your photos directly from the iPad.
Note
If you’re looking to order a print that’s of higher quality than a snapshot from the iPad, a combination of an app and the Web might be the way to go. At the Web site Zenfolio (zenfolio.com), you can use the service Mpix.com to create and distribute prints. From my storefront (jeffcarlson.zenfolio.com), I can upload photos and then access the site in Safari to place an order.