The iPad for Photographers: Addendum: The New iPad (Third Generation)
The week leading up to the launch of a new iPad is a fever dream of rumors, speculation, and anticipation. As the thirdgeneration iPad announcement neared, The iPad for Photographers was coming off a printing press and I was nervous. What if Apple added something that would directly impact how photographers use the new device? A high-resolution Retina display was almost a sure bet, but suppose Apple changed the entire photo workflow? I couldn’t burst into the printing plant and yell, “Stop the presses!” (without getting arrested).
Fortunately, the changes in the new iPad—which are impressive, especially that screen—don’t dramatically impact the book’s content, except one thing: iPhoto, a new $4.99 app from Apple that’s really quite well done. If it had been released before my book went to press, the content in this addendum would have definitely appeared in the print version.
But iPhoto isn’t the only noteworthy new thing. I suggest in the book that Photogene is a good fit for photographers accustomed to working in Adobe Photoshop. Well, also released after the book went to press was Adobe Photoshop Touch, a photo editor from the folks who basically invented digital photo editing. Both apps are featured in this addendum. Thanks for downloading it!
Edit Photos in iPhoto
iPhoto shares the same name as Apple’s photo software for the Mac, but they’re really completely different applications. iPhoto for iOS is not only optimized for a touch interface, it includes features, like the ability to selectively edit areas of a photo, that don’t appear on the computer. (In fact, I wouldn’t be surprised to see many aspects of the iOS version appear in the next version for the Mac.)
To start editing a photo, select it and tap the Edit button; the editing tools appear at the bottom of the screen. While in editing mode, you can also tap another photo to begin editing it without exiting the mode.
As you work, you can compare the edits you’ve made by tapping the Show Original button to the left of the Edit button. Tap it again to return to the edited view. Tapping the Undo button removes the last edit (or tap and hold to reveal an option to redo an adjustment), but if you want to start over from scratch, tap the gear button in the lower-right corner and choose Revert to Original.
Tip
Tap the Show or Hide Thumbnail Grid button to make more room for the photo you’re editing. If you don’t mind thumbnails along the side, drag the edge of the grid in the top toolbar (you’ll see three vertical lines, suggesting a grippy place to position your finger) left or right. That lets you choose between one and three columns of thumbnails. And here’s a nice touch, especially if you’re left-handed: Drag the top of the grid to move the whole thing to the other side of the screen. That also repositions the tool buttons.
Recompose
I’ll be honest, there are several approaches to cropping and straightening photos among various editors, but I like iPhoto’s implementation the best. Select a photo and, in the Editing mode, tap the Crop & Straighten tool.
Straighten the image
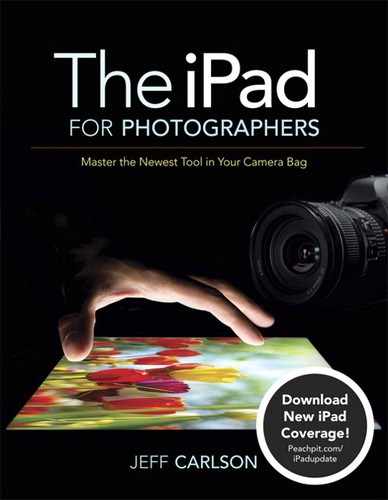
If iPhoto detects a possible horizon, it draws a line along it and attaches a rotate button to the right edge (A.1). Tap the button to accept the suggestion and straighten the image. Or, to manually straighten the photo, drag the dial at the bottom of the screen or touch the screen with two fingers and turn them to rotate and zoom the image as necessary.
A.1 iPhoto suggests straightening if it detects a horizon line.
Here’s a feature that’s fun but almost useless in real practice. Tap once on the straighten tool at the bottom of the screen to highlight it. Now, instead of dragging it to adjust rotation, turn the entire iPad itself clockwise or counter-clockwise and use the device’s gyroscope. Tap the control again to disengage the gyro.
Crop the frame
To redefine the visible area of the photo, do any (or all) of the following:
• Drag a corner or edge of the image’s border to resize the area freely.
• Drag the middle of the image to reposition it within the frame.
• Pinch with two fingers to zoom in or out of the image.
• Tap the Lock Aspect Ratio button (next to the gear button) to keep the ratio of the current frame
• Tap the gear button to choose from several standard aspect ratios, such as 4 × 3 or 16 × 9. This is often the quickest way to switch between landscape and portrait orientations (A.2).

A.2 Choose from standard aspect ratios.
Adjust Exposure and Color
iPhoto’s controls for improving exposure and color include sliders for adjusting brightness, contrast, saturation, and the like, as you might expect. But those are secondary to dragging directly on the photo and applying corrections based on where you touch.
Brightness and contrast
To adjust a photo’s tone, tap the Exposure button in the toolbar and do the following.
1. Tap anywhere in the image to reveal the onscreen brightness and contrast controls (A.3).

A.3 Exposure controls for iPhoto
2. Drag up or down to increase or decrease brightness. (Or, drag the Brightness control in the slider.)
3. Drag left to decrease contrast, or drag right to increase it. (Or, drag one of the Contrast controls in the slider.)
4. To brighten shadows specifically, touch a dark area of the photo to reveal a Shadows control. Or, drag the left-most control on the slider at the bottom of the screen. Extending it left beyond the hairline border clips the black pixes in the image (the area behind the control turns red to indicates clipping).
5. Similarly, to adjust highlights touch a bright area of the photo to reveal a Highlights control. Or, drag the right-most slider controla, optionally blowing out the lightest values to white.
Color
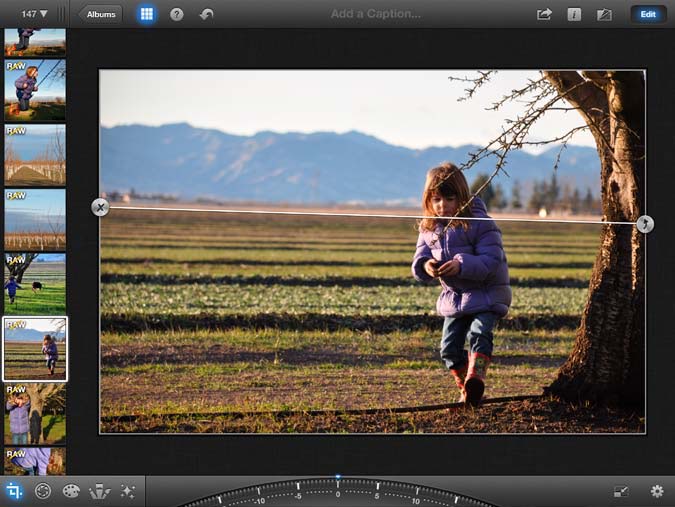
The color controls focus on five key areas: saturation, blues, greens, skin tones, and white balance. The sliders with the descriptive icons at the bottom of the screen control the intensity of these attributes, but you can drag corresponding areas of the photo to adjust those values.
For example, dragging from a blue area displays the Blue Skies control (even if you’re not technically editing a sky) that affects all blues in the image (A.4).
A.4 Apply color adjustments based on the area sampled in your image.
To change the photo’s color temperature, tap the White Balance button to the right of the Skin Tones slider and choose one of the white balance presets. For more granularity, tap the Face Balance or Custom buttons and pinpoint an area of the image to sample. (As the name implies, Face Balance is intended to better preserve skin tones when setting color temperature.)
Tip
Once you’ve made tonal or color changes to an image, it’s easy to apply them to related photos. Tap the gear button and choose Copy Exposure or Copy Tone (depending on the tool), switch to a different photo, and then tap Paste Exposure/Tone from the same menu. In fact, you can use this technique to apply adjustments to several photos at once. After copying settings from one, tap and hold to select multiple photos (or double-tap an image to select visually similar ones), tap the gear button, and choose Paste Exposure, Color and Effect.
Adjust Specific Areas
Some photos need just a touch of detail adjusted here and there, but until now iPhoto (on the Mac) applied changes to the entire image. Using the Brushes tools, paint adjustments just where you want them.
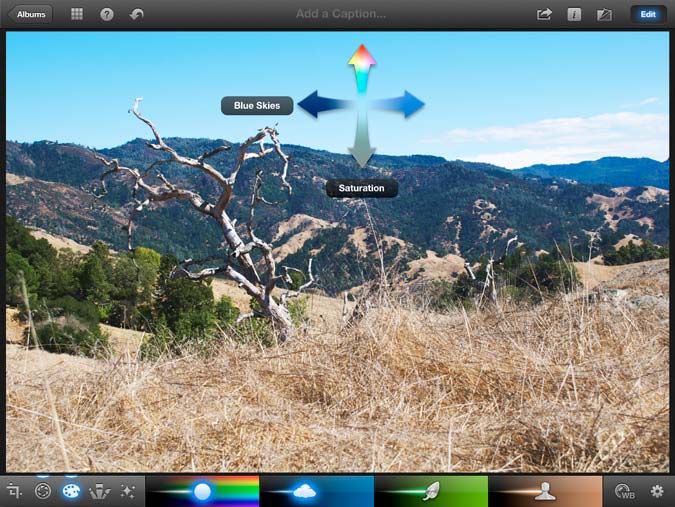
1. Tap the Brushes button to reveal the available tools (A.5).
A.5 Apply color adjustments based on the area sampled in your image.
2. Tap a brush to select it.
3. Zoom or pan the image using two fingers. When painting areas, it’s often easiest to zoom in.
4. Drag your finger on areas to apply the adjustment (A.6). If you paint an area by accident, switch to the Eraser tool. Or, tap the Edge Detection button (next to the Eraser) to help you scribble inside the lines. Sometimes it can be difficult to tell where you’ve painted. In that case, tap the gear button and enable the Show Strokes option (A.7).

A.6 Painting the berries brightens them.

A.7 View your strokes as a red overlay.
The tool settings popover also includes a slider for setting the intensity of the stroked areas you’ve painted. You can also apply a brush’s effect to the full image instead of painting by tapping the [Effect] Entire Image button; this isn’t as useful for a brush such as Lighten (since you could achieve similar effects using the Exposure tools), but is helpful if you select the Sharpen tool to make the entire photo more crisp.
Note
The results of the Brushes and Effects tools are applied to a virtual overlay of your image. If you add an effect and then decide to adjust the tone or color of the photo, switching to another tool temporarily disables the effect (it’s pulled up like a plastic film). The edits reappear when you finish the adjustment.
Apply Creative Effects
You won’t find the largest selection of preset effects in iPhoto, but for my money, that’s fine. The effects are restrained, not thrown in to see how many levels of visual complexity can be glommed onto a photo.
1. To get started, tap the Effects button in the toolbar to reveal the effect categories displayed as if they’re bound like a fan or a Pantone swatch book (A.8).

A.8 iPhoto’s array of effects
2. Tap a category to select it and explore its effects.
3. For the Vintage or Artistic categories, tap a thumbnail, such as Sixties or Oil Paint, to apply that effect (A.9). (It’s helpful to tap the Help button—the question mark—to view an overlay that labels each one.)

A.9 Vintage effects
4. For the other categories, drag along the thumbnail strip until you find a hue or look that appeals to you.
5. If the category includes other options, they appear to the right of the thumbnails. Add Vignette is most common: tap it to create the dark halo surrounding the photo, and then pinch with two fingers to specify the size and center of the vignette. The Black & White effects also include the option of adding film grain and a sepia tone (A.10).

A.10 Black & White effects, with a vignette and grain added (but sepia inactive)
Tip
I almost can’t believe I’m suggesting this, but make sure your iPad’s audio isn’t muted when you edit in iPhoto. Many actions have sound effects—like a ziiip as the loupe appears or disappeares—that are quite well done. If you find them annoying, don’t worry: At iPhoto’s main Albums screen, tap the gear button and switch the Sound Effects setting to Off.
Tip
Despite the improved camera in the third-generation iPad, I’m far more inclined to take photos using my iPhone 4S. The iPad, however, is a much better editing environment. Since iPhoto runs on both devices, it’s a cinch to transfer photos from one to the other. On the iPhone, select a photo and tap the Share button. Make sure the iPad is also running iPhone and tap the Beam button. Specify which photo to beam (the selected one, or others that may be flagged or favorited), and then choose the name of the iPad.
Edit Photos in Adobe Photoshop Touch
This is the real deal, Photoshop adapted for use on a tablet. It doesn’t support all of the desktop version’s features, of course, but you may be surprised to learn what is there: layers, blend modes, selection tools (including the very cool Scribble Selection tool), custom gradients, and more. As such, I’m not going to try to provide a comprehensive overview, and instead stick with common operations you’re likely use most often.
Note
It can’t be Photoshop without a little frustration, right? In its attempt to provide a stripped-down tablet app, Adobe has made the interface a little too sparse for my taste. For example, many operations are found under the & menu—yes, an “ampersand” menu. So when I mention that you need to choose Crop under the & menu, it’s not a typo.
To get started in Photoshop Touch, tap the New From button (at the bottom of the screen, to the right of the New, or plus-sign (+) button) to locate a photo to work with. It can come from local photos stored on the iPad, Adobe’s Creative Cloud (if you have an account), captured by the device’s camera, or downloaded from Google or Facebook. Select an image and tap the Add button.
Recompose
Straightening a crooked photo requires two steps: turning the image and cropping out empty space created by the rotation. While many apps crop automatically, Photoshop Touch leaves that step for you to do. Is the app slacking? Not really. Your photo exists on a layer, and edits you make are applied to that layer. This approach gives you the freedom to bring in an image, adjust it, add another image on a new layer, rotate or resize that, and perform other involved edits.
Straighten the image
1. With an image open, tap the Layer Transform tool (which looks like a cross) to view the transformation options.
2. Drag the Rotation button clockwise or counter-clockwise to turn the image (A.11). If your image needs just a small amount of straightening, the tool may snap to 90-degree angles; in that case, turn snapping off by tapping the magnet icon in the toolbar.
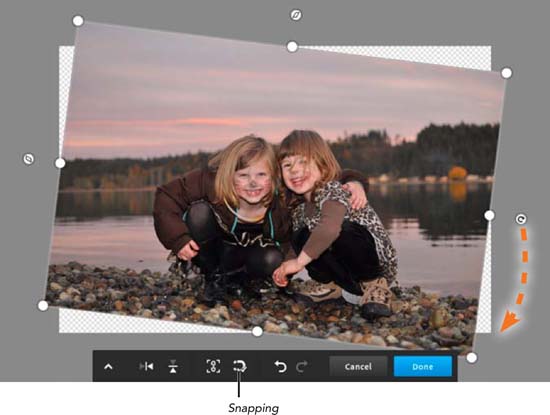
A.11 Straighten the photo by dragging.
3. Tap Done to accept the edit.
Crop the frame
1. Tap the & menu and choose Crop.
2. Drag the selection handles to redefine the visible area of the photo (A.12). If you want to maintain the image’s aspect ratio, tap the Lock Aspect Ratio button in the toolbar so that it appears that the chain in the icon is unbroken.

A.12 Crop to define the visible area.
3. Drag the middle of the selection area to move the entire area without adjusting its size.
4. Tap Done to finish.
Rotate the canvas
Surprisingly, Photoshop Touch offers no easy way to rotate the image in 90-degree increments, and doesn’t always honor the orientation of imported images. It’s possible, but it will make you feel like you need to be an engineer to do it.
1. Open a photo that needs to be rotated.
2. From the & menu, choose the Crop item.
3. Tap the carat button (^) to expand the options at the bottom of the screen.
4. In the W(idth) and H(eight) fields, take the largest value and apply it to the other field. For example, if your landscape-oriented photo is 1600 pixels wide by 1200 pixels tall, change the H value to 1600. Tap Done.
5. Tap the Layer Transform button.
6. Drag the Rotation button to turn it 90 degrees, and then tap Done.
7. Go back to the Crop command under the & menu and drag the handles to remove the excess background area. Tap Done to finish.
Adjust Tone and Color
So you want fine-grained control over how your image appears? Photoshop Touch has a slider for you.
1. Tap the Adjustments button to reveal the collection of tone and color adjustment tools you can use (A.13).

A.13 The Adjustments menu
2. Choose a tool to reveal its controls. For example, Brightness/Contrast offers a slider for each attribute (A.14).

A.14 Adjusting contrast and brightness
3. Drag the controls to adjust the settings, and then tap the Apply button.
Adjust Specific Areas
One advantage Photoshop Touch boasts over most editors is its array of selection tools. You can draw rectangular and free-form lasso selections, feather the selection borders, and more.
For my discussion here, I want to draw attention to the Scribble Selection tool, and use it to make the background of an image black and white, while keeping a foreground object in color. This also lets me demonstrate how layers are an important part of editing in the app.
1. In the Layers panel at the right edge of the screen, tap the Add Layer (+) button, and then tap Duplicate Layer in the dialog that appears.
2. Next, activate the Scribble Selection tool: Tap the toolbar at the left of the screen to view which tools are available. The Scribble Selection tool is grouped together with the Magic Wand; tap and hold the latter and then choose Scribble Selection Tool when it appears. When a tool is selected, its options replace the column of other tools.
3. Make sure the Keep button is highlighted, because you want to first define the area you want to select. Then, drag roughly to define the area with a green line; Photoshop Touch will do the hard work of detecting edges and making a better selection (A.15). (To refine the selection, pinch with two fingers to zoom.)
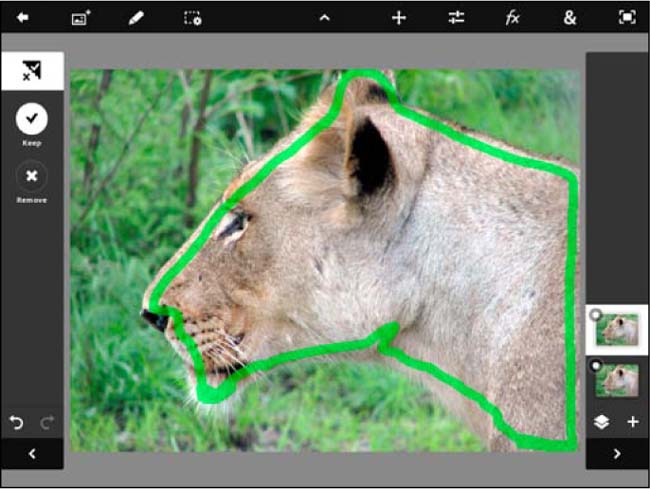
A.15 Using the Scribble Selection tool to define an area.
4. Tap the Remove button in the toolbar, and then paint the section you want to be outside the selection (the strokes show up in red). As soon as you lift your finger, Photoshop Touch makes the selection. However, if you want to refine the edge, you can continue to draw Keep or Remove strokes.
5. In this example, to keep the lion but remove the background, I choose Extract from the Edit menu (the pencil icon). The image looks the same due to the identical layer below it, but the layer icon reveals a transparent background (A.16).

A.16 Background extracted in top layer
6. To make the underlying layer black and white, first tap to select it.
7. From the Adjustments menu, choose Black & White. The end result is a foreground in color and background in gray (A.17).

A.17 A quick bit of selection separates the foreground and background.