Chapter 1. The iPad on Location
Through the years, I’ve hauled various laptops on vacations and business trips, and although the computers have gotten smaller and lighter over time, carrying one and its assorted peripherals still takes up a lot of space and weight. In contrast, the iPad’s slim size and weight makes it an ideal traveling companion. As a photographer, you probably already carry a fair amount of gear. Wouldn’t you like to lighten your bag further?
Instead of squinting at the LCD panel on the back of the camera, view your shots on the iPad’s brilliant 9.7-inch screen and pick out details in the middle of a shoot that you may miss through the viewfinder. You can also use the iPad as a remote photo studio. Sort, rate, and apply metadata to the images while you’re traveling, or edit and share them to your favorite social networks. And then, when you’re back at home or in your studio, bring the photos into your computer, ready for further editing in Lightroom or other software. Whether “on location” is somewhere truly remote or just your back yard, the iPad can be your new photographer’s assistant.
Shoot Raw or JPEG (or Both)?
Before stepping outside, it’s important to figure out how you want to capture the images that will end up on the iPad. The question of whether to shoot images in raw format or JPEG format initially seems irrelevant to the iPad—the device can import both types. But choosing one (or both) leads to considerations that ripple through the entire iPad workflow. So let’s take the time to look at this first. (The table below provides a quick overview of the discussion.)
Raw image files contain the unaltered information captured by the camera’s image sensor, which provides much more data to work with when editing in a desktop program such as Adobe Photoshop, Adobe Photoshop Lightroom, or Apple’s Aperture. In general, professional and intermediate cameras offer a raw capture option.
JPEG files, on the other hand, are processed within the camera before they’re saved. Each image is color corrected, sharpened, compressed, and adjusted in other ways to create what the camera believes is the best image.
When brought into an image editor on the desktop, a JPEG file doesn’t offer as much image data and therefore can’t be edited as thoroughly as a raw file. For example, you’re more likely to successfully pull detail out of shadow areas with a raw file than with a JPEG. All digital cameras can capture JPEG images; for some models, JPEG is the only choice.
Read on for an overview of the options. Although I assume you want to shoot raw if you’re able to—after all, the ultimate consideration is usually image quality—some situations may call for you to switch formats.

Shoot JPEG
If your camera doesn’t shoot in raw format, JPEG is your only option. You might also choose to capture JPEGs when you’re deliberately shooting snapshots that need to be processed or shared quickly, or when you want to employ the simplest workflow (1.1).
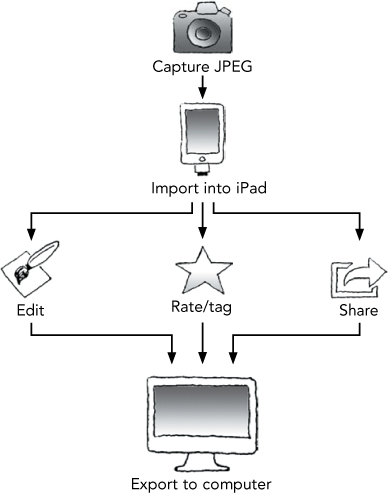
1.1 Workflow for shooting in JPEG format
1. Capture photos in JPEG format on your camera.
2. Import the photos into the iPad (discussed in detail later in this chapter).
3. Review the photos using the Photos app.
4. Optionally edit, rate, tag, or share pictures.
5. Synchronize the pictures to photo software on your computer when you’re back at home or the office.
The main advantage of the JPEG workflow is that it’s largely friction free. Photos occupy less storage space on the iPad, making even the lowest-capacity model (16 GB) workable for holding pictures on location. You also deal with just one set of images, unlike with raw files (as you’ll see shortly).
The primary disadvantage is that JPEG images are compressed and corrected within the camera, so you’re not getting the fullest possible image data. Editing images, whether on the iPad or on the desktop, further reduces image quality, because the JPEG format applies lossy compression—image data is removed from the file whenever it’s saved. If you edit the images on the iPad, many editing apps apply still more compression when they output the corrected JPEG files. When you bring the photos into the computer, you don’t have as much latitude for editing them.
I don’t mean to sound alarmist, as if shooting in JPEG is going to produce muddled images or as if you need to go out and buy an expensive DSLR to end up with decent photos. JPEG compression is based on how the eye perceives images and is generally very good. It’s just that, when compared to working with a raw file, JPEG files start you at a disadvantage.
Shoot Raw
Capturing photos in raw format adds some complexity to the iPad workflow (1.2). Although the iPad can import raw files, it can’t edit them natively (in most cases; see Chapter 4 to learn about apps that are able to manipulate raw files directly). Instead, any editing or sharing is done on JPEG previews supplied by the camera.

1.2 Workflow for shooting in raw format
1. Capture photos in raw format on your camera.
2. Import the pictures into the iPad.
3. If you edit or share photos on the iPad, the work is done on the JPEG previews. Edited versions are saved as new JPEG files, and the raw files remain untouched.
4. If you rate and tag photos using the app Photosmith, the metadata is retained when photos are exported from the iPad to the photo software on your computer (see Chapter 3).
5. Since any images you edited on the iPad are separate versions, they’re added to your photo software. For images you didn’t edit, the JPEG previews are ignored.
One option is to consider editing on the iPad a temporary step: Edit images to share them quickly when you know you won’t be back at the computer for a while, and then dump those edited versions when syncing to the computer, where you can edit the originals with better tools.
The advantage to the raw workflow is that you retain all of the image data for later editing, giving you the most flexibility with the photos on the desktop. Also, metadata that you add in Photosmith stays with the raw images when imported into Lightroom, so you don’t need to undertake another round of rating and keyword tagging.
However, a main disadvantage is that raw files occupy much more storage space, which is an issue if you’re shooting hundreds or thousands of photos. Most editing apps work only on JPEG previews, so you can’t take full advantage of the raw image data unless you use a dedicated raw editing app. Also, unless the iPad is acting as just temporary storage between camera and computer, you end up with separate JPEG versions that must also be imported (unless you dump the JPEG versions).
Shoot Raw+JPEG
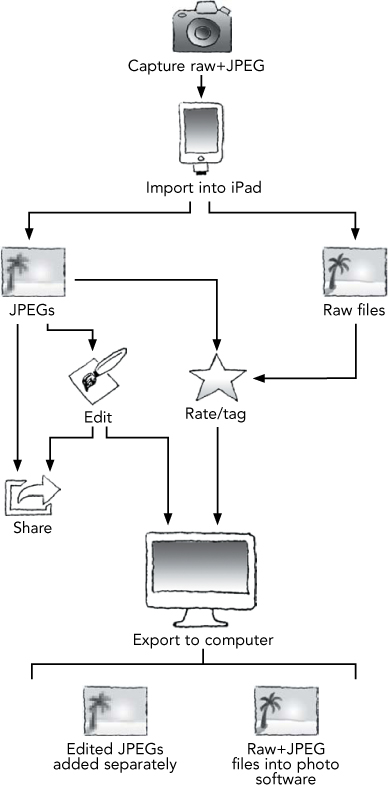
For cameras that support it, a third option is to shoot in Raw+JPEG mode. In this case, the camera writes two files: the raw file, plus a JPEG file as specified by the camera settings instead of an automatically generated preview file. The workflow looks something like this (1.3):
1. Shoot photos using the camera’s Raw+JPEG mode.
2. Import the photos into the iPad, which displays just one thumbnail for each image and a “RAW+JPG” badge, although each image is made up of a raw file and a JPEG file.
3. Optionally edit and/or share photos, which applies to the JPEG counterpart for each photo. Edited images are saved as new JPEG files.
4. Rate and tag images in Photosmith. When you do so, the Raw+JPEG pair is treated as a single image.
5. Export the photos to your computer. The Raw+JPEG pair is treated as one image, although you can choose to work on the versions separately; Aperture, for example, gives you the option to import just the raw file, to import just the JPEG, or to import both files and specify which is the “master” for the pair.
1.3 Shooting Raw+JPEG using one memory card
On some high-end cameras that accept two simultaneous memory cards, you can specify that raw files be written to one card and JPEG files to the other. This implementation can be somewhat cleaner, treating the raw files as “digital negatives” that exist separately from the iPad (1.4):
1. Capture photos in Raw+JPEG format, specifying that raw files are written to one card and JPEG files are written to the other.
2. Import the JPEG images into the iPad. Leave the raw files on the card and store it in your camera bag.
3. Edit and/or share the JPEG files on the iPad.
4. Export edited versions of the JPEGs to the computer; delete the rest.
5. Export the raw files to your computer.

1.4 Shooting Raw+JPEG using two memory cards
The primary advantage of shooting Raw+JPEG is that you have more control over the JPEG files that you import into the iPad. If your intent is to quickly preview and share photos from the iPad with a little editing here and there, and if you can save to separate cards, you can specify a smaller JPEG image size in your camera’s settings. That speeds up import time and saves storage space on the iPad without affecting image quality much. Also, the raw originals are still available for editing on your computer.
The disadvantage is that you’re taking up more storage space. If you’re writing to separate cards and importing just the JPEG files into the iPad, you don’t get the benefit of rating and tagging when you export the raw images to your computer.
Looking at these various options, I prefer to shoot just raw images and bring them into the iPad. None of my current cameras can record to dual memory cards, so shooting Raw+JPEG doesn’t offer a compelling advantage to me.
Review Photos in the Field
The shift from film to digital cameras brought an enhancement that fundamentally changed the way photographers shoot. It’s second nature for us now, but the ability to take a shot and review it on the camera’s LCD to provide immediate feedback was a real revolution. You could tell right away if you needed to adjust the exposure, you could check whether everyone in the shot was looking at the camera, and you could otherwise see what was just recorded to the memory card.
And yet. Camera screens have improved over the years, in both resolution and size, but it’s not always easy to spot details on a 3-inch screen. The iPad’s 9.7-inch screen, however, reveals plenty of detail, without involving the bulk and inconvenience of a laptop.
Using an inexpensive adapter from Apple, you can import shots from a memory card or from a camera directly and get a better view of your photos—while you’re shooting on location, not later at home when the shot is no longer available. It’s also possible to transfer photos to the iPad wirelessly using an Eye-Fi, a Wi-Fi–equipped memory card.
In this section, I’m making the assumption that you’ve left the computer at home and have the iPad on location—whether far-flung or just out and about for a couple of hours. There are times when you may want to review photos on the iPad even with a laptop available; I cover such situations in the next chapter, “The iPad in the Studio.”
Import Using the iPad Camera Connection Kit
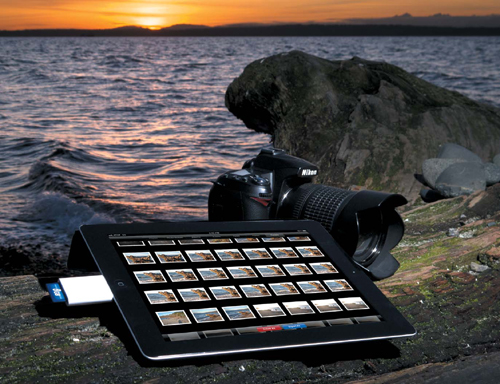
Apple’s $29 iPad Camera Connection Kit is one of the few truly essential iPad accessories; without it, I wouldn’t be able to write this book! The kit is made up of two pieces that attach to the iPad’s dock connector: an adapter that accepts SD memory cards, and one that accepts a standard USB plug (1.5).
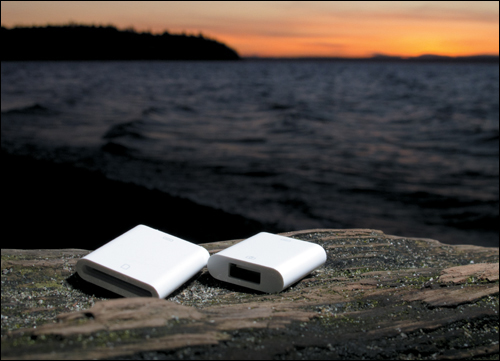
1.5 The two pieces of the Apple iPad Camera Connection Kit enjoying a sunset together
Import from a memory card or camera
When you’re ready to transfer the photos you shot, do the following:
1. Remove the SD card from your camera and insert it into the SD card adapter. Or, connect the USB cable that came with the camera (typically a USB-to-mini-USB cable) between the USB adapter and the camera’s USB port.
2. Wake the iPad if it’s not already on.
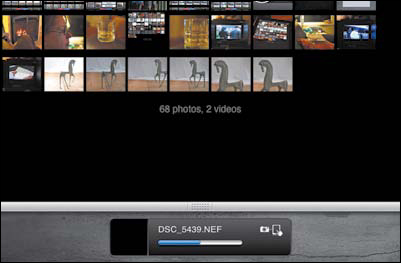
3. Insert the adapter into the iPad’s dock connector. If you’re connecting via USB, you may also need to power on the camera or switch it into its review or playback mode. The Photos app automatically launches and displays thumbnails of the memory card’s contents (1.6, next page).

1.6 The contents of a memory card
When importing Raw+JPEG images, the format is marked on their thumbnails (1.7). You can’t choose whether to import JPEG or raw independently, though.

1.7 Raw+JPEG files are clearly identified.
4. If you wish to bring in all of the photos, tap the Import All button. Otherwise, tap the thumbnails of just the photos you want; a blue checkmark icon indicates a photo is selected. Unfortunately, there’s no option to view a larger version of the shots at this point. There’s also no easy way to select a range of thumbnails other than tapping each one. iOS 4 actually included a great shortcut: touch and hold one photo, and then drag to select others without lifting your finger. That capability disappeared in iOS 5; I’m hoping it’s a glitch and that the shortcut returns in a future software update.
5. Tap the Import button (1.8). You still have the opportunity to ignore your selections and import everything by tapping the Import All button. Or, tap Import Selected to copy the ones you chose in the last step. The photos begin copying to the iPad’s memory; a green checkmark icon tells you the photo has been imported.
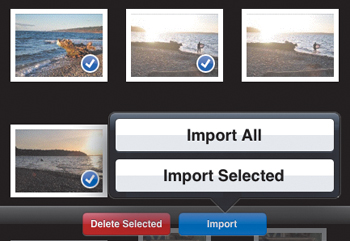
1.8 Import only the photos you want.
Tip
It can take a while to import a full memory card, but you don’t have to put the iPad down. Photos continue to copy in the background, even if you switch to another app.
6. After the photos are copied, you’re asked if you want to delete the imported files from the memory card. I recommend tapping the Keep button and then erasing the card using the camera’s controls.
The images appear in your Photo Library in two new, automatically created albums: Last Import and All Imported.
7. At this point, you can remove the adapter—no need to eject it, as you would on a computer. The Photos app switches to the Last Import album, where you can review the imported photos.
When the Photos app scans an inserted memory card, it identifies shots you’ve already imported with a green checkmark. For example, suppose you’re shooting with the same card that you used yesterday because there’s still plenty of free space left on it. If you tap the Import All button, you’re asked if you want to re-import all of the photos—in which case you end up with multiple copies—or to skip the duplicates.
Tip
As you can see from the screenshots, the import process also gives you the option of deleting images from the memory card. This feature is great if you want to keep using a card for shooting but don’t want to save obviously poor photos. For example, I don’t need to retain dozens of test and setup shots while I’m trying to dial in the right settings and lighting positions. Tap to select the photos you wish to remove, and then tap the Delete button.
Import from an iPhone
While I was having coffee with a friend, he asked, “So, are you going to get the cool new camera?” I must have looked puzzled, because he followed up with a grin and, “You know, the camera that also has some smartphone features.” He meant the iPhone 4S, which was about to be released. He was far less interested in the specifications or new features of the device than in the substantial improvements made to its camera.
That camera is quite impressive, made more so by the fact that the iPhone is always with me. I can capture great shots without also carrying a separate camera all the time.
Getting photos from the iPhone into the iPad is as simple as importing from any other digital camera. Plug a regular iPhone sync cable into the Camera Connection Kit’s USB adapter, and then connect the iPhone and the iPad. Thumbnails appear in the Photos app, ready to be imported (1.9).
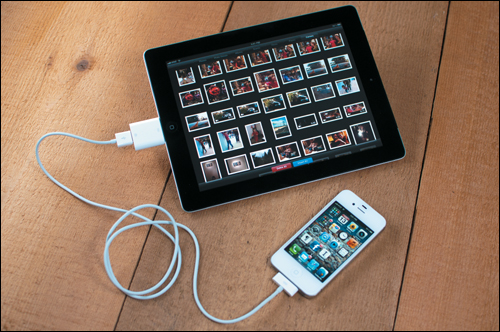
1.9 Importing photos from an iPhone into the iPad
Another direct import route from iPhone to iPad (or between any two iOS devices) is to transfer the photos wirelessly using an app called PhotoSync. As long as both devices are connected to the same Wi-Fi network, they can bounce images back and forth, like so:
1. On the iPad, launch PhotoSync and tap the red Sync button.
2. Tap the Receive Photos/Videos button.
3. On the iPhone, launch PhotoSync and tap the thumbnail of the image or images you want to transfer.
4. Tap the Sync Selected button.
5. In the next dialog, tap the iPhone-iPod-iPad button to specify where you want to transfer the image or images to (1.10).

1.10 Transfer photos from an iPhone (shown) to an iPad using PhotoSync.
6. Tap the name of the iPad that appears. The photo or photos you selected copy from the iPhone to the iPad.
Import Wirelessly Using Eye-Fi Direct
Wait a minute. We’re in the second decade of the twenty-first century, viewing high-resolution digital photos on a tablet computer operated by touch. Do we need to shuttle files using adapters and cables as if we were using floppy disks? Isn’t there another way, one that feels more like the future we live in?
How about taking a photo and having it appear on the iPad a few seconds later, using the camera you already own and without tethering it to the iPad via a cable? Using an Eye-Fi wireless memory card, you can do exactly that. The Eye-Fi looks and works like a regular SD memory card, but it also features a built-in radio that can connect to Wi-Fi networks or even create its own.

When you’re shooting on location, that latter detail is important. The Eye-Fi is known for being able to hop onto a Wi-Fi network and transfer photos to your computer on the same network, or upload images to photo-sharing sites such as Flickr, Facebook, or SmugMug. But that doesn’t help if a Wi-Fi network isn’t available. Eye-Fi’s Direct Mode turns the card into a wireless base station inside the camera. After you connect the iPad to that Eye-Fi network, photos you shoot are copied shortly after they’re captured.
As I write this, Eye-Fi sells cards in 4 GB and 8 GB capacities, ranging in price from $50 to $100. Although Direct Mode is available for each model, the high-end card, the Pro X2, is the only one that supports working with raw images.
Set up the Eye-Fi according to its instructions, which involves creating an Eye-Fi account, installing the Eye-Fi app from the App Store, and configuring the iPad to recognize the Wi-Fi network created by the Eye-Fi card. Then, insert the card into your camera and start shooting.
Tip
Some cameras now include built-in support for Eye-Fi cards. My Canon PowerShot G12, for example, recognizes when one is inserted and provides a menu of options specific to the Eye-Fi.
Shoot and import using Eye-Fi Direct Mode
Once the card and the iPad are set up, capturing and transferring photos works like this:
1. Take a photo to activate the Eye-Fi card’s Direct Mode. (It goes to sleep after a few minutes of inactivity to conserve power.)
2. On the iPad, go to Settings > Wi-Fi and select the Eye-Fi Card network (1.12).

1.12 The Eye-Fi card shows up in the iPad’s Wi-Fi settings.
3. Launch the Eye-Fi app.
4. The test photo you just took automatically transfers to the iPad; any images on the card that had not yet been transferred are also copied.
5. Continue shooting. As you capture each shot, it’s transferred to the iPad (1.13).
1.13 Photos arrive in the Eye-Fi app from the camera just after they’re shot.
6. Tap a thumbnail in the Eye-Fi app to view the photo full-screen. (However, you can run into problems with raw files; see the next sidebar for more information.)
Tip
Change the iPad’s Auto-Lock setting to 15 minutes or Never when you’re shooting with the Eye-Fi (go to Settings > General > Auto-Lock). If the iPad goes to sleep, it severs the connection to the Eye-Fi’s network to conserve power. When you wake up the iPad, it may not automatically grab the network again (especially if you took a break in shooting, during which the Eye-Fi goes to sleep).
Back Up Your Photos
The main focus of this chapter is to move photos from your camera to the iPad, but getting them off the tablet in the form of backups is just as important. When you’re shooting in the field with your iPad in hand, you don’t have the luxury of transferring dozens of gigabytes onto your computer or to an external hard drive attached to it. That leaves you with a few options.
You can import photos into the iPad and use the memory cards you shot with as backups. It’s like carrying film rolls all over again—although in this scenario, they occupy much less physical space. Fortunately, the price of memory cards has steadily dropped as capacities have increased, so you’re not spending a lot of money to pick up several 8 GB or 16 GB cards.
However, one problem with that approach is the relatively limited capacity of the iPad. The current high-end model, with 64 GB of memory, feels like an airy, open orchestra hall when you’re just loading apps and documents. But the walls begin to push in if you’re capturing several hundred shots during each outing (and that’s assuming you’ve minimized the amount of music and video being synced in order to make room for photos).
So, if the iPad itself isn’t big enough to hold one set of photos, you need to get them off the iPad and onto another medium. If I were talking about an average computer, this step would be trivial: just copy the files to a hard disk. Alas, the iPad doesn’t work that way. Since iOS doesn’t expose its file system to users, Apple opted not to offer the ability to push files around between devices without a computer in the middle.
Of course, that doesn’t mean the task is impossible.
Online Services
If your iPad can connect to a speedy Wi-Fi Internet connection, you can upload images to a service such as Dropbox or to Apple’s Photo Stream feature of iCloud. I recognize that “speedy Wi-Fi Internet connection” can be a giant if. Maybe someday you’ll be able to tap into a fast, high-capacity cellular network in a sheep pasture in Scotland, but chances are you’ll be blissfully (or agonizingly) far from the rest of the world while you’re shooting.

More likely, after shooting for the day, you return home or to a hotel room, or maybe park in a Wi-Fi–equipped coffee house for a few hours, and connect to a broadband Internet connection there (although even that possibility can be spotty, depending on location). Today’s cellular networks are only starting to approach the speed and capacity required to upload dozens or hundreds of multi-megabyte files, and in most cases you pay a premium to do so.
But again, it’s not impossible. I’ve uploaded large files for book projects while sipping in a Starbucks, and I’ve dribbled files over a flaky 3G cellular connection next to a tent and campfire in the North Cascades.
What’s important is to have some type of backup. Everything I discuss in this book becomes useless if you somehow lose the photos you went to such trouble to capture in the first place.
Note
I feel I should reiterate that these aren’t the swiftest methods of backing up photos, especially if you’re talking about multi-megabyte raw files. But if the choice is between letting the iPad upload files for a while or losing photos, I’ll always choose the backup route.
iCloud Photo Stream
I signed up for Apple’s free iCloud service primarily to share my calendars and contacts between various devices, but I also got an added bonus: Photo Stream.
Whenever you take a photo using an iPhone, iPod touch, or iPad 2, it’s saved to the device’s Camera Roll. With Photo Stream enabled, each of those photos is automatically uploaded to iCloud and copied to your other enabled devices when they’re connected to a Wi-Fi network. A photo captured by my iPhone, for example, shows up on my iPad, on my Apple TV at home, and on my MacBook Pro (when I launch iPhoto).
More importantly for our discussion here, any photos imported into the iPad using the Camera Connection Kit or an Eye-Fi are added to the Camera Roll, so they, too, appear in your Photo Stream (1.15). (The same applies to screenshots you capture on an iOS device, which often makes my personal Photo Stream quite the thrilling mix of photos, test images, and screenshots of those test images. Not quite the same emotional impact when playing slideshows for family.)

1.15 Photo Stream, shown in the Photos app
Photo Stream is great because you don’t have to do anything special other than enable the service. (In the iPad’s Settings app, tap the iCloud button, tap Photo Stream in the right column, and then flick the switch to On.) As long as you’re connected to the Internet via Wi-Fi, the photos copy automatically to Apple’s servers.
There are a couple of limitations, however:
• Photo Stream stores just 1000 pictures on the iPad. Once you reach that thousandth photo, the oldest images in the stream are removed in favor of new ones. On the iCloud servers, 30 days of photos are saved, giving you plenty of time to connect on your computer and download the pictures. Once on the computer, the photos aren’t deleted.
• As of iOS 5.0, you can’t delete pictures from the Photo Stream. So, if you import a flub from your camera, that file sticks around until it rotates out. (As I write this, there are rumors that an upcoming version of iOS may add the capability to remove images from Photo Stream. So, this point might be moot by the time you read this.)
If you do want to make sure a few photos stick around on the device, copy them from the Photo Stream to an album.
1. On the iPad, open the Photos app and tap the Photo Stream button.
2. Tap the Share button.
3. Tap to select one or more photos you want to copy to an album.
4. Tap the Add To button (1.16).

1.16 The Add To options
5. Tap Add to New Album, type a name for the album, and then tap Save. Or, tap Add to Existing Album and then tap an album (1.17).
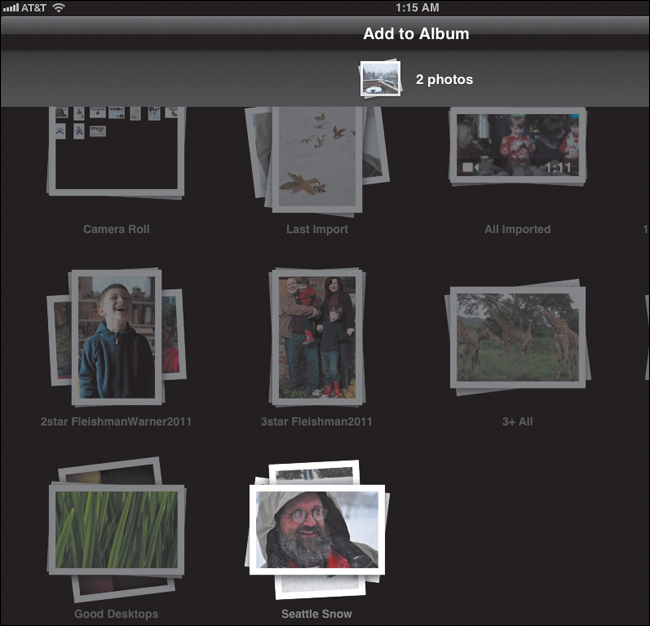
1.17 Choose an album to store the copies in.
The photos are added to the album you created or chose.
Dropbox and similar services
If you’re not using iCloud, or you want finer control over which photos are uploaded, consider using an online service such as Dropbox. It’s a file storage service that has fundamentally changed the way I work on my computers, and it extends its features to the iPad with the Dropbox iOS app. (Another good option is SugarSync; I happen to use Dropbox, so I’ll describe how it works here.)
On the Mac or under Windows, Dropbox creates a special folder that mirrors its content on the Dropbox servers. Anything you add to the folder is also copied to other devices you’ve set up with the Dropbox software. Here’s a real-world example: Whenever I write a new article, I create it in an “Active Work” folder within my Dropbox folder. Each time I save the file, it’s automatically copied not only to Dropbox’s servers, but also to a Mac mini and a Windows PC in my office.
On the iPad (and other iOS devices), the file isn’t copied automatically, because you may not want giant files to be pushed directly to a lower-capacity device. Instead, the Dropbox app is a window to everything stored in your Dropbox folder, letting you browse your files and download the ones you want to view. I can open my article in a text editor on the iPad and work on it, review PDFs, look at photos, and do pretty much anything else as long as I can download a file and own apps that work with the file formats.
Returning to photo backups, the Dropbox app can also upload files—files that you specify, not all files automatically—to your Dropbox. After you download and install the Dropbox app on the iPad, follow these steps to back up photos:
1. If you’re uploading raw files, skip to step 2. If you have JPEGs, open the Dropbox app, tap the Settings button, and then tap Upload Quality. Change the Photo Quality setting to Original so the app doesn’t compress your image. (You should only have to do this step once. Raw files are uploaded without compression, so this setting has no effect on them.)
2. Tap the Dropbox button in the upper-left corner of the screen, if you’re viewing in portrait orientation; in landscape orientation, the list of files and folders in your Dropbox folder appears along the left edge of the screen. If you don’t see the list, tap the “>” button at the upper-left corner to reveal the folders.
4. In the popover that appears, navigate to the folder in your Photo Library that contains the files you wish to upload.
5. Tap to select the photos (1.18).

1.18 Choosing files to upload to Dropbox
6. Tap the button under “Choose an upload location.”
7. Locate the folder you want as the destination and tap the Choose button. Or, tap the Create Folder button to make a new folder.
8. Tap the blue Upload button to start transferring the files. When the copying finishes, the files are available at the Dropbox servers and on any of your computers connected to the Internet.
Tip
Dropbox offers 2 GB of storage for free, which is suitable for most people’s document needs. Photos, of course, take up much more storage, so you’ll want to consider paying for more storage. Paying $9.99 a month gives you 50 GB; $19.99 a month bumps that up to 100 GB. That’s quite a jump, I know. I use the service enough that the 50 GB range is worth it for me, but I’ve also been told by reputable sources that if you contact the Dropbox folks directly, you can get less capacity for less money.
Portable Storage
Until recently, the notion of copying your photos from the iPad to a portable hard disk was science fiction. Doing so makes sense: just offload your photos to a small disk connected via USB. But that would require a level of interaction with the file system that Apple is intentionally trying to obscure; when you’re using an iPad, you’re focused on tasks, not on shuffling files and figuring out where they’re located.
Working with gigabytes of photos, however, begs for the capability to copy lots of files to a small, lightweight storage system. An external hard disk is almost a requirement for shooting on location with a laptop, so why not attach one to the iPad?
As I write this, I’m aware of one product that can make it happen.
Seagate GoFlex Satellite and Photosmith
Seagate’s GoFlex Satellite is a 500 GB portable hard disk with built-in Wi-Fi. Originally marketed as additional storage for the iPad (so you could carry your movie library without having to fill the iPad’s internal memory), the GoFlex Satellite can now also communicate with Photosmith 2.0 and store roughly 20,000 high-resolution photos. (See Chapter 3 for more about using Photosmith.)
After you’ve imported photos into the iPad and then brought them into Photosmith, do the following to copy photos to the GoFlex Satellite:
1. Select a collection or a group of photos in Grid view.
2. In the Services pane of the sidebar, tap the GoFlex button and make sure the drive is powered on and recognized by Photosmith.
3. Tap the Backup/Update Photos button (1.19). The files copy to the drive.

1.19 Copy photos from the iPad to a GoFlex Satellite external drive in Photosmith.
Any metadata you’ve applied in Photosmith (ratings, titles, keywords, and the like) are also copied (as XMP sidecar files). When you return to your computer, connect the drive and import the files into Lightroom.
Note
At the Consumer Electronics Show (CES) in January 2012, Sanho Corporation showed off a new product called CloudFTP, a portable Wi-Fi hotspot that connects to any USB hard disk to make it accessible to the iPad. They also demonstrated its ability to copy files to and from the iPad. As this book goes to press, the product is not yet shipping. I’ll post more information at www.ipadforphotographers.com as I learn it.
Use the iPad as a Fill Light
Most of this chapter has focused on using the iPad as a photo repository, whether you’re importing pictures to review in the field or backing up the images for safekeeping. But there’s another use for the iPad that doesn’t require any data transfer. That 9.7-inch screen is backlit and bright, so feel free to use it on location to throw some illumination on your subject.
The screen can’t replicate a strobe—you don’t want to turn your retinas to ash by frying them while reading in bed, after all. But it is plenty bright, especially in dark situations.
The easiest way to set the iPad up as a fill light is to open an app that appears mostly white. Launch Safari and open a blank page, or run something like PlainText, a text editor, with a blank document loaded. Then angle the iPad so the illumination falls where you want it to.
You can get creative with simulated gels by displaying various colors as background wallpaper images (1.20). Here’s how:
1. In your favorite image editor on your computer, create an empty document and fill it with the color you want.
2. Save that image as a JPEG or PNG file.
3. Add the file to iPhoto, Aperture, or a folder on your computer that you use to sync photos to the iPad.
4. Open the iPad’s Settings app.
5. Tap the Brightness & Wallpaper button.
6. Tap the Wallpaper button (which displays two background images: one for the lock screen and one for the home screen).
7. Select the photo you imported from the Photo Library.
8. Tap the Set Home Screen button to make that photo the background image on the iPad’s home screen.
9. Create a new screen of app icons: Touch and hold an app until the icons begin to shake, then drag it to the right edge of the screen until it’s the only icon visible; press the Home button to make the icon stop shaking.
10. Position the iPad near your subject and take the photo.

1.20 The iPad, out of frame at left, acts as a fill light with a cyan-colored gel. It also reminds us to monitor caffeine intake among writers after midnight.
A more elegant solution is to install the $2.99 SoftBox Pro app. It features several background colors, patterns (for adding custom catchlights), and a brightness control at your fingertips for quick adjustments (1.21). Choose the look you want, tap the screen to remove the controls, and get the shot.
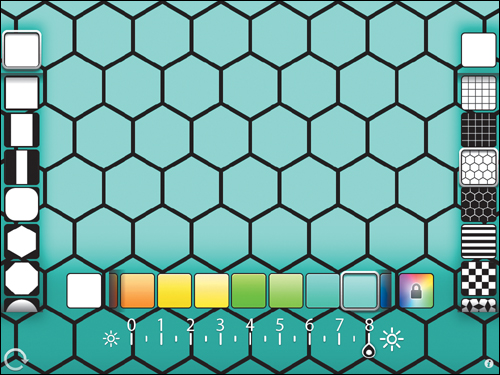
1.21 SoftBox Pro cooling the scene