Chapter 6. Build an iPad Portfolio

The desire to showcase your photos may have been your impetus to buy an iPad in the first place. The benefits are compelling: You can show off your work on the large screen, where the backlight makes the photos pop. You don’t need to create a printed portfolio, which can involve considerable cost and requires lugging it around whenever you’re meeting with a prospective client. And you or your client can zoom in to examine photos in detail.
An iPad portfolio also extends your reach beyond an initial meeting. Email a photo to a client directly from the iPad so they have something more than a business card or a print to remember you by. And since you’re likely to have your iPad with you at other times, impromptu portfolio viewings are possible wherever you are—airplanes, lunches, or even just around the coffee table with family members.
5 Steps to Create a Great Portfolio
Before getting into the nuts and bolts (or more accurately, taps and swipes) of building a portfolio, let’s look at what makes a portfolio successful. It’s easy to throw all your photos onto the iPad and use the Photos app to play a slideshow. What makes a good portfolio stand out is how well it’s edited. I doubt there’s such a thing as a portfolio that’s too small, but many portfolios end up being much too large.
1. Include only your best work. I know this should seem obvious, but I find that when I’m picking photos for my portfolio, I often consider one because it’s a favorite, not necessarily because it’s great. That’s an important difference. Always think about how best to impress the person viewing your portfolio.
2. Demonstrate your range. Choose photos that show a variety of skills and styles, to better help the client imagine what you’re capable of, not just what you’ve done before.
3. Tell a story. Even if your photos are pulled from a variety of situations and styles, your portfolio shouldn’t come across as if it had been just thrown together. Start and finish with your best images, and give purpose to everything in between. That can be as literal as starting with images that were shot early in the day and ending with those set at night (6.1), or working through the various stages of a wedding (preparation, ceremony, reception). Or consider working through the color spectrum—black and white images first, building to full-color, high-saturation closing shots.

6.1 Tell a story in the portfolio.
4. Build multiple portfolios. If you work in several areas, create portfolios for each, such as for weddings, for landscapes, for portraits, and so on (6.2).
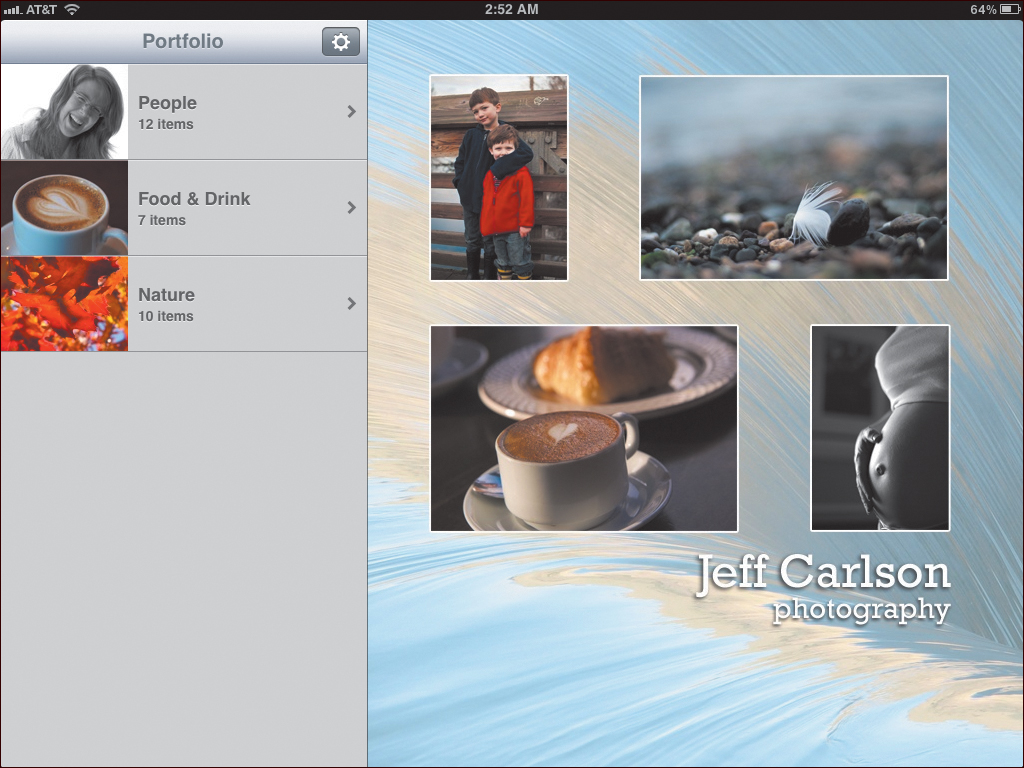
6.2 Multiple portfolios.
5. Update the portfolio as needed. A digital portfolio isn’t limited by paper. As you create more great shots, add them to your portfolio to keep it fresh. If necessary, rotate out old images to prevent the portfolio from getting bloated or looking dated.
Tip
Make sure your iPad portfolio reflects your online portfolio. I can almost guarantee that clients will search for your work online on their own time. Make sure your talents are equally represented there. If you have a personal photo library online, such as at Flickr, consider keeping it separate from your portfolio work. You don’t need to hide your casual photos—just make it more likely that the first images someone sees are the good ones.
Prepare Images for the Portfolio
The iPad will dutifully display the photos you add to it, but to make your portfolio look its best, you’ll want to prepare the images. Despite having a great screen, the iPad offers no color management. That means the colors you worked so hard to achieve in-camera or on the computer may not match exactly when viewed on the iPad.
You also need to consider the dimensions of the images you transfer to the iPad. Although iOS will scale large images to fit, they may not appear as sharp as you’d like. They also require more of the iPad’s memory. (The iPad 2 offers just 512 megabytes, or half a gigabyte, to run the operating system and all apps; the original iPad includes 256 MB.)
Both of these limitations are surmountable. Saving images in the sRGB color space (as opposed to Adobe RGB) provides the closest color fidelity between computer and iPad. For sizes, the iPad’s native resolution is 1024 by 768 pixels, but most apps can handle a 4096 by 2048 pixel size, which provides plenty of resolution to zoom in and appreciate details.
Definitely create some test images to see how they appear on your iPad. Other considerations when preparing the photos include the following:
• Crop to fill the frame. To take advantage of the entire iPad screen, you may want to crop the images to avoid empty areas above or below the photo. Personally, I prefer to not crop, so that I retain the same composition in the final photo, but that’s more of a general rule than an edict set in stone.
• Sharpen the image for the screen. Again, this suggestion is up to you and is worthy of testing. Sharpening the image for the screen can restore some crispness after it’s been resized. Since you’re outputting to a relatively low-resolution device rather than creating an image for print, I recommend sharpening a little—say, 10 percent—for the iPad.
• Increase the saturation. Boosting the saturation of an image can quickly push it into a dangerous realm of Vegas color, but I find that a small push of the Saturation slider (or, better, a Vibrance control if it’s available, to avoid messing up skin tones) helps for the iPad’s screen.
Using photo editing software on your computer, you can export copies with these characteristics for your iPad portfolio. I’m including a few common solutions here; if you use other software, the steps should be similar.
Adobe Photoshop Lightroom
When exporting photos from Lightroom, you can specify the size, color space, and other attributes, which can then be saved as a preset. For future portfolio images, you need only choose the preset to get files that are iPad-ready.
1. Select one or more photos to export.
2. Choose File > Export to open the Export dialog (6.3).

6.3 Lightroom’s export options
3. From the Export To pop-up menu, choose Hard Drive.
4. In the Export dialog, choose a location and a method of assigning the filename (such as the image’s name or a title you assign).
5. In the File Settings area, set Image Format to JPEG and push the Quality slider to 100. Also make sure the Color Space pop-up menu is set to sRGB.
6. Under Image Sizing, select the Resize to Fit checkbox and choose Width & Height from the pop-up menu. Set the W field to 4096 and the H field to 2048. I also recommend selecting the Don’t Enlarge checkbox; if the original dimensions are smaller than 4096 by 2048 pixels, enlarging the image can introduce blurring.
7. Scroll down to the Output Sharpening section, select the Sharpen For checkbox, and choose Screen. I keep the Amount value set to Standard.
8. To save these settings as a preset, click the Add button in the lower-left corner of the dialog and give the preset a name. Click Create.
9. Click the Export button to save the file or files.
With the preset created, you can create future portfolio versions by selecting them in Lightroom and choosing File > Export with Preset > [Name of your preset].
Apple Aperture
Apple’s photo organizer also offers the ability to create a preset that can output iPad-friendly images for your portfolio. Unlike Lightroom, Aperture does not offer to sharpen the file during export, so you’ll need to do that before you export; I recommend choosing Photos > Duplicate Version before sharpening, so you have a separate iteration for export.
1. Select one or more images to export.
2. Choose File > Export > Version(s).
3. In the Save dialog that appears, click the Export Preset pop-up menu and choose Edit.
4. In the Image Export dialog (6.4), click the Add (+) button in the lower-left corner. A duplicate of the currently selected preset is created.
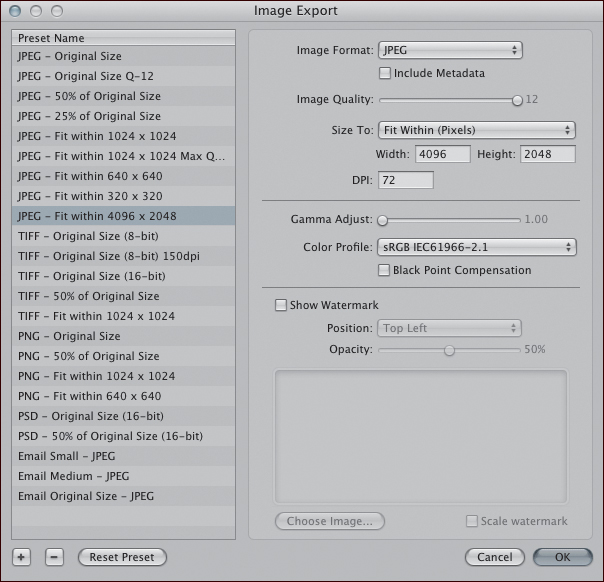
6.4 Aperture export settings
5. Rename the preset to something like “Fit within 4096 × 2048.”
6. Set the Image Format pop-up menu to JPEG.
7. Set Image Quality to 12 (the highest).
8. Change the Size To pop-up menu to Fit Within (Pixels), and specify the Width as 4096 and the Height as 2048.
9. Leave the Gamma Adjust slider alone (it should be zero), and set the Color Profile to sRGB IEC61966-2.1.
10. Click OK to return to the Save dialog.
11. Specify a filename and then click the Export Versions button.
Adobe Photoshop
Photoshop’s Actions and Automate tools are great for processing a lot of images quickly. Record the steps once to create an action, and you can then use it for other shots.
Create an action
1. Choose Window > Actions to show the Actions panel.
2. Click the New Action (+) button at the bottom of the panel to create a new panel. Give it a name and click Record. Any steps you take within the app will now be recorded.
3. Choose File > Image Size, and set a width of 4096 for landscape images or a height of 4096 for portrait images. (You’ll need to create a separate action for each orientation.)
4. Choose Image > Adjustments > Vibrance, and use the Vibrance setting to boost the image’s colors slightly.
5. Choose Filter > Sharpen > Unsharp Mask, and set an amount of sharpening you’re comfortable with.
6. Save the file by choosing File > Save As, and specify JPEG as the file format, a quality of 12, and sRGB as the intended color space.
7. In the Actions panel, click the Stop button (a square icon at the bottom of the panel).
Batch-process files
With the initial settings recorded, you can batch-process images.
1. Either open the images you want to send to the iPad, or place them all in one folder on your hard disk.
2. In Photoshop, choose File > Automate > Batch.
3. In the Batch dialog, choose the action you created from the Action pop-up menu.
4. Specify where your images are located (a specific folder or images open in Photoshop) in the Source area of the dialog (6.5).

6.5 Batch-export files in Photoshop.
5. Set the location and the file-naming convention in the Destination area.
6. Click OK to process the files.
It’s also possible to create a droplet, a small application that handles the automation. Instead of choosing Batch from the Automate submenu, choose Create Droplet, and then specify your iPad portfolio action and a destination. Then, whenever you want to prepare some images for your portfolio, you need only drag the photo files onto the droplet.
Adobe Photoshop Elements
The consumer version of Photoshop can accomplish almost everything its older sibling can, and in one dialog.
1. Open the files you want to process in the Photoshop Elements Editor, or group the files in a folder on your desktop.
2. Choose File > Process Multiple Files (6.6).

6.6 Photoshop Elements export settings
3. In the Process Files From area, choose Opened Files or specify the folder where the images are located.
4. Specify a location for the converted files in the Destination field.
5. Under Image Size, select the Resize Images checkbox and enter 4096 in either the Width or Height field, depending on the orientation of the images you wish to process; you’ll need to process the orientations separately.
6. In the Quick Fix area, select the Sharpen checkbox.
7. Under File Type, choose JPEG Max Quality from the Convert Files To pop-up menu.
8. Click OK to process the images.
Apple iPhoto
Apple’s consumer photo software doesn’t offer export presets, but you can easily save a version of a photo that’s sized correctly for the JPEG.
1. Select one or more images to export.
2. Choose File > Export to open the Export dialog (6.7).

6.7 iPhoto export options
3. Make sure you’re in the File Export section of the dialog that appears, and set the Kind pop-up menu to JPEG.
4. Change the JPEG Quality setting to Maximum.
5. From the Size pop-up menu, choose Custom.
6. To specify the size, choose Dimension from the Max pop-up menu, and enter 4096 in the field.
7. Choose how the file will be named in the File Name setting.
8. Click the Export button.
Tip
If you have a brochure or other printed work, save it as a PDF and include it in your portfolio. You can then send it to a client via email.
Create Your Portfolio
A portfolio is essentially a slideshow of your photos, and if you want to stick with the basics, you can use the iPad’s built-in Photos app to show off the images. But as you’re putting a portfolio together, you’ll want more control: over how photos are added and organized, over the way they’re presented, and over how your client interacts with the work.
Dedicated portfolio apps offer all of those options, and you’ll find many programs at the App Store. I’ve worked with several of them, and Portfolio for iPad (www.ipadportfolioapp.com) is my favorite. I’ll use it as the model for building a portfolio on the iPad in this chapter.
Create and Populate Galleries
Since this is a digital portfolio that will likely change over time, it’s important to be able to easily add images to your collection now and later. The Portfolio app groups multiple portfolios into galleries—you can have just one gallery as your entire portfolio, or you can create several. To create a new gallery, do the following:
1. Tap the Configure button (the gear icon), and then tap the Manage Galleries button (6.8).

6.8 Configure galleries in Portfolio for iPad.
2. On the Galleries screen, tap the Add (+) button and type a name for the gallery.
Repeat the process to create as many galleries as you’d like. If you decide to remove a gallery, tap the Edit button at the top of the page, tap the circular red delete button that appears, and then tap Delete to confirm the deletion.
Add Photos to a Gallery
The best way to load images into a gallery depends on what’s most convenient for you. I’m partial to using Dropbox, since I’m a big fan of the service anyway, and it provides a destination for the portfolio-specific images I generated earlier in the chapter. Dropbox also gives me an online backup of my portfolio images, so if for some reason I can’t use Portfolio to run a presentation, I can fall back on the Dropbox app. (If you don’t use Dropbox, give it a try at www.dropbox.com—the service is free for up to 2 GB of data storage.)
Other possibilities include loading images you’ve previously imported or synced to the iPad’s Photos app, transferring the files via iTunes, fetching files from specific URLs, or using the free Mac application Portfolio Loader, available from the developer. Here’s how to do it from the iPad, from iTunes, and from Dropbox.
Load from iPad media
1. With the gallery selected in the Galleries list, tap the Load button (6.9).

6.9 Load options
2. Tap the Load from iPad Media button.
3. Using the iOS Photos picker, navigate to an album containing an image you want (6.10).

6.10 The window to your photo library
4. Tap an image thumbnail to add it to the gallery. This method allows you to load only one photo at a time.
5. Tap outside the picker to dismiss it.
6. Tap Done to finish managing galleries.
Load from iTunes
1. In iTunes on your computer, select the iPad in the sidebar and click the Apps category at the top of the window. (If you don’t see your iPad in the sidebar, make sure it’s connected via a sync cable or a Wi-Fi connection.)
2. Under File Sharing, scroll down to the Portfolio app and select it (6.11).

6.11 Add files via iTunes.
3. Click the Add button at the bottom of the Portfolio Documents pane, and locate the files you want to add. Or, you can drag the files to the pane from the Finder or from Windows Explorer. The files are copied immediately without requiring a sync operation.
4. In the Portfolio app on the iPad, go to the Galleries screen (as described earlier) and tap the Load button.
5. Tap the Load from File Sharing button (6.12).

6.12 After transferring files via iTunes, import them in Portfolio.
6. In the File Sharing popover, select the photos you want to import.
7. Tap the Add button.
8. Tap Done to finish managing galleries.
Load from Dropbox
1. On your computer, copy any image files destined for your portfolio to a folder within your Dropbox folder.
2. In Portfolio on the iPad, go to the Galleries screen and tap the Load button.
3. Tap the Load from Dropbox button. A popover appears, containing the contents of your Dropbox folder (6.13). (Or, if you’re accessing this feature for the first time, you’re asked to log in to your Dropbox account.)

6.13 Adding photos from Dropbox
4. Navigate to the folder in which your images are stored.
5. Tap the thumbnails to select the photos you want to load, and then tap the Add button. The images are copied to the Portfolio app and appear in the gallery.
6. Tap Done to finish managing galleries.
Edit a Gallery
Here’s where you put all that earlier advice to good use. Now that you have a gallery full of images, you need to put them into your preferred order and set a thumbnail for the gallery.
Reorder images
1. Return to the Manage Galleries screen in the Portfolio app.
2. Tap the Edit button above the image thumbnails; the photos jiggle and appear with close boxes (x).
3. Tap and drag a thumbnail to change its position (6.14). Do the same with the others until the photos are in the order you want them to appear.

6.14 Drag to change the order of photos.
4. To remove an image, tap its close box and then tap the Delete button that appears (6.15).
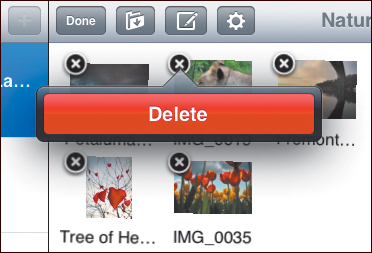
6.15 Remove a photo.
5. Tap Done when you’re finished.
Choose a gallery thumbnail
1. Tap the thumbnail of the photo you wish to use as the gallery’s thumbnail.
2. From the popover that appears, tap Set as Gallery Thumbnail.
3. Pinch with two fingers to resize the image to fit the visible area (in the center of the screen, not dimmed); you can also reposition the image by dragging it (6.16).
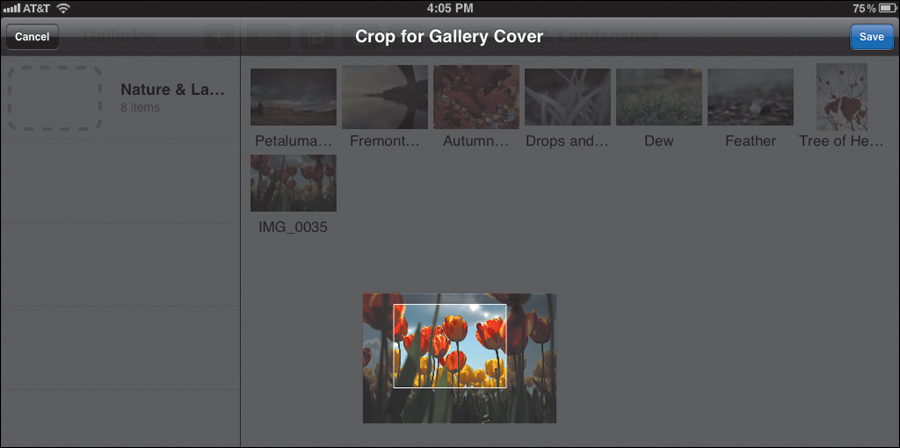
6.16 Specify the thumbnail source.
4. Tap the Save button to apply the change and assign the image as the thumbnail (6.17).
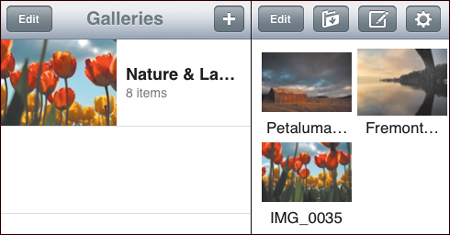
6.17 Thumbnail changed
Add a Logo Screen
To personalize the opening screen of your portfolio, the Portfolio app can display three logo screens: one for landscape orientation, one for portrait orientation, and one for an external screen when presenting with a video-out connection like a television or projector.
Tap the logo area (helpfully marked with “Tap here to place your logo”), or tap the Configure button and then tap the Customize Appearance button. Using the sizes specified on the Customize Appearance screen, create a set of images that act as a virtual cover for the portfolio. The pixel dimensions are important: The app won’t simply crop an image you throw at it; it will resize the image to fit (6.18).
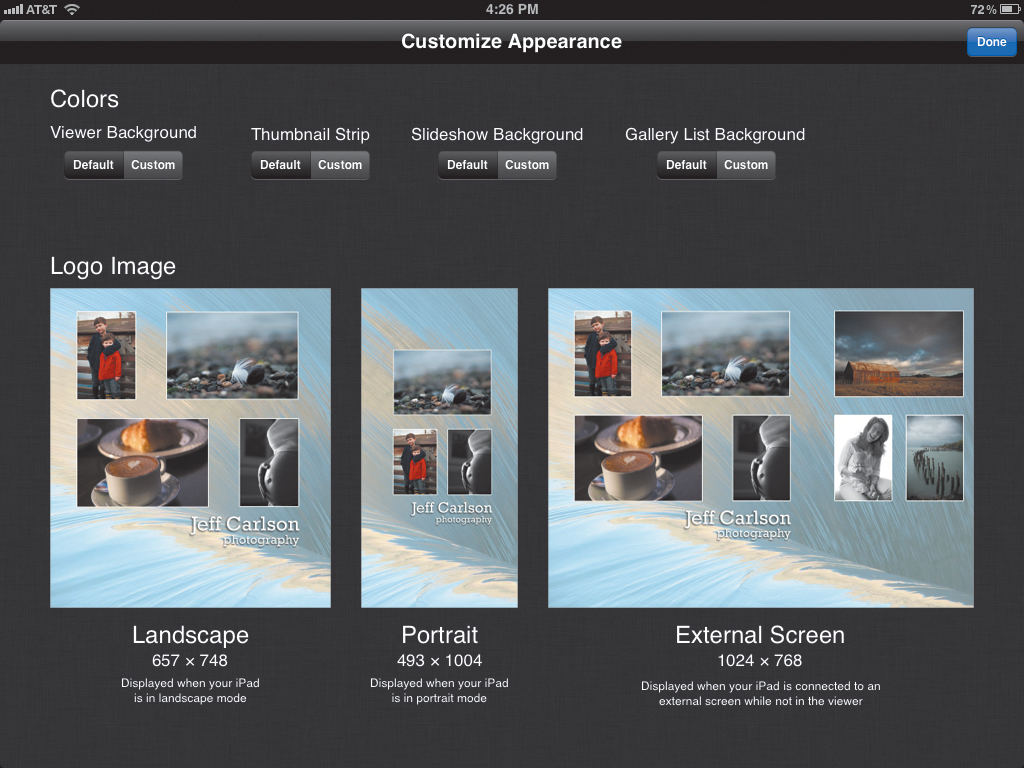
6.18 Set three custom images for your portfolio’s main screen.
Tap one of the placeholders, and load the corresponding image using the techniques described earlier.
Tip
If you don’t want to be restricted by the app’s logo screen dimensions, create black (or white, or anything else suitably forgettable) versions of the logo images. Then, create a 1024 by 768 logo image and set it as the first photo in your portfolio. You can then bypass the initial navigation and launch your presentation from within the gallery.
Present Your Portfolio
Depending on the client or target audience, you may choose to run the presentation yourself on the iPad, let the photos play in a slideshow, hand the iPad to the viewer, or display on an external television or projector.
Before you begin your presentation, it’s a great idea to restart the iPad by powering it off and powering it back on again, which resets the memory. That reduces the chances that the software will stall while shuffling large images in and out of active memory.
1. In a gallery, tap the Note button near the gallery name.
2. Tap a star to assign a rating.
3. Tap the Notes field, and type a comment (6.19).

6.19 Rate and make notes in Portfolio for iPad.
4. Tap outside the popover to dismiss it.
Present on the iPad
Presenting your portfolio can be as easy as running a slideshow in the Photos app, but again, you’ll appreciate some of the other features that a dedicated portfolio app can bring. I’ll use Portfolio for iPad as an example.
Tap a gallery to view the first photo it contains (6.20). Here, you can tap a thumbnail at the bottom of the screen to jump ahead and view any image in the gallery. For the best presentation, however, I prefer tapping the Full Screen button to view one image at a time. Flick between images by swiping left or right on the screen. (Tap once on the screen to reveal the controls if you want to exit full-screen mode.)
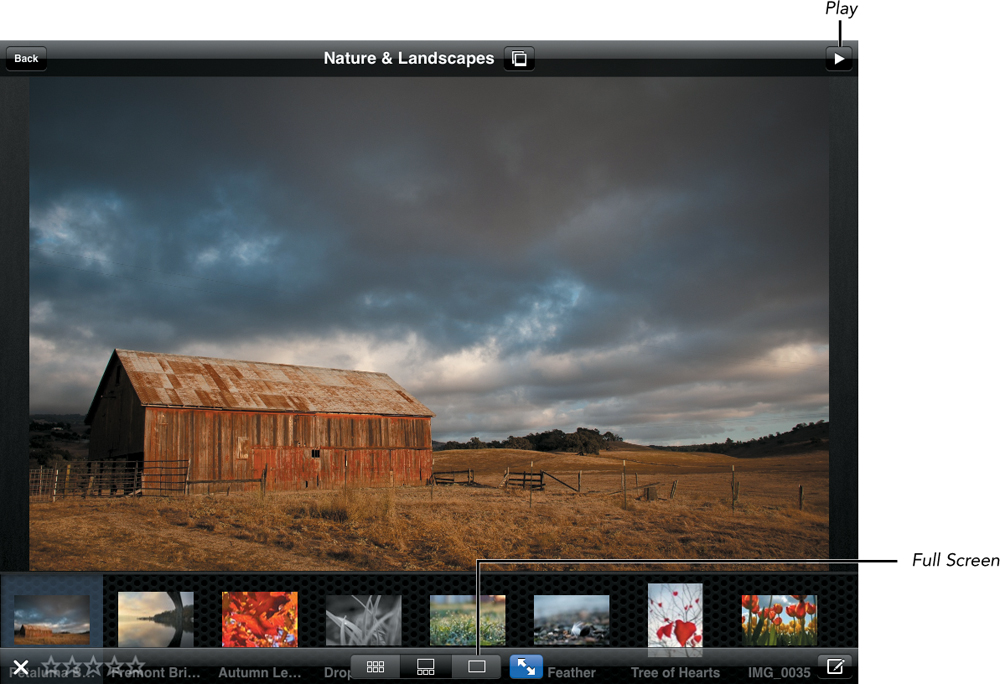
6.20 Presentation with thumbnails visible
Tip
With the thumbnail strip visible, double-tap a photo other than the one currently displayed; the two photos appear side by side (6.21). Double-tap again to return to the thumbnail strip.

6.21 Compare two images side by side.
To view an image in more detail, pinch outward or double-tap a photo to zoom in. Double-tap again or pinch inward to see the entire image.
For a self-directed presentation, tap the Play button in the upper-right corner to run the photos as a slideshow.
Tip
If you’re handing the iPad to a client, you can lock the editing interface in Portfolio for iPad to prevent them from accidentally editing your gallery. On the Portfolio title screen, tap the gear icon and then tap the Lock button. Specify a four-digit passcode that must be entered to access the editing features. This lock applies only within the app; a client can still access the rest of your iPad by pressing the device’s Home button.
Present on an External Display
The iPad’s screen is a good size for presenting to one or two people, but if you need to show your portfolio to more, moving the images to a larger display like an HD television or a projector can make quite an impact.
Wired
Connect the iPad to a TV or projector by using an HDMI, VGA, or component cable, depending on the available connections. Apple sells iPad adapters for each type of plug.

After connecting the iPad to the device, open Portfolio for iPad. If you specified a custom logo page for the largest size, it should appear on the external display. When you enter a gallery, the first image shows up. You can then direct the presentation from the iPad or start a slideshow. (As I write this, it’s not yet possible to zoom an image on the external display.)
If you’re using an iPad 2, connecting it to the device mirrors the screen, so your viewers can see exactly what you see on the iPad. However, in Portfolio for iPad, only the images appear, not the thumbnails. Swipe to switch between photos, or tap the Play button to start a slideshow.
Wireless
If you have an iPad 2 or later and a second-generation Apple TV (the small black model) at your disposal, and they’re both on the same Wi-Fi network, you can display the portfolio wirelessly using AirPlay. To make the two devices communicate, do the following:
1. Double-click the Home button to reveal the iPad switcher bar.
2. Swipe left to right to reveal the brightness, music playback, and volume controls.
3. Tap the AirPlay button, which appears to the right of the fast-forward button. If the AirPlay button isn’t there, verify that the iPad and Apple TV are both connected to the same network, that the Apple TV is powered on, and that AirPlay is enabled in the Apple TV’s settings.
4. Tap the name of the Apple TV in the AirPlay popover.
5. Set the Mirroring switch to On (6.22).
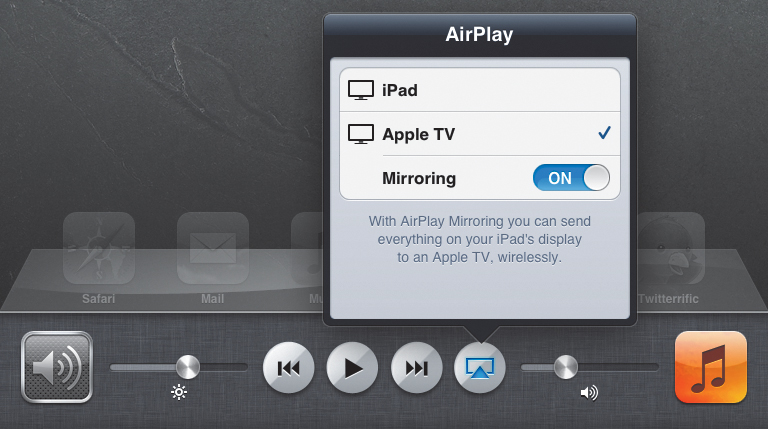
6.22 Connect to the Apple TV using AirPlay.
Now, without being physically tethered to the TV or projector, run your presentation from the iPad.