Topics and tasks in this chapter
Computers with DVD drives once drew envious looks. No longer were laptoppers simply cramming in more work during long flights. No, they were reclining the seats and watching their own in-flight movies.
Today, nearly every computer or laptop comes with a DVD drive. Windows 7 even requires a DVD for installation.
If your computer still doesn't have a DVD drive — or the drive's too slow or not working well — take heart: DVD drives are particularly easy to install. Netbook owners can simply plug a portable drive into their USB port, for example. Or, if your desktop's DVD player is acting slow or cranky, it's simple to upgrade it to something faster, or that plays the latest DVD lust word: Blu-ray.
This chapter explains how to buy the right DVD drive for your desktop computer, laptop, or netbook, as well as how to install it.
Just like hard drives, DVD drives come in three main types:
Most computers can handle all three types without much problem.
Tip
Unlike earlier models, today's drives can handle nearly any type of blank DVD. You needn't worry about buying the wrong format.
In fact, upgraders need only ask themselves one question: Do I need Blu-ray?
Blu-ray, the sucessor to DVD, holds enough information to store a high-definition movie. (That's about 25GB or 50GB, if you're curious, compared to a normal DVD's capacity of either 4 or 8GB.) Blu-ray discs look just like regular DVDs, but with the words Blu-ray written on them.
So, when you need a DVD drive, here's what to do:
If you're replacing a dead DVD burner, buy a Blu-ray DVD drive, not a Blu-ray burner. Blu-ray drives cost the same as regular DVD burners, and they can still burn regular CDs and DVDs. As a perk, they can play Blu-ray DVDs. However, they can't burn Blu-ray discs.
If you simply must burn Blu-ray DVDs, stretch open that wallet: Blu-ray burners cost several times more than Blu-ray players. (Wait until the price drops in a few months.)
If you want to watch Blu-ray DVDs on your desktop computer, install a Blu-ray drive next to your existing DVD burner. There's nothing extravagant about putting two DVD drives in one computer. A pair of DVD burners make it easier to duplicate discs, either CDs or DVDs.
Note
Finally, a laptop's DVD drive is notoriously difficult and expensive to replace. If your laptop's DVD drive dies, do as the netbookers do: Buy a portable DVD burner that plugs into a USB port. (Some companies even sell portable Blu-ray burners or players, but for a steep price tag.)
Just as with hard drives, your computer or laptop needs one of two types of CD/DVD drives: SATA or IDE. The most foolproof way to see what type of drive your computer can take is to open it up and take a look at the drive or drives it's currently using. You'll need to carry out this task before you can replace or add any disc drive in your desktop computer.
To do that, follow these steps:
Remove your computer's case, as described in this book's Cheat Sheet, downloadable from
www.dummies.com/cheatsheet/upgradingandfixingcomputersdiy.
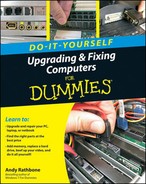
Examine the data cables that move from your computer's motherboard (the large, flat circuit board filled with chips and cables) to your CD/DVD drive or drives. If the drive's cable is small (left), then your computer uses SATA drives. (The SATA connector is often labeled, too.) If you see a wide, flat ribbon cable (right), then your computer uses IDE drives.
Tip
If your computer uses IDE drives, you can still add a SATA drive, or vice versa. The key is buying and inserting the right adapter: IDE to SATA or SATA to IDE. These small adapters fit between the drive and the cable, and they cost between $10 and $20. Their performance isn't the best, but they'll work in a pinch.
Finally, examine the power cables that move from your computer's power supply — that massive box in the corner that sprouts all the wires — to your drive. Your drive either uses a SATA power cable (left) or a Molex power cable (right). SATA power connectors are almost always black; Molex connectors are almost always white. Both of them only fit one way — the right way.
Tip
You can buy SATA-to-Molex as well as Molex-to-SATA power adapters at your computer store, if necessary. They're only a few dollars, and RadioShack often carries them in a pinch.
Installing an external CD/DVD drive is as simple as plugging in a mouse or keyboard. Here goes:
Remove the new drive and its cable from the box. Some bulky external drives come with power supplies, as well. Save the manual, as it often comes in handy later.
Plug the drive's power cable into the wall, if necessary, and turn on the drive. Some tiny drives skip the outlet, instead grabbing their power straight from your computer's USB port. Some really hoggy drives plug into two of your computer's USB ports in order to draw enough power.
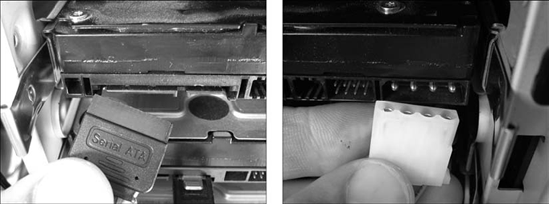
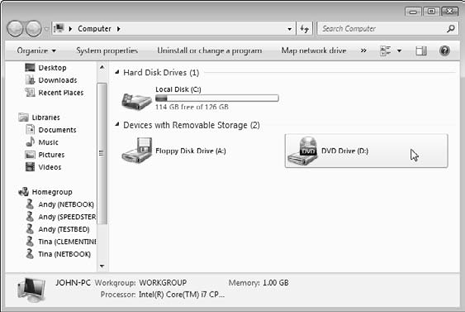
Plug the drive's USB cable into its own port and your computer's USB port (two USB ports, for the hoggy drives). Windows automatically recognizes your drive when it's plugged into the USB port, and it will appear in your Computer folder, ready to play your CDs and DVDs, and burn blank discs, as well.
Internal CD/DVD drives install nearly the same way as installing hard drives, discussed in Chapter 6: Just slide in the drive, screw it in place, and plug in the same two cables (power and data). Here are the steps:
Remove your computer's case, as described in this book's Cheat Sheet, downloadable from
www.dummies.com/cheatsheet/upgradingandfixingcomputersdiy.
Remove the old drive, if necessary. Unplug its power and data cables, shown in this chapter's "Identifying Your Computer's CD/DVD Drive Type" task, unscrew the drive from the case or pull on its rails, and slide it out of the front of your computer case.
If you're installing a SATA drive, jump to Step 4. If you're replacing an existing IDE drive, set its jumper to match your old drive's setting, either Master or Slave. If you're adding a second IDE drive, set its jumper to Slave. (You'll find an illustrated guide to setting master/slave jumpers in the last task of Chapter 6.)
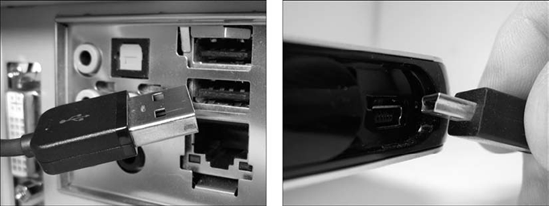
Attach rails to your DVD drive, if your case uses them. Slide the new DVD drive into the front of your computer. You need a vacant drive bay, which is an opening where your disk drive normally lives. You may need to pry out a rectangular plastic cover from the front of your computer before the drive slides in. (Sometimes you must pry out a thin foil protector from behind the plastic cover, too.) Screw the drive in place, if it doesn't use rails.
Connect the drive's data and power cables, as shown in this chapter's "Identifying Your Computer's CD/DVD Drive Type" task. The plugs fit only one way, so don't force them.
Replace your computer's cover, plug in the computer, and turn it on. When Windows boots up, it should recognize the new or replacement DVD drive and automatically list it in your Start menu's Computer program. Some drives come with free disc-burning software that's more powerful — but more complicated — than the disc-burning tools built into Windows 7. However, the software often lets you duplicate music CDs, a task Windows 7 still lacks.
Tip
Blu-ray and DVD drives may need updates to their firmware — built-in software that helps them write to discs. Visit your drive manufacturer's site, download the latest firmware for your drive, and run the installation program to bring your drive up-to-date.