Topics and tasks in this chapter
Buying a new drive
Installing a portable hard drive
Backing up your Windows drive with a system image
Identifying your PC's drive type
Upgrading or replacing your Windows drive
Reinstalling Windows from a system image
Adding a second internal drive
Partitioning and formatting a second internal drive
Defragmenting a hard drive
Checking for disk errors
Expanding a partition to fill a drive
Setting an IDE drive's jumpers
People pile their junk into closets, garages, and kitchen drawers. Computers stuff everything onto their humming hard drives.
Unfortunately, hard drives suffer from the same problem as their household counterparts. They're rarely large enough to hold everything, especially after a few years of accumulating odds and ends.
Every new Windows version consumes more hard drive space than the previous version, and new programs always grow larger, too. The Internet keeps dishing up stuff that's fun to store. E-mail keeps piling up. And those digital camera photos are larger than ever.
To deal with the constant information flow, some people add a second hard drive, either inside their PC or by plugging a portable hard drive into one of their PC's USB or FireWire ports. Others take the plunge and replace their Windows drive with a faster, larger hard drive.
This chapter shows you how to add more storage to your PC by adding a second hard drive, or by upgrading your Windows drive. As a bonus, it explains how to back up your Windows drive and store it on another drive as a system image for safekeeping.
Upgrading a hard drive isn't as difficult as it sounds. First, you discover what type of hard drive you need by peeking inside your computer. Armed with that knowledge, you decide how much you want to spend. Faster drives that hold oodles of information, for example, cost much more than slower drives with less capacity. And laptop drives cost a premium because of the mechanics of stuffing all that information into such a small space.
This section explains how to buy a compatible hard drive without spending more than necessary. Finally, it explains the best way to juggle hard drives inside your PC, keeping the newest, fastest drive for your Windows drive, and relegating the slower ones to extra storage.
The vast majority of today's PCs use SATA drives, described in this section. Older PCs, by contrast, usually require IDE drives, an older technology also described in this section.
And how do you tell whether your PC needs a SATA or an IDE drive? The surefire way is to peek at the drive itself, as described in the upcoming task, "Identifying Your PC's Drive Type."
You'll find that your PC uses one or more of these types of drives:
SATA (Serial ATA): Found inside almost all PCs and laptops sold in the last few years, SATA drives transfer their information through sleek, thin cables that easily route around your PC's innards.
IDE (Integrated Drive Electronics or Intelligent Drive Electronics): Found inside older desktop and laptop PCs, these drives will still work with SATA-style computers if you pick up a cheap adapter. (You can also buy an adapter to install a new SATA drive into a PC that accepts only IDE drives.) The latest breed of IDE drives is sometimes called EIDE rather than IDE, but for your purposes, they're the same.
Laptop: Unless a drive specifically says "laptop" somewhere in its specifications, it's meant for a desktop computer. Laptop drives, by contrast, are built specifically for laptops: They're about four times smaller than drives for desktops. Just as with desktop computers, new laptops use SATA drives; older ones used IDE drives.
SSD (Solid State Drive): Built with no moving parts, these speedy, low-capacity drives exist mostly for netbooks and specialty PCs. The hard drives of many netbooks can't be upgraded; others can. Only your netbook's manual, the manufacturer's Web site, or, sparing that, a tiny screwdriver and a removal of your netbook's case, can tell for sure.
Portable USB: Compatible with any computer, these drives live inside their own little cases, and they plug into any available USB port. Some people call portable drives "external drives."
Portable SATA: Like USB drives, portable SATA drives are also portable, living outside your PC. Instead of plugging into a USB port, though, these plug into an external SATA port, a rare feature found on some newer PCs. Because few computers come with an external SATA port, portable USB drives are much more versatile.
After you've decided what type of drive your computer needs, either SATA, IDE, laptop, SSD, or portable, you must decide how much to spend. The following items found on a drive's fine print will all affect that drive's price tag:
Capacity: The more information a drive can store, the higher the price. A drive's capacity is its most important feature: Buy the largest capacity drive you can possibly afford.
Access or seek time: This measures the amount of time the drive takes to locate stored files, measured in milliseconds (ms). The smaller the number, the faster the drive, and the more it will cost.
DTR (data transfer rate): This measures how quickly your computer can transfer the files after it finds them. Usually measured in RPM (revolutions per minute), larger numbers are better, and cost more.
Cache: Your drive stashes recently accessed information in a special, extra-speedy spot called a cache, where it can dish it out quickly if you need it again. The larger the cache, the faster the drive, and, of course, the more expensive.
Laptop: You pay a premium for laptop drives. They not only cost more than their desktop PC equivalents, but they don't hold as much information.
Portable drives: These are regular, internal hard drives stuffed inside a box with some electronics and a USB cable. They cost about the same as a regular, internal drive, but with a $20 to $30 premium for their casing, electronics, and cable.
SSD (Solid State Drive): Living on the cusp of developing technology, these drives cost more than their SATA or IDE counterparts, and they don't hold nearly as much information. But they're small, fast, and don't slurp up batteries, so they're often found in netbooks and some specialty PCs. Avoid them unless you have a pressing reason for one.
Reliability: Before settling on a particular make and model of drive, read that drive's customer reviews on sites like Amazon (
www.amazon.com) and NewEgg (www.newegg.com). Sometimes it's a good idea to trade some speed or capacity for reliability.
Tip
When you're purchasing a drive for everyday work or sound/video editing, spend extra to buy a very fast drive with a large cache. If you're looking to simply store large amounts of data, such as music, videos, or other large files, save money by buying a slower drive with a smaller cache.
You usually know when it's time for a new hard drive. Windows constantly complains about needing more room. Programs refuse to install, complaining of not enough available space. Or, worse yet, your C drive begins grinding noisily, Windows no longer loads, or you see error messages mentioning the words "disk error" or "disk failure."
You have three options, listed in order of preference:
Replace your C drive (the drive inhabited by Windows and most of your files) with a bigger drive. This is your only solution if your C drive dies. But even if your Windows drive still works fine, replacing it will add storage space and speed up your PC. Windows 7 makes this task easier than ever before. After replacing the drive, recycle your old C drive as a second drive inside your PC, which adds even more storage for your music and videos.
Add a second internal drive. This adds storage but doesn't solve the problem of an overcrowded C drive. You'll still need to transfer your large files from your C drive to your second drive. Plus, Windows will still live on its old drive, not the speedy new drive with the latest technology.
Add a portable drive. A quick and easy upgrade, this leaves you with the same problems mentioned above. But at least the drive is portable: a handy trait when copying large files between computers, or saving off-site backups.
The tasks in the rest of this chapter cover each of those three options, walking you through each upgrade.
All computer owners should start by backing up their computer. It's easily done when you complete the next two tasks: buy a portable hard drive and create a system image backup on that drive. Armed with a freshly made system image backup, you won't lose any information when your computer's hard drive dies. (And all hard drives will eventually die.)
Less expensive than ever before, a portable hard drive comes in very handy for several reasons:
You can make a backup of your computer's files and store the drive off-site — an important fact should your computer be stolen or, heaven forbid, catch fire.
It works easily with Windows 7's built-in backup program.
You can easily move the drive between computers, backing up each one in turn.
It simplifies transporting large files from home to work, and vice versa.
It greatly simplifies upgrading your C drive to a larger, faster hard drive.
It's often the only way to add more storage to a laptop or netbook.
Follow these steps to buy and install a portable hard drive that you can use for backups.
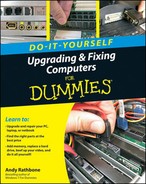
Find the size of your Windows drive, also referred to as your C partition by clicking Start, choosing Computer, and looking at the number beneath your C drive's icon. A partition is simply a sectioned-off portion of a hard drive. A hard drive can have one partition that fills the entire drive; a drive can also be divided into several separate partitions, each with a different letter.
Buy a portable hard drive at least as large as your C partition. Because my drive, for example, is 279GB, I'd want to buy a hard drive of at least 300GB, preferably 500GB. Portable hard drives can often connect through several different ports, but buy one that includes a USB port. That ensures the drive will connect to your own computer.
Plug the portable hard drive into its power adapter, if needed. Some portable hard drives don't require any power; others require a power adapter connected between the drive and an outlet. (Geeks call their little black power adapters wall warts.)
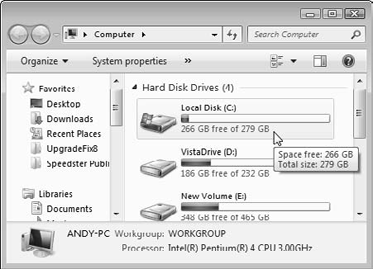
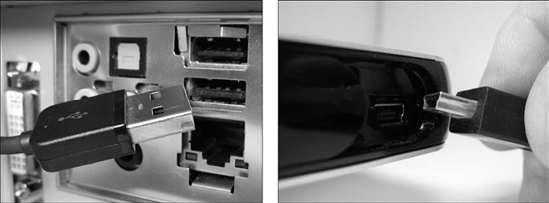
Plug the portable drive's USB cable into both your computer and the drive itself. The cable's large plug fits into your computer's or laptop's USB port (left); the small end fits into the drive's own, smaller USB port (right).
Most portable drives work as soon as you plug them in: Windows immediately recognizes the drive, assigns it the next available drive letter, and lists it in the Start menu's Computer program. If you have a hard drive labeled C, for example, and a DVD drive named D, then your new drive will be named the next available letter: E. (Some drives need to be formatted, covered in the "Partitioning and Formatting a Second Internal Drive in Windows" section, later in this chapter.)
Double-click the new drive's icon in Computer to see the drive's contents. That's it. Once you've opened its window in Computer, you can start moving files to and fro just as with any other drive. It's also ready to store a system image backup, covered in the next task.
Tip
To easily identify your portable hard drive in Windows, rename it: Right-click its icon in Computer, choose Rename, and type in Portable or PortHardDrive or something similar. That new name distinguishes it from other hard drives, which are usually named "New Volume" or "Local Disk."
Windows 7's Backup and Restore program lets you create a system image: a single file that contains everything on your computer's C drive: Windows, your installed programs, and the files you've created with those programs. A portable hard drive, described in the previous task, is the perfect receptacle for the system image you create in this task, because you can keep the portable drive in a safe location, safe from any hazards that may befall your PC.
A system image takes longer to create than a regular backup, so you should make a system image once a week, and daily regular backups. But when your C drive eventually dies — or you want to upgrade to a faster, larger Windows drive — a system image is your best friend. Here's how to create one:
Connect your portable hard drive, if you have one, as described in the previous task. No portable hard drive? You can still choose to save your system image to either a second internal drive in your PC, a few DVDs, or to a network location. Those areas aren't perfect backup locations, but they're better than nothing.
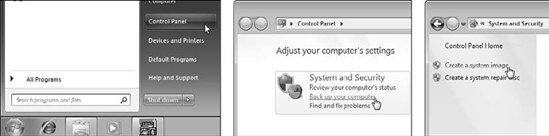
Click the Start button, choose Control Panel, and choose Backup Your Computer from the System and Security section. Then choose Create a System Image from the left pane.
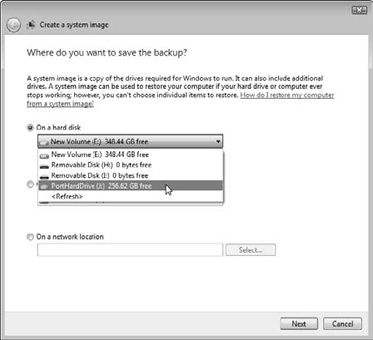
Choose where you want to save the system image file: a hard drive, a handful of blank DVDs, or on a network location. To choose your portable hard drive, click the On a Hard Disk drop-down menu, choose your portable hard drive, and click Next. (Your portable drive will probably have a different letter than the one in this figure.)
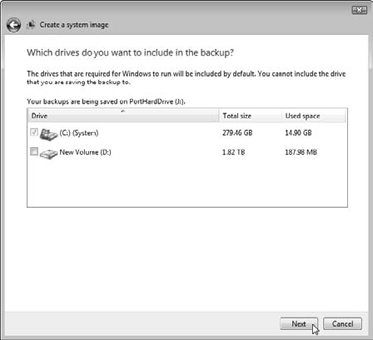
Click Next in the following window, which confirms that you're creating a system image of your (C:) (System) drive — the home of Windows, your programs, and your files. In the next window, click Start Backup to start copying the system image to the drive. Depending on your drive's speed, the backup consumes roughly an hour for each 200GB of files, but you can continue working while backing up.
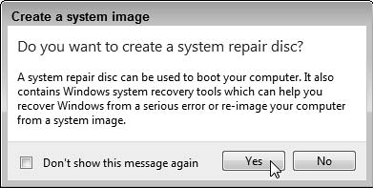
When the backup finishes, take Windows up on its offer to create a new type of disc: A system repair disc: Insert a blank CD or DVD into your CD/DVD burner, click Yes, and follow the onscreen instructions. Later, if your C drive dies or you've replaced it with a larger hard drive, you can insert that repair disc into your CD or DVD drive, and turn on your PC. Your PC boots from the repair disc and offers an option to restore your system image backup. I walk you through the process in the "Reinstalling Windows from a System Image" task later in this chapter.
Your computer or laptop needs one of two types of drives: SATA or IDE. The most foolproof way to see what type of drive your PC uses is to open its case and peek at the drive or drives inside. You'll need to carry out this task before you can buy a compatible drive for your computer or laptop.
To do that, follow these steps:
Remove your computer's case, as described in this book's Cheat Sheet, downloadable from
www.dummies.com/cheatsheet/upgradingandfixingcomputersdiy. Or if you have a laptop or netbook, turn it upside down and open the panel covering its hard drive. (You may have to check your laptop or notebook's manual to find the panel's location.)
Examine the data cables that move from your computer's motherboard (the large, flat circuit board filled with chips and cables) to your hard drive or drives. If the drive's cable is small (left), then your computer uses SATA drives. (The SATA connector is often labeled "SATA," as well.) If you see a wide, flat ribbon cable (right), then your computer uses IDE drives. It's that simple.
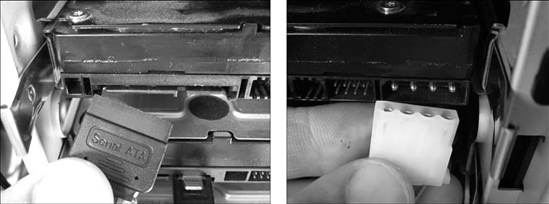
Examine the power cables that move from your computer's power supply — that massive box in the corner that sprouts all the wires — to your drive. Your drive uses either a SATA power cable (left) or a Molex power cable (right). SATA power connectors are almost always black; Molex connectors are almost always white. Both of them fit only one way — the right way. You can buy SATA-to-Molex or Molex-to-SATA power adapters at your computer store, if necessary. They're only a few dollars, and RadioShack often carries them.
Tip
If your desktop computer uses IDE drives, you can still add a SATA drive, or vice versa. The key is buying and inserting the right adapter: IDE to SATA or SATA to IDE. These small adapters fit between the drive and the cable and cost from $10 to $20. Their performance isn't the best, but they'll work in a pinch. Don't try the adapters in a laptop or netbook, though, as they won't fit.
Today's hard drives are larger and faster than the drive currently living inside your computer. So, one way to speed up your computer comes from installing Windows onto a newer, faster drive. (You can even recycle your old drive as a second drive for storage.) Windows 7 makes this seemingly complex task easier than ever.
You'll also need this task when your Windows drive crashes — taking with it all your programs and your work. (All drives eventually crash.) The loss can be devastating unless you've created a system image, a task I describe in this chapter's first two tasks.
The key point with this upgrade is making sure your replacement drive uses the same settings and cable as your old one, as I describe in the preceding task.
Identify your old drive, described in the preceding task, and buy a replacement of the same type, either SATA or IDE. You can buy new hard drives at office supply stores, computer stores, or online at places like Amazon (
www.amazon.com) or NewEgg (www.newegg.com). (I buy almost all of my computer parts at NewEgg.) I describe purchasing strategies in this chapter's "Deciding what features are worth your money" section.Remove your computer's case, as described in this book's online Cheat Sheet, find your hard drive, and examine where the cables currently plug into your dead hard drive, as described in the preceding task. Those same cables will plug into the same places on your new drive; you needn't buy new cables. (Take a close-up digital photo, if you want something to fall back on.)
Note
Upgrading a laptop or netbook's hard drive? Look in your laptop or netbook's manual and find the plastic compartment housing the drive. (Or just examine the drive's bottom for a plastic plate that's screwed in place.) Remove the plastic compartment with a small screwdriver, pry off the plastic cover, and find the drive awaiting inside. If your netbook's drive can't be replaced, the best you can do is buy a large-capacity SD card for its memory slot.
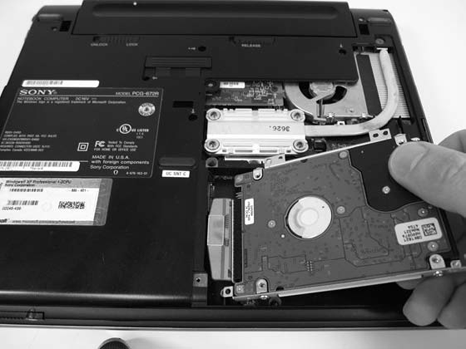
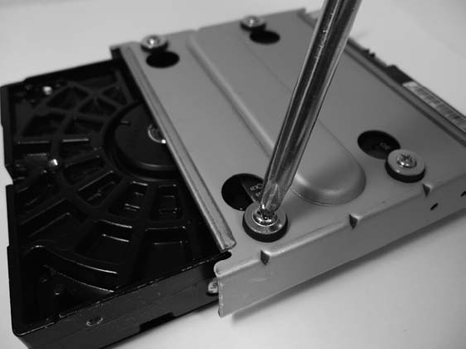
Remove the screws and/or trays holding the old drive, saving the screws. Then slide the new drive in the old one's place, and screw it back into place. Installing an old IDE/ATA drive? Then set the new drive's master/slave jumper to Master. (See this chapter's task, "Setting an IDE Drive's Jumpers" for more detailed information.)

Plug in the new drive's data cable and its power cable. The cables from the old drive fit into their new drive's connectors only one way — the right way — on both ATA/IDE (right) and SATA drives (left). Screw the drive back into place inside your computer's case, and replace the plastic cover if you're performing surgery on a laptop.
Head to the "Reinstalling Windows from a System Image" task, described next. When Windows reinstalls your information, it will automatically partition and format your new drive, if necessary. If your system image's partition is smaller than your new drive, you can expand it to fill the entire drive, as described in this chapter's "Extending a Partition to Fill a Drive" task.
Here's where your work in this chapter's first two tasks pays off. You've created a system image of your Windows drive, and you've stored it on a portable hard drive. You're now ready to place that system image onto a new, larger, and faster hard drive that you've just installed to replace your tired, old, or, gulp, stolen Windows drive.
In any of those cases, follow these steps to make your desktop computer or laptop wake up with that system image in place and ready to work. (If you're trying this on a netbook, you need a portable CD or DVD drive to read the system repair disc you created in an earlier task.)
With your computer turned off, plug in your portable USB drive that contains the system image you made in this chapter's earlier task, "Backing Up Your Hard Drive with a System Image." (Or, if you saved the system image to DVDs or a network location, go to the next step.)
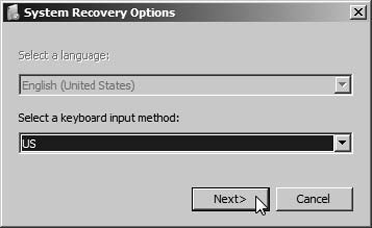
Turn on your computer, and quickly insert the system repair disc you made in the earlier task, "Backing Up Your Hard Drive with a System Image." When your computer asks, press any key — the spacebar will do — to tell the computer to load from the system repair disc. You'll see a message that Windows is loading files.

When the System Recovery Options window appears, click Next. (That chooses "US" as your keyboard layout. If you're not in the United States, choose a keyboard layout in a different language from the drop-down menu.)
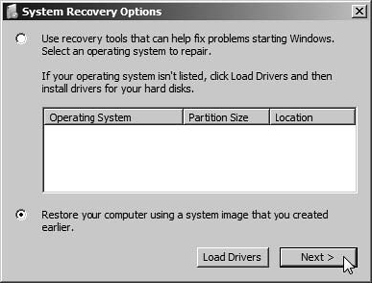
The system repair disc will search your newly installed hard drive for a previously installed version of Windows, but come up empty. Choose Restore Your Computer Using a System Image That You Created Earlier, and click Next.
The Reimage Your Computer window automatically finds the system image on your portable hard drive, listing the date and time it was made. Click Next to tell it to reinstall that image onto your new drive. Saved your system image on DVDs? Then when the program says it can't find a system image, eject the system repair disc from your disc drive. Insert the first DVD of your system image, and click Retry. The program will then find your system image on the DVD.

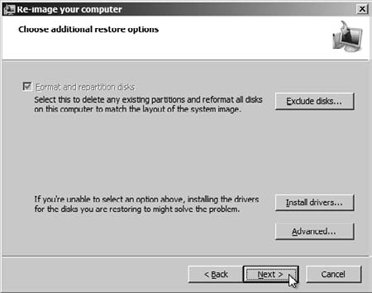
Click the Format and Repartition Disks option, if asked, and click Next. That tells the program to prepare your newly installed hard drive to receive the system image, install it, and make your computer wake up in the same state it was when you created the system image.
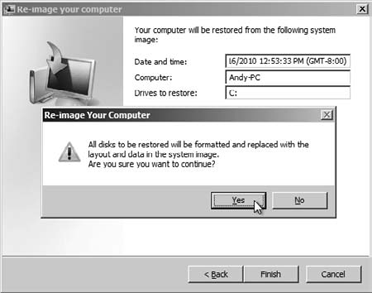
Click Finish to approve the date and time of the system image you'll be restoring. Then click a final Yes for approval, if necessary, and Windows goes to work. It partitions and reformats your newly installed hard drive to the same size as your system image. Then it fills that space with the system image, returning your computer to the way it was when you first created that system image. If your copy of Windows was activated, it should remain activated — even though it's installed on a new hard drive on the same computer.
Tip
If you're restoring a system image onto a newer, faster C drive, recycle your old Windows drive as a second internal drive, described in this chapter's "Partitioning and Formatting a Second Internal Drive" task. That lets you put it to use as a backup drive or for extra storage. You can even use it to store system images, now that you know how handy they can be.
This task doesn't apply to laptops or netbooks; they're too small for a second internal drive. If you need more space, add a portable drive or upgrade the existing drive. No, a second internal hard drive is a perk reserved for desktop computers. Some can even hold three or four extra drives. Depending on your computer's type of case, you may need special rails or an adapter to mount your hard drive inside your computer. Some drives and cases come bundled with mounting rails and/or an adapter; others don't. Rails and adapters are fairly inexpensive, and you can pick them up at the computer store, buy them online, or buy them from your computer's manufacturer.
Turn off and unplug your computer and remove the case, as described on this book's downloadable Cheat Sheet. If you live in a static-electricity-prone environment, buy a grounding strap that wraps around your wrist and attaches to the computer. Even if you don't have much static electricity in your area, remember to touch your computer's case to ground yourself before touching its innards.
Buy a compatible drive for your computer, as covered in the "Identifying Your PC's Drive Type" task. Drives usually live in a mounting bay: a collection of slide-in compartments inside your computer. Your existing hard drive takes up a mounting bay, for example. Look at how it's fastened inside the mounting bay; your hard drive will fasten in the same way. Find an empty bay — you can often find a spot adjacent to your existing hard drive — and slide the new drive in place.


Attach the data cable between your new hard drive and your motherboard. Follow the cable of your existing drive to see where it plugs into a motherboard connector marked "SATA." Then plug your new drive's SATA cable into one of your motherboard's adjacent SATA connectors. Plug the other end of this thin cable into your new SATA drive's connector (left). The plug fits into only one connector, and only right-side up. Installing an IDE drive? Attach the ribbon cable (right), and see the "Setting an IDE Drive's Jumpers" task later in this chapter.

Attach the power cable to the drive. A SATA power cable looks like a wider SATA data cable (left); an IDE drive's Molex connector has four pins (right); both cables lead from your PC's power supply.
Slide in the drive and screw it in place, if necessary. Cables attached? Master/slave jumpers set, if you're installing an older IDE drive? If your two hard drives are in the same large bay, sometimes loosening the existing drive's screws helps you slide the new drive into place. Sometimes it's easier to attach the cables after the drive is in place. Use your own judgment.
Replace the PC's cover, plug in your computer, and turn it on. Windows awakens with its new drive installed. Partition and format your new hard drive, and then assign it a drive letter so you can put it to work. You find this information in the "Partitioning and Formatting a Second Internal Drive" task, described next.
When you first install a second drive into your PC, Windows doesn't go out of its way to tell you about it. In fact, it ignores your installation handiwork because that brand-new drive is empty: You haven't prepared the drive to receive any data, nor have you assigned it a drive letter. To introduce your computer properly to its new drive in Windows 7, follow these steps:
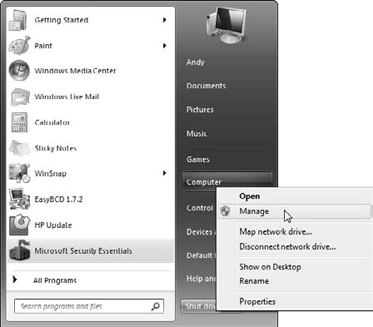
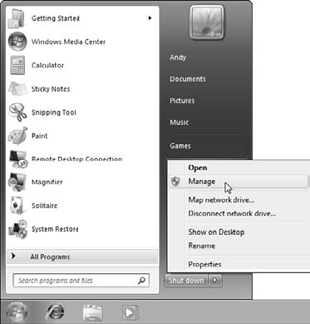
Click the Start button, right-click Computer, and choose Manage.
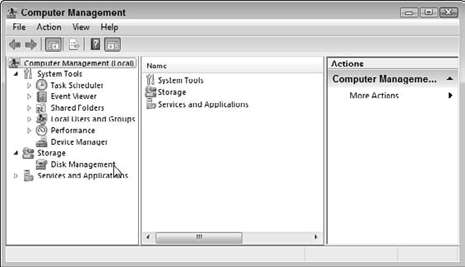
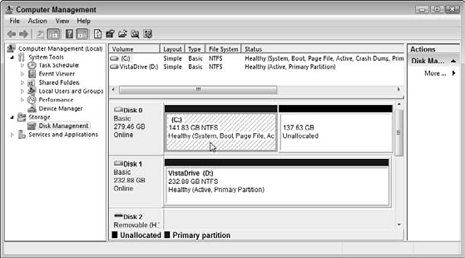
In the Computer Management window that appears, you see advanced controls few mortals dare to see. Click Disk Management from the left pane of the Computer Management window.
Windows pops up the Initialize Disk window, which lists your newly installed drive and asks your permission to initialize it — prepare it for Windows to start stuffing it with information. Without changing any other settings, click OK to start the process.

When Windows finishes, the drive is recognized, but still unallocated, meaning it needs to be given a drive letter and told to begin accepting files for storage. To do that, back in the Computer Management window, right-click your newly-installed-but-still-unallocated drive and choose New Simple Volume.
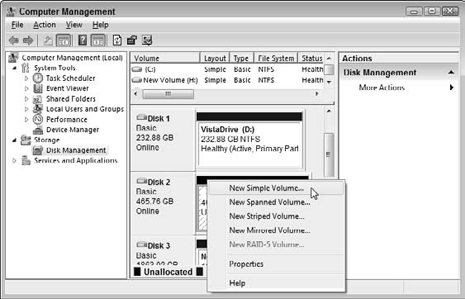

Thankfully, the New Simple Volume Wizard appears, ready to prepare your drive. And, as with most wizards, your journey's much easier from here: Click Next at every screen, and Windows assigns the next available letter to your drive, and formats it, the computer equivalent of setting up shelves so you can finally begin storing files. And, finally, you're through. Your newly installed second drive now has a letter, and the drive appears in your Computer program when you click Start and choose Computer.
When your computer first copies a bunch of files onto a hard drive, the computer pours them down in one long strip of information. As you begin working, you inevitably delete a few files, leaving gaps in that once-pristine strip. As you begin adding new files, the computer begins filling in those gaps. If an incoming file won't fill an entire hole, the computer breaks up the file, stuffing in bits and pieces wherever it can find room.
After a few months, your files can have their parts spread out all over your hard drive. Your computer remembers where to find everything, but it takes longer because the hard drive must work harder to find and grab all the parts. To stop this fragmentation, a concerned computer nerd released a defragmentation program. The program picks up all the information on your hard drive and pours it back down in one long strip, putting all the files' parts next to each other.
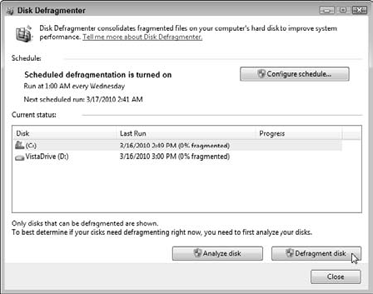
Windows 7 is smart enough to defragment your hard drive automatically once a week. However, you may want to defragment your drive immediately before changing a partition's size, described in the upcoming "Expanding a Partition to Fill a Drive" task. To defragment your drive immediately in Windows 7, follow these steps:
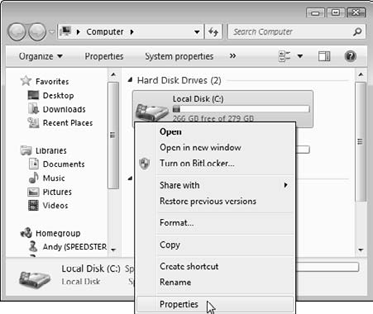
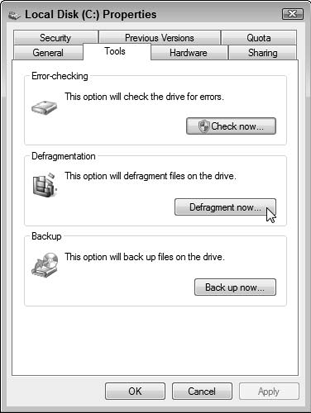
Click the Start menu and choose Computer. Right-click your hard drive's icon and choose Properties.
When the Properties window appears, click the Tools tab, and click the Defragment Now button. Windows brings the Disk Defragmenter dialog box to the screen.
Click Defragment Disk to start the process. When Windows finishes defragmenting, it issues a report on its results. Some files can't be defragmented, so don't worry if you see that message. If a file is being used at the time, Windows can't defragment it. Some files will always be in use, as Windows needs them to keep running.
Ever lost your train of thought after somebody snuck up and tapped you on the shoulder? The same thing can happen to your computer.
If the power goes out or a program crashes while a computer is working, the computer loses its train of thought and forgets to write down where it put stuff on the hard drive. (That's why you should always close your programs before turning off your computer.)
These lost trains of thought result in disk errors, and Windows fixes them pretty easily when you follow these instructions. In fact, Windows 7 usually senses when it has crashed and automatically fixes any resulting errors. Still, if your computer is running strangely, checking for disk errors is often the first step toward a fix.
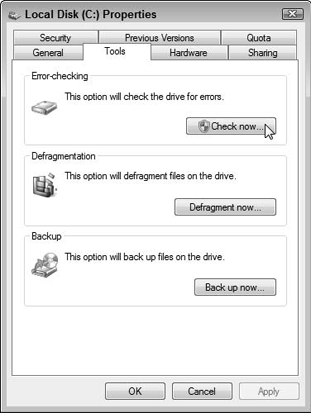
Click the Start button, open Computer, right-click your hard drive's icon, and choose Properties. Then click the Tools tab from the top of the Properties dialog box, just as in the previous task. Click the Check Now button.
When the Check Disk Local Disk window appears, select both options and click the Start button.
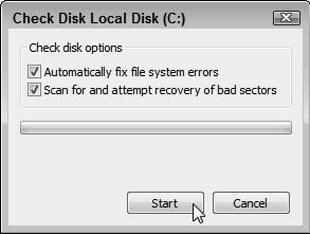
If you're checking your Windows drive, Windows asks to reschedule the scan for the next time you start your computer. Click the Schedule Disk Check button and restart your computer so that the scan can begin. If you're checking a different disk, Windows doesn't restart, but begins examining your drive, looking for suspicious areas and fixing the ones it can. The process can take a long time; feel free to let it run overnight. When Windows finishes the process, the proud little program leaves a dialog box on the screen, summing up the number of errors it found and fixed, if any.

Windows stores information on drives, but before Windows can store any information on a drive, you need to put "shelves" on the drives, known as partitions. Although often a partition fills an entire drive, some drives contain several partitions, each with its own letter. And, just as you occasionally need to rearrange your bookshelves, sometimes you need to change your drive's partitions, moving, deleting, creating, extending, or shrinking them.
For example, you may upgrade your old 150GB Windows drive to a faster, 300GB drive, as described in the "Upgrading or Replacing Your Windows Drive" task. Then, when you place your Windows system image back onto that new 300GB drive (described in the "Reinstalling Windows from a System Image" task), your Windows partition will still be a 150GB partition on a 300GB drive.
How do you give your Windows partition access to the entire drive? That's where this task comes in: You can extend that 150GB partition to fill the entire drive, all with Windows 7's built-in Disk Manager. Here's what to do:
Click the Start button, right-click Computer, and choose Manage. The Computer Management window appears, a launching point for lots of technical tasks. (You'll revisit here to see Device Manager when you want to update your computer's drivers, covered in Chapter 17, as well as for troubleshooting, covered in Chapter 19.)
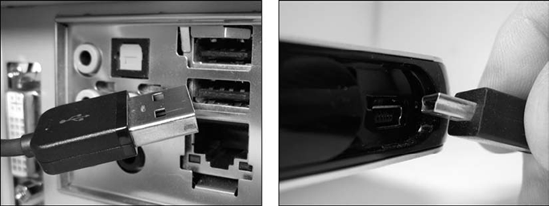
Choose Disk Management from the Computer Management window's left pane, and the window's right side displays your disk drives and their partitions. Your C partition is identified by the characters "(C:)", along with the words "System," "Boot File," "Page File," and other technical verbosity. (It also has a blue line across its top.) The space to the right on your C drive is listed as "Unallocated," meaning it's not being used. (It has a black line across its top.) So, your mission is to extend your C partition's boundaries to grab that unused space.
Right-click your C: partition and choose Extend Volume. The Extend Volume Wizard appears, ready to walk you through the process of extending your C partition to fill the entire drive. Click Next to start the Wizard.

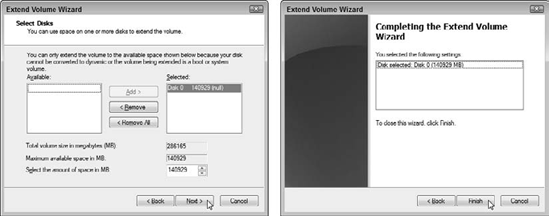
The wizened Wizard is sharp enough to know you want to extend your drive into the vacant space, so it offers you that option with its first screen. Click Next (left) to confirm that you want to extend the partition to fill the entire drive. Then click Finish (right) to confirm that you've chosen the right drive to extend. A few seconds later, your partition fills the entire drive.
Hailing from days gone by, IDE drives take more cajoling than today's SATA drives. SATA drives each have their own cable that connects to the computer's motherboard. Yesterday's IDE drives, by contrast, share a single cable. When two drives share one cable, how does the computer know which drive is which? Well, just as when you have two cats, you give them different names. And in the archaic world of IDE drives, those names are "Master" and "Slave."
And you can't simply flip a Master/Slave switch on the drive. No, in the dark ages of IDE drives, you assign the drive's names by manually moving little tiny jumpers over tiny rows of pins. I'm not joking.
With IDE drives, the Master/Slave relationship has three rules:
If you're replacing an IDE drive, set its jumpers to match the old drive's settings, either Master or Slave.
If you're adding a second drive, set its jumpers to Slave, and leave the other set to Master.
Here's the clincher: Drive manufacturers set different rules for their pins. A setting of Master for one drive model might be a setting of Slave for another — even though you're placing the little jumper over the same set of pins on both drives. Luckily, most drives come with labels telling which pins to cover to set them as Master or Slave.
Here's how to set the jumpers on an IDE drive:
Find the drive's Master/Slave identification chart, usually printed in black on a sticker attached to your drive. The sticker in the figure, for example, says to cover the middle pair of pins for Slave, and the right pair of pins for Master. No sticker on your drive? Visit the drive manufacturer's Web site and search for their downloadable Master/Slave pin settings for that particular model of drive.
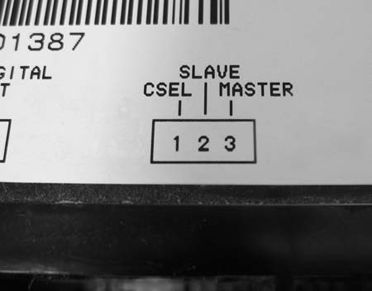

Locate the drive's Master/Slave pins (left). These both live near where the data and power cables plug into the drive. You'll find six or more pins, but they're always set in pairs like the ones in the photo. You'll also find a jumper (middle) — a little plastic thingy — resting on or near the pins. With a pair of tweezers or needle-nose pliers, place the jumper across the correct pair of pins (right), either Master or Slave.
Note
Set an IDE drive to Master if it's the only drive; choose Slave if it's the second drive on an IDE computer cable.