
Tasks in this chapter
Transferring movies and photos from a camera or camcorder to a computer
Upgrading a computer for video editing
No longer the shoulder-toted boxes of yesteryear, camcorders now live inside most digital cameras and cellphones, transforming everybody into a cinematographer. Old-school vacationers probably still have a few old camcorder tapes lying around.
But whether you created your movies yesterday or years ago, you're probably waiting for enough time to edit them into treasured keepsakes, storing them on DVDs for everybody to enjoy.
Editing takes a lot of time, but taking the essential first step — copying the video into your computer — doesn't take much time at all.
This chapter tackles the problem of moving your video out of its current receptacle and into your computer for storage. Actually, those old video tapes may be deteriorating, so your deadline for moving old video into your computer could be sooner than you think. See the sidebar, "Capturing sound and video fro mold camcorders," in this chapter. You also find help if you want to upgrade a computer so it can handle video editing.
Digital cameras and digital camcorders cooperate with your computer quite easily. As you film the action, the digital camcorder packs both the video and sound into a single file; your digital camera does the same thing with your snapshots.
That leaves the problem of moving the file from the camcorder to the computer. Luckily, many modern camcorders store their images on a memory card, easily read by a memory card reader that plugs into a USB port.
Other camcorders plug into one of these two jacks on your computer:
USB cable: Many digital camcorders and cameras use the ever-popular USB port, found on every computer, be it desktop, laptop, or even a tiny netbook.
FireWire: Some techies refer to FireWire as "IEEE 1394," but both refer to the same port. Unfortunately, many computers lack a FireWire port. The solution? Buy a FireWire card and install it inside your computer. (FireWire cards install the same way as dial-up modem cards, covered in Chapter 14.) Laptop owners can install a FireWire adapter card that slides into a PCMCIA slot. Netbook owners, unfortunately, are left out of the FireWire camp altogether.

To copy digital video into your computer from a camera or digital camcorder, follow these steps:
Connect a cable between your digital video camera's or camcorder's Data or Digital I/O port and your computer's USB port (left) or FireWire port (right). Then set the camera to either Play or View mode rather than Shoot mode. When your camera connects for the first time, Windows may say it's installing drivers.
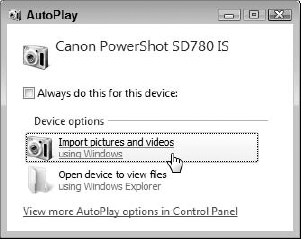
When the Autoplay window appears, click the words Import Video or Import Pictures and Videos.
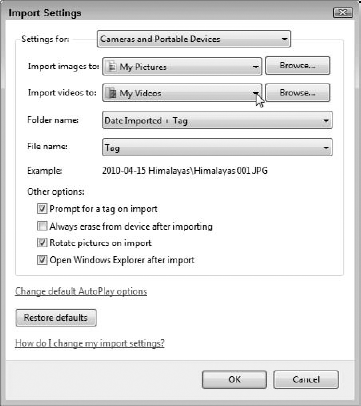
When the Import Pictures and Videos box appears, click the words Import Settings to fetch the Import Settings window.

Make sure you approve of the settings in the Import Settings window. For example, Windows 7 normally dumps your camera's photos and videos into the same folder in your Pictures library. If you'd prefer to see your videos moved into a folder in your Videos library instead, choose that option from the Import Videos To drop-down menu. Also, to keep your camera from filling up with old images, feel free to select Always Erase from Device After Importing. Click OK to return to the Import Pictures and Videos window.
In the Import Pictures and Videos window's Tag These Pictures box, type a short name that describes the video or photos you're importing, and then click Import. Depending on the settings you've chosen, Windows 7 grabs the videos and photos from your camera and places them into your Pictures library — or Videos library if you chose that option — with your chosen name. After importing your files, the program ends by showing you a Search window displaying your newly imported videos and pictures.

If your computer's able to run Windows 7 with its 3-D graphics and transparent windows, then your computer can probably stand up to the rigors of video editing. Still, you can speed things up and make your work easier by upgrading a few key areas of your computer.
Two hard drives: One drive stores Windows 7, of course, as well as your photo-editing program. But it should also be big enough to hold your imported video, which consumes 16GB for each hour. And if you plan on importing professional-quality, uncompressed high-definition video, count on filling up 40GB or more per hour. Then add a second drive to store your edited video, which also grabs a massive amount of hard drive space. Buy a drive with a fast transfer speed, as I explain in Chapter 6, so the drive will store the incoming video quickly, without gaps.
Video capture device: Most modern camcorders connect to your computer through a USB or FireWire port. Older videos, however, need a video capture box. The box plugs into your computer's USB or FireWire port, and your camera plugs into the box. As you play back the video on your camera, your computer records it. (Some TV tuners, described in Chapter 11, can grab video coming in through an S-Video or RCA port, if your camcorder offers that option.)
Fast CPU: The faster your computer's central processing unit (CPU), the faster your computer will be able to turn your edited video into a polished movie. When it's time for a new CPU, though, it's time for a new computer.
Video-editing software: Microsoft's free Windows Live Movie Maker program at
http://download.live.com/moviemakerworks for editing small movies. For more creative control, Sony's Vegas Movie Studio software has a popular following. You may also find a deal on Adobe Premiere Elements, which often comes bundled with Photoshop Elements in special deals online or at discount stores.
The steps in this task let you see where your computer falls short so that you know what to upgrade.
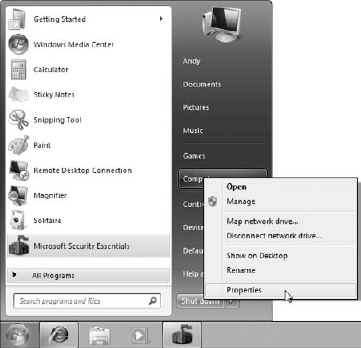
Run Windows Experience Index by clicking the Start menu, right-clicking Computer, and choosing Properties.
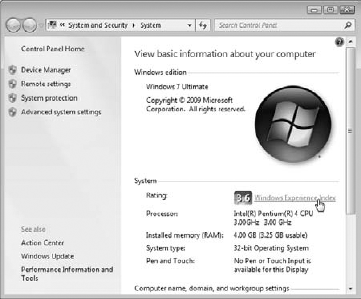
Then click the words Windows Experience Index. Meant as an easy way for showroom shoppers to assess a computer's strengths and weaknesses, the index tests your computer, and then rates its strengths on a scale of 1 to 5.9. (Windows Vista's index ranked computers on a scale of 1 to 7.9.)
If you've upgraded your computer lately, click Rerun the Assessment. Windows 7 will reassess your computer's performance and update the scores.

Look at the overall performance index — the large numbers in the square box. If your computer's rated 3 or below, it can probably play some high-definition video, but might have problems editing it. Consider this a warning flag.
Check the score for your computer's processor, also known as its CPU. If it's rated 4 or 5, you can edit most video without problems. But to edit high-definition video without problems, you'll want a processor rated at least 6 or 7. Unfortunately, it's usually cheaper to buy a new computer than upgrade your computer's processor or motherboard.
Look for your lowest score in any of the five categories. Your computer's lowest score in any of the five categories — Processor, Memory (RAM), Graphics, Gaming Graphics, and Primary Hard Disk — drops your computer's overall score to that level. After all, your computer's only as strong as its weakest link. So, find the lowest score, and start upgrading those parts first. (Don't worry about your computer's Gaming Graphics score, though, as that rates something called 3D Acceleration, which isn't used in video editing.) I describe how to upgrade memory in Chapter 5, graphics in Chapter 9, and hard drives in Chapter 6.
Tip
Can't afford a new computer or upgrades? Your old computer will still be able to import and edit video, but at a slower pace. Be prepared for delays while you work, waiting for your computer to catch up. When you've completed your edits, you might need to let your computer run all night to compile your edits into a finished video, ready for burning to DVD.