
Topics and tasks in this chapter
You can't see it, but you can almost always hear it: Your desktop computer's power supply sits inside your computer's case in a corner with its cooling fan whirring away. Some fans add a pleasant, running-water ambience to the room. Others whine like a weed whacker.
Power supplies suck in the 120 volts from your wall outlet and reduce it to the lower voltages preferred by your computer's more sensitive innards. This seemingly simple task heats up the power supply, so it needs a constantly whirling fan to keep it cool.
The power supply's fan sucks hot air out of your computer's case and blows it out the hole in the back. In fact, if you keep your computer too close to the wall and don't move it for a while, the fan leaves a black dust mark on the wall.
Power supplies retire more quickly than many other computer parts. This chapter shows how to interview potential replacements and place the new one into its proper cubicle. (Power supplies are replaceable only on desktop computers. Laptops and netbooks grab their power from batteries, which I describe how to replace in this chapter's last task.)
Almost all power supplies work fine with today's PCs. When choosing a replacement power supply, you need keep an eye only on these two things:
Watts: Power supplies come rated by the amount of watts that they can deliver, and you need to choose a high enough wattage to power your PC. Just like brighter light bulbs, powerful computers require more watts. An average PC needs a power supply of at least 500 watts. A modern, powerful PC handling lots of video games or video editing work needs more, from 750 to 1,000 watts.
Tip
When in doubt, buy more watts than you need. Like light bulbs with self-adjusting dimmer switches, computers rarely run at full power. A 500-watt power supply, for example, may send only 200 watts to your PC most of the time. But when you fire up some demanding software, your power supply will be able to kick in the power your PC needs.
Dell: For some reason, Dell computers break the rules with their power supplies, making them incompatible with most over-the-counter power supplies. If you're replacing a power supply in a Dell computer, buy the replacement from Dell. Or, if you shop at a retail store, make sure the power supply is built specifically for a Dell computer.
I've had good luck buying power supplies, both Dell and others, from PC Power & Cooling (www.pcpower.com).
Once you've chosen the amount of watts you need in a power supply, the sticker price varies according to these things:
Watts: I'm throwing this in here again just to explain that the more watts you need, the more expensive your power supply will be.
Sound level: Higher-quality power supplies come with quieter cooling fans, leading to a more relaxing computing experience. Look for fans with ball-bearings and rubber gaskets.
Durability: To keep the price down, many PC manufacturers skimp on power supplies. After all, they need them to last only throughout the one-year warranty. Spending more on a power supply ensures a longer life, and strong, steady power. That steady, unfluctuating power helps extend the life of your PC and its components.
Tip
Curious as to how many watts your PC currently uses? I bought a Kill-A-Watt P4400 from Amazon for $20 to find out. You plug the meter into the wall, plug your computer into the meter, and the digital readout shows how many watts is being consumed. Try it on your PC while running different types of software, as well as your friends' PCs, to compare ratings. (Then try it on your refrigerator. Ouch!)
When the power goes out in your home, so do the lights and everything else powered by electricity — including your desktop PC. And when your PC turns off unexpectedly, you lose any work you haven't saved. There's no way to recover it.
Laptops aren't affected by power outages; they simply switch to their battery to stay afloat. You can do the same for your PC with a UPS (uninterruptible power supply). Also known as a battery backup, a UPS is basically a big box with a heavy battery inside. You plug the UPS into the wall outlet, and plug your desktop computer into one of the UPS box's several outlets.
The UPS constantly powers your PC through the battery, simultaneously recharging the battery with power from the outlet. Then, when the power dips or dies, the UPS keeps sending battery power to keep your PC running. The power lasts for only a few minutes, but that's plenty of time to save your work, shut down your PC, and rummage for the flashlight. More expensive UPSs will work unattended. If the power dies while you're in the coffee room, they save your work and shut down your computer automatically.
Most uninterruptible power supplies also serve as a surge protector and power line conditioner, feeding your PC with the steady flow of power it craves. Here's how to buy and install a UPS in your home:
Buy a UPS, also called a "battery backup." Make sure it puts out enough wattage to power your computer, probably between 300 and 600 watts. They're sold at office supply stores, computer stores, and online.
Plug the UPS into the wall, and let its battery charge for 12 hours or the minimum specified by its manual. When the battery's charged, move to Step 3.
Plug your computer into one of the uninterruptible power supply's outlets; plug your monitor into another. (Without a monitor, you can't see how to save your work and turn off your PC.) Then turn on your computer and monitor.

Power supplies can't be repaired, just replaced. Recycle your old power supply by finding a local or mail order recycling company, as I describe in Chapter 13. The power adapters for laptops and netbooks can't be repaired, either, but they're easily replaced. Just visit the manufacturer's Web site and order a new one.
To install a new power supply, perform the following steps:
Turn off your PC, unplug it, and remove your computer's case, as described in this book's Cheat Sheet, downloadable from
www.dummies.com/cheatsheet/upgradingandfixingcomputersdiy.Locate your PC's old power supply sitting in a corner of your PC's case. The power supply's back end fits snugly against the back of your PC so that its built-in fan can blow out the hot air. On its other side, dozens of colorful cables flow from a small hole.
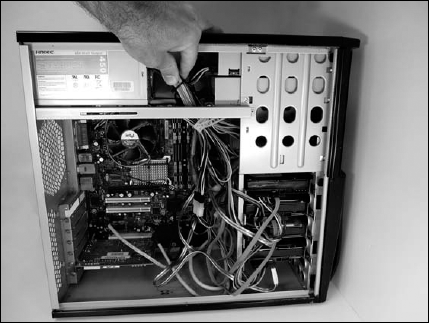
Each cable ends with one of several types of plugs. The plugs are shaped differently to mesh with their particular connector. To make sure the new power supply's cables will plug into the same spots, put a strip of masking tape on the end of each plug and write down its destination. Better yet, make a foolproof roadmap by taking a few well-lit digital photos before unplugging anything.
Warning
Don't ever open your power supply or try to fix it yourself. The power supply stores powerful jolts of electricity, even when the computer is turned off and unplugged. Power supplies are safe until you start poking around inside them.
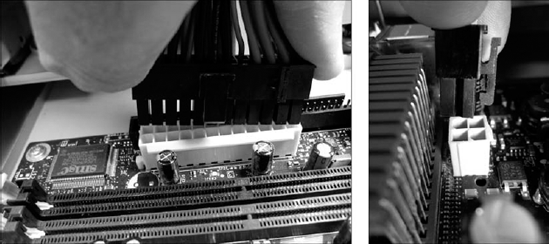
Start by unplugging the power cables from the motherboard (the large, flat, circuitry-and-slot-filled board). Two power supply cables plug into the motherboard: one pushes into a large, 20- or 24-pin connector (left), the other pushes into a smaller, 4-, 6-, or 8-pin connector (right). On motherboards set up to run two video cards (Chapter 9), you'll also remove a four-pin connector that looks just like the ones plugging into older CD/DVD drives, below.

Unplug the power cables from the hard drives and the CD/DVD burners (new on left, old on right), as well as any other places on the motherboard, usually small four-pin connectors for controlling switches and fans. Your old power supply will probably have some dangling cables that don't plug into anything. (Those cables are thoughtfully supplied to power any future upgrades.)
Remove the four screws that hold the power supply to the computer's case. Be careful not to remove the screws holding the power supply's internal fan. To see which screws are which, try loosening the screws slightly and wiggling the power supply from inside the case; that sometimes makes it easier to tell which screws are which.

Lift out the power supply. If the power supply is cramped, you may need to loosen the screws holding some drives in place and pull them forward a bit. If the power supply still won't come out, make sure that you've removed all the screws. Some power supplies have extra screws around their base to hold them down.

Tip
The screws that hold the power supply in place are generally closer to the outside edge of the computer's rear. The screws that hold the fan are generally closer to the fan's edge.
Tip
Plug your new power supply into the wall before installing it, just to listen for the fan. If the fan doesn't work, return the power supply for one that works. If you do hear the fan, though, unplug the power supply before beginning to install it.
Buy a replacement power supply. If you can't purchase a replacement power supply online, take the old one to the store and look for a replacement. If you're planning on adding more computer gear — a powerful graphics card, more hard drives, or more DVD burners — buy a power supply with a higher wattage. If you can't find a replacement for your particular power supply, head to your computer manufacturer's Web site and look for the replacement for your particular computer model. (It will be expensive.)

Make sure that the power supply's voltage is set correctly, if necessary. On the back of some power supplies, near the fan, a red switch toggles the power to either 120 volts or 220 volts. If you're in the United States, make sure that the switch is set to 120 volts. If your country uses 220 volts, flip the switch to the 220-volt setting.
Now, the steps (and figures) run in reverse, starting with Step 6. Place the new power supply in the old one's place, and tighten the screws. Then reconnect the cables to the motherboard, the drives, the fans, and the power switch. Grab your digital photo for reference, if necessary, or look at the masking tape labels you put on the old power supply's cables. Remember, some cables won't connect to anything; they're for future add-ons.
Reconnect the power cord. Plug your computer back in; its power cord should push into the socket near the fan. Turn on the power and see whether it works. Do you hear the fan whirring? Does the computer leap to life? If so, then all is well. If the fan is not spinning, though, something is wrong with the new power supply or your power outlet. Try plugging a lamp into the power outlet to make sure that the outlet works. If the outlet works, exchange the power supply for a new, working one.
Turn off the computer and put the case back on. Is everything still working right? If it is, put a cool glass of iced tea in your hands. Congratulations!
Tip
If your new power supply's cables don't fit your drives, buy adapters, either SATA to IDE or IDE to SATA. (I cover those in Chapter 6.) Be sure that you tighten down any disk drives you may have loosened.
Even if they don't explode in a ball of flames, laptop batteries eventually die of old age. Most batteries last between 18 to 24 months, depending on how often they're used and recharged. Toward the end, you'll notice that it doesn't hold a charge nearly as long, and you're constantly prowling for power outlets.
When it's time to replace your old battery with a new one, start shopping online. Laptops accept only batteries made specifically for their make and model. Other batteries either won't fit or may not supply the right voltage. Buy batteries only from reputable retailers, and avoid prices that seem too cheap: They're often fakes with safety issues.
When your replacement arrives, install it by following these steps:
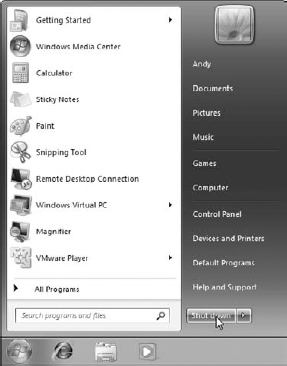
Save all your open files, close your programs, click the Start menu, and tell Windows to Shut down. You want to turn it off — completely off. Don't just choose hibernate or sleep modes.
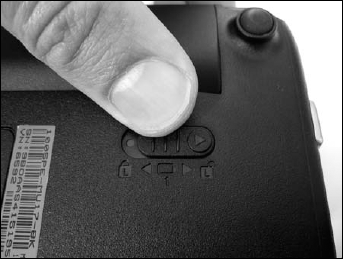
On the underside of your laptop or netbook, release the battery lock lever by pushing it to the side marked "Unlock," or with an unlocked lock icon. Then slide the other lever to release the battery, sliding it out with your hands.

Slide in the new battery; it fits only one way — the right way. Then slide the latch closed and slide the second latch to Locked.
Turn your laptop back on. Your laptop will probably need to charge the new battery before running on battery power alone. Leave the laptop turned off but plugged in overnight to ensure a good charge.