Topics and tasks in this chapter
Buying the right memory
Installing memory into a computer or laptop
Diagnosing failing memory
Adding memory is one of the most popular upgrades today, especially for people upgrading to Windows 7. It's also one of the easiest and cheapest upgrades around. Years ago, memory cost more per ounce than gold; computer stores doled it out to the highest bidder. Today, you'll find cheap memory chips sold at your local discount warehouse store, hanging next to the bulk-pack blank CDs.
What exactly is memory? When your computer's CPU (central processing unit) tells your computer what to do, it needs a scratch pad for taking notes. Memory works as that scratch pad. The more memory you stuff into your computer, the larger the scratchpad, letting you run more programs more quickly.
This chapter explains the many types of memory, their unfortunate acronyms, how to buy the specific type of memory your computer needs, and how to snap the new memory into the right spot inside your computer.
Although manufacturers have created many types of memory over the years, all the memory today looks pretty much the same.
For a desktop computer, memory comes on a fiberglass strip about four inches long and an inch tall, with little notches in its sides and edges. Most computers hold from two to four strips.
Note
Laptop memory is about half the size of a desktop computer's memory; most laptops can hold one or two strips.
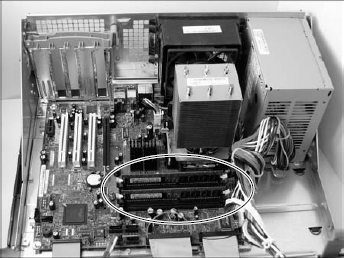
Different types of memory fit into different types of sockets — little slots that hold the strip's bottom and sides. The notches on the memory module must mesh with the dividers and holders on their sockets. If they don't line up, you're inserting the wrong type of memory into the socket.
You'll probably encounter the following words when shopping for those types of memory or browsing the ads:
Stick: A piece of memory, also called a module. Memory looks more like a strip than a stick, but many people still call it a stick.
Sockets: This describes the number of memory slots (sometimes called banks) living inside your computer. Each socket holds one stick of memory.
Matched pairs: Some computers require you to install memory in matched pairs. That means you need to buy and install two identical sticks of memory at a time. Also, those two memory sticks must be placed in matched pairs of memory sockets inside your computer. Not all computers are this picky. But if your computer requires memory to be installed in matched pairs, be sure to buy two identical sticks.
Free slots: If every one of your memory sockets contains a stick of memory, you don't have any free slots. That also means you don't have room to insert any more memory sticks. So, how do you upgrade your memory? You need to remove some low-capacity memory — a 512MB stick, for example — and replace it with a higher-capacity memory stick — 1GB, for example. Unfortunately, that tactic leaves you with a leftover-and-useless 512MB stick.
DDR400, DDR533, DDR2-4200, DDR2-6400: Numbers after an acronym describe the speed of a particular DDR SDRAM or DDR2 SDRAM module. (Those names refer to different types of memory, adding to the confusion surrounding memory.) The larger the number, the faster the memory — if your motherboard's equipped to handle it. You can usually install faster memory in slower motherboards without problem, but putting slower memory in faster motherboards will slow down your computer.
Laptop memory: Laptop computers use smaller parts for everything, and that includes memory. Regular sticks of memory won't fit into a notebook, and vice versa. Buy memory designed specifically for your brand and model of laptop.
When faced with the unpleasant task of buying the right type, speed, and size of memory for a computer, most people give up and take it to the shop. Do-it-yourselfers often turn to online memory vendors because they've made the process so easy. Follow these steps for the quickest and easiest way to figure out how much memory's already inside your computer, and the best type of memory to add to your particular model.
Visit the Web site of Crucial (
www.crucial.com) or another online memory vendor. Most online memory vendors, including Crucial, offer special programs to scan your computer's memory requirements and offer recommendations. Tell the Web site to find out what memory's inside your computer and to recommend compatible upgrades. On Crucial, for instance, click Scan Your Computer, and choose Download the Scanner. The Web site sends a small program to your computer to scan its memory, and then presents the results.
The Web site revealed these three things about my computer: My computer has four slots of memory; two slots are filled with 1GB memory modules, and two are empty. My computer currently has 2GB of memory, and the scanner recommends I double my memory from 2GB to 4GB, at a cost of $51.98. When you've identified the type and amount of memory you need, you're ready to make your purchase.
Tip
Feel free to make a printout of what you've learned about your computer- and memory-buying strategy at Crucial, and compare prices at other sites (or local stores) before buying. Or simply buy it from Crucial.
If you live in a static electricity-prone environment, buy a grounding strap that wraps around your wrist and attaches to the computer. Even if you don't have static electricity problems in your area, you should still ground yourself by touching a metal part of your computer's case before touching its innards. If you're working in a dry area with lots of static, take off your shoes and socks. Working barefoot can help prevent static buildup.
After you buy your new memory modules, follow these steps to install them.
Turn off the computer, unplug it, remove the case, and locate the memory sockets on your motherboard.

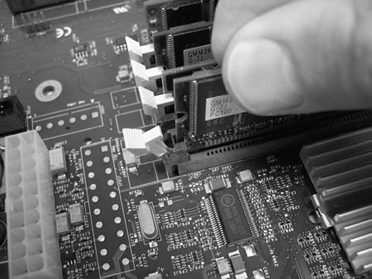
Remove any old memory sticks, if necessary, to make room for a higher-capacity memory stick. Pull the socket clasps away from the existing memory module on each side, and then pull the module up and out. Place the extracted memory into a plastic baggie for safekeeping.

Note
To open a laptop or notebook computer, turn it off, and remove the panel from the bottom of the laptop. (Check your notebook's manual to see exactly where its memory modules live.)
Add the new memory. Look for the notched sides and bottom of the memory stick. Align the memory stick's notches with the socket's dividers and clasps. Then push the memory stick straight down into its socket, and push its little locking clips toward its edges to hold it in place. (Or if you're adding memory to a laptop, skip to Step 4.)

On a laptop, push the smaller memory stick into a smaller socket. Two clips then hold the memory stick flat.

Double-check your work. Then plug in and turn on your computer. Are all the memory modules firmly in position? Wiggle them a little bit and make sure their clips hold them firmly. Are any of their pins showing? The pins should be deeply embedded in the socket. Your computer might greet you with an error message about memory mismatch or something weird. The message sounds scary, but it's good news! Your computer found the new memory chips and was startled to find more memory than the last time you turned it on.
Put the case back on your desktop PC, or the small panel back onto the laptop. Windows should run faster, more smoothly, and be able to juggle more programs at once.
Tip
If your computer doesn't recognize your new memory chips, turn it off and push those chips into their sockets a little more firmly. That may do the trick.
Memory rarely fails. But if your computer's sending a strange error message and somebody suggests you check your memory, it's an easy enough job. You simply copy a memory-testing program to a CD, stick the CD in your drive, and restart your computer. Your computer loads the program, instead of Windows, and proceeds to test your memory thoroughly. So thoroughly, in fact, that I suggest you run it before you go to bed so that you can wake up the next morning to see the results. Follow these steps to test all your memory, or one stick at a time:
Download a free memory testing program like Memtest86 Memory Diagnostic (
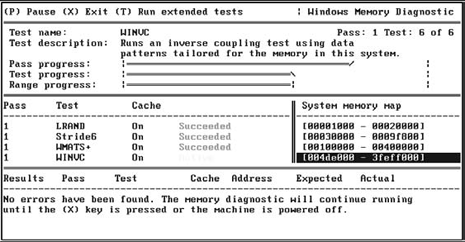
www.memtest86.com; click Free Download) or Microsoft's Memory Diagnostic utility (http://oca.microsoft.com/en/windiag.asp). The programs come in the format of an ISO file, ready to be burned to a CD.To burn the ISO to a CD, insert a blank CD into your CD or DVD burner, right-click the ISO file, and choose Burn Disc Image. After you've created the CD, keep it in the disc tray, and restart your PC by clicking the Start button and choosing Restart.

When your computer restarts, it will load the memory-testing program instead of Windows. Tell the program to run all night. In the morning, check the results to see if the program caught any memory errors. If it's found errors, you need to replace your memory stick. No errors? Then the memory is okay.

Tip
Not using Windows 7? Then you'll need to download an ISO burning program, or use a third-party disc burning program to burn the memory-testing program to a CD or DVD.
