
Topics and tasks in this chapter
Updating your printer and scanner
Fixing common problems
Installing a printer's ink cartridge
Installing a printer
Fixing a printer that doesn't print
Keeping words from running off the page
Installing a scanner
Scanning with Windows 7 software
Installing printers and scanners has never been easier. Most printers and scanners now come combined as one unit. You install the printer or scanner's software, plug in the new printer or scanner, and Windows automatically recognizes it and introduces your new printer or scanner to all your programs.
This chapter walks you through the steps you need to take, from buying the right printer or scanner for your needs, to fixing the problems when Windows' world of automation somehow leaves something stuck.
Printers have never been so inexpensive. Unless you're a graphic arts professional, it makes sense to buy a combination printer/scanner, known in the business as an "all-in-one." By combining the two, stand-alone models not only simplify printing and scanning, but also morph into a stand-alone copy machine.
Unlike other computer parts, the vast majority of printers work with every PC. Some wireless printers appear in your network (Chapter 15) as soon as they're plugged in and turned on. Almost every other printer plugs in through the ubiquitous USB port, a staple on every PC, laptop, and netbook.
Tip
Unfortunately, you'll probably have to supply your own USB cable: Most manufacturers leave out the cable in order to cut the price a few more dollars.
When you're shopping for a printer, compare the same letter and/or photo printed from several different printers. For example, one printer may be better for photos but lousy for letters. Other printers may be just the opposite. Consider your personal printing needs and compare several printers that meet those needs before making a final decision.
To help you decide, here's a list of the types of printers available, and their particular niches.
Inkjet: Popular for their low price and high quality, inkjet printers (shown in Figure 4-1) squirt ink onto a page, creating surprisingly realistic images in color or black and white. Although the printers come cheap, their expensive ink cartridges wear out much faster than the typewriter ribbons of yesteryear. For low-to-medium level work and digital photography, these versatile printers provide the best buy for the buck. (Most all-in-one printers, discussed next, rely on inkjet technology.)
All-in-one (AIO): The most popular printer today, this combines an inkjet printer, copy machine, scanner, and occasionally a fax machine into one compact package. (Sorry, no coffee maker.) The quality of all-in-one machines has risen dramatically in the past few years. As shown in Figure 4-2, their small footprint makes them perfect for small, one-person offices. The downside? If one component breaks — the scanner, for example — you've lost your copier and fax machine, as well. They also cost a little more than a plain old printer — but not much.
Photo printer: Many color inkjet printers do a fair job at printing digital photos, but photo printers contain several extra colors, letting them print with more finesse. Some photo printers print directly from your camera or its memory card, letting you print without firing up your PC. Photo printers work best as a second printer, keeping you from wasting your expensive color photo ink on shopping lists, schoolwork, and Web pages.

Figure 4.2. This all-in-one printer combines an inkjet printer, a scanner, a fax machine, and a copy machine into one package.
When buying a printer to print photos, pick up some photo-quality or glossy inkjet paper. It's not cheap, but it makes all the difference when printing photos.
Tip
Photo printers offer the utmost convenience, but they can't compete with professional developers for both quality and price. Drop by your local photo developer with a memory card or CD full of photos and compare the difference. Most photo developers like Costco even let you upload your digital photo files from your computer, and then pick up the prints at the store.
Laser: Laser printers may sound dangerous, but these printers (shown in Figure 4-3) use technology similar to their ho-hum equivalent, copy machines; they sear images into the paper with toner. Black-and-white laser printers cost a little more than inkjet printers; double or triple that price for color laser printers. Although laser printers can't print digital photos, they're cheaper in the long run for general office paperwork.
Warning
Laser printers are supposed to heat up. That's why you shouldn't keep dust covers on laser printers when they're running. If you don't allow for plenty of air ventilation, your laser printer may overheat. After you turn off your laser printer, let it cool; then put on the dust cover to keep out lint and small insects.


Replacing an inkjet printer is usually more cost-effective than repairing it, unfortunately. Some new printers cost less than the price of replacing their ink cartridges! The more expensive laser printers, by contrast, require regular servicing to ensure a long lifespan. Some printers simply need to be cleaned in the right places, so get an estimate on repairs before giving up.
All-in-one printers vary widely in price and quality, so there's no clear answer about the cost-effectiveness of repairing versus replacing. If your printer cost more than $200, get an estimate.
Tip
To test whether it's your computer or your printer that's acting up, plug the printer into a friend's computer or test it on a computer at work. (Have a coworker blindfold the network administrator first.) If the printer works fine on other computers, your own computer is the culprit. If the printer has the same problems when connected to other computers, though, your printer is the hitch. To fix your printer, run through the fix-it tasks dealing with printer problems later in this chapter.
Scanners work like tiny copy machines. But instead of printing paper copies of what you place onto the scanner's bed, a scanner stores a copy of your item as a computer file. The popular all-in-one printers, which include a built-in scanner, work as copy machines, as well.
Like printers, today's scanners all connect to your computer the same way, through a USB port, making them compatible with nearly every computer made in the past ten years. Luckily for you, nearly any scanner on the store shelf will work with your computer.
Your biggest decision when shopping for scanners becomes the size of your wallet. To help you choose between quality levels, here are some words you'll find on the boxes of most scanners. You'll be familiar with many terms if you've shopped for a digital camera because the two items are basically the same: Scanners are digital cameras that specialize in close-ups of large, flat items. Because of this specialization, scanners include their own specialized words, making you wade through awkward acronyms like dpi and TWAIN.
When you find yourself sinking into a scanner's vocabulary, use this rope to help pull you out.
dpi (dots per inch): Choosing a higher dpi setting tells the scanner to collect more detailed information about your image. That translates to a larger image on your monitor, a larger-sized file, and a higher-resolution image with higher quality when printed out.
Tip
You'll scan the majority of your photos and documents at between 75 to 300 dpi, although 2400 dpi comes in handy for archiving family photos.
Optical/Enhanced: Many scanners have two dpi ratings: one for "optical" and another for "enhanced." The difference? The enhanced mode is a blurry computerized exaggeration of the optical mode, which is what the lens actually sees. For a true look at your scanner's quality, rely on the optical figures. (Digital cameras and camcorders, discussed in Chapter 12, use similar computerized exaggerations with their digital zooms.) A higher optical dpi means a higher price.
OCR (optical character recognition): Scanners take high-quality, up-close pictures, usually of flat surfaces. Since they're taking photos, you can't view (or edit) the text from a scanned magazine in a word processor. But wouldn't it be nice if you could do just that? Well, some brainiac invented OCR software that analyzes images for recognizable characters. Then it dumps the characters into a text file as words. That lets you scan a document, run OCR software on the image, and save the text into a file for importing into a word processor.
Windows doesn't include OCR software, although some scanners toss it in for free on higher-priced models. If you need it, look for the acronym OCR on a scanner's box or specifications list.
Tip
When using OCR software, be sure to align your document or book's top edge with the top edge of the scanner's glass plate. Then scan at 300 dpi. Finally, most OCR software doesn't understand grammar, spelling, or etiquette. That's up to you and your word processor to fix.
TWAIN: A not-for-profit group decided to liberate scanners from their complicated bundles of software. So the group created a set of standards for manufacturers to incorporate into their scanners. Thanks to TWAIN, many programs — as well as Windows — can easily bypass your scanner's bundled software and access your scanner directly.
Tip
The initials TWAIN don't stand for anything. The TWAIN organization says it lifted the name from Rudyard Kipling's poem with the line, "and never the twain shall meet." However, one of TWAIN's founders (Hewlett Packard's Bob Gann) said they coined the term from "technology without an interesting name" after frustration at finding a name for a rather dry topic.
Note
TWAIN is a device-specific driver. You need to install the specific version of TWAIN that comes with your device. The TWAIN driver that comes with one scanner, for instance, won't necessarily work with other scanner models.
WIA (Windows Imaging Architecture): WIA incorporates portions of TWAIN into Windows, letting you control scanners from nearly any graphics program, including Windows' Paint, covered at the end of this chapter, or most other graphics programs, using the same commands for every brand or model of scanner. From Paint's File menu, you can choose From Scanner or Camera to control the scanner directly with Windows 7's built-in software.
Most graphics software can also control your scanner directly. Turn on your scanner, insert the material to be scanned, and load your graphics program. Choose Acquire or Import from the program's File menu. The program tells your scanner to grab the image and dump it directly into your graphics program, conveniently bypassing your scanner's bundled software. (The Acquire/Import trick works through the scanner's TWAIN driver, so it works only with TWAIN-compatible scanners.)
24-bit color and 48-bit color: Computers use bits — states of being turned on or off — to process information. Any item boasting 24-bit color means it can handle 16,777,216 colors, a standard known as True Color or photo quality. It's fine for most needs. (Some design and printing professionals scan at 48-bit color mode.)
Printers need ink to place images onto a page. When you buy a new printer — or when your current printer's pages start to look blotchy or faint — you probably need a new ink cartridge.
Changing cartridges differs among printer models, but here's the general rundown:
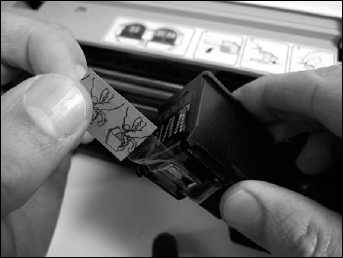
Leaving the printer turned on, open its cover. Printers usually have a hood-release type of latch that pops up the cover. (You may need to remove the paper tray first.) Before you may install the cartridge, most inkjet printers must be turned on first, so their cartridge-bearing arm slides out of its hiding place. On most printers, the ink cartridges slide into view when you open the cover.
Remove the old cartridge, if necessary. The cartridge usually pops or slides up and out. While the cartridge is out, wipe away any dust or dirt you see inside the printer. Pull off the plastic strip that protects the new cartridge's ink nozzles and electrical contacts, as shown in the figure.
Slide in the new cartridge. Look for a sticker on the inside of the case with illustrated instructions for your particular printer model. When the cartridge is in place, you'll hear it lock in tight. When the new cartridge snaps in place, close the printer's cover. You may need to put the paper tray back on the printer.
Run your printer's software, if it has any. Some inkjet printers, for example, come with software that aligns a newly installed cartridge. The software prints several coded designs and then asks you to examine them and choose the best-looking ones. The printer then knows the best way to print. New cartridges can be a tad blotchy for the first few pages, so don't print any résumés right off the bat.
Tip
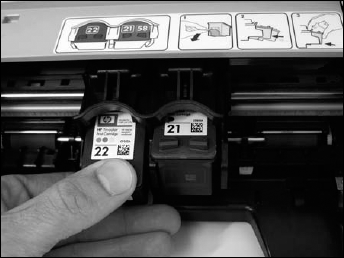
Color printers usually come with two ink cartridges, one for black and the other for colored ink. (Photo printers sometimes have four cartridges.) Luckily, the plastic ink cartridges are usually labeled to avoid confusion. If you're in doubt, the smaller cartridge probably holds the black ink.
Here's a secret: You don't have to install your printer's software. Windows 7 automatically recognizes and lets you print to hundreds of different printer models. So, try plugging in your printer without installing the printer's software. If you're not happy with the results, unplug the printer, install its software, and plug it back in.
To install a printer, follow these steps:
Remove the new printer and accessories from the box and install its software, if necessary. Remove the printer's cover and extricate any packaging from inside the printer. Many printers come with cardboard or plastic holders to protect moving parts during shipping. Check the manual to be sure you've located and removed them all. Also, make sure that you can account for any installation CDs, cables, paper, and cartridges that came with the printer.

Find the printer's USB cable and the cable's matching USB ports on your printer and on your computer. Then connect the cable between your PC (left) and your printer (right). The slightly rounded plug usually goes into your printer, as printers rarely use the most popular-sized USB cables. USB cables just need a slight push; if they're not going in, turn the plug upside down and try again.
Plug in the printer, turn it on, and install the printer's ink cartridges, as described in the preceding task. (Many new printers come with cartridges installed, but they're often only half full.)
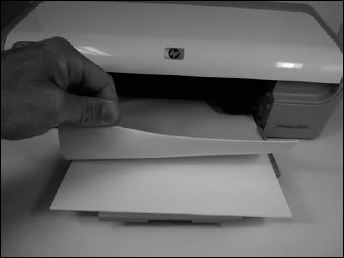
Add about 25 sheets of cheap or previously used paper; you don't want to waste your expensive photo paper on your first few tests. Rustle the paper to get some air between the pages before placing it in the tray. That reduces paper jams and expletives.
Turn on your monitor and PC, if you'd turned them off. As your PC awakens, Windows notices that you've attached a new printer. Give Windows time to sniff your printer thoroughly and add the printer's name to your programs' printer menus. Finally, print a test page on your newly installed printer: Click the Start button, choose Devices and Printers, right-click your newly installed printer's icon, and choose Printer Properties. Click the General tab, if necessary, and click Print Test Page. The test page looks like gibberish, but it's a Rosetta Stone for tech support should things not go well.
Sometimes an image or document refuses to align itself onto a single page: The printer cuts off lines or images along the right side. To avoid this problem, choose a program's Print Preview mode before you actually print the page. The computer displays a picture of the paper with your image or text printed on it. If the image doesn't fit onto the page, try these things to fix the problem:
Switch to Landscape mode, which prints the text sideways. Printers usually print onto paper in Portrait mode: The paper is positioned vertically. If you're printing a spreadsheet or something that extends off to the right, look for a place in the Print window's Preferences or Page Setup area to switch from Portrait to Landscape mode. Then the printer prints the information horizontally, like a landscape.

Choose the Reduce to Fit Page option. Some printers and programs offer an option to shrink the image so that it fits onto the page. This works nicely for photos, but not so well for things with lots of fine print. Give it a test on cheap paper or the back of a page that didn't print correctly.
Use templates. The label-maker Avery (
www.avery.com) and other manufacturers offer free templates from their Web sites. By calling up a template in your software and filling out the template's boxes, your program positions the text perfectly on the page. It works great for address labels, greeting cards, certificates, name tags, and other impossibly hard-to-configure spots. Avery has an online version, as well.
Change the margins. Use your program's Page Setup area and make sure you've set the margins to within a half-inch of the paper's edge. You might need to move out the right margin until everything fits.

Installing a scanner works much like installing a printer, except that you needn't worry about ink nor toner cartridges. Installing the scanner's fairly easy. (The hard part comes when trying to figure out all the confusing options offered by the scanner's bundled software.)
Follow these steps to install a scanner:
Remove the scanner and its accessories from the box. Be sure to search the scanner's box for a cable — probably USB — the software, the manual, and any weird-looking plastic holders for negatives or slides. Some scanners come with their lids detached, so you may need to rummage around for that.
If required, install the software before installing the scanner. Better check the manual on this one. Some scanners require their software to be installed before the scanner is plugged in.
Remove any tape securing the scanner's lid in place.
Unlock the scanner. Some scanners come with a lock that holds their mechanism in place during transport. Look for a round plastic area with a notch along the scanner's side. Rotating that round piece of plastic usually unlocks the scanner. (Sometimes there's a little slot to insert in the lock; a coin often works in the slot as a makeshift screwdriver.)

Put on the scanner's lid and fasten its connecting cable, if necessary. Most lids don't have a firm hinge. Some have two prongs that slide in and out of holds, and others have spring mechanisms.

Plug your scanner into the power outlet and plug its cable into the scanner and into your computer. The slightly rounded USB connector (right) usually goes into the scanner; the rectangular USB connector (left) plugs into your computer.
Press the power button. After a second or two, Windows recognizes your new scanner. If it doesn't, try fiddling with your bundled software to see if it recognizes your new software. If your computer doesn't seem to notice all your work, it's time to head to the next section.

Most scanners come with oodles of bundled software, yet Windows 7 already comes with its own simple software for scanning images. Follow these steps to hand the scanning reins to Windows 7. Windows 7's built-in software is so simple, you might find yourself using it for quick tasks, like scanning an item for a fax, e-mail, or party flyer.
Before scanning anything, always clean the item to be scanned and the scanner's glass thoroughly with a lint-free cloth. Any dirt or residue will show up on the scan.
Lift your scanner's cover, place the item to be scanned on the glass, and close the cover. Most scanners prefer that you nestle the scanned item in the top-right corner.
Open Paint from the Start menu, click Paint's File menu, and choose From Scanner or Camera. Paint comes with every version of Windows, so I'm using that as an example here. But almost every graphics program offers a similar option under the File menu. If you prefer a different graphics program, click its File menu and choose Acquire or Import to start scanning. Windows' built-in scanning software jumps in, shown here, with your scanner's name listed along the window's top edge. If the scanner's name doesn't appear, then it isn't WIA and TWAIN compatible, and you're stuck with its bundled software. If you own more than one scanner, choose your model from the pop-up menu.

Tip
Like cooking grills and tennis rackets, some inexpensive scanners have sweet spots, where the picture scans the most clearly. If you're having trouble with poor optics, light leaks, or uneven light along the scanner's edges, search the manufacturer's Web site to see if your particular model of scanner has a sweet spot. (Chapter 21 covers Web searches.) You may need to experiment by moving your item to different corners of the scanning bed.
Choose your Picture type. Windows offers four choices. Choose Color for anything with color or being sent to a color printer. Choose Grayscale for black-and-white photos. Choose Black and White only for scanning line art — that is, drawings made with a pen or pencil. Choose Custom only to change the resolution or fiddle with the brightness/contrast settings. Finally, click the Preview button, which tells Windows to scan the picture and place it on the screen.

The dotted lines surrounding the image on the screen show the exact area being scanned. See the black squares in each corner? Drag them in or out until the crop marks surround exactly what you want to scan — not the entire scanner area. Spend a little time adjusting them so you don't accidentally lose part of the image.

Click the Scan button, and save the image in Paint. When you click the Scan button, Paint scans your image and brings it into the program. From there, you can save the image as either a JPG or TIF file. Choose JPG format if you're saving a photo. Choose TIF for something you'll print, like a party flyer. The TIF format creates a larger file, but preserves the highest quality image. Save all your images in Windows 7's Pictures library, accessible from the Windows Start menu.