
Topics and tasks in this chapter
Walk into nearly any computer store today, and you'll see Windows 7 running on every single computer. Nearly 90 percent of today's computers arrive with Windows 7 already beaming from their monitors. So, who still needs to install Windows 7? Well, you'll be reading this chapter if you fall into any one of these three groups:
Your computer runs Windows XP or Windows Vista, and you want to move to Windows 7.
You've replaced or upgraded a hard drive, and need to install or reinstall Windows 7 onto it.
You're outgrowing Windows 7 Starter edition, which came on your netbook, and you want to upgrade to a more powerful version of Windows.
This chapter walks you through each of those scenarios.
Windows 7 usually runs well on computers purchased within the past four or five years. Before upgrading your computer, though, make sure that you've run through the following checklist:
Compatibility: Before upgrading or installing Windows 7 onto your computer, download and run Microsoft's Windows 7 Upgrade Advisor, described in this chapter's first task. The program alerts you beforehand if parts of your computer won't run well under Windows 7.
The program will also tell you that you can't upgrade from Windows XP to Windows 7 very smoothly. Most people have to start from scratch, installing Windows 7, then reinstalling all their programs, and then copying their files back over to the computer. Yes, it's such a hassle that many people consider buying a new computer, instead.
Computer power: Computers running Windows Vista have plenty of power to handle Windows 7. If you're upgrading from Windows XP, though, you should have at least 1GB of memory, a DVD drive, and at least a Pentium 4 processor. Windows 7 runs admirably well on underpowered computers. It won't be speedy, but it will run.
Security: Before upgrading to Windows 7, turn off your antivirus software and other security programs. They may innocently try to protect you from Windows 7's upgrade process.
Upgrade path: Both Windows Vista and Windows 7 come in many different versions, so Table 18-1 explains which versions are eligible for which upgrades.
After you upgrade, you can pay extra to unlock the features of a fancier version using Windows Anytime Upgrade, a strategic Microsoft marketing move described in this chapter's last task.
Backup: Back up all of your computer's important data in case something goes wrong. I describe how to back up your hard drive in Chapter 6. If you're switching from Windows XP, be sure to run Windows Easy Transfer program, a task covered in Chapter 20.
When you buy a copy of Windows 7, you'll notice two DVDs in the box: a 32-bit version and a 64-bit version. Why are there two copies, and what's the difference?
Windows 7 comes with two copies so you can choose which version to install. If your computer comes with 4GB of memory or more, install the 64-bit version; the 32-bit version can't access that much memory.
But if you have less than 4GB of memory and don't plan to add more, go with the 32-bit version. That version still has more drivers available for it. (The very next task shows how to find out the amount of memory inside your computer.)
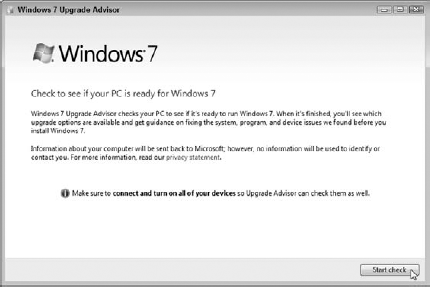
Windows 7's Upgrade Advisor preempts those screams of "Oh no!" when you discover that your software or computer gadget won't run after you upgrade to Windows 7.
To prevent those unwelcome surprises, the program examines your computer, whether it's running Windows XP, Windows Vista, and even Windows 7 itself. The advisor thoroughly probes your computer's parts and software, and then it lists any problem children, letting you deal with them before things get nasty.
When run on Windows XP, Windows Upgrade Advisor usually finds software or parts that simply won't survive the transition to Windows 7. (You can run troublemaking software in Windows 7 using a program called "Windows XP Mode," covered in Chapter 19.)
Windows Vista usually fares the Upgrad Advisor's exam much better. And, when run on a computer already running Windows 7, the advisor program handily explains whether or not you should upgrade to a 64-bit version of Windows 7.
Here's how to download and run Windows 7's free Upgrade Advisor to see how your computer will weather the upgrade:
Visit Microsoft's Windows 7 Upgrade Advisor Web site (
www.microsoft.com/windows/windows-7/get/upgrade-advisor.aspx) and click the Download the Windows 7 Upgrade Advisor button. In Microsoft's traditional sleight of hand, your click fetches a more complicated Windows 7 Upgrade Advisor page.
On the second Windows 7 Upgrade Advisor page, click the Download button. When asked if you wish to Run or Save the file, choose Save, saving the file on your Desktop or in your Downloads folder. When the download completes, install the program by double-clicking the downloaded program's name: Windows7UpgradeAdvisorSetup. Click through the approval screen, if you see one.


Click I Accept the License Terms, and click the Install button. When the program finishes installing, click the Close button.
Launch the program by clicking the Start button and choosing Windows 7 Upgrade Advisor. (If not on the Start menu's first page, it's in the All Programs area.) If asked, click Yes to allow the program to make changes to your computer.

When the Windows 7 Upgrade Advisor program appears, plug all of the equipment you want to use with Windows 7 into your computer's USB or FireWire ports. Turn on your printer, or anything else plugged into your computer. Then click the Start Check button. The program begins examining your computer, its software, and all the parts you've plugged into your computer. After a bit of brow furrowing, the program displays its findings.
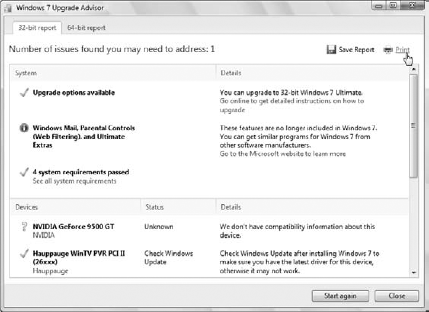
Read Windows Advisor's results, which explain which parts need updated drivers (Chapter 17) or must be replaced. Then click both the Save Report and the Print buttons; you can take the printed report to the store while shopping for updated parts and software.
Tip
If you're thinking about upgrading to the 64-bit version of Windows 7, click the 64-bit tab in the upper-left corner to see how your computer will fare. There's no easy upgrade path from 32-bit to 64-bit computing, however. To switch to the 64-bit version of Windows, you need to reformat your hard drive, install the 64-bit version, and then reinstall all your programs. (The process is the same as if you were upgrading from Windows XP or installing Windows 7 onto an empty hard drive. Simply put, it's a lot of work.)
Before upgrading Windows Vista to Windows 7, be sure to run Windows Upgrade Advisor, described in the previous task. The upgrade is fairly painless, and it will leave all your files and most of your programs alive and breathing.
However, your computer must be running Windows Vista Service Pack 1 or 2 before you can upgrade to Windows 7. Not sure what version of Vista you're running? Click the Start button, type winver into the Search box, and press Enter. When the About Windows box appears, the words Service Pack 1 or Service Pack 2 should be listed on the box's second line.
No service pack listed? Then grab it through Windows Update: Click the Start menu, choose All Programs, and click Windows Update. Keep downloading all the updates marked "Important" until Microsoft slips you a copy of Service Pack 1.
When you're running Windows Vista with at least one of its service packs, follow these steps to upgrade your copy of Windows Vista to Windows 7:
Insert the Windows 7 DVD into your DVD drive and click Run Setup, if necessary. You may also need to click one of Vista's permission screens before Windows 7 begins examining your computer. When the installation program finally comes up for air, click Install Now, and Windows 7 begins installing temporary files.
Choose Go Online to Get the Latest Updates for Installation (Recommended). This step tells Windows 7 to visit Microsoft's Web site and download the latest updates — drivers, patches, and assorted fixes for your particular computer — that help make your installation run as smoothly as possible. (Your computer must remain connected to the Internet for the downloads, of course.)

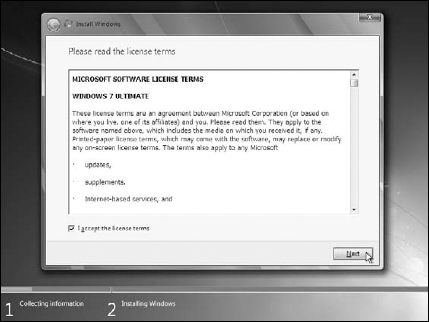
Scour Microsoft's 44-page License Agreement, select the I Accept the License Terms check box, and click Next.
Choose Upgrade, read the consequences, and click Next. Choosing Upgrade preserves your Windows Vista computer's old files, settings, and programs. If you told Windows 7 to go online in Step 2, Windows 7 explains any compatibility problems it finds with your computer's programs. Read the Compatibility Report, if offered, and then click Next to begin the upgrade, a process that could take several hours.

Tip
If the installation program doesn't let you upgrade, any of several things could be wrong: You're trying to upgrade a Windows XP computer, which isn't allowed; you're trying to upgrade a Windows Vista version that doesn't allow upgrades (see Table 18-1), or your copy of Windows Vista doesn't have Service Pack 1, meaning you need to visit Windows Update (
www.windowsupdate.com) to download and install Service Pack 1.Type your product key and click Next. The product key usually lives on a little sticker affixed to the CD's packaging. (If you're reinstalling a version of Windows 7 that came pre-installed on your computer, look for the product key printed on a sticker affixed to your computer's case.)

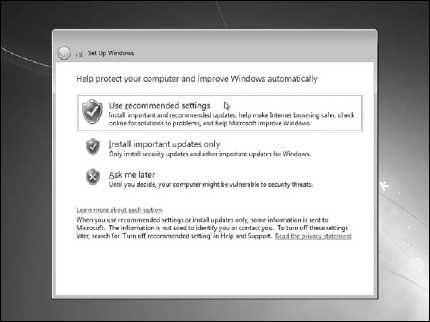
Choose Use Recommended Settings. This allows Windows to visit the Internet to update itself with security patches, warn you of suspicious Web sites, check for troubleshooting information, and send technical information to Microsoft to fine-tune Windows' performance.
Tip
Don't select the Automatically Activate Windows When I'm Online check box. You can do that later when you know Windows 7 works on your computer. (You must enter the product key and activate Windows 7 within 30 days of installation; Windows 7 nags you incessantly as the deadline approaches.) Windows 7's Activation feature takes a snapshot of your computer's parts and links it with Windows 7's serial number, which prevents you from installing that same copy onto another computer.
Confirm the time and date settings and then click Next. Windows 7 usually guesses these correctly.

If you're connected to a network, choose your computer's location. Windows 7 gives you options: Home, Work, or Public. If you choose Home or Work, Windows 7 eases up on the security a bit, letting the computers on the network see each other. If you're in a public setting, though, choose Public. Windows 7 keeps your computer more secure by not letting other computers share any of its files.

After rummaging around inside your computer for a few more minutes, Windows 7 appears on the screen, leaving you at the logon screen. But don't rest yet. After logging on, be sure to run Windows Update to download any security patches and updated drivers issued by Microsoft.
The steps in this task jump around a bit because you can move from Windows XP to Windows 7 in either of two ways. Your path, oddly enough, depends on whether your hard drive has at least 20GB of free space.
If you have enough free space, follow the steps that don't call for reformatting your hard drive. Windows 7 will neatly stash Windows XP, your programs, and your files, into a folder called Windows.old. You can't retrieve those stashed files without some expert help, and Windows XP will no longer run. However, those files will remain for an emergency.
If you don't have 20GB of empty hard drive space, though, take the steps that wipe your hard drive clean, giving Windows 7 enough room to settle in.
Finally, if you're installing Windows 7 onto an empty hard drive, insert your Windows 7 DVD into your computer's disc drive, restart your computer, and jump ahead to Step 4.
Got that? Follow these steps to climb into Windows 7:
Back up your files and settings by running Windows Easy Transfer on your Windows XP computer, a task covered in Chapter 20. For best results, transfer your files and settings to a portable hard drive that's at least as large as the drive in your Windows XP computer. Then unplug the portable drive and set it aside for copying the files back to Windows 7, also covered in Chapter 20.


Rename your Windows XP drive. This step isn't technically necessary, but it helps you identify the correct drive a few steps later. Open the Start menu and choose My Computer. Right-click your C drive, choose Rename, type XP, and press Enter. Finally, hover your mouse pointer over your C drive's icon to see your drive's amount of free space. (The drive in the figure shows 124GB; you need at least 20GB.)
If your drive has less than 20GB of free space, insert the Windows 7 DVD into your DVD drive and restart your computer. Your computer restarts, but begins loading files directly from the Windows 7 DVD. (You may have to press a key to tell your computer to load from the DVD drive rather than the hard drive.) Then go to Step 4. If your drive has more than 20GB of free space, insert the Windows 7 DVD into your DVD drive and choose Install Now. Your computer begins installing temporary files. Then, choose Go Online to Get the Latest Updates for Installation (Recommended). Finally, select the I Accept the License Terms check box, and click Next. Then jump to Step 7.

Click Next to tell the program to install everything in English, including menu language, keyboard layout, and currency symbols.

Click the Install Now button to tell Windows to begin copying the DVD's files to your hard drive.

Read the License Agreement, select the I Accept the License Terms check box, and click Next.

Choose Custom (Advanced) instead of the Upgrade option, and the program shows you a window listing your computer's partitions and/or drives. (You can't upgrade from Windows XP, so the Upgrade option doesn't work.)

If your hard drive didn't have at least 20GB of free space, go to Step 9. Otherwise, click your Windows XP drive. (If you see several drives listed, your Windows XP drive will have the letters "XP" listed somewhere in its name.) Your next move depends on your drive's size, which you measured in Step 3. If your hard drive had at least 20GB of free space, simply click Next. Windows 7 installs itself over Windows XP, saving your computer's old files in a folder called
Windows.old. Now jump to Step 11.
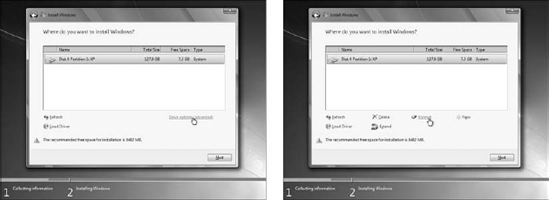
Click Drive Options (Advanced) (left). Then click Format (right), and click OK to approve the format process. Then click Next. Regardless of which path you choose, the click of the Next button tells Windows 7 to install itself on your old Windows XP drive, a process that consumes about 10 to 30 minutes on most computers.
If you reformatted your hard drive in Step 9, Windows now asks you to choose your Country, Time and Currency, and keyboard layout. (Because you reformatted your hard drive, you weren't allowed to do this in Step 4.)
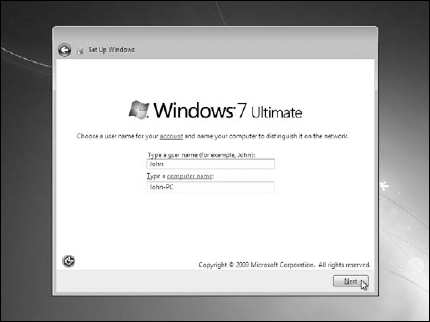
Enter your username and a name for your computer, and click Next. Feel free to type in the same username and computer name as you did on your old computer.
Warning
Clicking Format completely erases your copy of Windows XP and all of your information on that partition. There's no going back after you finish Step 9, so make sure you've backed up your Windows XP files in Step 1.
Type and retype a password, then type in a password hint, and then click Next. The password hint should be a phrase that reminds you of your password but doesn't give it away. For example, if your password is the name of your elementary school, the password hint could be, "My first elementary school."

Jump to Step 5 in the preceding task, "Upgrading from Windows Vista to Windows 7." From here onward, the remaining installation steps are identical to the closing steps in that section.
Small notebook computers known as netbooks usually come with Windows 7 Starter edition — a stripped-down version of Windows 7 lacking the features found in more expensive versions. For example, Windows 7 Starter edition won't let you change the desktop wallpaper, it limits the number of programs you can run simultaneously, and it lacks the fancier graphics found in other Windows versions. There's no Media Center for watching and recording television, either.
If you tire of Windows 7 Starter version's restrictions, you can upgrade to a better version through the built-in Windows Anytime Upgrade program. By entering your credit card number and choosing a better Windows version, your netbook wakes up with the upgraded version of Windows already installed. You don't need to reinstall your programs, nor retrieve your files from a backup: They're all still there.

Follow these steps to upgrade your netbook from Windows 7 Starter to a more powerful version of Windows 7:
Click the Start menu and choose Windows Anytime Upgrade. The Windows Anytime Upgrade window appears, listing your current Windows version in its top-right corner. If you bought an Anytime Upgrade key in a retail store (or online from Amazon), choose Enter an Upgrade Key, type in your key, and jump to Step 6. Otherwise, move to Step 2.
Choose the option labeled Go Online to Choose the Edition of Windows 7 That's Best For You. The program's Choose Edition window lists the three versions of Windows you may upgrade to: Windows 7 Home Premium, Professional, or Ultimate.

In the Choose Edition window, click the Buy button beneath the version you want to buy.

In the Billing window, fill out the online form with your billing name, address, and e-mail address. Click the Next button.

In the Payment window, enter your credit card type, number, expiration date, and security code. Then click the Next button. The program charges your credit card, and assigns you a key that lets you upgrade to the newer version.

In the Confirmation window, click the I Accept button. Because you're basically installing a new version of Windows, you need to agree to Microsoft's zillion-page licensing agreement.

Save any work you have in progress, close all your open programs, and click the Upgrade button to begin the upgrade process. After ten minutes to a half hour, depending on your particular computer, Windows 7 returns to the screen wearing the clothes of its new version.
