
Topics and tasks in this chapter
Adding a sound card
Plugging the right cable into the right jack
Adding a sound box
Connecting your computer's sound to your home stereo
Routing sound through an HDMI cable
Years ago, computers simply beeped when you turned them on. A few early games managed to strangle the computer's little speaker into making squawking noises. Engineers eventually created sound cards: circuit-filled gadgets that plug inside your computer to add music and explosions to computer games. A few years later, the cards grew sophisticated enough to power speaker-filled home theaters.
Today, however, sound cards are slowly fading away. What once took a large circuit-filled card now lives on a single chip built into many computers' motherboards.
Some folks still shell out the cash for the higher-quality sound available only through an add-on card. Gamers still buy sound cards, for example, as do musicians, who turn their computers into full-fledged recording studios.
This chapter explains how to upgrade the sound on your computer, laptop, or netbook; plug the right cables into the right spots; and route the sound to your computer's speakers or to your home stereo.
Today, nearly every computer, from netbooks to desktops, includes a ⅛-inch stereo speaker jack, and a ⅛-inch microphone jack. Plug in your headphones or a small microphone, and you're ready to hear music or record your own podcasts.
But when you're looking for more quality or volume, you can upgrade your computer's sound in either of two ways: Plug in a USB sound device, or slide a sound card into a slot inside your computer.
Every desktop computer comes with both USB ports and either a PCI or PCI-Express 1x slot. (The first task in this chapter lets you know whether you have one or both of those two slots.) The small size of laptops and netbooks, by contrast, limits them to USB port add-ons. Still, that's hardly a concern, with the wide variety of USB sound options available.
So, when it comes to sound, your biggest decision is really how much to spend. These items influence the price the most:
Line Out: Even the most basic sound card comes with a Line Out jack, so you won't need to pay extra for this perk.
Line In: All sound cards include a Line In jack. Built to accept amplified sounds, this ⅛-inch stereo jack lets your PC record music that comes from a small radio, tape recorder, mixing board, or an amplifier's Line Out jack.
¼-inch jacks: Those tiny ⅛-inch stereo ports work fine for amateur work. But professionals use larger, ¼-inch jacks that aren't as prone to damage. Add in the higher-quality circuitry found on these cards, and the price increases.
MIDI: MIDI stands for Musical Instrument Digital Interface, a system widely used by musicians. Run a MIDI cable from your music synthesizer's MIDI Out port into your sound card's MIDI In port to record the sounds. Or plug a MIDI cable from your computer's MIDI Out port to your synthesizer's MIDI In port, and your PC can tell your synthesizer what sounds to play.
Dolby 5.1: Stereo normally has two speakers: left and right. Dolby 5.1 stereo builds on that by controlling six separate speakers. You place your normal stereo speakers up front, along with one center speaker for dialogue. Add two rear stereo speakers for sound effects, and a booming subwoofer to shake the room during explosions, and you've created home-theater-level sound.
Subwoofer: The coolest sound cards come with a way to send sound to a subwoofer — a big box with a large speaker that plays the bass rumbles of explosions and drums. Because of their physical size and large magnets, subwoofers cost more than regular speakers.
5.1, 7.1: These numbers refer to the number of speakers. The ".1" part of the number refers to the subwoofer, so a 5.1 system has six speakers: One lives atop the monitor for the center channel, two live on each side of the monitor, a pair sits behind the listener, and a subwoofer shakes the rafters from the room's corner. A 7.1 system works like 5.1, but adds an extra pair of speakers, one on each side of the listener. Many low-cost chips include this, so it's not as expensive as you'd think.
Audio-processing software: Because many PCs already come with built-in sound, audio-processing software is now a rising star. Look for software that lets you easily digitize your old vinyl collection, for example. Some software tricks the ear, making your headphones sound as spacious as a movie theater. Don't be surprised if the software bundled with your device completely replaces Windows 7's built-in sound processing.
Amplified speakers: Most sound cards don't crank out enough power to drive a traditional set of bookshelf speakers. To increase the volume, most computer speakers come with a tiny amplifier hidden inside their box. If your speakers require batteries or an AC adapter for power, they're amplified speakers, which drives up the cost. Also, to hear 7.1 sound you need eight speakers, further upping the price.
Every computer sold in the past ten years comes with PCI slots. Chances are, your PC also has the PCI-Express slots preferred by some new sound cards. Follow these steps to locate one or both of those slots inside your computer so that you know exactly which sound cards will work inside your PC. Then proceed to install your new sound card into the correct slot.
To install a sound card, follow these steps:
Turn off your PC, unplug it, and remove your computer's case, as described in this book's Cheat Sheet, downloadable from
www.dummies.com/cheatsheet/upgradingandfixingcomputersdiy.Find the slots for your sound card — the row of parallel slots inside your PC. The tiniest slots, about an inch long, are PCI-Express 1x slots. The adjacent slots, about three times as long, are usually PCI slots. The longest slot is probably a PCI-Express 16x slot, almost always reserved for video cards, which I cover in Chapter 9.

Tip
Take a digital photo of the inside of your computer before taking things apart or replacing them. You can always turn to the photo for later reference.
Tip
If you find both types of slots, you're exceptionally lucky: You can install a sound card built for either PCI slots or PCI-Express 1x slots, and you can install USB options, as well. No little PCI-Express 1x slots in your PC? Then you're limited to PCI slot cards or USB add-ons. Also, if you have two compatible slots, you can insert the card into either of them. You don't need to fill the slots in any particular order, just make sure the PCI card goes into a PCI slot, and the PCI-Express 1x card goes into a PCI-Express 1x slot.
If you're replacing your old sound card, find and remove the old card. To find it, look at the back of your computer for a row of ⅛-inch jacks. (Your speaker cable plugs into one of them.) Those jacks live on the back of your old sound card. Remove the single screw holding that card in place, and then lift the card up and out of its slot. If those jacks aren't in a long row, then the jacks are built into your computer's motherboard. (Don't worry about it; Windows lets you choose to use your newly installed sound card, instead.)
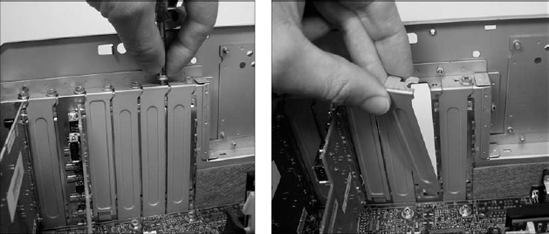
If you're placing a new card in an empty slot, remove the empty slot's metal backplate by removing the single screw that holds the backplate in place. Then lift out the little plate. (Save the screw, as you need it to secure the new sound card in place.)
Push the card into any empty slot, either PCI-Express 1x or PCI. Hold the card by its edges and position it over the appropriate empty slot, either PCI or PCI-Express 1x. The edge with the shiny metal bracket faces toward the back of your computer. Line up the tabs and notches on the card's bottom edge with the notches in the slot. Push the card slowly into the slot. You may need to rock the card back and forth gently. When the card pops in, you can feel it come to rest. Don't force it!

Tip
If the screw accidentally drops into your PC, pick up your computer and shake it until the screw falls out.
Secure the card in the slot with the screw you removed in Step 3 or 4.

Plug the computer's power cord back into the wall and PC, turn on your PC. Windows usually recognizes a newly installed card, displays a message saying it recognizes the new device, and automatically sets the card up to work correctly. If something goes wrong, install the software that came with your card. No software? Then head for Chapter 17 for tips about installing drivers. If everything's working, however, put your PC's cover back on.
Tip
Whenever you install a new sound card or any other card, visit the manufacturer's Web site. Find the site's Support or Customer Service section, and then download and install the latest drivers for that particular model and your version of Windows. Card manufacturers constantly update their drivers and software to fix bugs.
Most sound cards offer a long row of almost identical ⅛-inch jacks for plugging in your speakers, microphones, and other goodies. How do you know what plugs in where? If you're lucky, your computer comes with a little label explaining the purpose of each jack. If you're not lucky, follow these steps:
Examine the colors of each jack, and look for tiny lettering. Then consult Table 8-1 to see which cables plug into which colored jack:
Plug the appropriate cable into the appropriately-colored-and-labeled jack. (A flashlight often helps.) Be sure your speakers are turned way down before plugging in any cables. Then, slowly turn up the volume to make sure you've plugged the right cable into the right spot.
Table 8.1. Deciphering a Sound Jack's Color-Coding
The Jack's Color | What Usually Plugs Into It |
|---|---|
Pink | Microphone |
Blue | Line Input (iPod, VCR, tape deck, or other unamplified source) |
Green | Stereo speakers (two front speakers or headphones) |
Black | Stereo speakers (two rear speakers) |
Silver | Stereo speakers (two side speakers) |
Orange | Center speaker and subwoofer |
A sound box is any sound-related item that plugs into a USB port. It can be as simple as a tiny USB plug with a headphone and microphone jack — a handy solution to a laptop with a broken headphone or microphone jack. Or it can be a desk-sized home studio for making professional recordings.
Prices range from $20 for a USB flash drive-sized model to $500 for home theater models. Plan on spending between $100 to $200 for a good one.
Follow these steps to install a sound box to a PC or laptop:
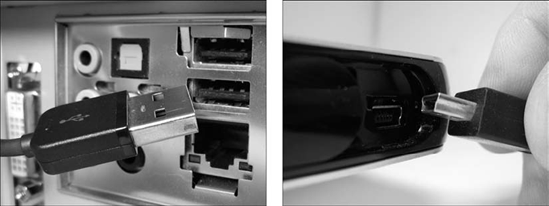
Plug the USB cable into the USB ports of both the sound box and your computer or laptop. (Some tiny laptop adapters plug right into the USB port without a cable.) Some sound boxes require power from a wall outlet.
Install the sound box's software. Most sound boxes come with excellent software, but manufacturers also dump borderline-useful software onto your hard drive — trial versions of software with rapid expiration dates, for example. Be prepared for that bit of rudeness with a post-installation trip to the Control Panel's Uninstall a Program area to remove any unwanted software.
Connect your gadgets to the sound box. Many sound boxes come with only one cable: A USB cable for plugging into your PC. That means you'll have to buy cables for everything else you want to connect to the sound box: speaker cables, a microphone, optical cables for hooking up to a surround sound system, and similar items. Now's the time to make a trip to RadioShack or an office supply store.
Tip
Some sound cards and boxes add their own icon to the Control Panel. If you spot a Control Panel icon named after either your card or its manufacturer, open it with a double-click. It usually offers many more options than Windows' standard settings area.
To hear your PC or laptop at its best, hook it up to a home stereo. There's just no comparison in sound. To hear how good your PC's sound can be, spend less than ten dollars on a cable and try it yourself. (No, you don't need those extraordinarily expensive cables sold at stereo stores. Do your shopping at computer stores or online, instead.)
If you're connecting your sound to a home theater system and want surround sound through five speakers and a subwoofer, flip ahead to Chapter 11, where I explain how to hook up a surround sound system.
But if you're connecting your PC through an amplifier to a set of stereo speakers, follow these steps:

Buy a ⅛-inch stereo plug to stereo RCA port cable. This handy cable plugs into your sound card's ⅛-inch jack and offers two handy RCA ports on its other end, one for each stereo channel. Plug the cable's ⅛-inch jack into your computer's headphone or speaker port.
Tip
This same handy cable also lets you plug your iPod and most other portable music players into your home stereo, as well. Just unplug it from the back of your PC and plug it into your iPod or music player. Plug it back into your PC when you're through.
Connect the stereo audio cable's two RCA connectors to your stereo's two Line In ports. If your stereo lacks a free pair of Line In jacks, connect the cable to any other jacks designed to accept sound: a CD or DVD player, for instance.

Set your stereo's front sound input to Line In. Most stereos let you hear sound from a variety of gadgets: CD/DVD players, radios, digital video recorders like TiVO, or record players. To hear your PC, turn the stereo's input to Line In — or the name of the jack you've plugged the cable into in Step 2.
Adjust the volume. Play music through your PC at a low volume, and then slowly turn up the volume on your stereo. You'll probably want to control the volume at your PC because that's within reach. So turn the volume up on your stereo, and leave your PC set fairly low. Then, as you turn up the volume on your PC, your stereo will grow louder, as well. Slowly tweak the volume settings until you find the right mix. If the PC's too loud and the stereo's too low, you'll hear distortion. If the PC's too low and the stereo's too loud, you'll blast your ears when you turn up your PC's sound.
Note
The red jack connects to the stereo's right channel. The other jack (usually white) connects to the left channel.
Follow this rarely undertaken task only if all three of these conditions are met:
Your monitor (which might double as your TV set) includes built-in speakers, and you want to listen to sound through them.
Your monitor connects to your video card through an HDMI cable.
You want to route the sound through the HDMI cable rather than through a separate sound cable.
If you meet those narrow guidelines, follow these steps to route your sound through your video card's HDMI cable, into your monitor, out of your monitor's built-in speakers.
Turn off your PC, unplug it, and remove your computer's case, as described in this book's Cheat Sheet, downloadable from
www.dummies.com/cheatsheet/upgradingandfixingcomputersdiy.Locate the S/PDIF (Sony/Philips Digital Interconnect Format) pins that carry sound from your sound card or motherboard. Then slide one end of the jumper cable onto the two pins. And just where are these "S/PDIF pins"? Well, sometimes they're labeled with tiny print on the circuit board, right next to the connector. But if they're not labeled, you'll have to pull out the manual, unfortunately. Don't have the manual? You can almost always download the manual online from the manufacturer, described in Chapter 21.


Slide the other end of the jumper cable onto the S/PDIF pins on your video card. Secure the jumper cable with a twist tie to keep it from being caught in any nearby fans.
Replace your computer's case and turn on your computer. You may have to adjust the volume on your monitor to hear the newly flowing sound running through the HDMI cable.