
CHAPTER 36. Windows NT Domains
SOME OF THE MAIN TOPICS IN THIS CHAPTER ARE
Strategies to Minimize Logon Problems 683
The Windows NT domain is a collection of users and resources. It is the primary unit of user and resource administration. Administrators in any particular domain can control the addition or modification of user accounts in their domain and can control which resources any user can access, along with the type of access. To begin to understand the logon process under Windows NT, you should first become cognizant of how users and security information is organized into user groups and domains and how these interact. Understanding how domains operate in the Windows NT environment makes it easier for you to plan an integration with, or upgrade to, Windows 2000 Server or Windows Server 2003. When you upgrade your network to include only Windows 2000 and 2003 computers, you’ll find that instead of primary and backup domain controllers, you’ll have only domain controllers (that are neither primary nor backup), which are essentially peers on the network. It is important to understand how primary and backup domain controllers work if you plan to keep Windows NT, Windows 2000, and 2003 computers all in the same network.
In this chapter we examine the tools an administrator can use to manage users of a Windows NT 4.0 server. In the next chapter we look at managing users of Windows 2000/Windows 2003 servers using the Microsoft Management Console (MMC) utility. As a prerequisite to the next chapter, you might want to first read Chapter 30, “Using the Active Directory.”
Note
Windows Server 2003 and Windows XP Professional have both been available as a replacement for Windows NT 4.0 as well as Windows 2000. However, the basic concepts of the Windows domain are important to understand, whether or not your network contains Windows NT servers. These domains were incorporated into the Windows 2003 Active Directory as container objects. The trust relationships that you have to establish manually, as described in this chapter, are now transitive and automatic in the Active Directory. Yet, for those still using Windows NT 4.0, as well as those who have upgraded to Windows 2000 or Windows Server 2003, the concepts covered in this chapter can be useful. If you are still using Windows NT 4.0 domains, consider this chapter to be a guide to managing those domains. If you have already upgraded to the Active Directory, you should read this chapter to understand how domains have changed in the Active Directory, as well as to understand how to manage Windows NT 4.0 domains in your directory if you have a mixed-mode network that contains both Windows NT 4.0 domains and Windows 2000/Windows Server 2003 domain container objects.
Windows NT 4.0 has had several years to settle down. Although Windows NT 4.0 is a stable platform that has provided reliable operation over the years, the lack of ongoing support from Microsoft means that, as time passes, NT 4.0-based networks can become increasingly vulnerable to security threats. As of January 1, 2007, Microsoft will no longer provide any online support for Windows NT 4.0. Given the constant barrage of threats against networks of all sizes, it’s time to move to Windows Server 2003 or to a well-supported Linux distribution to assure ongoing support for new technologies and security threats.
Tip
If you are not yet considering a move away from Windows NT 4.0 Server domains, you might want to review the availability and support schedule published at www.microsoft.com/ntserver/ProductInfo/Availability/Retiring.asp.
Upgrading to Windows 2000/2003 can be expensive from both a hardware and a software point of view. Planning the namespace for the Active Directory, used in Windows 2000 and Windows Server 2003, can be a complex task as well. A carefully managed Windows NT 4.0 network can continue to serve you for a few more years, but availability and support are dwindling. It would be a good idea to start planning your migration strategy early, because an adequate Active Directory model is much harder to design and implement than an adequate Windows NT 4.0 domain.
This chapter will walk you through the Windows NT 4.0 domain management utilities. The next chapter, Chapter 37, “Windows 2000 and Windows Server 2003 User and Computer Management Utilities,” will introduce you to the new Microsoft Management Console (MMC), which is a consistent interface used to manage many aspects of Windows 2000/2003 (as well as the client operating system Windows XP Professional). You will also learn in that chapter how to manage users and user groups under Windows 2000.
Before you read that chapter, however, explore the concepts in this chapter so that you will better understand what a domain is. In Chapter 37, you will then find it easier to understand how these domains are incorporated into the Active Directory.
Workgroups and Domains
Let’s step back even farther in time to find out how earlier versions of Windows provided for authentication and access controls before the concept of the domain was created.
In many ways, a domain is similar to a Windows 3.1 workgroup, but with one major exception: The domain has a single, centralized security accounts manager (SAM) database that holds all security information for the domain. In a workgroup, each computer in the network has its own security database, and the user of that computer can set passwords on resources that the computer provides to the network. Whereas a domain provides for centralized administration of the network’s resources and users, the workgroup provides a highly decentralized, peer-to-peer networking model.
The disadvantages to the workgroup method include not only the decentralized management functions, but also the ways in which the workgroup method impacts the end user. For example, to access a resource on another computer in a workgroup, the user needs to know the password associated with that share-level resource. Because a different person can potentially manage each computer or workstation, you often need to know as many different passwords as you have resources to which you need to connect. Keeping track of multiple passwords usually leads to lax security because you must write them all down so that you don’t forget them.
In a domain the administrator is in charge of the security policy for the entire domain. Users need only a single username and password to log on to the network and access resources throughout the domain. There are limits, however, to what a single domain can do in a network. As the network grows in size, whether it is in users, resources, or geographical size, using a single security database can have some drawbacks. Specific computers are designated to be domain controllers. These computers are the repositories of the security database—the SAM. This database contains data for four types of security objects, or accounts:
![]() User accounts
User accounts
![]() Computer accounts
Computer accounts
![]() Global group accounts
Global group accounts
![]() Local group accounts
Local group accounts
As you can see, in addition to keeping track of usernames, passwords, and other information about the users on the network, the SAM also keeps track of which computers have joined the domain and which user groups have been defined, along with the members of each group. Note that only Windows NT computers are tracked in the database. Users on other platforms, such as Windows 95/98/Me, can log on to a Windows NT domain, but their computers will not have computer accounts in the domain. Windows NT computers actually join the domain when the administrator creates a computer account for that workstation in the SAM.
The number of accounts that a single Windows NT 4.0 domain can accommodate, according to Microsoft figures, is around 40,000 due mostly to the maximum size to which the SAM database can grow. This figure can vary, depending on the information you store in the SAM. For example, you might have a lot of computer and user accounts but only a few trust relationships stored in the SAM. Or you might have a large number of trust relationships stored in the SAM, and this would mean you would have less room for computer and user accounts. You would need more than one domain for a larger network.
Note
There are actually two places where you can find the SAM for Windows NT. The domain controllers hold copies of the domain database, and this is used to validate domain logons and grant users the ability to access resources in the domain. However, any Windows NT Server or Windows NT Workstation computer that is not a domain controller also has its own local security database, much like a Windows for Workgroups computer. The local user can create individual user accounts on the local computer and can grant access to resources on the computer to these users. However, users who are validated by a computer’s local database cannot use this logon to access domain resources, unless their username/password on the local computer matches one on the Windows NT computer, as long as the administrator creates an account on the Windows NT computer with the same name/password. This is called pass-through authentication. Additionally, when a Windows NT computer joins a domain, the domain administrator’s global group is, by default, placed into the local domain administrator’s group, giving the domain administrators the ability to control security functions on the local computer.
Of course, it will probably be a rare thing to find a domain that actually has 40,000 user or computer accounts. When a network grows this large, a solution needs to be found that provides a convenient method of managing users and controlling access to network resources.
The solution is to create multiple domains in the network and allow them to interact with each other so that users can access resources anywhere on the network, while still using only a single username and password to log on. In Windows NT this is done using a concept called a trust relationship between domains.
Interdomain Trust Relationships
To support the concept of one username and one password throughout a collection of domains, the trust relationship is used to allow domains to share information contained in the security database. Without a trust relationship you would have to create a new user account in the database of each domain to which a user would need to have access. This would be sort of like the workgroup model, only on a larger scale using domains instead of individual computers.
When a user account is created in a domain, it is assigned a unique identifier, called an SID, which stands for security identification descriptor. If you create several accounts in different domains for a user, with the same logon username and password, the SID will not be the same from one domain to another. The user’s logon name is ordinary text, which is used for the convenience of humans who must remember it. The SID is the actual method that the network uses when identifying a particular user (and to identify the domain, which holds the user account) and deciphering what access that user is allowed, based on Access Control Lists (ACLs).
![]() For more information on ACLs, see Chapter 39, “Rights and Permissions.”
For more information on ACLs, see Chapter 39, “Rights and Permissions.”
Because there should be only one username and password for any user throughout the network, no matter how many domains are created, a method is needed to allow a domain to recognize that a user has already been validated in another domain. If this can be communicated between domains, it becomes possible to simply trust a user if a domain trusts the domain from which the user comes.
A trust relationship is created when an administrator from one domain uses the User Manager for Domains utility to create a specific relationship with another domain. For example, if domain A has a trust relationship whereby it trusts the users in domain B, then the administrator of domain A can grant access to resources in domain A to users who reside in domain B. A trust relationship, however, is a one-way street. So this example does not give users in domain A access to resources in domain B.
Note
A trust relationship does not automatically give users in one domain access to resources in another domain. Just as users in a domain are granted access to resources by their domain administrators, users from trusted domains must be granted the necessary access rights and privileges in a trusting domain before they can access resources. The trust relationship that is set up between two domains is merely the prerequisite that allows users to be granted access to resources in another domain.
A trust relationship enables the Windows NT LSA (local security authority) to use pass-through authentication to validate a user. When a user from a trusted domain tries to access a resource, the netlogon service contacts the domain in which the user account resides to confirm that the user account is valid. The LSA receives copies of the user’s SIDs (the account SID and the SIDs for any global groups of which the account is a member). After this pass-through authentication process, the LSA has all the information it needs in order to evaluate the user against the Access Control List entries that might be present in an ACL for a particular resource.
For users in both domains to have access to resources in both domains, the administrators of each domain must create two trust relationships.
Creating a Trust Relationship
The domain administrator uses the User Manager for Domains utility to create trust relationships. To start the utility, select Start, Programs, Administrative Tools, and finally User Manager for Domains. In Figure 36.1 you can see the utility as it looks when it is first started, showing a list of user accounts in the domain at the top and a list of user groups at the bottom.
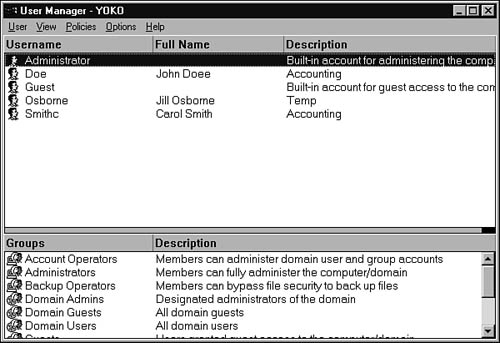
Figure 36.1. The User Manager for Domains is used to create a trust relationship.
To create a trust relationship the administrator in both domains will have to run the utility and enter the other domain’s name into the list of domains it trusts or is trusted by. To bring up the dialog box that is used to accomplish this task, select the Policies menu at the top of the utility and select Trust Relationships (see Figure 36.2).
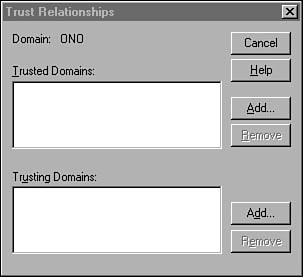
Figure 36.2. The Trust Relationships dialog box is used to create a trust relationship with another domain.
The order in which a trust relationship is established is important. The administrator of the domain that will be trusted should run the utility first to add the name of the domain that will trust his domain. To do this, click the Add button next to the Trusting Domains list. The Add Trusted Domain dialog box appears. Here you enter the name of the domain that will trust your domain, and an optional password, and click OK.
The administrator of the domain that will trust this domain must perform the same function, this time clicking the Add button next to the Trusted Domains list. In the Add Trusted Domain dialog box, the administrator will put the name of the domain it will trust and then the same password that was entered by the administrator of the trusted domain.
Although the password is optional, you should always use one. The password is not used later by domain controllers that are performing pass-through authentication. It is used only to verify both ends of this process of creating the trust relationship. After the trust relationship has been established, the domain controllers will use SID information to validate each other.
After the trusting domain has entered the correct password, a message is displayed indicating that the trust relationship was set up. Each administrator then sees the other domain listed in the trusted or trusting section of the Trust Relationships dialog box. If you have a network that has multiple domains and a large number of administrators, from a security viewpoint, it is a good idea to regularly check this dialog box to be sure that the trusts you expect to exist are there and that no others have been added. Remember that a trust relationship gives a user with administrative privileges the capability to grant rights and privileges to users outside your domain. This is a very powerful capability.
Again, remember that each trust relationship under Windows NT 4.0 is unidirectional. If you want both domains to allow users from the other domain to access resources in each domain, you will have to repeat the process and create two trust relationships between the two domains.
When it becomes necessary to remove a trust relationship, all you have to do is select the domain from either the trusted or trusting domains lists in the dialog box and click the Remove button.
Domain Controllers
The domain controller is a computer that holds a copy of the SAM. Domain controllers authenticate users when they log on to the network. In Windows NT there are two kinds of domain controllers:
![]() Primary Domain Controller (PDC)—This type of domain controller is where the master copy of the SAM resides for the domain. Updates to the SAM can be made only on the PDC, which then propagates the changes to the other domain controllers. Because there can be only one master copy of the domain’s SAM, there can be only one PDC in any given domain.
Primary Domain Controller (PDC)—This type of domain controller is where the master copy of the SAM resides for the domain. Updates to the SAM can be made only on the PDC, which then propagates the changes to the other domain controllers. Because there can be only one master copy of the domain’s SAM, there can be only one PDC in any given domain.
![]() Backup Domain Controller (BDC)—This domain controller holds a copy of the SAM and receives updates to this copy via replication from the PDC. A BDC can authenticate users, but changes to the SAM must be done on the PDC. Because the BDC holds a copy of the SAM, there can be multiple BDCs in the network. BDCs are usually used to offload processing from a busy PDC, provide quick network access to the SAM in network segments that are distanced from the PDC, or provide for fault-tolerance so that users can still log on to the network when the PDC becomes unavailable.
Backup Domain Controller (BDC)—This domain controller holds a copy of the SAM and receives updates to this copy via replication from the PDC. A BDC can authenticate users, but changes to the SAM must be done on the PDC. Because the BDC holds a copy of the SAM, there can be multiple BDCs in the network. BDCs are usually used to offload processing from a busy PDC, provide quick network access to the SAM in network segments that are distanced from the PDC, or provide for fault-tolerance so that users can still log on to the network when the PDC becomes unavailable.
Only a Windows NT Server computer can be used to create a domain controller, and this must be done during the initial installation of the operating system. Without a complete reinstallation of the operating system, Windows NT Servers that are installed as ordinary “member servers” cannot be upgraded later to become a PDC. Nor can a domain controller be downgraded to a standard member server without a complete reinstall. Windows NT Workstation computers cannot be used as domain controllers in any fashion. However, a Windows NT Workstation has its own local SAM database that can be used to allow users to log on to the local workstation, but not the network. This can be useful in small networks in which a domain controller is not necessary. However, in such a situation, if a user needs to access resources on more than one workstation, the user must have a user account on each workstation to which it needs access.
Note
Windows 2000 Server (or 2003) does not use the concept of primary and backup domain controllers. Instead, all domain controllers are the same, and they exchange information among themselves. The way in which Windows 2000 enables you to “promote” a server to be a domain controller is discussed in Chapter 37.
All Windows NT computers that participate in a network run a service called the netlogon service. You can see it listed in the Services applet found in the Control Panel. This service is responsible for taking a user’s logon request and communicating with a domain controller to process the logon. It also is the entity that handles synchronization between the PDC and the BDC copies of the SAM database.
Windows NT Domain Models
The single logon principle that is so important in Microsoft networking is enhanced by allowing domains to trust each other’s user base by using trust relationships. However, in a network that contains a large number of domains, it is important to decide on a model to use when establishing trust relationships to make them easy to manage for the particular needs of your environment. Although it would be very easy to create trust relationships among all domains in a large network, that is not the way it’s usually done. Instead, four basic models are often used:
![]() Single domain model
Single domain model
![]() Master domain model
Master domain model
![]() Complete trust domain
Complete trust domain
Deciding on which domain model to use depends on many factors, but the basic things to consider are the size of the network (in users) and the organization of the business, along with management and geographical factors.
The Single Domain Model
For a small organization that has a centralized management team for its network, a single domain might be sufficient. In this model, all the user accounts are created in a single domain, along with all the network resources, such as file and print services. There are no interdomain trust relationships to worry about because there is only one domain.
In this model there is only one PDC, but one or more BDCs are typically created for fault-tolerance purposes. If users are located at different sites geographically, you can use this model and put a BDC at each site to reduce network traffic associated with logons, allowing users to be validated by the local BDC. Having a BDC at each site also enables users to continue working if the network link between them and the site that has the PDC goes down.
The Master Domain Model
In a large enterprise it might be desirable to have one central database that contains all the user accounts, while maintaining other departmentalized databases that hold security information about resources in the network. In the master domain model one domain is designated to be the master domain, and all user accounts are created in this domain. Additional resource domains are then created, which do not have to contain any user accounts other than those used for the local administrators to manage resources. Because of the concept of trust relationships, you don’t even have to create accounts for these administrators in their own domains. By using global and local groups, it is possible to give a user account from the master domain the capability to administer another domain by placing that user account in a special Domain Admins user group.
In the resource domains, file and print shares are created and can be managed locally in the resource domain by the domain’s administrators. User accounts can be managed from a central location—by administrators in the master domain. In this model each resource domain has a one-way trust relationship with the master domain whereby it trusts the users in the master domain, as shown in Figure 36.3.
Figure 36.3. Resource domains trust the users validated by the master domain in this model.
This type of domain model is ideal if you need a central place to manage user accounts but want to let local administrators take responsibility for managing resources in their area of the network. In a large company you might want the personnel or human resources department to be responsible for creating accounts for new employees and deleting accounts when users leave the company. The accounting department then can take charge of managing printers and other resources in their own domain, while those in charge of the warehouse can similarly be responsible for granting access to resources in their domain.
The Multiple Master Domain Model
The multiple master domain model is similar to the master domain model, but in this case there can be more than one master domain. Resource management is still decentralized by allowing resource domain administrators to control local resources, but instead of one master domain to hold all user accounts, there are several. In Figure 36.4 you can see an example of this model in which users in the United States are managed by one domain, while users in the United Kingdom are managed by a separate master domain.
Figure 36.4. In the multiple master domain model there can be more than one master domain to hold user accounts.
This model is the most scalable domain mode because you can just add another master domain if you need to add more users when the existing master domains become highly populated, or when a new geographical area is brought into the company. In fact, if you have a large network that already has more than 40,000 user accounts and you want some degree of centralized user administration, then the multiple master domain model is the best method to use. It provides for local administration of resources but also allows you to separate users into large administrative groups for management purposes.
In an enterprise that has a global network, this model can be used to allow large divisions of a company to control users located in their area. User account management is still centralized, but into several large groups that each division manages. If trust relationships are set up correctly, a user still needs only one logon to be granted access to resources that exist anywhere throughout a worldwide global network.
Another reason you might choose the multiple master domain model over the master domain model is to minimize network replication traffic. Remember that updates to the SAM are made to the database residing on the PDC, and are then sent to BDCs during the replication process. If you have a user base that experiences frequent changes, replication traffic on a global scale can consume valuable network bandwidth. By having several master domains, one for each location, you reduce the bandwidth consumption because replication occurs only within each domain.
The Complete Trust Model
This domain model provides for decentralized user account management and decentralized resource management. Each domain in the network has a two-way trust relationship with every other domain in the network, as shown in Figure 36.5. Administrators can still manage their own local resources but also can manage their own user database. This method requires good communication skills among domain administrators to make sure that users are properly granted access to the resources in other domains.
Figure 36.5. The complete trust model provides the highest degree of decentralized management in a large network.
Although this model has the greatest chance of causing confusion when one is trying to troubleshoot logon or resource access problems, it can be a good method to choose under some circumstances. For example, in the highly competitive business environment of the past decade, in which growth is achieved by acquisition, this model can be used to quickly join networks when companies merge. This assumes, of course, that both business entities are using a Microsoft Windows NT network.
Windows NT User Groups
To make assigning access rights and privileges easier to manage, Windows NT enables you to group users together. Rather than spending an inordinate amount of time granting each user the right to access a particular file share, for example, you can simply put multiple users into a user group and grant or revoke the right from the group. User groups can be either a local group that exists on a particular computer, or domain-wide local or global groups.
Local groups in a particular server are used to allow the local administrator of a member server to control access to local resources. For example, when a member server (a Windows NT Server computer that is not a domain controller) joins a domain, the domain’s global group called Domain Admins is placed into the server’s local group called Administrators. It is through this mechanism that the domain administrators are granted the capability to administer the local server. Of course, it is also quite possible for the user of the member server to use the server’s built-in Administrator account to remove the Domain Admins global group from the local administrators group, and thereby deny the domain administrators their access to administer resources on the member server.
Local domain groups function in much the same way, but on a domain-wide scale. When a trust relationship is created between two domains, users in one domain do not automatically gain access rights to resources in the trusting domain. Instead, the administrator in the trusting domain needs to grant each user the needed access privilege. Because granting access rights on a user-by-user basis can be quite tedious in a large network, groups can be used for that purpose as well.
Local domain groups can contain users from the domain in which the group is created, and users or global groups from other trusted domains. Domain administrators can grant or deny access to domain resources by granting or denying access to the local domain groups.
Global user groups contain only users or groups from a single domain. Global user groups are used to “export” users to another trusting domain as a single unit. For example, the domain administrator of a trusting domain can place global groups from trusted domains into a local domain group and grant or deny access to domain resources by the local domain group.
Built-In User Groups
To make things easier when you first set up a Windows NT computer, several local and global groups are created by default. If the computer is a Windows NT Server computer operating as a domain controller, you will find these domain local groups:
![]() Administrators
Administrators
![]() Backup Operators
Backup Operators
![]() Account Operators
Account Operators
![]() Guests
Guests
![]() Print Operators
Print Operators
![]() Replicator
Replicator
![]() Server Operators
Server Operators
![]() Users
Users
The functions of most of these groups are fairly obvious at first glance. The Administrators group is a local group that is granted rights to manage the domain. The Backup Operators group can be used to enable users to perform backups, bypassing normal security restrictions for this purpose. The Print Operators group has the necessary privileges to manage printers and print queues for the domain, and so on. The Users local group is used to group users on the particular server, whereas the Domain Users group usually contains all users in the domain. If you look at the membership of the server’s Users group, you can see that the Domain Users global group is a member of the group, which is how ordinary domain users are able to get limited access rights to the server.
If the server is a domain controller, you also will see three built-in global groups:
![]() Domain Admins
Domain Admins
![]() Domain Guests
Domain Guests
![]() Domain Users
Domain Users
Windows NT Workstation computers, along with Windows NT Server computers that are operating as a non-domain controller computer (called a member server) have the following built-in local groups:
![]() Administrators
Administrators
![]() Backup Operators
Backup Operators
![]() Power Users
Power Users
![]() Guests
Guests
![]() Replicator
Replicator
![]() Users
Users
Note
The rights associated with built-in user groups are what give them their functionality. For an in-depth discussion of user rights and the functions that a member of a built-in user group can perform, see Chapter 39.
Creating User Groups
These built-in groups make it easy to set up initial groups of users that can perform standard server or network management tasks. For more specific functions you can create your own groups. To do so, use the User Manager for Domains utility.
First make a list of the functional groups you want to create, based on the resources or type of access you think each group will need. For example, if your domain supports several different business units, such as an accounting department, a research department, and a warehouse, you might want to create three user groups, one for each of these departments. If one group of users, such as the accounting users, needs to be further subdivided into groups with some having more access to confidential data than others, you can create several user groups for that department instead of a single group.
The important point to remember is that by creating groups you will make the job of granting or revoking access rights easier as resources or users on the network change.
To create a group, you need to activate the User menu in the User Manager for Domains, and select either Create New Local Group or Create New Global Group. In Figure 36.6 you can see the dialog box used to create a new local group.
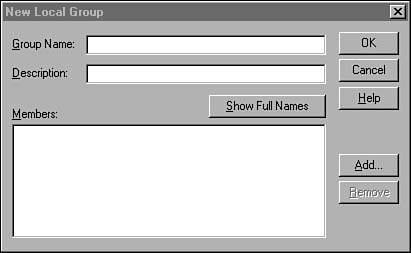
Figure 36.6. To create a new local group, specify the group name and then add members.
After you enter the name of the new group and an optional description, you can click the Add button to bring up the Add Users and Groups dialog box. This dialog box is used for many different functions in the User Manager for Domains when selecting users is required. In Figure 36.7 you can see that all you have to do is select a username or a group name, and then click the Add button to move that name to the Add Names display at the bottom of the dialog box. You can use the Search button to locate names if the list for your network is very large and you don’t want to scroll through the entire list to find the correct name.
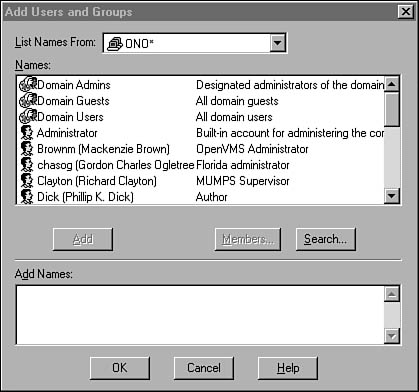
Figure 36.7. Select user or other groups to place into the new local group.
After you have finished selecting users or groups to add to this local group, click the OK button. You are returned to the New Local Group dialog box, and the users or group names that were selected now appear in the Members list at the bottom of the dialog box. Click OK to dismiss this dialog box when you are finished.
If you need to modify group membership later, all you need to do is select the user group from the display on the main window of the User Manager for Domains and then, from the User menu, select Properties. Alternatively, you can simply double-click the group name to bring up the Properties sheet. This display is exactly like the one used when creating the new group except for its title. You can use the Add and Remove buttons to modify group membership.
Special User Groups
Besides the local and global built-in groups that were just described, there are several user groups whose memberships are not assigned by the administrator. These groups are not seen when looking in the list of user groups in the User Manager for Domains. They are, however, seen when you use other utilities, such as the Windows NT Explorer, to grant access to files and directories. These are the groups:
![]() Interactive—Users who are currently logged on locally to the computer.
Interactive—Users who are currently logged on locally to the computer.
![]() Network—Users who are currently logged on to the computer through the network.
Network—Users who are currently logged on to the computer through the network.
![]() Everyone—Just what it says: any interactive or network user on the computer.
Everyone—Just what it says: any interactive or network user on the computer.
![]() System—The operating system itself.
System—The operating system itself.
![]() Creator owner—The user who creates an object, such as a file or directory.
Creator owner—The user who creates an object, such as a file or directory.
Managing User Accounts
On Windows NT Server member servers and Windows NT Workstation computers, the User Manager utility is used to manage the local SAM. In a domain, the utility is similar but is called the User Manager for Domains. This is the tool you use for most user account management in Windows NT. To start the User Manager for Domains, select it from the Administrative Tools folder in the Programs folder.
The User menu in this utility can be used to add, delete, or modify user accounts. To modify an existing account, simply double-click the account name and the Properties dialog box appears (you also can highlight the account and select Properties from the User menu).
To add a new user, select New User from the User menu. The New User dialog box (shown in Figure 36.8) appears. You can enter the user’s logon username here (as many as 20 characters), along with other useful information such as the user’s full name and a description of what the account is used for.
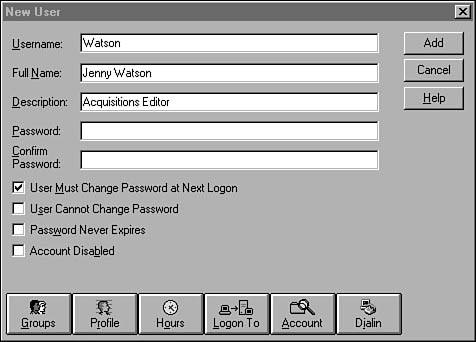
Figure 36.8. Add a new user by specifying a username and other information for the account.
When you enter the password for the user account, you must enter it twice to confirm what you have typed. You can select from the check boxes any of the password options you want to use. If you select User Must Change Password at Next Logon, users will be prompted when they first use the account to create a new password known only to them. You can use this same check box on an existing user’s Properties dialog box when resetting a user password that the user has forgotten. This allows you to reset the password to a new value you can give the user, but still force the user to change the password when using it for the first time.
If you select User Cannot Change Password, the user will be locked out of this function. This function is useful for service accounts, such as for SQL Server, because it precludes anyone from changing the password, which would cause the service to not start on boot.
If you select Password Never Expires, this bypasses the password policy you can set for the domain, which would usually force the user to change the password to a new value on a periodic basis. Finally, you can use the Account Disabled check box to temporarily disable logons for an account when you do not want the account to be accessible but also do not want to delete it.
After you have finished filling in the information for this dialog box, you can click the Add button to add the account, or you can use the buttons at the bottom of the dialog box to bring up additional prompts.
Adding a User to a Group
If you click the Groups button in the New User dialog box, you get the Group Memberships dialog box, shown in Figure 36.9. When an account is first created, it is, by default, a member of the Domain Users local group. You can select other groups from those shown and use the Add button to add the user to the group. You can select a group of which the user is already a member and use the Remove button to remove the user from that group. To specify the primary group to which a user will belong, highlight that group under the Member Of box and click the Set button. When you have finished selecting user groups for this user, click the OK button.
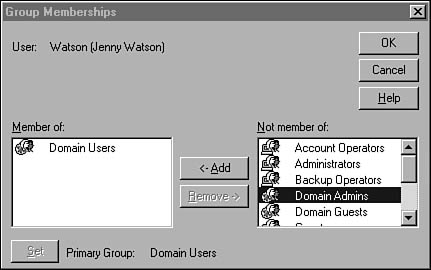
Figure 36.9. The Group Memberships dialog box allows you to control to which groups a user belongs.
User Profiles
You can use the Profile button in the New User dialog box to bring up the User Environment Profile dialog box. Here you can specify a path to the location of the file that contains the user’s profile (desktop and environment settings), as well as the name of a logon script that is executed each time the user logs on to the domain. In Figure 36.10 you can see that this also is where you specify the path to the user’s home directory.

Figure 36.10. The User Environment Profile dialog box allows you to set the user’s profile and home directory.
You also can specify drive letters in the Connect box and then specify a pathname. This will cause the user to be automatically connected to the file shares you specify when the user logs on to the system.
Limiting the Time a User Can Log On
The Hours button in the New User dialog box brings up the Logon Hours dialog box (see Figure 36.11), where you can select the days and hours that a user account can be used.
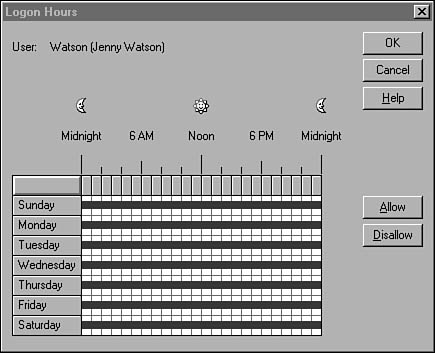
Figure 36.11. In this dialog box specify the hours an account can be used.
In this display you can select one-hour periods by clicking on one or more of them and then using the Allow or Disallow button to specify whether the user can log on during that period. By default, all the boxes representing hours for all days are filled in with a blue color indicating that the user can log on at that time.
Tip
What happens when a user is already logged on and the time changes to a period when they are disallowed? This depends on the settings you make in the Accounts Policy for the domain. You can allow the user to continue working but not make any new network connections, or you can set the policy to force the user off the server when the time changes to a disallowed period.
Limiting Which Workstations a User Can Log On To
The Logon To button in the New User dialog box will bring up the Logon Workstations dialog box (see Figure 36.12), which you can use to specify up to eight workstations to which the user is allowed to log on using this domain account.
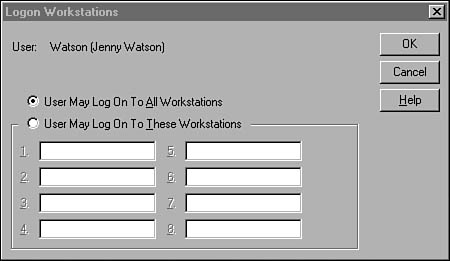
Figure 36.12. The Logon Workstations dialog box can be used to limit the workstations a user can use to log on to the domain.
If you want the user to be able to log on by using any workstation in the domain (the default selection), select the appropriate radio button in this dialog box.
This dialog box can be useful for situations in which security is a high priority. For user accounts that have been given advanced rights and are able to access sensitive data, you might want to restrict their use to computers that are in a particular physical location that can be monitored. For example, the payroll process is usually a very sensitive function in an organization. Not only do you want to prevent unauthorized users from modifying information here, but you also want to keep prying eyes out of information that might cause user embarrassment or discomfort. By limiting the payroll applications to specific user logon accounts and by restricting those accounts to selected workstations, you can make the monitoring process easier and more defined.
Account Information
The Account button in the New User dialog box brings up the Account Information dialog box, shown in Figure 36.13. Here you can specify that an account will never expire, or you can set a date at which time the account will no longer be able to be used for a domain logon.
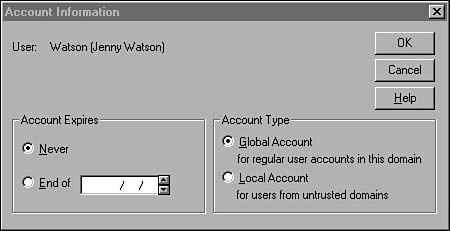
Figure 36.13. The Account Information dialog box can be used to specify the type of account and limit its use.
There are two types of domain accounts, and you can select the type for this account in this dialog box. A global account is the default account for a user in that user’s own home domain. This account can be placed into a global group and exported to another domain to be granted access to resources.
Local groups are more limited. They are used to provide access for a user who is not a member of a trusted domain. This can be used by a user in another Windows NT domain or by a user from another operating-system type. The local account cannot be used to log on locally to a Windows NT computer and is provided so that you can give access through the network. Because the local account is provided so that you can give access to your domain to special-case users, you cannot place local accounts into a global group and export them to another domain.
Allowing Dial-Up Access
If you want the user to be able to dial into the network using the remote access service (RAS), click the Dialin button in the New User dialog box to bring up the Dialin Information dialog box (see Figure 36.14). Here you can select the callback option. Callback means that after a user dials into the network, the server will disconnect the phone and then dial the user’s computer back. This can be used for security purposes or for cost savings.
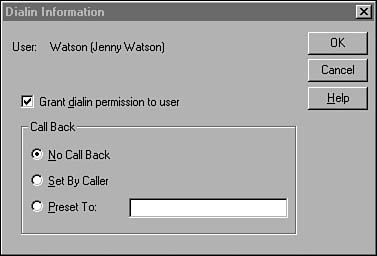
Figure 36.14. The Dialin Information dialog box can be used to control dial-up access to the network for this account.
These are the Call Back options:
![]() No Call Back—This is the most common form, which enables a user to log in using a modem and, after validation, begin working.
No Call Back—This is the most common form, which enables a user to log in using a modem and, after validation, begin working.
![]() Set By Caller—The caller can specify the telephone number that the server will use to perform the callback function.
Set By Caller—The caller can specify the telephone number that the server will use to perform the callback function.
![]() Preset To—The administrator can set the telephone number that will be used for the callback.
Preset To—The administrator can set the telephone number that will be used for the callback.
If security is not a great issue for this user’s account, you can select the No Call Back option. If the user is a mobile user and you want the long-distance charges to be paid by the server’s end of the telephone line, use the function to allow the caller to specify the callback number. If security is an important issue for this account, use the third option so that you can specify the number that will always be called back. This prevents users from other locations from using this account to dial in to your system and establish an RAS session.
Replication Between Domain Controllers
Modifications to the SAM database are always made on the primary domain controller. Periodically, the PDC will check the database to determine whether any changes have been made. The default value for this time interval is 5 minutes. When changes to the database are detected, the PDC will send a message to each BDC informing the BDC that it holds changes that need to be applied to the BDC’s copy of the database. The BDC can then poll the PDC to get the updates. The process is called directory synchronization.
To prevent a large number of BDCs from making synchronization requests at the same time, the PDC staggers the messages it sends out when there are multiple BDCs. By default, the PDC sends the message to only 10 BDCs. When the first 10 BDCs have finished the synchronization process, the PDC sends the message to the next 10 BDCs that need to be informed, and so on.
Full and Partial Synchronization
There are two types of synchronization: full and partial. When a BDC is created during a Windows NT Server installation, one of the first tasks it must perform is to download a copy of the full SAM database. This is an example of full synchronization. When it’s complete, the BDC is able to respond to logon requests from clients.
When changes are made on the PDC, they are not immediately propagated to the domain’s BDCs. Instead, a change log file 64KB in size is used to buffer the modifications. Each change record is stamped with a serial number and a version number. The change log is a circular file. That means that when it becomes full, it simply wraps back on itself, overwriting the oldest record in the file.
When the PDC sends out notifications that changes exist in the database, it does so only to those BDCs that it knows do not have the most recent data. The PDC can do this because it keeps track of the serial numbers of the most recent records updated to each BDC. This partial synchronization prevents unnecessary replication traffic. When a BDC polls the PDC for the changes it needs, it receives only those changes that it has not already gotten during a previous poll, based on the serial number.
A full replication can still occur under this process. For example, a BDC can be taken offline for an extended period. Or the network link between the BDC and the PDC might be unavailable due to a network problem. Again, using the serial numbers of the records it already has, the BDC can determine whether any changes have been overwritten in the PDC’s change log, and it can then request a full synchronization so that it will have a complete copy of the database.
Logon Failures Related to Synchronization
One common function administrators or help-desk personnel perform is that of adding a new user account or changing the password for an account when the user cannot log on. As simple a matter as this might seem, the role played by backup domain controllers can be an issue when this is done in a Windows NT network.
When a password is changed or an account added, it is done on the master copy of the database that resides on the PDC. Remember that the BDC does not immediately receive updates that are made on the SAM. If you add a new account or if you modify a user account, whether it be to change the password or remove a lockout condition, the user who is validated at a remote location by a backup domain controller might not be able to immediately log on because the BDC might not be aware of the change.
You could just tell the user to wait and try again, but this is not the kind of response that builds up trust between users and the help-desk personnel or the administrator. Instead, Windows NT allows you to force the synchronization process to begin. To do this, you must invoke the Server Manager, which is found in the Administrative Tools folder. From the Computer menu select Synchronize Entire Domain. A pop-up dialog box informs you that this process can take a few minutes. Click the Yes button to proceed. The PDC then begins sending out messages to the BDCs, informing them that it is time to synchronize. Windows displays a message informing you that the synchronization process has begun.
After a few minutes, you can check the Event Viewer to find out whether the synchronization process has completed. You should check both the BDC and the PDC for these messages. The Event Viewer utility enables you to connect to another computer to check messages in its log files, so this can be done from one location by the administrator. When synchronization has finished, you can instruct the user to try the new password or account again.
Passwords and Policies
Windows NT enables the administrator to set certain parameters that control passwords and accounts. This is called the account policy for the domain. To view the defaults or make changes, select Account from the Policies menu in the User Manager for Domains utility. The Account Policy dialog box (see Figure 36.15) is displayed.
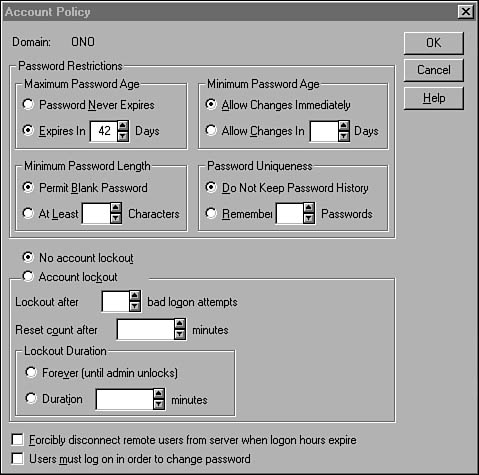
Figure 36.15. The Account Policy dialog box.
As you can see, you can configure various settings here. The values you choose for these parameters should reflect the degree of security you want to enforce at your site. At the same time, you need to balance your concerns with the abilities of your users. For example, if you set a large minimum password size and a low value for the number of days it can be used, users might end up writing down passwords just to keep track of them.
These are the parameters you can configure here:
![]() Minimum Password Age and Maximum Password Age—The Minimum Password Age specifies the number of days that must elapse before a user is allowed to change a password. The Maximum Password Age is the number of days that a password can be used, after which the system will force the user to change it. Both of these parameters can be set to a value ranging from 1 to 999 days.
Minimum Password Age and Maximum Password Age—The Minimum Password Age specifies the number of days that must elapse before a user is allowed to change a password. The Maximum Password Age is the number of days that a password can be used, after which the system will force the user to change it. Both of these parameters can be set to a value ranging from 1 to 999 days.
![]() Minimum Password Length—This is the minimum number of characters that must be used for a password. Too small a value will make it easy for hacker programs to guess a password. Too large a value will make it difficult for users to think up new passwords. This parameter can be set to a value ranging from 1 to 14, or you can permit a blank password (no password), although it is hard to imagine a network where you might want to allow, as a policy for every user in the domain, a blank password.
Minimum Password Length—This is the minimum number of characters that must be used for a password. Too small a value will make it easy for hacker programs to guess a password. Too large a value will make it difficult for users to think up new passwords. This parameter can be set to a value ranging from 1 to 14, or you can permit a blank password (no password), although it is hard to imagine a network where you might want to allow, as a policy for every user in the domain, a blank password.
![]() Password Uniqueness—The system will keep a history list of passwords used by each user and will not allow them to reset their password to one that is still in the list. This prevents users from constantly reusing a few easy-to-remember passwords, which can be bad for security purposes. Set this parameter to a value from 1 to 24. Selecting not to keep a history list is probably not a good idea because many users will take advantage of this option, and eventually someone else will find out what their usual password is.
Password Uniqueness—The system will keep a history list of passwords used by each user and will not allow them to reset their password to one that is still in the list. This prevents users from constantly reusing a few easy-to-remember passwords, which can be bad for security purposes. Set this parameter to a value from 1 to 24. Selecting not to keep a history list is probably not a good idea because many users will take advantage of this option, and eventually someone else will find out what their usual password is.
![]() Account Lockout—You can set up the system so that a user account is “locked out” after a number of failed login attempts. This can be used to prevent an unauthorized user from trying to guess a password for an account, as is done in the brute-force method by many hacker programs that simply go through a dictionary, trying every word until they crack an account. If you set a value for bad logon attempts, you also can use the Reset Count After field to a time value (in minutes). This field specifies the period of time during which the failed logon attempts are counted. The Lockout Duration fields can be used to permanently lock the account until an administrator intervenes, or to set a time in minutes that the account will be disabled. A good idea is to set a small value for the Lockout After parameter (3 to 5 is a good choice), while using a long lockout value. Thirty minutes to an hour will usually suffice to deter unauthorized users.
Account Lockout—You can set up the system so that a user account is “locked out” after a number of failed login attempts. This can be used to prevent an unauthorized user from trying to guess a password for an account, as is done in the brute-force method by many hacker programs that simply go through a dictionary, trying every word until they crack an account. If you set a value for bad logon attempts, you also can use the Reset Count After field to a time value (in minutes). This field specifies the period of time during which the failed logon attempts are counted. The Lockout Duration fields can be used to permanently lock the account until an administrator intervenes, or to set a time in minutes that the account will be disabled. A good idea is to set a small value for the Lockout After parameter (3 to 5 is a good choice), while using a long lockout value. Thirty minutes to an hour will usually suffice to deter unauthorized users.
At the bottom of this dialog box, you can see two other check boxes. The Forcibly Disconnect Remote Users check box must be checked in order for the user to be disconnected from the server when he stays logged on past the authorized period specified in the Hours button of the user’s Account Properties dialog box. If the second check box, User Must Log On in Order to Change Password, is checked, users will not be able to log on after their password expires and change it. The administrator will have to perform this function instead. If this box is not checked, after a user password expires the user still will be allowed to log on but will be required to change the password before performing any other function.
Detecting Failed Logon Attempts
User logon failures occur for many reasons. The most common reason is that users forget passwords or type them incorrectly enough times to trigger the account lockout mechanism. Because Windows NT allows you to create a single username and password logon for each user, the problem of multiple passwords is usually not a problem as it is some other networks.
The Windows NT Event Viewer utility, found in the Administrative Tools section along with the User Manager for Domains, can be used to check for failed logon attempts. This is the first place you should look when a user is having problems logging on to the domain or connecting to a resource on a remote server. The user might not be providing the correct password or might be trying a username for which there is no account. The Event Viewer keeps three log files: Application, System, and Security. It is in the Security log file that you will find messages that relate to logon attempts.
Some of the more common logon attempt–related messages found in the Event Viewer are listed in Table 36.1.
Table 36.1. Common Logon Errors You Can See Using the Event Viewer
As you can see, successful logon and logout events can be tracked. These types of messages can be useful when you are trying to determine who was on the system, perhaps during off hours, when you are trying to troubleshoot security problems. The other messages can be helpful in quickly identifying what the problem is when a user cannot log on to a server or connect to a resource.
The security log file you can examine using the Event Viewer can be configured to track all successful and unsuccessful logon attempts. This includes users who log on locally at the computer, connections made through network access, and logons by special accounts that you set up to run services.
Windows NT does not automatically track events such as these. You must enable the types of events you want to audit before they will be recorded in the security log file. See Chapter 43, “Auditing and Other Monitoring Measures,” for information on how to set up the events to audit for Windows NT computers.
Strategies to Minimize Logon Problems
The best way to solve a problem is to take all necessary measures to ensure that the problem doesn’t happen in the first place. Although it is not possible to completely eliminate every source of failed logon problems, you can do a lot to keep your network users happy by taking a few precautions:
![]() Place a backup domain controller on every physical subnet—If a network link goes down, users can still be validated by the local BDC and continue to work with resources to which they can still connect. A BDC with enough available resources can simultaneously perform the same functions as any other Windows NT Server, so if you have a server on a subnet that is offering resources and it is not already overloaded, consider replacing it with a BDC and let it serve two roles. Remember, if the server is not already a domain controller, you will have to re-install the OS and select that option during setup.
Place a backup domain controller on every physical subnet—If a network link goes down, users can still be validated by the local BDC and continue to work with resources to which they can still connect. A BDC with enough available resources can simultaneously perform the same functions as any other Windows NT Server, so if you have a server on a subnet that is offering resources and it is not already overloaded, consider replacing it with a BDC and let it serve two roles. Remember, if the server is not already a domain controller, you will have to re-install the OS and select that option during setup.
![]() Enforce reasonable password policies—Some operating systems allow you to computer-generate random passwords that are very difficult to remember. If a user cannot remember a password, most of the time the user will just write it down somewhere, which can compromise security. If you force users to change passwords too frequently, they will most likely have a hard time remembering what the recent password is, unless they write it down somewhere. If you set the account policy lockout values too low, you will find that users get locked out because of simple typing errors, and the help desk will spend a lot of time unlocking these accounts.
Enforce reasonable password policies—Some operating systems allow you to computer-generate random passwords that are very difficult to remember. If a user cannot remember a password, most of the time the user will just write it down somewhere, which can compromise security. If you force users to change passwords too frequently, they will most likely have a hard time remembering what the recent password is, unless they write it down somewhere. If you set the account policy lockout values too low, you will find that users get locked out because of simple typing errors, and the help desk will spend a lot of time unlocking these accounts.
![]() Keep track of user accounts—You can use a paper method or an electronic one such as a spreadsheet or database. Delete accounts for users who leave the company and create new ones for new employees. Getting rid of the dead wood will help avoid confusion when troubleshooting and will help keep the SAM databases down to a reasonable size.
Keep track of user accounts—You can use a paper method or an electronic one such as a spreadsheet or database. Delete accounts for users who leave the company and create new ones for new employees. Getting rid of the dead wood will help avoid confusion when troubleshooting and will help keep the SAM databases down to a reasonable size.
![]() Never use generic accounts where more than one user logs in under the same username—Though this is a tempting idea because you have fewer user accounts to manage, it can be a security nightmare if something goes wrong and you are unable to use auditing measures to figure out the who, what, and when of the matter. Also, when more than one person is using the same account to log on, it takes only one person with fumble-fingers to incorrectly type a password a few times and lock an account, also preventing others who use the same account from logging in.
Never use generic accounts where more than one user logs in under the same username—Though this is a tempting idea because you have fewer user accounts to manage, it can be a security nightmare if something goes wrong and you are unable to use auditing measures to figure out the who, what, and when of the matter. Also, when more than one person is using the same account to log on, it takes only one person with fumble-fingers to incorrectly type a password a few times and lock an account, also preventing others who use the same account from logging in.
To fully understand how to troubleshoot problems with logons, you should make yourself knowledgeable about the Windows NT Event Viewer administrative tool. You can find out more about this valuable utility in Chapter 43.