
CHAPTER 37. Windows 2000 and Windows Server 2003 User and Computer Management Utilities
SOME OF THE MAIN TOPICS IN THIS CHAPTER ARE
The Microsoft Management Console 686
In Windows NT Server 4.0, every basic management task required you to use a different program: the User Manager, the Server Manager, and others. In Windows 2000 and Windows 2003 servers, the Microsoft Management Console (MMC) is the main interface for most all administrative tools. By using a common interface, MMC makes it easy to learn new utilities, because they all operate about the same.
The Microsoft Management Console
MMC is intended to provide a common interface into various administrative tools used with Windows 2000/XP/2003. Utilities are created as snap-ins that are loaded into the MMC application and presented to the user. Each console consists of a left pane with a tree of objects you can manage using the particular snap-in. This tree can contain things such as folders and other containers, or administrative objects. Some objects in the tree can be expanded by clicking on the plus sign (+) next to them, to reveal a further nesting of objects. Hence the treelike structure, which is similar to a set of directories and subdirectories.
Note
The MMC interface is not limited to Microsoft management applications. Many third-party applications also have designed snap-ins that can be used with MMC. The goal of this effort is to provide a consistent interface to manage not just the operating system and layered products, but also applications and utilities created for Windows platforms.
The right pane is usually used to display data or other information based on choices made in the left pane. For example, in the Computer Management administrative tool, you select Disk Defragmenter from the tree of options in the left pane, and the disk defragmenter displays disks that you can defragment, as well as the progress of the fragmentation process, in the pane on the right.
Note
For the most common system management tasks, you don’t have to worry about setting up a snap-in for MMC. Use Start, Programs, Administrative Tools for Windows 2000, and you will see that the familiar utilities are already set up, along with some others you might not recognize. For Windows Server 2003, use Start, Administrative Tools.
User Management
The Active Directory Users and Computers MMC snap-in is used to manage both users and computers in the domain. Most of the functions that were done using the User Manager for Domains have been moved into this MMC snap-in. The main difference is the interface—the MMC console—and the amount of information you can keep track of using the Active Directory as compared to the limited amount of data that could be stored in the old security accounts manager (SAM) database of previous versions of Windows NT.
This chapter first covers the basic functions of this utility: adding users and computers to the domain. Then you’ll learn about built-in user groups and how you can create your own user groups to help make administrative duties for large numbers of users an easier task.
Creating a New User Domain in the Active Directory
This common task is simplified by the use of a few dialog boxes to create the account. After the user account has been created, you can go back and use the properties page for the account to add more information.
![]() For Windows domains beginning with Windows 2000 domain controllers, information—from user accounts to computer accounts, resource records, and so forth—is now stored in the Active Directory. You can learn more about the Active Directory and the objects it stores in Chapter 30, “Using the Active Directory.”
For Windows domains beginning with Windows 2000 domain controllers, information—from user accounts to computer accounts, resource records, and so forth—is now stored in the Active Directory. You can learn more about the Active Directory and the objects it stores in Chapter 30, “Using the Active Directory.”
To create a new user account in a domain in the Active Directory, follow these steps:
1. Click Start, Administrative Tools, Active Directory Users and Computers. For Windows 2000, use Server, Start, Administrative Tools, and then Active Directory Users and Computers.
2. The MMC console pops up. In the left pane there is a domain with a tree of objects under it. In Figure 37.1 you can see the opening screen and the folders you can use to manage users and computers.
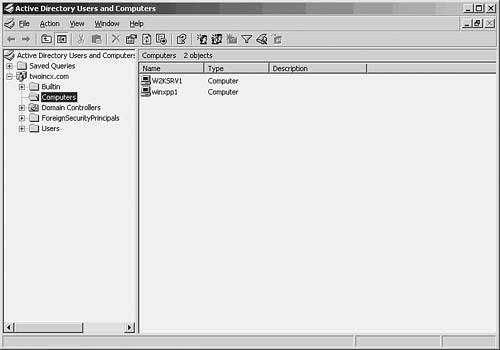
Figure 37.1. The Active Directory Users and Computers MMC snap-in is used to administer users in the domain.
3. Click the Users folder in the left pane, and a list of user groups and individual users is displayed as shown in Figure 37.2.
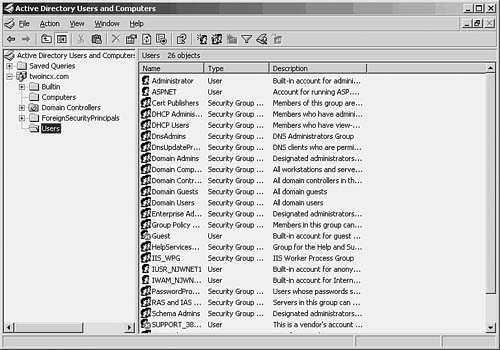
Figure 37.2. The Users folder contains user groups and users.
4. Right-click on the Users folder and select New and then User. The New Object-User dialog box pops up. Here you can fill in information such as the username; the user’s first, last, and full names; initials; and other information. Figure 37.3 shows an example, adding a new user named Yoko Ono.

Figure 37.3. The New Object-User dialog box enables you to input basic information about the new user account.
5. The next dialog box (see Figure 37.4) enables you to enter a password for the user and to use one of several password options. For most new users, it’s easiest to use the first check box (User Must Change Password at Next Login) so that the user can enter his own unique password, unknown to anyone else, even the administrator who created the account. If you are creating an account to use for running a service or some other similar use, you might want to use the Password Never Expires option so that you don’t have to change the password periodically. Finally, you can disable a user account with the Account Is Disabled check box. This is useful when creating new accounts so that they are all initially disabled. When users are contacted about a new account, the administrator can deselect this property and give the user the first password needed to log in to the account.
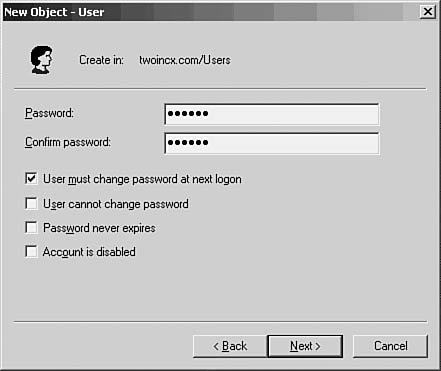
Figure 37.4. You can manage password administration using this dialog box.
6. Finally, a summary screen pops up showing the data you’ve entered for the new account. Click the Finish button to complete the process of creating the new account.
After creating a new user account, you might want to log in yourself before informing the user. This way you can avoid mistakes, such as having entered the wrong password for the account. Note that if you elected the option that the user must change the password at the next logon, you will also be forced to do that. An easy method for creating a large number of accounts is to enter a password you can remember and, when you log in to check the account, set the new password to one that matches the password policy for your organization.
Managing Other User Account Information
When you enter a new user account, you are prompted for only the minimal information needed to create the account in the Active Directory. After the account is created, you can use the properties page for the user account to add or modify other information. Simply right-click on the username in the right pane of the MMC console, and select Properties from the menu that appears. In Figure 37.5 you can see that, despite the minimal input used to create the account, there are several tabs that enable you to track all sorts of useful information about the user.
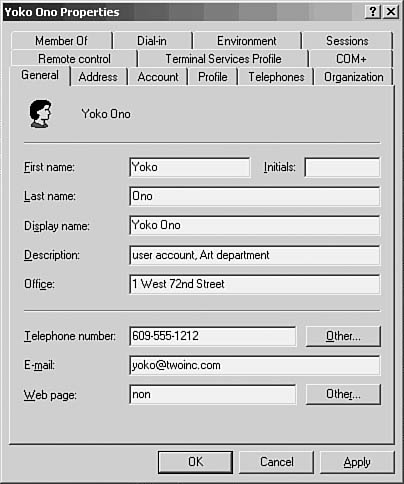
Figure 37.5. The properties page for a user account enables you to administer a lot more information than was input during account creation.
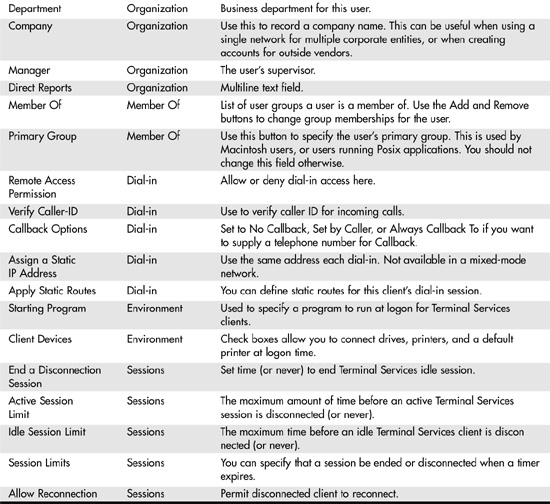
Rather than try to show all the tabs for this properties page (because there are so many), all the user attributes that are part of the default user object are listed for reference in Table 37.1. This summary listing should make it easy to locate the data you want to look at or modify, and go straight to that properties page tab.
Table 37.1. Attributes of the User Account Object
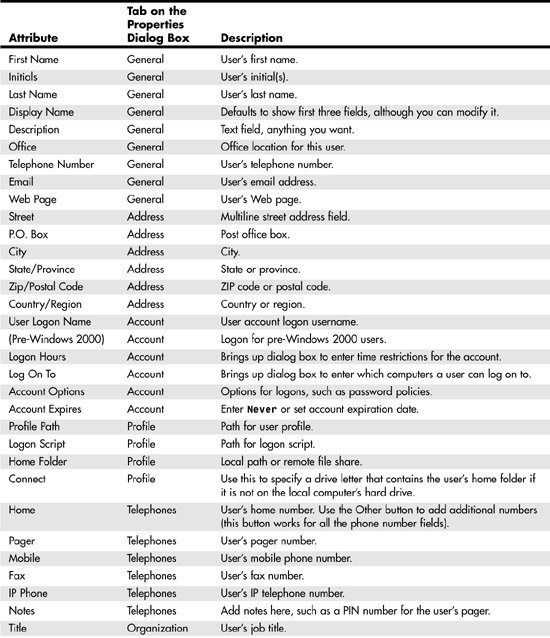
In addition to these fields, there are two other tabs (for Windows 2000). The Remote Control tab enables you to remotely control or view a user’s session when using Terminal Services. The Terminal Services Profile tab enables you to set a path for a home directory and user profile for Terminal Services users. This also is where you use a check box (Allow Logon to Terminal Server) to enable the user account for Terminal Services. Generally, terminal services are not heavily deployed in most networking environments and are not detailed any further here.
For Windows Server 2003, there is an additional tab labeled COM+. This tab can be used to designate the partition set for the user. Partition sets are made up of one or more COM+ partitions to enable users to access COM+ applications.
As you can see, you can keep a lot more information about a user on your network than was possible under Windows NT 4.0 Server’s simple User Manager for Domains and the Security Accounts Manager (SAM) database. And if that isn’t enough data to keep about a user, you can always extend the schema, which is the definition of all the classes of objects (and attributes) in the Active Directory. You can add new attributes and then add them to this user class of objects. You can also create a new user object (with a different name) if your business has a need to create objects for users who differ radically in the attributes associated with them. For example, in a factory environment you might want to use attributes that define the method used to pay the employee, or perhaps an attribute to store the skills the employee possesses. Although extending the schema should be done only when absolutely necessary, there are times when it is a good idea.
Caution
Never extend the schema unless you are absolutely certain of your decision. You cannot roll back an extension to the schema—your changes will be permanent! Always keep this in mind when evaluating third-party software that requires extending the AD schema.
Note
For more information about the Active Directory and the schema, see Chapter 30, “Using the Active Directory Service.” As indicated in that chapter, the kinds of objects and attributes that can be stored in the directory database are extensible. That is, you can create new attributes and objects. If you’ve installed Microsoft Exchange Server, for example, or a third-party product that is integrated with the Active Directory, you might find additional tabs or fields in the properties sheets for a particular object.
Using the Action Menu
In the preceding section you brought up the properties page by right-clicking on the user account and selecting Properties from the menu that popped up. You also can reach this menu, called the Action menu, by highlighting a user or group and then clicking on the Action menu at the top of the MMC console. Use this menu to do the following:
![]() Delegate Control—Brings up a wizard that enables you to delegate control of folders and objects by groups or by users.
Delegate Control—Brings up a wizard that enables you to delegate control of folders and objects by groups or by users.
![]() Find—Brings up a search dialog box you can use to search the directory.
Find—Brings up a search dialog box you can use to search the directory.
![]() New—Brings up a submenu you can use to add a new computer, contact, group, InetOrgPerson, MSMQ Queue Alias, printer, user, or shared folder.
New—Brings up a submenu you can use to add a new computer, contact, group, InetOrgPerson, MSMQ Queue Alias, printer, user, or shared folder.
![]() All Tasks—Enables you to delegate control or use the Find search function. The Find Users, Contacts, and Groups dialog box is shown in Figure 37.6. Click on the Advanced tab if you want to refine your search more precisely.
All Tasks—Enables you to delegate control or use the Find search function. The Find Users, Contacts, and Groups dialog box is shown in Figure 37.6. Click on the Advanced tab if you want to refine your search more precisely.
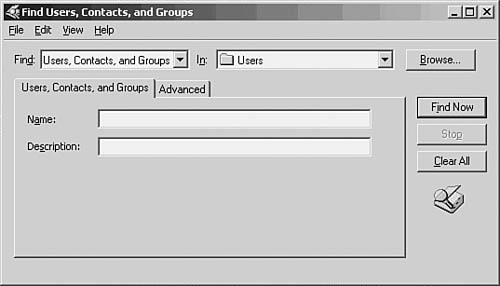
Figure 37.6. Use the Find dialog box to locate information in the Active Directory.
![]() Refresh—Refreshes the display with current information.
Refresh—Refreshes the display with current information.
![]() Export list—Enables you to export a list of users and groups to various file types, such as comma-delimited or tab-delimited ASCII and Unicode files. You can use this to import listings into other applications, such as Microsoft Excel.
Export list—Enables you to export a list of users and groups to various file types, such as comma-delimited or tab-delimited ASCII and Unicode files. You can use this to import listings into other applications, such as Microsoft Excel.
![]() Properties—Accesses all those user attributes covered in the preceding section. This is an alternative way to bring up the user’s properties page.
Properties—Accesses all those user attributes covered in the preceding section. This is an alternative way to bring up the user’s properties page.
![]() Help—Provides help for using this utility.
Help—Provides help for using this utility.
There are many useful items on this Action menu. The Export List capability is especially useful in large environments where it is necessary to produce reports on users or the user database. The New menu item enables you to manage not just users, but also other objects, such as computers, which is the topic of the next section, and user groups, which is discussed later in this chapter.
Computer Management
Again, you use the Active Directory Users and Computers MMC snap-in to manage computers in the domain. Click the Computers folder in the left pane, and the right pane displays a list of computers in your domain, as you can see in Figure 37.7.
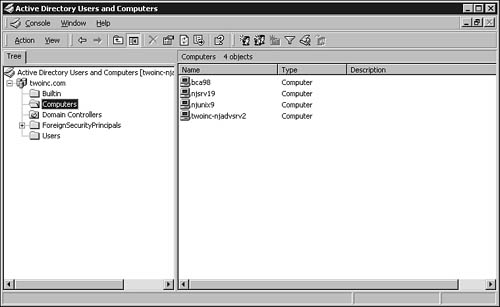
Figure 37.7. The Computers folder is used to administer computers in the domain.
The Action menu for managing computers is similar to that for managing users. The first thing to do is add a computer to the domain. This should be done when you are setting up new computers on the network. In addition to creating user accounts, computers must have an entry in the Active Directory database.
Adding a Computer to the Domain
To add a new computer, you can use the Action menu and select New and then Computer. Alternatively, you can right-click on the Computers folder and select the same items. The New Object-Computer dialog box, shown in Figure 37.8, enables you to input basic information about the computer, such as the hostname.

Figure 37.8. You enter basic computer information in this dialog box when adding a computer to the domain.
What TCP/IP users typically call a hostname goes in the Computer Name field. There is also a field to enter a pre-Windows 2000 computer name that can be recognized by older computers. Another field enables you to specify the users or groups that can add computers to the domain. The default is the Domain Admins group. If the user who will be joining the computer to the domain is not a member of the Domain Admins group, you should change this value to either the user’s name or a group to which the user belongs. If you are uncertain who will be adding a particular computer account to the domain, you can specify the Everyone group. Finally, if the computer is not a Windows 2000 or Windows XP client, select the check box labeled Allow Pre-Windows 2000 Computers to Use This Account. You would want to check this box for Windows NT and Windows 98 computers, for example. Click the Next button to continue the process of adding the new computer.
The next dialog box prompts you to specify whether this is a managed computer and, if so, the GUID/UUID for the computer. These values are usually found in the computer’s BIOS or on a label attached to the computer. Click the Next button to continue adding the computer.
Finally, a dialog box displays a summary view of the information you’ve entered. Click Finish to create the computer account. After you’ve done this, the computer should be able to boot and join the domain. Users who have accounts on the domain should be able to log in to the domain using the computer.
Managing Other Computer Account Information
Just like the user objects you create, the computer objects have a lot more attributes than you are prompted for when creating the initial computer account in the Active Directory. You can get to the properties page for a computer by right-clicking on the computer in the left pane and selecting Properties, or by highlighting the computer and selecting Properties from the Action menu. In Figure 37.9 you can see an example of a computer object properties page.
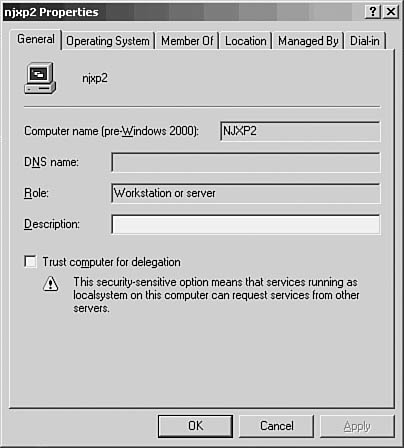
Figure 37.9. The properties of a computer account enable you to manage a large amount of information about the computer.
There are six tabs for this properties sheet: General, Operating System, Member Of, Location, Managed By, and Dial-In.
The General Tab
This tab shows you the fully qualified domain name of a computer, as well as its pre-Windows 2000 name. You also can see what role the computer plays in the network (workstation or server). The Description field enables you to enter useful information that will help you identify this computer or its use (or perhaps its location), depending on the information you want to enter. Finally, you can select the check box labeled Trust Computer for Delegation. This allows services running on the computer to request services from other computers as long as the service is running under the localsystem special account.
The Operating System Tab
This tab has only a few fields. Here you can see the operating system running on the computer, the version, and the highest level service pack installed.
The Member Of Tab
This tab enables you to add the computer to a group. For example, a domain controller computer is a member of the Domain Computers group, and this is its primary group. However, you can use other built-in groups or create new groups to assist you in managing computers that are similarly configured or used.
Use the Add button to add a new group. A list of groups is displayed in another dialog box, and you can select the groups from there. You also can remove group membership by using the Remove button. The Advanced button on the Select Groups dialog box that pops up from the Add button enables you to search for groups based on search criteria you enter so that you can refine your group selection to the greatest degree. The search function allows you to specify a term and then choose from these options:
![]() Starts with
Starts with
![]() Is exactly
Is exactly
Another button on this page, Location, allows you to select the location from which the search should be executed, such as the domain, the built-in groups, and other computers such as domain controllers.
The Location Tab
This tab has only one field: Location. Use it to specify the particular office, or perhaps building, in which a computer is located. This information can be very useful when you get a call from a user and need to visit the computer for maintenance purposes. The Browse button enables you to select from other locations that have been entered previously.
The Managed By Tab
This tab enables you to select the user that manages this computer. Use the Change button to bring up a dialog box to select the user. After a user has been selected, the fields on this tab show the following information:
![]() The user’s name
The user’s name
![]() The user’s office
The user’s office
![]() The user’s street address
The user’s street address
![]() The user’s city, state/province, country/region data
The user’s city, state/province, country/region data
![]() The user’s telephone number
The user’s telephone number
![]() The user’s fax number
The user’s fax number
Again, you can see that this kind of information can be valuable when trying to locate the person responsible for managing this computer in a large network. When this detailed information is kept in the Active Directory, it is accessible by computers throughout the domain, provided that the user has the access rights.
The Dial-In Tab
This tab allows you to specify values that allow dial-in access for this computer. You can use two radio buttons to either allow or deny dial-in access. If you choose to allow dial-in access, you can select to control the access using a Remote Access Policy (another topic entirely, and beyond the scope of this book). You can also specify callback options, specify a callback number set by the user, and specify to always call back. These fields are the same as those used for a user account, and they allow you to add a static IP address and static route to be used for dial-in access.
Windows 2000 User Groups
You need to understand several concepts about user groups in Windows 2000/.NET before you begin to create them. Groups are helpful because they simplify administrative tasks when you have groups of users that must be treated similarly when it comes to rights and permissions. Second, because groups can be limited in scope, they can be useful for security purposes, limiting the computers or domains in which a user can be granted access.
Choosing a Group Based on the Group’s Scope
Groups each have a scope, which is basically the area of the domain or global forest that the group covers. By having several types of groups, each with its own particular kind of membership and scope, you can put together combinations that should solve most of your administrative needs for managing users with similar needs. The types of groups, and the scope implied by each, are as listed here:
![]() Domain local group—These groups are limited to just the domain in which they are created. Users can be placed into these groups for local domain management purposes.
Domain local group—These groups are limited to just the domain in which they are created. Users can be placed into these groups for local domain management purposes.
![]() Global group—These groups are made up of users or groups from a single domain but are used to grant access for the members of the group in other trusted domains. Think of this as a way to “export” users to allow them access to resources in other domains.
Global group—These groups are made up of users or groups from a single domain but are used to grant access for the members of the group in other trusted domains. Think of this as a way to “export” users to allow them access to resources in other domains.
![]() Universal group—This type of group can contain user accounts and global group accounts from any trusted domain that exists in the Active Directory forest. This is similar to a global group but allows members of the group to be granted permission to resources in domains throughout the entire forest.
Universal group—This type of group can contain user accounts and global group accounts from any trusted domain that exists in the Active Directory forest. This is similar to a global group but allows members of the group to be granted permission to resources in domains throughout the entire forest.
As described previously, groups can be members of other groups just like users, and this is where things can become a little complicated. For example, a domain local scope group can have the following as members:
![]() Groups that have global scope—You place the global group into a local group and then manage the local group when granting rights and permissions.
Groups that have global scope—You place the global group into a local group and then manage the local group when granting rights and permissions.
![]() Groups that have universal scope—Again, you can place universal scope groups into a local group and then use the local group for management purposes.
Groups that have universal scope—Again, you can place universal scope groups into a local group and then use the local group for management purposes.
![]() Groups with domain local scope—Other domain local scope groups can be placed in a domain local scope group.
Groups with domain local scope—Other domain local scope groups can be placed in a domain local scope group.
![]() User accounts—You can put individual users into a group with domain local scope.
User accounts—You can put individual users into a group with domain local scope.
Note that the domain local group does not have to have just one of the preceding groups (or users) as its members. You can combine any of the preceding and place them into a single domain local scope group, and then use the group to manage the members of these other groups locally in your domain.
A domain local group is a very useful management tool. For example, if you have a particular resource that several users share, place the users in the group and grant the group the necessary access to the resource. The resource can be a folder or a file, or perhaps a printer. If the resource changes in the future (for example, you decide to use a new file server for a particular set of files), you have to change permissions only on the group to let the group members access the new resource. Otherwise, you’d have to modify the permissions for each individual user, which in a large environment can be an almost impossible task if your network changes frequently.
Unlike domain local groups, global groups can have as members only users or other groups from within a single domain. Yet global groups can be granted access to resources in other trusted domains. This enables you to package a group of users that need similar treatment in other domains when it comes to resource permissions.
Universal groups also can be used to grant permissions in multiple domains—throughout the forest of domain trees. Note that these groups are available only if you have an Active Directory structure that is part of a multidomain forest. They serve no purpose in a single-domain tree because domain local groups and global groups provide the necessary functions in a single-domain tree.
The membership of a universal group should not change on a frequent basis. This is because when a universal scope group’s membership changes, the entire list of members is replicated to every global catalog in the forest of trees. Use universal groups for grouping users and other groups that are more stable in membership. Although global groups enable you to create groups of users and other groups that can be granted access in trusted domains, their membership must come from a single domain. To make managing a universal group easier, first place users into global groups in their own domains, and then place these global groups into a universal group. Thus, when the membership of a global group changes, there is no need to replicate the universal group membership to every other global catalog. Only the global group has changed. The universal group has as its member the global group, not the individual users who come and go from the global group.
Built-In Groups
There are several kinds of built-in groups, depending on where you look in the directory structure. For example, in Figure 37.10 you can see the list of groups found under the Built-in folder. Simply click the Built-in folder and you’ll see the list of built-in domain local groups. As the name implies, each group was designed to give the access permissions to perform specific types of administrative jobs.
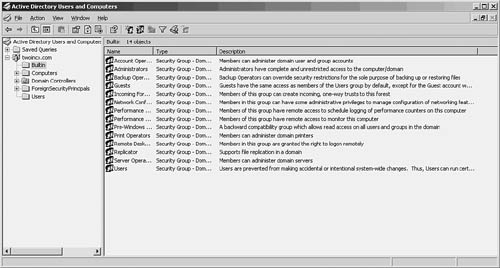
Figure 37.10. The Builtin folder contains a collection of domain local scope groups you can use.
The domain local scope built-in groups can include the following:
![]() Account Operators—Users placed into this group can perform account management duties, such as creating new users.
Account Operators—Users placed into this group can perform account management duties, such as creating new users.
![]() Administrators—This is the most powerful group. Members of this group can do just about anything they want in the domain, including taking ownership of files and creating user accounts.
Administrators—This is the most powerful group. Members of this group can do just about anything they want in the domain, including taking ownership of files and creating user accounts.
![]() Backup Operators—Members of this group get the access rights needed to perform backups on computers in the domain.
Backup Operators—Members of this group get the access rights needed to perform backups on computers in the domain.
![]() Guests—A guest group, which can be used to grant very limited access to users from other domains.
Guests—A guest group, which can be used to grant very limited access to users from other domains.
![]() Incoming Forest Trust Builders—Users in this group can create incoming trust relationships from other forests. Keep in mind that trust relations in the Active Directory are transitive but must be established manually between Active Directory trees in the forest.
Incoming Forest Trust Builders—Users in this group can create incoming trust relationships from other forests. Keep in mind that trust relations in the Active Directory are transitive but must be established manually between Active Directory trees in the forest.
![]() Network Configuration Operators—This group allows users to manage some aspects of network configuration.
Network Configuration Operators—This group allows users to manage some aspects of network configuration.
![]() Performance Log Users—Members of this group can schedule logging of performance monitors on this computer, from a remote computer.
Performance Log Users—Members of this group can schedule logging of performance monitors on this computer, from a remote computer.
![]() Performance Monitor Users—This user group can monitor performance on this computer from a remote computer.
Performance Monitor Users—This user group can monitor performance on this computer from a remote computer.
![]() Pre–Windows 2000 Compatible Access—This group is meant for pre–Windows 2000 users to enable them to have read access for users and groups in the domain stored in the Active Directory.
Pre–Windows 2000 Compatible Access—This group is meant for pre–Windows 2000 users to enable them to have read access for users and groups in the domain stored in the Active Directory.
![]() Print Operators—You guessed it: Members of this group can control printers and print jobs.
Print Operators—You guessed it: Members of this group can control printers and print jobs.
![]() Remote Desktop Users—Users in this group can log in to this computer from a remote computer.
Remote Desktop Users—Users in this group can log in to this computer from a remote computer.
![]() Replicator—Used by services responsible for replication.
Replicator—Used by services responsible for replication.
![]() Server Operators—Members of this group can perform tasks on specific servers.
Server Operators—Members of this group can perform tasks on specific servers.
![]() Users—A built-in group for ordinary users in the domain, which can run applications, but not make systemwide configuration changes.
Users—A built-in group for ordinary users in the domain, which can run applications, but not make systemwide configuration changes.
In addition to these built-in groups, you can click on the Users folder and see a list of predefined groups, which also can be used to organize users. These are global scope groups, so you can use them to organize users and computers, and then place them in domain scope groups in the current domain or in other domains. If none of the following group names fits your needs, you can create your own groups, which we’ll look at next.
The Predefined groups found in the Users folder are listed here:
![]() Cert Publishers—Users can publish certificates to the Active Directory.
Cert Publishers—Users can publish certificates to the Active Directory.
![]() DHCP Administrator—Members can administer the DHCP service.
DHCP Administrator—Members can administer the DHCP service.
![]() DHCP Users—Members of this group have view-only access to the DHCP service.
DHCP Users—Members of this group have view-only access to the DHCP service.
![]() DnsAdmins—The DNS Administrators group who can manage the DNS service.
DnsAdmins—The DNS Administrators group who can manage the DNS service.
![]() DnsUpdateProxy—This group allows members to update the Domain Name System (DNS) service for other clients, such as a DHCP server.
DnsUpdateProxy—This group allows members to update the Domain Name System (DNS) service for other clients, such as a DHCP server.
![]() Domain Admins—Users who administer the domain.
Domain Admins—Users who administer the domain.
![]() Domain Computers—All workstations and servers joined to the domain.
Domain Computers—All workstations and servers joined to the domain.
![]() Domain Controllers—Every domain controller in this domain is a member of this group.
Domain Controllers—Every domain controller in this domain is a member of this group.
![]() Domain Guests—Members are guests in the domain, with limited access.
Domain Guests—Members are guests in the domain, with limited access.
![]() Domain Users—All members of the domain.
Domain Users—All members of the domain.
![]() Enterprise Admins—Members can administer the entire enterprise.
Enterprise Admins—Members can administer the entire enterprise.
![]() Group Policy Creator Owners—These users can modify the group policy for a domain.
Group Policy Creator Owners—These users can modify the group policy for a domain.
![]() HelpServicesGroup—Users that provide help via the Help and Support Center.
HelpServicesGroup—Users that provide help via the Help and Support Center.
![]() IIS_WPG—Members who manage the Internet Information Server.
IIS_WPG—Members who manage the Internet Information Server.
![]() PasswordPropDeny—Members of this group should not have their password synchronized.
PasswordPropDeny—Members of this group should not have their password synchronized.
![]() RAS and IAS Servers—Servers that are members of this group can access the remote access properties of users.
RAS and IAS Servers—Servers that are members of this group can access the remote access properties of users.
![]() Schema Admins—Administrators of the Active Directory schema.
Schema Admins—Administrators of the Active Directory schema.
![]() Terminal Server Computers—Computers that can communicate with the Terminal Services License server.
Terminal Server Computers—Computers that can communicate with the Terminal Services License server.
![]() WINS Users—Members of this group have view-only access to the WINS server.
WINS Users—Members of this group have view-only access to the WINS server.
In general, the groups you’ll use most in the list will probably be the Domain Computers and Domain Users groups. By default, when you create a user account, the new account is placed automatically into the Domain Users group. Likewise, when you add a computer to the domain, the computer is automatically placed into the Domain Computers group. Looking at the domain from an overall picture, you can use these two groups when you want to make changes that apply to all users or all computers in a domain. The Domain Admins group can be used to give selected individuals administrator-level rights in a domain. It is always a good idea to not use the actual built-in Administrator account for a domain. Instead, create individual accounts for each user, and then place the user into one or more groups that give him the access he needs. If you need to grant a user administrator-level rights, just place him into the Domain Admins groups.
The other groups will depend on the services you have installed. Some may not appear if you have not installed that service (such as DHCP).
A few notes about these predefined groups in the Users folder:
![]() The Domain Users group is a member of the domain’s Users group (the one located in the Builtin folder).
The Domain Users group is a member of the domain’s Users group (the one located in the Builtin folder).
![]() The Domain Admins group is automatically a member of the Administrator’s group in the Builtin folder.
The Domain Admins group is automatically a member of the Administrator’s group in the Builtin folder.
![]() The Domain Guests group is automatically placed into the Guests group in the Builtin folder.
The Domain Guests group is automatically placed into the Guests group in the Builtin folder.
Note
User Profiles are never cached locally on any system for members of any out-of-the-box Guest groups.
Some of the other groups listed here also can be used to organize users and grant them access to resources on a group basis. However, you can always create your own group and tailor the rights and permissions for the group to match your exact needs.
Creating a New User Group
To start the process, click Action, New, Group. In Figure 37.11, you can see the dialog box that pops up to allow you to enter basic information about the group, such as the new group’s name, the scope (Domain Local or Global), and the type (Security or Distribution).
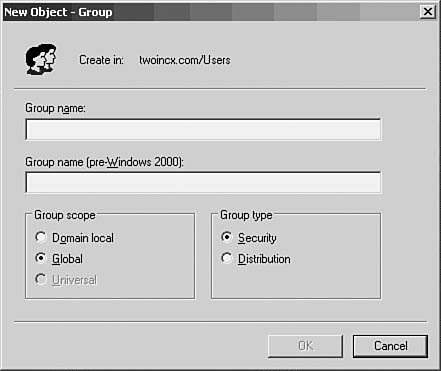
Figure 37.11. The New Object-Group dialog box prompts you for basic group information.
These are the differences between these two types of groups:
![]() Security groups are used to manage user access and permissions. Users and other groups can be members of a security group. This is the sort of group discussed so far in this chapter.
Security groups are used to manage user access and permissions. Users and other groups can be members of a security group. This is the sort of group discussed so far in this chapter.
![]() Distribution groups are used for functions such as grouping users for other purposes, such as email. These groups cannot be used to grant access to resources.
Distribution groups are used for functions such as grouping users for other purposes, such as email. These groups cannot be used to grant access to resources.
You can probably guess that after you fill in the basic information and click OK, the group is immediately created. In the example, a group was in the Users folder. Just as with User objects and Computer objects in the Active Directory, you can now bring up a properties page for the group and from there configure additional attributes for the group.
Right-click on the group and select Properties. You also can highlight the group and select Properties from the Action menu. In Figure 37.12 you can see an example of the properties page for the group we just created.

Figure 37.12. You can configure and view additional attributes by using the properties page for the new group.
Here you can see fields that allow you to input a description of what the group is used for, as well as an email address that can be used to send email to members of the group. Additionally, you can put in notes about the group that might be helpful in the future. For example, you might create a group to be used only for a short period. You can put notes here to remind yourself to remove the group later.
Two other tabs relate to group membership. The first tab, Members, lists current members of the group. On this tab you can click the Add button to bring up a dialog box to use for adding other users or groups to the group. The Member Of tab displays groups of which this particular group itself is a member. You also can use the Add button on this property sheet tab to add the group to other groups.
Finally, the Managed By tab is similar to that discussed earlier, and is used to define a responsible contact person for this group.
Other Things You Can Do with the Active Directory Computers and Users Snap-In
This utility is not as simple as the User Manager for Domains that was included in previous versions of Windows NT. However, most of the additional functions for which you can use this utility don’t directly relate to user or computer management, so it’s not relatively important to go into the nitty-gritty details. For example, you can create organizational units and use them to further subdivide the objects managed in your domain.
There are other tools you’ll find in the Administrative Tools folder that again don’t relate directly to user or computer management, but you should be aware of them in case they are used at your site. Some of these utilities won’t show up in your Administrative Tools folder unless you’ve already installed the prerequisite software. For example, the DHCP manager MMC snap-in won’t be there if you haven’t installed a DHCP service on the server.
Some of the more popular tools include the following:
![]() Active Directory Domains and Trusts—This utility manages trust relationships. The User Manager for Domains formerly handled that job.
Active Directory Domains and Trusts—This utility manages trust relationships. The User Manager for Domains formerly handled that job.
![]() Component Services—This selection allows you to configure COM+ applications.
Component Services—This selection allows you to configure COM+ applications.
![]() Event Viewer—Use this standard utility to review the system, security, and application log files. It’s similar to its Windows NT 4.0 predecessor but uses the MMC console instead.
Event Viewer—Use this standard utility to review the system, security, and application log files. It’s similar to its Windows NT 4.0 predecessor but uses the MMC console instead.
![]() DHCP—This snap-in enables you to manage the DHCP service on the local server. If a user’s computer is having problems communicating on the network, you can check the DHCP logs to see whether the client has obtained a valid IP address.
DHCP—This snap-in enables you to manage the DHCP service on the local server. If a user’s computer is having problems communicating on the network, you can check the DHCP logs to see whether the client has obtained a valid IP address.
![]() DNS—This snap-in will be present if the server is running the DNS service. This service is used by computers on the network to locate both domain controllers (for authentication purposes) and other resources on the network.
DNS—This snap-in will be present if the server is running the DNS service. This service is used by computers on the network to locate both domain controllers (for authentication purposes) and other resources on the network.
![]() Computer Management—Use this tool to manage services and other aspects of your server. You can defragment disk drives, see system information, and use the Event Viewer, among other things.
Computer Management—Use this tool to manage services and other aspects of your server. You can defragment disk drives, see system information, and use the Event Viewer, among other things.
![]() Distributed File System—This will show up if you’ve installed the Distributed File System.
Distributed File System—This will show up if you’ve installed the Distributed File System.
![]() Internet Services Manager—IIS can be installed on Windows 2000/2003 servers. This tool can be used to manage the IIS services, as well as to set up printers for the Internet Printing Protocol (IPP). You can also choose to install IIS later if you want to put it off until you have installed the operating system and then want to choose which servers to use for IIS.
Internet Services Manager—IIS can be installed on Windows 2000/2003 servers. This tool can be used to manage the IIS services, as well as to set up printers for the Internet Printing Protocol (IPP). You can also choose to install IIS later if you want to put it off until you have installed the operating system and then want to choose which servers to use for IIS.
![]() For more on DFS, see Chapter 31, “File Server Protocols.” IPP is covered in detail in Chapter 40, “Network Printing Protocols.”
For more on DFS, see Chapter 31, “File Server Protocols.” IPP is covered in detail in Chapter 40, “Network Printing Protocols.”
There are many other administrative tools you can use, from the Performance Monitor (and Network Monitor) to utilities used to manage Terminal Services. If you are using components that are not part of the default installation, be sure to examine the administrative tools to find an MMC snap-in utility for those components.