CHAPTER 43. Auditing and Other Monitoring Measures
SOME OF THE MAIN TOPICS IN THIS CHAPTER ARE
Configuring Windows NT 4.0 Auditing Policies 832
Configuring Windows 2000 and Windows Server 2003 Auditing Policies 836
Auditing Windows XP Professional Computers 845
NetWare Auditing Solutions 848
Security for an individual computer system or for the network as a whole requires a two-pronged approach. First you must try to ensure that all applications and data are secured against unauthorized usage. This can mean anything from setting up and enforcing a good password policy to using the access mechanisms (such as resource permissions) provided by the operating system or network software to secure resources or to restrict user activity (by selectively granting or denying rights). However, no matter how good you are at this before-the-fact approach to preventing security breaches, it’s almost impossible—short of taking a system off the network and locking it in a room with a guard outside—to be absolutely sure that the system is totally secure. If you are a genius and make use of all the rights and permissions mechanisms at your disposal to secure a system (much less the entire network), an application bug or a disgruntled employee can still compromise a system.
Because you can never be certain that you’ve covered all your bases, it’s also necessary that you follow up on your security configuration by monitoring the activities of the system. This chapter discusses the second part of securing your system: auditing techniques.
Note
For information about the mechanisms you can use to try to secure a computer and the network in the first place, see Chapter 39, “Rights and Permissions.” You should be sure that you understand how to protect your system using the built-in security measures so that you will have less auditing data to wade through when you are trying to determine whether your security measures are working.
This second approach to securing the network is an important one. You should use all practical auditing features to record access to resources and to set up a policy for reviewing the data gathered on a regular basis. The degree to which you will find it necessary to gather information using the various utilities that an operating system provides depends on how important the data is on a system, or whether the system provides access to the network from the Internet. During normal operations, if you were to enable every single type of event auditing on a Windows NT/2000 or 2003 Server, you would end up with a very slow response time and with more data than you could possibly review daily. However, you can strike a compromise, depending on the particular system, and set up auditing that can be used to sufficiently record system activities and increase your audited events during times when you suspect that something might be awry.
Tip
Security issues are always a compromise. You can’t lock every door, secure every file or directory, much less prevent users from misusing the system. So be careful to choose the items you monitor. If you suspect that a security incident has occurred, you can then decide to audit a wider range of events for the time required to determine the cause of a security breach. If, however, you operate in a highly secure environment where any security breach can cause damage that cannot be tolerated, then you might want to choose to audit a much wider range of events. In that case, you should configure servers with sufficient storage capacity to store logged event records, and assign one or more of your staff to review the logs daily.
Every major server operating system in use in a business environment today that is connected to a network has the capability to set up auditing for many events. Don’t expect to find these capabilities with older client operating systems such as Windows 95 or 98. If you are still using these operating systems, it’s time for an upgrade.
But for most operating systems, you can keep track of file and printer accesses, user logins/logouts, and other information that gives you the who, where, what, and when information you’ll need for researching when you have reason to believe that a security problem exists. The methods of auditing and the tools used to exploit this data depend on the network or computer operating system. Because most networks are hybrids that have multiple operating systems, it’s a good idea to have an employee who is skilled in each OS environment, intimately familiar with the peculiarities of each system.
Unix and Linux Systems
Although Unix was originally developed to be a programmer’s operating system and not a business production system, it has been enhanced over the years to include utilities that can track resource usage and access. Today, the various implementations of Unix (along with its cousin Linux) are the primary operating systems used on the Internet for most firewalls and Web servers in the high-end market.
The files discussed here might vary from one Unix/Linux system to the next, but in general most systems have these available for the system administrator’s use. The syslog utility covers the widest area of system resources because you can configure it to record messages from many different system utilities, and you can also decide how the utility will notify you of events as they happen.
Other files—such as /etc/utmp and /usr/adm/wtmp—keep track of who is currently logged on to the system and who has logged on to the system in the past. This is an example of Unix and Linux storing files in different locations. For Linux, the files would be /var/run/utmp and /var/log/wtmp.
Understanding each utility or log file and the type of information you can derive from it will enable you to set up a good auditing policy for your systems.
Using syslog
The syslog utility can be used to set up logging for many components that make up the Unix operating system. You can set up message logging so that messages from a wide variety of programs can be managed from a central location. To enable syslog logging, you must edit the /etc/syslog.conf configuration file and enter a record that contains a selector for each type of message you want to be logged by the facility, as well as an action, which is the action the daemon should take for this type of message.
The syslog daemon (syslogd) is usually started when the system boots, by commands placed in one of the rc startup files. This is the syntax for starting the daemon:
/etc/syslog [-mN] [-ffilename] [-d]
The -f option can be used to specify a configuration file other than the standard /etc/syslog.conf file. The -m option sets a “mark” interval for placing timestamps into the file. Timestamps can be important because they indicate that the logging mechanism is working during periods when no other significant events are logged. The absence of timestamps (if you use them) can be a tip that someone has been tampering with your system. The -d option turns on debugging mode.
The syslog.conf File
The syslog.conf file stores the information that the syslog daemon uses to decide which messages to accept (source and severity) and what to do with them (log file, notify user, and so on). You can use any ASCII text editor (such as VI) to configure this file. Each line should be composed of two components:
![]() The selector—This part of the record is composed of two pieces of information separated by a period. The first part of the selector is the name of the system component (or facility) from which the message originates. The second part of the selector is the severity (or priority) of the message. You can place multiple selectors on one line if you separate them with a semicolon.
The selector—This part of the record is composed of two pieces of information separated by a period. The first part of the selector is the name of the system component (or facility) from which the message originates. The second part of the selector is the severity (or priority) of the message. You can place multiple selectors on one line if you separate them with a semicolon.
![]() The action—This tells the daemon what to do when it receives a message that matches the selector criteria.
The action—This tells the daemon what to do when it receives a message that matches the selector criteria.
Table 43.1 lists the facility names you can use when composing the selector portion of the record.
Table 43.1. Facility Names in the syslog.conf Configuration File
Table 43.2 lists the severity levels you can use as the second component for the selector.
Table 43.2. Severity Levels in the syslog.conf File

Note that another severity level, called panic, has been removed in later versions of Unix/Linux—it’s the same functionality provided by emerg. At this time the error and warn severity levels are also considered to be deprecated, which means that although they work now, they will be removed in future versions.
To create a selector, select one of the facilities listed in Table 43.1 and combine it with one of the error conditions listed in Table 43.2. For example:
kernel.info
mail.notice
lpr.crit
To create the rest of the record, you need to specify an action to take. The action portion of the record is separated from the selector portion by a space character. The syslog daemon can deliver the message in these ways:
![]() Write the message to a log file
Write the message to a log file
![]() Send it to another computer
Send it to another computer
![]() Send it to one or more usernames
Send it to one or more usernames
![]() All the above
All the above
For example, because kernel events are usually important (the kernel is the heart of the Unix operating system) and need to be looked at immediately, you might want to send them to the computer’s console device. To do this, use the following entry:
kern.* /dev/console
The asterisk tells syslog to log all message types generated by the kernel, and the /dev/console part of the record specifies the console device (check the documentation to be sure of the exact device filename).
If the message is something important, but not so critical that it needs immediate attention, you can send it to a user whose responsibilities are associated with the application. The following example sends all messages from the mail facility (at a severity level of info or above) to the mail administrator named Johnson:
mail.info johnson
For security reasons, you might want to send important logging messages to another host. This can be a valuable service that the syslog daemon can perform. For example, when you are using bastion hosts in a demilitarized zone (DMZ), it’s best not to store security logging events on a host computer that might be compromised. Instead, you instruct the daemon to send these events to another server for logging purposes. In a large network, you can dedicate a single host computer to this function and use other security measures to make the computer inaccessible to ordinary users. To send messages relating to kernel events and authorization events to another computer, for example, you might use this:
kern.*;auth.* @yoko.ono.com
![]() You’ll find more detailed information about bastion hosts, firewalls, and DMZs in Chapter 45, “Firewalls.”
You’ll find more detailed information about bastion hosts, firewalls, and DMZs in Chapter 45, “Firewalls.”
Some message types are more useful for reviewing at a later date to review the overall functioning of the system. Using log files for these kinds of messages is a good idea. To send messages to a log file, specify the log file path in the action field:
mail.info;lpr.info;news.* /var/adm/messages
Tip
When sending messages to a log file, you can send them all to the same file as shown in the preceding example (/var/adm/messages). However, to make administering the logged messages easier, you might want to create several log files and group similar message types together. This way you don’t have to search through a large file that might contain a large number of entries to find just a few records of interest. Using separate log files makes it easier to write script files to automate the process of searching for important messages.
Another good reason to use multiple log files is that you can delegate the reviewing of these log files to those employees who are best qualified to review them. A typical Unix system administrator has a lot of things to do during a normal working day. Delegating the review of certain events to subordinates can make the day a much more pleasant experience!
When sending syslog messages to a file, don’t forget to review the log files periodically. Depending on the severity level you set for each facility, these files can grow to be quite large over a short period. To make administration more efficient, decide on a policy for reviewing, archiving, and deleting log files on a regular basis. You should keep these files available for at least a year. Some intrusions can lie in wait for a trigger before causing your system a problem. If you keep your log files on tape or other offline storage, you can look back through them for what might not have seemed an obvious event when it originally occurred. For legal reasons, keeping log files archived and readily available can help you make your case against an intruder who has spent days, weeks, or months trying to compromise your system.
System Log Files
Unix systems have many log files not related to the syslog utility that you can review for security purposes. For example, user logins are recorded in a file, as are usages of the switch user (su) command. When you are new to a system, you should review the documentation to make sure you are aware of all the logging facilities on the computer, where the files are located, and what maintenance procedures are necessary.
Some of the more useful files are listed here:
![]()
/usr/adm/wtmp—This file keeps track of all logins, showing the username, terminal, and connect time. System shutdowns (but not system crashes, of course) are also listed in this file. Use the last command or the ac command to view entries in this log file.
![]()
/etc/utmp—This file is similar to the /usr/adm/wtmp file, in that it stores information about users logging in to the system. However, this file only shows information about users that are actually logged on to the system currently and is not a historical file.
![]()
/var/adm/sulog—This important log file should be looked at often because it records the usage of the su (switch user) command.
![]()
/var/adm/aculog—This file records the usage of dial-out utilities, such as tip or cu.
![]()
/var/log/cron—Actions taken by the cron scheduling utility are recorded here. This utility schedules events for execution on the system. By reviewing this file, you can determine whether unauthorized users are running procedures.
![]()
/var/adm/lpd-errs—This file is used to record messages having to do with the lpr/lpd spooling system. Although not really of great concern from a security point of view, it can be a potential tool to use when looking for security breaches, such as determining who printed what.
![]()
/var/adm/acct—This is the process accounting file. Use the sa command or the lastcomm command to view the contents of this file.
Configuring Windows NT 4.0 Auditing Policies
Windows also allows you to set permissions on resources and audit their access. To secure the system, use the following:
![]() User rights and permissions
User rights and permissions
![]() NTFS file and directory access control lists (ACLs)
NTFS file and directory access control lists (ACLs)
![]() Passwords, groups, and interdomain trust relationships
Passwords, groups, and interdomain trust relationships
To audit the system, you can configure the events that you want to track and then use the system’s Event Viewer to examine the data collected by the system-auditing software.
Setting Up Events to Audit
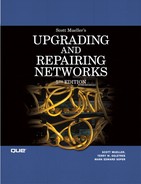
To set up categories of events to be audited, run the User Manager for Domains utility and choose Policies, Audit. In Figure 43.1, you can see that the Audit Policy dialog box allows you to select which event category to audit and whether to audit successes or failures associated with each category.
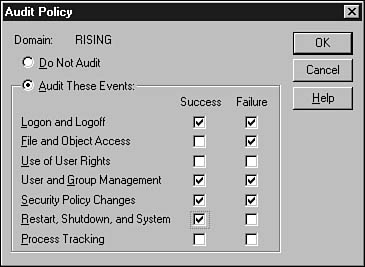
Figure 43.1. Use the Audit Policy dialog box in the User Manager for Domains to configure events to audit.
If you do not want to audit any events, select the Do Not Audit radio button. If you do want to audit, select Audit These Events and check the Success and/or Failure options for each category. The types of events you can set up auditing for are as detailed here:
![]() Logon and Logoff—Tracks users logging in to the system. This also tracks network logins from remote systems.
Logon and Logoff—Tracks users logging in to the system. This also tracks network logins from remote systems.
![]() File and Object Access—Tracks file and directory access and sending of jobs to printers. This category requires you to further define the events for the file, directory, or printer that will be audited.
File and Object Access—Tracks file and directory access and sending of jobs to printers. This category requires you to further define the events for the file, directory, or printer that will be audited.
![]() Use of User Rights—Records when users make use of rights you grant to them when you set up their account with the User Manager for Domains.
Use of User Rights—Records when users make use of rights you grant to them when you set up their account with the User Manager for Domains.
![]() User and Group Management—Tracks changes to group accounts, such as creating, deleting, and renaming user groups and passwords.
User and Group Management—Tracks changes to group accounts, such as creating, deleting, and renaming user groups and passwords.
![]() Security Policy Changes—Keeps track of changes to user rights, and audit or trust relationships.
Security Policy Changes—Keeps track of changes to user rights, and audit or trust relationships.
![]() Restart, Shutdown, and System—Tracks when the system is shut down or restarted, and other events that relate to system security. This category also includes changes to the security event log on the system.
Restart, Shutdown, and System—Tracks when the system is shut down or restarted, and other events that relate to system security. This category also includes changes to the security event log on the system.
![]() Process Tracking—Records voluminous information about user processes, including when programs are executed, objects are accessed, and programs are exited.
Process Tracking—Records voluminous information about user processes, including when programs are executed, objects are accessed, and programs are exited.
In most cases, you won’t want to select success and failure for every category in this list. For example, the data collected when you select Process Tracking can create a large event log file very quickly. You should probably turn on this event-logging mechanism only when you have a definite suspicion about a particular user’s activities and then review and purge the log on a regular basis. Another category that can generate a lot of log-file data is the Use of User Rights category.
Other categories, such as users’ logins, can be useful and do not take up a lot of space in the log files. The data collected for files and object accesses depends on the specific events you select to audit for them.
File and Directory Events
If you have selected to audit this event category, you need to use Windows NT Explorer to set the specific types of events to audit. To set up auditing on a directory or file, highlight it, right-click, and select Properties. Alternatively, you can highlight the file or directory and select File, Properties.
When the Properties sheet appears, select the Security tab and then click the Auditing button to see a display that looks as shown in Figure 43.2.
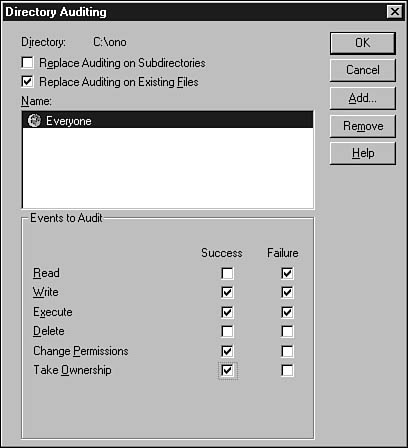
Figure 43.2. Use the Auditing button on the Security tab on the file or directory’s properties sheet to set up events to audit.
These are the event types you can audit:
![]() Read
Read
![]() Write
Write
![]() Execute
Execute
![]() Delete
Delete
![]() Change Permission
Change Permission
![]() Take Ownership
Take Ownership
However, because these will be audited by a user or group, you should first click the Add button to add a user or group of users. The Add Users and Groups dialog box (shown in Figure 43.3) displays the current list of user groups. You can use the Show Users button to display the individual users in each group. Select users or groups by highlighting them and clicking the Add button.

Figure 43.3. The Add Users and Groups dialog box allows you to select which users to audit.
Continue to select users and groups. Click OK when you are finished. After you return to the previous screen, highlight each user or group and select the events to audit for that file or directory on a peruser basis. You also can use the Remove button to remove the auditing configuration for a particular user or group.
You can select success or failure for events. For example, if you selected Success for the Read event type, every time an audited user was able to read this file, a record would be generated in the event log. If you selected Failure, each time an audited user tried to read the file, but did not have the correct access permissions, a record would be created in the event log file.
Printer Events
You select events to audit for printers in much the same way that you do for files and directories. However, instead of using the Windows NT Explorer, you use the properties sheet for the particular printer. You can get to the properties sheet by right-clicking the icon for a printer in the Printers folder. You can add or remove users by using the same type of dialog box. The events you can audit for printers are different and include the following:
![]() Print
Print
![]() Full Control
Full Control
![]() Delete
Delete
![]() Change Permissions
Change Permissions
![]() Take Ownership
Take Ownership
Using the Windows NT 4.0 Event Viewer
The Event Viewer is a utility found in the Administrative Tools folder that can be used to display events from three different log files:
![]() System
System
![]() Security
Security
![]() Application
Application
The System log file records certain system events, and the Application log file records events generated by many different applications that were coded to write event log messages. The Security log file is used to track events you have set up for auditing purposes. To start the Event Viewer choose Start, Programs, Administrative Tools, Event Viewer. Figure 43.4 shows the Event Viewer with the Security log file selected.

Figure 43.4. The Security log file can be viewed using the Event Viewer.
If the Event Viewer starts up with another log file displayed, such as the Application log file, choose Log, Security to change to the correct display.
This view shows the list of events currently in the log file. To get the detailed record for any event, double-click it. The Event Viewer does not have a reporting capability like the AUDITCON utility in NetWare (which you’ll read about shortly). However, you can choose Log, Save As and save the data to either an ASCII text file or a comma-delimited file and use another utility, such as a spreadsheet, to perform further filtering or analysis on the data found here.
You also can change the log file settings by choosing Log, Log Settings. This allows you to set the maximum size the log can grow to, and whether to cycle around and overwrite older events when the file is full. From the Log menu you can also select to clear all the events in the log file, at which time you are prompted to save the current file in a backup file. This is something you should do on a regular basis, archiving the previous log files for a period consistent with the security policy in force at your site.
Configuring Windows 2000 and Windows Server 2003 Auditing Policies
Windows 2000 and Windows 2003 Servers use the Active Directory to store objects, such as user and computer accounts, as well as security information for the domain. When you promote a Windows 2000/2003 server to be a domain controller in the domain, you can use the Domain Security Policy MMC Snap-in to set up auditing for the domain. With few exceptions, this Snap-in works the same for both Windows 2000 and Windows 2003 servers.
This utility is the first step toward setting up events to audit. You use the Domain Security Policy tool to select the categories of events to audit. You can then select the individual objects (such as files, folders, or printers) that will be audited. After you have selected the kinds of events you want to audit, you need to configure auditing on the resources that you consider important, just as you did in Windows NT 4.0.
Use Start, Programs, Administrative Tools (or Start, Administrative Tools for Windows 2003), Domain Security Policy (Domain Controller Security Settings for Windows 2003) to start this tool. In Figure 43.5, you can see the MMC that is displayed, with the Security Settings object in the left pane of the console expanded to show the various objects that can be used to configure and monitor security for the domain.
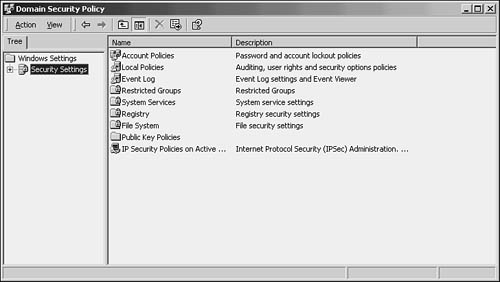
Figure 43.5. Use the Domain Security Policy tool to enable auditing.
Note
The remainder of this section uses examples from Windows 2000 Advanced Server. Windows 2003 Server operating systems can be configured using pretty much the same procedures discussed in this chapter. You will find, however, that there are additional items in the Default Domain Controller Security Settings window. These are specific to the Windows 2003 operating system. However, when you finish reading this chapter, you will find that using Windows 2003 will be easy to learn, because the differences are basically due to the new features that Windows 2003 offers.
In the right pane, double-click Local Policies and then Audit Policy. In Figure 43.6, you can see the events you can set up for auditing for the domain.
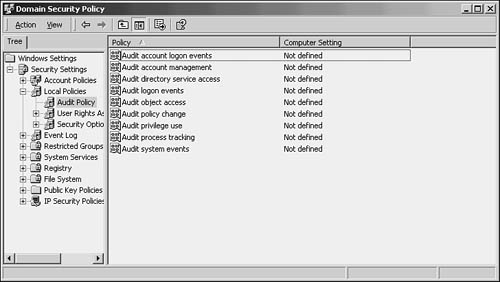
Figure 43.6. Use the Audit Policy object in the left pane to configure auditing.
To enable auditing, first select the kinds of events you want to audit. For example, to enable logging for successful or failed logon attempts, use the category Audit Logon Events. If you double-click this item, you can then select to audit successful or unsuccessful logon attempts (Success, Failure), as shown in Figure 43.7.
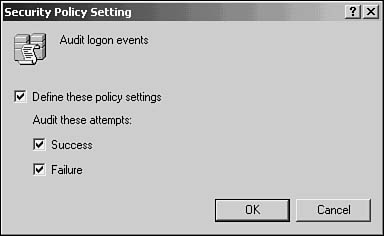
Figure 43.7. When you enable auditing for a category, you can enable both successful access and failed access attempts.
You can choose to audit other categories in this utility, such as changes made to user accounts (Audit account management), and file or printer access (object access). To audit object access on the domain controller, use Audit Directory Service Access. To audit object access on a member server in the domain, select Audit Object Access.
For each category, just double-click the entry in the MMC and select the Define These Policy Settings check box. You can then select either Success or Failure, to decide which kinds of access to audit.
In some environments, it might be desirable to log successful logons so that you can track when users are active on the network. Enabling failed logons can also be useful when you’re trying to determine whether someone is attempting to break into your system, or whether a user is having a problem with his account, such as a forgotten password.
Enabling Auditing for Files and Folders
Keeping track of when users log on to the domain or when failed logon attempts occur enables you to track user account usage in the domain. It’s also a good idea to keep track of access to important files and folders that reside on your servers. Although the NTFS allows you to grant or deny access with a large degree of precision, it can sometimes be difficult to determine the right combination of user rights and access permissions to use to set up the required access.
For example, the description for the Backup Operators Builtin group you’ll find in the Active Directory Users and Computers administrative tool is “Backup Operators can override security restrictions for the sole purpose of backing up or restoring files.” Does this mean they can read your files when not using a backup program? No, but to be sure, you can always set up event logging for important files or directories, and then use the Event Viewer to determine when these files or directories were successfully (or unsuccessfully) accessed.
After you’ve used the Domain Security Policy administrative tool to enable auditing for objects, you can configure specific objects for auditing.
The simplest way to set up auditing for a file or folder is to bring up the Windows Explorer accessory and use the properties page for a folder or a file:
1. Choose Start, Programs, Accessories, Windows Explorer.
2. Locate the folder or file you want to enable for auditing.
3. Right-click the file or folder and select Properties from the menu that appears. For Windows 2003 Servers, you can also select Sharing and Security from this same menu.
4. Select the Security tab and click the Advanced button that appears at the bottom of the display. This brings up the Access Control Settings properties page for the folder. Click the Auditing tab (see Figure 43.8).
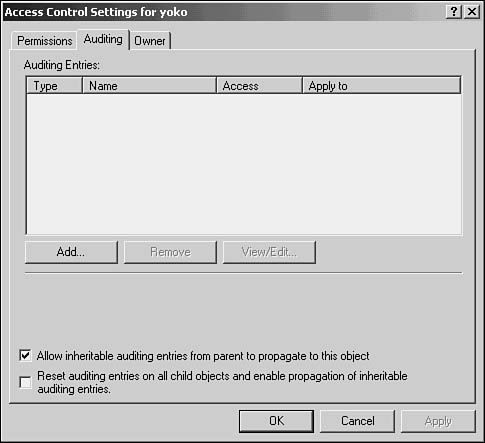
Figure 43.8. The Access Control Settings properties page allows you to control access and auditing for the folder.
5. Click the Add button to bring up the standard Select User Computer or Group dialog box. You can use this dialog box to select the user(s) or group(s) that will generate audit records when access is attempted for the folder. Use the scrollbar to find the user, or enter the name of the user (or group) if you already know it, into the Name field. Click the OK button and the Auditing Entry dialog box appears (see Figure 43.9).
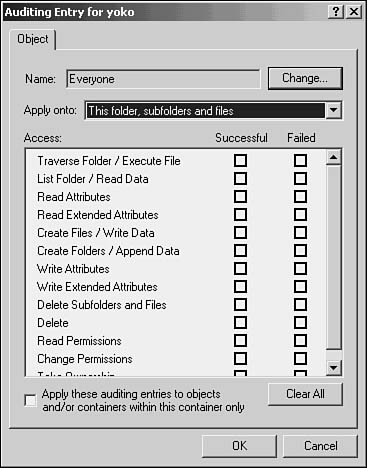
Figure 43.9. After you’ve selected the user or group whose access will be audited, you can select the event(s) that will generate an audit record.
6. This dialog box allows you to select the events to be audited in great detail. Use the Apply Onto drop-down list to choose whether the auditing entry is created for just this folder, the folder and files in the folder, subfolders, and combinations thereof. Use the Access pane to select the action that will be audited by clicking either the Successful or Failed (or both) check boxes.
Tip
Note the Apply These Auditing Entries to Objects and/or Containers Within This Container Only check box at the bottom of the dialog box. Because child objects in the Active Directory inherit attributes from parent objects, you should enable this check box if you want to restrict the auditing entry to just the users or groups you’ve selected in this particular container (that is, domain, or organizational unit).
Note
In Figure 43.9, the types of access are complicated because on a secure Windows 2000 computer, NTFS is used as the file system. In addition to the traditional access types such as read, write, and delete, you’ll see a lot of other things that can be manipulated in the file system, such as changing the permissions or reading and writing extended attributes for the file or folder. Before you begin to select events for auditing, make sure you understand them. You should be well versed in how the NTFS operates before you begin auditing access types that you are unfamiliar with, or you might end up generating literally thousands of entries in the event log. See Chapter 39 for more information on this topic.
7. When you’ve finished selecting the events to be audited, click OK.
8. When the Access Control Settings properties sheet reappears, note the check boxes at the bottom of this dialog box. By default, the Allow Inheritable Auditing Entries from Parent to Propagate to This Object check box is selected. Remember that unless the parent object has blocked inheritance for auditing entries, this is the default in the Active Directory. The second check box resets the auditing entries for all objects that fall under the user or group in the Active Directory.
9. Click OK to dismiss the Access Control Settings properties sheet, and then do the same for the initial properties page for the folder.
After you’ve set up auditing, you can check the event log periodically to determine which users have successfully accessed the folder or file, and also those that have failed to gain access, depending on which check boxes you have selected.
If all this seems complicated, it is! The Active Directory allows you to finely tune the access permissions, user rights, and auditing for objects that exist in the directory. Obviously, you should structure your file system and user groups with careful planning so that you don’t end up with a large number of variables to contend with. If you try to set up auditing for every folder on a user-by-user basis, for example, you’ll spend a lot of time setting up auditing every time you add a new user or create a new directory.
Notice also that inheritance can be blocked from above as well as propagated to objects that are beneath the object you are auditing. For example, if you have multiple organizational units in your domain, you can set up auditing based on the domain, and let these auditing records filter down the tree to apply also to the organizational units that fall underneath it. Or you can elect to set up auditing differently for each organizational unit.
Note
The Active Directory can be only as complex as you make it. For many small organizations, a single domain and the builtin containers (that is, Users and Computers) are sufficient for managing a small number of users. For a small home network, you should probably be using a less expensive operating system, such as Windows XP configured in a workgroup instead of using the domain-based Active Directory service.
For more information about container objects in the directory, as well as how the directory is organized, see Chapter 30, “Using the Active Directory,” or Appendix D, “The Lightweight Directory Access Protocol.”
Enabling Auditing for Printers
The method used for selecting users and groups and the access that will be audited is just about the same for printers as it is for files and folders. You use the same dialog box to select users and groups, and a similar dialog box to select the type of access to be audited. To set up a printer for auditing, use the following steps:
1. For Windows 2000, choose Start, Settings, Printers. For Windows 2003 Server, choose Start, Printers and Faxes. When the Printers window appears, right-click the printer you want to set up auditing for and select Properties from the menu that appears. Select the Sharing or Security tab.
2. Click the Advanced button at the bottom of this properties sheet. The Access Control Settings properties sheet appears. Click the Auditing tab.
3. Click the Add button and the standard Select User, Computer or Group dialog box appears, just as it did when you were setting up auditing for folders in the preceding section. Select the user or group that will be audited and click Add.
4. The Auditing Entry dialog box for printers appears looking a little different from the one used for files and folders (see Figure 43.10).

Figure 43.10. Select the type of access to be audited for the user or groups you have chosen.
5. Here the access types are much simpler than they were for file and folder objects. Select one of the first two if you want to track what users print and to keep track of users who manage printers. Note that if you select the Print option, the Read Permissions event is also selected because users must be able to read the permissions you’ve applied to the printer to determine whether they can print to it. Likewise, if you select Manage Printers, all other events are automatically selected with the exception of Manage Documents, because these other events occur while managing a printer.
6. When you’ve finished selecting successful and failed events to audit, click OK to dismiss the properties sheet, and then click OK to dismiss the preceding properties sheets.
Logging Shutdown and Startup Events with Windows 2003 Server
Windows 2003 prompts the administrator to give a text message to indicate why the server is being shut down or restarted. This text shows up in the Event Viewer just like any other audited event. Additionally, should the system crash, a similar text message window will pop up after the system boots, allowing you to enter a text message regarding the crash. In this manner, your audit trail can be used to determine what events led up to a crash. If you archive these events to a separate file using the Event Viewer, you can save them for future reference when similar problems occur.
In Figure 43.11 you can see an example of the Shut Down event dialog box for Windows 2003.
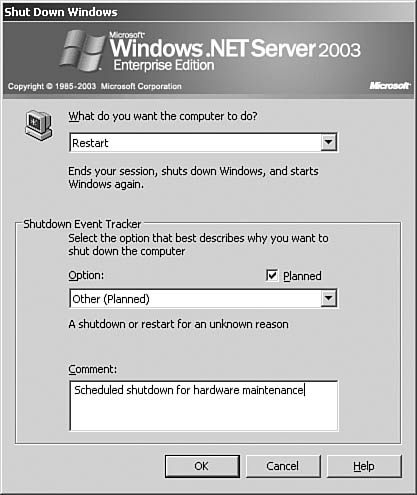
Figure 43.11. You can record an event when shutting down the system.
Using the Event Viewer
The Event Viewer is another tool you’ll find in the Administrative Tools folder. It functions much the same as it did in Windows NT 4.0, although now the MMC is used as the interface, and some additional functionality has been added. In Figure 43.12 you can see the Event Viewer for Windows 2003 with the Security object selected.

Figure 43.12. The Event Viewers for Windows 2000 Server and Windows 2003 Server now use MMC. This view is from Windows 2003 Server.
In addition to the Application, Security, and System log files, other log files might show up, depending on the services you’ve installed on the server. For example, in Figure 43.12, the Directory Service, DNS Server, and File Replication Service log files are also listed because they are installed on the domain controller. On member servers that are not domain controllers, your view might be different.
In the right pane of the Event Viewer, you will see a line item for each event in the file. Double-click any event to bring up a properties sheet that contains the detailed information about the event that was logged. In Figure 43.13, for example, you can see an example of a failed logon attempt by the user Administrator on the system.

Figure 43.13. Yes, even the administrator can forget his password once in a while.
Notice also in Figure 43.13 that you can use the up- and down-arrow buttons to move through line items so that you don’t have to double-click each one to view the details. This can make scanning a set of events easier. Directly under these arrows is a button that looks like two sheets of paper. Clicking this button copies the details of the logged event to the Clipboard. You can then use a word processor or another utility that has a paste function to save or print the details of the event.
Using the Event Viewer Action Menu
You can use a central MMC to manage the event logs from the local computer that you are logged onto. You can also add other computers in your network to the console tree in the left pane so that you can manage their log files from the same place.
Choose Action, Connect to Another Computer. Figure 43.14 shows the dialog box that pops up. Enter the name or IP address of another computer here, and, if you have access to that computer, click the OK button and it will be added to the tree.
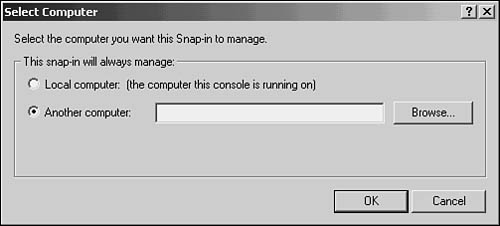
Figure 43.14. You can connect to multiple computers to manage event log files from a central location.
The Action menu also allows you to manage the properties of each log file. You can set the maximum size the log file can grow to, or set whether events should be overwritten when the file becomes full (see Figure 43.15).

Figure 43.15. Choose Action, Properties to manage a log file.
The Filter tab allows you to specify information that will be used to narrow down the records you want to look at. You can select the date range, event type, source, category, event ID, and user, among other things. To return the display to show all records in the file, select View, All Records.
Finally, you can use the Action menu to save a log file to another file, export the information in a log file to a text file, rename the log file, create a new log file, or clear all events from the log file.
Auditing Windows XP Professional Computers
Although Windows XP Professional is a client operating system, it can be used in SOHO environments to provide file and print shares for other computers on the network. And Windows XP Professional does include the Event Viewer, which enables you to monitor activity on the computer.
As with Windows NT/2000/2003, you must first set up the events to audit. The interface (the Microsoft Management Console, or MMC) is used to perform this function just as it is in Windows 2000/2003. However, for Windows XP you are auditing actions taken on the XP computer, not events for the domain. This is because Windows XP cannot be a domain controller in the network.
To set up the events to audit, click on Start, Control Panel, Administrative Tools. When the Administrative Tools folder appears, click on the Local Security Policy icon. You will see there (as shown in Figure 43.16) that the local security policy MMC interface looks a lot like the domain interface.

Figure 43.16. The Windows XP Local Security Settings window is similar to the Windows 2000/2003 domain security window.
Setting up security policies for such things as the password policy and setting up auditing for the computer are similar to the same tasks for Windows 2000/2003.
You can also use the Event Viewer with Windows XP. In Figure 43.17, you can see an example of this utility. Use Start, Control Panel, Administrative Tools. Click on Event Viewer.
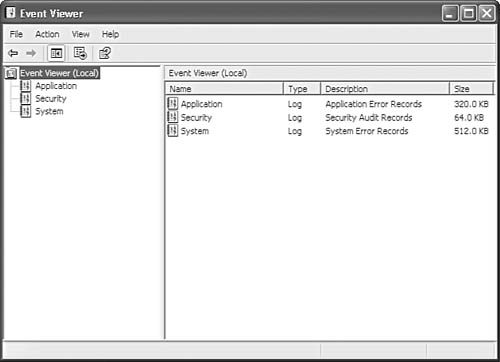
Figure 43.17. The Windows XP Event Viewer enables you to monitor selected significant events.
Because Windows XP does not host applications such as DNS, you will not see these items included in the left pane of the Event Viewer. Keep in mind that this is a client operating system. The capability for auditing and viewing significant events, however, is a good feature that makes Windows XP an ideal pseudo-server for small networks that do not need the capabilities offered by Windows server operating systems.
Novell Security
Novell’s NetWare has been around for many years, though it is not the dominant network operating system anymore. Early versions were limited in their capability to keep track of events, but this changed with NetWare 4.x. The most useful tool for older systems is the AUDITCON tool, which can be used to configure and audit a wide range of system events.
Syscon and Auditcon
The SYSCON utility that was used in NetWare 3.x was limited in the type of information it could provide to the administrator. It was basically limited to statistical information such as the number of blocks read/written and the services the server provided. In NetWare 4.x the AUDITCON utility provides an advanced tool that is superior to SYSCON in two ways:
![]() The information is more granular. File-system events, such as access and modifications to individual files or directories, can be tracked. Events are also audited for NDS objects.
The information is more granular. File-system events, such as access and modifications to individual files or directories, can be tracked. Events are also audited for NDS objects.
![]() The auditing role has been separated from the administrator’s role, enabling an employee other than the administrator to act as the network auditor.
The auditing role has been separated from the administrator’s role, enabling an employee other than the administrator to act as the network auditor.
Both of these features are significant advances. The first makes the information gathered more than just statistical. You can now track access and the type of access to individual files or objects. The second can be used to ensure that the network administrators, usually all-powerful people who can do anything on the network, are also held accountable for their actions. Network security is not compromised by the auditor, however, because this person does not have to be granted administrator-like rights to objects such as the SYS:SYSTEM directory. The administrator’s and the auditor’s functions are separated.
Note
The administrator does have some control over the auditor: The administrator has to set up the auditor so that she can perform her functions. After an auditor has been assigned and the account set up, the auditor can change her password, thereby keeping the administrator locked out of the auditing functions. This approach allows the administrator and the auditor to balance each other. The auditor can track the administrator’s actions, and the administrator can always change the person designated to be the auditor.
After the administrator has enabled auditing on volumes or containers and designated the auditor, the auditor can use the AUDITCON utility to check the system. Using AUDITCON, the auditor can modify which events are audited on which resources, and can produce reports showing auditing information.
Auditable Events
The precise granularity of things you can audit is what makes AUDITCON a powerful tool. The person who has been set up as the auditor can perform these actions:
![]() Audit by event—This includes file-related events such as open, read, write, and create files or directories. These can be audited for all users (global) or on a per-user basis. You can also audit printer queue events (QMS), server events (such as when it is brought down or restarted), and user events (such as user logins and logouts or the creation or deletion of user objects).
Audit by event—This includes file-related events such as open, read, write, and create files or directories. These can be audited for all users (global) or on a per-user basis. You can also audit printer queue events (QMS), server events (such as when it is brought down or restarted), and user events (such as user logins and logouts or the creation or deletion of user objects).
![]() File or directory events—You can select files or directories for which all access will be audited.
File or directory events—You can select files or directories for which all access will be audited.
![]() User—You can select individual users for which auditable events will be recorded.
User—You can select individual users for which auditable events will be recorded.
Auditing Files
The auditing software uses several places to store its data:
![]()
NET$AUDT.DAT—This file can be found at the root of every volume that has auditing enabled. It is always flagged as an open file to prevent anyone other than the auditor from accessing it directly. This file stores binary information in a binary format only for the volume on which it resides.
![]() NDS Database—Auditing for events for the directory (NDS) is stored in the NDS database.
NDS Database—Auditing for events for the directory (NDS) is stored in the NDS database.
![]()
AUD$HIST.DAT—This file is used to keep track of actions taken by the auditor(s). After all, someone has to watch the watcher! When more than one auditor is assigned to the network, each should have a separate user account so that this file can be used to track the actions taken by each auditor, giving still more checks and balances to the system.
![]()
NET$AUDT.CFG—This file contains audit file configuration information and is found at the root of the volume that is being audited. Using the AUDITCON utility, you can change the configuration information stored here, such as the maximum size the audit file can grow to, whether to allow more than one auditor to access the audit file at the same time, and whether dual-level passwords are used, among other things. The dual-level password requires an additional auditor password to be used when changing configuration information.
Note
No system, of course, is perfect. It is easy for the auditor to clear the AUD$HIST.DAT file when he has performed some action that was not allowed. However, the new file created after the old one is cleared will record that fact. Thus, although you might not be able to find out what was done, you can still find out that something suspicious is going on.
Using AUDITCON to Enable Auditing
An Admin user can enable auditing on a volume by running the AUDITCON utility. From the main menu, select the Enable Volume Auditing option and enter the password for that volume. If an old audit data file exists on the volume, it is replaced by the new file.
After this has been done, the administrator should give the volume password to the auditor, who should run AUDITCON and change it to a new value that the administrator does not know. Note that if the password is forgotten, the volume must be deleted and re-created if you want to change the password. You cannot recover the password. Also, without the correct password, you can disable auditing on the volume!
To change the audit password, the auditor should run the AUDITCON utility and select Audit Files Maintenance. From the next menu, select Auditing Configuration and then Change Audit Password. When prompted, enter the new password.
Producing Reports
Reports are produced to translate the binary auditing data into a format readable by humans. These reports can be produced by selecting Auditing Reports from the AUDITCON main menu. For security purposes, you should never leave these reports in a directory that can be easily accessed by other users. Instead, view or print the report text files and then delete them. You can always rerun the report later if you need to obtain another copy.
When producing an audit report, you can select events by date, time, and event; you also can choose to include or exclude selected files, directories, or users. This filtering capability makes it easy to get right to the important data when you are troubleshooting a security breach. If you are performing a regular review of the system, you can select all data and spend hours poring through it, but a large volume of data will most likely make it easy to miss an important event. In other words, when performing an analysis of the data, it’s best to have a target objective of files or events, or possibly users, you need to keep an eye on.
NetWare Auditing Solutions
NetWare 6.5 contains an auditing utility developed by Blue Lance (www.bluelance.com) called LT Auditor+ Server Edition for NetWare, which replaced the Novell Advanced Audit Service (NAAS) added to NetWare 6. LT Auditor+ Server Edition for NetWare is a “light” version of Blue Lance’s popular LT Auditor+ that supports only a single NetWare 6.5 server.
If you need support for eDirectory, Windows 2000/NT, or other advanced features, you should consider upgrading to the full version of LT Auditor+ 8 SP4 or use Novell’s own Audit 2.
In addition to providing LT Auditor+ Server Edition for NetWare as part of NetWare 6.5, Novell also sells its own full-featured auditing solution known as Novell Audit 2, an upgraded version of Novell Nsure Audit 1.0. Novell Audit 2 is a cross-platform auditing product that supports Novell NetWare 4.2 and above; Windows NT 4.0, 2000, 2000 Server, XP and Server 2003; SUSE Linux Enterprise 8; Solaris 8 and 9; RedHat Linux 7.3, 8, AS, and ES 2.1.
Novell Audit 2 works by using an agent which is used to collect data on an object, such as a server. A secure logging server receives this information from agents on the network. Agents are configured through a simple text-based configuration file known as the logevent. On a NetWare server, this file is called /etc/logevent.cfg; on Linux and Solaris, as /etc/logevent.conf; on Windows, as logevent.cfg in the default Windows folder (usually Windows or WinNT). Novell supplies a Java-based Platform Agent Configuration Tool to provide a graphical editor for the logevent file.
Novell Audit 2 can receive log events from Novell eDirectory 6.x, DirXML 2.0, NetMail 3.5 and above, iChain 2.2 SP1, BorderManager 3.8, NetWare NSS and NetWare Traditional file systems.
You can learn more about Novell Audit 2 by visiting its home page at the URL www.novell.com/products/audit/.