
CHAPTER 38. Managing Unix and Linux Users
SOME OF THE MAIN TOPICS IN THIS CHAPTER ARE
Network Information Service (NIS) 713
Unix is not generally considered an office desktop operating system. The Windows OS family has pretty much taken over the desktop, along with other minor players such as Apple’s Macintosh operating system and, to some degree, Linux. However, Unix is a dominant player in the server market, and many large networks are made up of a collection of Unix servers, X-Window Systems clients, and, usually, some Windows clients. Unix becomes much more prevalent when you get past the office desktop environment and into the workstation or server environment. Establishing a network connection or an interactive session on a Unix server requires, in most cases, that the user provide some form of authentication (that is, username and password).
This chapter covers the files typically used for user authentication purposes on Unix and Linux systems and some of the problems commonly associated with the logon process.
In addition, you’ll learn a bit about Network Information Service (NIS). This set of client/server programs can be used to manage many important files on multiple computers, keeping all computers within an NIS domain in sync. These files include those used for user management, as well as others, depending on the implementation, such as network configuration files. Although it is impossible to cover all the various things you can do with NIS in only one chapter, you’ll get a good overview of the kinds of tasks associated with setting up and managing multiple servers using NIS.
User Administration
Several files are generally associated with the user logon process for Unix systems. These files can be located in different directories, and the fields within some of these files can vary from one implementation to another. However, the following two files are generally used:
![]()
/etc/passwd—This is the password file. It is used to store the username, the password (in encrypted format), and other information specific to the user account. This file has its file protection value set to be world-readable so that anyone can access the file when logging in to the system. It also means that when someone gets into your system, he or she can usually copy this file and then begin to crack the passwords it contains.
![]()
/etc/groups—This file contains a list of user groups and a numerical value associated with each group. A field in the /etc/passwd file references a group in this file using this value.
The /etc/passwd File
The Unix operating system usually authenticates users by comparing their credentials with those stored in one or more files on the server. This is similar to the method used for the older Novell-based bindery, in which users must authenticate to each server they want to access. The typical username/password exchange is used, and the /etc/passwd file is the standard file used to store most user information. It is a simple text file that stores data using ASCII characters, and it’s world-readable because access to the file is required during the logon process.
The fields in this file store information such as the username, the home directory, the default shell, and an encrypted password, among other things. This file is one of the most vulnerable and soughtafter files by hackers. You might think that it’s a safe file because the password field in this file is encrypted. Not true! After a hacker has access to this file, a large number of utilities can be downloaded from the Internet to run against a password file to decrypt the password. Many hackers just use a dictionary and known encryption techniques and then compare the result with the value found in your /etc/password file. When a match is found, the hacker knows your password for that account.
Keep in mind that this file is world-readable. That means after someone has broken into even the most restricted account, if they can get to a shell command prompt, they can most likely copy this file and use it to further compromise accounts that have been granted much greater access rights to the system.
Note
This chapter covers files used to secure individual or groups of Unix servers and workstations in a network. It should be obvious that managing a large number of workstations, even using things such as NIS, can be a difficult task from a security standpoint. For this reason, every network that connects to another outside network, or the Internet, needs a good firewall. The authentication files discussed in this chapter help protect an individual Unix system. A firewall can help protect the entire network from outsiders. Chapter 45, “Firewalls,” contains more information on this important topic.
After the root password is discovered, or the password to any account that has administrator-equivalent privileges is discovered, your system is wide open to attack. This is just one of many reasons why it is very important to use a long, meaningless, and complex password consisting of a mix of letters, numbers, and symbols. Password complexity makes it more difficult to use either dictionary or brute-force attacks to break a password. However, don’t make your password so difficult to remember that you have to write it down.
This is the format for the /etc/passwd file, on most systems:
username:password:uid:gid:GECOS:homedir:shell
Note that the colon character (:) is used to separate fields. If a field is to be left blank, you’ll see two colons in a row. The fields in this file are detailed here:
![]()
username—The account name used to log in to the account.
![]()
password—The encrypted password for the user account. An asterisk character (*) in this field means that the account is disabled. If this field is left blank, no password is required for the account. Unless you have a very good reason, you should not have any account with a blank password on a networked computer. Any access can usually lead to further penetration by a clever user. An x character in this field generally means that a shadow password file, discussed later, is in use.
![]()
UID—A numerical value that the system gives to the account to identify the user when running processes or evaluating access to files and other system resources. A value of zero for this field is used to indicate the superuser, or a user who has the same privileges as root. On some systems values from 1 to 99 are reserved for use for system processes, such as background daemons.
![]()
GID—A numerical value that identifies a user group to which the account belongs. The file /etc/group contains a listing of user groups and the numbers associated with them. Group membership can be used to make managing access to system resources, such as files and directories, an easier task. Access to a resource can be granted to the group. The alternative method is to grant access individually, which is a time-consuming process when you have a large number of users who access similar resources.
![]()
GECOS—Yet another computer acronym! GECOS stands for General Electric Comprehensive Operating System. It is used to hold comments about the user, such as office and telephone number. This field can also be used to hold text that is used by certain applications, such as the finger utility. If more than one item is included in this field, commas should separate the items. It is common to store the user’s full name in this field.
![]()
homedir—This text field specifies the user’s home directory. When the user logs in to the system, he or she is initially placed in this location in the file system. As with most operating systems, a separate home directory is maintained for each user for storing his or her own files. Home directories also can contain subdirectories to make organizing one’s files a simple task.
![]()
shell—The user on a Unix system interacts with the system using one of the many shell applications available for Unix today. This field in the /etc/passwd file is used to specify the shell program that will be invoked when the user logs in to the system.
A typical entry in the /etc/passwd file looks like this:
jdoe:Gfjhjo9Uia$jpo2dYtaGGdsh:223:100:John Doe:/home/jdoe:bash
rsmith:HuiTytsm$ld34tTbd9Saa2:119:110:Rob Smith:/home/rsmith:bash
Note that the second field, the password field, appears to have nonsense characters. This is the encrypted password that is highly prized by network intruders.
Using a Shadow Password File
To plug the password security hole presented by the /etc/passwd file, a technique called a shadow password file is usually used. This file contains the actual passwords, also in encrypted format. However, the shadow password file is not world-readable, and permissions are set so that only the root account can access this file.
On many systems, the name of the shadow password file is /etc/shadow. Check your documentation to determine the exact path on your system. Also note that on some older systems (and a few current ones), you’ll have to load an extra component to install the shadow password file capabilities. Keep up-to-date by consulting your vendor’s Web site.
The contents of this file also can vary from one system to another. However, the following format contains the fields used in most implementations:
username:password:last:may:must:warn:expire:disable:reserved
The following list describes these fields:
![]()
username—This field is used for the same purpose as it is in the /etc/passwd file. It is the login name for this user’s account.
![]()
password—The user account password stored in encrypted format.
![]()
last—The number of days, since January 1, 1970, that the password for this account was changed.
![]()
may—The number of days that must pass before the password for this account can be changed.
![]()
must—The number of days after which the password for this account must be changed.
![]()
warn—The number of days before the password expires to warn the user about the upcoming password expiration.
![]()
expire—The number of days that must pass before the account password expires and the account becomes disabled.
![]()
disable—The number of days, since January 1, 1970, that the account has been disabled.
![]()
reserved—This field is reserved for future use.
As you can see, using a shadow password file gives you additional control over accounts, such as setting password expiration values. It also gives you informational fields (such as last and disable that can be used when managing user accounts.
The /etc/groups File
This file contains a list of user groups and a numerical value used to identify the group. The syntax for entries in this file is as follows:
groupname:grouppassword:groupID:username1,username2 ...
![]()
groupname—A name associated with the group. Using a meaningful name can help you simplify user administration.
![]()
grouppassword—Yes, you can place a password on a group, but this is generally not done. Instead, this field is usually left blank.
![]()
groupID—This is the group’s ID number, which is used by the operating system to identify the group. It is often referred to as the GID. This number can range from 0 to 32,767, and the numbers 0 to 10 are generally reserved for system groups. For example, in most Unix implementations, the root user has a GID of zero.
![]()
username1,username2 ...—This is a comma-delimited list of members of the group. Separate each using a comma.
Users can be members of more than one group. If this is the case, the first group is the user’s primary group, and the GID of this group is used when files are created or saved. Users can use the groups command to view the group(s) of which they are a member. The command chgrp can be used to change the current default group.
Adding or Removing User Accounts
To add or remove a user from a Unix/Linux box, you can edit the password and group files. However, whenever you make an edit to such an important file, there is always the chance that something will go wrong and you’ll end up rendering an account, or possibly a system, unusable. It’s advisable to always make a backup of an important file before making any edits.
After making entries in the /etc/passwd and /etc/groups files, you’ll have to create the user’s home directory and install any files that are part of your standard distribution, such as shell files.
However, on most systems you won’t have to go through all this trouble. Instead, most versions of Unix or Linux provide a program that can be used to perform all the functions needed to add or remove a user. On FreeBSD Unix, for example, the adduser command can be used. The syntax for this command is as follows:
adduser [-dDv] [-c changetime] [-C class] [-e expiretime] [-g primarygroup]
![]() [-G gecos] [-h homedirectorybasedir] [-H homedirectory]
[-G gecos] [-h homedirectorybasedir] [-H homedirectory]
![]() [-m homedirectorymode] [-p passwd] [-P encryptedpasswd] [-s shell]
[-m homedirectorymode] [-p passwd] [-P encryptedpasswd] [-s shell]
![]() [-S skeletondir] [-u uid] [username...]
[-S skeletondir] [-u uid] [username...]
![]()
-v—This is the typical Unix/Linux “verbose” option. It causes the adduser command to output more information about its operations. Good to use if you’re new at this.
![]()
-d—This is equivalent to the rmuser command (remove user) described later in this section.
![]()
-D—If you use the uppercase “D” character, the adduser command does not actually add a user. Instead, it sets defaults to use the next time adduser is invoked.
![]()
-C class—This specifies a login class for the user. FreeBSD Unix provides a file called /etc/login.conf that stores class definitions for users. Classes can be used to customize authentication methods and the user environment.
![]()
-e expiretime—This field is not generally used. It is intended to set an expiration time for the password.
![]()
-g primarygroup—This sets the user’s default group value. If you do not include this on the command line, adduser will prompt you for it.
![]()
-G gecos—This is the GECOS comment field. You’ll be prompted for this value if it is not included on the command line. Substitute text after the –G command that you want to appear in the GECOS field.
![]()
-h homedirectorybasedirectory—Use this to specify the home directory for the user. The value of homedirectory is the base directory under which the user’s directory is created using the username.
![]()
-H homedirectory—This version of the home directory option lets you specify the complete path of the user’s home directory.
![]()
-m homedirectorymode—Use this to specify the mode for the user’s home directory. The default is 0775.
![]()
-p passwd—This option enables you to enter, in clear text, a password for the user account.
![]()
-P encryptedpasswd—This option enables you to enter, in encrypted format, a password for the user account. You must use either -p or -P. If neither is used, you will be prompted for a value.
![]()
-S skeletondir—You can set up a “skeleton” directory to serve as a template to use when creating user home directories. This option enables you to specify the name of the template to use for this user’s home directory and possible subdirectories.
![]()
-u uid—Enter the user’s ID (UID) with this option. FreeBSD starts ordinary users’ UID at 100 and increments the value. Other flavors of Unix/Linux may use different starting values.
![]()
username ...—You can enter one or more user account names separated by spaces.
If you enter the adduser command with no command-line arguments, the command will prompt you for the information it needs (such as a username) to create the new account. You can use the large number of options available with the command to construct your own command to add users. If you need to add a large number of users at a time, or if you use the same command-line options frequently, create script files that can be used to invoke the adduser command for your customized requirements.
By using this command, you not only make the necessary entries into the /etc/passwd and /etc/groups files, but also create the user’s home directory.
The rmuser command can be used to remove a user. Simply follow the command with the username that is to be removed. The -v option is the only other command-line option available with this command.
The addgroup command works similar to the adduser command and helps automate the process of managing entries in the /etc/groups file. The syntax for this command is much simpler because there are fewer fields in the groups file, and no directories or other data structures need to be created. The syntax for this command is as follows:
addgroup [-vd] [-g gid] [-m members] [groupname...]
![]()
-v—Again, this causes more output to be displayed during the execution of the command. Useful when you are first learning to use the system.
![]()
-d—Similar to the adduser -d command, this command is the equivalent of using the rmgroup command that is used to remove a group. For example, addgroup –d groupname will remove that groupname from the /etc/groups file.
![]()
-g gid—This is used to specify the group ID (GID) for the group you are adding. If you omit this, the next available (unused) group number will be used.
![]()
-m members—Use this to specify the initial members of the group, separating each by a space when more than one member is entered.
![]()
groupname—This is the name you want to give to the group.
Other versions of Unix/Linux have similar programs. For example, Compaq’s True64Unix uses the useradd command. The syntax is similar to that of the adduser command, but a few other options are available. For example, the -x option enables you to further specify options relating to NIS, password expiration times, and so on. Red Hat’s Linux distribution enables you to use a similar useradd command. However, it also offers a more complex tool called linuxconf, which can be used in text mode, and also in a GUI mode using an X Window Systems interface or a Web browser. This tool goes far beyond simple user configuration tasks, including options for managing groups, file systems, system services, and many other objects.
Check the documentation of your Unix or Linux version to determine the commands and exact syntax for any script files or other utilities that can be used to automate user management.
Tip
In addition to any printed documentation you get with the Unix or Linux product you purchase, you can get online help. The command MAN followed by a topic will display text for the command you specify. The term MAN comes from Manual Pages. Consider this as a first resort when you need help with command syntax, and so on.
Using a Linux GUI Utility to Manage Users
Both Unix and Linux systems come with a graphical interface that can be used to perform many of the functions you can do at the command line. Some of these utilities provide all the functionality of the command-line version, whereas others offer a subset. For example, in Figure 38.1 you can see an example from Linux—the Red Hat User Manager.
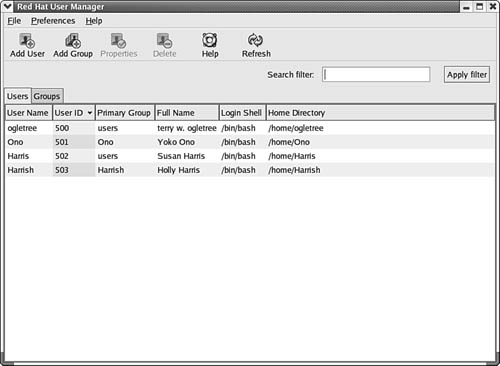
Figure 38.1. Unix and Linux also enable you to manage users using a GUI interface.
To bring up this utility, click on the Red Hat (the equivalent of the Windows Start button), and then from the menu click on System Settings and finally Users and Groups.
The only account that exists on this computer now is the root account, which exists on the computer when it is first booted. It was set up during the operating-system installation. As the “superuser” account, this has the rights and privileges to do anything on the computer, depending on what mode the Linux box is booted into. You can also enter user accounts during the installation and use the user manager utility to add or modify accounts later.
To add users, use the Add User button at the top of the window. Similarly, to add a new group that you can use to categorize users, use the Add Group button. In Figure 38.2 you can see an example of the Create New User dialog box.
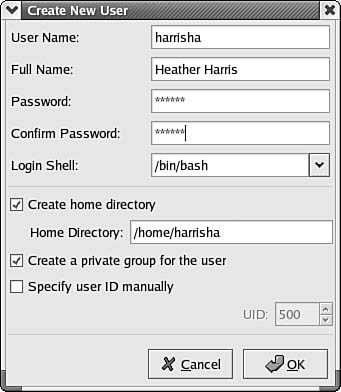
Figure 38.2. The Create New User dialog box allows you to enter the basic information about a new user.
Here you can enter information that looks a lot like that used in Windows NT 4.0. There are just a few fields such as these:
![]() User Name—This is the logon username.
User Name—This is the logon username.
![]() Full Name—As you may have guessed, this is the user’s full name—useful in large networks.
Full Name—As you may have guessed, this is the user’s full name—useful in large networks.
![]() Password—You’ll have to guess this one.
Password—You’ll have to guess this one.
![]() Confirm Password—Okay, if you got the last one right, then you might just get this one right, too.
Confirm Password—Okay, if you got the last one right, then you might just get this one right, too.
![]() Login Shell—Unix/Linux operating systems have different “shells,” which are basically command environments that wrap around the Unix kernel, and each shell has its own set of commands. Different users prefer different command environments. The default is the “bash” shell, located in
Login Shell—Unix/Linux operating systems have different “shells,” which are basically command environments that wrap around the Unix kernel, and each shell has its own set of commands. Different users prefer different command environments. The default is the “bash” shell, located in /bin/bash, as the figure shows. However, if you click the down arrow on the Login Shell field, you’ll see a lot of options you or your users can use instead of the default bash shell.
Note
As mentioned in the main text, shells in Unix/Linux are basically command environments, similar to the commands you can enter in a DOS system (a DOS shell implemented by the program COMMAND.COM or CMD.EXE and other program files). Every operating system has a command interface of some sort. Another thing to consider when deciding which shell to use in your network is that each shell has its own commands, and thus, it’s own syntax and command structure for creating script files. Script files are a valuable part of most operating systems because they group together commands to perform one or more functions. This saves the network administrator the chore of having to enter voluminous commands on many workstations. Script files are also used to perform setup duties for users when they log in to the system. So when choosing which shell to use, evaluate the commands and their flexibility and find out from seasoned Unix/Linux employees which is the one they prefer. If an administrator or programmer has to learn a new shell syntax from scratch, you might lose their years of experience using another shell. And you can let each user account use a different shell.
![]() Create Home Directory—If you want to give this user his own home directory, select the Create Home Directory check box and use the default shown in the Home Directory field, or change it to suit the specifications in your LAN. This is the default directory in which a user’s files will be stored. Unless this is a special account, such as one used only by an in-house written application, each user will most likely need a home directory. Note that due to the capability of the Unix/Linux operating systems to mount file systems from another computer, you can specify here a home directory on another computer by specifying the full pathname to the directory.
Create Home Directory—If you want to give this user his own home directory, select the Create Home Directory check box and use the default shown in the Home Directory field, or change it to suit the specifications in your LAN. This is the default directory in which a user’s files will be stored. Unless this is a special account, such as one used only by an in-house written application, each user will most likely need a home directory. Note that due to the capability of the Unix/Linux operating systems to mount file systems from another computer, you can specify here a home directory on another computer by specifying the full pathname to the directory.
Note
You can learn more about mounting file systems in Unix/Linux using the Network File System protocols that were first developed by Sun Microsystems, and later ported to most modern operating systems, by reading Chapter 40, “Network Printing Protocols.”
![]() Create a Private Group for the User—Generally it is a good idea to plan your network based on some business organization and create user groups to gather together users who perform similar functions. However, sometimes you get a new user for which there is no match for your existing groups. Use this check box to later enable you to create a new group for the user.
Create a Private Group for the User—Generally it is a good idea to plan your network based on some business organization and create user groups to gather together users who perform similar functions. However, sometimes you get a new user for which there is no match for your existing groups. Use this check box to later enable you to create a new group for the user.
![]() Specify User ID Manually—In general, when you are adding a lot of users, selecting a user ID is not that important, except that each user should have a unique ID. The group ID and the user ID can uniquely identify a particular user on the system. If you don’t want to use the default user ID displayed in this window, click on the Specify User ID Manually check box and enter a new value.
Specify User ID Manually—In general, when you are adding a lot of users, selecting a user ID is not that important, except that each user should have a unique ID. The group ID and the user ID can uniquely identify a particular user on the system. If you don’t want to use the default user ID displayed in this window, click on the Specify User ID Manually check box and enter a new value.
When you are finished entering information for a new user, click the Cancel button if you’ve changed your mind (or any time when you are entering information and are not sure of what data needs to be entered). If the information is correct, click on the OK button. The new user account then shows up in the window shown earlier in this chapter, in Figure 38.1.
As you enter information in this dialog box, you’ll notice that other fields are filled in automatically with default information. For instance, when you enter the username, the Home Directory field expands from /home/ to /home/<username>, where username is the name you chose for the login username. If you like this method for naming home directories for clients, this utility will save you a lot of time.
When you want to review a user’s account properties, you can click on the user in the main Red Hat Users Manager and use the Properties button. Figure 38.3 shows the basic information entered in the Create New User dialog box. Note that you can use this dialog box after the account has been created to change the user’s password, something the Help Desk has to do often in many networks. You can also update additional information by using the tabs at the top of the dialog box.

Figure 38.3. The Properties button on the Red Hat User Manager utility allows you to review a user account, and make changes.
These are the tabs you can use:
![]() User Data
User Data
![]() Account Info
Account Info
![]() Password Info
Password Info
![]() Groups
Groups
The first tab (User Data) enables you to change the basic information you entered when creating the account, such as changing the password.
You can use the Account Info tab to enforce an account expiration date or lock the account. The Password Info tab lets you find out the last date that the password was changed, and enable a password change policy. These are the items that make up this policy:
![]() Days Before Change Allowed—Use this to restrict arbitrary changes in a very short length of time, which can indicate intruder attempts.
Days Before Change Allowed—Use this to restrict arbitrary changes in a very short length of time, which can indicate intruder attempts.
![]() Days Before Change Required—All good things must come to an end, or be re-created. A good password must be changed to something else after this value expires. You should keep this to 30–90 days, depending on the value you place on the date hosted by your network.
Days Before Change Required—All good things must come to an end, or be re-created. A good password must be changed to something else after this value expires. You should keep this to 30–90 days, depending on the value you place on the date hosted by your network.
![]() Days Warning Before Change—This is the number of days before the expiration of a password that users will begin to get notices that the password is about to expire.
Days Warning Before Change—This is the number of days before the expiration of a password that users will begin to get notices that the password is about to expire.
![]() Days Before Account Inactive—Those who don’t change their password, or use their account, will no longer be able to access the account after this number of days.
Days Before Account Inactive—Those who don’t change their password, or use their account, will no longer be able to access the account after this number of days.
![]() The Groups tab—As shown in Figure 38.4, this allows you to use check boxes to select (or view) the groups that the user is a member of. The groups that the user is a member of may determine some of the capabilities the user has on the system.
The Groups tab—As shown in Figure 38.4, this allows you to use check boxes to select (or view) the groups that the user is a member of. The groups that the user is a member of may determine some of the capabilities the user has on the system.
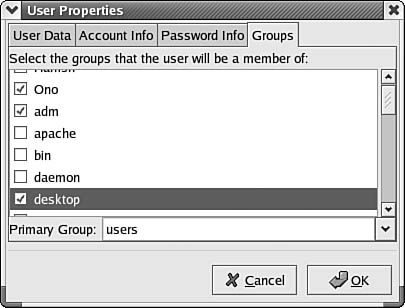
Figure 38.4. The Groups tab allows you to view user groups, including membership.
This simple graphical interface allows you to perform a number of functions that would require many command-line interface commands. As the fast pace of computer and software development continues, it’s possible, and very likely, that Linux may become a competitor for the desktop. The main driving forces for the desktop are cost, ease of use, and the applications. Windows operating systems can be more complex. In many cases Linux can be implemented more easily and at a much lower cost.
In the main window (shown in Figure 38.1), there is another tab right next to the Users tab: the Groups tab. Selecting this tab enables you to manage the groups of users on your network. If you simply click on the Groups tab, you will see a name for the group(s) on the computer, the group ID (GID), and the members of each group. You can use tabs at the top of this window to change this data. In Figure 38.5 you can see the Group Members window, which lets you see the members of each group.
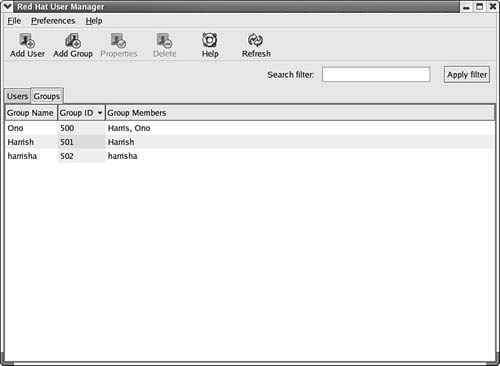
Figure 38.5. This tab enables you to see the name of each group, its GID, and the members of the group.
You can also click on any group to select it and then use the Properties button at the top of the window to see a dialog box showing the group name and the members of the group, should the member accounts not fit on the main display.
Lastly, the Delete button (in Figure 38.1) can be used to remove a user account from the system.
Network Information Service (NIS)
One of the main problems inherent in storing logon information on each computer on a network is managing user accounts on multiple machines. Every time a change is made for a user, the change must be propagated to other computers on the network that the user logs in to. Instead of visiting each Unix box to make changes to the appropriate files, you can use Network Information Service (NIS). This application was developed by Sun Microsystems and was originally called Yellow Pages (or YP for short). You still might see references to Yellow Pages in older documentation. However, due to trademark infringement, the application is now known as NIS.
Master and Slave NIS Servers
NIS stores important information for servers on a network in a central database. When important information is stored in a central location, management of the data becomes much easier. The network administrator can make the necessary changes to the maps on an NIS master server and let NIS take care of informing the affected slave servers on the network about the change. The NIS master server also works to authenticate users against its database. However, to provide a backup, slave servers on the network also keep copies of the same files maintained by the NIS master server. This redundancy enables users to keep working if an NIS master server is offline for a short period. The master/slave method also can be used to provide for load balancing so that the master NIS server does not become overloaded on a large network.
The kind of data that NIS can manage for Unix servers includes the standard /etc/password and /etc/group files. It also includes other important files containing data about remote file systems, other hosts on the network, and so on.
NIS Maps
When you initially set up NIS, important system files are converted into databases that are referred to as NIS maps. In addition to the typical files that we’ve talked about in this chapter so far, the following files also are candidates for NIS management:
![]()
/etc/ethers—This file results in two NIS maps: ethers.byaddr and ethers.byname. The Reverse Address Resolution (RARP) uses this information when resolving Ethernet hardware (MAC) addresses to IP addresses. Typically, this is used by diskless workstations that need to discover their assigned IP address (which might not be stored locally) during the boot sequence.
Note
The concept of a master and slave in the NIS structure does not apply to a server as a whole. For example, one NIS server might be the master server for a particular map or set of maps, while it is also the slave server for other maps controlled by other master servers. The terms master and slave relate to whether the NIS server holds the master map (where changes are made and then propagated to slave servers) or whether the server holds a duplicate copy that is regularly updated by the master map’s server. Each map contains information that tells it what its master server host is.
Note that, unless you have good reasons to distribute master copies among different servers, the whole point in using NIS is to centralize information updates. In general, it’s a good idea to use one master server in a typical domain and several slave servers (if needed) to help provide for load balancing and redundancy.
![]()
/etc/networks—This file also results in the creation of two NIS maps: networks.byname and networks.byaddr. You probably can guess that these maps store information used to associate network names with IP network addresses.
![]()
/etc/services—Only one NIS map is created from this file. It contains a list of network services and the TCP and UDP ports associated with these service port numbers.
![]()
/etc/protocols—Two NIS maps result from this file. The first is called protocols.byname and the second is called protocols.byaddr. These maps work similarly to the services maps, in that they act to cross-reference protocol numbers with the names of the protocols.
![]()
/etc/netmasks—The NIS map created by this file is called netmasks.byaddr, and it is used to store the subnet masks for the network.
![]()
/etc/hosts—This field also results in two NIS maps, hosts.byname and hosts.byaddr. The standard hosts file used in TCP/IP is almost an antique today but still has a few uses. These maps can be used to translate hostnames to IP addresses for computers. The Domain Name System (DNS) servers typically perform this function on most networks today.
![]()
/etc/aliases—This file also results in two NIS maps. They are mail.aliases and mail.byaddr. These maps are used to define alias email addresses.
The ypserve daemon runs on a central server and manages the NIS maps created from the standard systems files. The ypbind daemon runs on workstations and is responsible for interacting with the ypserve daemon to satisfy user requests and information interchange.
Note
NIS works in a fashion similar to DNS. Both provide information to clients from a database that stores all kinds of network information. To help you distinguish the difference between NIS and DNS, think of NIS as a local client/server mechanism that helps keep information sorted on and made available to local clients. DNS is part of a global, hierarchical system for managing IP addresses, domain names, services, and other data used for wide area communications, as well as functioning perfectly well on a local area network to satisfy requests for the data it manages. Note that DNS and NIS do not keep identical information. For example, DNS does not store usernames and passwords. This is a local function of the LAN.
Also note that NIS uses the concept of domains, like DNS. However, although it is typical to create domains that use the same name and cover the same network territory, this does not necessarily have to be the case. So when thinking about NIS domain names, don’t confuse them with DNS domain names. They might be the same for the affected portion of the network, but the administrator can choose to use different names for the different domains. For more information about DNS, see Chapter 29, “Network Name Resolution.”
In addition to these files, other files that can be used on most NIS implementations include the following:
![]() Shadow password files—As discussed earlier in this chapter, a user authorization file that is not world-readable like the
Shadow password files—As discussed earlier in this chapter, a user authorization file that is not world-readable like the /etc/passwd file. Instead, only root can manage this file.
![]()
bootparams—Specific parameters for booting computers on the network.
![]()
netgroup—Used to define networkwide groups (as opposed to the /etc/group groups). This makes managing groups of users on the network a simpler task.
The NIS Server ypserve Daemon and Maps Location
On the NIS server, the NIS maps can be found in a subdirectory that falls under the /var/yp directory. Names for the subdirectories are created by using the NIS domain name you have chosen. To use the old venerable acme.com name, the resulting file path for this domain would be /var/yp/acme.com.
The ypserve daemon is the background server process that is responsible for finding the information in its maps to satisfy client requests. When NIS is set up, you must have at least one master server that runs this daemon in order for NIS to function on the network.
Setting the NIS Domain Name Using the Command domainname
After you’ve decided on a name to use for the NIS domain, you’ll need to issue the domainname command to set that name on the Unix system.
To set the NIS default domain name, use the following command:
# domainname acme.com
You also can place a similar command (substituting your NIS domain name in the example for acme.com, of course), in a startup file to automate the process during system boot.
You also can enter the command domainname from the command line, without any command-line parameters. This syntax of the command displays the current NIS domain name so that you can check it for accuracy when making changes or performing troubleshooting efforts.
Starting NIS: ypinit, ypserve, and ypxfrd
Installing NIS on Unix and Linux platforms is not the same for all platforms. See the usual README.TXT and installation and release notes files for your platform to install the necessary files that are used to configure NIS on the server or client system.
The ypinit command creates the /var/yp/domainname directory (where domainname is the name you’ve chosen for your NIS domain) and reads the files in the /etc directory and creates the NIS maps. The NIS maps are then saved in the domainname subdirectory. When the ypinit program is finished, you can use the command ypserv to start the NIS server. When the server is up and running, you’ll need to start the map transfer daemon if you have configured other NIS servers in the network. Type ypxfrd at the command line. You also could add the command to the /etc/rc.local file to have it start automatically at startup.
After you’ve finished the initial installation, use the following commands to configure and set up NIS:
![]()
ypinit—This command is used to create the map directory and subdirectories (that is, /var/yp/acme.com) on the server. This command also runs through the various /etc files and creates the maps needed for the domain. This command also can be used to set up the /var/ypbinding/domainname/ypservers file on client computers, where domainname is the name of the NIS domain.
![]()
ypserv—After you’ve used ypinit to create the necessary NIS databases, use the ypserv command to start the server on the NIS server. The format for this command is ypserv -m. You can enter this at the command line or put it into a startup file if you want the server daemon to start each time the system is booted.
Note
By default, the domain name and hostname used by NIS are taken from the files /etc/nodename and /etc/defaultdomain. During the system boot process, these files are consulted and used with the appropriate NIS commands (that is, the domainname command).
To use ypinit, you should be logged in as root. Next, make edits to the /etc/hosts file and be sure that it contains all the IP addresses of each NIS server. Start the process of building the maps by using the following command:
/user/sbin/ypinit –m
The command (actually a script file) prompts you for the names of other host computers that you want to make into NIS servers. Be sure to include the server you are working on as well as the names of other NIS server candidates you’ve created. Next, you’ll be asked whether you want to terminate the operation if a nonfatal error occurs. Generally, you should enter yes to this prompt so that you can fix any problems that crop up. After fixing any problem, you can reinvoke ypinit to start over again.
Next, ypinit asks whether you want to delete any currently existing files that are in the /var/yp/domainname directories. If you are reinstalling NIS, you are prompted to delete the files created by the previous installation.
After this, ypinit uses make to process instructions contained in the makefile. The script file uses makedbm to create the maps and places the name of the master server for each map in a location in the map so that it will know its master server.
The Default Makefile Used by ypinit
When the ypinit command is invoked to begin configuring your server, it calls the make(1) command to process information in a makefile that is usually located in the /var/yp directory. You can make modifications to this file if required for your environment. The makefile is used to convert the input files discussed earlier into the ndbm(3) format, which is beyond the scope of this discussion. The makefile then creates the appropriate maps that NIS uses.
NIS Slaves
NIS slaves hold exact duplicates of NIS maps as the master server. The slave also runs the same ypserv daemon. The only difference between the two servers is that only the slave answers client requests; the slave doesn’t make any changes to the NIS maps. Only the master server can update the NIS maps. When the master server makes a change to the maps, it then propagates the changes to all the slave servers in the NIS domain.
Setting Up Slaves
Creating a slave server is similar to creating the master server. First, set the NIS domain name by typing domainname at the command line. After setting the NIS domain name, start the ypbind server process by entering this:
ypbind
And then enter the following on the slave server-to-be:
ypinit -s NISmaster
The -s option specifies that you are setting up a slave server, followed by the NIS domain master server name. After the slave server is initialized, the master server transfers all the NIS domain information to the slave. During the setup of the slave server, it does not look at its local /etc files to create the NIS maps. The slave server has only the information that is stored in the maps on the master server.
Deciding when to create a slave server should be done during the initial planning phase of setting up the NIS network. Although growing networks don’t exactly grow according to plan, it is possible to add slave servers later. If you add a slave server after the initial setup of the master server, you’ll need to add the new slave’s hostname to the ypservers map file.
Starting and Stopping the NIS Service on Slave Servers
Starting and stopping all YP processes is a simple task. These commands may be used online to start or stop the services. The following line will cause the YP processes to all stop running:
/etc/init.d/yp stop
To start all YP processes, use the following command:
/etc init.d/yp start
Now it can’t be simpler than that, after all you’ve gone through to get this system up and running!
Changing NIS Maps
You can make changes to the normal system files (that is, /etc/passwd) on the NIS master server. After you make these kinds of changes, set your default directory to be /var/yp, and then execute the command make mapname, where mapname is the name of the map being modified.
To update the system after making changes to the makefile, you’ll need to stop the YP processes, make the changes, and restart NIS. You can make changes to the makefile to add or remove maps. Use the same start/stop commands described in the preceding section for this purpose.
Pushing Modifications to NIS Slave Servers
After you’ve made modifications on the master NIS server, the changes must be sent to all other slave servers so that the databases can be kept in sync. The makefile utility uses the yppush command to send these map changes to the affected servers. The process is accomplished by sending a message to the ypserve daemon. The ypserve daemon that resides on the slave server then starts up another process using the ypxfr utility. This utility establishes communication with the ypsfrd daemon that runs on the master NIS server to see whether any changes need to be made. If so, the yppush program sends the map changes. If they are successfully applied to the slave server, it returns a successful status message to yppush.
Note that yppush sends only maps that have changed and that already exist on the slave servers. If you create new maps on the master NIS server that don’t yet exist on the slave NIS servers, use the command ypxfr by itself on the command line to do this. For troubleshooting purposes you can check the results of the command by viewing the log file named /var/yp/ypxfr.log.
Other Useful NIS YP Commands
Although the documentation for your system contains a lot of other tasks you can perform using NIS, this chapter has only touched on the basics. However, a few other useful commands that you’ll find in most implementations of NIS include the following:
![]()
ypcat mapfilename—This command lists the values stored in a map file. If you want to list the keys for the map file values, use the option -k in this syntax directly after the ypcat command.
![]()
ypwhich –m—This command lists all the available maps on the server and their masters. If you want to list only the master server for a particular map, include the map name following the -m option.
NIS Clients
Starting the NIS client is simple. First, set the NIS domain on the local machine using the domainname command, and then start the ypbind service by entering ypbind at the command line. To have ypbind start every time the machine boots, ensure that the ypbind script exists in the /etc/rc.local file and that it is not commented out.
The following is a sample boot script to launch ypbind in the correct NIS domain:
domainname acme.com
. . .
if [ -d /var/yp ] ; then
ypbind; echo -n ' ypbind'
fi
Common Login Problems
The most common problem users encounter when logging in to a Unix system is summed up by the following error message:
login incorrect
This message doesn’t convey a great deal of information to the user, but it usually indicates one of the following conditions:
![]() There is no user account in the
There is no user account in the /etc/passwd file for this username.
![]() The password entered by the user is not correct.
The password entered by the user is not correct.
![]() The home directory for the user (as specified in the password file) does not exist.
The home directory for the user (as specified in the password file) does not exist.
In the first instance, the administrator might not have gotten around to creating a record for the user in the /etc/passwd file. It is more likely that the user entered the username incorrectly. Remember that, in the Unix operating system, usernames and passwords are case sensitive. For example, if your username is LukeKurtis, entering lukekurtis or LUKEKURTIS will not work.
When you’re choosing passwords, it is a good idea to choose one that is not easy for others to guess. Unfortunately, this sometimes means that it is also easy for a user to forget. Choosing a text string that contains both uppercase and lowercase letters, along with numeric and alphabetic characters, is a good idea. When you receive the login incorrect error message, check to be sure that you are really entering the password as it was originally set up.
In all cases, one of the first things to check is that the Caps Lock key is not on. On a notebook, you may also need to double-check the settings of your Num Lock key, because the right half of the keyboard often acts as a 10-key when Num Lock is enabled.
If the account is new, it is possible that the user’s home directory has not been created or the administrator has not set the correct permissions on the directory to allow the user access to it. Using a script file to create new user accounts can help prevent this problem. Coding all the necessary commands by a script file will prevent the problems caused when an administrator creates a new account in a hurry and forgets a step or two.