
14. Emailing or Publishing Your Photos Online
Learn how to email photos, plus post pictures to Flickr and Facebook in iPhoto ’11.
iPhoto has always offered a handful of ways to share your photos via the Internet. However, iPhoto ’11 offers several significant improvements to the ways you can email and publish your photos on the Web.
For the first time, you can email photos directly to one or more recipients from your email account without leaving iPhoto. There’s no need to export your photos or drag and drop them into another application. iPhoto ’11 not only allows you to directly email photos, but also offers a handful of templates for creating and sending attention-getting and sometimes whimsical themed emails.
In addition, iPhoto ’11 has made it even easier to upload and publish one or more photos directly to a Flickr account or your Facebook page and then manage all aspects of those photos, such as comments and tags, in iPhoto ’11.
This chapter focuses on how to email photos in iPhoto ’11, as well as how to share your photos via Flickr or Facebook, providing your Mac has access to the Internet.
Sharing Photos via the Web
From any photo viewing mode in iPhoto ’11, select and highlight one or more images. Then click on the Share command icon located in the lower-right corner of the screen to share your photos via the Web.
You can choose to publish your photos on MobileMe, Flickr, or Facebook. Alternatively, you can directly email photos to specific recipients using themed email messages with your photos embedded in them.
![]() To learn more about uploading photos to MobileMe and creating online galleries, see Chapter 16, “Using Apple’s MobileMe with iPhoto ’11.”
To learn more about uploading photos to MobileMe and creating online galleries, see Chapter 16, “Using Apple’s MobileMe with iPhoto ’11.”
Sending Emails from iPhoto ’11
Using older versions of iPhoto, you needed to utilize a separate email application and either drag and drop or export your images from iPhoto before sending them as email attachments to your desired recipients.
Now, as long as you have any type of email account set up for use with the Mac’s Mail program, you can send images via email (viewable in the email message itself and, if you wish, as an attachment) without leaving the iPhoto program.
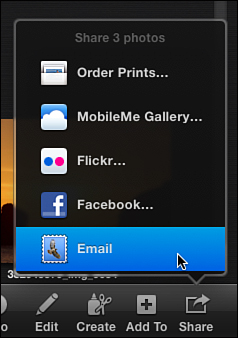
After highlighting at least one image, click the Share command icon and choose the Email option (see Figure 14.1). The screen is replaced by an email message screen, with your selected photos already embedded in the body of the message. At the top of the screen is a To field, as well as Subject and From fields. Fill out these fields just as you would when composing and sending an email message from your regular email program.
Figure 14.1. Send an email from iPhoto. Choose your favorite images and click on the Share command icon.
When you look at the main body of the email message, you see your selected photos already displayed. Where you see the text message “Insert Your Message Here,” you can manually enter your own message to the recipient.
Note
After iPhoto ’11 was first released, several revisions to the software were later made available by Apple. Within iPhoto ’11 (Version 9.1.1), for example, several new email templates were added to the program, giving users a total of 10 email template choices.
On the right side of the email screen are 10 email templates, each offering a different theme and appearance:
• Classic—This is a basic-looking email message template with your photos and message displayed on a white background.
• Journal—This slightly more formal-looking template allows you to display your photos within the body of an email message, along with a text-based message, plus captions for each photo.
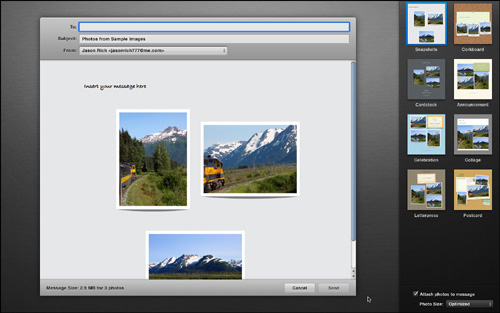
• Snapshots—This is a generic-looking email message with a solid light-gray background. The selected photos are displayed in the body of the email and are surrounded by thin white borders. Above the photos, there is an area to enter your text-based message (see Figure 14.2).
Figure 14.2. The Snapshots template offers an area to manually type the text that will accompany the photos in the body of your message. This is the most basic looking of the templates.
• Corkboard—The background of this email template looks like a corkboard, and the photos look as though they’re attached to the board using pushpins. In one area of this template, which looks like a sheet of paper, you can enter your text message to the recipient.
• Cardstock—This template can be used for sending a formal email invitation to the recipient. The color scheme uses shades of gray, and the design is somewhat elegant yet contemporary. You’ll find several text fields in this template to add text to.
• Announcement—You can use this template to send a more casual announcement that includes your text and photos. The design is simple and uses a light color scheme.
• Celebration—This theme is perfect for creating electronic birthday party invitations that can be emailed to recipients, complete with party time, date, and location details.
• Collage—This is a contemporary and sleek-looking collage design that is useful for sending multiple images in a single email. The theme allows you to enter a headline and your own text message above the display of photos.
• Letterpress—This theme has a textured look, just like the Letterpress greeting cards you can create using the Create Card feature of iPhoto (described in Chapter 13, “Creating Photo Projects and Photo Gifts”). This is a classy-looking template for sending one or multiple photos in the same email message.
• Postcard—Ideal for sending vacation or travel photos, this template looks like the front and back of a postcard. Figure 14.2 shows a sample of this template with images from Alaska added for demonstration purposes. The heading “Hello from Alaska!” has been added in one of the text fields in the template on the front of the postcard.
To add a theme to your email, simply click on one of the theme templates displayed on the right side of the screen. Otherwise, the last theme chosen is automatically used.
Each template allows you to customize various text elements. To add your own text to these template fields, click on any of them in the preview window and start typing. Above the text field, a formatting window appears, allowing you to choose your favorite font, font size, justification, and spacing for the text.
Tip
While previewing an email template with your photos displayed in it, you can click on any of the photos. This causes the photo to be framed with a blue box, indicating that it’s been selected, and a Zoom slider to appear above the photo. You can zoom in on any of your photos to change its appearance and then use the mouse to reposition it within the blue frame before sending the email.
Below the eight theme thumbnails displayed on the right side of the screen is a check box labeled Attach Photo to Message. Using the mouse, add a check mark to this check box if you want the photos to be sent as an email attachment, as well as in the main body of the email message as part of the themed template. The attached version will contain your images without the email theme graphics.
The file size of the email increases when you add a photo as an attachment, but doing this makes it easier for the recipient to do more with the photo than just view it.
In the lower-right corner of the screen, you can select the photo size if you choose to attach the photo to the message.
Caution
Some email service providers have a maximum email file size that you can send or receive. Thus, if you opt to send actual size photos, you may be able to attach only one, two, or three of them to a single message; otherwise, the total message size will become too big. In the lower-left corner of the email window, the total file size of the email message you’re creating is displayed. If you’re sending from a Google Gmail account or sending an email to a Gmail account, the maximum file size is 25MB. Yahoo! Free Mail, however, allows attachments only up to 10MB.
After you fill in all the fields on the email screen, click the Send icon in the lower-right corner of the email window. Your message is automatically sent to its recipients.
When the email has been sent, the email window disappears, and you return to the Events viewing mode in iPhoto.

SHOW ME Media 14.1—Learn how to send a theme email containing your photos in iPhoto ’11
Access this video file through your registered Web Edition at http://www.quepublishing.com.
Sending an Email in iPhoto ’11
With a few clicks of the mouse, you can send an email containing one or more of your photos to individual recipients. To accomplish this, follow these steps:
- Select and highlight one or more images.
- Click on the Share command icon and choose the Email option.
- When the email window appears, fill in the To, Subject, and From fields.
- Select an email template from the right side of the screen.
- Decide whether to also attach photos to your message and whether the attached photos should be sent in their actual size or optimized.
- Fill in the text-based fields in the email message’s body. The available fields vary, based on which template you select.
- Preview your outgoing email on the screen.
- Click Send to send your email.
Publishing Photos on Flickr.com
When it comes to sharing your photos on the Web, one of the most popular services with which to do this is Flickr (www.flickr.com). After setting up a free account, you can upload and share individual photos, or you can create complete online galleries (referred to on Flickr as Sets) that showcase dozens or hundreds of your images. It’s also possible to create animated slideshows for others to watch or to order prints and photo products that feature your favorite photos that have been uploaded to your Flickr account (a fee applies).
Note
Flickr.com is a worldwide online community based around sharing digital photos. Setting up a Basic Flickr account is free. A Pro account, which gives you access to more features, costs $24.95 per year. Benefits of a Pro account include unlimited uploads, unlimited image storage space, and the ability to use Flickr without seeing advertisements when you access the service from your web browser.
After you upload your photos, you can decide exactly who will be able to access them using their own web browser. For example, you can invite just immediate friends and family to view your images, or you can create a public gallery that anyone with web access is able to visit and view.
Normally, it would be necessary to access your Flickr account using your Mac’s web browser (such as Safari). However, iPhoto ’11 offers functionality that allows you to upload files directly to your Flickr account and then view and manage them.
To do this, highlight and select the photos you want to upload to Flicker, click on the Share command icon, and choose the Flickr option. The first time you do this, a window appears asking if you want to set up iPhoto to publish to Flickr. This process takes just minutes and needs to be done only once.
Set up your free Flickr account and follow the prompts for linking the account directly with iPhoto ’11. This process involves iPhoto opening your default web browser to initially access the Flickr.com website.
After your Flickr account is established and linked to iPhoto ’11, the next time you click on the Share command icon and choose Flickr in iPhoto, a window appears in iPhoto, called Flickr Sets, which displays thumbnails representing each Set of photos you’ve already uploaded (see Figure 14.3).
Figure 14.3. Add new photos from iPhoto ’11 to your Flickr account by creating a new Set or adding the selected photos to a pre-existing Set in your Flickr account.
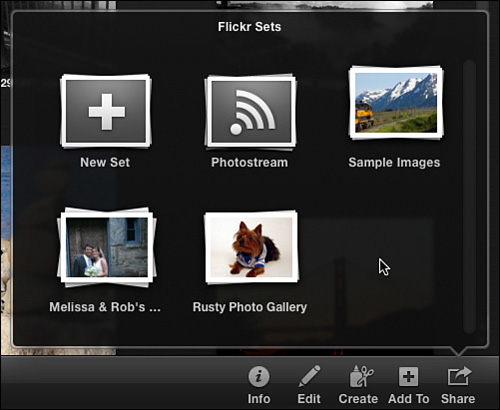
From this window, decide if you want to add photos to an existing photo Set on Flickr, create a new Set, or add to your Photostream. To create a new Set, click on the empty New Set thumbnail.
A pop-up window appears asking you to enter a Set name. You must also decide who will be able to view the photos. For this option, a pull-down menu offers a handful of choices, such as Only You, Your Friends, Your Family, Your Friends and Family, or Anyone.
You also need to select a photo size for uploading. The Web option uses compression but keeps the files so they look perfect on your Mac’s monitor. The Half Size and Full Size options are available if you have a Flickr Pro account. Uploading a file in full-size mode uses no compression and is an ideal solution for creating an online backup of your images or for showcasing your images in their highest possible resolution.
![]() To learn more about creating a backup of your images and archiving them, see Chapter 18, “Burning Photos to CD or DVD from iPhoto ’11,” and Chapter 19, “Photo Backup Solutions.”
To learn more about creating a backup of your images and archiving them, see Chapter 18, “Burning Photos to CD or DVD from iPhoto ’11,” and Chapter 19, “Photo Backup Solutions.”
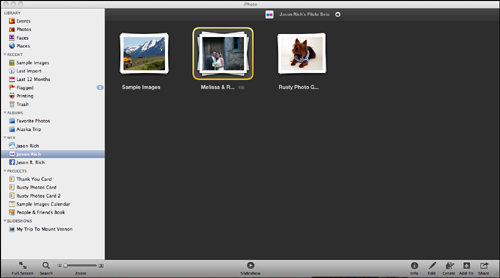
When you click on the Publish icon located in the lower-right corner of this window, your images are uploaded, one at a time, into the Set you just created (or into the pre-existing Set you selected). iPhoto then displays the Flickr viewing screen, shown in Figure 14.4, which looks similar to the Events viewing mode, but the image thumbnails that are displayed are of the images you have uploaded and published on Flickr. You can also access this screen anytime from iPhoto ’11’s Source list located on the left side of the screen (when not in full-screen mode).
Figure 14.4. iPhoto ’11’s Flickr viewing mode. View photos that have been published online in iPhoto ’11.
At the top of this screen is the Flickr logo displayed to the left of your Set name. On the right of your Set name is a small right-pointing arrow icon. Click this icon to open your Mac’s default web browser and view your Flickr account in a traditional way as you surf the Web.
Note
After images are published on Flickr, the Set is listed within iPhoto ’11’s Source list, under the heading Web. A Set is just like an Album. It’s a collection of your images that you compile and to which you assign a specific name.
While in Flickr viewing mode, you can highlight and select any thumbnail image and use any of iPhoto ’11’s features or functions. For example, you can edit the photo by clicking on the Edit command icon. You can also print the image or use it in a Photo Project you’re creating. It’s as if the photo stored online is part of your iPhoto ’11 photo library. Any edits you make while in Flickr Viewing mode will be saved in iPhoto, but not on the Flickr service.
Tip
In addition to creating individual Sets of images using Flickr, you can use this service to create a Photostream, which is a single gallery of all images you upload, displayed in reverse chronological order (with the newest images shown first). From within Flickr, you can customize the look of your Photostream.
Beyond uploading and viewing your images on Flickr (which you can do in iPhoto ’11), to use Flickr’s other features and functions, such as the service’s capability to create slideshows or order prints, for example, you need to access Flickr using your Mac’s web browser.
Sharing Photos on Facebook
Facebook is an ever-evolving, global online community that’s become a multicultural phenomenon with more than 500 million members. Creating a Facebook account is free, and thanks to iPhoto ’11, posting individual photos to your Wall (one public aspect of your account) or creating entire online Photo Albums that can be viewed by specific people whom you select, or the entire online community, is extremely easy.
One reason Facebook is so popular is that it encourages people to interact. Thus, when you post photos online, other people can post comments about your images and engage in online dialogues about them. Plus, you have the ability to tag photos.
When a photo gets tagged with someone’s name (because that person is featured in a photo), that photo can be searched by the tagged person’s name and viewed on his or her Facebook page, as well as the page where the photo was originally posted. This makes the online distribution of photos spread faster, but it also diminishes a person’s privacy.
Part of the seamless integration between iPhoto ’11 and Facebook includes the optional sharing of Faces tags when you upload your images to Facebook.
Caution
Before tagging yourself or your children, for example, in photos, think about the content of the photo and who will potentially be able to see those images (based on the privacy settings you select). Photos of you drunk and dancing on tables at a bar probably shouldn’t be tagged with your name associated with them and published in a public Photo Album that your boss might wind up seeing after using your name in a Google search or searching for you on Facebook. In other words, tag your photos responsibly and invest a few minutes to learn about Facebook’s privacy options before publishing your photos and making them viewable to the public. To learn about Facebook’s Privacy settings, visit www.facebook.com/privacy/explanation.php or click on the Privacy link at the bottom of Facebook’s main screens.
Until iPhoto ’11 was released, if you wanted to upload your images to Facebook, you needed to export them from older iPhoto versions and then access your Facebook page using your Mac’s browser. In Facebook, it was then necessary to use the service’s photo uploading and management tools.
Today, iPhoto ’11 offers seamless integration with Facebook, allowing you to upload your photos, add captions and tags, and manage photo-related comments.
Uploading Your Photos to Facebook
After selecting and highlighting the photos you want to share on Facebook while using iPhoto ’11, click on the Share command icon and then select the Facebook option.
You can initially add your Facebook account information to iPhoto ’11 by selecting the Preferences pull-down menu and clicking on the Accounts option. Choose the Add option in the Accounts window, select Facebook from the pop-up menu, and then manually type your existing Facebook username and password.
Alternatively, the first time you try to upload photos to Facebook in iPhoto, the Facebook login window appears. Enter your email address and password; then click on the check box acknowledging that you agree to Facebook’s terms of service. Click the Login icon (in the lower-right corner of the Login to Facebook window) to continue.
Tip
After selecting images that you want to publish onto Facebook, you can also select the Facebook option from iPhoto ’11’s Share pull-down menu or access Facebook from iPhoto ’11’s Source list.
Above the Share command icon, the Facebook Albums screen appears on the iPhoto screen (see Figure 14.5). This window offers three main options, plus the capability to add your selected photos in iPhoto ’11 to a pre-existing Album you have on Facebook.
Figure 14.5. Choose where in Facebook you want to publish your photos.

The available options include the following:
• Profile Picture—If you’ve selected one photo while in iPhoto, you can upload it to Facebook and make that image your new profile picture using this option.
• New Album—If you’re uploading one or more photos, use this command to create a new Album, to which you can add a custom name.
• Existing Album—Using this option, you can add new photos (currently stored in iPhoto ’11) to an Album already created and being displayed on Facebook.
• Wall—Instead of publishing photos in your Albums area of Facebook, you can publish one or more photos directly to your Wall for public viewing.
If you choose to make the photo you’re uploading your Facebook profile picture, a window appears asking you to confirm this decision. Click on the Set icon in this window to continue.
If you opt to add the photos to a new Album, a window appears prompting you to enter an Album name and then, from a pull-down menu, choose privacy options for that Album. Your options include Everyone (the images can be viewed by the general public), Only Friends (the images can be viewed only by your Facebook friends), or Friends of Friends (the images can be viewed only by your Facebook friends and their respective friends). Click on the Publish icon to continue publishing your photos to a new Album on Facebook.
If you choose to add the photos to your Wall, before you publish the photos, a window appears allowing you to enter comments (equivalent to a caption) related to those images. Enter the text in the dialog box that appears in the window and then click the Publish icon displayed in the lower-right corner of the window.
If you select to have your images uploaded to an existing Facebook Album, the images are automatically uploaded and saved in that Album and then can be viewed based on the privacy settings already set for that particular Album.
Note
Whenever you upload new images to Facebook, thumbnails and your photo captions are automatically displayed as part of your Facebook news feed.
SHOW ME Media 14.2—Upload Your Photos to Facebook
Access this video file through your registered Web Edition at http://www.quepublishing.com.
Uploading Your Photos to Facebook
To upload your photos directly from iPhoto ’11 into Facebook, follow these steps:
- Select and highlight the photos you want to share.
- Click on the Share command icon and select Facebook.
- From the window that appears above the Share command icon, choose which option you want related to publishing photos on Facebook. You can make one photo your profile picture, create a new Album, import photos to an existing Album, or publish photos directly to your Facebook Wall.
- Depending on which option you choose, follow the onscreen prompts that appear in whatever pop-up window is displayed in iPhoto ’11.
Managing Your Photos, Tags, and Comments on Facebook Using iPhoto ’11
After you link your Facebook account with iPhoto ’11, the account is listed in iPhoto’s Source list on the left side of the screen, under the Web heading. When you click on your Facebook account name listing from the Source list, the Facebook view is displayed on the screen (see Figure 14.6).
Figure 14.6. The Facebook view in iPhoto ’11 looks like and works the same as the Events view.
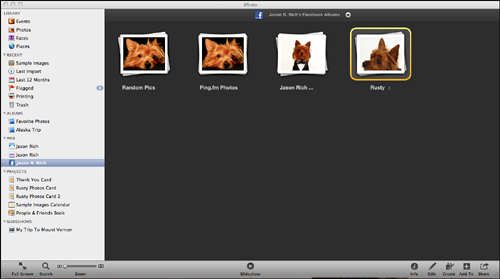
The Facebook view looks just like iPhoto ’11’s Events view; however, the Album thumbnails displayed represent Albums already published online on Facebook.
To access your Facebook account using your Mac’s browser, simply click on the small right-pointing arrow at the top center of the Facebook view screen. The icon is located to the right of your Facebook account’s name and the Facebook logo.
To view the individual image thumbnails in a Facebook Album, double-click on one of your Album thumbnails from the Facebook view. When you’re viewing your individual photo thumbnails contained in a Facebook Album, you can highlight and select one or more of those images and use any of iPhoto ’11’s features. For example, you can edit, print, or change the data related to that image.
You can also manage online tags and comments other people have added to your photos in iPhoto ’11. To do this, access your Facebook account by clicking on the listing for your account in the Source list. Choose one of your published Albums and double-click its thumbnail to open it. That Album then “syncs” with iPhoto ’11, a process that may take a few minutes, depending on how many photos are in the Album.
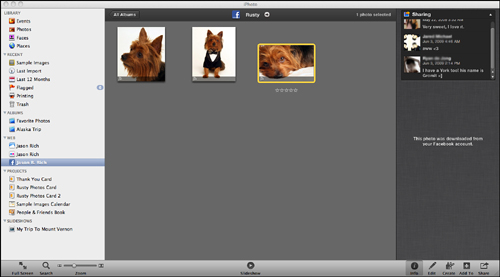
From the Facebook view of that Album’s contents in iPhoto ’11, you are able to see whether anyone has added comments or tags to individual photos. To do this, double-click on a photo to see a larger version of it in the image-viewing area and then click the Info command icon (located in the lower-right corner of the screen) to reveal the Facebook Sharing window on the right side of the screen.
If comments and/or tags related to that photo from other people exist, they are displayed in this window (see Figure 14.7). This information corresponds to what you’d see if you visited Facebook directly to view one of your uploaded images. You can also add your own tags and captions (comments) to Facebook photos from the Facebook Sharing window.
Figure 14.7. In iPhoto ’11, you can view comments and tags other people add to the photos you publish on Facebook.
Note
Any changes you make in iPhoto to Facebook Albums or individual photos stored on Facebook are updated immediately and automatically updated on your Mac and on Facebook.