
15. Creating and Sharing Slideshows
Use iPhoto ’11 to create and share entertaining, fully animated slideshows featuring your photos.
One way to showcase your photos in a highly engaging and entertaining way is to create a slideshow that includes text-based titles, animated transitions, special effects, and your favorite music. Being able to create a Hollywood-style production used to require many hours of time, not to mention specialized software, creativity, and production skills. But not anymore!
iPhoto ’11 allows you to create extremely impressive and entertaining slideshows from your photos. Just as it does with other Photo Projects, the process for creating slideshows involves inserting your images into professionally designed templates that allow you to add animated transitions, special effects, titles, and music to your presentations without having to do any programming or even tap your own creativity.
Slideshows are a fun and entertaining way to share groups of your images or enjoy them yourself. This chapter focuses on how to create and share slideshows using the features and functionality built into iPhoto ’11.
Creating a Slideshow That Tells a Story
The best use of a slideshow is to tell a story using pictures, music, and text-based titles. Your story might be about a vacation, wedding, honeymoon, birthday party, anniversary celebration, special event, look back at the first year in your baby’s life, or it might show off a group of similarly themed images.
You might opt to tell your story by showcasing photos in a chronological order or set your photos to music and arrange for the images to appear in a way that ties into specific song lyrics. There are many ways to use iPhoto ’11’s slideshow feature. The trick, however, is to use the special effects, animations, and capability to add music to your presentation to add to the experience of others enjoying your photos—not distract them with too much eye candy or make them dizzy because too much is happening on the screen at once.
You can include any number of images in your slideshows. However, to ensure that people stay interested and engaged, keep your presentations short. As a general rule, pick no more than 30 to 40 of your favorite images to showcase in a slideshow, and if you add music, don’t draw out the slideshow’s duration by longer than one or two songs.
To create a slideshow, begin by choosing the images you want to feature. The best way to do this, especially if the images are spread out in several Event folders, is to create a separate Album that contains just the images you want to use in your slideshow.
After you select and highlight the photos to feature in your slideshow, click on the Create command icon and select the Slideshow option. The iPhoto software will produce a slideshow for you, which you can now customize. To begin this process, click the Themes command icon in the lower-right corner of the screen. iPhoto ’11’s Slideshow Production screen is displayed (see Figure 15.1).
Figure 15.1. iPhoto ’11’s Slideshow Production screen.
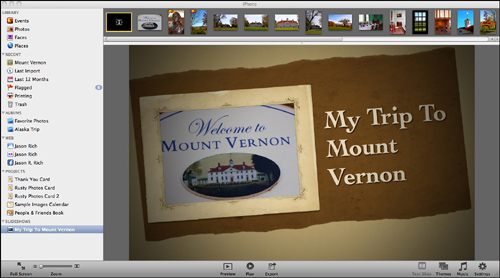
At the top of this screen are thumbnails of the images to be included in your slideshow. In the main image viewing area, you now see a preview window for editing and watching your slideshow as you’re creating it.
Located at the bottom of the screen is a handful of command icons, which provide all the features, functions, and tools needed to create a really impressive presentation.
Starting with the Full Screen command icon located in the lower-left corner of the screen and moving to the right, these command icons include the following:
• Full Screen—Switch into full-screen mode. The pull-down menus at the top of the screen, as well as the Source list on the left side of the screen, disappear, giving you more onscreen real estate to view your images and slideshow.
• Zoom (Slider)—Zoom in on whatever you’re looking at in the preview window. Move the slider to the left to zoom out or to the right to zoom in.
• Preview—Play your slideshow as is, in the preview window.
• Play—Play your slideshow as is, in full-screen mode. Press the Esc key to exit this mode and return to the main iPhoto screen.
• Export—Share your completed slideshow with others by saving it as a standalone file on your Mac’s hard drive (or another form of recordable media), in a format and file size that will work best, based on how you plan to share your presentation. The Export command offers a handful of options for creating a slideshow that can be viewed on an iPod, iPhone, iPad, Apple TV, a full-size computer monitor, or through the MobileMe service.
• Text Slide—Add text to your slides in the form of short captions that will be displayed during your slideshow, placed over selected images.
• Themes—Select the theme that best suits your photos and the story you’re trying to convey from the 12 extremely different slideshow themes featured in iPhoto ’11.
• Music—Easily add music to your presentation, using a selection of sample instrumental arrangements bundled with iPhoto ’11, or use any song that’s stored in your iTunes library on your Mac.
• Settings—Adjust the settings for your slideshow that determine, for example, how long each slide will be displayed and whether you want to fit the slideshow to a specific song (which autoadjusts as the duration slides are displayed). With some themes, you can also adjust slide transition effects and speeds, decide whether your slideshow will automatically repeat, and determine whether photos will automatically be scaled to fit the screen.
After you select your photos and click on the Create command, followed by the Slideshow option, iPhoto takes those photos and creates a basic slideshow that you can then fully customize. Start by adjusting the order in which your slides will appear. This is done with a drag-and-drop method using the image thumbnails displayed along the top of the screen. Select one image at a time using the mouse, click on it and hold down the mouse button, and then drag the thumbnail to the desired location to determine the slide order. Slides are displayed in the order in which you’ll see them during the slideshow, from the leftmost image thumbnail to the rightmost image thumbnail.
When the images are in the correct order, continue customizing your slideshow using the command icons located in the lower-right corner of the screen, starting with the Text Slide command icon.
Incorporating Titles and Text into Your Slides
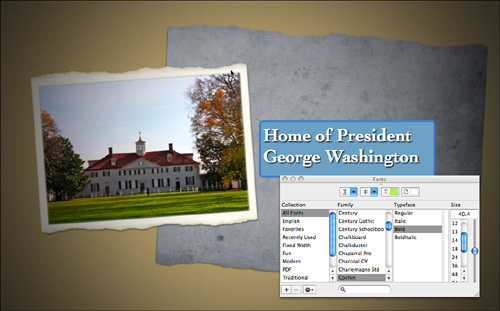
To overlay text onto any slide, choose an image and then click on the Text Slide command icon located in the lower-right corner of the screen. In the preview window, you see a line of text that says “Subtitle Text Here.” Click on this text to highlight and edit it. Enter whatever text you want.
Next, press Command + T to make your font selection using the font customization window that appears. From this window, you can choose a font, typestyle, font size, and font color. With the text on a slide highlighted, make your selections. The alterations you make appear instantly in the preview window and become part of your slideshow. To get rid of the font selection window, click on the small red dot in the upper-left corner of this window. Figure 15.2 shows an example of a slide that has a title, with the font selection window showing.
Figure 15.2. Add text to your slides using the Text Slide command icon.
At the top of the screen, notice that the text you add to a slide is displayed in a separate thumbnail from the image onto which you overlaid it. A black thumbnail containing the letter T is placed immediately before the image thumbnail.

SHOW ME Media 15.1—Add titles and text to your slides
Access this video file through your registered Web Edition at http://www.quepublishing.com.
![]() LET ME TRY IT
LET ME TRY IT
Adding Titles and Text to Your Slides
Follow these steps to add titles or text to your slides:
- When creating or editing a slideshow, highlight one slide and view it in the main preview area.
- Click on the Text Slide command icon.
- When you see the text message “Subtitle Text Here” overlaid on the slide in the preview window, double-click on that text to highlight it.
- Type your new title or text-based message.
- With all the text highlighted, press Command + T to access the font selection window and adjust the font, font size, typestyle, and font color.
- To finalize your text addition, reposition the mouse anywhere in the preview area and click it.
Giving Your Slideshow Pizzazz Using a Theme
The best way to quickly and easily add entertainment value and pizzazz to your slideshow is to add a theme. Click on the Themes command icon located in the lower-right corner of the screen and choose from one of a dozen themes built into iPhoto ’11. Each theme can be customized and will give your presentation a totally different vibe, regardless of whether you add music.
![]() To see a video sampling of the slideshow themes built into iPhoto ’11, see Media 2.2, which is part of Chapter 2, “Upgrading to iPhoto ’11: What’s New and Noteworthy.”
To see a video sampling of the slideshow themes built into iPhoto ’11, see Media 2.2, which is part of Chapter 2, “Upgrading to iPhoto ’11: What’s New and Noteworthy.”
The available themes include the following:
• Ken Burns—This is a television production effect that adds slight movement to still images to give them a sense of motion. It’s a subtle effect that can add a professional quality to your presentation. To learn more about Ken Burns, the American a documentarian who created this now-popular visual effect, visit http://en.wikipedia.org/wiki/Ken_Burns_effect.
• Origami—This theme displays each photo alone or as part of a collage (which iPhoto ’11 creates) and uses a folding transition effect to make the slideshow visually interesting. Because multiple images are used simultaneously, this is a great theme to use if you have a lot of photos to include in your presentation. Just make sure you display each slide long enough (say, five to seven seconds) for the people viewing it to be able to take in everything they’re seeing. A sample of a multiphoto collage displayed as part of an Origami slideshow is shown in Figure 15.3.
Figure 15.3. iPhoto ’11 automatically creates multiphoto collages as part of your slideshows when you select certain themes.

• Reflections—To give your slideshow a contemporary and professional look, choose this theme. Your slides are displayed alone or in photo collages containing two, three, or four photos, but there is a constant solid color background, and reflections of the images are displayed at the bottom of the screen.
• Vintage Prints—This theme makes your images look like individual snapshots placed in a pile. The animation shows one or multiple images at a time in a slow-moving animated sequence that simulates viewing the pile of images from different perspectives.
• Snapshots—By making your images look like individual snapshots, this theme places one snapshot on top of another using a slow-moving animated sequence with a solid color background. One photo is displayed at a time for several seconds before another snapshot is dropped on top of the virtual pile.
• Sliding Panels—This theme divides the screen in one, two, or four sections and then creates animated collages using your images. Use this theme to showcase a larger group of photos in relatively quick succession.
• Scrapbook—Imagine flipping through the pages of a virtual scrapbook. Each page of the scrapbook has a different layout that looks as though your images are mounted on paper pages. This animated slideshow theme automatically turns the pages of the virtual scrapbook as you watch it. Use this theme to showcase a large group of photos in an interesting way.
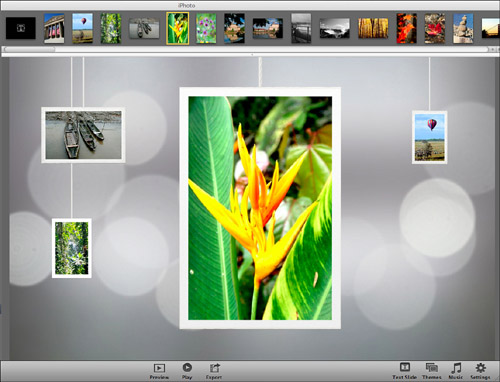
• Photo Mobile—Each one of your images is displayed as a print hung by a virtual string on a mobile that continuously rotates, revealing one full image at a time. This is a really cool, multidimensional visual effect for showcasing a small handful of photos, but after 60 seconds or so, the visual novelty of this effect wears off. Figure 15.4 shows a sample of this theme.
Figure 15.4. Here’s what the Photo Mobile theme looks like.
• Holiday Mobile—This theme works just like the Photo Mobile theme, but the background has more of a winter holiday look that features animated snowflakes. Add some holiday music, and you’ll have a great way to show off your favorite holiday photos.
• Shatter—This animated effect is high-tech looking and slick. Image transitions involve a photo breaking apart or shattering, while the next photo materializes into place. This template does not work well, however, with vertically oriented photos.
• Places—If you utilize geo-tagging with your photos, this theme creates customized maps for each of your photos that allows you to display where the photo was taken, as well as the photo itself. In between animated map slides, your photos are displayed using a variety of different photo collage layouts. Geo-tagging can be added to images in order to use this theme.
• Classic—This is the default slideshow template. It simply displays one photo at a time, with a fade-out and fade-in transitional effect in between slides.
Tip
When multiphoto collages are created and displayed, you can edit which photo appears where by first clicking on and selecting the thumbnail image for a picture displayed within a collage (from the top of the screen). In the preview window, the collage slide is displayed. Drag and drop images from the thumbnails above into the location you want them to appear in the collage slide. This action replaces the placeholder photo. When you replace an image, the image that previously appeared is returned to the lineup of thumbnails at the top of the screen, so you can use that image later. When you click on one of the images in a collage, a hand-shaped cursor appears. Use it to reposition the photo within the collage frame by dragging it around.
Caution
Some of the themes work better just with horizontally or vertically oriented photos. If a photo’s orientation doesn’t fit into a template, it is automatically cropped to fit, which could distort the photo or delete important elements of the image.
Using Animated Transitions and Special Effects
Depending on which slideshow theme you select, by clicking on the Settings command icon located in the lower-right corner of the screen, you can customize various aspects of that template.
For the Classic slideshow template, for example, from the Slideshow Settings screen (see Figure 15.5), you can make adjustments to all slides in the presentation or individual slides, based on which tab (All Slides or This Slide) is highlighted at the top of the window.
Figure 15.5. Use the Settings adjustments to customize a slideshow theme.
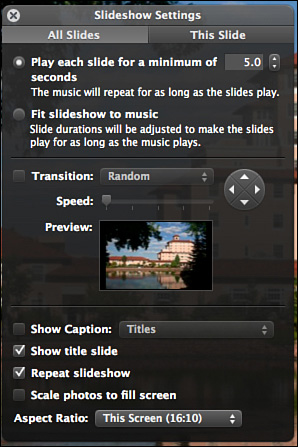
Some of the adjustments you can make include how long each slide will be displayed, what transitional effect will be used in between slides, and whether photos should be automatically scaled to fit the screen.
The options for customizing each slideshow theme vary. When you adjust the settings for other themes, you can pick the background color displayed behind the images, for example.
If you’re including music in your presentation, when you click on the Fit Slideshow to Music option, iPhoto ’11 automatically determines how long each slide should be displayed to fit perfectly (timing wise) with the music selection. However, if you don’t use this feature, you can set all slides to be displayed for the same amount of time (there is a different default time for each theme), or you can determine the amount of time each individual slide will be displayed if you make adjustments after clicking on the This Slide tab, as opposed to the All Slides tab in the Settings window.
Adding Music to Your Presentation
One of the best ways you can bring your slideshow to life, so to speak, and set the mood for the people viewing it, is to select applicable music to play in the background. Whether you use a slow instrumental music bed, ballad, high-energy pop song, or techno song as background music, it will make a huge difference in the emotions that are conjured up when people watch your presentation.
To make your music selection, click on the Music command icon located in the lower-right corner of the screen. The Music Settings window appears (see Figure 15.6).
Figure 15.6. Use the Music Settings window to add music to your slide presentation.
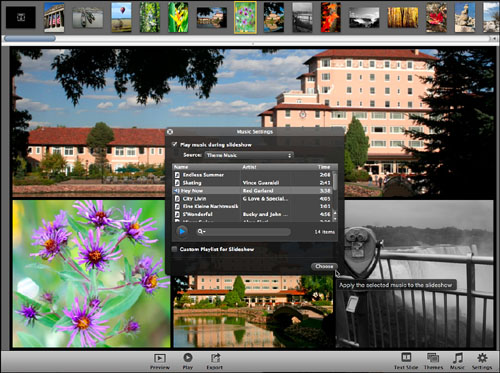
From the Source pull-down menu of the Music Settings screen, view the selections of music available to you. The Sample Music and Theme Music libraries are collections of instrumental pieces built into iPhoto ’11. If you have Garage Band (part of iLife ’11) installed on your Mac, you also have access to a selection of Garage Band demo songs. Alternatively, from this pull-down menu, you can pick any song you have stored in your personal iTunes music library.
Using iTunes, you can easily download virtually any song you want to add to your slideshow (a fee applies) and then incorporate it into your presentation when that song is saved in your iTunes library.
To select a single song to add to your slideshow, simply click on its title from the list that appears below the pull-down menu, highlight it, and then click on the Choose icon located in the lower-right corner of the window.
If you want to add several songs to a slideshow, add a check mark to the Custom Playlist for Slideshow check box and then drag your song title choices from the song list in the middle of the Music Settings window to the Custom Playlist window.
SHOW ME Media 15.2—See how to add music to your slideshow
Access this video file through your registered Web Edition at http://www.quepublishing.com.
![]() LET ME TRY IT
LET ME TRY IT
Adding Music to Your Slideshow
To add music to your slideshow, follow these steps:
- As you’re editing a slideshow, click on the Music command icon.
- Use the pull-down menu at the top of the window to select a source, such as Sample Music, Theme Music, or your iTunes library.
- To use just one song or track in a slideshow, highlight one song from the list and click on the Choose icon.
- To use multiple songs in a slideshow, add a check mark to the Custom Playlist for Slideshow check box and then drag and drop song selections from the displayed list to the bottom of the window, where you can arrange your slideshow’s multisong playlist. Click the Choose icon when you’re done.
Sharing Your Slideshow
After you make all your customizations to a slideshow, its title is displayed in iPhoto ’11’s Source list under a Slideshows heading. It is automatically saved and can be viewed at any time on your Mac in iPhoto.
Tip
iPhoto ’11 automatically makes the first slide in your presentation the title slide. The text you enter as the title is displayed on this first slide during your presentation but also serves as the filename for the entire slideshow. (The filename is then listed on iPhoto ’11’s Source list.)
However, you can easily export your presentation, making it available to share with other people via email or by publishing it onto a website or into a blog, for example. It can even be uploaded and shared on YouTube, if you export the slideshow into the MPEG-4 or QuickTime Movie format.
After the slideshow is exported, it can also be synced to an iPod, iPhone, iPad, or Apple TV unit and viewed, or saved to a CD (or DVD) and viewed on any computer or on a TV that’s equipped with a DVD player, for example.
Click the Export icon located at the bottom center of the screen when creating a slideshow to open the Export Your Slideshow window (see Figure 15.7).
Figure 15.7. The Export Your Slideshow window.
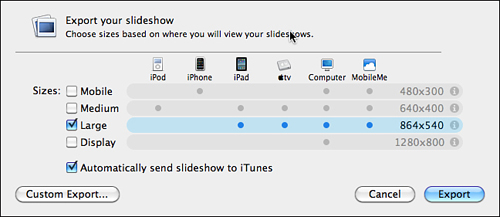
Select the file size (Mobile, Medium, Large, or Display) that corresponds on the displayed chart with the device on which you want to view your slideshow. Then click on the Export icon in the lower-right corner of the window.
If you click on the Custom Export option located in the lower-left corner of the Export Your Slideshow window, you can choose the destination where the exported file will be saved (the default is in your iPhoto Slideshows folder). You also can choose specifically in what file format you want the slideshow exported.
Tip
If you want to watch your slideshow on a full-size television set, export it into MPEG-4 format. If you plan to view it on the Web (as part of a website or blog), save it in the QuickTime Movie format.
Using Your Other Slideshow Options
In addition to being able to create animated slideshows from iPhoto ’11, you can export your photos and create dazzling slideshow presentations using many of the online-based photo services.
![]() For a list of popular online photo services, such as KodakGallery.com, Snapfish.com, and SmugMug.com, see Chapter 12, “Creating Prints Using a Professional Photo Lab.”
For a list of popular online photo services, such as KodakGallery.com, Snapfish.com, and SmugMug.com, see Chapter 12, “Creating Prints Using a Professional Photo Lab.”
There are also dedicated photo websites, such as Slide.com (www.slide.com), that just allow you to create animated slideshows using your photos. These slideshows can be shared through websites, email, blogs, or almost any online social networking sites, such as Facebook.
For the Mac, third-party software packages, such as FotoMagico 3 ($29, www.boinx.com/fotomagico/overview), are designed exclusively for producing professional-looking animated slideshows using your photos and video clips. This software offers many special effects and editing features not available in iPhoto ’11.

TELL ME MORE Media 15.3—Hear a discussion about your other options for creating slideshows outside iPhoto ’11
To listen to a free audio recording about your other options for creating impressive slide shows using your images, log on to http://www.quepublishing.com.