
SECONDARY WINDOWS
You can rearrange secondary windows such as the Toolbox and Solution Explorer even more easily than you can rearrange toolbars. Click and drag the window’s title bar to move it. As the window moves, the IDE displays drop icons and blue drop areas to help you dock the window, as shown in Figure 2-6. This figure probably looks somewhat confusing, but it’s fairly easy to use.
FIGURE 2-6: Use the IDE’s docking icons to help you dock windows.
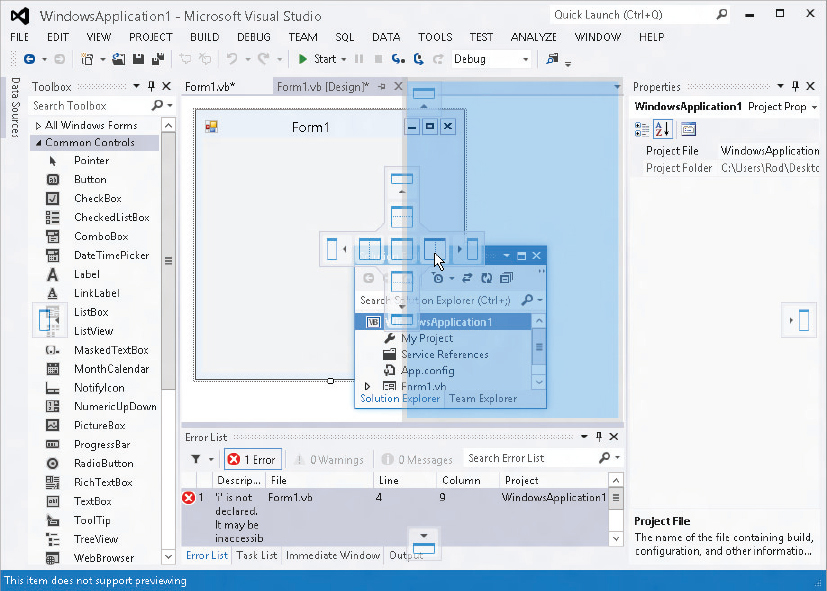
When you drag the window over another window, the IDE displays docking icons for the other window. In Figure 2-6, these are the icons in the center that look like little windows. In Figure 2-6 the cursor is hovering over one of these icons.
The four icons on the sides dock the window to the corresponding edge of the other window. The center icon places the dropped window in a tab within the other window.
When you drag the mouse over one of the docking icons, the IDE displays a pale blue rectangle to give you an idea of where the window will land if you drop it. In Figure 2-6, the mouse is over the main document window’s right docking icon, so the blue rectangle shows the dropped window taking up the right half of the main document window.
If you drop a window somewhere other than on a docking icon, the window becomes free-floating.
When you drop a window on the main document area, it becomes a tabbed document within that area, and you cannot later pull it out. To free the window, select it and use the Window menu’s Dock or Float command.
This section described some of the general features of the IDE’s secondary windows. The following sections describe two of the most important of those secondary windows: the Toolbox and the Properties window.
Toolbox
The Toolbox window displays tools that you can use with the currently active document. The tools are available when you are editing a Windows Form, WPF Form, UserControl, web page, or other item that can contain objects such as controls and components.
The tools are grouped into sections called tabs, although they don’t look much like the tabs on most documents. The Toolbox in Figure 2-6 displays tools for the Windows Forms Designer. The Common Controls tab is showing its tools as icons. The Containers and Menus & Toolbars tabs are listing their tools by name. Other tabs are hidden.
You can customize the Toolbox by right-clicking a tab and selecting one of the commands in the context menu. The following list briefly describes the most useful of these commands:
- List View — This command toggles the current tab to display tools as either a list of names (as in the Containers tab in Figure 2-6) or a series of icons (as in the Common Controls tab in Figure 2-6).
- Show All — This command shows or hides less commonly used tabs such as Data, WPF Interoperability, Visual Basic Power Packs, and many others.
- Choose Items — This command displays a dialog box where you can select the items that should appear in a tab.
- Sort Items Alphabetically — This command sorts the items within a Toolbox tab alphabetically.
- Reset Toolbox — This command restores the Toolbox to a default configuration. This removes any items you may have added by using the Choose Items command.
- Add Tab — This command creates a new tab where you can place your favorite tools. You can drag tools from one tab to another. Hold down the Ctrl key while dragging to add a copy of the tool to the new tab without removing it from the old tab.
- Delete Tab — This command deletes a tab.
- Rename Tab — This command lets you rename a tab.
- Move Up, Move Down — This command moves the clicked tab up or down in the Toolbox. You can also click and drag the tabs to new positions.
If you right-click a tool in the Toolbox, the context menu contains most of these commands plus Cut, Copy, Paste, Delete, and Rename Item.
Properties Window
When you are designing a form, the Properties window allows you to view and modify the properties of the form and of the controls that it contains. Figure 2-7 shows the Properties window displaying properties for a Button control named btnCalculate. You can see in the figure that the control’s Text property is “Calculate” so that’s what the button displays to the user.
FIGURE 2-7: The Properties window lets you view and modify control properties.
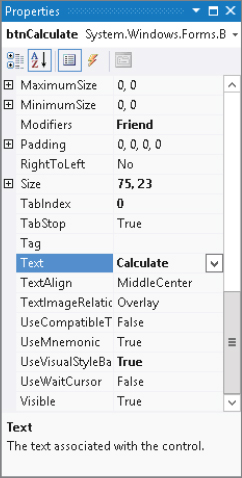
Figure 2-7 shows some important features of the Properties window that deserve special mention. At the top of the window is a drop-down list that holds the names of all of the controls on the form. To select a control, you can either click it on the Windows Forms Designer or select it from this list.
The buttons in the row below the drop-down determine what items are displayed in the window and how they are arranged. If you click the leftmost button, the window lists properties grouped by category. For example, the Appearance category contains properties that affect the control’s appearance such as BackColor, Font, and Image. If you click the second icon that holds the letters A and Z, the window lists the control’s properties alphabetically.
The third icon makes the window display the control’s properties, and the fourth icon (which displays a lightning bolt) makes the window display the control’s events instead. (Yes, it’s a little odd that the Properties window displays either properties or events, but there is no Events window.)
For more information on using the Properties window to edit properties and create event handlers in the Windows Forms Designer, see Chapter 3, “Windows Forms Designer.”