
WPF IN THE IDE
The Visual Studio IDE includes editors for manipulating WPF Window classes and controls. Although many of the details are different, the basic operation of the IDE is the same whether you are building a Windows Forms application or a WPF application. For example, you can use the WPF Window Designer to edit a WPF window. You can select controls from the Toolbox and place them on the window much as you place controls on a Windows Form.
Despite their broad similarities, the Windows Forms Designer and the WPF Window Designer differ in detail. Although the Properties window displays properties for WPF controls much as it does for Windows Forms controls, many of the property values are not displayed in similar ways.
The window represents many Boolean properties with check boxes. It represents other properties that take enumerated values with combo boxes where you can select a value or type one in (if you know the allowed values).
Future Visual Studio releases may make Expression Blend more consistent with Visual Studio, although some more advanced features (such as animation recording) are likely to remain only in Expression Blend to encourage developers to buy it.
Note that the editors in the Properties window merely build the XAML code that defines the user interface. You can always edit the XAML manually to achieve effects that the Properties window does not support directly.
The following sections explain how to write XAML code and the Visual Basic code behind it.
Editing XAML
Figure 11-2 shows the IDE displaying a new WPF project. Most of the areas should look familiar from Windows Forms development. The Toolbox on the left contains tools that you can place on the window in the middle area. Solution Explorer on the right shows the files used by the application. The Properties window shows property values for the currently selected control in the middle. The selected object in Figure 11-2 is the main Window, so the top of the Properties window shows its type: Window.
FIGURE 11-2: The IDE looks almost the same for Windows Forms and WPF applications.
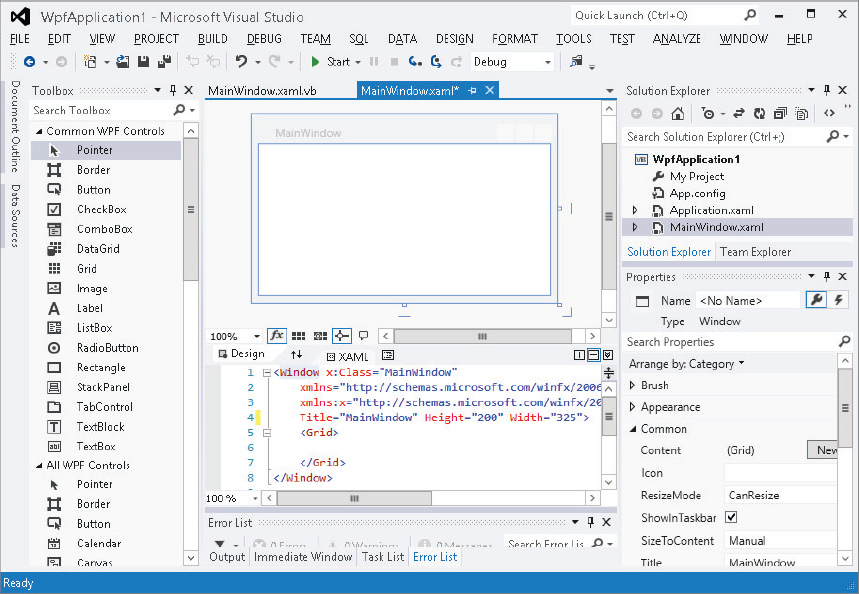
One large difference between the IDE’s appearance when building a WPF application versus a Windows Forms application is the central editor. In a Windows Forms application, you edit a form with the Windows Forms Designer. In a WPF application, you use the graphical XAML editor shown in Figure 11-2 to edit a Window object’s XAML code. The upper half of this area shows a graphical editor where you can drag controls from the Toolbox much as you design a Windows Form. The lower part of the editor shows the resulting XAML code.
If you look closely at Figure 11-2, you can see the Window element that includes the rest of the file. When you first build an application, the Window object’s element contains a single Grid control.
Usually, it is easiest to build WPF Window objects by using the graphical editor and the Toolbox. When you select a control in the graphical editor, you can view and modify its properties in the Properties window. If you can’t get a desired effect by using the Properties window, you can use the XAML view at the bottom to edit the XAML code by hand. For example, the Properties window won’t let you set a non-container control’s Content property to another control, but you can do this easily with XAML code. For example, to place a Grid inside a Button control, simply type the Grid control’s definition between the Button control’s start and end tags.
The graphical editor and the Properties window don’t give you access to all of XAML’s features, but they do let you build a basic user interface for WPF applications. Once you have defined the window’s basic structure, you can use XAML to fine-tune the result.
Editing Visual Basic Code
Each XAML file is associated with a Visual Basic code file. When you first create a WPF project, that file is opened by default. If you look closely at the central designer in Figure 11-2, you’ll see that the XAML file MainWindow.xaml is open and visible in the designer. Another tab contains the corresponding Visual Basic file MainWindow.xaml.vb. Click that tab to view the Visual Basic source code.
The following text shows the Visual Basic source code initially created for a XAML file:
Class MainWindow

End Class
You can add event handlers to this file just as you can add event handlers to Windows Forms code. Use the left drop-down to select a control or MainWindow Events. Then use the right drop-down list to select an event for that object.
One difference between WPF and Windows Forms event programming is that WPF controls are not given names by default so they don’t appear in the code editor’s left drop-down list. If you want to use the editor’s drop-downs to create an event handler for a control, you must give the control a name either by using the Properties window or by typing it into the XAML code.
Another way to create an event handler is to double-click a control on the WPF Window Designer.
In addition to event handlers, you can also add non-event handler subroutines and functions to the Visual Basic code file just as you can in any other Visual Basic file.
Inside the Visual Basic code file, you can get and set control properties and call control methods, just as you can in a Windows Forms project.
Anything you can do by using the WPF graphical designer or declaratively with XAML you can also do procedurally with Visual Basic code. The following section, “XAML Features,” describes some of the things that you can do with XAML and shows examples. The section “Procedural WPF” later in this chapter explains how you can implement some of the same features with Visual Basic code instead of XAML.