CREATING A PROJECT
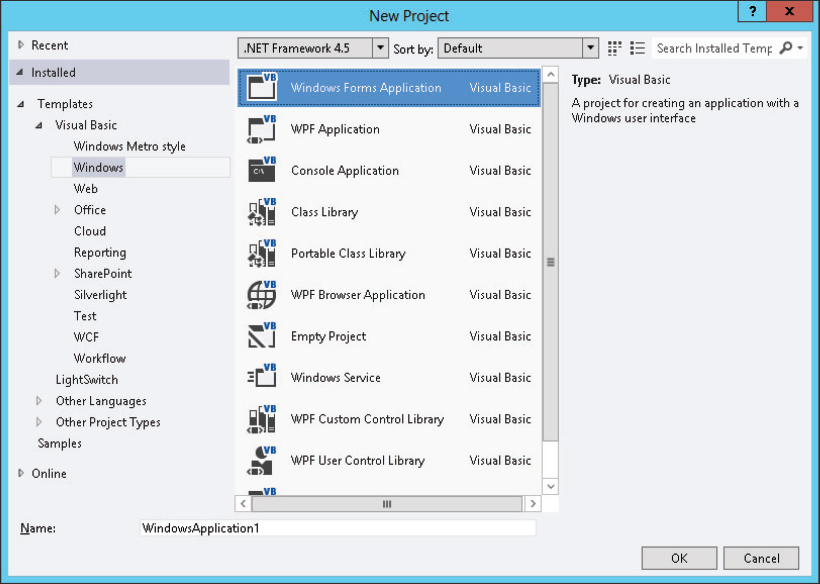
After you open Visual Studio, you can use the Start Page’s New Project link or the File menu’s New Project command to open the New Project dialog box shown in Figure 1-3.
Use the Templates tree view on the left to select the project category that you want. Then select a specific project type on the right. In Figure 1-3, the Windows Forms Application project type is selected. Enter a name for the new project in the text box at the bottom.
After you fill in the new project’s information, click OK to create the project.
NOTE
Visual Studio initially creates the project in a temporary directory. If you close the project without saving it, it is discarded.
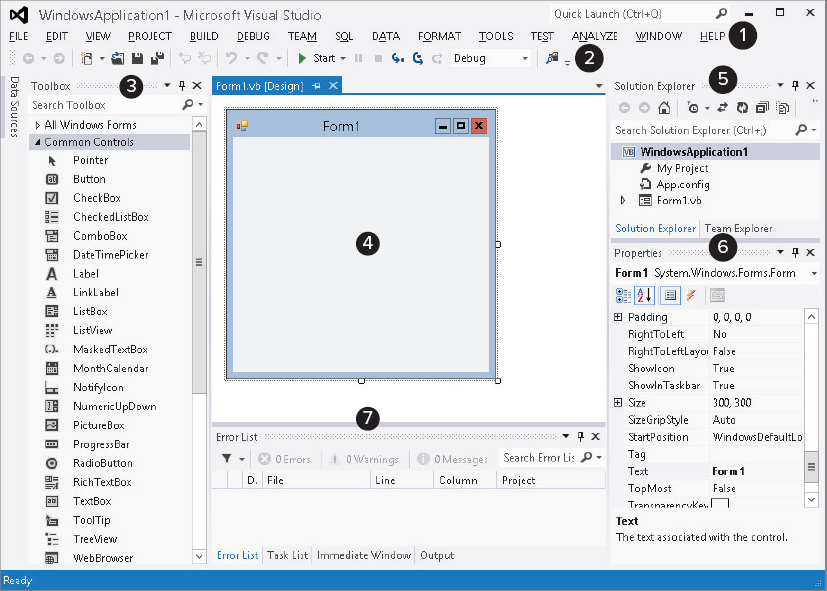
Figure 1-4 shows the IDE immediately after starting a new Windows Forms Application project. Remember that the IDE is extremely configurable, so it may not look much like Figure 1-4 after you have rearranged things to your liking (and I’ve arranged things to my liking here).
The key pieces of the IDE are labeled with numbers in Figure 1-4. The following list briefly describes each of these pieces:
1.
Menus — The menus contain standard Visual Studio commands. These generally manipulate the current solution and the modules it contains, although you can customize the menus as needed. Visual Studio changes the menus and their contents depending on the object you currently have selected. In
Figure 1-4, a Form Designer (marked with the number 4) is open so the IDE is displaying the menus for editing forms.
2. Toolbars — Toolbars contain tools that you can use to perform frequently needed actions. The same commands may be available in menus, but they are easier and faster to use in toolbars. The IDE defines several standard toolbars such as Formatting, Debug, and Image Editor. You can also build your own custom toolbars to hold your favorite tools. Visual Studio changes the toolbars displayed to match the object you currently have selected.
3.
Toolbox — The Toolbox contains tools appropriate for the item that you currently have selected and for the project type that you are working on. In
Figure 1-4, a Form Designer is selected in a Windows Forms application so the Toolbox contains tools appropriate for a Form Designer. These include Windows Forms controls and components, plus tools in the other Toolbox tabs.
4.
Form Designer — A Form Designer lets you modify the graphical design of a form. Select a control tool from the Toolbox, and click and drag to place an instance of the control on the form. Use the Properties window (marked with the number 6) to change the new control’s properties. In
Figure 1-4, no control is selected, so the Properties window shows the form’s properties rather than a control’s.
5.
Solution Explorer — The Solution Explorer lets you manage the files associated with the current solution. For example, in
Figure 1-4, you could select Form1.vb in the Project Explorer and then click the View Code button (the second icon from the right at the top of the Solution Explorer) to open the form’s code editor. You can also right-click an object in the Solution Explorer to get a list of appropriate commands for that object.
6. Properties — The Properties window lets you change an object’s properties at design time. When you select an object in a Form Designer or in the Solution Explorer, the Properties window displays that object’s properties. To change a property’s value, simply click the property and enter the new value.
7. Error List — The Error List window shows errors and warnings in the current project. For example, if a program uses a variable that is not declared, this list will say so.
If you look at the bottom of Figure 1-4, you’ll notice that the Error List window has a series of tabs. The Task List tab displays items flagged for further action such as To Do items. The Immediate window lets you type and execute Visual Basic commands, possibly while a program is running, but paused.
The Output tab shows output printed by the application. Usually an application interacts with the user through its forms and dialog boxes, but it can display information here, usually to help you debug the code.
WHAT WINDOWS?
If you don’t see the Error List, Task List, and other windows, they are probably hidden. You can display many of them by selecting the appropriate item in the View menu. Commands to display some of the more exotic windows are located in other menus, such as the View menu’s Other Windows submenu and the Debug menu’s Windows submenu.
As soon as you create a new project, it is ready to run. If you open the Debug menu and select Start Debugging, the program will run. It displays only an empty form containing no controls, but the form automatically handles a multitude of mundane windowing tasks for you.
READY TO RUN
If you’re using the Visual Basic environment settings, you can simply press F5 to start the program.
Before you write a single line of code, the form lets you resize, minimize, restore, maximize, and close the form. The form draws its title bar, borders, and system menu, and repaints itself as needed when it is covered and restored. The operating system also automatically handles many tasks such as displaying the form in the Windows taskbar and Task Manager. Some operating systems, such as Windows 7 and Vista, automatically generate thumbnail previews for the Flip and Flip 3D tools that you display by pressing Alt+Tab or Windows+Tab, respectively. Visual Basic and the operating system do a ton of work for you before you even touch the project!
The form contains no controls, can’t open files, doesn’t process data, in fact doesn’t really do anything unique, but a lot of the setup is done for you. It handles the windowing chores for you so you can focus on your particular problem.