
COMPLEX DATA BINDING
For some controls (such as the TextBox and Label) binding the Text property is good enough. Other controls, however, do not display a simple textual value.
For example, suppose that you have a database containing a Users table with fields FirstName, LastName, and UserType. The UserTypes table has fields UserTypeId and UserTypeName. The Users.UserType field contains a value that should match UserTypes.UserTypeId. The UserTypes.UserTypeName field contains values such as Programmer, Project Manager, Department Manager, Program Manager, and Lab Director.
When you build a form to display the Users table data, you would like to use a ComboBox to allow the user to select only the allowed choices Programmer, Project Manager, and so on. However, the Users table doesn’t store those string values. Instead it stores the UserTypeId value corresponding to the UserTypeName value that the user selects. When the user picks a UserTypes.UserTypeName value, the ComboBox should look up the corresponding UserTypes.UserTypeId value and save it in the Users.UserType field.
Clearly, the simple binding strategy used for TextBoxes won’t work here. Binding this control requires two rather complicated steps: defining the DataSet and binding the control. Each piece of the operation is easy, but you must do everything correctly. If you miss any detail, the ComboBox won’t work, and Visual Basic’s error messages probably won’t give you enough information to figure out how to fix the problem.
The first step is building a data connection. Select the Data menu’s Add New Data Source command. Use the Data Source Configuration Wizard to make a data source that selects both the Users and the UserTypes tables from the database.
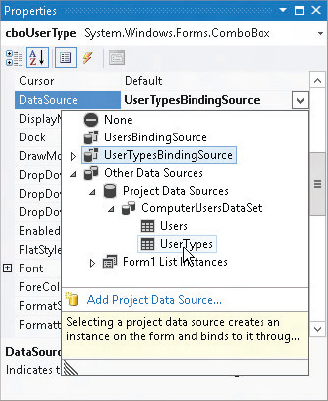
Next, add a ComboBox named cboUserType to the form. In the Properties window, select the control’s DataSource property and click the drop-down arrow on the right. Select the UserTypes table as shown in Figure 19-17. This tells the ComboBox where to look up values.
FIGURE 19-17: Set the ComboBox’s DataSource property to the UserTypes table.
When you set this property, Visual Basic also adds a DataSet, BindingSource, and TableAdapter to the form. These components provide access to the UserTypes table.
Set the ComboBox’s DisplayMember property to the field in the lookup table (specified by the DataSource property) that the control will display to the user. In this example, the field is UserTypeName.
Set the ComboBox’s ValueMember property to the field in the lookup table that represents the value that the ComboBox will need to read and write from the database. In this example, that’s the UserTypeId field.
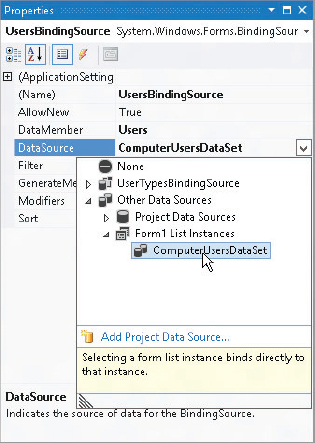
That takes care of telling the ComboBox how to relate display values with IDs. Next, you need to bind the ComboBox to the field that it must read and write in the database. In this example, that’s the Users table’s UserType field. To simplify this binding, use the Toolbox to add a new BindingSource to the form. Change its name to UsersBindingSource and set its DataSource property to the ComputerUsersDataSet as shown in Figure 19-18. Then set the BindingSource object’s DataMember property to the Users table.
FIGURE 19-18: Set the BindingSource object’s DataSource to the ComputerUsersDataSet.
The last ComboBox property you need to set is SelectedValue. Click the ComboBox, open the Properties window, and expand the (DataBindings) entry at the top. Click the drop-down arrow to the right of the SelectedValue property and select the field that the control must read and write in the database. For this example, that’s the UsersBindingSource object’s UserType field.
Next, create TextBox controls to display the Users table’s FirstName and LastName fields. In the Properties window, open their (Data Bindings) items and set their Text properties to the UsersBindingSource object’s FirstName and LastName fields.
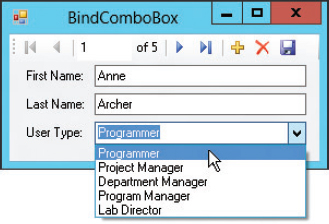
Finally, to give the user a way to navigate through the data, add a BindingNavigator to the form. Set this component’s BindingSource property to UsersBindingSource and the program is ready to run. Figure 19-19 shows the BindComboBox example program, which is available for download on the book’s website, in action. (I also added a save button to the BindingNavigator and some code to save changes when the user clicks it.)
FIGURE 19-19: At run time, the ComboBox displays the field bound to its DisplayMember property while updating the field bound to its SelectedValue property.
The steps for binding a ListBox control are exactly the same as those for binding a ComboBox. Example program BindListBox, which is available for download on the book’s website, works much as program BindComboBox does, except it uses a ListBox instead of a ComboBox. As you move through the records, the ListBox selects the appropriate user type for each user record.