
AUTOMATICALLY CONNECTING TO DATA
Visual Studio provides tools that make getting started with databases remarkably easy. Although the process is relatively straightforward, it does involve a lot of steps. The steps also allow several variations, so describing every possible way to build a database connection takes a long time. To make the process more manageable, the following two sections group the steps in two pieces: connecting to the data source and adding data controls to the form.
Connecting to the Data Source
To build a simple database program, start a new application and select the Data menu’s Add New Data Source command to display the Data Source Configuration Wizard shown in Figure 19-1.
FIGURE 19-1: Select the data source type for a new connection.
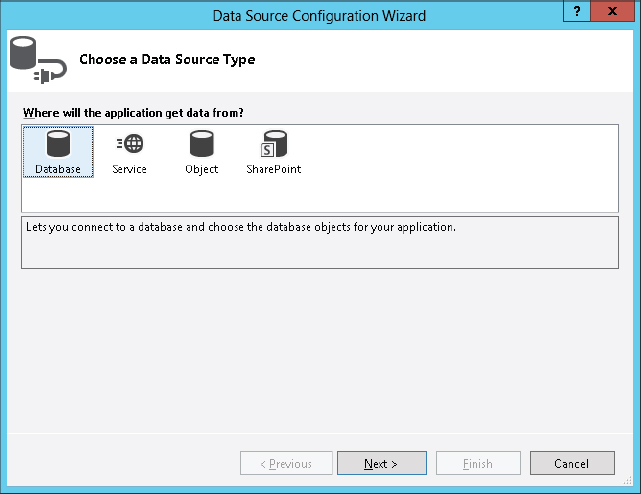
Visual Studio allows you to use databases, web services, and objects as data sources for your application. The most straightforward choice is Database. Select the type of data source you want to add (this example assumes it’s a database) and click Next to select a data model. The data model determines the kinds of objects your code can use to manipulate the data. This example assumes you will use a DataSet, which provides objects to represent tables and rows in the database. Pick the data model type and click Next to select a data connection on the page shown in Figure 19-2.
FIGURE 19-2: Pick the data connection or click New Connection to create a new one.
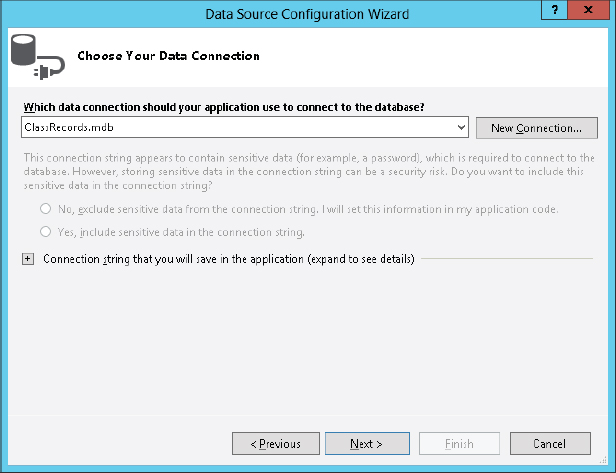
If you have previously created data connections, you can select one from the drop-down list. If you have not created any data connections, click the New Connection button to open the Add Connection dialog box shown in Figure 19-3. (If you see a Change Data Source dialog box at this point, pick a data source type and click OK to see the Add Connection dialog box.)
FIGURE 19-3: Use the Add Connection dialog box to create a data connection.
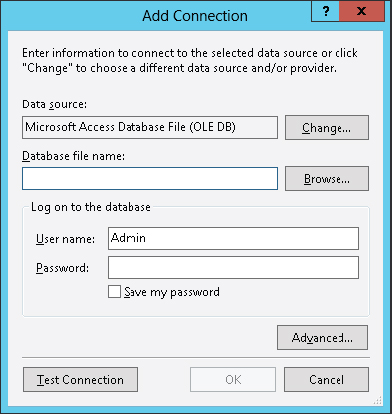
In Figure 19-3 I was selecting an Access database so Data Source is set to Microsoft Access Database File. If you want to use SQL Server, Oracle, or some other database, click the Change button to pick the correct kind of data source.
After you select a data source, the Add Connection dialog box rearranges itself to let you specify the database. In Figure 19-3 the dialog box lets you type in an Access database’s path or click the Browse button to select the file. If the data source is SQL Server, the dialog box lets you pick the server from a list of those that are running.
After you enter all of the required information, click the Test Connection button to see if the wizard can open the database. If the test fails, recheck the database path (if the database is on a network, make sure the network connection is available), username, and password and try again.
Once you can test the database connection, click OK.
When you return to the Data Source Configuration Wizard previously shown in Figure 19-2, the new connection should be selected in the drop-down list. If you click the plus sign next to the “Connection string” label at the bottom, the wizard shows the connection information it will use to connect the data source to the database. For example, this information might look like the following:
Provider=Microsoft.Jet.OLEDB.4.0;
DataSource=|DataDirectory|ClassRecords.mdb
When you click Next, the wizard tells you that you have selected a local database file that is not part of the project and it asks if you want to add it to the project. If you click Yes, the wizard adds the database to the project so it shows up in Project Explorer. If you plan to distribute the database with the application, you may want to do this to make it easier to manage the database and the Visual Basic source code together.
Next, the wizard asks whether you want to save the connection string in the project’s configuration file. If you leave this check box selected, the wizard adds the string to the project’s app.config file.
The following shows the part of the configuration file containing the connection string:
<connectionStrings>
    <add name="Students.My.MySettings.ClassRecordsConnectionString"
        connectionString="Provider=Microsoft.Jet.OLEDB.4.0;
Data Source=|DataDirectory|ClassRecords.mdb;
        providerName="System.Data.OleDb" />
</connectionStrings>
Later, the program uses that value to connect to the database. You can easily make the program connect to another data source by changing this configuration setting and then restarting the application.
Adding Data Controls to the Form
At this point you have defined the basic connection to the database. Visual Studio knows where the database is and how to build an appropriate connection string to open it. Now you must decide what data to pull out of the database and how to display it on the form.
Click Next to display the dialog box shown in Figure 19-4. This page shows the objects available in the database. In this example, the database contains two tables named Students and TestScores. By clicking the triangles to the left of the objects, you can expand them to see what they contain. In Figure 19-4, the tables are expanded so you can see the fields they contain.
FIGURE 19-4: Select the database objects that you want included in the data source.
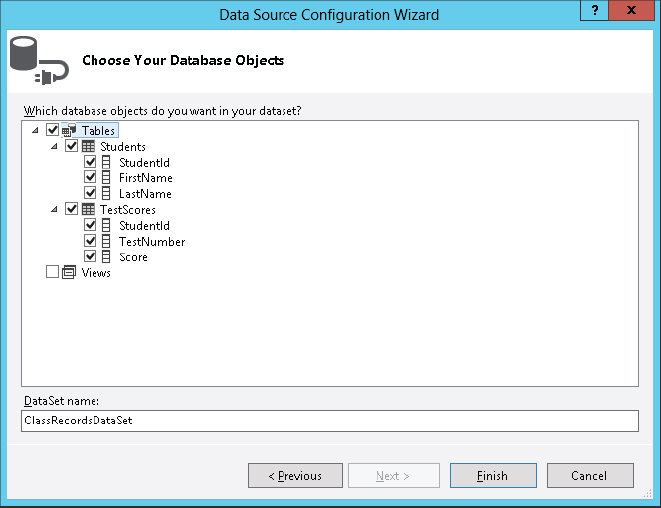
Select the database objects that you want to include in the data source. In Figure 19-4, both of the tables are selected.
When you click Finish, the wizard adds a couple of objects to the application. The Solution Explorer now lists the new file ClassRecordsDataSet.xsd. This is a schema definition file that describes the data source.
When you double-click the schema file, Visual Basic opens it in the editor shown in Figure 19-5. This display shows the tables defined by the schema, their fields, and any relationships defined between the tables.
FIGURE 19-5: The Schema Editor shows the tables defined by the schema and their relationships.
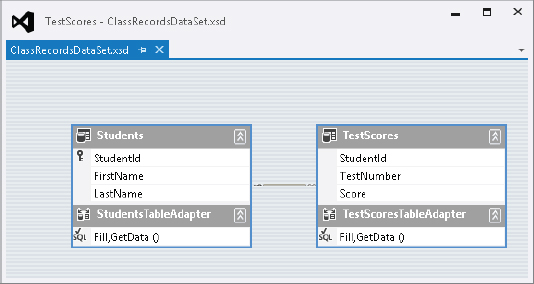
The line between the files with the little key on the left and the infinity symbol on the right indicates that the tables are joined by a one-to-many relationship. In this example, the Students.StudentId field and TestScores.StudentId field form a foreign key relationship. That means every StudentId value in the TestScores table must correspond to some StudentId value in the Students table. In other words, a test score must be associated with a student who exists.
When you double-click the relationship link or right-click it and select Edit Relation, the editor displays a dialog box that you can use to modify the relation.
At the bottom of the tables shown in Figure 19-5, you can see two table adapter objects containing the labels Fill, GetData(). These represent data adapter objects that the program will later use to move data from and to the data source.
In addition to adding the schema file to Solution Explorer, the Data Source Configuration Wizard also added a new DataSet object to the Data Sources window shown in Figure 19-6. (If this window is not visible, select the Data menu’s Show Data Sources command.)
FIGURE 19-6: The Data Sources window lists the new data source.
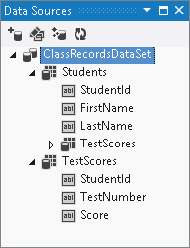
You can use the triangles to the left of the entries to expand and collapse the objects in the DataSet. In Figure 19-6, the DataSet is expanded to show its tables, and the tables are expanded to show their fields. Notice that the TestScores table is listed within the Students table’s entries because it has a parent/child relationship with that table.
It takes a lot of words and pictures to describe this process, but using the wizard to build the data source is actually quite fast. After you have created the data source, you can build a simple user interface with almost no extra work. Simply drag objects from the Data Sources window onto the form.
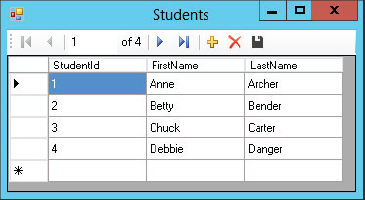
When you click and drag a table from the Data Sources window onto the form, Visual Basic automatically creates BindingNavigator and DataGridView controls, and other components to display the data from the table. Figure 19-7 shows the result at run time.
FIGURE 19-7: Drag and drop a table from the Data Sources window onto the form to create a simple DataGridView.
Instead of dragging an entire table onto the form, you can drag individual database columns. In that case, Visual Basic adds controls to the form to represent the column. Figure 19-8 shows the columns from the Students table dragged onto a form.
FIGURE 19-8: Drag and drop table columns onto a form to create a record-oriented view instead of a grid.
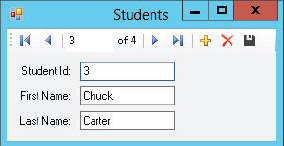
If you select a table in the Data Sources window, a drop-down arrow appears on the right. Open the drop-down to give the table a different display style. For example, if you set a table’s style to Details and drag the table onto a form, Visual Basic displays the table’s data using a record detail view similar to the one shown in Figure 19-8. Set the table’s style to DataGridView and drag it onto the form to get a grid similar to the one shown in Figure 19-7.
Similarly, you can change the display styles for specific columns. Select a column in the Data Sources window and click its drop-down arrow to make it display in a text box, label, link label, combo box, or other control. Now, when you drag the column onto a form, or when you drag the table onto the form to build a record view, Visual Basic uses this type of control to display the column’s values.