EVENTS
A control or other object raises an event to let the program know about some change in circumstances. Sometimes raising an event is also called firing the event. Specific control classes provide events that are relevant to their special purposes. For example, the Button control provides a Click event to let the program know when the user clicks the button.
The program responds to an event by executing code in an event handler that catches the event and takes whatever action is appropriate. Each event defines its own event handler format and determines the parameters that the event handler will receive. Often, these parameters give additional information about the event.
For example, when part of the form is covered and exposed, the form raises its Paint event. The Paint event handler takes as a parameter an object of type PaintEventArgs named e. That object’s Graphics property is a reference to a Graphics object that the program can use to redraw the form’s contents.
Some event handlers take parameters that are used to send information about the event back to the object that raised it. For example, the Form class’s FormClosing event handler has a parameter of type FormClosingEventArgs. That parameter is an object that has a property named Cancel. If the program sets Cancel to True, the Form cancels the FormClosing event and remains open. For example, the event handler can verify that the data entered by the user was properly formatted. If the values don’t make sense, the program can display an error message and keep the form open.
Although many of a control’s most useful events are specific to the control type, controls do inherit some common events from the Control class. Appendix A summarizes the Control class’s most important events. Controls that inherit from the Control class also inherit these events unless they have overridden the Control class’s behavior.
Creating Event Handlers at Design Time
You can create an event handler at design time in a couple of ways. If you open a form in the Windows Forms Designer and double-click a control, the code editor opens and displays the control’s default event handler. For example, a TextBox control opens its TextChanged event handler, a Button control opens its Click event handler, and the form itself opens its Load event handler.
To create some other non-default event handler for a control, select the control and then click the Properties window’s Events button (which looks like a lightning bolt). This makes the Properties window list the control’s most commonly used events. If you have defined event handlers already, possibly for other controls, you can select them from the events’ drop-down lists. Double-click an event’s entry to create a new event handler.
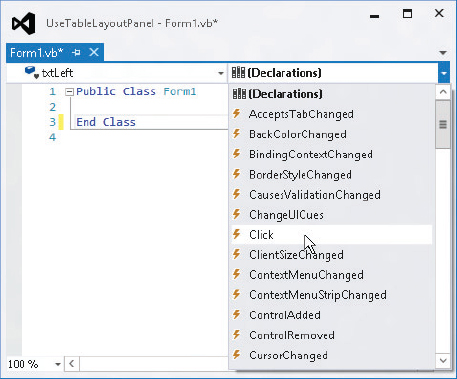
To create event handlers inside the code editor, open the code window, select the control from the left drop-down list, and then select an event from the right drop-down list, as shown in Figure 8-8. To create an event handler for the form itself, select “(Form1 Events)” from the left drop-down and then select an event from the right drop-down.
FIGURE 8-8: To create an event handler in the code window, select a control from the left drop-down, and then select an event from the right drop-down.

The code window creates an event handler with the correct parameters and return value. For example, the following code shows an empty TextBox control’s Click event handler. Now you just need to fill in the code that you want to execute when the event occurs.
Private Sub txtLeft_Click(sender As Object, e As EventArgs) Handles txtLeft.Click

End SubPrivate Sub txtLeft_Click() Handles txtLeft.Click
End SubThe section “Creating Controls” earlier in this chapter explains how you can use code to add and remove event handlers at run time.
Validation Events
Data validation is an important part of many applications. Visual Basic provides two events to make validating data easier: Validating and Validated. The following sections describe three approaches to using those events to validate data.
Integrated Validation
The Validating event fires when the code should validate a control’s data. This happens when a control has the input focus and the form tries to close, or when focus moves to another control that has its CausesValidation property set to True. Integrated validation uses the Validating event to perform all validation.
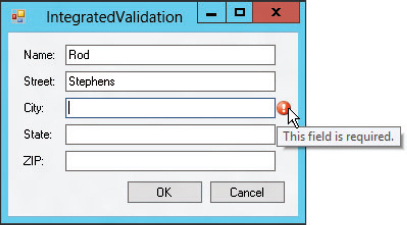
The Validating event handler can verify that the data in a control has a legal value and take appropriate action if it doesn’t. For example, the IntegratedValidation example program, which is available for download, is shown in Figure 8-9. Each of the program’s TextBoxes has a Validating event handler that requires its value to be non-blank before the user can move to another control. In Figure 8-9 I entered the Name and Street values, and then tried to tab past the City field. The program used an ErrorProvider component named erroMissingData to display an error indicator beside the City field and prevented me from moving to a new control.
FIGURE 8-9: The IntegratedValidation example program displays an error indicator next to a TextBox if the user tries to leave that control without entering a value.

The following code shows the program’s Validating event handler. Notice that the Handles clause lists all five TextBoxes’ Validating events so this event handler catches the Validating event for all five controls.
' Verify that this field is not blank.
Private Sub txtValidating(sender As Object,
 e As System.ComponentModel.CancelEventArgs) Handles _
 txtName.Validating, txtStreet.Validating, txtCity.Validating,
 txtState.Validating, txtZip.Validating
    ' Convert sender into a TextBox.
    Dim txt As TextBox = DirectCast(sender, TextBox)

    ' See if it's blank.
    If (txt.Text.Length > 0) Then
        ' It's not blank. Clear any error.
        errMissingData.SetError(txt, "")
    Else
        ' It's blank. Show an error.
        errMissingData.SetError(txt, "This field is required.")

        ' Do not allow focus to leave the control.
        e.Cancel = True
    End If
End Sub
The event handler receives a reference to the control that raised the event in its sender parameter. The code uses DirectCast to convert that generic Object into a TextBox object. It then checks whether the TextBox’s value is blank. If the text is non-blank, the code calls the ErrorProvider’s SetError method to clear any error that was previously set for the TextBox. If the TextBox’s value is blank, the code uses the ErrorProvider to display an error indicator. It then sets e.Cancel to prevent focus from leaving the TextBox.
Deferred Validation
By keeping focus in the control that contains the error, the previous approach forces the user to fix problems as soon as possible. In some applications, it may be better to let the user continue filling out other fields and fix the problems later. For example, a user who is touch-typing data into several fields may not look up to see the error until much later, after entering a series of invalid values in the first field and wasting a lot of time.
The DeferredValidation example program, which is available for download, uses the following code to let the user continue entering values in other fields and fix errors later:
' Verify that this field is not blank.
Private Sub txtValidating(sender As Object,
 e As System.ComponentModel.CancelEventArgs) Handles _
 txtName.Validating, txtStreet.Validating, txtCity.Validating,
 txtState.Validating, txtZip.Validating
    ' Convert sender into a TextBox.
    Dim txt As TextBox = DirectCast(sender, TextBox)

    ' See if it's blank.
    If (txt.Text.Length > 0) Then
        ' It's not blank. Clear any error.
        errMissingData.SetError(txt, "")
    Else
        ' It's blank. Show an error.
        errMissingData.SetError(txt, "This field is required.")
    End If
End Sub

' See if any field is blank.
Private Sub Form1_FormClosing(sender As Object,
 e As FormClosingEventArgs) Handles Me.FormClosing
    If (txtName.Text.Length = 0) Then e.Cancel = True
    If (txtStreet.Text.Length = 0) Then e.Cancel = True
    If (txtCity.Text.Length = 0) Then e.Cancel = True
    If (txtState.Text.Length = 0) Then e.Cancel = True
    If (txtZip.Text.Length = 0) Then e.Cancel = True
End Sub
The Validating event handler is very similar to the one used by the IntegratedValidation program. If a value is missing, it still displays an error message but this version doesn’t set e.Cancel to True so it doesn’t prevent the user from moving to the next field.
When the user tries to close the form, the FormClosing event handler rechecks all of the TextBoxes and if any have blank values it sets e.Cancel to True to prevent the form from closing. (A more elaborate program might also display an error message telling the user which TextBox had an invalid value. It could even use that TextBox’s Focus method to set focus to that control so the user can fix the problem more easily.)
