
MENUS
The IDE’s menus contain standard Visual Studio commands. These are generally commands that manipulate the project and the modules it contains. Some of the concepts are similar to those used by any Windows application (File ⇒ New, File ⇒ Save, Edit ⇒ Copy), but many of the details are specific to Visual Studio programming, so the following sections describe them in a bit more detail.
The menus are customizable, so you can add, remove, and rearrange the menus and the items they contain. This can be quite confusing, however, if you later need to find a command that you have removed from its normal place in the menus. Some developers place extra commands in standard menus, particularly the Tools menu, but it is generally risky to remove standard menu items. Usually it is safest to leave the standard menus alone and make custom menus and toolbars to hold customizations.
Many of the menus’ most useful commands are also available in other ways. Many provide keyboard shortcuts that make using them quick and easy. For example, Ctrl+N opens the New Project dialog box just as if you had selected the File ⇒ New Project menu command. If you find yourself using the same command very frequently, look in the menu and learn its keyboard shortcut to save time later.
Many menu commands are also available in standard toolbars. For example, the Debug toolbar contains many of the same commands that are in the Debug menu. If you use a set of menu commands frequently, you may want to display the corresponding toolbar to make using the commands easier.
Visual Studio also provides many commands through context menus. For example, if you right-click a project in the Solution Explorer, the context menu includes an Add Reference command that displays the Add Reference dialog box just as if you had invoked Project ⇒ Add Reference. Often it is easier to find a command by right-clicking an object related to whatever you want to do than it is to wander through the menus.
The following sections describe the general layout of the standard menus and briefly explain their most important commands. You might want to open the menus in Visual Studio as you read these sections, so you can follow along and see what other commands might be available.
File
The File menu contains commands that deal with creating, opening, saving, and closing projects and project files. The following list describes the most important commands contained in the File menu and its submenus:
- New Project — This command displays a dialog box that lets you create new Windows applications, class libraries, console applications, control libraries, and more. Select the type of project you want to start, enter a project name, and click OK.
- New Web Site — This command lets you start a new website project. It displays a dialog box where you can select the type of website to create from among choices such as ASP.NET Web Site, ASP.NET Empty Web Site, and WCF Service.
- Open Project — This command lets you open an existing project.
- Open Web Site — This command lets you open an existing website project.
- Open File — This command displays a dialog box that lets you select a file to open. The IDE uses integrated editors to let you edit the new file. For example, a simple bitmap editor lets you set a bitmap’s size, change its number of colors, and draw on it. When you close the file, Visual Studio asks if you want to save it. Note that this doesn’t automatically add the file to your current project. You can save the file and use the Project ⇒ Add Existing Item command if you want to do that.
- Add — This submenu lets you add new items to the current solution. This submenu’s most useful commands for Visual Basic developers are New Project and Existing Project, which add a new or existing Visual Basic project to the current solution.
- Close — This command closes the current editor. For example, if you were editing a form in the Windows Forms Designer, this command closes the designer.
- Close Project — This command closes the entire project and all of the files it contains. If you have a solution open, this command is labeled Close Solution and it closes the entire solution.
- Save Form1.vb — This command saves the currently open file, in this example, Form1.vb.
- Save Form1.vb As — This command lets you save the currently open file with a new name.
- Save All — This command saves all modified files. When you start a new project, the files are initially stored in a temporary location. This command allows you to pick a directory where the project should be saved permanently.
- Export Template — This command displays the Export Template Wizard, which enables you to create project or item templates that you can use later when making a new project.
- Page Setup and Print — The Page Setup and Print commands let you configure printer settings and print the current document. These commands are enabled only when it makes sense to print the current file. For example, they let you print if you have a code editor open because the code is text but they are disabled while you are using a Windows Forms Designer.
- Recent Files and Recent Projects and Solutions — The Recent Files and Recent Projects and Solutions submenus let you quickly reopen files, projects, and solutions that you have used recently.
Edit
The Edit menu contains commands that deal with manipulating text and other objects. These include standard commands such as the Undo, Redo, Cut, Copy, Paste, and Delete commands that you’ve seen in other Windows applications.
The following list describes other important commands contained in the Edit menu:
- Find Symbol — This command lets you search the application for a program symbol rather than a simple string. You can search for such items as namespaces, types, interfaces, properties, methods, constants, and variables.
- Quick Find — This command displays a Find dialog box where you can search the project for specific text. A drop-down menu lets you indicate whether the search should include the current document, the currently selected text, all open documents, the current project, or the current solution. Options let you determine such things as whether the text must match case or whole words.
- Quick Replace — This command displays the same dialog box as the Quick Find command except with some extra controls. It includes a text box where you can specify replacement text, and buttons that let you replace the currently found text or all occurrences of the text.
REGRETFUL REPLACEMENTBe careful when using Quick Replace. Often it gets carried away and replaces substrings of larger strings so they don’t make sense anymore. For example, suppose you want to replace the variable name “hand” with “handed.” If you let Quick Replace run, it will change Handles clauses into “handedles” clauses, which will confuse Visual Basic. To reduce the chances of this type of error, keep the scope of the replacement as small as possible and check the result for weird side effects.
- Go To — This command lets you jump to a particular line number in the current file.
- Insert File As Text — This command lets you select a file and insert its text into the current location. This can be useful if the file contains a code snippet.
- Advanced — The Advanced submenu contains commands for performing more complex document formatting such as converting text to upper- or lowercase, controlling word wrap, and commenting and uncommenting code.
- Bookmarks — The Bookmarks submenu lets you add, remove, and clear bookmarks, and move to the next or previous bookmark. You can use bookmarks to move quickly to specific pieces of code that you have previously marked.
- Outlining — The Outlining submenu lets you expand or collapse sections of code, and turn outlining on and off. Collapsing code that you are not currently editing can make the rest of the code easier to read.
- IntelliSense — The IntelliSense submenu gives access to IntelliSense features. For example, its List Members command makes IntelliSense display the current object’s properties, methods, and events.
- Next Method and Previous Method — The Next Method and Previous Method commands move to the next or previous method or class in the current document.
View
The View menu contains commands that let you hide or display different windows and toolbars in the Visual Studio IDE. The following list describes the View menu’s most useful commands:
- Code — This command opens the selected file in a code editor window. For example, to edit a form’s code, you can click the form in the Solution Explorer and then select View ⇒ Code.
- Designer — This command opens the selected file in a graphical editor if one is defined for that type of file. For example, if the file is a form, this command opens the form in a graphical form editor. If the file is a class or a code module, the View menu hides this command because Visual Studio doesn’t have a graphical editor for those file types.
- Standard windows — The next several commands in this menu list some explorers, Object Browser, Error List, Properties window, and Toolbox. These commands restore a previously hidden window.
- Other Windows — The Other Windows submenu lists other standard menus that are not listed in the View menu itself. These include the Bookmark window, Class View, Command window, Document Outline, Output, Task List, and many others. Like the standard windows commands, these commands are useful for recovering lost or hidden windows.
- Tab Order — If the currently visible document is a Windows Form that contains controls, the Tab Order command displays the tab order on top of each control. You can click the controls in the order you want them to have to set their tab orders quickly and easily. (If you are working with a WPF form, you must set the controls’ TabIndex properties to set their tab order.)
- Toolbars — The Toolbars submenu lets you hide or display the currently defined toolbars. This submenu lists the standard toolbars in addition to any custom toolbars you have created.
- Full Screen — This command hides all toolbars and windows except for any editor windows that you currently have open. This gives you the most space possible for working with the files you have open. The command adds a small box to the title bar containing a Full Screen button that you can click to end full-screen mode.
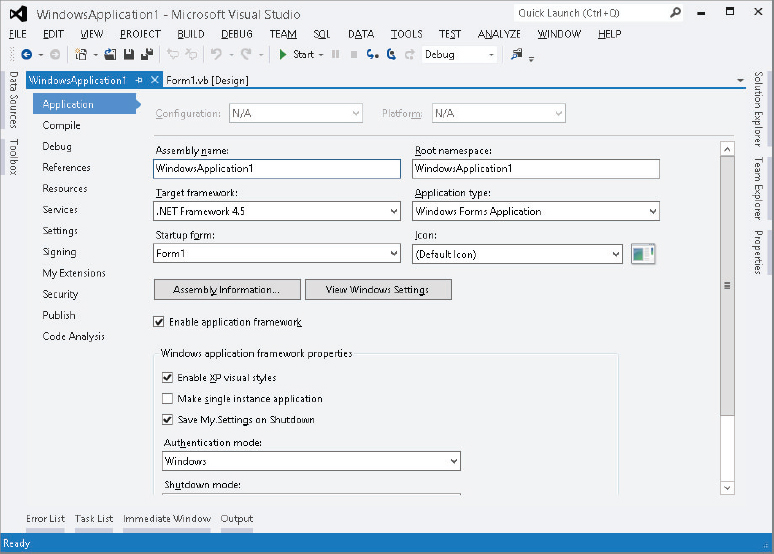
- Property Pages — This command displays the current item’s property pages. For example, if you select a project in the Solution Explorer, this command displays the application’s property pages similar to those shown in Figure 2-1.
FIGURE 2-1: The View menu’s Property Pages command displays an object’s property pages.
Project
The Project menu contains commands that let you add and remove items to and from the project. Which commands are available depends on the currently selected item.
The following list describes the most important commands on the Project menu:
- New items — The first several commands let you add new items to the project. These commands are fairly self-explanatory. For example, the Add Class command adds a new class module to the project. Later chapters explain how to use each of these file types.
- Add New Item — This command displays a dialog box that lets you select from a wide assortment of items such as About Boxes, text files, bitmap files, and class modules.
EASY ICONSYou can build an icon, cursor, or other graphical file right inside Visual Studio. Use the Add New Item command to add the new file. Visual Studio’s built-in editors let you draw these files, give them transparent backgrounds, and even set a cursor’s hotspot. (The hotspot is the pixel that determines where the cursor is pointing. For example, an arrow cursor’s hotspot is the tip of the arrow.) Note that integrated editors for some of these file types may be unavailable if you have the Express Edition, although lots of editors for these file types are available for download on the Internet.
- Add Existing Item — This command lets you browse for a file and add it to the project. This may be a Visual Basic file (such as a module, form, or class), or some other related file (such as a related document or image file).
- Exclude From Project — This command removes the currently selected item from the project. Note that this does not delete the file; it just removes it from the project.
- Show All Files — This command makes Solution Explorer list files that are normally hidden. These include resource files used by forms and hidden partial classes such as designer-generated form code. Normally, you don’t need to work with these files, so they are hidden. Select this command to show them. Select the command again to hide them again.
- Add Reference — This command displays the Reference Manager shown in Figure 2-2. On the left select the category of the external object, class, or library that you want to find. For a .NET component, select the Assemblies category’s Framework item. This is what you’ll want most of the time. For a component object model (COM) component such as an ActiveX library or control built using Visual Basic 6, select the COM category. Click the Browse button to manually locate the file that you want to reference.
FIGURE 2-2: Use the Reference Manager to add references to libraries.
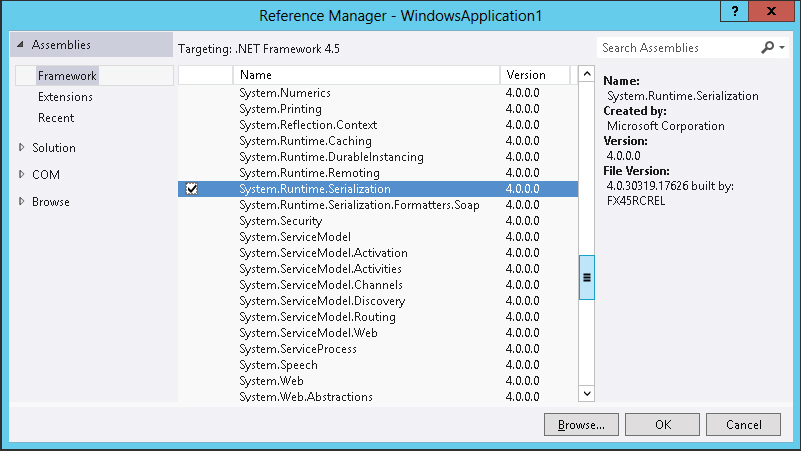
Scroll through the list of references until you find the one you want and click the Add button to select it. A checkmark to the left of an item shows that the item is selected. When you have made your selections, click OK to add the references to the project. After you have added a reference to the project, your code can refer to the reference’s public objects. For example, if the file MyMathLibrary.dll defines a class named MathTools and that class defines a public function Fibonacci, a project with a reference to this DLL could use the following code:
Dim math_tools As New MyMathLibrary.MathTools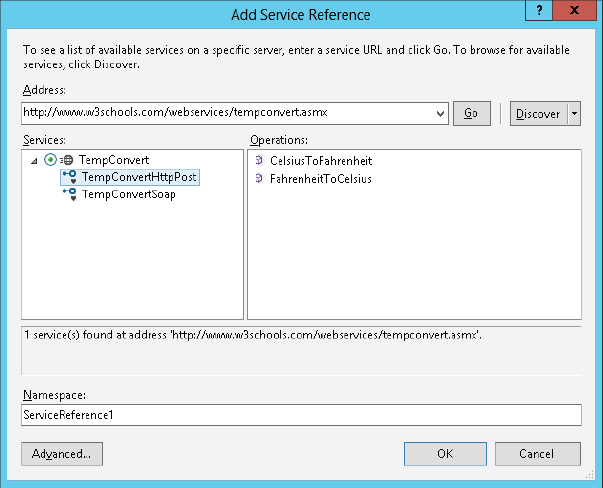
MessageBox.Show("Fib(5) = " & math_tools.Fibonacci(5))- Add Service Reference — This command displays the dialog box shown in Figure 2-3. You can use this dialog box to find web services and add references to them so your project can invoke them across the Internet. Figure 2-3 shows a service reference for the TempConvert example service. For more information, go to http://www.w3schools.com/webservices/tempconvert.asmx.
FIGURE 2-3: Use the Add Service Reference dialog box to add references to web services.
- WindowsApplication1 Properties — This command displays the application’s property pages shown in Figure 2-1.
Use the tabs on the left of the application’s property pages to view and modify different categories of application settings. You can leave many of the property values at their defaults, and many can be set in ways other than by using the property pages. For example, by default, the Assembly Name and Root Namespace values shown in Figure 2-1 are set to the name of the project when you first create it. For most projects, that’s fine.
Figure 2-4 shows the Compile property page. This page holds four properties that deserve special mention.
FIGURE 2-4: The Compile tab contains important properties for controlling code generation.

First, Option Explicit determines whether Visual Basic requires you to declare all variables before using them. Leaving this option turned off can sometimes lead to subtle bugs. For example, suppose you mistype a variable’s name. If Option Explicit is Off, Visual Basic assumes that you are trying to create a new variable with a new name. The two variables are not the same, and that can lead to confusion. If you set Option Explicit to On, the compiler complains that the misspelled variable is not declared and the problem is easy to fix.
The second compiler option is Option Strict. When this option is turned off, Visual Studio allows your code to implicitly convert from one data type to another, even if the types are not always compatible. For example, your program might be able to assign the value in a string variable to an integer variable. That will work if the string happens to contain text such as “10” that is a number but fails if the string contains something else such as “ten.”
If Option Strict is On, the IDE warns you at compile time that the two data types are incompatible, so you can easily resolve the problem while you are writing the code. You can still use conversion functions such as CInt, Int, and Integer.Parse to convert a string into an Integer, but you must take explicit action to do so. This makes you think about the code and reduces the chances that the conversion is just an accident. This also helps you use the correct data types and avoid unnecessary conversions that may make your program slower.
The third compiler directive, Option Compare, can take the values Binary or Text. If you set Option Compare to Binary, Visual Basic compares strings using their binary representations. If you set Option Compare to Text, Visual Basic compares strings using a case-insensitive method that depends on your computer’s localization settings. Option Compare Binary is faster, but may not always produce the result you want.
The final compiler directive, Option Infer, determines whether you can omit the data type when declaring a variable and let Visual Basic deduce its data type from the context. For example, when it sees the statement Dim x = 1.2, Visual Basic assumes that x must be the Double data type.
The problem with inferred data types is that it is not obvious from the code what data type Visual Basic should use. In the statement Dim x = 1.2, you need to know Visual Basic’s inference rules to know whether variable x is a Single, Double, or Decimal.
You can use an Option statement to set the values for each of these options at the top of a code module. For example, the following code turns Option Explicit on and Option Infer off for a module:
Option Explicit On
Option Infer Off
Instead of using Option statements in a file, you can use the property page shown in Figure 2-4 to set these options for all of the files in the application.
Build
The Build menu contains commands that let you compile projects within a solution. The following list describes the most useful commands contained in the Build menu:
- Build WindowsApplication1 — This command compiles the currently selected project, in this case the project WindowsApplication1. Visual Studio examines the project’s files to see if any have changed since the last time it compiled the project. If any of the files have changed, Visual Studio saves and recompiles them.
- Rebuild WindowsApplication1 — This command recompiles the currently selected project from scratch. It recompiles every file even if it has not been modified since the last time it was compiled.
- Clean WindowsApplication1 — This command removes temporary and intermediate files that were created while building the application, leaving only the source files and the final result .exe and .dll files.
- Publish WindowsApplication1 — This command displays the Publish Wizard, which walks you through the process of making your application available for distribution in a local file, file share, FTP site, or website.
If your solution contains more than one application, the Build menu also contains the solution-related commands Build Solution, Rebuild Solution, and Clean Solution. These are similar to their application counterparts except they apply to every application in the solution.
Debug
The Debug menu contains commands that help you debug a program. These commands help you run the program in the debugger, move through the code, set and clear breakpoints, and generally follow the code’s execution to see what it’s doing and hopefully what it’s doing wrong.
For more information about the Debug menu and debugging Visual Basic code, see Chapter 6, “Debugging.”
Data
The Data menu contains commands that deal with data and data sources. Some of the commands in this menu are visible and enabled only if you are designing a form and that form contains the proper data objects.
The following list describes the most useful Data menu commands:
- Show Data Sources — This command displays the Data Sources window, where you can work with the program’s data sources. For example, you can drag and drop tables and fields from this window onto a form to create controls bound to the data source.
- Preview Data — This command displays a dialog box that lets you load data into a DataSet and view it at design time.
- Add New Data Source — This command displays the Data Source Configuration Wizard, which walks you through the process of adding a data source to the project.
Format
The Format menu contains commands that arrange controls on a form. The commands are grouped into submenus containing related commands. The following list describes the Format menu’s submenus:
- Align — This submenu contains commands that align the controls you have selected in various ways. It contains the commands Lefts, Centers, Rights, Tops, Middles, Bottoms, and “to Grid.” For example, the Lefts command aligns the controls so their left edges line up nicely. The “to Grid” command snaps the controls to the nearest grid position.
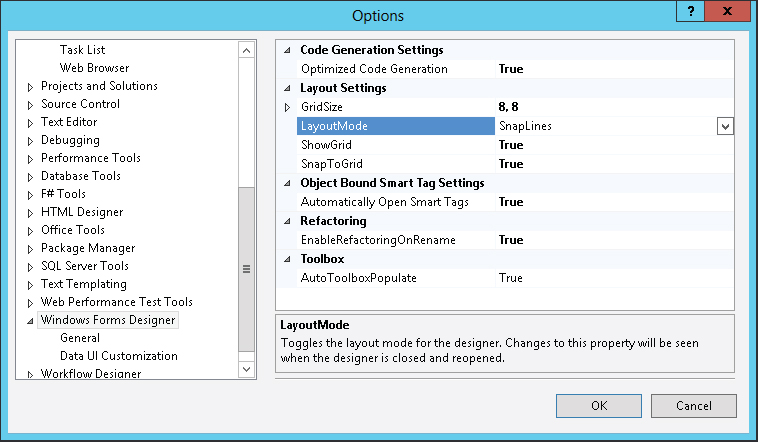
- Make Same Size — This submenu contains commands that make the dimensions of the controls you have selected the same. It contains the commands Width, Height, Both, and Size to Grid. The Size to Grid command adjusts the selected controls’ widths so that they are a multiple of the alignment grid size. (This command is disabled unless the Windows Forms Designer’s LayoutMode is set to SnapToGrid. To set this, open the Tools menu, select Options, go to the Windows Forms Designer tab, open the General subtab, and set the LayoutMode property.)
- Horizontal Spacing — This submenu contains commands that change the horizontal spacing between the controls you have selected. It contains the commands Make Equal, Increase, Decrease, and Remove.
- Vertical Spacing — This submenu contains the same commands as the Horizontal Spacing submenu except it adjusts the controls’ vertical spacing.
- Center in Form — This submenu contains the commands Horizontally and Vertically that center the selected controls on the form either horizontally or vertically.
- Order — This submenu contains the commands Bring to Front and Send to Back, which move the selected controls to the top or bottom of the stacking order.
- Lock Controls — This command locks all of the controls on the form so that you cannot accidentally move or resize them by clicking and dragging, although you can still move and resize the controls by changing their Location and Size properties in the Properties window. Invoking this command again unlocks the controls.
Tools
The Tools menu contains miscellaneous tools that do not fit particularly well in the other menus. It also contains a few duplicates of commands in other menus to make them easier to find, and commands that modify the IDE itself.
The following list describes the Tools menu’s most useful commands. Note that some of these commands appear only when a particular type of editor is open. Note also that some may not be available in Visual Studio Express Edition.
- Attach to Process — This command displays a dialog box to let you attach the debugger to a running process. This is useful for debugging programs that you cannot run directly in the Visual Studio IDE such as Windows services, which run automatically when the computer starts.
- Connect to Database — This command displays the Connection Properties dialog box, where you can define a database connection. The connection is added to the Server Explorer window. You can later use the connection to define data adapters and other objects that use a database connection.
- Connect to Server — This command displays a dialog box that lets you connect to a database server.
- Code Snippets Manager — This command displays the Code Snippets Manager, which you can use to add and remove code snippets.
- Choose Toolbox Items — This command displays a dialog box that lets you select the tools displayed in the Toolbox. For instance, some controls are not included in the Toolbox by default. You can use this command to add them if you will use them frequently.
- Add-in Manager — This command displays the Add-in Manager, which lists the add-in projects registered on the computer. You can use the Add-in Manager to enable or disable these add-ins.
- Extension Manager — This command displays an Extension Manager dialog box that lets you find Visual Studio extensions online and install them.
- External Tools — This command displays a dialog box that lets you add and remove commands from the Tools menu. For example, you could add a command to launch WordPad, MS Paint, WinZip, and other handy utilities from the Tools menu.
NOTEIf you set an external tool’s Command to the location of your favorite browser and its Arguments to a web address, you can easily open that address by selecting your tool from the Tools menu. You can even set the Arguments to a mailto address as in mailto:[email protected] to quickly send e-mail from the Tools menu.
- Import/Export Settings — This command displays a dialog box that you can use to save, restore, or reset your Visual Studio IDE settings. Use this dialog box to configure your development environment for general development, project management, SQL Server development, Visual Basic, C#, C++, or web development.
- Customize — This command allows you to customize the Visual Studio IDE.
- Options — This command allows you to specify options for the Visual Studio IDE. See the following text for more details.
The Tools menu’s Options command displays the dialog box shown in Figure 2-5. This dialog box contains a huge number of pages of options that configure the Visual Studio IDE.
FIGURE 2-5: The Options dialog box lets you specify IDE options.
The following list describes the Options dialog box’s most important categories:
- Environment — Contains general IDE settings such as whether the IDE uses tabs or multiple windows to display documents, the number of items shown in the most recently used file lists, and how often the IDE saves AutoRecover information. The Fonts and Colors subsection lets you determine the colors used by the editors for different types of text. For example, comments are shown in green by default, but you can change this color.
- Projects and Solutions — Contains the default settings for Option Explicit, Option Strict, and Option Compare.
- Source Control — Contains entries that deal with the source code control system (for example, Visual Studio Team Foundation Server or Visual SourceSafe). These systems provide file locking and differencing tools that let multiple developers work on the same project without interfering with each other.
- Text Editor — Contains entries that specify the text editor’s features. For example, you can use these pages to determine whether long lines are automatically wrapped, whether line numbers are displayed, and whether the editor provides smart indentation. The Basic ⇒ VB Specific subsection lets you specify options such as whether the editor uses outlining, displays procedure separators, or suggests corrections for errors.
- Debugging — Contains debugging settings such as whether the debugger displays messages as modules are loaded and unloaded, and whether it should allow Edit-and-Continue.
- Database Tools — Contains database parameters such as default lengths for fields of various types and how long to let long queries run before canceling them.
- HTML Designer — Contains options for configuring HTML Designer. These options determine such settings as the spacing of the display grid and whether the designer starts in source or design view.
- Office Tools — Contains settings that specify how the keyboard should work when you use Excel or Word files within Visual Studio.
- Test Tools — Contains settings that determine how testing tools behave.
- Windows Forms Designer — Contains settings that control the Windows Forms Designer. For example, this section lets you determine whether the designer uses a snap-to grid or snap lines and how far apart grid points are.
Test
The Test menu, which is not available in Visual Studio Express Edition, contains commands that control the Visual Studio testing tools. These tools let you perform such actions as coverage testing (to see if every line of code is executed), regression testing (to see if changes to the code broke anything), and load testing (to see how the application performs with a lot of simulated users running at the same time).
The following list briefly describes the Test menu’s most useful commands:
- New Test — This command displays a dialog box that lets you create various kinds of tests for the application.
- Load Metadata File — This command lets you load a test metadata file. These XML files describe test lists, each of which can contain tests. This command lets you load test lists into different projects.
- Create New Test List — This command lets you make a new test list. Test lists let you group related tests so that you can execute them together. For example, you might have test lists for user interface testing, print tests, database tests, and so forth.
- Run — This command starts executing the currently active test project without the debugger.
- Debug — This command starts executing the currently active test project with the debugger.
- Windows — This command displays test-related windows including Test View, Test List Editor, Test Results, Code Coverage Results, and Test Runs.
Window
The Window menu contains commands that control Visual Studio’s windows. Which commands are enabled depends on the type of window that has the focus. For example, if focus is on a code editor, the Split command is enabled and the Float, Dock, and Dock as Tabbed Document commands are disabled, but when the Solution Explorer window has the focus, the opposite is true.
The following list briefly describes the most useful of these commands:
- Split — This command splits a code window into two panes that can display different parts of the code at the same time. This command changes to Remove Split when you use it.
- Float, Dock, Dock as Tabbed Document — Secondary windows such as the Toolbox, Solution Explorer, and Properties windows can be displayed as dockable, floating, or tabbed documents. A dockable window can be attached to the edges of the IDE or docked with other secondary windows. A floating window stays in its own independent window even if you drag it to a position where it would normally dock. A tabbed document window is displayed in the main editing area in the center of the IDE with the forms, classes, and other project files.
- Auto Hide — This command puts a secondary window in Auto Hide mode. The window disappears, and its title is displayed at the IDE’s nearest edge. When you click the title or hover over it, the window reappears so that you can use it. If you click another window, this window hides itself again automatically.
- Hide — This command removes the window.
- Auto Hide All — This command makes all secondary windows enter Auto Hide mode.
- New Horizontal Tab Group — This command splits the main document window horizontally so that you can view two different documents at the same time.
- New Vertical Tab Group — This command splits the main document window vertically so that you can view two different documents at the same time.
- Close All Documents — This command closes all documents.
- Reset Window Layout — This command resets the window layout to a default configuration.
- Form1.vb — The bottom part of the Window menu lists open documents such as form, code, and bitmap editors. The menu displays a checkmark next to the currently active document. You can select one of these entries to view the corresponding document.
- Windows — If you have too many open documents to display in the Window menu, select this command to see a list of the windows in a dialog box. This dialog box lets you switch to another document, close one or more documents, or save documents. By pressing Ctrl+Click or Shift+Click you can select more than one document and quickly close them.
Help
The Help menu displays the usual assortment of help commands. You should be familiar with most of these from previous experience. The following list summarizes some of the more interesting non-standard commands:
- Set Help Preference — This command lets you indicate whether you prefer to use local or online help.
- MSDN Forums — This command opens an MSDN community forums web page where you can post questions and search for answers.
- Report a Bug — This command opens Microsoft Connect where you can report bugs, make suggestions, and look for hot fixes for known problems.
- Samples — This command opens a Microsoft web page containing links to Visual Studio documentation and samples.
- Customer Feedback Options — This command displays a dialog box that lets you indicate whether you want to participate in Microsoft’s anonymous Customer Experience Improvement Program. If you join, Microsoft collects anonymous information about your system configuration and how you use its software.
- Check for Updates — This command checks online for Visual Studio updates.
- Technical Support — This command opens a help page describing various support options. The page includes phone numbers and links to more information.