
Appendix A. Installing & Upgrading to Windows 10
If your computer came with Windows 10 already on it, you can skip most of this appendix; jump to “The Windows 10 Setup Assistant”. But if you’re running an earlier version of Windows and want to savor the Win10 experience, this appendix describes how to install the new operating system on your computer.
Before You Begin
Most of the work involved in installing Windows 10 takes place before the installation software even approaches your computer. You have some research and planning to do, especially if you want to avoid a weekend in Upgrade Hell.
For example, you must ensure that your PC is beefy enough to handle Windows 10. You also have to decide which of two types of installation you want to perform: an upgrade or a clean install. (More on this in a moment.)
If you opt for the clean install (a process that involves erasing your drive completely), you must back up your data. Finally, you have to gather all the software bits and pieces you need in order to perform the installation.
Hardware Requirements
Windows 10 runs on all the same computers as Windows 7 and 8 did; its system requirements are no steeper. Your machine needs a 1-gigahertz processor (or faster), 2 gigabytes of memory (or more), and 20 gigabytes of free hard drive space (or more).
Microsoft also points out, helpfully, that Windows’ touchscreen features require a touchscreen.
What You Have to Lose
Upgrading to Windows 10 from an earlier version doesn’t necessarily mean all your stuff will survive the journey. Here’s how the transition might go, depending on the version you have now:
Upgrading from Windows 7, 8, or 8.1. Your files, settings, and programs all survive. (You no longer have to upgrade 8.0 to 8.1 before making the leap to 10.)
Windows XP, Windows Vista. You have to start up from an external drive and perform a clean install; none of your files, settings, or programs are preserved.
Keep in mind, too, that upgrading to the latest Windows 10 means saying goodbye to some traditional features. They include the Reader app (for opening PDF files—Microsoft recommends using Edge instead); Windows Media Center; Windows Journal (Microsoft recommends using OneNote instead); Windows 7 desktop gadgets; Minesweeper and Hearts games; HomeGroup (see Chapter 19); and Phone Companion (Microsoft recommends ![]() →
→![]() →Phone instead).
→Phone instead).
Finally, if you’re starting from Windows 7 or 8.1, it’s worth noting that Microsoft has simplified the vast array of Windows versions. There are now only two mainstream versions: Home and Pro (see the box below). If you upgrade from a Starter, Home Basic, or Home Premium edition of Windows 7 or 8.1, you wind up with Windows 10 Home. If you upgrade from a Professional or Ultimate edition, you wind up with Windows 10 Pro.
Kinda makes sense.
How to Upgrade to Windows 10 April 2018 Update
You can upgrade your PC to the April 2018 Update in any of three ways, listed here from simplest to most flexible: using the fully automatic background installation; using the partly automated Update Assistant; and using the Media Creation Tool.
Fully Automatic Background Installation
If you’ve set up your PC to automatically download and install Windows updates (“Windows Update”), then there’s almost nothing to it. One day you’ll see the message shown in Figure A-1. Hit “Restart now,” and boom—your PC starts and wakes up again in the April 2018 Update. (Or, of course, you can ask to be reminded later, or choose a time for the restart, when it won’t interrupt your work.)
No dialog boxes, no legalese, nothing to set up—it’s over.
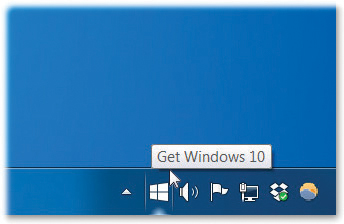
Figure A-1. This little balloon means Windows 10 is ready to download—for free. Click to open the Get Windows 10 app, whose instructions guide you through the download and install process.
Update Assistant (Partly Automatic)
If you can’t, or don’t want to, wait for the automatic method to kick in, you can grab the latest Windows 10 version using the Update Assistant app instead. Here are two scenarios when you might want it:
Manual check. If you already have a version of Windows 10, but you’ve turned off automatic updates, you can trigger the installation manually. Open
 →
→ →Update & Security→Windows Update, and hit “Check for updates.” That’s all you have to do; the update, if there is one, begins to download.
You now have Windows 7 or 8.1. Microsoft is supposed to send you a notification or make a
logo appear near the right end of your taskbar, alerting you that the Windows update is available. Click or tap to commence the procedure, which begins at the Microsoft website (Figure A-2).If you’re not seeing those signals, you can also kick-start the installation yourself at https://www.microsoft.com/software-download/windows10. Choose “Update now” (Figure A-2).
Those two methods begin with a download of the Windows Update Assistant, a small program that manages the installation process. Even choosing “Update now” on the Microsoft download page doesn’t actually download Windows 10; it downloads only the Update Assistant, and it downloads Windows 10. See Figure A-3.
You’ll know the process is over when the April 2018 Update website opens automatically. Congratulations! You’re now running the Windows 10 April 2018 Update. All your files, folders, programs, and settings are still in place.
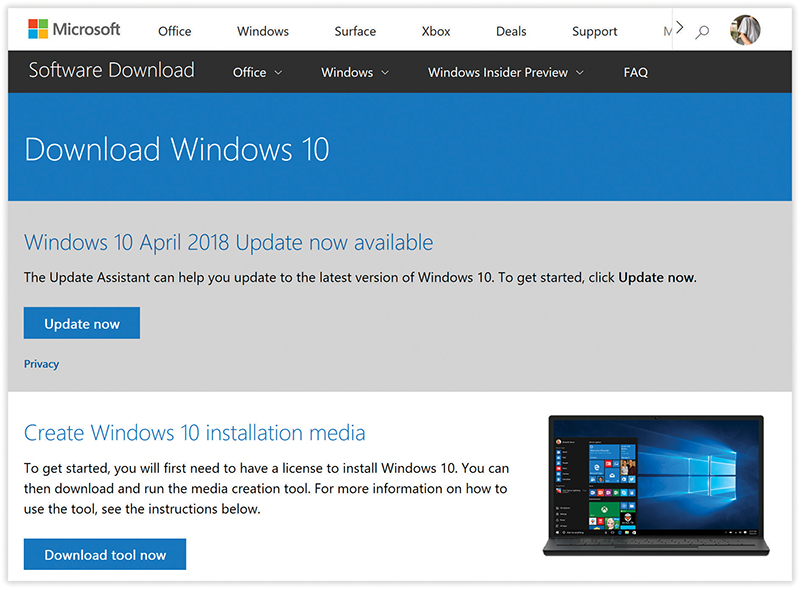
Figure A-2. This page is the mother lode: the source of all Windows 10 installation.
Its two big buttons correspond to the two methods of installing Windows 10: “Update now” and “Download tool now” (for creating your own installation flash drive).
Media Creation Tool (Flash-Drive Method)
If you want a “disk” you can use to install Windows 10 onto multiple machines, you have to create it yourself.
That’s why Microsoft offers the Media Creation Tool. It downloads Windows 10 and copies the installer to a flash drive (or DVD) that you supply. Clearly, this procedure involves more steps than the other install methods—but, of course, it gives you great flexibility of time and place.
Create the flash drive
The routine goes like this:
On your PC, go to the Windows 10 download page (Figure A-2).
For the U.S. edition of Windows, that address is https://www.microsoft.com/en-us/software-download/windows10.
Click “Download tool now.”
Your browser offers you a choice of Run or Save. Choose Run.
Authenticate yourself as described in “Authenticate Yourself: User Account Control”. After a moment, you’re asked: “What do you want to do?” Your choices are “Upgrade this PC now” or “Create installation media for another PC” (Figure A-4).
Do you want to upgrade your computer right now? Or make an installation flash drive (or disc) that you can use to upgrade other machines?
If you choose “Upgrade this PC now” (and then hit Next), the installer springs into action, as described in the next section.
But suppose your intention here has been to create an installation flash drive or DVD.

Figure A-3. The Update Assistant walks you through a series of checks and tests—and if all is well, begins the download. Once the big download is over (bottom), you can either hit “Restart now” or wait 30 minutes for Windows to restart by itself.
Choose “Create installation media for another PC”; click Next.
The little app begins downloading Windows 10 from the Internet. It may take awhile. When that’s over, you see the “Applicable notices” screen, brought to you by the lawyers.
Hit Accept.
Now you arrive at a language/edition/architecture screen.
Use the drop-down menus to specify your language, Windows 10 edition, and architecture.
The architecture means 32-bit or 64-bit, corresponding to the kind of computer you have. (If you’re not sure, open
→→System→About. Under “Device specifications,” you’ll see what kind of machine you’ve got.)Hit Next.
Now you’re asked what kind of installation drive you want to create: A flash drive or an ISO file (for burning a DVD).
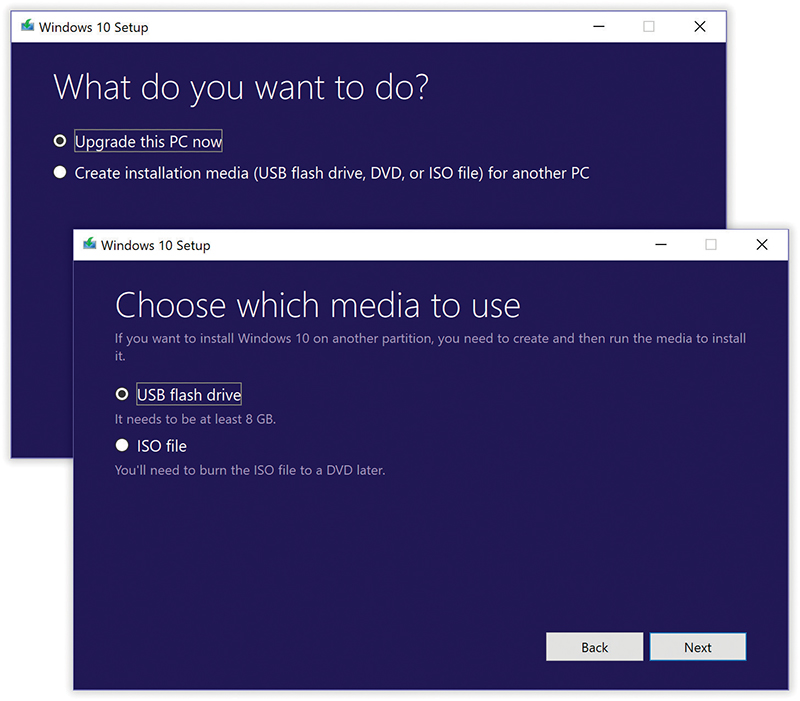
Figure A-4. Top: Truth is, the handy Media Creation Tool isn’t just for creating a Windows flash-drive installer; you can also use it to upgrade your PC right now.
Bottom: Not many people have DVD drives anymore—but you don’t technically need one to use the ISO feature, as described in the Tip on the facing page.Choose “USB flash drive” or “ISO file” (Figure A-4, bottom).
Insert a blank flash drive that’s at least 8 gigabytes in size. Windows goes to town, building you an installer on that drive. (If the drive wasn’t blank before, Windows erases it first.)
If you don’t have a flash drive, you can opt for the ISO option. It creates a disk image of the type described in “ISO Disk Images”. You can install directly from this file, or you can burn it onto a blank DVD, if that’s how you prefer to go.
Tip:
Once you create the ISO file, you can convert it into a DVD (if your machine has a DVD burner) using a DVD-burning program. But you can also install Windows 10 directly from the ISO file!
To do that, mount the ISO file by right-clicking its icon; from the shortcut menu, choose Properties. On the General tab, click Change; choose Windows Explorer as the program to use to open ISO files. Hit Apply.
Right-click the ISO file and select Mount. Double-click the ISO file to see what’s inside it—including the app called setup.exe. Open it to begin the Windows 10 installation.
Install from the flash drive or DVD
Whether you start the upgrade cycle straight from the Update Assistant or from a flash drive or DVD, the actual process is pretty much the same.
You have only a short checklist left to follow:
Update your virus program and scan for viruses—and then turn it off. If you’re updating an existing copy of Windows, turn off your virus checker. Also turn off auto-loading programs like non-Microsoft firewall software and web ad blockers.
Gather updated, Windows 10–compatible drivers for all your computer’s components. Graphics and audio cards are particularly likely to need updates, so be sure to check the manufacturers’ websites—and driver-information sites like www.windrivers.com and www.driverguide.com—and download any new drivers you find there.
Plug in. If it’s a laptop or tablet you’re upgrading, keep it plugged in to power during the upgrade. If its battery dies midway through, you’re in trouble.
Back up your world. Use File History (“File History”). Upgrades that go wrong are very rare. But you don’t want to be that one in a million who loses files.
If you’ve gone to all this trouble and preparation, the Windows installation process can be surprisingly smooth. The Windows 10 installer is much less painful than the ones for previous versions of Windows—and in the April 2018 Update, it takes much less time, too. The whole process can take as little as 30 minutes, thanks to a new background-downloading scheme.
OK, ready?
With your PC turned on, insert the flash drive or DVD containing the Windows 10 installer, and then shut down the PC.
Now start the computer; just after it chimes, hold down any key.
Note:
That’s usually the trick for starting up from a DVD or a flash drive. If it doesn’t work, and the computer starts up into your existing Windows version, then you probably have to fool around with the machine’s BIOS or UEFI settings. To find out how you do that, you’ll have to visit your computer maker’s website and hunt for details, since it’s different for every computer model. Sorry.
Eventually, the Install Windows page appears. Now you’re in for a lengthy screen-by-screen interview process that goes like this:
Language to install. Specify your language, regional preferences, and keyboard language; hit Next.
Install now. Yep; hit “Install now.”
Enter the product key to activate Windows. Your product key (serial number) is the proof you’ve actually bought Windows 10; the product key number came in the confirmation email that Microsoft sent you.
You may, of course, choose “I don’t have a product key” instead, but you’ll get persistent nags to buy one until you finally do.
Applicable notice and license terms. Yay, lawyers! Choose “I accept the license terms.” Hit Next.
Which type of installation do you want? Choose “Upgrade: Install Windows and keep files, settings, and applications” (Figure A-5, top).
Now the installation begins; this is the time-consuming part. The PC will restart a couple of times along the way; that’s normal.
Eventually, things on the screen start looking a lot more modern; you’ve arrived in the Setup Assistant. Continue as described in “The Windows 10 Setup Assistant”.
The Clean Install
Upgrading, as described above, retains all your existing settings and data files. Sounds great, right? Who wouldn’t want to avoid having to redo all those settings?
Well, there are two situations when you might prefer a clean install:
When you’re working with an empty PC or hard drive—one that doesn’t already have Windows on it.
When you have a copy of Windows already—but as a troubleshooting or speed step, you want to reformat your disk, wiping out everything on it. You wind up with a fresh system, 100 percent free of any little glitches and inconsistencies that have built up over the years. (Of course, you’ll also have to take the time to reinstall all your programs, reconfigure your personalized settings, recreate your network connections, and so on.)
Note:
You must also do a clean install if you’re upgrading from Windows Vista or Windows XP, or if you’re going from a 32-bit version of Windows to the 64-bit version.
A clean install requires that you first make a Windows 10 installation flash drive or DVD, as described in “Media Creation Tool (Flash-Drive Method)”. And the process is identical to the one described already—right up until you reach the “Which type of installation do you want?” screen (Figure A-5, top).
Here, though, you should choose “Custom: Install Windows only (advanced).” That’s the clean-install option.
From there, you proceed to the “Where do you want to install Windows?” screen.
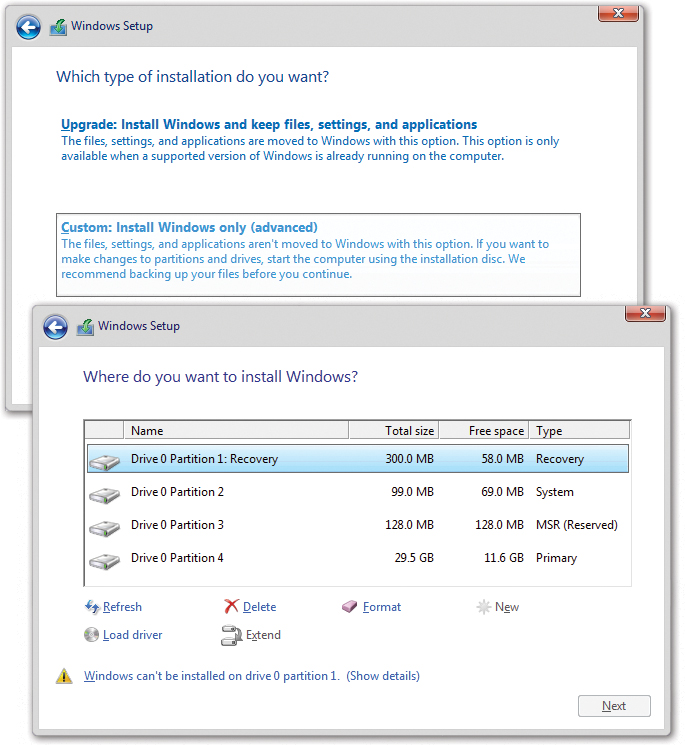
Figure A-5. Top: Use the buttons on this screen to indicate whether you want a clean installation or an upgrade installation.
Bottom: You have to install Windows onto its own partition.
It shows you a list of the partitions on your hard drive (Figure A-5, bottom). Unless you’ve set up your hard drive for dual booting as described in the box below, you probably have only one.
Select the name of the partition (or choose some unallocated space) on which you want to install Windows, and then hit Next. If you see a “Drive options (advanced)” link at the bottom of this window, you can use it to delete, create, or format partitions. To create a dual-boot situation, you have to erase a partition completely to make it ready for Windows 10.
After the formatting process is complete, click Next.
The Setup program begins copying files to the partition you selected and, eventually, restarts the computer a time or two.
Suddenly, the screen looks colorful and the typography modern. You’ve entered the Setup Assistant, described next.
The Windows 10 Setup Assistant
If you’ve just bought a brand-new PC, you don’t have to install Windows 10; it’s already installed and activated. You’ll also enjoy a variation of this setup assistant after you perform a clean install (“The Clean Install”).
In these cases, you don’t go straight to the desktop when you turn it on. Instead, you have to punch through a slew of setup screens (Figure A-6)—made more pleasant by Cortana, whose voice walks you through them (and even lets you confirm each screen by saying “Yes”).
Tip:
Or you can shut her up by hitting the microphone icon (![]() ) at lower left.
) at lower left.
Here are some of the screens you may see along the way (Figure A-6). Keep in mind that you may see more or fewer screens (for example, your computer maker—Dell or whatever—can insert its own screens along the way):
Let’s start with region. Is this right? Make sure Windows has identified your country correctly; hit Yes.
Is this the right keyboard layout? Choose the country whose keyboard you’re used to; then hit Yes.
Want to add a second keyboard layout? Up to you; hit Skip if not.
Let’s connect you to a network. Here are all the available Wi-Fi networks, plus an Ethernet option. Choose the one you want to join, hit Connect, specify whether you want this computer to be discoverable on the network (“File Sharing 1: Nearby Sharing”), and enter that password if necessary.
Windows 10 License Agreement. Enjoy the law firm’s output; hit Accept.
Sign in with Microsoft. Enter the email address you’ve registered as your Microsoft account (“Local Accounts vs. Microsoft Accounts”); if you don’t have one, hit “Create account” to take care of that essential task. Then hit Next.
Enter your password. Enter it and hit Next.
Set up a PIN? You probably do want to set up a personal identification number (see “The Four-Digit Passcode (PIN)” for background); a four-digit number and your password is much more secure than just a password. Hit “Set a PIN,” enter your chosen code twice, and then hit OK.
Link your phone and your PC. See “Phone” for details. Hit “Do it later” to pass for now, or enter your number, hit Next, and finish that setup process.
Protect your files with OneDrive. Windows is asking if you want to set up OneDrive as your automatic backup system. A nice idea, if you’ve got the space. Hit “Only save files to this PC” if you decline; otherwise, hit Next.
Make Cortana your personal assistant? Cortana is Microsoft’s Siri: a voice-activated assistant, as described in Chapter 5. No reason to turn her off unless you don’t like the idea of your queries being sent to Microsoft’s servers. (Also turn on “Let Cortana respond to ‘Hey Cortana’ ” if you’d like to be able to ask things of Cortana without having to click a button first; she’ll be listening for her name at all times.)
Choose No or Yes.
Choose privacy settings for your device. This screen (Figure A-6, bottom), new in the April 2018 Update, is a big deal; it lays out every single kind of information Windows would like to collect from your PC to send back to Microsoft.
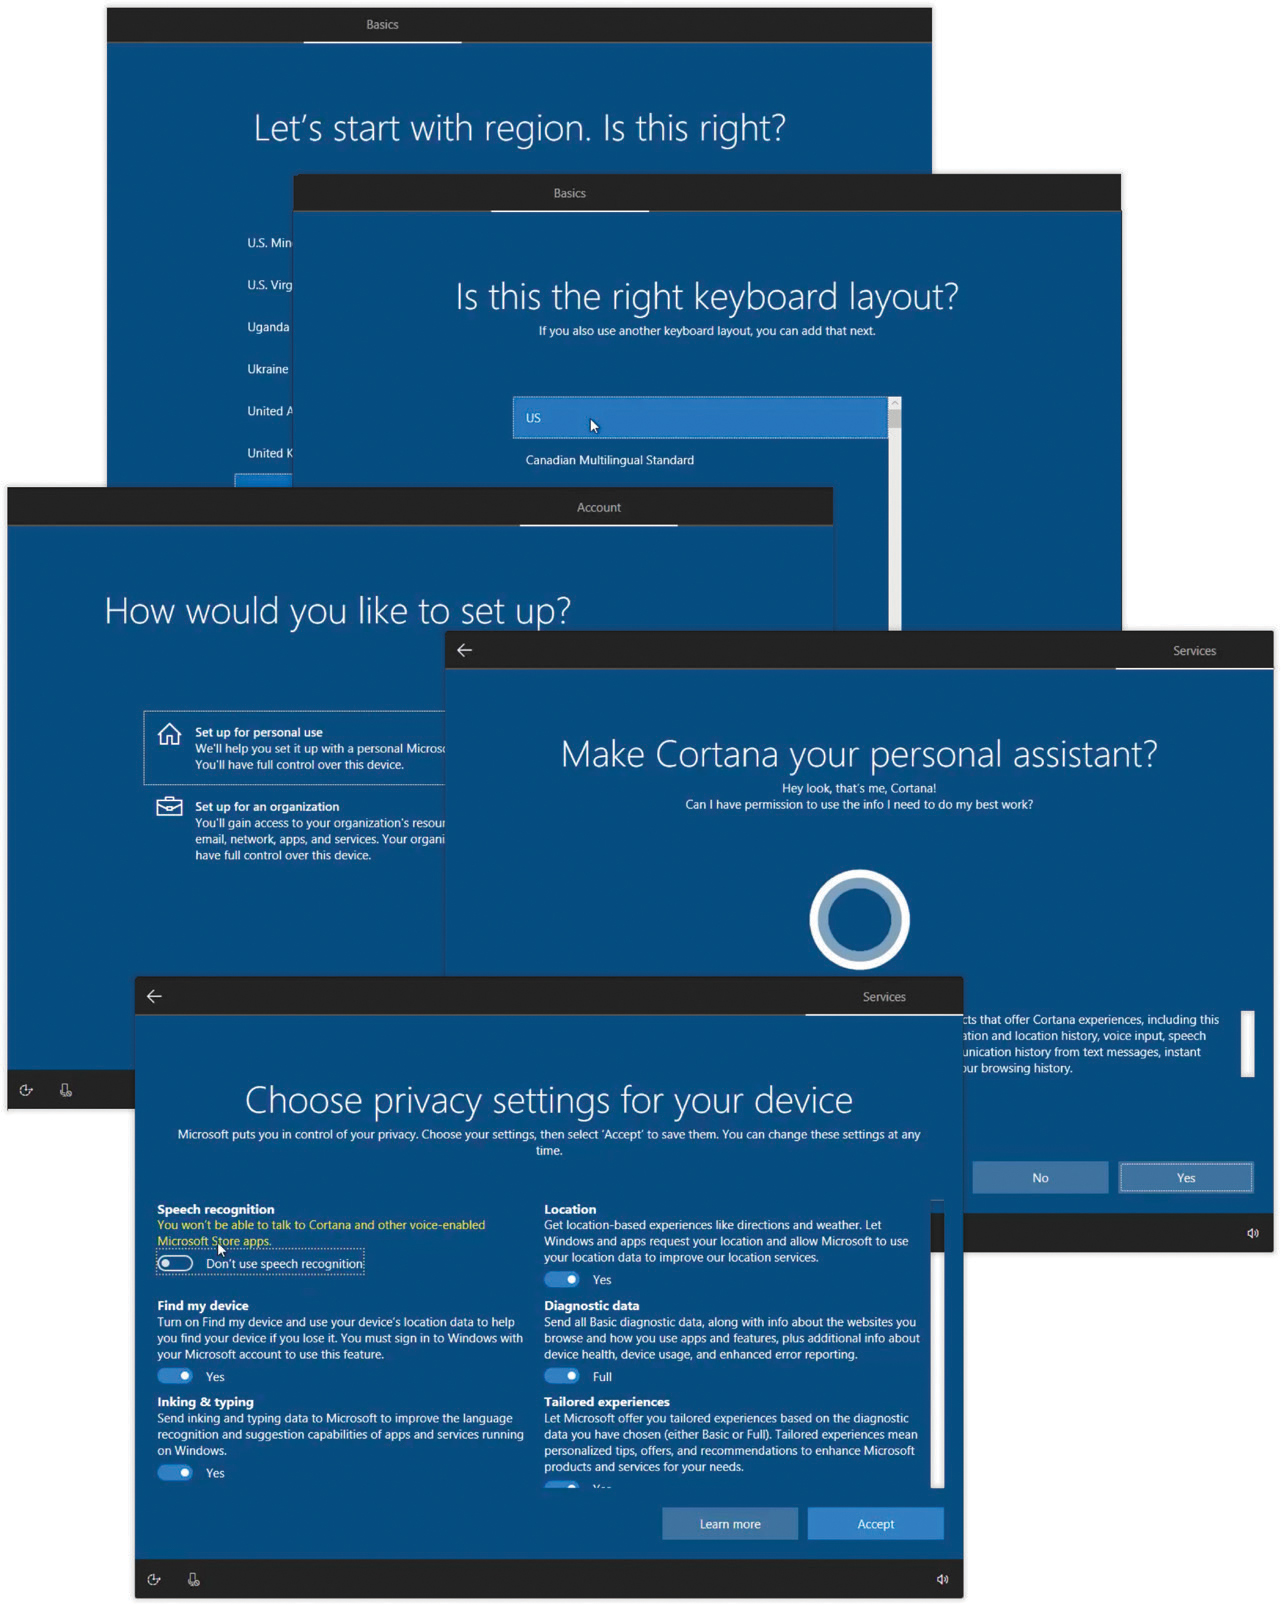
Figure A-6. The Setup Assistant is the final stage of any clean install or flash-drive install. It concludes with the new April 2018 Update Privacy dashboard (bottom).
Of course, the reason it’s harvesting data is to make possible the features listed here: Speech recognition, Find my device, Inking & typing, and so on.
You can turn off these switches individually; a message lets you know, as you do so, exactly which features you won’t have as a result.
Note:
Depending on the laws where you live, this central privacy dashboard screen may be broken up onto several successive screens, but the idea is the same.
Choose Accept. You can always review or change your privacy settings in
→ →Privacy.
After a moment, the triumphant word “Hi” appears on your screen. That’s your signal that the installation has gone well.
After another minute or two, you arrive at the desktop; Microsoft Edge opens to a welcome screen containing details about the April 2018 Update.
Jobs Number 1, 2, 3…
Once you’ve installed Windows 10, you can start using the computer however you like. But if you’re smart, you’ll make these tasks your first order of business:
Transfer files from your old computer, if necessary. The old Windows Easy Transfer program no longer comes with Windows, so you’ll have to use file sharing, an external hard drive, or something like your OneDrive to bring all your stuff over.
Tip:
If it’s worth money to do the job right, programs like Laplink PCmover or Todo PCTrans can bring over not just your files and programs, but also your settings and every last shred of your old PC’s account.
Customize the Start menu (“Meet the Start Menu”).
Add users. That means adding accounts to a PC that will be used by more than one person, as described in Chapter 18.
Turn on Windows Defender. If you have a new PC, and it came with a trial version of antivirus software like Norton or McAfee, you’d be wise to mutter, “But Windows comes with its own antivirus software!”
Well done! Now uninstall the trialware and turn on Windows Defender (“Windows Defender Security Center”).
The adventure begins!