11. Working with Drawings, WordArt, and Clip Art
Like most of the Office apps, Word 2013 includes a set of drawing tools that you can use to construct artwork out of lines and shapes. Although these drawing tools are not professional-grade, they are more than adequate for simple projects like creating logos and making simple flow charts. In this chapter, you find out how to use these drawing tools and how to format and arrange the lines and shapes to produce effects. This chapter also covers clip art, which is predrawn art that uses the same type of lines and shapes that the drawing tools generate. This chapter also explains how to create and format WordArt, which turns ordinary text into attractive graphics.
Understanding Vector Graphics
In this chapter, you work with vector graphics, rather than bitmaps. Vector graphics are very different from the bitmap-based photos you worked with in Chapter 10, “Working with Pictures and Videos.” Whereas a bitmap image records a numeric color value for every pixel in the image, a vector drawing expresses the image as a set of mathematical equations, somewhat like what you learned in Geometry class in high school. For example, a vector drawing of a circle consists of a math formula describing the circle (its shape and diameter) plus information about its border color and fill color. Because the graphic is constructed on-the-fly for each usage, its edges appear smooth (see Figure 11.1).

Figure 11.1. A vector graphic has smooth edges that remain smooth even when resized.
It doesn’t take much space to store that information, so vector drawings have small file sizes compared to bitmap pictures. The benefits don’t stop there, though. Vector drawings also have a huge advantage over bitmaps when they are resized. When a bitmap image is resized, it loses a certain amount of quality, especially when enlarged. Resized bitmap images tend to get the “jaggies”—that is, jagged edges on curves and lines—when they are used at different sizes (see Figure 11.2). Vector drawings are not subject to this problem because each time they are resized, their math formula is simply recalculated and they are redrawn.

Figure 11.2. A bitmap circle has jagged edges, which only get worse if the circle is resized.
Vector drawings will never replace photos because they are not realistic-looking. You can’t save scanner or digital camera output in vector format. Vector graphics can’t have complex shading, and it’s difficult to construct anything reasonably lifelike with them. Think about the people in 3-D vector-based games such as The Sims, for example. They’re fun to play with, but you would never mistake any of those images for photos of real humans. Vector drawings are best for cartoons, drawings, diagrams—and, of course, clip art.
Vector graphics are used for almost every object type that can be created using the tools contained within Word. For example, vector graphics are used to compose drawn shapes, WordArt, clip art, charts, and SmartArt diagrams. In this chapter, you learn about the first three of those; the next two chapters cover the latter two.
Drawing Lines and Shapes
The drawing tools in Word create simple vector graphics. Although Word is probably not going to end up being your all-time favorite drawing tool for professional illustrations, it will do nicely for basic lines and shapes. And by combining and layering lines and shapes, you can even create some surprisingly complex drawings.
Word’s drawing tools are vector based. As you read at the beginning of this chapter, a vector graphic is a line-based drawing that’s created via a math formula, like in geometry. Unlike a bitmap image, a vector graphic can easily be modified and resized without loss of quality. Each line and shape in a vector-based drawing has its own selection handles, so you can move, resize, and reshape it as needed.
Drawing a Shape
Word provides dozens of predrawn shapes from which you can choose, including stars, arrows, circles, and polygons.
To draw a shape in a document, follow these steps:
1. On the Insert tab, click the Shapes button and then click the desired shape (see Figure 11.3). The mouse pointer changes to a crosshair.

Figure 11.3. Draw a shape using Word’s drawing tools.
2. (Optional) Hold down Shift to constrain the dimensions of the shape, such as to force a rectangle to be a square or to force an oval to be a circle.
3. Drag to draw the shape. An outline shows the shape; release the mouse button when the shape is as you want it.
![]() Note
Note
Early versions of Word referred to pre-drawn shapes as AutoShapes, and some parts of the program still do too, although the term shape is more common in Word 2013.
Drawing a Straight or Curved Line
Word’s palette of shapes includes several types of lines, pointed out in Figure 11.4.

Figure 11.4. Tools for drawing lines.
• Straight lines—Click and hold down the mouse pointer at the beginning, point and drag to the end point, and then release the mouse. A straight line can be plain or have arrows at one or both ends.
• Straight (elbow) connectors—Click and drag to draw an elbow connector. You can adjust the bend in the connector by dragging the yellow diamond.
![]() Note
Note
Connectors can be used by themselves but are traditionally used to join other shapes such as in a flow chart.
• Curved connectors—Click and drag to draw a curve. You can adjust the shape of the curve by dragging the yellow diamond in the center.
• Curve—This freeform curve is drawn differently from the others, as shown in Figure 11.5. Click the beginning point, click to create a second point, and then click again to create additional points. Between points, drag the mouse pointer to adjust the curvature of the line. When you are finished, double-click to end the shape.

Figure 11.5. Draw a curve by clicking.
• Scribble—This line is completely freeform. You can draw straight or curved segments, or a combination of them. Hold down the mouse button and drag to draw the line; when you release the mouse button, the line is completed.
Drawing a Freeform Polygon
A polygon is a shape that consists of line segments. A rectangle is a polygon, as is a star, a triangle, an octagon, and so on. The line segments do not need to be the same length or at any particular angle.
Word’s drawing tools include a Freeform tool that creates custom polygons. (It’s pointed out in Figure 11.4.) Here’s how to use it:
1. Open the Shapes menu on the Insert tab and click the Freeform button.
2. Click to place the start point. (Don’t hold the mouse button down.)
3. Click somewhere else to place the next point. A straight line appears between the two points.
4. Repeat step 3 to create more points. Then, do one of the following:
• To end the shape and leave it open (that is, not joining the startpoints and endpoints together), double-click instead of clicking for the final point.
• To end the shape and close it, click on the endpoint. You don’t have to be precise; if you click reasonably near the endpoint, the shape closes itself.
Working with the Drawing Canvas
A drawing canvas is a defined rectangular area in which you can place the lines and shapes. Using a drawing canvas is optional. If you use one, the drawing canvas functions as the backdrop on which all the lines and shapes sit. If you choose not to use one, the lines and shapes sit directly on the document page. Figure 11.6 shows a blank drawing canvas.
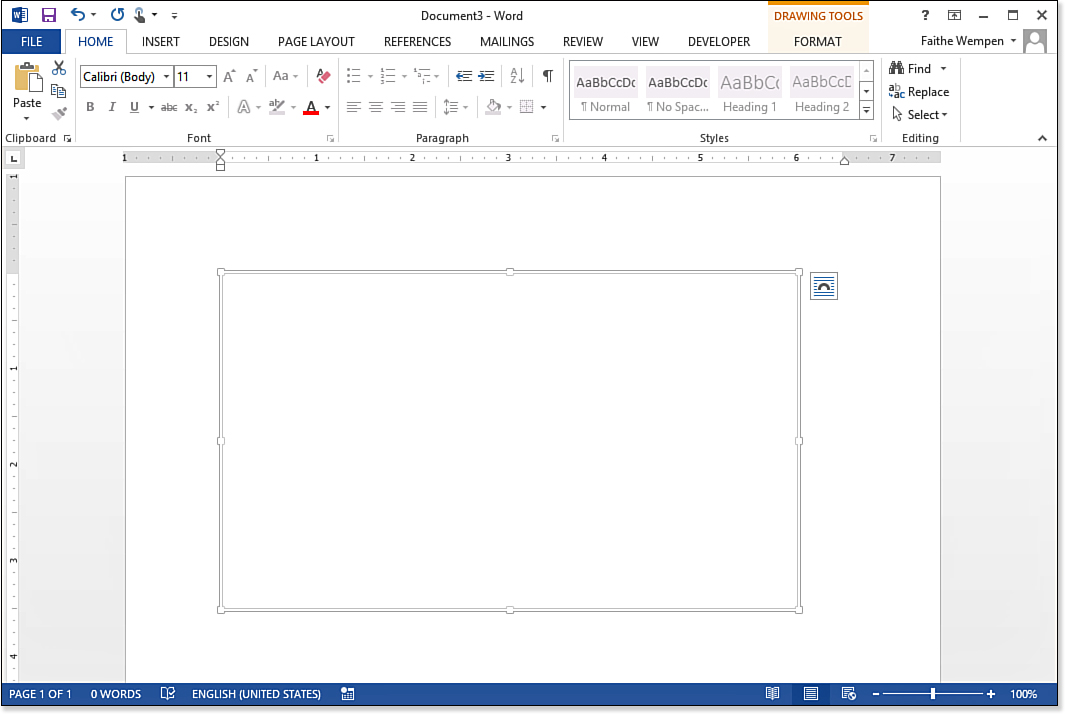
Figure 11.6. A blank drawing canvas, ready for a drawing.
One advantage of using a drawing canvas is that you can apply a background fill (solid or a special effect) to the canvas, so your drawing will have a colored background separate from the document background. Another is that you can assign an automatically numbered caption to a drawing canvas, so a group of lines and shapes together can be considered a single figure for numbering purposes. (To do that, right-click the canvas border and choose Insert Caption.)
![]() Tip
Tip
If you always (or nearly always) want to use a drawing canvas whenever you use the drawing tools, you can set up Word to make canvas-insertion the default whenever you draw. To do this, choose File, Options, click Advanced, and then mark the Automatically Create Drawing Canvas When Inserting AutoShapes check box in the Editing Options area. (The reference to AutoShapes is a holdover from early Word versions, where shapes were known as AutoShapes.)
To create a new drawing canvas, follow these steps:
1. On the Insert tab, click the Shapes down arrow, opening the menu of shapes.
2. At the bottom of the menu, click New Drawing Canvas. A rectangular boxed area appears. This is your canvas.
3. Use the Shapes menu to create lines and shapes within the drawing canvas as desired.
To delete a drawing canvas, select the outer border of the canvas (not any particular drawn item within it) and press the Delete key on the keyboard.
If you forget to create a drawing canvas and then later wish you had, it’s not too late. Create a new drawing canvas, and then cut and paste the drawn objects into it (Ctrl+X and Ctrl+V).
Resizing the Canvas
By default, the drawing canvas occupies almost the entire space between the margins horizontally, and it is about 3.5 inches high. To resize it, drag one of its selection handles.
To size the drawing canvas so that it is exactly the size needed to hold the current content, right-click its border and choose Fit (see Figure 11.7). The Fit command is unavailable when there are no drawn lines or shapes yet in the canvas area.

Figure 11.7. Right-click the border of the drawing canvas to access sizing options.
To expand the drawing canvas slightly (by about 1/2 inch) so that the content has a little more space around the edges, right-click the drawing canvas border and choose Expand.
The size of the canvas is constrained by the size of the content within it. You can’t make the canvas smaller than its content. However, you can resize the canvas and its content together using the Scale feature:
1. Right-click the canvas border and choose Scale Drawing.
2. Drag a selection handle to resize the canvas and the drawing together.
3. When you are finished, right-click again on the border and choose Scale Drawing again to toggle that mode off.
Formatting the Canvas
In terms of formatting, the drawing canvas is a lot like a shape or other object. You can place a border around it, and you can apply a background fill. See “Formatting Drawn Objects” later in this chapter to review the techniques for applying borders and fills to objects.

Adding Text to a Shape
Shapes can function as text boxes, and you can create some interesting effects by adding text to unusual shapes such as starbursts and arrows.
To add text to a shape, right-click the shape and choose Add Text or click the shape and start typing. An insertion point appears in the shape; just type your text as you would in a text box and then click outside the shape when you are done.
Formatting text in a shape is the same as formatting text in a text box. You can set all the usual paragraph and character formatting, and you can adjust the vertical and horizontal alignment and internal margins.
![]() To review the procedures for formatting text in a text box, see “Creating Text Box Layouts,” p. 303.
To review the procedures for formatting text in a text box, see “Creating Text Box Layouts,” p. 303.
Modifying Drawn Objects
There are lots of ways you can modify drawing objects (lines and shapes). Some of these involve formatting, such as applying fill colors and border styles, and that type of modification is covered later in the chapter. This section, however, looks at modification from a structural standpoint—changing the contours and angles of the shapes and lines.
Modifying a Straight Line
A straight line has only two selection handles—one at each end. Drag one of those selection handles to change the line’s length or to point it in a different direction.
Adding and Removing Arrow Heads
Each end of a line can be modified to include an arrow or not. Further, you can choose between different arrowhead styles. Follow these steps:
1. Right-click the line and choose Format Shape. The Format Shape task pane opens, with the Line controls displayed.
2. Choose a Begin Arrow Type and an End Arrow Type setting.
3. For each end for which you’ve chosen an arrow, choose a Begin Arrow Size and an End Arrow Size setting (see Figure 11.8).
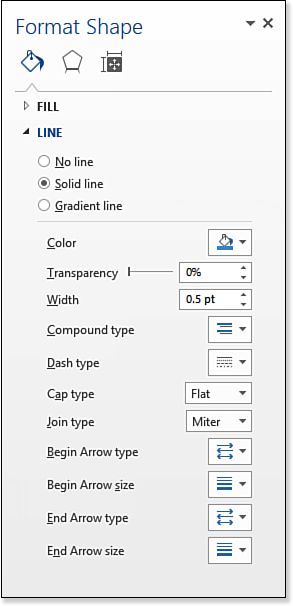
Figure 11.8. Select arrow types and sizes for each end of the line.
4. Click OK.
Modifying an Elbow or Curved Connector
An elbow connector is a line that turns at a 90-degree angle at some point and then turns again the opposite way so it ends up going the same direction again. A curved connector is a two-segment curve.
You can drag either end to change the position and size, just like with any other line. The angled parts or the joint where the two segments meet remain centered.
An elbow connector has a yellow square selection handle in the center; you can drag the yellow square to move the angles (see Figure 11.9). If you drag the yellow square all the way in one direction or the other, one of the angles disappears and the line becomes a simple two-segmented right angle line.

Figure 11.9. Modify an elbow connector by dragging the yellow square.
A curved connector also has a yellow square, but dragging it does something different—it changes the position of the point where the two curves join, and one or both curves change their shape in proportion (see Figure 11.10).
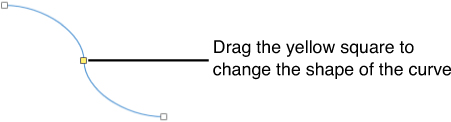
Figure 11.10. Modify a curved connector by dragging the yellow square.
Modifying Curves and Scribbles
A true curve—as opposed to a curved connector—has a variable number of bends in it. The same goes for a scribble. It may be a mixture of curves and straight lines, and it has a variable number of segments. Such lines do not have a yellow square for changing their shape; instead, you must edit their points.
To edit a curve or scribble, follow these steps:
1. Select the line.
2. On the Drawing Tools Format tab, click Edit Shape and then click Edit Points. Small black squares appear on the curve for each point.
3. Drag a point to reposition it. As you drag, the curve of the adjacent segments changes (see Figure 11.11).

Figure 11.11. Modify a curve by editing its points.
4. Drag other points as needed; press Esc when you’re finished.
When you click a point on a curve or scribble, notice that two small white squares appear near it, with a short line segment between them. These squares represent the ends of directional line that can control the contours of the segment without moving it. Drag one of these squares to reshape the segment, while keeping the points at both ends of the segment stationary (see Figure 11.12).

Figure 11.12. Drag the directional lines for a point to change the segment’s curve without moving the startpoint or endpoint of the segment.
Modifying Shapes
Some shapes have one or more yellow squares on them when selected. You can drag these yellow squares to modify the shape. Dragging yellow squares does not change the shape’s basic self—an arrow is still an arrow—but rather changes the proportions. For example, in Figure 11.13, the yellow squares on a block arrow shape are used to change the thickness of the line and the size of the arrowhead.

Figure 11.13. Modify a shape by dragging a yellow square.
![]() Note
Note
Some shapes, such as the curved ribbon-style arrows, have multiple yellow squares, each one controlling a different dimension of the shape.
Rotating and Flipping Objects
The easiest way to rotate an object is to drag the rotation handle (the circle at the top of the shape), as shown in Figure 11.14.

Figure 11.14. Rotate a shape by dragging its rotation handle.
You can also rotate a shape with the Rotate Objects button’s menu on the Drawing Tools Format tab. Choose one of the presets there or choose More Rotation Options to open the Layout dialog box’s Size tab. Then, enter a rotation amount in degrees in the Rotation box. These skills were covered in “Rotating a Picture” in Chapter 10.
Flipping creates a mirror image of the object. From the Drawing Tools Format tab, click Rotate and then click Flip Horizontal or Flip Vertical.
![]() To learn about 2-D rotation, see “Rotating a Picture,” p. 407.
To learn about 2-D rotation, see “Rotating a Picture,” p. 407.
![]() To learn about 3-D rotation, see “Applying 3-D Rotation,” p. 409.
To learn about 3-D rotation, see “Applying 3-D Rotation,” p. 409.
Sizing and Positioning Objects
Now that you know how to create the lines and shapes you need for your drawings, let’s look at ways to size and position those objects.
Sizing Objects
You can size drawn objects (lines and shapes) the same way you did for the other object types you’ve seen so far in this book. The quickest way is to drag a selection handle. Lines have only two selection handles—one at each end—but shapes have multiple handles. To keep the shape proportional as you drag, hold down the Shift key.
To specify an exact size for a drawn object, enter precise values in the Height and Width boxes on the Drawing Tools Format tab (see Figure 11.15).
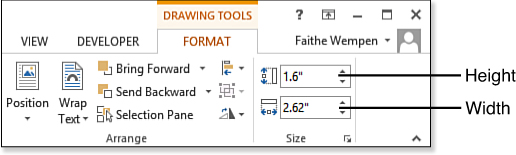
Figure 11.15. Resize an object with the Height and Width controls.
For other size-adjustment options, right-click the object and choose More Layout Options. Then on the Size tab, enter absolute or relative heights and widths, or in the Scale section, enter a percentage by which to resize (see Figure 11.16).
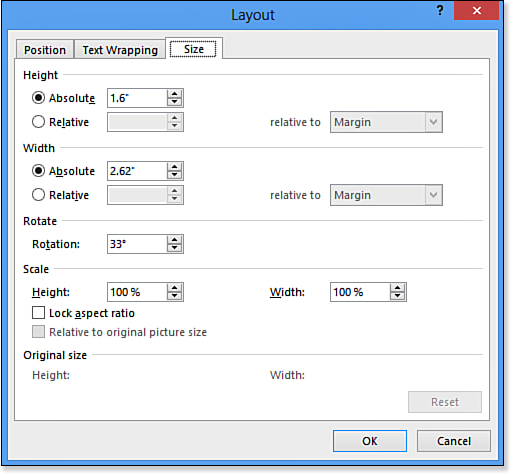
Figure 11.16. More resizing options are available on the Size tab of the Layout dialog box.
![]() Caution
Caution
More Layout Options is not available on the right-click menu for shapes within a drawing canvas; you have to use the Drawing Tools Format tab method, or remove them from the canvas.
![]() To review the available position presets, see “Choosing a Position Preset,” p. 391.
To review the available position presets, see “Choosing a Position Preset,” p. 391.
The text-wrapping options are the same as for clip art, covered later in this chapter. Drawn shapes are more like clip art than pictures in this regard because they sometimes have irregular edges around which text can tightly wrap. Choose text-wrap options from the Wrap Text button on the Drawing Tools Format tab. You can edit the wrap points the same as with clip art, or you can stick with standard text wrap styles.
![]() To learn more about text-wrapping options, see “Setting Text Wrap Properties for Clip Art,” p. 460.
To learn more about text-wrapping options, see “Setting Text Wrap Properties for Clip Art,” p. 460.
Anchoring Lines to Shapes
When you are creating drawings that illustrate connections, such as flowcharts, you might want certain lines and shapes to remain connected. Figure 11.17 shows an example of a flowchart. Suppose you wanted to move the shapes around, perhaps to compress the spacing between them. Wouldn’t it be nice if the connecting lines stayed connected?
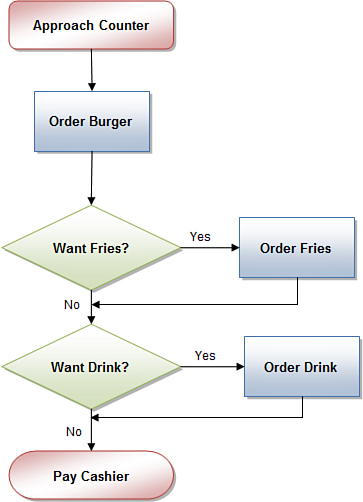
Figure 11.17. A flowchart uses connectors to join shapes.
![]() Note
Note
You can create a flow chart like the one in Figure 11.17 using any shapes you like, but certain shapes are traditionally used in specific situations. For example, a rectangle usually indicates an action, and a diamond usually denotes a decision point. Many good tutorials are available online for flow charting; a quick search for “flow chart tutorial” using any search engine will turn them up.
To create connections between lines and shapes, anchor the line to a shape at one or both ends. Follow these steps:
1. Using a drawing canvas, draw the two shapes that you want to connect. For best results use the shapes in the Flowchart group.
![]() Note
Note
It is important that you use a drawing canvas for this procedure (choose Insert, Shapes, New Drawing Canvas); otherwise, the connectors will behave like ordinary lines, and will not snap to the shapes.
2. Choose one of the line tools on the Insert Shapes menu: Straight Connector (line), Elbow Connector, or Curved Connector.
3. Click to place the connector line so that its beginning point is on the border of one of the shapes, over a selection handle, and hold down the left mouse button.
4. Slowly drag the mouse to move the pointer so it touches a selection handle on the border of the other shape, and then release the mouse button.
When both ends of a line are successfully anchored to shapes, green circles appear at each end of the line. When an end is not anchored, a white square appears at that end instead (see Figure 11.18).

Figure 11.18. Line selection handles appear in green when a line is anchored to a shape.
Here are a few tips for working with flowchart layouts:
• Adding text to a shape—Usually, a flowchart contains text in each shape. To add text, click a shape and start typing. Refer to the section “Adding Text to a Shape.”
![]() Tip
Tip
Lines are not required to be anchored to shapes; you can have lines anywhere on your drawing that are not connected to anything.
• Changing an anchor point—To change the point to which an end of a line is anchored, drag its endpoint. You can re-anchor a line to a different point on the same shape or to a different shape entirely, or you can drag it away from any shape to make it free floating.
• Toggling connection points—To toggle between the other possible connection points for a connector line, right-click the line and choose Reroute Connectors. (If nothing happens when you do that, there are no other possible connection points.)
• Changing the connector type—If you decide you want a different connector type, right-click the connector and point to Connector Types, and then pick a different type from the submenu: Straight Connector, Elbow Connector, or Curved Connector. Then, drag one end of the line or the other as needed. You might not see the effect of the change until you reposition one end or the other of the line.
• Aligning shapes—Your flowchart will look nicer if all the shapes are uniformly aligned. See “Aligning and Distributing Objects” later in this chapter to learn how to make that happen.
Layering Objects and Text
A Word document has two main layers. On the text layer is the regular document text and any inline images. (And remember, by default pictures are inserted as inline images.) The graphics layer contains everything else: text boxes, drawings, pictures, and anything else that’s set for a text wrapping other than inline.
Within that graphics layer, it is possible to stack objects. For example, you could create a drawing that consists of overlapping shapes and lines, and you could then use that drawing as a backdrop mat for a photo. Figure 11.19 shows an example.

Figure 11.19. Several overlapping drawn shapes form a background for this picture.
Word’s layering options enable you to move objects in stacking order within the upper layer, but that’s not all. They also enable you to move graphics objects behind the text layer itself, effectively creating an extra graphics layer behind the text layer. (The original graphics layer stays on top of the text layer, so you can have graphics both on top of and behind the text.)
When you overlap one graphic object with another, by default they are stacked according to the order in which they were originally drawn, with the oldest one on the bottom.
![]() Note
Note
Layering drawn shapes works only if you are not using a drawing canvas. Drag the shapes outside the drawing canvas if the layering tools do not work.
To move an object one position within the graphics layer, select the object and then choose either Bring Forward or Send Backward (on the Drawing Tools Format tab), respectively. To bring an item all the way forward or back in the stack of objects (but still within the graphics layer), choose Bring Forward, Bring to Front or Send Backward, Send to Back on the Drawing Tools Format tab. Figure 11.20 shows the Send Backward button’s menu.

Figure 11.20. The Bring Forward button and Send Backward buttons have their own menu.
![]() Note
Note
Depending on the object’s text-wrapping setting, you might not see any immediate difference in using Send Behind Text or Bring in Front of Text. To see the difference most obviously, set Wrap Text to Through.
To move an object behind the text layer, open the Send Backward button’s menu and choose Send Behind Text. To move it back above the text layer again, open the Bring Forward button’s menu and choose Bring in Front of Text.
Grouping Shapes
When creating complex drawings that have multiple shapes and lines in them, it can be a challenge to select, move, and resize all the pieces at once. To make it easier, consider grouping the pieces into a single unit. You can then move, size, cut, copy, and paste the group object.
To create a grouping, select all the pieces and then on the Drawing Tools Format tab, click the Group button, and then click the Group command on its menu. The individual selection handles disappear, and a single set of selection handles appears for the entire group. If all the shapes to be grouped are within the same drawing canvas, you can select them by lassoing (that is, by dragging a box around them). If the shapes are not within a drawing canvas, you can hold down the Ctrl key as you click on each one to select it.
If you find you need to work with one of the pieces separately, right-click the group and choose Group, Ungroup.
After making changes, you can reestablish the group by right-clicking one of the objects and choosing Group, Regroup.
You can lasso the individual shapes in the drawing canvas, but the lasso must start inside the drawing canvas. If there are shapes tight against the edges of the canvas, making it hard to position the mouse pointer, expand the canvas temporarily. To do so, right-click it and choose Expand. When you’re done, you can shrink it again; right-click, and choose Fit.
Aligning and Distributing Objects
Drag-and-drop can be a frustrating, inexact way of positioning objects in relation to one another. When creating stacked groupings of objects, you might instead prefer to use the Align and Distribute commands for more precision.
Two or more objects can be aligned with one another at the top, bottom, middle, right edge, left edge, or horizontal center.
Single objects can be aligned, but only in relation to some portion of the page. For example, you can align an object with any of the margins or with the edge of the page.
To align objects, follow these steps:
1. Select the objects to align. (Hold down Ctrl and click on each object.) For Align to Page or Align to Margin, you need only select one object. For Align Selected Objects, you must select at least two.
2. On the Drawing Tools Format tab, click Align and then choose the desired alignment relationship: Align to Page, Align to Margin, or Align Selected Objects (see Figure 11.21).

Figure 11.21. Choose the type of alignment you want to do.
This step doesn’t perform alignment; it just sets the stage.
3. Click Align again and then select one of the alignments, such as Align Center or Align Left.
Distributing means spacing objects equally. You can distribute three or more objects in relation to one another, or you can distribute two or more objects in relation to the margins or page.
Objects can be distributed either vertically or horizontally. Distribution is based on the amount of whitespace between the objects, not the centers of the objects, so objects of unequal size are still distributed with equal amounts of whitespace between them.
To distribute objects, follow these steps:
1. Select the objects to be distributed. (Hold down Ctrl and click multiple objects.) For Align Selected Objects, you must select at least three.
2. On the Drawing Tools Format tab, click Align and then choose the desired distribution relationship: Align to Page, Align to Margin, or Align Selected Objects.
If you choose the latter, the objects are distributed between the rightmost and leftmost objects, or topmost and bottommost ones, but the overall space occupied by the group of objects will not change. If you choose Align to Page or Align to Margin, the distribution spreads out the objects to fill the available space on the page or between the margins.
3. Click Align again and then select one of the distributions: Distribute Horizontally or Distribute Vertically.
New in Word 2013, you can turn on alignment guides, which are nonprinting horizontal and vertical guide lines that pop up when you drag an object near a document margin or other point with which an object might be aligned. To turn them on, choose Drawing Tools Format, Align, Use Alignment Guides. To try them out, drag an object near the page’s right, left, top, or bottom margin. A green line appears temporarily, and the object position snaps to it. Alignment guides do not display in the drawing canvas.
You might also want to turn on the display of gridlines to help you align objects on the page. To do so, choose Drawing Tools Format, Align, View Gridlines, or on the View tab, mark the Gridlines check box.
Formatting Drawn Objects
When you get the objects sized, shaped, and placed where you want them, the next step is to think about their formatting. In the following sections, you find out how to change the colors, borders, shadows, and other effects associated with drawn objects.
Applying Shape Styles
Shape Styles offer a way to quickly apply a complete set of formatting to a drawn object: color, border, and shadow. You can choose among six designs from each of seven colors from the Shape Styles drop-down list on the Drawing Tools Format tab. Select a shape and point to a Shape Style to see a preview of the Shape Style applied to the shape (see Figure 11.22).

Figure 11.22. Apply a Shape Style to a shape.
The only problem with Shape Styles is that they’re limited to the choices provided. If you want something other than what’s provided, see the following sections to fine-tune.
Formatting Borders
Most of what you’ve learned earlier in this book about borders also applies to drawn objects. You can apply a border with any style, thickness, and color desired.
Shape borders are called outlines in Word terminology. To format a shape border, open the Shape Outline menu from the Drawing Tools Format tab, as shown in Figure 11.23, and select one or more of the following:
• Color—Choose a theme color, a tint or shade of a theme color, or a standard color, or click More Outline Colors to select from a dialog box. This works the same as for font color (see “Changing Font Color” in Chapter 4, “Applying Character Formatting”) and for text boxes (see “Applying and Removing Text Box Borders and Fills” in Chapter 8, “Working with Templates and Nonstandard Layouts”).
• Weight—Choose a line thickness, from 1/4 pt to 6 pts, or click More Lines to specify some other weight in the Format Shape task pane.
• Dashes—Choose a line style. Choices include solid lines and various types of dotted and dashed lines. If desired, click More Lines to choose from a wider variety of styles in the Format Shape task pane.

Figure 11.23. Apply border formatting to a drawn object.
Applying Solid Fills
You’ve learned about theme colors and fixed colors in several other places in this book, but let’s quickly review.
A fixed color does not change, regardless of the theme applied. A few basic fixed colors are provided on the menu, but you can also choose More Colors to open a dialog box containing a variety of fixed color choices.
Theme colors are colors provided by the formatting theme you have applied (on the Design tab). Choosing a theme color does not actually apply a color to the selection; it creates a link to one of the theme’s color placeholders. Then whatever color happens to be assigned to that placeholder trickles down to the selection. That way, you can have elements in your document that change color automatically when you switch themes.
![]() To change themes, see “Applying a Theme,” p. 243.
To change themes, see “Applying a Theme,” p. 243.
Each theme color can be applied at full strength or as a tint. A tint is a scaled-back version of a color, derived by blending the color with white. Tints are described in percentages, such as Lighter 40 percent, Lighter 80 percent, and so on. Shades are the darker versions of the colors, derived by blending the color with black. They have names such as Darker 25 percent.
To apply a solid color fill to a drawn object, follow these steps:
1. Double-click the object to select it and to display the Drawing Tools Format tab.
2. Open the Shape Fill drop-down list (see Figure 11.24).

Figure 11.24. Select a shape fill color, either a fixed color or one from the current theme.
3. Do one of the following:
• Click No Fill to remove any fill color, making the shape transparent.
• Click a theme color (top row).
• Click a tint or shade of a theme color.
• Click a standard (fixed) color (bottom row of colors).
• Click More Fill Colors to select a different fixed color.
If you go with the latter choice, you can select a color from the Colors dialog box. On the Standard tab, you can click any of the colored hexagons, as in Figure 11.25.

Figure 11.25. Select one of the standard colors from the Standard tab.
On the Custom tab, you can define a color precisely using its numeric value from either the RGB or the HSL color model (see Figure 11.26). These numeric color models can be useful when you are trying to match a color exactly; for example, many corporations have official colors to be used in all company correspondence and publications.

Figure 11.26. Define a color numerically on the Custom tab.
RGB stands for Red/Green/Blue; colors are defined with values ranging from 0 to 255 for each of those three colors. Equal amounts of each color result in varying shades of black-gray-white.
HSL stands for Hue/Saturation/Luminosity. These are also 0 to 255 values, but H is for all hues (0 and 255 are both red; the numbers in between are the other colors of the rainbow), S is for saturation (the intensity of the color, as opposed to neutral gray), and L is for the lightness/darkness (white to black). You can click any spot on the color grid to select that color, or you can drag the vertical slider up/down.
Applying a Picture Fill
A picture fill places a bitmap image inside a shape. It enables you to use any shape as a picture frame, as in Figure 11.27.

Figure 11.27. Picture fills allow any shape to be used as a picture frame.
There are several ways of setting up a picture inside a shape. One is to apply a picture preset, as you learned in Chapter 10. This doesn’t work with all pictures, though, and you are limited to the shapes provided in the Picture Presets list.
A more flexible way is to insert a shape in the document and then fill the shape with the picture. This works in all types of documents, even Word 97-2003 format documents, and you can use any shape or draw your own custom shape. (Yet a third method is to crop the picture to a shape, which is covered in the next section.)
To apply a picture fill to a shape, follow these steps:
1. Select the shape. Double-click it to display the Drawing Tools Format tab if needed.
2. Click Shape Fill and then click Picture. The Insert Pictures dialog box opens.
3. Click the Browse button next to From a File to browse your local drives for the file to use, or click the Browse button next to your SkyDrive to browse there.
4. In the Insert Picture dialog box, navigate to the folder containing the picture to use, select it, and click Insert. The picture is inserted into the shape.
If the picture is larger than the shape it is filling, the part of the picture that you want to show in the shape might not be quite right by default. You can fix this by doing the following:
1. Right-click the picture-filled shape and choose Format Shape. The Format Picture task pane opens.
2. Click the Fill & Line icon under Format Picture and make sure that Picture or texture fill is selected in the Fill section.
3. Make sure that the Tile Picture as Texture check box is marked.
4. Use the increment buttons for Offset X and Offset Y to adjust the placement of the picture (see Figure 11.28).

Figure 11.28. Adjust the offset values to shift an image if the image is larger than the shape it is filling.
5. Close the task pane.
The drawback to the preceding method is that the aspect ratio is not locked, so the picture might appear distorted. You can fix this by changing the dimensions of the shape, or by adjusting the Scale X and Scale Y values in the Format Picture task pane.
Cropping a Picture to a Shape
Another way to fill a shape with a picture is to start with the picture and then crop it to conform with a shape. You learned about cropping pictures in Chapter 10, but let’s take a closer look at this particular type of cropping now.
To crop a picture to a shape, follow these steps:
1. Insert the picture into the document, and select the picture.
2. On the Picture Tools Format tab, open the Crop button’s drop-down list, point to Crop to Shape, and then click the desired shape (see Figure 11.29).

Figure 11.29. Choose a shape to which to crop the selected picture.
Applying a Gradient Fill
A gradient is a gradual blending of colors. A gradient can be single-color (one color plus either black or white), two-color (one color blending into another color), or preset (special combinations such as rainbow or gold).
Several common one-color gradients are available from the Shape Fill menu. Here’s how to use one of these:
1. Apply a solid color fill to the shape.
2. On the Drawing Tools Format tab, click Shape Fill, and then point to Gradient. The Gradient menu appears.
3. Click one of the gradient presets. As you point to a gradient, it is previewed on the shape, as shown in Figure 11.30.

Figure 11.30. Select a gradient effect from the menu.
If you would like a different one-color effect, or if you want a two-color effect or custom gradient, click More Gradients and use the Format Shape task pane. Click the Gradient Fill option button and then use the controls that appear to customize the gradient, as shown in Figure 11.31. You can start with one of the Preset gradients and then adjust the settings as needed.

Figure 11.31. Gradient stops determine the colors and their distribution.
When you set up a multicolor gradient, you work with stops on a gradient scale. Each stop represents a certain color, and the stop’s position on the scale determines how much of the shape’s area, percentage-wise, that color will occupy. For example, in Figure 11.31, there are three stops. To add another stop, click the Add Gradient Stop button. To remove a stop, select it and click the Remove Gradient Stop button.
For each stop, you set the Color, Position, Transparency, and Brightness using the controls shown in Figure 11.31. To set them for different stops, click on the marker for the stop you want to affect. You can also drag markers along the slider to change their positions. For an evenly spaced gradient, space the markers evenly.
The Transparency setting adjusts the amount of transparency that is associated with that position in the gradient. You can use this setting to make certain areas of an object more transparent than others. For example, you could define the same color for all the gradient stops but set different levels of transparency for each stop to make an object seem like it is fading away.
The Rotate with Shape option determines if the gradient rotates when you rotate a shape.
The Type setting, also shown in Figure 11.31, determines the direction of the flow from one color to another. Your choices are
• Linear—A linear gradient travels from one point to another. You can set it to travel vertically (as shown in Figure 11.31), horizontally, or diagonally, or you can set a specific angle.
• Radial—A radial gradient radiates out from a point. You can set it to radiate from the center of the object or from any of its corners.
• Rectangular—This gradient is similar to Radial, except that it radiates as a rectangle, rather than as a curve.
• Path—This gradient follows the shape of the object. Try applying it to a starburst, for example; the color radiates out from the center of the star.
You can define your own colors and stops for a gradient, or you can start with one of the Preset Colors settings. These are different from the single-color presets in the Drawing Tools Format tab because they are color combinations with predefined stops. You can also start with one of these sets of combinations as a shortcut.
To create a custom gradient, follow these steps:
1. Click the shape to be filled and then choose Drawing Tools Format, Shape Fill, Gradient, More Gradients.
2. Under the Fill heading, click the Gradient Fill button. Controls for creating a custom gradient appear, as in Figure 11.31.
3. (Optional) Select a preset from the Preset Colors drop-down list. If you select a preset, Word predefines three or more stops for you in the Gradient Stops section.
4. Open the Type drop-down list and select the type of gradient that you want: Linear, Radial, Rectangular, or Path.
• If you chose Linear, Radial, or Rectangular, open the Direction drop-down list and choose a direction swatch.
• If you chose Linear, increment the value in the Angle text box as needed to adjust the angle.
5. Mark or clear the Rotate with Shape check box.
6. On the Gradient Stops slider, select the first marker. (You can do them in any order; I usually start with the leftmost one and work to the right.)
7. Do the following to modify the stop:
a. Open the Color drop-down list and select the color for that position.
b. (Optional) Increment the Stop Position value, or drag the marker to a different position on the slider.
c. (Optional) Increment the Transparency setting, or drag its slider. Zero percent is no transparency, whereas 100 percent is complete transparency.
d. (Optional) Increment the Brightness setting, or drag its slider.
8. Select the next stop on the Gradient Stops slider bar, and repeat step 7.
9. (Optional) Add or remove stops.
• If you need to create more stops, click the Add gradient stop button and then repeat step 7 for each new stop.
• If you need to delete a stop, select it and then click the Remove gradient stop button.
10. Close the task pane.
Applying a Texture Fill
A texture is a small bitmap image with edges that blend cleanly so that it can be tiled to occupy any size object. Textures have effects such as wood, cloth, paper, and marble. Figure 11.32 shows an example of a wood texture.

Figure 11.32. A texture fill makes the object appear to be made of a material such as wood or cloth.
![]() Note
Note
The difference between a texture and a picture fill is that the texture fill tiles the image to fill the shape, whereas the picture fill crops or stretches a single copy of the image to fill the shape.
To apply a texture fill to an object, follow these steps:
1. Double-click the object to display the Drawing Tools Format tab.
2. On the Drawing Tools Format tab, click Shape Fill, point to Texture, and click the desired texture (see Figure 11.33).

Figure 11.33. Apply a texture from the Texture submenu.
You can use any bitmap graphic as a texture, but not all produce good results. A texture is much like any other small graphic; the main difference is that it is created with tiling in mind, so the right and left edges blend in with each other, as do the top and bottom edges.
![]() Caution
Caution
If you search for the keyword texture in the Office.com clip art collection, the results will include some graphics that are not true textures, in that they do not have the matched edges for tiling.
It is possible to create your own textures, but it’s much easier to download already-made textures from online sources. The Office.com site has some textures available in its clip art collection, for example, and many websites are devoted to providing free and low-cost backgrounds and textures.
To use a texture graphic you have acquired, follow these steps:
1. Double-click the object to display the Drawing Tools Format tab.
2. On the Drawing Tools Format tab, click Shape Fill, point to Texture, and click More Textures. The Format Shape task pane opens with the Fill controls displayed.
3. Click the File button. In the Insert Picture dialog box, select the texture file to use and click Insert to return to the Format Shape task pane.
4. Mark the Tile Picture as Texture check box if it is not already marked.
5. Close the task pane.
Applying a Pattern Fill
A pattern is a simple, repeating overlay of a one-color design over a background of another color. For example, Figure 11.34 shows one that looks like bricks. There are also patterns with dots, dashes, lines, and so on.

Figure 11.34. An example of a pattern fill.
To set up a pattern fill, follow these steps:
1. Right-click the shape and choose Format Shape. The Format Shape task pane opens.
2. Click the Fill & Line icon, and expand the Fill options.
3. Click the Pattern Fill option button. The controls change to show pattern options (see Figure 11.35).

Figure 11.35. Apply a pattern fill from the Format Shape task pane.
4. Click the desired pattern.
5. Open the Foreground Color menu and select the foreground color. As with other color selectors, you can select a theme color, a tint or shade, or a standard color.
6. Open the Background Color menu and select the background color.
7. Close the task pane.
Applying Shadows
The shadow effect for a drawn object is the same as for pictures. From the Drawing Tools Format tab, choose Shape Effects, Shadow, and then click one of the presets, or click Shadow Options for the full array of controls via the Format Shape task pane (see Figure 11.36).

Figure 11.36. Choose a shadow preset.
![]() For more detail about applying shadows, including customizing the shadow effect with different colors and widths, see “Applying a Shadow Effect,” p. 404.
For more detail about applying shadows, including customizing the shadow effect with different colors and widths, see “Applying a Shadow Effect,” p. 404.
Applying 3-D Effects
A 3-D effect adds depth to a drawn object, turning your flat drawings into something with perspective. Figure 11.37 shows an example.

Figure 11.37. An example of a 3-D effect.
3-D effects apply to drawn shapes the same way they do to pictures. For information about 3-D effects, see the following sections in Chapter 10:
• “Applying a Beveled Edge and Other 3-D Formatting,” p. 406
• “Rotating a Picture,” p. 407
• “Applying 3-D Rotation,” p. 409
Creating and Modifying WordArt
WordArt is a unique combination of a drawn object and text. It enables you to format text as if it were a graphic, applying most of the same special effects to it that you apply to drawn lines and shapes, plus some additional effects that are WordArt-specific. WordArt is great for company logos, headings, decorative graphics on flyers and advertisements, and so on. Figure 11.38 shows some WordArt examples.

Figure 11.38. Some WordArt examples.
To create WordArt, start with one of the preset designs and then modify it. Follow these steps to create WordArt with a preset:
1. On the Insert tab, click WordArt. A menu of presets appears (see Figure 11.39).

Figure 11.39. Select a WordArt preset.
2. Click one of the presets. A text box containing some sample text (Your Text Here) appears.
![]() Caution
Caution
One of the most common mistakes beginners make with WordArt is to use too much text, which ends up looking crowded. WordArt is best with a simple word or two.
3. Replace the sample text with the text you want.
If you decide you want a different preset format, on the Drawing Tools Format tab, click the More button in the WordArt Styles group, and make a different selection.
Editing and Formatting WordArt Text
To edit the text, click inside the WordArt and use regular text editing techniques (such as Backspace and Delete).
You can also use regular formatting tools on the WordArt text:
• Size—Home tab, Font Size drop-down list
• Font—Home tab, Font drop-down list
• Attributes—Home tab, Bold, Italic, and Underline buttons
• Font Color—Home tab, Font Color list, or Drawing Tools Format tab, Text Fill list
![]() See Chapter 4, “Applying Character Formatting,” for more details.
See Chapter 4, “Applying Character Formatting,” for more details.
Changing WordArt Text Wrap
The default wrap position for WordArt is In Front of Text. That means it floats over the top of the text in your document, obscuring it wherever the two cross. You can modify this by changing the Wrap Text setting on the Drawing Tools Format tab, the same as with any other object.
![]() To review the procedures for changing text wrapping, see “Setting Text Wrap,” p. 388.
To review the procedures for changing text wrapping, see “Setting Text Wrap,” p. 388.
Applying WordArt Effects to Regular Text

Figure 11.40. Many WordArt–type effects can be applied to regular text via the Home tab.
Transforming the WordArt Shape
The shape of the WordArt is the form into which the text is poured. WordArt starts out flat and straight, but you can mold it into many different shapes.
To change the WordArt shape, select the WordArt and then on the Drawing Tools Format tab, in the WordArt Styles group, choose Text Effects, Transform, and click one of the transformations (see Figure 11.41).

Figure 11.41. Transform the WordArt shape.
Changing the Fill and Outline
Fill and Outline for WordArt is like it is for drawn objects, except you can only fill with solids or gradients (not textures, patterns, or pictures). Use the Text Fill and Text Outline drop-down lists in the WordArt Styles group on the Drawing Tools Format tab.
![]() For more information about fills and outlines, see “Formatting Drawn Objects,” p. 438.
For more information about fills and outlines, see “Formatting Drawn Objects,” p. 438.
Creating Vertical WordArt
You can optionally make the WordArt text run vertically on the page, with the Text Direction command. On the Drawing Tools Format tab, click Text Direction, and then choose Horizontal (the default), Rotate All Text 90°, or Rotate All Text 270° (see Figure 11.42).

Figure 11.42. Make WordArt vertical.
![]() For more information about rotating, see “Rotating and Flipping Objects,” p. 431.
For more information about rotating, see “Rotating and Flipping Objects,” p. 431.
![]() Tip
Tip
If you apply a vertical text direction to some WordArt and it gets all bunched up and un-readable, adjust the size of the WordArt frame to straighten it back out again.
Setting WordArt Alignment
There are two types of alignment you can set for WordArt: vertical and horizontal. Horizontal alignment is the same as with regular paragraphs and text boxes: Left, Center, or Right. Vertical alignment refers to the position of the text within the WordArt frame: Top, Middle, or Bottom.
To set vertical alignment, use the Align Text button on the Drawing Tools Format tab, as shown in Figure 11.43. To set horizontal alignment, use the alignment buttons on the Home tab, as you would for any other text.

Figure 11.43. Change vertical alignment from the Align Text button.
Working with Clip Art
By purchasing Word (or Office), you gain access to a huge online repository of artwork from Microsoft. You learned how to insert clip art in Chapter 10; I repeat that basic instruction here, and also go beyond the basics to show you how to modify clip art in various ways.
A few clip art images are stored on your hard drive when you install Office, but the main clip art collection for Office 2013 comes from Office.com online, so your computer should be connected to the Internet as you use the clip art feature; otherwise, the clips available to you will be a small collection.
Clip art is organized by keyword, so you can search for a word and see all clips that contain that keyword. A clip can have multiple keywords assigned to it, so you might find the same clip by searching for dog, animal, puppy, and pet, for example.
To find and insert a clip, follow these steps:
1. On the Insert tab, click Online Pictures. The Insert Pictures dialog box opens.
2. Click in the Office.com Clip Art text box and type the keywords to search for.
3. Press Enter. Results appear from Office.com. Some clips are clip art, whereas others are photographs.
4. Click the clip you want to insert (see Figure 11.44).

Figure 11.44. Select the clip you want to insert.
5. Click the Insert button to place it in the document at the insertion point.
Using a Clip in Another Application
After you insert a clip art image in a Word document, you can copy it into other applications, even non-Microsoft programs. Suppose, for example, that you are working with a desktop publishing program such as Adobe InDesign, and you want to use a clip art image from Word in a document there. Copy the clip to the Windows Clipboard and then paste it into that application.
![]() Caution
Caution
If you paste a vector clip into a bitmap graphics program such as Paint, it is converted to a bitmap image, and its edges become less smooth.
Browsing Clips via Office.com
You can access Microsoft’s clip art collection from outside of Word, via a web interface. Some people prefer to browse clips this way, picking the clips they like without having a particular document in mind for their immediate use. You can select as many clips as you want and have them transferred to your local hard disk and then use them in Word later (or not).
Here’s how to reach the Office.com clip art collection and search for clips:
1. In Word, position the insertion point where you want to insert the clip.
2. Switch to the Windows desktop, start Internet Explorer, and navigate to http://office.microsoft.com.
3. Click the Images hyperlink. The Clip Art, Photos, and Animations page opens.
4. Click in the Search All Images box, type a keyword to search for, and then press Enter or click the Search button (the magnifying glass) to see clips matching your search criteria.
5. Point to a clip. A box appears around it with three hyperlinks: View Details, Copy, and Download (see Figure 11.45).

Figure 11.45. Use Microsoft’s Office website to transfer batches of clip art to your hard disk at once.
6. Click Copy. The clip is copied to the Windows Clipboard.
7. Switch to Word and press Ctrl+V to paste the clip at the insertion point position.
8. Close the web browser window.
Setting Text Wrap Properties for Clip Art
By default, a clip-art image is placed into the document as an inline image at the insertion point. An inline image is treated as a character of text; it moves when you edit the surrounding text, and it cannot be moved outside the text area. You can drag an inline image to a different location, but only within existing text paragraphs (see Figure 11.46).

Figure 11.46. By default, clip art is inserted inline.
Most people prefer to use clip art as floating images, which can be dragged anywhere on the page. Text interacts with a floating image according to its text wrap setting, such as Square, Tight, Top and Bottom, and so on (see Figure 11.47).

Figure 11.47. This clip art image is set to Square text wrapping.
Clip art uses the same text wrap controls as do photographic images (see Chapter 10). Select a clip’s text wrap setting from the Wrap Text button’s menu on the Picture Tools Format tab, as shown in Figure 11.48.

Figure 11.48. Select a text wrap setting from the Picture Tools Format tab.
As with photos, a Layout dialog box is available in which you can fine-tune the text wrap settings. Choose Wrap Text, More Layout Options.
![]() To review text wrap settings in more detail, see “Setting Text Wrap,” p. 388.
To review text wrap settings in more detail, see “Setting Text Wrap,” p. 388.
Wrapping Text Tight Against Clip Art
There are some differences when working with clip art versus photographs, in that most clip art has a transparent background. This means that text can actually wrap around the image itself, not just its frame. The Tight text wrap choice makes this possible, as shown in Figure 11.49.

Figure 11.49. Tight text wrapping allows the text to wrap around the picture itself, not just its rectangular frame.
Editing Text Wrap Points
Sometimes, the Tight text wrapping results in some odd-looking text wraps. When that happens, you can switch to Square wrapping (the easiest fix), but if the tight wrapping is important, you might instead choose to edit the wrap points. Wrap points are the markers that define the clip’s wrap boundaries when Tight is used. These points are usually invisible, but you can display them and modify them.
To edit the wrap points for a clip, follow these steps:
1. Select the clip art image in the document. Make sure that its Wrap Text setting is set to something other than In Line with Text.
2. Open the Wrap Text menu on the Picture Tools Format tab and choose Edit Wrap Points. A set of red lines appears around the image, with black squares indicating the wrap points.
3. Drag a wrap point to change it. The red outline moves along with the wrap point to show the new boundary for the image (see Figure 11.50).

Figure 11.50. Manually edit the image’s wrap points by dragging.
4. When you are finished editing the wrap points, press Esc.
Modifying a Clip Art Image
Now, let’s look at some ways you can change a piece of clip art. Many of these techniques are the same for clip art as for photographs, so to avoid duplication I’ll reference the appropriate sections in Chapter 10 as needed. Some techniques, though, are unique to clip art.
Setting Clip Size and Position
Clip art can be dragged to any position on the page. Just make sure that the text-wrapping setting is something other than In Line with Text, and then drag the clip art where you want it.
To resize a clip, drag one of its selection handles. To resize the clip proportionally, drag a corner handle. To resize in one dimension only, drag a side handle.
The other techniques for changing size and position are the same for clip art as they are for photographs. See the following sections to review them:
• To use and modify anchor points for positioning, see “Working with Anchors,” p. 390.
• To specify a custom position with an exact measurement, see “Specifying a Custom Position,” p. 392.
• To resize a picture using the Picture Tools Format tab, see “Resizing Pictures,” p. 393.
Cropping and Color-Adjusting Clip Art
You can crop clip art just as you do a photograph, using the Crop tool on the Picture Tools Format tab (see “Cropping Pictures” in Chapter 10). However, realistically speaking, you will probably not have much occasion to crop a piece of clip art. Clip art usually stands alone as a self-contained unit, without a lot of extraneous material in it. Cropped clip art can look like a mistake if not done strategically.
You can also set a clip-art image’s brightness, contrast, and color mode using the same procedures as for photographs (see “Setting the Brightness, Contrast, and Color Mode” in Chapter 10).
Applying Clip Art Background Fill
Most clip art has a transparent background. The frame around the clip art is rectangular, but within that frame, the image can be any shape. And as you saw earlier in the chapter, text can wrap around that image shape when you use the Tight style of text wrapping.
You can change that transparent background to a solid-color background, though, with a varying degree of transparency. That way, the clip appears to be a rectangular object, and text wrapping applies to the rectangle. Figure 11.51 shows some clip art with a solid background.

Figure 11.51. Apply a background to a piece of clip art.
Follow these steps to apply a background fill:
1. Right-click the clip art and choose Format Picture. The Format Picture task pane opens.
2. Click the Fill & Line icon in the task pane and then click the Fill heading to expand its options if necessary.
3. Click the Solid Fill option button.
4. Open the Color palette and choose the desired color. You can choose a theme color or a standard color, or click More Colors to choose some other color.
5. Drag the Transparency slider to the desired level of transparency. Increasing the transparency lightens the color when on a white background because more of the background shows through.
6. Close the task pane.
![]() To review theme colors versus standard colors, see “Changing Font Color,” p. 150.
To review theme colors versus standard colors, see “Changing Font Color,” p. 150.
Setting the Transparent Color
When you are working with true clip art (WMF or EMF format), the background is usually transparent, as you just saw. This makes it easy to set up tight text wrapping around the image.
However, not every picture that the Clip Art task pane finds is real clip art. When you search for clip art on Office.com via Word’s Online Pictures command, you’ll get an assortment of other files as well, including photos in JPG or other bitmap formats. And these usually do not have transparent backgrounds. Therefore, when you set text to wrap around them, the text wraps around the outer frame rather than around the image.
For example, consider the bunny in Figure 11.52. This is a JPG image provided by Office.com, and inserted via the Online Pictures command. It has a white background, which would be great if we were using it on a white page, but in this example the page happens to be shaded. Because this is a bitmap image, setting the background fill to No Fill has no effect.

Figure 11.52. This JPG file has a white background that Word can’t take away with its background fill setting.
To solve this problem, use the Set Transparent Color feature in Word. Word enables you to select one color of a bitmap image to “hide,” and if you choose the image’s background color, the background becomes transparent. Follow these steps:
2. On the Picture Tools Format tab, click the Color button and then choose Set Transparent Color. The mouse pointer turns to a pen.
3. Click the background of the picture. All instances of that color in the picture become transparent.
Figure 11.53 shows our bunny with its background set to transparent. Only one color can be transparent in an image at once; if you set a different transparent color, the first one goes back to normal.

Figure 11.53. The JPG image’s white background has been made transparent.
Setting the transparent color has no effect on text wrap. A Tight text wrap will still not wrap around the image in Figure 11.53, even though the white background is no longer visible. You can modify this behavior by editing the wrap points.
![]() Caution
Caution
All instances of that color in the image become transparent, not just the ones around the outer edges of the image. If you were to look very closely at the rabbit in Figure 11.53, you would see that the little white dot in his eye is now transparent, too.
![]() To make more than one color transparent to remove a picture’s background, see “Removing a Picture Background, p. 401.
To make more than one color transparent to remove a picture’s background, see “Removing a Picture Background, p. 401.
![]() To edit wrap points, see “Editing Text Wrap Points,” p. 462.
To edit wrap points, see “Editing Text Wrap Points,” p. 462.
Applying a Border
Usually a border around clip art is unnecessary, and even undesirable. A border runs around the rectangular frame of the image rather than the image itself, so applying a border draws attention to the rectangular frame and disables the ability to wrap text tightly around the image. In some cases, however, a visible border on a clip art image might be useful. For example, if you have applied a fill color to the clip art background that is similar to the page background, a border might help call attention to the image.
Applying a border to clip art is the same as applying one to a photo. Use the Picture Border button on the Picture Tools Format tab.
![]() Tip
Tip
A border clings tightly to the rectangular frame of the clip art, and it touches the clip on each side. If you want a little more spacing than that between the clip art image and its border, combine a bordered shape (such as a rectangle) with a borderless clip art image, similar to what’s described in “Applying a Fill Effect to Clip Art,” earlier in this chapter.
![]() To review applying borders to photos, see “Applying a Picture Border,” p. 410.
To review applying borders to photos, see “Applying a Picture Border,” p. 410.
For more line choices, choose More Lines from either the Dashes or the Weight submenu (from the Picture Border menu). This opens the Format Picture task pane. From here, you can use the Line controls to select a line type, thickness, color, and so on (see Figure 11.54). The combinations and choices here are more extensive than on the Picture Tools Format tab’s menus.

Figure 11.54. Select properties for the border around the clip art.
Applying Shadow Effects to Clip Art
To apply shadow effects to clip art, open the Picture Effects button’s menu on the Picture Tools Format tab and then select a shadow effect from the Shadow submenu. See “Applying a Shadow Effect” in Chapter 10 for details. Using the Format Picture task pane, you can change every aspect of a shadow, including its color, transparency, size, blur, angle, and distance from the image.
The main difference is that when you’re applying a shadow effect to a clip art image with a transparent background, the shadow clings to the image, not to the rectangular frame. If the image has a border around it, the shadow also clings to the border. For example, in Figure 11.55, a shadow has been applied to a clip with a visible border and a transparent background.
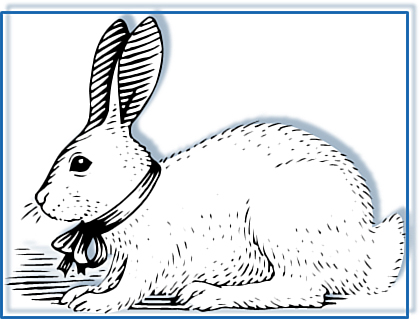
Figure 11.55. Shadows cling to the image and to the border.
If you want the shadow to cling to the rectangular frame rather than to the image, apply a background fill to the image. (Make it the same color as the page background if you don’t want it to be obvious.)
Rotating Clip Art
You can rotate clip art in either 2-D or 3-D. A 2-D rotation simply spins the clip around a center point; a 3-D rotation alters its proportions so it appears to be shown at an angle. Both types of rotation are covered in Chapter 10.
![]() To learn about 2-D rotation, see “Rotating a Picture,” p. 407.
To learn about 2-D rotation, see “Rotating a Picture,” p. 407.
![]() To learn about 3-D rotation, see “Applying 3-D Rotation,” p. 409.
To learn about 3-D rotation, see “Applying 3-D Rotation,” p. 409.
Flipping Clip Art
Flipping creates a mirror image of a clip. From the Picture Tools Format tab, click Rotate Objects and then click Flip Horizontal or Flip Vertical.
One of the most common reasons to flip is to create a mirror-image pair of clips, such as for a masthead or logo. For example, Figure 11.56 shows two copies of a clip—one flipped and one regular.

Figure 11.56. Flipping an image mirrors it.
Editing Clip Art
Because clip art is vector based, you can edit it on a shape-by-shape basis. You can reduce even the most complex clip art to a series of simple shapes, and you can move, resize, delete, recolor, or otherwise modify each of those shapes.
However, you cannot modify a clip in its native format; you must convert it to a Microsoft Drawing object. This is simple to do: Right-click the clip and choose Edit Picture. (If a warning appears, asking you to confirm the action, click Yes.) If you have previously made any formatting changes to the clip, such as flipping or rotating it, applying a shadow, and so on, these changes are removed when you convert the clip.
![]() Tip
Tip
If the Edit Picture command is not available, try setting the clip art’s Wrap Text setting to In Line with Text.
When in Edit Picture mode, the Picture Tools Format tab changes to show drawing tools (Drawing Tools Format), and each part of the clip art image becomes a separately selectable and editable object. For example, in Figure 11.57, a carrot has been removed from the picture.

Figure 11.57. A clip art image consists of many individual shapes, all of which you can move and modify.
Selecting and Moving Clip Art Shapes
To select a clip art shape, click it. Selection handles appear around it. To select more than one shape at once, hold down Ctrl as you click additional shapes. This can be tricky; if you click a background shape, all the others may be deselected. Watch the mouse pointer for a plus sign, indicating that the item being pointed at will be added to the selection group. To move a clip art shape, position the mouse pointer over it. The pointer turns into a four-headed arrow as you click, and then drag. To delete a shape, select it and press the Delete key on the keyboard.
Recoloring Clip Art Shapes
After you have split apart a clip art image into individual shapes, you can recolor any of the shapes individually. To recolor a shape, select it and use the Shape Fill button on the Drawing Tools Format tab. You can choose any solid color or any fill effect (gradient, texture, pattern, and so on). This works just like applying a color fill to any drawn shape.
![]() For more information about fill effects, see “Formatting Drawn Objects,” p. 438.
For more information about fill effects, see “Formatting Drawn Objects,” p. 438.
Editing Clip Art Shapes
To edit a clip art shape, right-click the shape and choose Edit Points. Black handles appear around the shape. (Zooming in helps you see them better.) Drag these handles to change the shape’s contours and dimensions. This is very much like editing the wrap points for an image, as you did earlier in this chapter (see Figure 11.58). When you finish changing the shape, press Esc to return to normal editing mode.

Figure 11.58. Change a shape by dragging the shape handles that form it.
Moving and Resizing a Modified Clip
After you’ve broken down a piece of clip art into individual lines and shapes, it stays that way; there’s no putting it back together again as a real piece of clip art. It’s a drawing now, not a clip art image, technically speaking.
You can still move and resize the drawing, but the techniques for doing so are a little different.
When clip art is split into pieces and becomes a drawing, all those pieces are placed on a drawing canvas, to keep them together in an orderly way. You can also manually create a drawing canvas on which to draw your own lines and shapes (Insert tab, Shapes, New Drawing Canvas), but most people do not bother with a canvas unless their drawings are going to be complex.
![]() To learn more about the drawing canvas, see “Working with the Drawing Canvas,” p. 424.
To learn more about the drawing canvas, see “Working with the Drawing Canvas,” p. 424.
To enlarge the drawing canvas, position the mouse pointer over the bottom-right corner of the canvas, so the mouse pointer becomes a double-headed arrow, and then drag outward. This does not resize the drawing; it only resizes the canvas. You can also right-click the drawing canvas border and choose Fit to resize the canvas to exactly fit the drawing, or right-click the border and choose Expand to enlarge the drawing canvas slightly.
To change the size of the drawing itself, right-click the frame and choose Scale Drawing. This turns on the scaling feature. You can now drag the border of the frame to resize the drawing within it. To go back to being able to adjust the frame separately from the drawing, right-click the frame again and choose Scale Drawing again to toggle scaling off.
To move the drawing canvas, set Wrap Text (on the Drawing Tools Format tab) to anything except In Line with Text, and then drag the canvas frame as if it were any other graphics object.
To move pieces of the drawing within the drawing canvas, simply drag and drop them. If you want to work with multiple shapes at once, you might find it useful to group them. To do so, first select the pieces to group; then right-click the selection and choose Group, Group. The same skills work here as for lines and shapes that you draw yourself.