
5. Formatting Paragraphs and Lists
Besides the character-based formatting that you learned about in Chapter 4, “Applying Character Formatting,” there are many types of formatting that apply to entire paragraphs, such as alignment settings, indentation, line spacing, and tab stops. In this chapter, you see how to apply these and many other types of paragraph formatting. You also discover how to format paragraphs into bulleted or numbered lists and use custom bullets and number styles. How Word Handles Paragraphs
A paragraph is a block of text that ends with a paragraph marker (¶), which you create by pressing the Enter key on the keyboard. The marker symbol does not print, and it does not show up onscreen unless you have configured Word to display nonprinting characters.
![]() Tip
Tip
To toggle between displaying nonprinting characters, such as the paragraph marker, click the Show/Hide (¶) button on the Home tab or press Ctrl+Shift+8.
Pressing Enter starts a new paragraph (and ends the previous one), but not all line breaks are paragraph breaks. You can create a line break that does not start a new paragraph by pressing Shift+Enter. A line break is represented by the nonprinting symbol ↵. (Again, the symbol doesn’t appear onscreen unless Word is displaying nonprinting characters.) Figure 5.1 shows examples of paragraph breaks and line breaks.

Figure 5.1. Paragraph and line breaks are nonprinting characters; they can be displayed or hidden onscreen.
Generally speaking, starting a new paragraph by pressing Enter carries over the same paragraph settings as were in the preceding paragraph. So, for example, if the preceding paragraph has a 1-inch left indent, the new paragraph will, too. (An exception would be if the style assigned to that paragraph was set up to use a different style on subsequent paragraphs.)
Paragraph formatting is stored as part of the end-of-paragraph marker. Deleting the paragraph marker between two paragraphs combines them into a single paragraph that has the paragraph formatting settings of the first of the two paragraphs. Any settings that were stored in the second paragraph’s marker are deleted, along with the marker.
Remember that paragraph formatting is stored in the marker because when you are copying or moving text, you might or might not also want to copy or move the paragraph formatting along with it. To preserve the paragraph formatting, make sure that the end-of-paragraph marker is included in your selection. To make the pasted text conform to the paragraph settings in its new destination, do not include the paragraph marker in the selection.
Each paragraph has a paragraph style applied to it from which it inherits its basic properties. These basic properties include not only paragraph characteristics such as line spacing and indentation, but character-formatting defaults such as font, size, and color.
To change a paragraph’s appearance, you can apply a different paragraph style to it, change the definition of the paragraph style that’s applied, or apply manual paragraph formatting that overrides the style’s formatting.
In this chapter, you find out how to apply manual paragraph formatting that overrides the paragraph’s style. Learning these techniques enables you to format paragraphs without worrying about style definitions. These techniques also familiarize you with the basic paragraph controls you can use to make changes to the paragraph styles in Chapter 6, “Creating and Applying Styles and Themes.”
Setting Line Spacing
Line spacing is the vertical spacing of the paragraph’s lines. It can be expressed as a fixed amount in points or as a percentage of the line height. You can set line spacing to any amount you like, as described in the following sections. You can also set different line spacing for different paragraph styles. (Paragraph styles are discussed in Chapter 8, “Working with Templates and Nonstandard Layouts.”)
Choosing a Line Spacing Multiplier
You can quickly switch a paragraph among a few common line-spacing settings with the Line and Paragraph Spacing button on the Home tab. The choices are measured in multiples of the text height: 1.0, 1.15, 1.5, 2.0, 2.5, or 3.0 (see Figure 5.2).

Figure 5.2. Make quick line spacing selections from the Home tab.
When a paragraph has multiple font sizes, each line of the paragraph controls its own height independently based on the size needed for the largest font used on that line.
Because line spacing depends on the font size, it changes as the font size does. For example, if the text in the paragraph is 12 points in size, a setting of 1.5 (as in Figure 5.2) would add 6 points of extra space between lines. (The 1 is the line itself, and the .5 is the extra space.)
Setting a Precise Line-Spacing Value
The Line Spacing Options command on the Line and Paragraph Spacing button’s menu opens the Paragraph dialog box (see Figure 5.3).
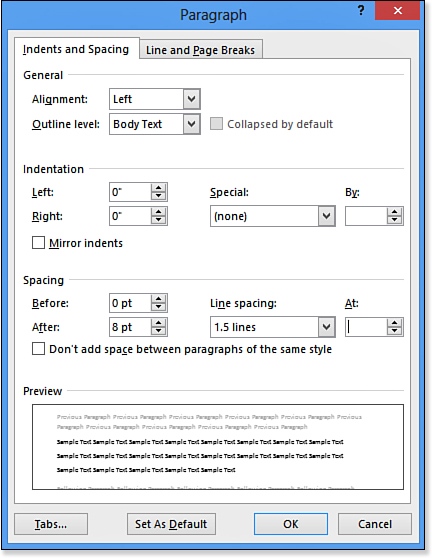
Figure 5.3. More spacing options are available in the Paragraph dialog box.
The Line Spacing drop-down list in the Paragraph dialog box offers these choices:
• Single—Single spacing. There’s no extra space between lines. It’s the same as 1.0 on the button’s menu.
• 1.5 Lines—One-and-a-half spacing. There’s an extra half-height blank line between each printed line of the paragraph. It’s the same as 1.5 on the button’s menu.
• Double—Double-spacing. There’s an extra blank line between each printed line of the paragraph. It’s the same as 2.0 on the button’s menu.
• At Least—A minimum line height to be used. (You specify the amount.) If the single-space line height is greater than the amount specified, single spacing is used for that line. Otherwise, the At Least value is used.
• Exactly—A precise line height to be used. (You specify the amount.) Be careful with this setting; if you specify a size that’s smaller than the largest font size used in the paragraph, the large letters become truncated on top.
• Multiple—A multiple of single spacing. (For example, enter 3 for triple spacing.) You can enter any value from 0 to 132, in decimal increments of 0.01. This is how the default setting of 1.15 is created.
Desktop publishing programs typically call line spacing by another name: leading (rhymes with bedding). The term leading technically refers to the amount of blank space between the lines, not to the total line height. For example, in a desktop publishing program, a leading value of 4 points would add 4 points of vertical space between each line of the paragraph, regardless of the total line heights.
In Word, you cannot directly set leading. The At Least and Exactly settings are the closest things to it, but they’re calculated differently. The At Least and Exactly values are expressed in total line height, not blank space height. For example, an Exactly setting of 16 pt, when used on a paragraph that has 12-point text in it, would result in a 4-point vertical space between lines. However, that same setting, when used with 10-point text, would have a 6-point vertical space between lines. And when used with 20-point text, there would be no vertical space between lines, and the tops of the larger letters would be cut off.
![]() Tip
Tip
Because all these cumulative effects can be potentially confusing, I recommend using only After spacing (not Before spacing) when creating space between paragraphs. That’s a somewhat arbitrary decision; you could just as easily stick with the Before setting and never use the After setting. However, because line spacing applies itself below each line of a paragraph (including the last line), it makes marginally more sense to go with After.
When the line spacing setting specifies more height than is needed for a line of text (given its largest font size), the extra spacing appears below the text. This is useful to keep in mind because it affects the amount of space that follows the paragraph. If you have two consecutive double-spaced paragraphs, there will also be double spacing between them because the extra space for the last line of the first paragraph will appear at its bottom. However, if a double-spaced paragraph follows a single-spaced one, there will only be single spacing between them because the single-spaced paragraph specified no extra space below each line.
Setting Spacing Before or After a Paragraph
The quickest way to add spacing before or after a paragraph is to choose Add Space Before Paragraph or Remove Space After Paragraph from the Line and Paragraph Spacing button’s menu on the Home tab (refer to Figure 5.2). This adds the same amount of space, either before or after the paragraph, as the paragraph’s largest font size. For example, if the font size is 12, choosing Add Space Before Paragraph adds 12 points of space before it.
If you need different spacing than that, use the Paragraph dialog box (refer to Figure 5.3). It has Before and After settings that add space before and after the paragraph, respectively. Enter the number of points of extra space you want.
The After setting is cumulative with the line-spacing setting. For example, if you have a paragraph with 12-point text and its line spacing is set to Double, and then you add an After value of 5 pt, there will be 17 points of space between that paragraph and the next one.
Before and After values are also cumulative with one another. If two consecutive paragraphs have Before values of 10 and After values of 10, they will have 20 points of space between them (not counting any extra space coming from the Line Spacing setting).
The Page Layout tab also has Before and After boxes that work the same as their counterparts in the Paragraph dialog box. Use the increment arrows or type values directly into the text boxes there (see Figure 5.4).

Figure 5.4. Set Before or After spacing from the Page Layout tab.
If you’re in a hurry, it can be tempting to simply create extra space between paragraphs by pressing Enter a few extra times. That technique backfires in longer documents, however, because it results in spacing that is inflexible and difficult to modify. Each time you press Enter, you get exactly one line of space—what if you want more or less than that? And each of the spaces between the paragraphs is actually its own blank paragraph, so you can’t change the spacing by applying paragraph styles to the text.
On the other hand, by applying spacing to a paragraph with the After setting (or Before, whichever you like), you make the spacing an integral part of the paragraph. That way, you can easily define that paragraph’s settings as a new style and apply that style to other paragraphs to achieve a consistent look. You can also modify the style at any time to change the amount of spacing between paragraphs to tighten up or spread out a page as needed.
![]() To change the line spacing for a paragraph style, see “Modifying a Style Definition,” p. 236.
To change the line spacing for a paragraph style, see “Modifying a Style Definition,” p. 236.
Indenting Paragraphs
Indentation is the amount of horizontal space between the margin and the paragraph. It is used for a variety of stylistic purposes. For example, left and right indents often set off long quotations, and first-line indents are commonly used in newspapers and magazines to help readers’ eyes track the beginnings of paragraphs.
You can set paragraph indentation with keyboard shortcuts, with buttons on the Home tab, with the Paragraph dialog box, or with the ruler. Although these methods achieve the same basic results, you create them somewhat differently.
Setting Precise Indent Values
For maximum control and precise numeric entry, use the Paragraph dialog box method. Select the paragraphs and then open the Paragraph dialog box by clicking the dialog box launcher icon in the bottom-right corner of the Paragraph group on either the Home tab or the Page Layout tab.
As you can see in Figure 5.5, the Paragraph dialog box offers three types of indents:
• Left—The indentation between the left margin and the left side of the paragraph.
• Right—The indentation between the right margin and the right side of the paragraph.
• Special—A list from which you can select one of two types:
• First Line—The indentation of only the first line of the paragraph, in relation to the general left indent. For example, if the paragraph has a 1-inch left indent and a 0.5-inch first-line indent, the first line starts at 1.5 inches and all other lines start at 1 inch.
• Hanging—The indentation of all the lines of the paragraph except the first one. Like First Line, this setting is cumulative with the Left indent setting.
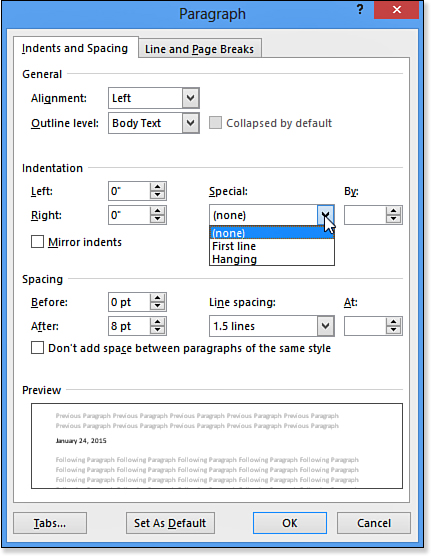
Figure 5.5. Set indents in the Paragraph dialog box.
The Page Layout tab also has Left and Right indent controls that correspond with the Left and Right settings in the Paragraph dialog box. Enter amounts or use the increment arrow buttons (see Figure 5.6).

Figure 5.6. You can set left and right indents from the Page Layout tab.
Indents can be either positive or negative numbers. A negative indent forces the paragraph outside of the document margins. For example, in a document with a 1-inch left margin, a setting of –0.25 inches would place the paragraph 0.75 inches from the edge of the paper.
You can specify each indent type in increments as small as 0.01 inches. Note that indents are measured in inches, not points, as with vertical spacing. There is no fixed limit for the maximum amount of indentation you can specify, but if the indents are so large that they squeeze the text out entirely, an error message appears telling you that you have chosen indents that are too large.
Quick Indenting with Buttons and Shortcuts
To quickly increase or decrease the left indent of a paragraph by 0.5 inches, select the paragraphs to affect and then click the Increase Indent or the Decrease Indent button on the Home tab (see Figure 5.7).

Figure 5.7. Use the Indent buttons on the Home tab to quickly increase or decrease a paragraph’s left indent.
These buttons have corresponding shortcut keys for: Ctrl+M for Increase Indent and Ctrl+Shift+M for Decrease Indent.
You can decrease an indent only to 0 with the Home tab’s buttons or the shortcut keys; you cannot force the paragraph outside the document margins that way. If you need to do that, for example, to create a one-time hanging indent, use the Paragraph dialog box method described in the preceding section, the ruler method described next, or use the Indent buttons on the Page Layout tab.
There are also shortcut keys for increasing or decreasing hanging indents, although there are no corresponding buttons on the tab: Ctrl+T is used to increase the hanging indent 0.5 inches, and Ctrl+Shift+T is used to decrease it.
Visually Indenting with the Ruler
Sometimes it is easier to set an indent by “eyeballing it” with drag-and-drop. By dragging the indent markers on the ruler, you can do just that.
![]() Tip
Tip
If the ruler does not appear across the top of the document, turn it on by marking the Ruler check box on the View tab.
The ruler has four indent markers on it (see Figure 5.8). The first three described in the following list are on the left of the rule; the last one is on the right:
• Left indent—Controls the left indent for all lines of the paragraph.
• Hanging indent—Controls all lines except the first line. On the ruler, it is inseparable from the left indent marker.
• First-line indent—Controls the first line of the paragraph.
• Right indent—Controls the right indent for all lines of the paragraph.

Figure 5.8. Indent markers on the ruler.
Indent changes apply only to the selected paragraphs, so make your selection before working with the indent markers.
You can drag the first-line indent marker separately from the others to create a different first line from the rest, just like when you enter a hanging indent value in the Paragraph dialog box. The zero mark on the ruler represents the document’s left margin; you can drag the first-line marker to the left of 0 to create a negative indent that forces the paragraph past the margin.
The hanging indent works differently on the ruler than it does in the Paragraph dialog box. With the ruler method, dragging the hanging indent marker also moves the left indent marker, so the hanging indent is not cumulative with the left indent. A paragraph’s left indent is always the same as its hanging indent; the first-line indent can either match up with them or can be offset to the left or the right.
When you drag the left indent marker (the rectangle), the first-line and hanging markers move along with it, without losing their relationship to each other. So, for example, if the hanging and left indent markers are at 1 inch and the first-line indent marker is at 0 inches, moving the left indent marker to 2 inches moves the first-line indent marker to 1 inch.
There is also an alternative method of setting the first-line indent and left indent on the ruler: Use the tab stop controls. (You see these in detail in the next section.) Here’s how that works:
1. Select the paragraphs you want to change.
2. At the far-left end of the ruler is the Tab Stop Type button. Click it until the first-line indent marker appears on the button’s face, as shown in Figure 5.9.

Figure 5.9. You can set the first-line and left indents using a tab stop method.
3. Click the ruler where you want to move the first-line indent marker.
![]() Note
Note
The ScreenTip calls the marker in step 4 the hanging indent marker, but that’s not wrong; it’s just that the left indent marker and the hanging indent marker function as a single entity when setting them this way.
4. Click the Tab Stop Type button again. Now the left indent marker appears on its face.
5. Click the ruler where you want to move the left indent marker (and the hanging indent marker; remember that they move together).
Working with Tab Stops
Tab stops are nonprinting markers that tell the insertion point where to stop when you press the Tab key. By default, a paragraph has tab stops every 0.5 inches in Word, but you can create your own custom tab stops to replace or supplement these.
Back in the days of the typewriter, the best (and only) way to create a multicolumn layout was to use tab stops. Word provides many alternatives to that, such as creating newspaper-style columns with the Columns feature and creating a multicolumn tabular layout with the Tables feature. Nevertheless, tab stops remain a viable option for simple multicolumn lists, and they even have some advantages that those other options can’t match.
![]() To create a document with newspaper-style columns, see “Working with Multiple Columns,” p. 277.
To create a document with newspaper-style columns, see “Working with Multiple Columns,” p. 277.
![]() To create a document with tabular columns, see “Creating a Table,” p. 332.
To create a document with tabular columns, see “Creating a Table,” p. 332.
![]() To modify a style’s tab stop settings, see “Modifying Styles,” p. 235.
To modify a style’s tab stop settings, see “Modifying Styles,” p. 235.
![]() Tip
Tip
Each paragraph maintains its own tab stop settings, just like it does with line spacing and indentation. If you want the entire document to have the same tab stops, select the entire document (Ctrl+A) before setting the tab stops, or better yet, include tab stops in the definitions of the styles you apply to the paragraphs.
When setting up a tabbed list, many beginners end up pressing Tab multiple times, moving through the default tab stops until they reach the desired position. With nonprinting characters displayed, that might look something like Figure 5.10.

Figure 5.10. Some people press Tab multiple times to move through the default tab stops.

A better way, though, is to simply set a custom tab stop where you want the insertion point to stop and then press Tab only once to get to it. (When you set a custom tab stop, all the default tab stops to its left disappear.) With a single tab stop creating the full amount of space, as in Figure 5.11, it’s easy to modify the list later by adjusting that one tab stop’s position.
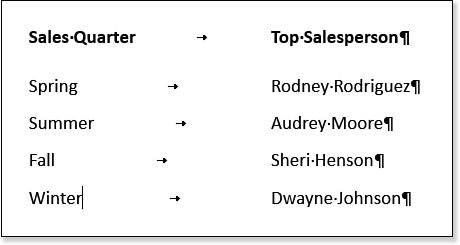
Figure 5.11. A better use of tab stops is to create a single stop exactly where you want it.
Types of Tab Stops
The default tab stop type is Left, the traditional “typewriter-style” stop. That’s not the only type of stop available, though; here is a full list of the tab stop types. Figure 5.12 shows examples of several types.

Figure 5.12. Tab stop examples.
![]() Left—Text is left-aligned and extends to the right of the stop. This general-purpose tab stop is the staple of most lists.
Left—Text is left-aligned and extends to the right of the stop. This general-purpose tab stop is the staple of most lists.
![]() Center—Text is center-aligned with the tab stop so that half of it extends to the left of the stop and half to the right. Center tab stops work well for centering headings over columns of data.
Center—Text is center-aligned with the tab stop so that half of it extends to the left of the stop and half to the right. Center tab stops work well for centering headings over columns of data.
![]() Right—Text is right-aligned and extends to the left of the tab stop. This type is good for aligning text at the right margin, for example.
Right—Text is right-aligned and extends to the left of the tab stop. This type is good for aligning text at the right margin, for example.
![]() Decimal—The first decimal (period) in the text is aligned at the tab stop position; anything that comes before it is right-aligned, and anything that comes after it is left-aligned. This one is great for lining up columns of numbers that have differing numbers of digits before and after the decimal point.
Decimal—The first decimal (period) in the text is aligned at the tab stop position; anything that comes before it is right-aligned, and anything that comes after it is left-aligned. This one is great for lining up columns of numbers that have differing numbers of digits before and after the decimal point.
![]() Bar—This one is not really a tab stop in the same sense as the others. When a bar stop is set at a particular position, pressing Tab to move to that spot places a vertical line there, the height of that line of text. When several of these appear in consecutive lines, they form a solid vertical divider line, making the tabbed list resemble a table.
Bar—This one is not really a tab stop in the same sense as the others. When a bar stop is set at a particular position, pressing Tab to move to that spot places a vertical line there, the height of that line of text. When several of these appear in consecutive lines, they form a solid vertical divider line, making the tabbed list resemble a table.
Placing and Removing Tab Stops on the Ruler
Each time you click the Tab Stop Type button (to the far left of the ruler), the button cycles through the tab stop types listed in the preceding section. (There are actually two other items within the cycle—First Line Indent and Hanging Indent—but they are for setting indents, not tabs.)
![]() To learn about setting indents using the Tab Stop Type button, see “Visually Indenting with the Ruler,” p. 183.
To learn about setting indents using the Tab Stop Type button, see “Visually Indenting with the Ruler,” p. 183.
When the Tab Stop Type button face shows the type of stop you want, click on the ruler to place it at the desired location. To remove a tab stop from the ruler, drag the stop off the ruler (up or down) and drop it.
To reposition a tab stop on the ruler, drag the stop to the left or right. As you drag, a dotted vertical line appears to help you line up the stop appropriately with the content in your document.
![]() Tip
Tip
As you are dragging a stop to reposition it, hold down the Alt key to see measurements of the current tabbed column widths. This is useful if you need to create tabbed columns with exact width measurements. That’s different from the exact positions on the ruler you get when creating tab stops with the Tabs dialog box (covered next), because this feature tells you the width of each column individually, whereas the Tabs dialog box tells you the ruler position of each stop. (Sure, you could calculate the width of a column from the ruler positions, but why bother when Word does it for you?)
Defining Tab Stops with the Tabs Dialog Box
The Tabs dialog box is useful for setting tab stops when you need precise positions or when you need a leader character. A leader is a repeated character that extends from typed text to the next tab stop. Leaders are commonly used in tables of contents, for example, as shown in Figure 5.13.

Figure 5.13. A tab leader example.
![]() To generate tables of contents in Word, see “Creating a Table of Contents,” p. 731.
To generate tables of contents in Word, see “Creating a Table of Contents,” p. 731.
There are two ways to open the Tabs dialog box:
• Double-click any custom tab stop on the ruler.
• Open the Paragraph dialog box and click the Tabs button.
The Tab Stop Position list shows all the custom tab stops that are set for the selected paragraphs. Tab stops are identified by their position on the ruler, in inches. The ruler begins with 0 inches as the left margin.
To remove a single tab stop from the list, click it and click Clear. To remove them all, click Clear All.
To create a new tab stop, enter a new value in the Tab Stop Position box, select an Alignment for it, and optionally select a leader for it (see Figure 5.14). Then, click the Set button to create the tab stop.

Figure 5.14. Control custom tab stops in the Tabs dialog box.
You can change every aspect of a tab stop. Select the stop from the Tab Stop Position list and then change its numeric value (position), its alignment, or its leader setting.
Changing the Default Tab Stop Interval
Word provides soft tab stops every 0.5 inches in a paragraph. By “soft,” I mean they exist only when necessary—that is, when you press the Tab key. Otherwise, you would never know they’re there.
![]() Tip
Tip
A change to the default tab stop interval affects all paragraphs in the current document. To make the change to all new documents, open the Normal.dotm template and make the change there.
You can change this interval for the entire document by doing the following:
1. Display the Tabs dialog box (refer to Figure 5.14).
2. In the Default Tab Stops box, increase or decrease the value.
3. Click OK to close the Tabs dialog box.
Converting a Tabbed List to a Table
Tabbed lists work great when they contain small amounts of text, but what if some text in one of the columns needs to wrap to an additional line or two? In cases like that, you’re faced with the thorny task of manually splitting up lines of text and trying to figure out how much text will fit between the tab stops.
When items of text must wrap to multiple lines in the list, go for a table instead. Fortunately, you don’t have to start from scratch when you make the discovery that you should have used a table; you can convert a tabbed list to a table easily:
1. Select the entire tabbed list.
2. On the Insert tab, click the Table button. A menu appears.
3. On the menu, click Convert Text to Table. The Convert Text to Table dialog box opens (see Figure 5.15).

Figure 5.15. Converting a tabbed list to a table.
4. Confirm the number of columns. If the number is not what you expected, click Cancel, check that you have an equal number of tab stops in each line, and then try again.
5. Click OK. The tabbed list is now a table, and the Table Tools tab appears.
![]() To control the table’s size or adjust row heights or column widths, see “Sizing a Table,” p. 346.
To control the table’s size or adjust row heights or column widths, see “Sizing a Table,” p. 346.
![]() To format the table, see “Formatting a Table,” p. 350.
To format the table, see “Formatting a Table,” p. 350.
Copying Tab Stop Settings Between Paragraphs
Because tab stops are somewhat time-consuming to set up, you will probably want to reuse the settings wherever possible rather than reset the stops for each paragraph. One way to facilitate this is to select multiple paragraphs before you set the tab stops in the first place. But let’s suppose for the moment that you forgot to do that.
When you start a new paragraph by pressing Enter at the end of a paragraph, the tab stops carry over automatically.
To manually copy the tab stop settings (and other paragraph formatting too) from one paragraph to another, use the Format Painter tool you learned about in Chapter 4, but instead of selecting specific text, follow these steps:
1. Click anywhere within the paragraph that contains the tab stops to be copied.
2. On the Home tab, click the Format Painter button.
3. Click anywhere within the paragraph to receive the tab stops.
If you need to copy the stops to more than one paragraph, double-click the button in step 2 rather than single-clicking, and then you can click multiple paragraphs, one by one, in step 3. Alternatively, you can drag over a group of paragraphs in step 3 instead of clicking within one.
Setting Paragraph Alignment
Alignment, also called justification, is the way that text aligns horizontally within its assigned area. In a regular paragraph, that area is the space between the right and left margins (or between the right and left indent markers, if set). In a table or text box, that area is the cell or the box.
The choices for paragraph alignment are as follows:
![]() Left
Left
![]() Centered
Centered
![]() Right
Right
![]() Justified
Justified
![]() Caution
Caution
Some people use Justified alignment for all their documents, thinking it makes the documents look more polished. Well, it does make for a pretty page, which is nice in a brochure or glossy handout, but it often impedes readability. For text-heavy documents such as letters, business reports, and research papers, stick with Left alignment.
All are self-explanatory except perhaps that last one. Justified, also called Full in some programs, aligns the text at both the right and left margins. To accomplish this, Word inserts small amounts of space between words and characters so that shorter lines come out the same length as longer ones.
Left alignment is usually the best choice for business letters, reports, booklets, and other print publications. Left alignment results in the easiest-to-read text.
To set a paragraph’s alignment, select the paragraphs to affect and then click one of the alignment buttons on the Home tab.
You can also select paragraph alignment from the Paragraph dialog box, although there is no advantage to doing so unless you already happen to have that dialog box open. Use the Alignment drop-down list on the Indents and Spacing tab.
Creating Numbered and Bulleted Lists
Bulleted and numbered lists help break up text into more manageable chunks and make it easier to read and skim. Just look at the text in this book! Regular paragraphs and headings are interspersed liberally with lists to better help you understand the material being presented.
![]() Tip
Tip
Some people use bulleted and numbered lists interchangeably, but that’s not always appropriate. When the order of the items is significant, such as in step-by-step driving directions, use numbering. When the order is not significant, such as in a grocery list, use bullets.
Bulleted and numbered lists almost always use hanging indents, so that the bullet or number character “hangs” to the left of the rest of the paragraph. Back in the days of the typewriter, such formatting was done rather awkwardly with tab stops, but Word’s Bullets and Numbering feature makes list making as simple as clicking a button.
![]() To number an outline, see “Numbering Outline Items,” p. 678.
To number an outline, see “Numbering Outline Items,” p. 678.
Typing a Quick Numbered or Bulleted List
For a quick and simple bulleted or numbered list, use the Bullets button or the Numbering button on the Home tab, as shown in Figure 5.16.

Figure 5.16. The Bullets and Numbering buttons on the Home tab quickly turn list formatting on and off.
There are two ways to use these buttons:
• Type the entire list, select all the text, and then click the Bullets button or the Numbering button.
• Click one of the buttons first and then start typing the list. Each time you press Enter, a new bulleted or numbered paragraph is created. Press Enter twice in a row to turn off the list formatting and return to normal text.
The bullet character or numbering style applied with these buttons is whatever you most recently used. The default is a plain round black bullet or Arabic numerals (1, 2, 3) in the same font and size as the paragraph text. Later in this chapter, you will learn how to change the bullet character or number style. After you make such a change, Word will remember your setting and will use that new setting for all future lists.
Creating Lists with AutoFormat As You Type
Recall from Chapter 4 that AutoFormat As You Type allows Word to apply certain types of formatting for you, on-the-fly, as you work. The feature includes help for creating bulleted and numbered lists, too.
First, make sure that the options are enabled for numbered and bulleted lists by doing the following:
1. Choose File, Options. The Word Options dialog box opens.
2. Click Proofing, and then click AutoCorrect Options. The AutoCorrect dialog box opens.
3. Click the AutoFormat As You Type tab.
4. In the Apply As You Type section, make sure that Automatic Bulleted Lists and Automatic Numbered Lists are marked.
5. Click OK to close the AutoCorrect dialog box, and then click OK to close the Word Options dialog box.
Then just start typing a list in Word. For a bulleted list, type an asterisk followed by a tab, and then the text for the paragraph. Or for a numbered list, type a number followed by a tab or period. Word automatically converts the list to use its own Bullets and Numbering feature.
To the left of the new number or bullet, an AutoCorrect Options icon appears. Open its menu and choose Undo Automatic Numbering or Undo Automatic Bullets if you did not intend for AutoFormat As You Type to kick in for that instance (see Figure 5.17). You can also press Ctrl+Z or click Undo to undo the autoformatting immediately after it occurs.

Figure 5.17. The AutoCorrect Options icon’s menu lets you reverse an AutoFormatting action.
If you decide you do not like the automatic bullets and numbering, you can turn off either or both. Use the preceding steps to go back to the AutoCorrect Options dialog box and clear one or both check boxes, or on the AutoCorrect Options icon’s menu shown in Figure 5.17, choose Stop Automatically Creating Numbered Lists (or Bulleted Lists, as the case may be).
![]() To learn more about AutoFormat As You Type, see “Setting AutoFormat As You Type Options,” p. 169.
To learn more about AutoFormat As You Type, see “Setting AutoFormat As You Type Options,” p. 169.
Restarting or Continuing List Numbering
When one paragraph of a numbered list immediately follows another, Word continues the list without incident. But when there is intervening text, Word can sometimes get confused.
Fortunately, Word knows it can get confused, so it asks for your help in the form of an AutoCorrect Options icon. In Figure 5.18, Word has guessed that the new numbered item is a new list, and it has restarted the numbering at 1. But whatever Word guesses, it gives you the option of sending it the other way. Click the AutoCorrect Options icon, and on its menu, click Continue Numbering.

Figure 5.18. Word gives you the option of continuing the preceding numbered list.
The AutoCorrect Options icon remains next to the paragraph after you switch to Continue Numbering, but its menu choice changes to Restart Numbering so you can go back if needed.
If you don’t see an AutoCorrect Options icon, there’s an alternate way. Follow these steps:
1. Do one of the following to open the Set Numbering Value dialog box (see Figure 5.19):
• Click in the paragraph to affect. Then on the Home tab, click the down arrow to the right of the Numbering button, opening a menu, and then click Set Numbering Value.
• Right-click the paragraph to affect, and on the menu that appears click Set Numbering Value.
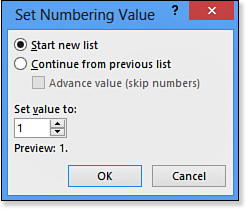
Figure 5.19. Control numbering by starting a new list, continuing a list, or setting a specific value.
2. Click Start New List or click Continue from Previous List.
3. Click OK.
Starting a List at a Certain Number
Besides starting or continuing a list, you can assign a specific number to a numbered list item. A list need not start with 1; it can start with any number you want, including 0. That can be useful when you are enumerating items that have unusual numbering or when you’re continuing a list from another document.
To set a specific number, display the Set Numbering Value dialog box (refer to Figure 5.19), as in the preceding section, and then enter a specific number in the Set Value To box.
![]() Caution
Caution
If you are using some other style of numbering, such as letters or Roman numerals, don’t enter that style in the Set Value To box; enter simple Arabic numbers there (1, 2, 3, and so on).
Changing the Number Format
A number format is the specification that defines how the numbering for the numbered list will appear. A number format consists of the following aspects:
• Number style—What type of number characters will you use? Choices include Arabic (1, 2, 3), uppercase or lowercase Roman (I, II, III or i, ii, iii), and uppercase or lowercase letters (A, B, C or a, b, c).
• Font—In what font, size, and color will the numbers appear? By default, they appear in whatever way is defined by the paragraph’s style, but you can modify that.
• Extra text or symbols—What text or symbols will precede or follow the number character? Common symbols to follow a number include a period or a closing parenthesis. Some numbered lists also have text preceding the number, as in Chapter 1, Chapter 2, Chapter 3.
• Alignment—What type of tab stop will be used to separate the numbers from the paragraph? The choices are left, right, and centered. The choice determines the way the numbers align.
Alignment is not much of an issue when all the numbers are the same length (such as an Arabic list of fewer than 10 items), but it’s a big issue in longer lists or lists that use Roman numerals. Figure 5.20 illustrates the difference between Left and Right number alignment.

Figure 5.20. Alignment governs the tab stop type at which the numbers align.
Selecting from the Numbering Library
The quickest way to change number formats is with the Numbering Library, available from the Numbering button’s drop-down list on the Home tab (see Figure 5.21). You can also access the Numbering Library by right-clicking the selected list and pointing to the Numbering command. Just click the number format you want.

Figure 5.21. Select one of the built-in number formats from the Numbering Library list.
Your number format choice remains in effect (within the current document only) until you select a different number format. Subsequent numbered lists within the document use your chosen format automatically when you create them by clicking the Numbering button on the Home tab.
When you move to a different document (or start a new one), the default numbering reverts to regular Arabic style, but your previous choice remains easily accessible from the Recently Used Number Formats area of the Numbering button’s drop-down list.
Defining a Custom Number Format
If none of the choices in the Numbering Library is right, you can define a custom number format instead. Follow these steps:
1. Select the numbered list to affect.
2. Open the drop-down menu for the Numbering button on the Home tab and click Define New Number Format. The Define New Number Format dialog box opens (see Figure 5.22).
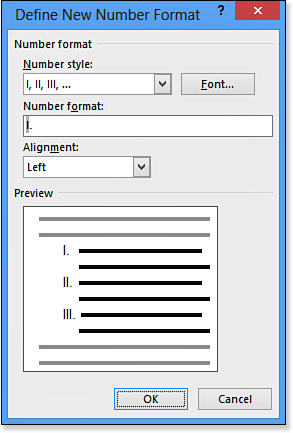
Figure 5.22. Define your own number format here.
3. Open the Number Style list and select the desired style. Notice that this list contains some additional options that were not in the Numbering Library, such as ordinals (1st, 2nd, 3rd) and text numbering (One, Two, Three).
4. Click the Font button. The Font dialog box appears.
It is just like the regular Font dialog box, except some of the Effects check boxes are filled with solid squares. These squares indicate “no selection” for those effects. In other words, for those effects, the numbers will inherit the settings from the style. Leave these alone unless you need one of the effects to always be on or off for the numbers; if so, click the check box to cycle through its settings (see Figure 5.23).

Figure 5.23. Specify different font formatting for the numbers if desired.
5. If desired, select a different font, font style, size, color, and so on for the numbers; then click OK to return to the Define New Number Format dialog box.
6. In the Number Format box, a code for the number appears shaded in gray. You can’t change that. Click in the Number Format box, though, and place any extra text on either side of that code, such as a period or parenthesis after it or some text such as Chapter or Section before it.
7. Open the Alignment list and select an alignment for the numbering.
8. Click OK. The new numbering format is applied to the numbered list in your document.
After you’ve defined a new number format, it appears in the Numbering Library. It continues to appear there even if you start a new document or close and reopen Word. To remove it from the gallery, right-click it and choose Remove.
Changing the Bullet Character
With numbering formats, there’s a limit to the creativity because numbers have to be... well, numbers. And there are only so many ways of expressing them. However, with bullet characters, the sky’s the limit. Virtually anything, text or graphic, can be used as a bullet character.
The Bullets button on the Home tab has a drop-down list containing a small library of bullet characters. To apply one of these bullets to your list, select the list and then open the button’s drop-down list and click a bullet (see Figure 5.24).

Figure 5.24. Select a bullet from the Bullet Library.
If you don’t like any of the bullets in the Bullet Library, choose Define New Bullet from the menu. This opens the Define New Bullet dialog box, shown in Figure 5.25. From here, you can choose one of two types: Symbol or Picture.
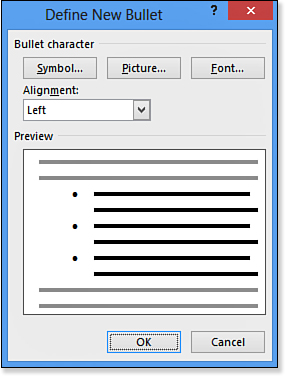
Figure 5.25. Create a new bullet.
Creating a Symbol (Text) Bullet
Symbols are text characters. You can select any character from any font installed on your PC—even one of the characters that doesn’t correspond to any of the keyboard keys. To select a symbol bullet, click the Symbol button and then select from the Symbol dialog box (see Figure 5.26). First, choose the desired font from the Font list, and then click the desired character within that font.

Figure 5.26. Select a symbol to use as a bullet.
Any font is a potential source of symbols, but some are much better suited than others. You wouldn’t typically want to use a regular letter or number as a bullet, for example, and most fonts are primarily letters and numbers. Look instead at the specialty fonts such as Symbol, Wingdings, Webdings, and Marlett. Not sure which fonts contain potential bullet characters? Open the Font drop-down list on the Home tab and scroll through, looking for fonts where sample characters appear to the right of the name. Such fonts are good candidates.
![]() Note
Note
If you happen to know the numeric code for a particular symbol, you can enter it in the Character Code box to locate and select it quickly.
After selecting a symbol as your bullet, click the Font button to change the font formatting for it. You can make all the same changes as for numbers, as you saw back in Figure 5.23. One of the most common changes is to increase or decrease the font size for the bullet, for example.
![]() To install a font, see “Adding More Fonts to Your System,” p. 148.
To install a font, see “Adding More Fonts to Your System,” p. 148.
Creating a Picture Bullet
To use a picture bullet, click the Picture button in the Define New Bullet dialog box. The Insert Pictures dialog box opens (see Figure 5.27). This dialog box is the same one that you select other graphics from, such as clip art and files stored on your local computer.

Figure 5.27. Search the Office.com Clip Art for a bullet image.
You can choose any picture from any source as a bullet character, but you will probably want to stick to small graphics. Microsoft provides an assortment of graphics suitable for use as bullets in its clip art collection, tagged with the keyword bullet. To find and select one of these, click in the Search Office.com text box, type bullet, and then press Enter. In the search results, click the bullet character you want and click Insert. (Ignore any images that are of actual bullets like the kind you put in a gun.)
![]() To learn more about inserting art from the Clip Art collection, see “Working with Clip Art,” p. 458.
To learn more about inserting art from the Clip Art collection, see “Working with Clip Art,” p. 458.
To use a graphic of your own design for a bullet, from the Insert Pictures dialog box, click the Browse hyperlink and choose a file. Valid graphic formats for bullets include .gif, .bmp, and .jpg (or .jpeg). Simple graphics work best because of the small size; if you use a large complex picture as a bullet, it will be unrecognizable at the size of a bullet. Unlike with a symbol bullet, you cannot directly modify the size of a picture bullet. The paragraph’s font size determines the picture bullet’s size.
![]() Tip
Tip
Here’s a workaround for picture bullet size. Global settings for a paragraph are stored in its end-of-paragraph marker, so by changing the formatting on that marker, you can affect the bullet character size. Make sure that end-of-paragraph markers are displayed onscreen, so you can see what you’re doing, and then select the marker only. (Position the insertion point to the left of the marker, hold down Shift, and press the right arrow key once.) Then, change the font size from the Font Size list on the Home tab. The picture bullet’s size will change.
Changing the List Level
Word supports up to nine levels of list nesting—that is, placing a subordinate list within a list. You can combine bulleted lists and numbered lists within the same nested structure, too. For example, in Figure 5.28, a numbered procedure has a bulleted list nested under one of the steps, and one of those bullet points has its own nested numbered list.
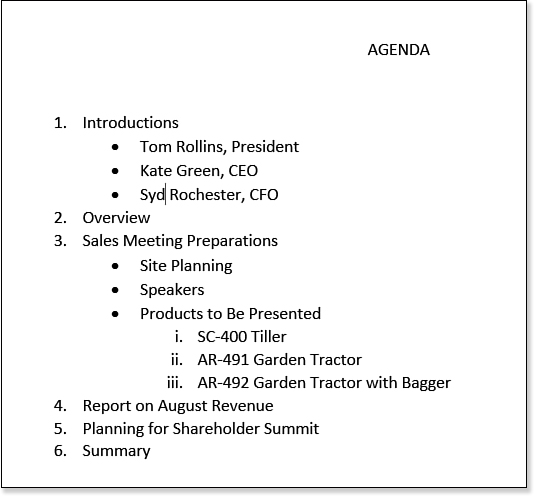
Figure 5.28. Word supports up to nine levels of list nesting.
Here’s the easiest way of creating a nested list: Start typing the main list normally, and press Enter for a new paragraph, and then press the Tab key. An indented, subordinate list item is created, ready for the text to be typed.
![]() Note
Note
Tab and Shift+Tab control list levels only if you press them when the insertion point is at the beginning of the paragraph, and only when bullets or numbering is turned on. Otherwise, pressing Tab simply tabs over to the next tab stop.
When the subordinate list is complete and you want to go back to the main list level, press Enter again to start a new paragraph, and then either press Enter again or press Shift+Tab. Both do the same thing: They promote that paragraph to the next-higher level.
Another way to switch among list levels is with the Change List Level submenu, found on the drop-down list for both the Bullets and the Numbering buttons on the Home tab. Open the submenu and click the desired level for the selected paragraphs, as shown in Figure 5.29.

Figure 5.29. Switch among list levels via the Change List Level submenu.
![]() For more information about multilevel numbered lists, especially when used in outlines, see “Numbering Outline Items,” p. 678.
For more information about multilevel numbered lists, especially when used in outlines, see “Numbering Outline Items,” p. 678.
Adjusting Bullet or Number Spacing and Indents
You can define bullet and text indents in Word 2013, but not as part of the bullet or number format. Instead, you make those changes as you would with any other paragraph, through the Paragraph dialog box or with the ruler.
![]() To review the procedures for controlling indents, see “Indenting Paragraphs,” p. 180.
To review the procedures for controlling indents, see “Indenting Paragraphs,” p. 180.
Applying Paragraph Borders
A border is a visible line around one or more sides of a paragraph (or around a group of paragraphs). Borders help create separations in the text to make it easier to read and skim. You can see borders at work in this book, for example, in the tips, notes, and cautions.
You can place a border on any or all sides of a paragraph. The most common usage is to place the border around all sides, creating a box, but you can also achieve interesting effects by applying the sides more selectively. For example, in Figure 5.30, a bottom-only border is used under each heading, and notes are marked with top and bottom borders.
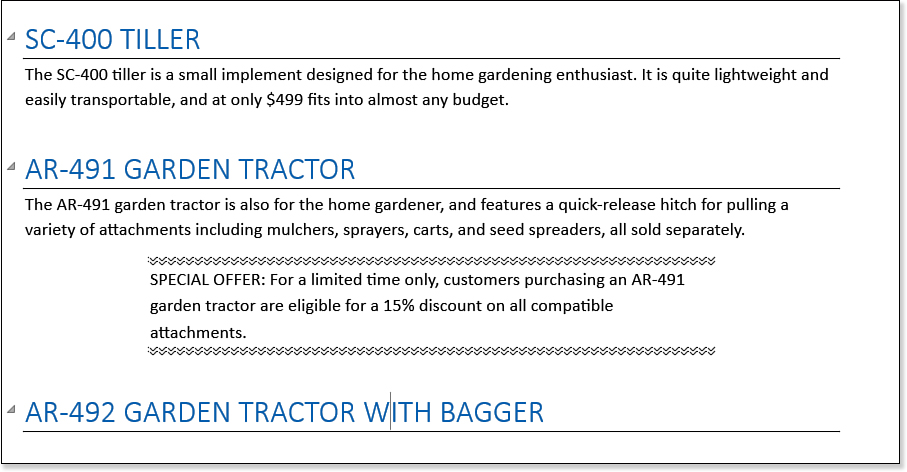
Figure 5.30. Examples of borders applied to only certain sides of paragraphs.
![]() To create a paragraph style, see “Creating a New Style by Example,” p. 227.
To create a paragraph style, see “Creating a New Style by Example,” p. 227.
Applying and Removing Borders
For a basic border (solid, black, thin), select the paragraphs and then use the Borders drop-down menu on the Home tab. It contains options for borders on various sides of the selection (see Figure 5.31).
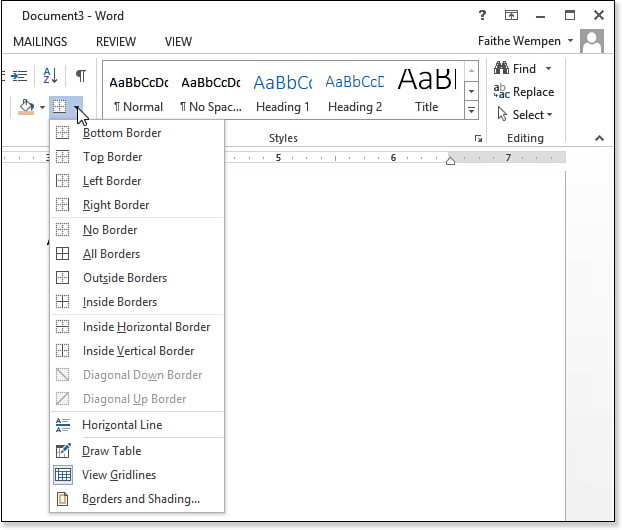
Figure 5.31. Apply a basic border to one or more sides of the selected paragraphs.
![]() Tip
Tip
Although you can manually apply borders to individual paragraphs, as you learn in this section, it is often more efficient to create a paragraph style that includes the desired border and apply that paragraph style to the desired text.
Table 5.1 provides a summary of the border choices, along with some notes on their usage.

Formatting Borders
The Borders button enables you to turn borders on and off, but it doesn’t help you format them. So, if you want a border that’s a different thickness, color, or line style (such as dotted or dashed), you must use the Borders and Shading dialog box.
![]() Tip
Tip
The Shadow effect that the Borders and Shading dialog box applies is quite limited. You can’t change its size or color, and you can’t shift it to other sides of the paragraph. If you need a more complex shadow, consider placing the text in a text box and then applying a shadow to the text box. That way you get a full range of shadow-formatting tools.
To format a border, follow these steps:
1. Select the paragraphs to affect. They can already have a border applied to them or not—it doesn’t matter.
2. Open the Borders button’s drop-down list and click Borders and Shading. The Borders and Shading dialog box opens with the Borders tab displayed (see Figure 5.32).

Figure 5.32. Format paragraph borders from the Borders tab of the Borders and Shading dialog box.
3. Select a border type from the Setting icons along the left side of the dialog box:
• None—Turns off all borders.
• Box—Places an outside border in which all sides are the same thickness.
• Shadow—Places an outside border, and places a shadow effect along the bottom and right sides.
• 3-D—Places an outside border with a 3D effect—in theory, anyway. In most cases there is no difference in the result between Box and 3D.
• Custom—Enables you to select and format each side individually. (You can start with any of the other settings, and when you start to change individual sizes, the setting changes to Custom automatically.)
4. On the Style list, select a line style.
5. On the Color list, select a line color. (Color selection works the same here as with any other colored object.)
![]() For an explanation of Word’s color choices, see “Changing Font Color,” p. 150.
For an explanation of Word’s color choices, see “Changing Font Color,” p. 150.
6. On the Width list, select a line thickness.
7. (Optional) If you want to remove the border on certain sides, click the corresponding button in the Preview area. (There is a button for each of the four sides.)
8. (Optional) To control how far the border appears from the text on each side, click the Options button and then enter values (in points) in the Border and Shading Options dialog box (see Figure 5.33). Then, click OK to return to the Borders tab.
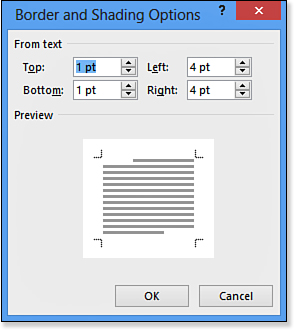
Figure 5.33. Adjust spacing between the text and the border if desired.
9. Click OK to accept the new border.
After having applied border formatting as in these steps, the next borders you apply with the Border button’s drop-down list are formatted in the same way. For example, if you chose a light-green double border in the preceding steps, all new borders you apply will be light green and double until you change to something else (within the current document only).
![]() Note
Note
If you remove the border on one or more sides and a Shadow effect was chosen in step 3, the Shadow effect is removed and the Setting type changes to Custom.
Applying Paragraph Shading
Paragraph shading places a colored background behind the entire paragraph. Shading—like borders—helps make the text stand out from the crowd. You might make the shading on an important warning bright orange, for example, to point out its urgency.
![]() Note
Note
Don’t confuse paragraph shading with highlighting (from Chapter 4). Highlighting is applied to individual characters within a paragraph; highlighting cannot exist in areas where there is no text (for example, at the ragged right margin of a paragraph). Paragraph shading, on the other hand, extends all the way to the edges of the paragraph on all sides in a neat rectangular form.
To apply a simple solid-fill shading, follow these steps:
1. Select the paragraphs to affect.
2. On the Home tab, open the Shading button’s drop-down list and click the desired color (see Figure 5.34). To try out different colors before committing, point to a color to see a preview of it.
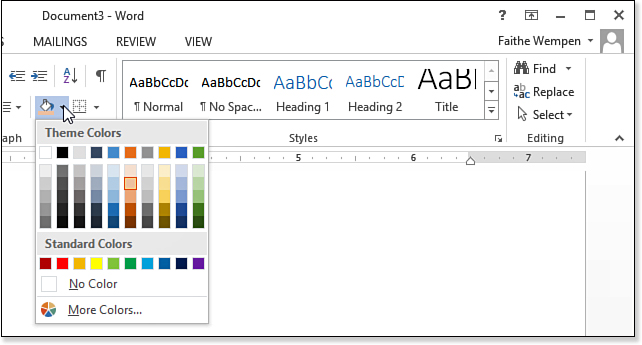
Figure 5.34. Select a solid shading color.
![]() For an explanation of Word’s color choices, see “Changing Font Color,” p. 150.
For an explanation of Word’s color choices, see “Changing Font Color,” p. 150.
Patterned shading is another option. A pattern is a two-tone background that consists of one basic color (the Fill color) overlaid with a pattern of the second color. That pattern can be subtle, such as a spray of fine dots, or dramatic, such as strong stripes. The two colors can sharply contrast for a strong effect or can be very nearly the same for a subtle one.
To create a pattern fill, follow these steps:
1. Select the paragraphs to affect.
2. On the Home tab, open the Borders button’s drop-down list and click Borders and Shading. The Borders and Shading dialog box opens.
![]() Caution
Caution
Patterns make the text more difficult to read, especially the bold ones with strongly contrasting colors. Use patterned shading sparingly and strategically.
3. Click the Shading tab.
4. Open the Fill drop-down list and choose the desired color.
5. Open the Style drop-down list and select the pattern style desired (see Figure 5.35).

Figure 5.35. Select a pattern for the shading if desired.
6. Open the Color drop-down list and choose the color for the pattern.
7. Click OK to apply the pattern.
Preventing Paragraphs from Breaking
In multipage documents, paragraphs don’t always break gracefully. Sometimes, a single line of a paragraph appears either at the bottom or the top of a page. These stray lines are called widows and orphans, and you can easily prevent them from occurring.
![]() Note
Note
Word Help defines an “orphan” as a single line at the bottom of a page, and a “widow” as a single line at the top. Word has several settings for controlling how (or if) paragraphs are allowed to break between pages. All are found in the Paragraph dialog box, on the Line and Page Breaks tab.
Follow these steps to examine and change the break settings for a paragraph:
1. Select the paragraphs to affect. To affect the entire document, press Ctrl+A.
2. Open the Paragraph dialog box (by clicking the dialog box launcher in the Paragraph group on the Home tab) and click the Line and Page Breaks tab (see Figure 5.36).

Figure 5.36. Specify options for keeping lines together.
3. Mark or clear any of these check boxes as desired:
• Widow/Orphan Control—Ensures that if a paragraph breaks across pages, at least two lines of the paragraph will appear on each page. If this is not possible, the paragraph floats completely to the next page.
• Keep with Next—Ensures that the paragraph will not be on a different page from the paragraph that follows it. This is useful for keeping a heading with the body paragraph that follows it.
![]() Note
Note
If you want to change the widow/orphan setting for all text, including any new text you type later, modify the paragraph style, as you find out how to do in Chapter 6. You can specify line and page breaks in style definitions just like any other paragraph formatting.
• Keep Lines Together—Prevents a paragraph from breaking at all. If it will not fit at the bottom of a page, the whole paragraph moves to the next page. This is especially useful in tables, where a page break that interrupts the text in a table cell can create confusion.
• Page Break Before—Starts the paragraph on a new page. This is useful for chapter and section titles, for example.
4. Click OK.
![]() To create styles, see “Creating a New Style by Example,” p. 227.
To create styles, see “Creating a New Style by Example,” p. 227.
![]() Tip
Tip
Why use Page Break Before when you could just insert a hard page break before the paragraph? Well, if it’s a one-time instance, that would be fine, but if you are setting up a paragraph style to be reused for multiple headings, all of which should start on a new page, you can save some time by adding the formatting to the style.