
6. Creating and Applying Styles and Themes
Styles are named formatting definitions that you can apply to text to ensure consistency within a document. For example, you could apply the Heading 1 style to all headings in the document, and all the headings would be formatted in the same way.
Styles also make it easier to make global changes to the formatting in a document; when you modify the style, all text based on that style is automatically updated. Suppose, for example, that you decide you want all the headings to be underlined. Just turn on underlining for the Heading 1 style and you’re done.
Word uses styles not only to standardize document formatting but also to control the organization in outlines, tables of contents, and master documents. Investing time in learning about styles in this chapter will pay off many times over as you explore Word’s advanced features later in this book.
Understanding Styles
Word supports several types of styles, each suitable for a specific formatting task.
The most common style type is a paragraph style, which can apply both paragraph and character formatting to entire paragraphs. All paragraphs have a paragraph style; the default one is called Normal, and it carries the default settings for body paragraphs in the document. There are also built-in paragraph styles for headings, such as Heading 1, Heading 2, and Heading 3, each presenting a different heading level.
A character style is a style that contains only character-level formatting and that applies to individual characters. The default character style is Default Paragraph Font, which is derived from the character formatting defaults from the Normal paragraph style.
Two popular built-in character styles are Strong and Emphasis. By default, Strong makes text bold, and Emphasis makes text italic. At first it might seem strange that there are character styles that basically do the same thing as Bold and Italic manual formatting. The benefit in using them is not in the initial application, but in the possibility they create for easy change later. For example, suppose you know that you want to set off certain new vocabulary words in a document in some way but you haven’t decided on the exact formatting yet. If you’ve made them all bold with the Bold button and then later decide to use italic instead, you would have to manually change each instance. (Using the Replace feature could help somewhat.) Suppose, however, that you format all the vocabulary words as Strong using the character style. Then if you decide to make the words italic, you simply modify the definition of Strong so that it is italic rather than bold.
In addition to character and paragraph styles, there are linked styles. Linked styles are nearly identical to paragraph styles, except for their behavior when applied to a selection of text (rather than to an entire paragraph). Suppose you select one sentence within a paragraph and then you apply a paragraph style. The entire paragraph receives that style’s character and paragraph formatting equally. If you apply a linked style, however, the character aspects of the style apply only to the selected text. (The paragraph aspects of the style apply to the entire paragraph as usual.) Throughout this chapter, everything you learn about paragraph styles also applies to linked styles, unless otherwise noted.
You can apply paragraph styles to text within table cells, but not to the cells themselves. To format table cells, use a table style. Table styles store table cell formatting such as background color, vertical and horizontal alignment, and cell border.
![]() To format tables, see “Formatting a Table,” p. 350.
To format tables, see “Formatting a Table,” p. 350.
A list style applies settings specific to bulleted and numbered lists. List formatting, such as bullet and numbering styles, can also be stored in paragraph styles, but the List type has the advantage of storing up to nine levels of numbering or bullet formatting in a single named style. That way, if a list item changes in level, it need not have a different style applied to it.
Methods of Applying Styles
There are many ways of applying styles in a document, and much of the first half of this chapter is devoted to explaining those methods. Here’s a quick summary:
• Select a style from the Style Gallery—This is a fast and easy way to use styles, but not all the available styles are represented. See “Working with the Style Gallery,” p. 216.
• Choose a style from the Apply Styles pane—Use a handy floating pane to access a drop-down list of styles. See “Using the Apply Styles Pane,” p. 220.
• Choose a style from the Styles pane—Use the full-size Styles pane for full access to all styles. See “Using the Styles Pane,” p. 218.
• Press a shortcut key combination assigned to a style—You can assign keyboard shortcuts to any style for quick application. See “Applying a Keyboard Shortcut to a Style,” p. 233.
Methods of Creating and Modifying Styles
The built-in styles are useful, but most people find that they need more or different styles for their projects. You can create new styles or modify the definitions of existing ones. Here’s a quick reference to those skills I cover in this chapter:
• Change the style set—You can quickly change the look of the paragraphs that have the built-in styles applied by changing the style set. These sets alter the definitions of the built-in styles automatically for you. See “Changing the Style Set,” p. 217.
• Create a new style based on existing formatting—You can quickly define a new style that mimics some manual formatting that’s already applied in the document; see “Creating a New Style by Example,” p. 227.
• Define a new style—You can precisely define every aspect of a new style—everything from the font choice to the spacing and indentation. It takes longer, but you have more control. See “Creating a New Style by Definition,” p. 229.
• Make a style change automatically—If you like, you can set up styles such that, when you apply manual formatting to text that has those styles applied, change their definition to match, so there is no manual formatting in your document. See “Updating a Style Automatically,” p. 235.
• Change a style to match a selection—You can apply manual formatting to some text and then update the text’s style to match it. See “Updating a Style to Match a Selection,” p. 235.
• Modify a style definition—You can precisely define the changes you want to make to the style. See “Modifying a Style Definition,” p. 236.
Working with the Style Gallery
You can apply certain styles from a sample-based menu system called the Style Gallery on the Home tab.
The first row of styles appears on the tab without opening the menu. Click a style there to apply it (see Figure 6.1).

Figure 6.1. The Style Gallery is located on the Home tab.
If the style you want doesn’t appear, click the More button to open the full gallery and menu (see Figure 6.2).
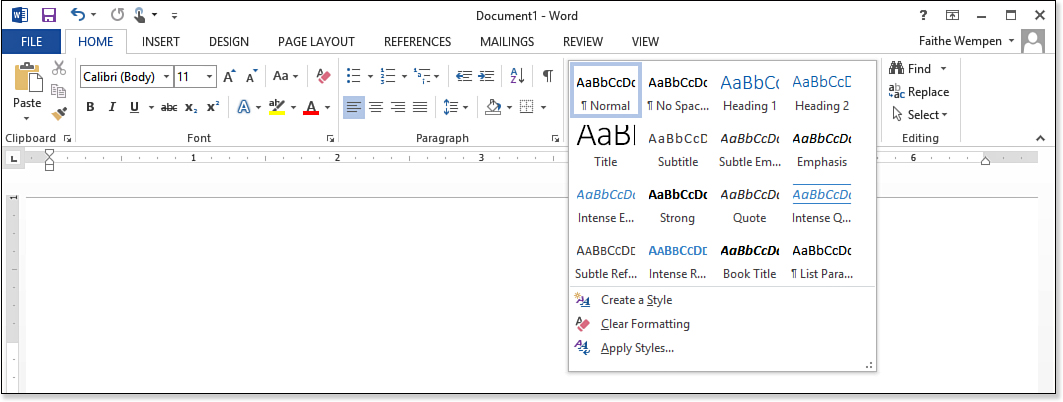
Figure 6.2. Select a style from the Style Gallery.
In Print Layout or Web Layout view, as you roll the mouse over the various styles, the text in the document changes to show a preview of that style, so you can experiment with the various styles before you commit to one.
![]() Tip
Tip
To quickly apply one of the built-in heading styles (Heading 1 through Heading 3), press Ctrl+Alt plus the number corresponding to the heading level. For example, for Heading 1, press Ctrl+Alt+1. To quickly apply the Normal style, press Ctrl+Shift+N.
![]() To create your own styles, see “Creating a New Style by Example,” p. 227.
To create your own styles, see “Creating a New Style by Example,” p. 227.
Ideally, the Style Gallery should show only the styles you use most often. Keeping the list streamlined makes it easier to apply your favorite styles without wading through a large assortment. For example, if you never use heading levels deeper than Heading 1, you could remove the other heading levels.
To remove a style from the Style Gallery, open the gallery and right-click a style; then choose Remove from Style Gallery.
If you change your mind and want to re-add the style to the list later, display the Styles pane (by clicking the dialog box launcher in the Styles group on the Home tab), and then right-click the style and choose Add to Style Gallery.
Changing the Style Set
You can apply style sets that redefine the built-in styles in various ways, all within the current template. You can quickly switch among the various style sets to create different looks without having to modify styles or change templates.
To choose a different style set, click a style set on the Design tab, in the Document Formatting group. You can click one of the style sets that appear in the first row, or you can click the More button to open the full gallery of style sets (see Figures 6.3 and 6.4).

Figure 6.3. Style sets are located on the Design tab.
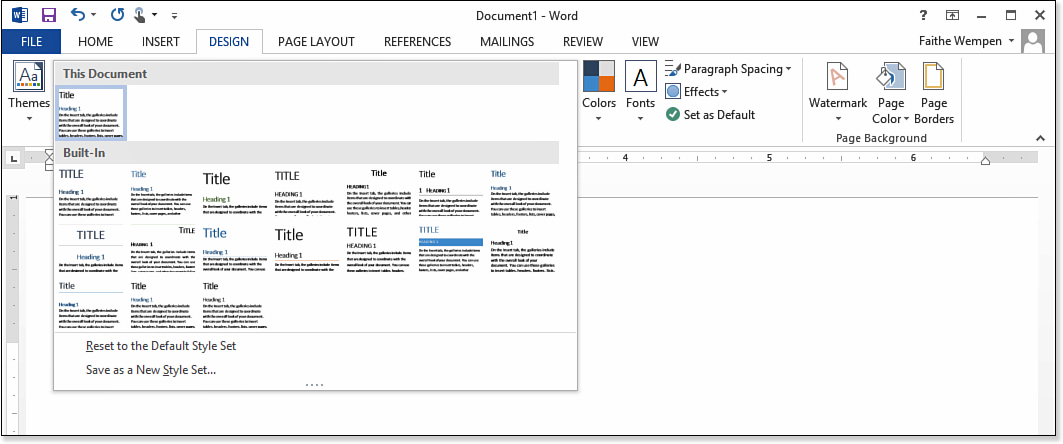
Figure 6.4. Choose a style set from the gallery.
![]() Note
Note
Quick Styles is the name that earlier versions of Word used for the styles in the Style Gallery; the name has carried over in the folder name, even though the Quick Styles moniker in Word itself is gone now.
You can create your own style sets by setting up the formatting the way you want it and then clicking the More button to display the gallery (as in Figure 6.4) and clicking Save as a New Style Set. Style sets are stored separately for each user in C:UsersusernameAppDataRoamingMicrosoftQuickStyles.
If you have any styles you’ve created yourself, they will not be updated by changing to a different style set unless they are based on one of the built-in styles. For example, if you have a Big Normal style that is based on the Normal style but is 14 point, and the style set redefines the font and size of Normal, the font change cascades down to Big Normal, but the size change does not because Big Normal has its own size definition.
![]() To learn more about basing one style on another, see “Working with Cascading Styles,” p. 237.
To learn more about basing one style on another, see “Working with Cascading Styles,” p. 237.
![]() Tip
Tip
You can prevent users from switching style sets in a document by doing the following: Click the Styles dialog box launcher in the bottom-right corner of the Styles group (on the Home tab) to display the Styles pane. Click the Manage Styles button at the bottom (the third button from the left). In the Manage Styles dialog box, click the Restrict tab and then mark the Block Switching to a Different Style Set check box.
Using the Styles Pane
The Styles pane shows a list of the available styles (optionally with a preview). You can click a style to apply it to the selected text.
To display the Styles pane, click the dialog box launcher in the bottom-right corner of the Styles group on the Home tab. You can dock it, as shown in Figure 6.5, or drag it by its title bar into the center to turn it into a floating window.

Figure 6.5. The Styles pane.
![]() Note
Note
Why use the Styles pane, when the Style Gallery is so much more convenient? The Style Gallery is somewhat limited in the styles it shows, for one thing. Not all styles appear there—nor should they. Style Gallery designation is reserved for the few most frequently used styles that you need to keep closest at hand. Heavy-duty style work is best done in the Styles pane.
To see a complete description of a style’s definition, point at the style with the mouse (see Figure 6.6).

Figure 6.6. View a description of the style’s formatting.
Each style has its own drop-down list in the Styles pane, which you can access either by right-clicking the style name or by pointing at it and then clicking the down arrow that appears to its right. On this menu, you’ll find these options:
• Update stylename to Match Selection—Changes the style’s definition to match the formatting of the currently selected text or the formatting at the insertion point’s current location if no text is selected.
• Modify—Opens the Modify Style dialog box, where you can edit the style’s definition. (More on this later in the chapter.)
• Select All x Instances—Enables you to quickly select all instances of the style in the entire document. This makes it easy to apply manual formatting to all instances at once (although that’s not really a good idea; it would be better to update the style definition to make such a global change). If the style is not currently in use, this option will be unavailable and will read Select All: Not Currently Used.
• Clear Formatting of x Instances—Strips off any manually applied formatting to text formatted with this style, reestablishing the consistency of the formatting. This option does not appear unless you have manually applied formatting.
• Delete stylename—Deletes the style. Works only on user-created styles; you cannot delete built-in styles.
• Remove from Style Gallery—Keeps the style on the Styles pane’s list but removes it from the list on the Home tab. If the style is not currently in the Style Gallery, the command appears as Add to Style Gallery.
Using the Apply Styles Pane
An abbreviated version of the Styles pane is also available: the Apply Styles pane. To display it, click the More button to open the Style Gallery on the Home tab and click Apply Styles, or press Ctrl+Shift+S.
The Apply Styles pane enables you to choose styles from a drop-down list (see Figure 6.7). Its buttons are described in the following list:
• Reapply—After selecting a style from the list, click this button to apply it to text. It’s equivalent to clicking a style on the Styles pane.
• Modify—Click this button to modify the style’s definition (which you find out how to do later in this chapter). It’s equivalent to right-clicking a style and choosing Modify on the Styles pane.

Figure 6.7. The Apply Styles pane.
![]() Another way to avoid moving the mouse to apply styles is to use shortcut key assignments for common styles. See “Applying a Keyboard Shortcut to a Style,” p. 233.
Another way to avoid moving the mouse to apply styles is to use shortcut key assignments for common styles. See “Applying a Keyboard Shortcut to a Style,” p. 233.
Customizing the Styles Pane
The controls at the bottom of the Styles pane (see Figure 6.8) offer several ways of customizing its appearance and functionality.

Figure 6.8. Controls at the bottom of the Styles pane
When Show Preview is enabled, the style names appear in the actual styles they represent, as nearly as possible. This makes it easier to remember what a style represents, but it makes the list somewhat less compact and can slow down performance somewhat on a slow PC.
When Disable Linked Styles is enabled, linked styles behave like paragraph styles. For example, when you select some characters of text and then apply a linked style, only those characters receive the character-level formatting from the style. If you disable linked styles, however, that character-level formatting applies to the entire paragraph regardless of the selection.
Click the Options hyperlink to display the Style Pane Options dialog box (see Figure 6.9).

Figure 6.9. The Style Pane Options dialog box.
The Select Styles to Show setting controls which styles appear on the Styles pane and Apply Styles pane. Here are the choices:
• Recommended—Only styles marked as Recommended appear.
![]() To choose which styles are marked as Recommended, see “Sorting the Styles List,” p. 239.
To choose which styles are marked as Recommended, see “Sorting the Styles List,” p. 239.
• In Use—Only styles that are currently in use appear.
• In Current Document—Only styles that have been applied in this document appear. (Heading 1 through Heading 3 and Normal always appear even if they are not in use.)
• All Styles—All available styles appear.
The Select How List Is Sorted setting controls how styles will be arranged on the list. You can choose from the following options:
• Alphabetical—From A to Z by name.
• As Recommended—Styles marked as Recommended appear first, followed by the others, alphabetically within each section of the list.
• Font—Arranged according to the font choice, alphabetically by font.
• Based On—Arranged according to the style on which each is based, and alphabetically within that list.
• By Type—Arranged according to paragraph style versus character style, and alphabetically within those categories.
In the Select Formatting to Show as Styles section, specify how you want entries to appear in the Styles pane for manual formatting that has occurred but has not yet been officially designated as a style. This can be handy because it can help you create styles more quickly out of existing formatting.
In the Select How Built-In Style Names Are Shown section, specify whether you want built-in names to appear only if the previous level is used (for example, show Heading 5 only if Heading 4 is in use), and whether to hide built-in names when an alternate name exists.
Finally, you can choose to have these options apply Only In This Document or in New Documents Based on This Template. If you choose the latter, these settings are saved with the template; otherwise, they are saved with the document.
Clearing Styles and Formatting
There are several ways of clearing formatting, depending on how extreme you want the removal to be:
• To clear all manual formatting and remove all styles from selected text, reverting the text to Normal style, choose Clear All from the Styles pane’s list.
• To remove the manual formatting from selected text, leaving only the style’s formatting, do any of the following:
• Click the Clear Formatting button on the Home tab.
• In the Apply Styles pane, select the style name and click Reapply.
• Open the Style Gallery and click Clear Formatting.
• To remove all the manual formatting and all the character styles, leaving only the paragraph formatting, select the text and press Ctrl+spacebar.
• To strip any manually applied paragraph formatting, leaving only the paragraph formatting specified by the paragraph style, select the text and press Ctrl+Q.
You can also use a feature called the Style Inspector, a floating pane that can help you examine the formatting for text and strip anything you don’t want. To activate the Style Inspector, click the Style Inspector button in the Styles pane.
![]() Tip
Tip
You can drag the Style Inspector window to the far left or right edge of the Word window to dock it there as a full-size pane.
The Style Inspector consists of two sections: Paragraph Formatting and Text Level Formatting. Each section has two eraser buttons. The upper button in each section removes the style (paragraph style and character style, respectively), and the lower button in each section strips any manual formatting but leaves the style intact (see Figure 6.10).

Figure 6.10. Use the Style Inspector to examine and remove formatting.
Each of the areas in the Style Inspector also has a menu, similar to the menus available by right-clicking the style names in the Styles pane or the Style Gallery (see Figure 6.11). What’s different here is that you can access the paragraph style and the character style separately for the same text; this is useful when manual formatting has been overlaid over character styles that have in turn been overlaid on paragraph styles.

Figure 6.11. All the usual menu commands for the styles appear here.
The Reveal Formatting button, pointed out in Figure 6.10, opens the Reveal Formatting pane that you learned about in Chapter 4, “Applying Character Formatting.” It shows the exact formatting applied to the selected text.
![]() For more information about the Reveal Formatting pane, see “Revealing and Comparing Formatting,” p. 166.
For more information about the Reveal Formatting pane, see “Revealing and Comparing Formatting,” p. 166.
Viewing the Style Area
In Draft or Outline view, you can optionally display a Style area to the left of the document. Next to each paragraph, the assigned paragraph style name appears, so you can easily locate any paragraphs that do not have the desired styles applied (see Figure 6.12).
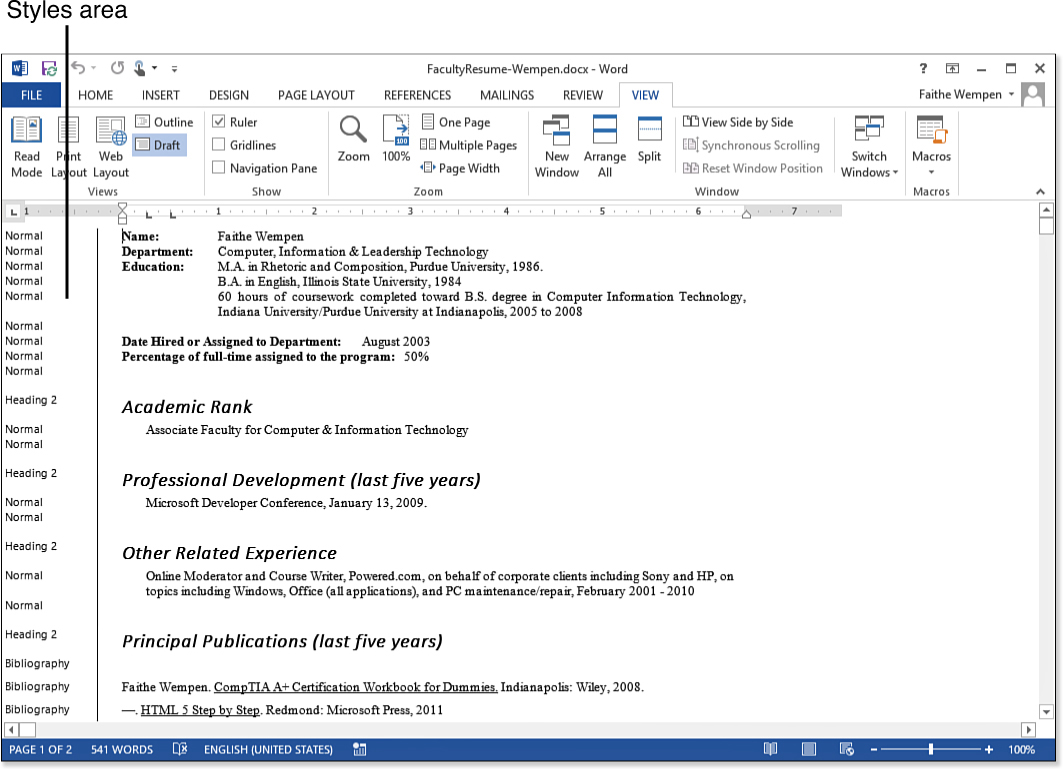
Figure 6.12. The Style area appears to the left of the document in Draft view.
To turn on the Style area, do the following:
1. Choose File, Options.
2. Click Advanced.
3. Scroll down to the Display section, and in the Style Area Pane Width in Draft and Outline Views box, enter a value greater than 0, in inches. The larger the number, the wider the Style area will be (see Figure 6.13). Figure 6.12 shows a width of 1 inch, which is typical.

Figure 6.13. Display the Style area by specifying a width for it.
4. Click OK.
![]() To switch to different views such as Draft and Outline, see “Working with Views,” p. 12.
To switch to different views such as Draft and Outline, see “Working with Views,” p. 12.
Creating and Deleting Styles
There are several ways to create styles, ranging from simple example-based techniques to powerful and specific definitions. The following sections look at the ins and outs of style creation, naming, and deletion.
Style Naming and Alternate Names
Before you start creating styles, spend some time thinking about the rules you will use for deciding on the names. Many a beginner has started out with a naming scheme that proved unwieldy, only to have to rename dozens of styles later to fix the problem.
Create style names based on the intended usage for the style, not based on the formatting. For example, Article Title is a much better name than Arial 16-point because you might decide later that the title should be a different font or size.
To create clusters of styles, name them with the same first few characters so that they appear together in alphabetically sorted listings. For example, to keep several bulleted and numbered list styles together alphabetically, you might name them List Bullet A, List Bullet B, List Number A, and List Number B.
Strategic naming is an issue only for the new styles you create yourself, because Word does not allow you to rename a built-in style. You can, however, create alternate names (aliases) for them.
To create an alternate name, follow these steps:
1. From the Styles pane or the Style Gallery, right-click a style and choose Modify.
2. In the Name box, click to place the insertion point at the end of the current name. Then, type a comma and the alternate name. For example, to alias Heading 1 as H1, type the following:
Heading 1,H1
3. Click OK. The style name now appears in all listings with both names.
![]() Note
Note
With built-in styles, you can actually just delete the name that appears in the Name box and replace it entirely with the alternate name. When you click OK, Word reinserts the original name before the name you typed, with a comma separator.
Creating the alternate name is in itself not that useful because lists continue to be sorted by the real names. However, you can then set up the Styles list to show the alternate names of styles instead of the real names. Follow these steps:
1. In the Styles pane, click Options. The Style Pane Options dialog box opens.
2. Mark the Hide Built-In Name When Alternate Name Exists check box (see Figure 6.14).

Figure 6.14. Set the Styles list to show only alternate names when they exist.
3. Click OK. Now, if a style has an alternate name, that name appears instead of the real name in the Styles list.
Creating a New Style by Example
Creating a style by example is useful if you already have some text that’s formatted in the correct way and you want to apply that same formatting consistently throughout the document.
Here’s how to create a new style and place it on the Style Gallery list:
1. Format text the way you want the style to be, and select that text. If creating a paragraph style, select the entire paragraph.
2. On the Home tab, open the Style Gallery and choose Create a Style. Alternatively, right-click the selected text and in the mini toolbar, choose Styles, Create a Style. The Create New Style from Formatting dialog box opens.
3. In the Name box, type a name for the style (see Figure 6.15).

Figure 6.15. Create a new style by example.
4. Click OK. The new style appears on the Style Gallery list.
![]() Note
Note
The Modify button in Figure 6.15’s Create New Style from Formatting dialog box opens a larger version of the same dialog box. This larger version opens by default when you create the new style from the Styles pane, as in the next set of steps. In it, you can make changes to the style definition. You learn about these changes later in the chapter.
You can also create a new style by example with the Styles pane:
1. If the Styles pane is not already open, display it by clicking the dialog box launcher in the bottom-right corner of the Styles group in the Home tab.
2. Format text the way you want the style to be, and select that text. If you’re creating a paragraph style, select the entire paragraph.
3. At the bottom of the Styles pane, click the New Style button. The Create New Style from Formatting dialog box opens (see Figure 6.16).

Figure 6.16. This dialog box is a more complex version of the one in Figure 6.15.
4. In the Name box, type a name for the style.
5. (Optional) Make any changes desired to the style definition. (You learn about such changes in the next section.)
6. (Optional) If you want this style to appear in the Style Gallery, mark the Add to the Styles Gallery check box.
7. (Optional) If you want the style to automatically update, mark the Automatically Update check box.
You probably don’t want to use Automatically Update because it can get you into unintended messes. This feature updates the style’s definition whenever you make manual formatting changes to text that has that style applied. For example, if you have a heading level that is bold but not italic, and you apply italic to one instance, the style itself changes so that it includes italic and changes all instances.
8. (Optional) If you want the new style to be saved in the template, click New Documents Based on This Template.
9. Click OK. The new style appears in the Styles pane.

Creating a New Style by Definition
Creating a style by definition means constructing the style’s specifications based on dialog box settings rather than based on an example. That’s somewhat misleading as a definition, though, because technically every new style definition starts out as a “by example.” When you open the dialog box for constructing a new style, the default settings within it come from whatever style was in effect at the insertion point position when you opened the dialog box. The main point of differentiation, then, is whether you make modifications to the settings or just accept what the example provided.
To define a style, you use many of the skills you acquired in Chapter 4, “Applying Character Formatting,” and Chapter 5, “Formatting Paragraphs and Lists,” for applying character and paragraph formatting to individual blocks of text. The same controls—or at least similar ones—are used for the style definition in many cases.
To create a new style by definition, it is preferable to start out with as much of a “blank slate” as possible example-wise, so click in an area of the document that has the Normal style applied, or apply that style to an area. (Ctrl+Shift+N is a shortcut for applying the Normal style.) Then do the following:
1. If the Styles pane is open, click the New Style button at the bottom of the pane. If not, on the Home tab open the Style Gallery and click Create a Style. Then click the Modify button. Either way, the larger version of the Create New Style from Formatting dialog box appears.
2. Type a name for the new style in the Name box.
3. Select a style type from the Style Type list. The dialog box controls change to show formatting appropriate for the type chosen:
• Paragraph—Contains paragraph-level formatting and can optionally contain character-level formatting that applies to the entire paragraph
• Character—Contains character-level formatting only
• Linked (paragraph and character)—Contains both paragraph-level and character-level formatting and can be applied as either a Paragraph or Character style
• Table—Contains formatting specific to tables and can include elements of paragraph and character formatting, as they apply to table cells
• List—Contains formatting specific to bulleted or numbered lists, somewhat like an outline numbered list
![]() Note
Note
A List style contains paragraph formatting for up to nine levels of bulleted or numbered list elements in a single style. This is useful because you can use the same style for an entire multilevel list, and you can promote and demote items without changing their styles.
4. Select a parent style from the Style Based On list. Anything that is not specifically defined for the new style is copied from this style. The most common style to base other styles on is Normal. This option is not available for List styles.
5. (Paragraph and Linked types only) Make a selection in the Style for Following Paragraph list. This determines the style of the next paragraph that appears when you press Enter at the end of a paragraph. For a heading style, it is appropriate for the next paragraph to be a body style such as Normal; for a body style, it is appropriate to have another paragraph of the same style.
![]() Tip
Tip
If you want to be able to change the text appearance by applying formatting themes, don’t specify a certain font or color for a style. Instead, set the font to the (Body) font for a body style or the (Heading) font for a heading style, and set the color to Automatic.
6. In the Formatting section, use the controls to define formatting for the style.
The controls differ for each style type. Figure 6.17 shows them for a Paragraph style, for example.
Figure 6.17. Creating a new Paragraph type of style.
The Linked style type’s controls are the same as in Figure 6.17, and the Character type’s controls are a subset of those. (The Character type includes only the controls that apply to individual characters, such as font, size, and color.)
The Table style type’s controls are shown in Figure 6.18, and the List style type’s in Figure 6.19.

Figure 6.18. Creating a new Table type of style.
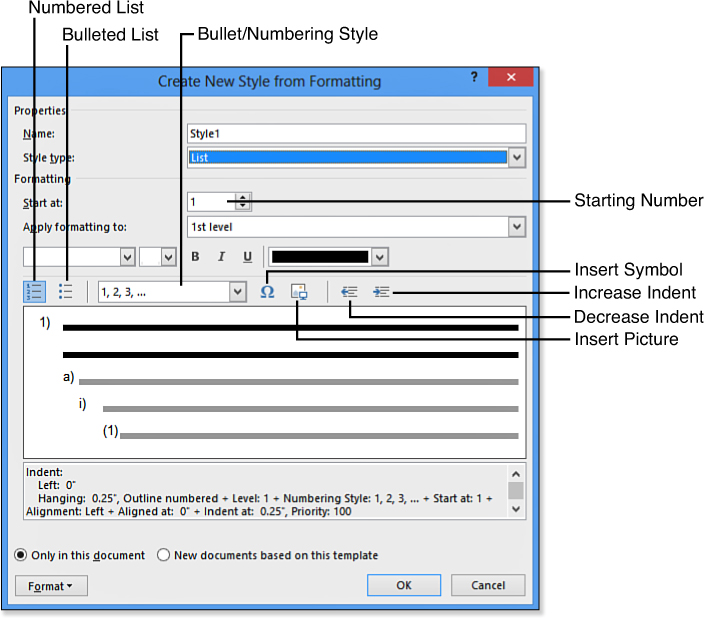
Figure 6.19. Creating a new List type of style.
7. For the List type only, open the Apply Formatting To list and choose a list level (1st through 9th). Then specify the formatting for that level, and go on to the next level until you have set up all levels (refer to Figure 6.19).
8. If any formatting is needed that isn’t available in the Formatting section, click the Format button to open a menu of formatting categories, and then click the appropriate category.
Then set up the formatting in the dialog box that appears and click OK to return to the Create New Style from Formatting dialog box. The dialog boxes are the same as the ones you learned about in Chapters 4 and 5 for the individual formatting categories (Font, Paragraph, Tabs, and so on).
For example, to create a hanging indent for the style, you would need to select Paragraph and then set the Special indent on the Indents and Spacing tab.
![]() Many of the choices on the Format button’s menu corresponds to a dialog box covered elsewhere in the book:
Many of the choices on the Format button’s menu corresponds to a dialog box covered elsewhere in the book:
![]() For Font, see “Changing the Font and Size,” p. 141.
For Font, see “Changing the Font and Size,” p. 141.
![]() For Paragraph, see “Setting Line Spacing,” p. 177.
For Paragraph, see “Setting Line Spacing,” p. 177.
![]() For Tabs, see “Working with Tab Stops,” p. 184.
For Tabs, see “Working with Tab Stops,” p. 184.
![]() For Border, see “Applying Paragraph Borders,” p. 203.
For Border, see “Applying Paragraph Borders,” p. 203.
![]() For Language, see “Checking Spelling and Grammar in Multiple Languages,” p. 106.
For Language, see “Checking Spelling and Grammar in Multiple Languages,” p. 106.
![]() For Frame, see “Setting Text Wrap,” p. 338.
For Frame, see “Setting Text Wrap,” p. 338.
![]() For Numbering, see “Creating Numbered and Bulleted Lists,” p. 191.
For Numbering, see “Creating Numbered and Bulleted Lists,” p. 191.
9. If you want this style to appear in the Style Gallery, mark the Add to the Styles Gallery check box. (This is not available for Table or List styles.)
10. If you want the style to automatically update its definition when you reformat text in the document that has that style applied, mark the Automatically Update check box. (This option is for Paragraph and Linked styles only.)
11. Select how the new style will be available: either Only in This Document or New Documents Based on This Template.
12. Click OK to create the new style.
Applying a Keyboard Shortcut to a Style
Keyboard shortcuts make style application much faster and easier because you don’t have to take your hands off the keyboard to use them.
![]() Note
Note
You cannot assign shortcut keys to Table styles.
Certain built-in styles already have keyboard shortcuts assigned to them:
• Normal—Ctrl+Shift+N.
• Heading 1 through Heading 3—Ctrl+Alt+number (for example, Ctrl+Alt+1 for Heading 1).
You can optionally assign keyboard shortcuts to other styles as you are creating the styles or add them later.
To assign a shortcut key combination, follow these steps:
1. Do one of the following:
• To assign while creating a new style, start the new style as you learned in the preceding section, so that the large version of the Create New Style from Formatting dialog box is open.
• To modify an existing style, right-click the style on the Style Gallery or in the Styles pane and choose Modify.
2. Click the Format button and then choose Shortcut Key. The Customize Keyboard dialog box opens.
![]() Tip
Tip
To remove a keyboard shortcut from a style, repeat steps 1 and 2, select the shortcut in the Current Keys list, and then click Remove.
3. Click in the Press New Shortcut Key box and then press the key combination to assign (see Figure 6.20).
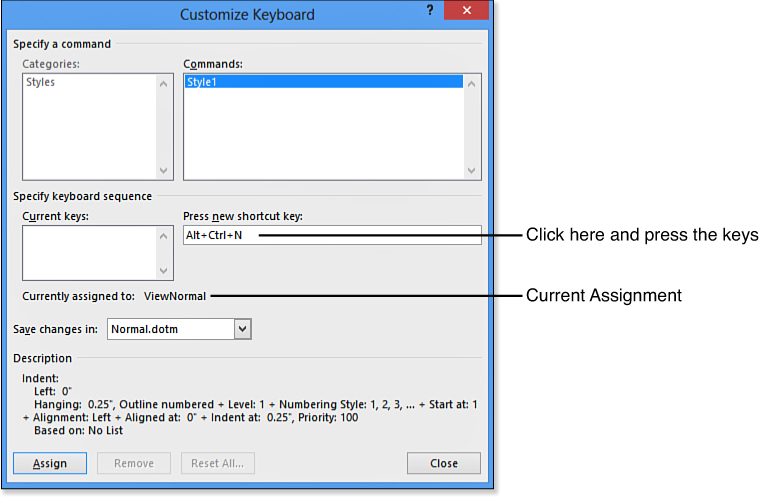
Figure 6.20. Assign a keyboard shortcut to a style.
Key combinations usually involve some combination of the Ctrl or Alt key plus one or more numbers or letters, or a function key (F1 through F12). Many key combinations are already assigned; if you pick one that is taken, the Currently Assigned To indicator shows its existing assignment. You can assign an already assigned combination, but the new assignment overrides the old one.
4. Open the Save Changes In list and choose where to store the keyboard shortcut—either in the current template or the current document.
5. Click Assign to assign the keyboard shortcut.
6. Click Close.
Deleting a Style
You cannot delete built-in styles, such as Normal and Heading 1 through Heading 9. (You can redefine them, though, as you learn in the next section.)
To delete a user-created style, right-click it (either from the Style Gallery or the Styles pane) and choose Delete name, where name is the style name.
If the style is based on some other style than Normal, rather than a Delete command, you see a Revert To command. This command not only deletes the style but converts the formatting on any text to which it is assigned to the parent style. For example, if you have a style called Modified Heading 1 that is based on the Heading 1 style, selecting Revert to Heading 1 deletes Modified Heading 1, and all text that was formatted with it becomes formatted with Heading 1 instead.
Modifying Styles
Styles can be modified in several ways. You can set styles to update automatically, update a style by example, or revisit the style’s definition using dialog box interfaces.
Updating a Style Automatically
As you saw when creating styles earlier in the chapter, an Automatically Update option is available. This option changes the style’s definition whenever you apply manual formatting to text with that style applied. So, for example, suppose you select a Heading 1-styled paragraph and change the font for it. If the Automatically Update check box is marked for the Heading 1 style, the definition of Heading 1 changes to reflect the new font choice, and all instances of Heading 1 used in the document also change.
It sounds like a good idea, but in practice, Automatically Update can cause problems because it takes away your ability to apply manual formatting to individual instances within a document. Therefore, be cautious with this option.
Here’s how to turn on/off Automatically Update for a style:
1. Right-click the style on the Style Gallery or in the Styles pane and choose Modify.
2. Mark or clear the Automatically Update check box.
3. Click OK.
Updating a Style to Match a Selection
As long as Automatically Update is not enabled (see the preceding section), you retain the ability to manually format some text in a manner that’s different from its style’s definition. If you then choose to incorporate that new formatting into the style’s definition, you can use Update to Match Selection to do so.
![]() Tip
Tip
If you want to retain the ability to have a theme change the body text’s font, make sure you set the Font to +Body rather than a specific font. The same goes for color: If you want themes to be able to specify body color, set the Font Color to Automatic.
To update a style to match the formatting of selected text, right-click the style on the Style Gallery or in the Styles pane and choose Update name to Match Selection, where name is the style name.
Modifying a Style Definition
You can use the same process you learned earlier in “Creating a New Style by Definition” to modify the style later. This method uses a set of dialog boxes for defining the formatting.
![]() Note
Note
Different dialog boxes open when you’re creating a new style versus modifying an existing one, but they are nearly identical except for their names.
To access the Modify Style dialog box, right-click the style and choose Modify. The Modify Style dialog box is identical to the Create New Style from Formatting dialog box, except for the name. Then use the same controls as when creating a style. You can set the basic formatting in the Formatting section; for more options, click the Format button to open a menu of categories.
Redefining the Normal (Default) Style
The Normal style is the basis for most other styles in the document, so modifying it trickles down changes throughout many styles.
You can modify the Normal style the same as you can any other style, but there is also a special location in which you can set a definition of Normal, either for the document or for the template. This is a rather basic definition, but it includes the essentials: font, size, color, paragraph position and indentation, and paragraph spacing (before, after, and between lines).
To modify the default settings for the Normal style, follow these steps:
1. Display the Styles pane and then click the Manage Styles button. The Manage Styles dialog box appears.
2. Click the Set Defaults tab.
3. Change any settings as desired (see Figure 6.21).

Figure 6.21. Redefine the default Normal style settings for the document or template.
4. (Optional) If you want the changes to apply to the template, click New Documents Based on This Template.
5. Click OK.
Renaming Styles
To rename a style, open the Modify Style dialog box (right-click the style and choose Modify) and type a different name in the Name box. You cannot rename the built-in styles, only the user-created ones. (However, see the section “Style Naming and Alternate Names” earlier in the chapter to learn how to assign an alternate name to a built-in style.)
Style name changes are automatically populated throughout the document. Any text that is formatted with the renamed style remains so, but the style name associated with it changes to match the new name.
Working with Cascading Styles
Documents look best when all the styles are coordinated to give a unified impression. (That’s the basic idea behind the Themes feature, covered later in this chapter.) When you make a change to one style in your document, you might end up needing to make the same change to all the styles to keep the document’s look consistent, and this can be time-consuming.
To avoid having to make changes to multiple styles, consider setting up all the styles in the document as cascading versions of one central style, such as Normal. Then if you want to change a certain aspect of the formatting, you make the change to Normal, and the change trickles down to all styles based on it. This is known as cascading style definitions. You could even have multiple levels of cascading. Style C could be based on Style B, and Style B based on Style A, and Style A based on Normal.
Or, at the other end of the spectrum, perhaps you don’t want every style to update based on your changes to Normal. Perhaps there’s a certain style that should never change. You can set up such a style to be based on No Style, locking it into its own definition.
To set the style’s basis, follow these steps:
1. Right-click the style and choose Modify.
2. Open the Style Based On list and select a style, or choose (No Style) from the top of the list.
3. Click OK.
Changing the basis does not change the style’s definition, but it changes whether and how it will (or will not) change later. For example, if a style is no longer based on Normal, changes to Normal will not affect it in the future.
Modifying the Styles in the Current Template
Word makes it easy to modify the styles in the template. You do not even have to open the template for editing to do so; just work from within any document based on that template.
To modify the style definitions in the current template, start modifying a style and make sure you select the New Documents Based on This Template option in the Modify Style dialog box. This saves the style change to the template, not just to the current document.
You can also open the template file itself (File, Open, select a location option (SkyDrive or Computer), and then select All Word Templates as the file type to open), but there’s not much advantage in that because you can so easily save styles to the current template from within any document.
Modifying Styles in the Manage Styles Dialog Box
If you need to modify a lot of styles, you might find the Manage Styles dialog box to be a more efficient interface for doing so than the Style Gallery or the Styles pane.
To access the Manage Styles dialog box, display the Styles pane and click the Manage Styles button at the bottom.
The Manage Styles dialog box has four tabs. We’re most interested in the Edit tab at the moment, shown in Figure 6.22. It lists all available styles in the document.

Figure 6.22. Manage the entire Styles list from one interface in the Manage Styles dialog box.
From the Edit tab, you can do the following:
• Specify that changes be saved in the template—Click New Documents Based on This Template before making changes.
• View style definitions—Click a style and examine the Preview area’s sample and definition.
• Modify a style’s definition or name—Click the style and click Modify, and use the Modify Style dialog box.
• Delete a style (except built-in styles)—Click the style and click Delete.
• Create a new style—Click the New Style button and use the Create New Style from Formatting dialog box.
One handy feature of the Manage Styles dialog box is that it identifies styles that are set for Automatically Update with an (AutoUpdate) indicator following their names. This is a good way to see at a glance which styles are being automatically updated and to remove that designation if needed. None of those are shown in Figure 6.22, but you can scroll through the list on your own computer to find some that are auto-updated, such as the TOC styles, for example.
![]() To import or export styles, see “Copying Styles Between Documents,” p. 242.
To import or export styles, see “Copying Styles Between Documents,” p. 242.
![]() To learn about the Recommend tab in the Manage Styles dialog box, see “Sorting the Styles List,” p. 239.
To learn about the Recommend tab in the Manage Styles dialog box, see “Sorting the Styles List,” p. 239.
Sorting the Styles List
An alphabetic list of styles, such as the one that appears in the Styles pane, is perhaps not the most efficient list. If a frequently used style happens to begin with a Z, for example, and the Styles list is long, you end up needing to scroll through the Styles pane’s list every time you want to apply that style. It would be much nicer to be able to prioritize the list so that your favorite styles appear near the top of the list, for easy selection.
The Recommend feature enables you to do just that. You can set up a Recommend level for a style between 1 and 99 and then set the list’s sort order to As Recommended. Within a certain level, entries are sorted alphabetically.
To view the current Recommend level assignments, follow these steps:
1. From the Styles pane, click the Manage Styles button. The Manage Styles dialog box opens.
2. Click the Recommend tab. All the styles available in the current document appear. (This includes both styles inherited from the template and styles you might have created uniquely in this document.)
3. Scroll through the list. The number that appears to the far left is the Recommend level (see Figure 6.23).

Figure 6.23. Set a Recommend level for each style.
4. To change a level, select the style and then click one of the following buttons:
• Move Up—Promotes it one level (if not already 1)
• Move Down—Demotes it one level (if not already Last)
• Make Last—Sets it to Last
• Assign Value—Opens a dialog box where you can type the number desired
![]() Note
Note
If you set the Recommend level to greater than 99, the style is set for Last, which means it appears at the bottom of the list.
5. Click OK.
![]() Tip
Tip
You can set the level for more than one style simultaneously. Select multiple styles by holding down Ctrl as you click each one, or use the Select All or Select Built-In button. Be aware, however, that if either All or Built-In includes one or more unchangeable styles, you won’t be able to change the value for that group.
Now make sure that the Styles list is set to be sorted by the Recommend level. Here’s how to do this:
1. On the Styles pane, click Options. The Style Pane Options dialog box opens (see Figure 6.24).
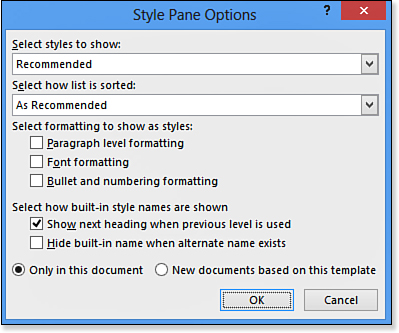
Figure 6.24. Set viewing options for the Styles list.
2. On the Select How List Is Sorted list, make sure that As Recommended is selected.
3. Click OK.
Filtering the Styles List
Besides the style sort order, the Recommend list controls which styles appear on a list that is filtered to show only recommended styles. The term recommend in this context has nothing to do with the recommend level number you assigned in the preceding section. Instead, it has to do with which of three statuses are configured for the style on the Recommend tab of the Manage Styles dialog box (refer to Figure 6.23):
• Show—The style appears on the list whether the list is filtered or not.
• Hide Until Used—The style appears on the list whether the list is filtered or not, but only if the style is in use in the document.
• Hide—The style does not appear on a filtered list.
To set a style’s status, follow these steps:
1. From the Styles pane, click the Manage Styles button. The Manage Styles dialog box opens.
2. Click the Recommend tab. All the styles available in the current document appear.
3. Select a style, and then click the Show, Hide Until Used, or Hide button.
4. Repeat for each style to control whether it appears on a filtered list.
5. Click OK.
Next, filter the Styles list to show only the recommended styles by doing the following:
1. On the Styles pane, click Options. The Style Pane Options dialog box opens (refer to Figure 6.24).
2. In the Select Styles to Show list, choose Recommended.
3. Click OK.
Copying Styles Between Documents
One way to transfer the styles between documents is to save the styles to the template and then use the same template for the other document. That’s the simplest and most-used method—and in fact, that’s what templates are for.
If you can’t do this for some reason, though—perhaps because the two documents must have different templates or because you didn’t save the styles to the template and don’t have the patience to go back and modify each style—you might find the Import/Export feature useful.
To transfer styles from one document to another or to transfer the styles from the document to the template, follow these steps:
1. Display the Styles pane and then click the Manage Styles button. The Manage Styles dialog box opens.
2. Click the Import/Export button. The Organizer dialog box opens.
3. Click the Styles tab. A list of the styles in the current document appears on the left, and a list of styles in the current template appears on the right (see Figure 6.25).

Figure 6.25. Use the Organizer to copy styles between documents.
4. Select styles from the list at the left, and then click the Copy button to copy them to the list at the right.
What if the files you want to copy to/from don’t appear in the right spots in the Organizer? Not a problem. Click the Close File button under the area to change, and the button changes to Open File. Then click it again and an Open dialog box appears. From here, you can select any file you like from which to copy styles.
Working with Themes
Themes enable you to change the look of the entire document at once by applying color, font, and effect changes that apply globally.
In Chapter 1, “Creating and Saving Documents,” you learned that Word’s native file format is based on eXtensible Markup Language (XML), and one of the benefits of XML is its ability to apply definitions to the various tags in a document. For example, if a certain paragraph is tagged as a Heading 1 style, you can use an XML-based theme to redefine certain aspects of what Heading 1 looks like, without actually modifying the Heading 1 style. This is useful if you want to change the look of a style in only one document and not all the documents you have that might use that style.
The Themes feature provides two main attributes to the text: font choice and color. A font theme defines two font choices: Heading and Body. A color theme defines about a dozen color swatches. These placeholders, when they are assigned to styles instead of fixed values, enable those attributes to be changed by changing the theme.
![]() Note
Note
Themes are files with .thmx extensions. (They’re binary files, not straight XML, so you can’t browse them in a text editor.) The built-in themes are stored in C:Program FilesMicrosoft OfficeDocument Themes 15.
If you want to use themes to control formatting, you must set the style’s Font setting to either Body or Heading, depending on the type of element it represents. Also, you must set the Font Color to Automatic. Otherwise, the Theme setting cannot affect the text.
Applying a Theme
When you apply a theme, it affects the whole document, and it changes the font, font color, and effect settings. (Don’t worry about effect settings yet; they don’t affect text. They’re for graphic object formatting.)
To apply a theme, display the Design tab and then click the Themes button and select a theme from the Themes list (see Figure 6.26).

Figure 6.26. Select a theme.
When you point at a theme on the Themes list, a box pops up telling you its filename (for example, Flow). Sometimes it can be useful to know the filename of a theme if you want to copy it to another computer or delete it from your computer.
To go back to the default theme in the template, open the Themes list again and choose Reset to Theme from Template.
Resetting to the Template Theme
After you have changed to a different theme in a document, you might want to go back to the default theme for the template on which the document is based. To do so, on the Design tab, click Themes and then click Reset to Theme from Template.
Creating New Themes
A theme is a combination of fonts, colors, and effects, so to create your own new theme, first select all three of those elements. (Use the corresponding drop-down list buttons on the Design tab: Colors, Fonts, and Effects. You learn more about each of these later in the chapter.)
![]() For information about effects, see “Changing the Theme Effects for the Entire Document,” p. 536.
For information about effects, see “Changing the Theme Effects for the Entire Document,” p. 536.
Then after you have made your selections, on the Design tab, choose Themes, Save Current Theme. In the Save Current Theme dialog box, enter a name for the theme and click Save.
User-created themes are saved in the C:UsersusernameAppDataRoamingMicrosoftTemplatesDocument Themes folder. Each local user has a separate set of user-created themes, so your saved themes will be available only to you. If you need to make a theme available to all users on the local PC, save them instead to C:Program FilesMicrosoft OfficeDocument Themes 15. (The 15 refers to Microsoft’s own numbering convention of version numbers; Office 2010 was 14. Don’t worry too much about it.)
If you need to integrate a theme into Word that is not stored in either of those locations, browse for it. To browse for a theme, open the Themes menu and choose Browse for Themes.
Applying a Color Set
In addition to the full-blown themes, you can apply a variety of color sets. Use these when you’re already happy with your fonts and just want the colors. Theme color sets are stored in C:Program FilesMicrosoft OfficeDocument Themes 15Theme Colors, and they are stored in files with an .xml extension. (Again, you can copy these from PC to PC.)
To choose a different color set, open the Theme Colors menu on the Design tab and click the desired color set (see Figure 6.27).

Figure 6.27. Select a color set.
Creating a New Color Set
You can create your own color set, defining the exact colors that should appear in each of the color theme placeholder spots. You can then apply it to any document from the Colors drop-down list, or you can use it as part of a new custom theme you create.
User-defined color sets are saved by default to C:UsersusernameAppDataRoamingMicrosoftTemplatesDocument ThemesTheme Colors as .xml files. As with themes files, these are available only to the current user. To make sets available to all users, store them instead in C:Program FilesMicrosoft OfficeDocument Themes 15Theme Colors.
Color sets consist of 12 placeholders, each one populated with a certain color. There are four text/background colors (two each for light and dark), six accent colors, and colors for visited and unvisited hyperlinks. Those are just the default purposes for the colors, though; you can assign any placeholder to any object.
![]() Note
Note
Yes, technically, there are 12 colors in a theme, but two of those are for hyperlinks only and can’t be applied to normal text. When selecting colors for text or objects in Word, you have 10 choices available, and when you’re selecting a color theme from the Design tab, the samples show only 8 swatches.
Follow these steps to create a color set:
1. If you want to base the new set on an existing one, apply that set to the document.
2. From the Design tab, open the Colors menu and choose Customize Colors. The theme colors from the current theme are filled into the placeholders in the Create New Theme Colors dialog box (see Figure 6.28).

Figure 6.28. Create a new set of theme colors.
3. Click a placeholder to open a color menu for it and then click one of the colored squares, or click More Colors to select a color that is not shown.
4. Repeat step 3 for each of the colors you want to change.
5. In the Name box, type a name for the color scheme. This is also the filename assigned to the scheme file saved to the hard disk.
6. Click Save to create the new color set.
![]() Tip
Tip
Technically, you could also create a new color set by copying one of the existing color .xml files and editing it in a text editor such as Notepad. But the method from within Word is so much easier that there’s little reason to do so.
Applying a Font Set
You can apply font sets to change the theme font without changing the color or effects. Any text that has a font choice of Body or Heading is eligible for formatting via the font set. These font changes work only if no specific font has been designated for the text, either through a style or through manual formatting.
To choose a different font set, click the Fonts button on the Design tab and click the desired font set (see Figure 6.29).

Figure 6.29. Select a font set.
Creating a New Font Set
To create a new font set, click the Fonts button (Design tab) and choose Customize Fonts. Then in the Create New Theme Fonts dialog box (see Figure 6.30), use the drop-down lists to select Heading and Body fonts. Give the set a name in the Name box and click Save.

Figure 6.30. Create a new font theme.
User-defined font sets are saved by default to C:UsersusernameAppDataRoamingMicrosoftTemplatesDocument ThemesThemes Fonts as .xml files. As with themes files, these are available only to the current user. To make sets available to all users, store them instead in C:Program FilesMicrosoft OfficeDocument Themes 15Theme Fonts.